
- 1吸星大法:像科学家一样思考_吸星学习法
- 2毕业/课程设计——基于STM32的智能灯光控制系统(物联网、智能家居、手机APP控制、语音控制)_基于语音控制的led照明系统的研发
- 3AOP 在android中的使用之埋点日志_android日志埋点
- 4校园小情书微信小程序源码 | 社区小程序前后端开源 | 校园表白墙交友小程序
- 5字节跳动发布最新AI视频模型Magic Animate(附教程)
- 6记录 Dubbo+Zookeeper 学习Demo_dubbo+zk 官网demo
- 7“pycharm打印结果被折叠,显示不完全”的解决方案_pycharm输出完整结果
- 8【wails】(6):使用wails做桌面应用开发,使用gin+go-chatglm.cpp进行本地模型运行,在windows上运行成功
- 9Android通过Web与后台数据库交互_安卓app与web数据交互
- 10Android Studio 实验四_android studio实验报告
【WebSocket 】入门学习_websocket学习
赞
踩
提示:文章写完后,目录可以自动生成,如何生成可参考右边的帮助文档
一、WebSocket 简单介绍
WebSocket 是基于 TCP 的一种新的网络协议。它实现了浏览器与服务器全双工通信——浏览器和服务器只需要完成一次握手,两者之间就可以创建持久性的连接, 并进行双向数据传输。
HTTP协议和WebSocket协议对比:
- HTTP是短连接
- WebSocket是长连接
- HTTP通信是单向的,基于请求响应模式
- WebSocket支持双向通信
- HTTP和WebSocket底层都是TCP连接


思考: 既然WebSocket支持双向通信,功能看似比HTTP强大,那么我们是不是可以基于WebSocket开发所有的业务功能?
WebSocket缺点:
服务器长期维护长连接需要一定的成本
各个浏览器支持程度不一
WebSocket 是长连接,受网络限制比较大,需要处理好重连
结论: WebSocket并不能完全取代HTTP,它只适合在特定的场景下使用
二、WebSocket 应用场景
1). 视频弹幕

2). 网页聊天

3). 体育实况更新

4). 股票基金报价实时更新

三、入门案例
3.1 案例分析
需求: 实现浏览器与服务器全双工通信。浏览器既可以向服务器发送消息,服务器也可主动向浏览器推送消息。
效果展示:

实现步骤:
1). 直接使用websocket.html页面作为WebSocket客户端
2). 导入WebSocket的maven坐标
3). 导入WebSocket服务端组件WebSocketServer,用于和客户端通信 (类似于controller)
4). 导入配置类WebSocketConfiguration,注册WebSocket的服务端组件
5). 导入定时任务类WebSocketTask,定时向客户端推送数据
3.2 代码开发
1). 定义websocket.html页面
<!DOCTYPE HTML>
<html>
<head>
    <meta charset="UTF-8">
    <title>WebSocket Demo</title>
</head>
<body>
    <input id="text" type="text" />
    <button onclick="send()">发送消息</button>
    <button onclick="closeWebSocket()">关闭连接</button>
    <div id="message">
    </div>
</body>
<script type="text/javascript">
    var websocket = null;
    var clientId = Math.random().toString(36).substr(2);

    //判断当前浏览器是否支持WebSocket
    if('WebSocket' in window){
        //连接WebSocket节点
        websocket = new WebSocket("ws://localhost:8080/ws/"+clientId);
    }
    else{
        alert('Not support websocket')
    }

    //连接发生错误的回调方法
    websocket.onerror = function(){
        setMessageInnerHTML("error");
    };

    //连接成功建立的回调方法
    websocket.onopen = function(){
        setMessageInnerHTML("连接成功");
    }

    //接收到消息的回调方法
    websocket.onmessage = function(event){
        setMessageInnerHTML(event.data);
    }

    //连接关闭的回调方法
    websocket.onclose = function(){
        setMessageInnerHTML("close");
    }

    //监听窗口关闭事件,当窗口关闭时,主动去关闭websocket连接,防止连接还没断开就关闭窗口,server端会抛异常。
    window.onbeforeunload = function(){
        websocket.close();
    }

    //将消息显示在网页上
    function setMessageInnerHTML(innerHTML){
        document.getElementById('message').innerHTML += innerHTML + '<br/>';
    }

    //发送消息
    function send(){
        var message = document.getElementById('text').value;
        websocket.send(message);
    }

	//关闭连接
    function closeWebSocket() {
        websocket.close();
    }
</script>
</html>

- 1
- 2
- 3
- 4
- 5
- 6
- 7
- 8
- 9
- 10
- 11
- 12
- 13
- 14
- 15
- 16
- 17
- 18
- 19
- 20
- 21
- 22
- 23
- 24
- 25
- 26
- 27
- 28
- 29
- 30
- 31
- 32
- 33
- 34
- 35
- 36
- 37
- 38
- 39
- 40
- 41
- 42
- 43
- 44
- 45
- 46
- 47
- 48
- 49
- 50
- 51
- 52
- 53
- 54
- 55
- 56
- 57
- 58
- 59
- 60
- 61
- 62
- 63
- 64
- 65
- 66
- 67
- 68
2). 导入maven坐标
在pom.xml中已定义
<dependency>
	<groupId>org.springframework.boot</groupId>
	<artifactId>spring-boot-starter-websocket</artifactId>
</dependency>
- 1
- 2
- 3
- 4
3). 定义WebSocket服务端组件
import org.springframework.stereotype.Component;
import javax.websocket.OnClose;
import javax.websocket.OnMessage;
import javax.websocket.OnOpen;
import javax.websocket.Session;
import javax.websocket.server.PathParam;
import javax.websocket.server.ServerEndpoint;
import java.util.Collection;
import java.util.HashMap;
import java.util.Map;

/**
 * WebSocket服务
 */
@Component
@ServerEndpoint("/ws/{sid}")
public class WebSocketServer {

    //存放会话对象
    private static Map<String, Session> sessionMap = new HashMap();

    /**
     * 连接建立成功调用的方法
     */
    @OnOpen
    public void onOpen(Session session, @PathParam("sid") String sid) {
        System.out.println("客户端:" + sid + "建立连接");
        sessionMap.put(sid, session);
    }

    /**
     * 收到客户端消息后调用的方法
     *
     * @param message 客户端发送过来的消息
     */
    @OnMessage
    public void onMessage(String message, @PathParam("sid") String sid) {
        System.out.println("收到来自客户端:" + sid + "的信息:" + message);
    }

    /**
     * 连接关闭调用的方法
     *
     * @param sid
     */
    @OnClose
    public void onClose(@PathParam("sid") String sid) {
        System.out.println("连接断开:" + sid);
        sessionMap.remove(sid);
    }

    /**
     * 群发
     *
     * @param message
     */
    public void sendToAllClient(String message) {
        Collection<Session> sessions = sessionMap.values();
        for (Session session : sessions) {
            try {
                //服务器向客户端发送消息
                session.getBasicRemote().sendText(message);
            } catch (Exception e) {
                e.printStackTrace();
            }
        }
    }

}
- 1
- 2
- 3
- 4
- 5
- 6
- 7
- 8
- 9
- 10
- 11
- 12
- 13
- 14
- 15
- 16
- 17
- 18
- 19
- 20
- 21
- 22
- 23
- 24
- 25
- 26
- 27
- 28
- 29
- 30
- 31
- 32
- 33
- 34
- 35
- 36
- 37
- 38
- 39
- 40
- 41
- 42
- 43
- 44
- 45
- 46
- 47
- 48
- 49
- 50
- 51
- 52
- 53
- 54
- 55
- 56
- 57
- 58
- 59
- 60
- 61
- 62
- 63
- 64
- 65
- 66
- 67
- 68
- 69
4). 定义配置类,注册WebSocket的服务端组件
import org.springframework.context.annotation.Bean;
import org.springframework.context.annotation.Configuration;
import org.springframework.web.socket.server.standard.ServerEndpointExporter;

/**
 * WebSocket配置类,用于注册WebSocket的Bean
 */
@Configuration
public class WebSocketConfiguration {

    @Bean
    public ServerEndpointExporter serverEndpointExporter() {
        return new ServerEndpointExporter();
    }

}
- 1
- 2
- 3
- 4
- 5
- 6
- 7
- 8
- 9
- 10
- 11
- 12
- 13
- 14
- 15
- 16
- 17
5). 定义定时任务类,定时向客户端推送数据
package com.sky.task;

import com.sky.websocket.WebSocketServer;
import org.springframework.beans.factory.annotation.Autowired;
import org.springframework.scheduling.annotation.Scheduled;
import org.springframework.stereotype.Component;
import java.time.LocalDateTime;
import java.time.format.DateTimeFormatter;

@Component
public class WebSocketTask {
    @Autowired
    private WebSocketServer webSocketServer;

    /**
     * 通过WebSocket每隔5秒向客户端发送消息
     */
    @Scheduled(cron = "0/5 * * * * ?")
    public void sendMessageToClient() {
        webSocketServer.sendToAllClient("这是来自服务端的消息:" + DateTimeFormatter.ofPattern("HH:mm:ss").format(LocalDateTime.now()));
    }
}
- 1
- 2
- 3
- 4
- 5
- 6
- 7
- 8
- 9
- 10
- 11
- 12
- 13
- 14
- 15
- 16
- 17
- 18
- 19
- 20
- 21
- 22
3.3 功能测试
启动服务,打开websocket.html页面

服务器向浏览器间隔5秒推送数据:

四、 来单提醒
4.1 需求分析和设计
用户下单并且支付成功后,需要第一时间通知外卖商家。通知的形式有如下两种:
- 语音播报
- 弹出提示框

设计思路:
- 通过WebSocket实现管理端页面和服务端保持长连接状态
- 当客户支付后,调用WebSocket的相关API实现服务端向客户端推送消息
- 客户端浏览器解析服务端推送的消息,判断是来单提醒还是客户催单,进行相应的消息提示和语音播报
- 约定服务端发送给客户端浏览器的数据格式为JSON,字段包括:type,orderId,content
- type 为消息类型,1为来单提醒 2为客户催单
- orderId 为订单id
- content 为消息内容
4.2 代码开发
在OrderServiceImpl中注入WebSocketServer对象,修改paySuccess方法,加入如下代码:
	@Autowired
    private WebSocketServer webSocketServer;
	/**
     * 支付成功,修改订单状态
     *
     * @param outTradeNo
     */
    public void paySuccess(String outTradeNo) {
        // 当前登录用户id
        Long userId = BaseContext.getCurrentId();

        // 根据订单号查询当前用户的订单
        Orders ordersDB = orderMapper.getByNumberAndUserId(outTradeNo, userId);

        // 根据订单id更新订单的状态、支付方式、支付状态、结账时间
        Orders orders = Orders.builder()
                .id(ordersDB.getId())
                .status(Orders.TO_BE_CONFIRMED)
                .payStatus(Orders.PAID)
                .checkoutTime(LocalDateTime.now())
                .build();

        orderMapper.update(orders);
		//
        Map map = new HashMap();
        map.put("type", 1);//消息类型,1表示来单提醒
        map.put("orderId", orders.getId());
        map.put("content", "订单号:" + outTradeNo);

        //通过WebSocket实现来单提醒,向客户端浏览器推送消息
        webSocketServer.sendToAllClient(JSON.toJSONString(map));
        ///
    }
- 1
- 2
- 3
- 4
- 5
- 6
- 7
- 8
- 9
- 10
- 11
- 12
- 13
- 14
- 15
- 16
- 17
- 18
- 19
- 20
- 21
- 22
- 23
- 24
- 25
- 26
- 27
- 28
- 29
- 30
- 31
- 32
- 33
4.3 功能测试
可以通过如下方式进行测试:
- 查看浏览器调试工具数据交互过程
- 前后端联调
1). 登录管理端后台
登录成功后,浏览器与服务器建立长连接


2). 小程序端下单支付
修改回调地址,利用内网穿透获取域名

下单支付


3). 查看来单提醒
支付成功后,后台收到来单提醒,并有语音播报

五、 客户催单
5.1 需求分析和设计
用户在小程序中点击催单按钮后,需要第一时间通知外卖商家。通知的形式有如下两种:
- 语音播报
- 弹出提示框

设计思路:
- 通过WebSocket实现管理端页面和服务端保持长连接状态
- 当用户点击催单按钮后,调用WebSocket的相关API实现服务端向客户端推送消息
- 客户端浏览器解析服务端推送的消息,判断是来单提醒还是客户催单,进行相应的消息提示和语音播报
约定服务端发送给客户端浏览器的数据格式为JSON,字段包括:type,orderId,content- type 为消息类型,1为来单提醒 2为客户催单
- orderId 为订单id
- content 为消息内容
当用户点击催单按钮时,向服务端发送请求。
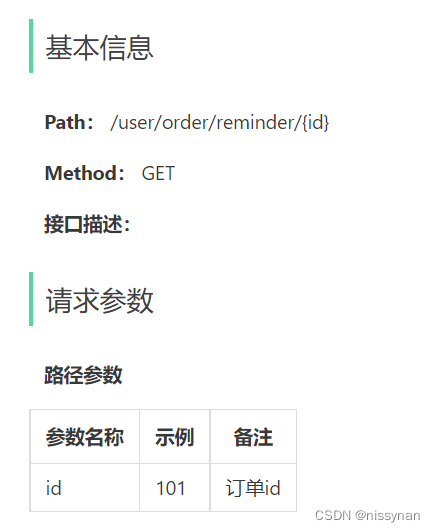
接口设计(催单):

5.2 代码开发
5.2.1 Controller层
根据用户催单的接口定义,在user/OrderController中创建催单方法:
	/**
     * 用户催单
     *
     * @param id
     * @return
     */
    @GetMapping("/reminder/{id}")
    @ApiOperation("用户催单")
    public Result reminder(@PathVariable("id") Long id) {
        orderService.reminder(id);
        return Result.success();
    }
- 1
- 2
- 3
- 4
- 5
- 6
- 7
- 8
- 9
- 10
- 11
- 12
5.2.2 Service层接口
在OrderService接口中声明reminder方法:
	/**
     * 用户催单
     * @param id
     */
    void reminder(Long id);
- 1
- 2
- 3
- 4
- 5
5.2.3 Service层实现类
在OrderServiceImpl中实现reminder方法:
	/**
     * 用户催单
     *
     * @param id
     */
    public void reminder(Long id) {
        // 查询订单是否存在
        Orders orders = orderMapper.getById(id);
        if (orders == null) {
            throw new OrderBusinessException(MessageConstant.ORDER_NOT_FOUND);
        }

        //基于WebSocket实现催单
        Map map = new HashMap();
        map.put("type", 2);//2代表用户催单
        map.put("orderId", id);
        map.put("content", "订单号:" + orders.getNumber());
        webSocketServer.sendToAllClient(JSON.toJSONString(map));
    }
- 1
- 2
- 3
- 4
- 5
- 6
- 7
- 8
- 9
- 10
- 11
- 12
- 13
- 14
- 15
- 16
- 17
- 18
- 19
5.2.4 Mapper层
在OrderMapper中添加getById:
	/**
     * 根据id查询订单
     * @param id
     */
    @Select("select * from orders where id=#{id}")
    Orders getById(Long id);
- 1
- 2
- 3
- 4
- 5
- 6
5.3 功能测试
可以通过如下方式进行测试:
- 查看浏览器调试工具数据交互过程
- 前后端联调
1). 登录管理端后台
登录成功后,浏览器与服务器建立长连接
查看控制台日志
2). 用户进行催单
用户可在订单列表或者订单详情,进行催单

3). 查看催单提醒
既有催单弹窗,同时语音播报

总结
WebSocket 是基于 TCP 的一种新的网络协议。它实现了浏览器与服务器全双工通信——浏览器和服务器只需要完成一次握手,两者之间就可以创建持久性的连接, 并进行双向数据传输。
实现步骤:
1). 直接使用websocket.html页面作为WebSocket客户端
2). 导入WebSocket的maven坐标
3). 导入WebSocket服务端组件WebSocketServer,用于和客户端通信
4). 导入配置类WebSocketConfiguration,注册WebSocket的服务端组件
5). 导入定时任务类WebSocketTask,定时向客户端推送数据

