
- 1LaTeX - 填充图中的阴影部分
- 2基于Java校园网站系统的设计与实现(Springboot框架) 参考文献_springboot论文参考文献
- 3人工智能实战项目:智慧交通_智慧交通黑马csdn
- 4ClickHouse学习笔记(一):ClickHouse安装、数据类型、表引擎、SQL操作_clickhouse日志路径
- 5第七十一篇:从ADAS到自动驾驶(四):车辆检测_有轨电车的adas如何识别出车辆
- 6STM32的三种下载方式
- 7HarmonyOS Text设置换行_鸿蒙akrts开发登录界面换行
- 8vscode 安装clangd插件 替代 c++自带插件
- 9xHCI1.1-TRB Ring_xhci协议
- 10Android遇到的问题,解决方法和一些小技巧,kotlin线程安全_failed resolution of: lcom/ta/utdid2/device/utdevi
Java多线程(一)--之线程范围内共享变量的概念与作用_多线程为什么需要共享变量
赞
踩
最近在学习多线程,通过看了一些视频教程和博客后,我觉得对自己的编程学习又有了进一步的认识,在此,以这篇博客记录下学习的知识,分享给需要的朋友。
一、首先试着创建两个线程:
创建一个测试类:ThreadScopeShareVariable
- public class ThreadScopeShareVariable {
-
- private static int datas = 0;
- public static void main(String[] args) {
- for(int i=0;i<2;i++){
- new Thread(new Runnable() {
-
- @Override
- public void run() {
- datas = new Random().nextInt();
- System.out.println("put variable is :"+datas+" to Thread:"+Thread.currentThread().getName());
- new A().get();
- new B().get();
- }
- }).start();
- }
- }
-
- static class A{
- public void get(){
- System.out.println("A get variable is :"+datas+",from Thread:"+Thread.currentThread().getName());
- }
- }
-
- static class B{
- public void get(){
- System.out.println("B get variable is :"+datas+",from Thread:"+Thread.currentThread().getName());
- }
- }
- }

嗯,上面的是测试code,运行输出如下
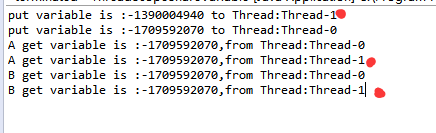
看了上面的结果,按照预想应该是 Thread-1产生的变量,运行到A方法后,线程的名字和它携带的variable应该是一致的才对,但是实际运行起来确不是这样的,这时候呢就和我们的需求不一样了。
那怎么样才能达到我们的需求呢?
这里我们可以借助一个Map集合来实现,将我们的变量数据放进Map里面,Map<Thread,Integer>,然后按当前线程来获取它携带的数据,直接撸代码:
创建一个ThreadScopeShareMapDemo类
- public class ThreadScopeShareMapDemo {
- private static Map<Thread,Integer> maps = new HashMap<Thread,Integer>();
- public static void main(String[] args) {
- for(int i=0;i<2;i++){
- new Thread(new Runnable() {
-
- @Override
- public void run() {
- int datas = new Random().nextInt();
- System.out.println("put variable is :"+datas+" to Thread:"+Thread.currentThread().getName());
- maps.put(Thread.currentThread(), datas);
- new A().get();
- new B().get();
- }
- }).start();
- }
- }
-
- static class A{
- public void get(){
- int datas = maps.get(Thread.currentThread());
- System.out.println("A get variable is :"+datas+",from Thread:"+Thread.currentThread().getName());
- }
- }
-
- static class B{
- public void get(){
- int datas = maps.get(Thread.currentThread());
- System.out.println("B get variable is :"+datas+",from Thread:"+Thread.currentThread().getName());
- }
- }
- }
嗯,看了上面的代码,真的很简单,哈哈慢慢来嘛。。。。。其实相对于上一块也没改动多少。。我想追求的是对于一个过程的享受,这样你会获得更多的信息。。。
下面我们再来看看它运行的结果:
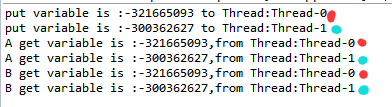
看着就是我想要的结果,不管哪个线程怎么样运行,它携带的数据是不会错误的。嗯。。。。。
对于上面的方法呢,其实java多线程里面早就提供了这样一个类,相对于上面的更加简洁,其实里面的实现方式也是差不多和上面的Map集合一样。这里我就直接撸代码吧
- public class ThreadScopeShareLocalDemo {
- /*private static Map<Thread,Integer> maps = new HashMap<Thread,Integer>();*/
- private static ThreadLocal<Integer> threadLocal = new ThreadLocal<Integer>();
- public static void main(String[] args) {
- for(int i=0;i<2;i++){
- new Thread(new Runnable() {
-
- @Override
- public void run() {
- int datas = new Random().nextInt();
- System.out.println("put variable is :"+datas+" to Thread:"+Thread.currentThread().getName());
- threadLocal.set(datas);
- new A().get();
- new B().get();
- }
- }).start();
- }
- }
-
- static class A{
- public void get(){
- int datas = threadLocal.get();
- System.out.println("A get variable is :"+datas+",from Thread:"+Thread.currentThread().getName());
- }
- }
-
- static class B{
- public void get(){
- int datas = threadLocal.get();
- System.out.println("B get variable is :"+datas+",from Thread:"+Thread.currentThread().getName());
- }
- }
- }
就不必多说了,看看结果
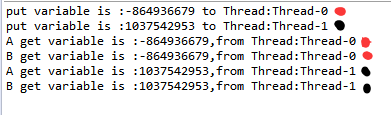
嗯,结果达到了我们的需求,代码也更加简单。。。
上面实现了这么多,我也看了一些博客和视频,最后呢我们来实现,线程范围内共享N个数据呢?这个这么实现,这个时候我们可以用一个实体类来封装这N个数据,在这里呢,通过不断学习,学习到了代码的规范性,和优雅性,下面让我们来看看这个优雅是怎么的优雅?用了饥汉式的模式实现:
- public class ThreadScopeShareLocalInstanceDemo {
- public static void main(String[] args) {
- for(int i=0;i<2;i++){
- new Thread(new Runnable() {
-
- @Override
- public void run() {
- int datas = new Random().nextInt();
- System.out.println("put variable is :"+datas+" to Thread:"+Thread.currentThread().getName());
- SharResource sharResource = SharResource.getInstance();
- sharResource.setName(Thread.currentThread().getName());
- sharResource.setData(datas);
- new A().get();
- new B().get();
- }
- }).start();
- }
- }
-
- static class A{
- public void get(){
- SharResource sharResource = SharResource.getInstance();
- int datas = sharResource.getData();
- System.out.println("A get variable is :"+datas+",from Thread:"+Thread.currentThread().getName());
- }
- }
-
- static class B{
- public void get(){
- SharResource sharResource = SharResource.getInstance();
- int datas = sharResource.getData();
- System.out.println("B get variable is :"+datas+",from Thread:"+Thread.currentThread().getName());
- }
- }
- }
- //实现N变量共享
- class SharResource{
- private String name;
- private int data;
- //这里用私有初始化,是为了不让外界随便使用它,而是让外界按照我们给定的接口去创建。
- private SharResource(){}
- private static ThreadLocal<SharResource> threadLocal = new ThreadLocal<SharResource>();
- //运用饥汉式的模式创建实体类
- public static SharResource getInstance(){
- SharResource instance = threadLocal.get();
- if(instance == null){
- instance = new SharResource();
- threadLocal.set(instance);
- }
- return instance;
- }
-
-
- public String getName() {
- return name;
- }
- public void setName(String name) {
- this.name = name;
- }
- public int getData() {
- return data;
- }
- public void setData(int data) {
- this.data = data;
- }
- }
我们来看一下输出的结果:
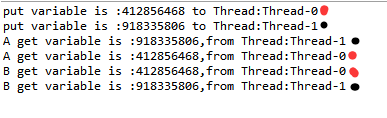
这个达到了我们的期望,写了这么多,这个就是相当于上面两个的概括吧,怎么样,这种写法看起来是否觉得舒服点(这里我直接使用外部类和内部类是为了看的方便些,但在实际开发中不要这样写。。。)。听说这种实现的模式跟strus2有点类似

