
- 1AXI Quad SPI IP核基于AXI接口的设计指南
- 2数据传输安全(为支付宝第三方做铺垫)
- 3解码2024:可解释人工智能的十大突破揭晓_2024年神经网络的可解释性这一大突破对于什么至关重要
- 4Android Gradle相关总结_gradle-6.7.1-all.zip
- 5Vue+OpenLayers 实现地图上添加 Echarts 环形图_openlayers在地图上添加效果
- 6毕业设计:基于深度学习的用户评价情感分析系统_怎么通过平均主题余弦相似度判断最优主题数
- 7vue3+vite+ts 使用webrtc-streamer播放海康rtsp监控视频_vue3 webrtc 播放
- 8NOI的1.5.39与7无关的数_noi与7无关的数csdn
- 9linux安装emqx_linux 更换emqx版本
- 10终于还是在上电时序问题上给自己挖了个坑
【StableDiffusion】在MAC上的官方安装教程与个人实践验证_stable diffusion下载 mac版
赞
踩
官方安装地址
https://github.com/AUTOMATIC1111/stable-diffusion-webui/wiki/Installation-on-Apple-Silicon
个人安装步骤
1、安装 Homebrew
官网:https://brew.sh/zh-cn/
命令:/bin/bash -c "$(curl -fsSL https://raw.githubusercontent.com/Homebrew/install/HEAD/install.sh)"
2、安装环境
打开终端:brew install cmake protobuf rust python@3.10 git wget
建议 分开安装,一一验证
brew install cmake
brew install protobuf
brew install rust
brew install python@3.10
brew install git
brew install wget
- 1
- 2
- 3
- 4
- 5
- 6
cmake: `cmake --version`
protobuf: `protoc --version`
rust:` rustc --version`
python@3.10:` python3.10 --version`
git:` git --version`
wget: `wget --version`
- 1
- 2
- 3
- 4
- 5
- 6
3、下载工程
git clone https://github.com/AUTOMATIC1111/stable-diffusion-webui
- 1
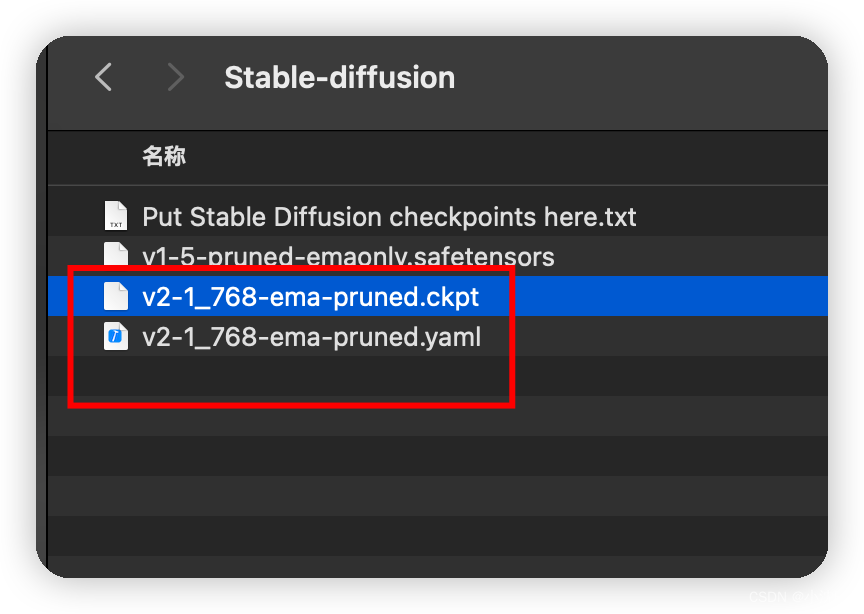
4、下载模型
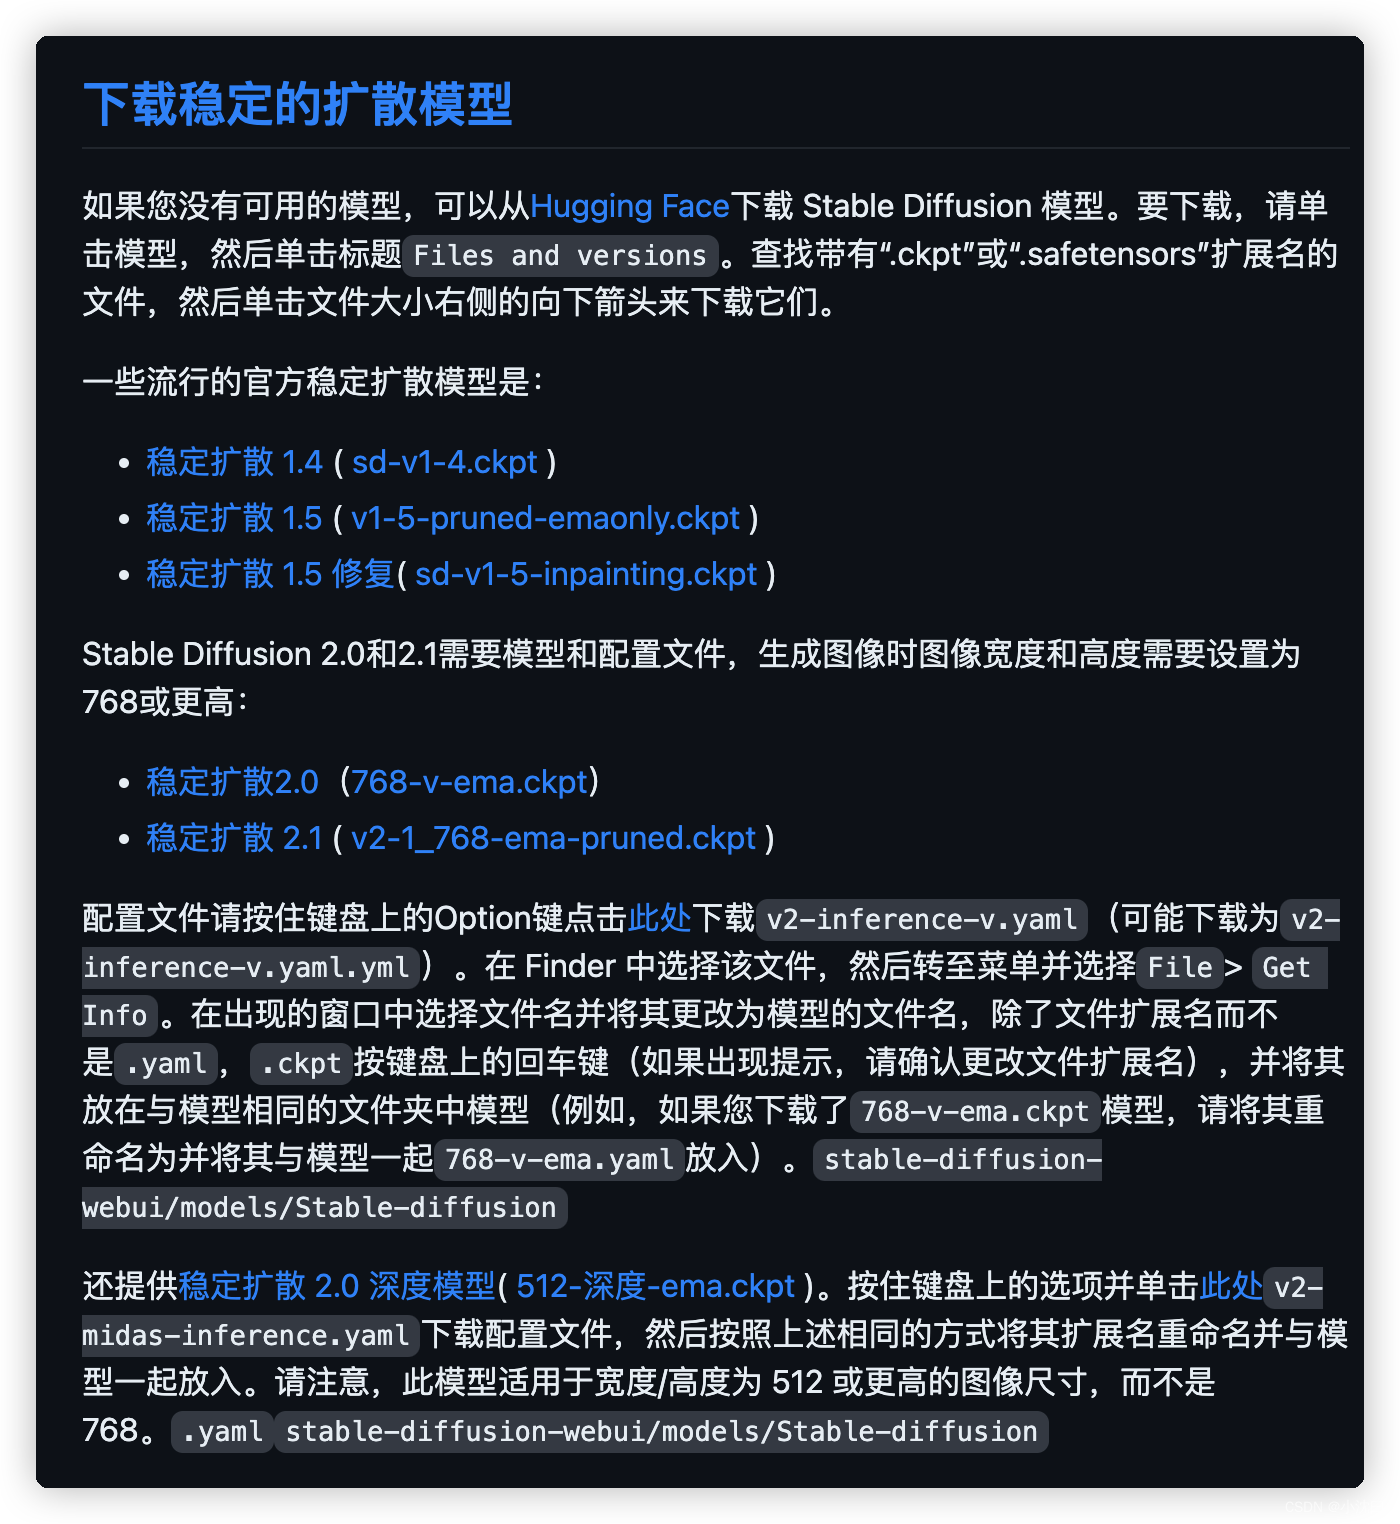
本人使用的是稳定扩散 2.1 ( v2-1_768-ema-pruned.ckpt )
模型文件:
https://huggingface.co/stabilityai/stable-diffusion-2-1/resolve/main/v2-1_768-ema-pruned.ckpt
下载完成后,放到stable-diffusion-webui/models/Stable-diffusion文件下,两个文件的前缀名称一致
5、启动
./webui.sh
- 1
问题记录
1、NansException: A tensor with all NaNs was produced in Unet
打开解决方法链接https://szlsay.blog.csdn.net/article/details/133777539
官方英文教程
Mac users: Please provide feedback on if these instructions do or don’t work for you, and if anything is unclear or you are otherwise still having problems with your install that are not currently mentioned here.
Important notes
Currently most functionality in the web UI works correctly on macOS, with the most notable exceptions being CLIP interrogator and training. Although training does seem to work, it is incredibly slow and consumes an excessive amount of memory. CLIP interrogator can be used but it doesn’t work correctly with the GPU acceleration macOS uses so the default configuration will run it entirely via CPU (which is slow).
Most samplers are known to work with the only exception being the PLMS sampler when using the Stable Diffusion 2.0 model. Generated images with GPU acceleration on macOS should usually match or almost match generated images on CPU with the same settings and seed.
Automatic installation
New install:
- If Homebrew is not installed, follow the instructions at https://brew.sh to install it. Keep the terminal window open and follow the instructions under “Next steps” to add Homebrew to your PATH.
- Open a new terminal window and run brew install cmake protobuf rust python@3.10 git wget
- Clone the web UI repository by running git clone https://github.com/AUTOMATIC1111/stable-diffusion-webui
- Place Stable Diffusion models/checkpoints you want to use into stable-diffusion-webui/models/Stable-diffusion. If you don’t have any, see Downloading Stable Diffusion Models below.
- cd stable-diffusion-webui and then ./webui.sh to run the web UI. A Python virtual environment will be created and activated using venv and any remaining missing dependencies will be automatically downloaded and installed.
- To relaunch the web UI process later, run ./webui.sh again. Note that it doesn’t auto update the web UI; to update, run git pull before running ./webui.sh.
Existing Install:
If you have an existing install of web UI that was created with setup_mac.sh, delete the run_webui_mac.sh file and repositories folder from your stable-diffusion-webui folder. Then run git pull to update web UI and then ./webui.sh to run it.


