
热门标签
热门文章
- 1MySQL数据库设计作业 ——《网上书店系统》数据库设计实验报告_mysql数据库课程设计报告
- 2【Python学习】第三方库安装后仍然import失败,提示ModuleNotFoundError:No module named'XXX'_modulenotfounderror: no module named 'pytorch3dune
- 3Educational Codeforces Round 109 C. Robot Collisions(栈的应用)
- 4C#中常见集合类的底层原理与时间复杂度_c#集合类型时间复杂度
- 5粗粒度和细粒度入门知识_明确粒度为什么要选择最细粒度,举例
- 6数字电路的基础知识(结合Verilog)_电路图fpga的输入输出
- 7flink-1.16.1集群部署_flink 1.16.1
- 8[Hololens+Unity]UnityEngine.XR.WSA.WebCam报错
- 9Spring Cloud Alibaba Sentinel_springcloudalibaba sentinel
- 10图神经网络代码_一种基于抽象语法树的新型神经源代码表示
当前位置: article > 正文
基于yolov5的PCB缺陷检测_北京大学pcb数据集
作者:weixin_40725706 | 2024-06-23 09:27:05
赞
踩
北京大学pcb数据集
1.简述
基于图像识别技术实现自动印刷电路板(PCB)缺陷检测,具有高效、准确、可靠、自动化程度高和可扩展性强等优点,大大提高了检测效率,节省了人力成本。传统的检测方法通常需要大量的人力和时间,并且容易受到环境、工人技能和疲劳等因素的影响,而基于图像识别的缺陷检测方法可以实现自动化的缺陷检测,无需人工干预,提高了生产效率。
此外,图像识别技术可以通过不断的学习和训练,不断完善自身的识别能力,适应更多的缺陷类型,具有很强的可扩展性。
2.数据集介绍
使用北京大学公开的PCB数据集,包含1386张图像,具有6种缺陷类型分别为:漏孔、鼠咬、开路、短路、杂散、杂铜。 下载地址:北京大学智能机器人开放实验室
3.数据集构建
先把数据集划分为train, val ,处理代码 split_train_val.py如下:
- # -*- coding: utf-8 -*-
- import os
- import random
- import argparse
-
- parser = argparse.ArgumentParser()
-
- #xml文件的地址,根据自己的数据进行修改 xml一般存放在Annotations下
- parser.add_argument('--xml_path', default='Annotations', type=str, help='input xml label path')
-
- #数据集的划分,地址选择自己数据下的ImageSets/Main
- parser.add_argument('--txt_path', default='ImageSets/Main', type=str, help='output txt label path')
-
- opt = parser.parse_args()
-
- trainval_percent = 0.9
- train_percent = 0.8
- xmlfilepath = opt.xml_path
- txtsavepath = opt.txt_path
- total_xml = os.listdir(xmlfilepath)
- if not os.path.exists(txtsavepath):
- os.makedirs(txtsavepath)
-
- num = len(total_xml)
- list_index = range(num)
- tv = int(num * trainval_percent)
- tr = int(tv * train_percent)
- trainval = random.sample(list_index, tv)
- train = random.sample(trainval, tr)
-
- file_trainval = open(txtsavepath + '/trainval.txt', 'w')
- file_test = open(txtsavepath + '/test.txt', 'w')
- file_train = open(txtsavepath + '/train.txt', 'w')
- file_val = open(txtsavepath + '/val.txt', 'w')
-
- for i in list_index:
- name = total_xml[i][:-4] + '\n'
- if i in trainval:
- file_trainval.write(name)
- if i in train:
- file_train.write(name)
- else:
- file_val.write(name)
- else:
- file_test.write(name)
-
- file_trainval.close()
- file_train.close()
- file_val.close()
- file_test.close()
-

然后再把VOC的标签格式转换为yolov5的格式,代码如下:
- # -*- coding: utf-8 -*-
- import xml.etree.ElementTree as ET
- import os
- from os import getcwd
-
- sets = ['train', 'val']
- classes = ["missing_hole","mouse_bite","open_circuit","short","spur","spurious_copper"] # 改成自己的类别
- abs_path = os.getcwd()
- print(abs_path)
-
-
- def convert(size, box):
- dw = 1. / (size[0])
- dh = 1. / (size[1])
- x = (box[0] + box[1]) / 2.0 - 1
- y = (box[2] + box[3]) / 2.0 - 1
- w = box[1] - box[0]
- h = box[3] - box[2]
- x = x * dw
- w = w * dw
- y = y * dh
- h = h * dh
- return x, y, w, h
-
-
- def conver_annotation(image_id):
- in_file = open('Annotations/%s.xml' % (image_id), encoding='UTF-8')
- out_file = open('labels/%s.txt' % (image_id), 'w')
- tree = ET.parse(in_file)
- root = tree.getroot()
- size = root.find('size')
- w = int(size.find('width').text)
- h = int(size.find('height').text)
- for obj in root.iter('object'):
- difficult = obj.find('difficult').text
- #difficult = obj.find('Difficult').text
- cls = obj.find('name').text
- if cls not in classes or int(difficult) == 1:
- continue
- cls_id = classes.index(cls)
- xmlbox = obj.find('bndbox')
- b = (float(xmlbox.find('xmin').text), float(xmlbox.find('xmax').text), float(xmlbox.find('ymin').text), float(xmlbox.find('ymax').text))
- b1, b2, b3, b4 = b
-
- # 标注越界修正
- if b2 > w:
- b2 = w
- if b4 > h:
- b4 = h
- b = (b1, b2, b3, b4)
- bb = convert((w, h), b)
- out_file.write(str(cls_id) + " " + " ".join([str(a) for a in bb]) + '\n')
-
-
- wd = getcwd()
- for image_set in sets:
- if not os.path.exists('labels/'):
- os.makedirs('labels/')
- image_ids = open('ImageSets/Main/%s.txt' % (image_set)).read().strip().split()
- list_file = open('%s.txt' % (image_set), 'w')
- for image_id in image_ids:
- list_file.write(abs_path + '/images/%s.jpg\n' % (image_id))
- conver_annotation(image_id)
- list_file.close()
-
4.模型训练
(1)创建数据集配置文件
在 yolov5/data/ 目录下创建自己的数据集配置文件 pcb.yaml,内容如下,nc表示类别为6个分类
- # PCB data
-
- # Train/val/test sets as 1) dir: path/to/imgs, 2) file: path/to/imgs.txt, or 3) list: [path/to/imgs1, path/to/imgs2, ..]
- train: ./data/PCB_DATASET/train.txt
- val: ./data/PCB_DATASET/val.txt
-
- nc: 6 # number of classes
-
- names: ['missing_hole', 'mouse_bite', 'open_circuit', 'short', 'spur', 'spurious_copper']
(2)创建模型文件
在 yolov5/models/ 目录下,拷贝一个版本模型作为自己的模型,这里我使用yolov5s,然后把文件中的类别数改为6即可:
cp yolov5s.yaml yolov5s_pcb.yaml- # Parameters
- nc: 6 # number of classes
- depth_multiple: 0.33 # model depth multiple
- width_multiple: 0.50 # layer channel multiple
- anchors:
- - [10,13, 16,30, 33,23] # P3/8
- - [30,61, 62,45, 59,119] # P4/16
- - [116,90, 156,198, 373,326] # P5/32
(3)模型训练
执行以下命令进行训练:
python train.py --img 640 --batch 16 --epochs 100 --data ./data/pcb.yaml --weights yolov5s.pt经过100 epochs的训练,效果如下:

mAP@0.5 达到了0.953,效果还是不错的。
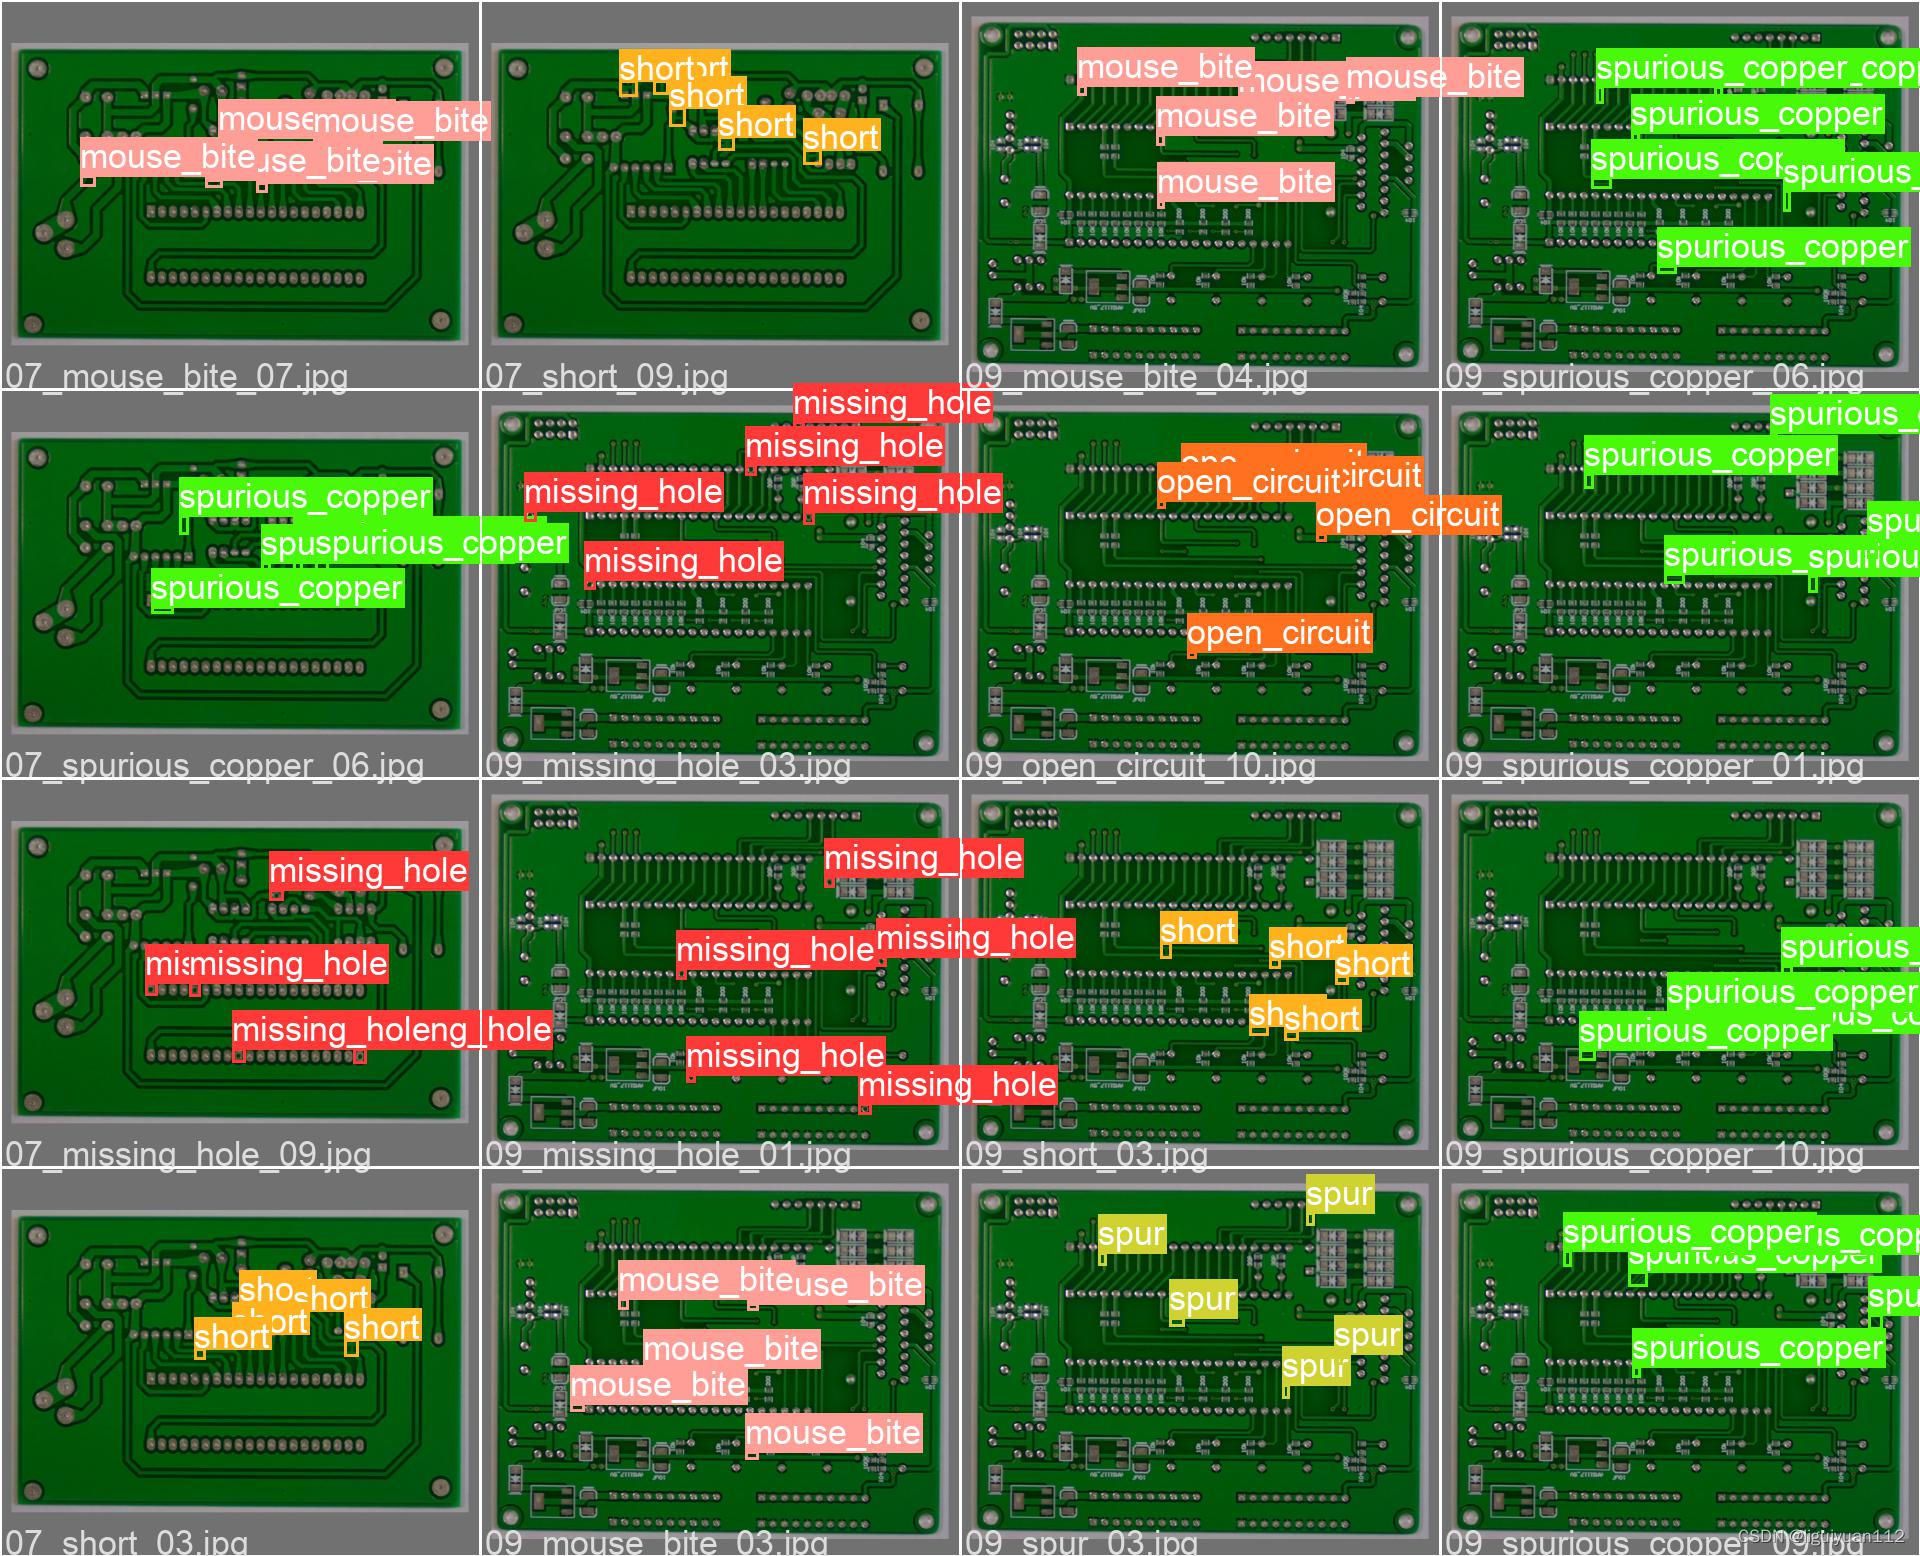
(4)实测验证效果


参考:
声明:本文内容由网友自发贡献,不代表【wpsshop博客】立场,版权归原作者所有,本站不承担相应法律责任。如您发现有侵权的内容,请联系我们。转载请注明出处:https://www.wpsshop.cn/w/weixin_40725706/article/detail/749306
推荐阅读
相关标签

