
- 1Sui 线下活动回顾|资管升级与技术革新,探索 Sui 生态发展新风向
- 2搭建Hadoop分布式文件系统HDFS、海量列式存储数据库HBase_海量文件管理用什么数据库
- 3mongodb 之 特殊集合及索引_mongodb特殊之处
- 4爬山法实现 八皇后问题 (Python 实现)_(五)爬山法算法通常在最佳后继的集合中随机选择一个进行扩展。给出上图最佳后继
- 5植物大战僵尸 for Mac(策略游戏)m1_植物大战僵尸for mac m1
- 6论文后面的参考文献格式应该如何写_论文尾注参考文献格式
- 7MVX-net3D算法笔记_mvx net
- 8数字钟设计Verilog代码远程云端平台Quartus_简易数字钟设计verilog
- 9microsoft store下载速度慢怎么办 微软商店游戏下载一键提速方法
- 10[C] 五、异常捕获_c中捕获异常
WebSocket学习笔记,SpringBoot整合WebSocket,前后端建立心跳_spring boot websocket 心跳机制
赞
踩
1.概述
1.1概念
WebSocket 是 HTML5 一种新的协议,基于TCP协议实现了客户端和服务端全双工异步通信。
1.2特点
- 最初的握手阶段是http协议,握手完成后就切换到websocket协议,并完全与http协议脱离了。
- 通讯一旦建立连接后,通讯就是“全双工”模式了。服务端和客户端都能在任何时间自由发送数据。
- 交互模式不再是“请求-应答”模式,完全由开发者自行设计通讯协议。
- 通信的数据是基于“帧(frame)”的,可以传输文本数据,也可以直接传输二进制数据,效率高。
- 协议标识符是ws(如果加密,则为wss,类似http与https),服务器网址就是 URL。
1.3运行机制
每个WebSocket连接都始于一个HTTP请求。 就是WebSocket协议在第一次握手连接时,通过HTTP协议在传送WebSocket支持的版本号,协议的字版本号等一些列字段给服务器端。其中,有个Upgrade首部,用来把当前的HTTP请求升级到WebSocket协议。

请求成功则返回状态码101
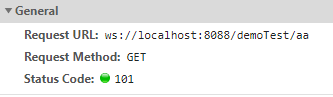
WebSocket通过第一次的HTTP请求实现客户端与服务端的连接,如果成功则触发onOpen事件,否则触发onError事件,后续的传输不再依赖HTTP协议。
2.应用
本次学习通过搭建springBoot整合webSocket来实现一个简单的webSocket前后端通讯,前端使用html界面。
2.1客户端
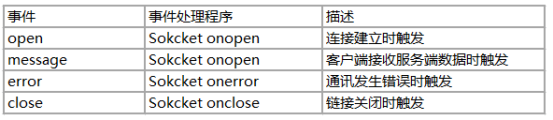
一个界面通常会用到以下几个方法与服务进行交互
- $(document).ready(function(){
- // 服务端请求地址
- var urlPrefix ='ws://localhost:8088/demoTest/';
- var ws = null;
- $('#user_join').click(function(){
- var name = $('#in_user_name').val();
- var url = urlPrefix + name;
- ws = new WebSocket(url);
- ws.onopen = function () {
- console.log("客户端建立 websocket 连接...");
- };
- ws.onmessage = function(event){
- //服务端发送的消息
- $('#message_content').append(event.data+'\n');
- console.log("服务端发送的消息:" + event.data);
- };
- ws.onclose = function(){
- console.log("客户端关闭 websocket 连接...");
- }
- });
- // 客户端发送消息到服务器 私发
- $('#user_send_single').click(function(){
- var userName = $('#user_name_2').val();
- var msg = $('#in_room_msg3').val();
- if(ws){
- ws.send(userName + "=" + msg);
- }
- });
- // 客户端发送消息到服务器 群发
- $('#user_send_all').click(function(){
- var msg = $('#in_room_msg').val();
- if(ws){
- ws.send(msg);
- }
- });
- // 断开连接
- $('#user_exit').click(function(){
- if(ws){
- ws.close();
- }
- });
- })

2.2服务端
1、maven引入相关依赖
- <dependency>
- <groupId>org.springframework.boot</groupId>
- <artifactId>spring-boot-starter-websocket</artifactId>
- </dependency>
2、配置Bean
- @Component
- public class WebSocketConfig {
- /**
- * ServerEndpointExporter 作用
- * 这个Bean会自动注册使用@ServerEndpoint注解声明的websocket endpoint
- * 前提是直接使用springboot的内置容器
- */
- @Bean
- public ServerEndpointExporter serverEndpointExporter() {
- return new ServerEndpointExporter();
- }
- }
3、服务端核心处理
- @Component
- // 把当前类标识成一个WebSocket的服务端
- @ServerEndpoint("/demoTest/{name}")
- public class WebSocket {
- // 用于存所有的连接服务的客户端,这个对象存储是安全的
- private static ConcurrentHashMap<String, WebSocket>
- webSocketSet = new ConcurrentHashMap<>();
- @OnOpen
- public void onOpen(@PathParam(value = "name") String name) {
- webSocketSet.put(name,this);
- String message =
- "用户[" + name + "]建立连接,当前人数为:" + webSocketSet.size();
- groupSending(message);
- }
- @OnMessage
- public void onMessage(@PathParam("name") String name,
- String message) {
- // 判断是否需要指定发送
- String[] split = message.split("=");
- if (split.length > 1){
- appointSending(split[0] ,
- "用户[" + name + "]发来的消息: " + split[1]);
- appointSending(name ,
- "给用户[" + split[0] + "]发送消息: " + split[1]);
- } else {
- groupSending("用户[" + name + "]的群发消息:" + message);
- }
- }
- // 群发
- public void groupSending(String message){
- for (String name : webSocketSet.keySet()){
- try {
- webSocketSet.get(name).session.getBasicRemote().sendText(message);
- }catch (Exception e){
- e.printStackTrace();
- }
- }
- }
- // 指定发送
- public void appointSending(String name,String message){
- try {
- webSocketSet.get(name).session.getBasicRemote().sendText(message);
- }catch (Exception e){
- e.printStackTrace();
- }
- }
-
- @OnClose
- public void onClose(@PathParam(value = "name") String name) {
- // 当前的Session移除
- webSocketSet.remove(name);
- String message =
- "用户[" + name + "]断开连接,当前人数为:" + webSocketSet.size();
- groupSending(message);
- }
- }
2.3运行结果
经过调试能够建立客户端与服务端之间的通讯


3.心跳检测和重连机制
3.1心跳的作用
在客户端和服务端建立了webSocket连接后,可能会发生一些异常现象,比如断网、断电之类,心跳是为了确认客户端和服务端是否都还正常存在,有了心跳,在某些断网瞬间可以及时重连,避免消息丢失。
3.2核心代码
前端增加心跳请求,后端在接收消息处修改,如果收到的是心跳信息,也返回一个心跳信息给前端
- var heartCheck = {
- timeout: 5000, // 发送心跳间隔的时间 毫秒
- num: 3, // 3次心跳均未响应重连
- timeoutObj: null,
- reset: function () {
- clearInterval(this.timeoutObj);
- this.start();
- },
- start: function () {
- var this_ = this;
- this.timeoutObj = setTimeout(function () {
- ws.send("msg=heartCheck");
- }, this.timeout)
- }
- };
异常时调用重连方法
- //重连函数
- //因为重连函数会被socket事件频繁触发,设置延迟避免请求过多
- function reconnect(url) {
- if (!flag) {
- return;
- }
- flag = false;
- setTimeout(function () {
- createWebsocket(url);
- flag = true;
- }, 5000)
- }
-
- //建立websocket连接函数
- function createWebsocket(url) {
- try {
- ws = new WebSocket(url);
- // 对WebSocket各种事件进行监听方法,onopen那些
- init(ws);
- } catch (e) {
- //进行重连;
- console.log('websocket连接错误,即将重连');
- reconnect(url);
- }
- }
3.3运行结果
建立心跳后把服务端断掉可以触发重连,重新启动服务端又可以连上了

3.4消息丢失
实际的交互场景中,有可能会出现连接已断开而服务端不知道的情况,那么此时服务端的消息可能没有传给客户端造成消息丢失的情况。可以把服务端接收到的消息存起来,并且给消息定义编号,在交互过程中带上这些信息,客户端在收到消息后返回该消息的确认信息,确认已经收到消息。
而客户端未收到的消息可以在正常情况下重新发送,通过比较服务端的消息编号与客户端确认收到的消息编号之间的大小来判断是否存在丢失的消息。交互过程可以把信息封装为json,接收时方便解析。
- // 定义一个SendRequest 类来记录交互中传递的消息信息
- public class SendRequest {
- private String sendName;
- private String revName;
- private Integer sendId;
- private Integer revId;
- private Map<Integer, String> msgRequestMap = new HashMap<>();
- //...getter setter 略
- }
- /服务端发送
- // 封装信息
- if (sendRequest != null){
- JSONObject jsonObject = new JSONObject();
- jsonObject.put("type","msg");
- jsonObject.put("msgId",sendRequest.getSendId());
- jsonObject.put("msg",message);
- jsonObject.put("sendName",sendRequest.getSendName());
- message = jsonObject.toJSONString();
- }
- try {
- webSocketSet.get(name).session.getBasicRemote().sendText(message);
- log.info("服务端发送消息:" + message);
- }catch (Exception e){
- log.info("指定发送异常,接收用户[" + name +"]," + e.getMessage());
- e.printStackTrace();
- }
修改接收消息
- @OnMessage
- public void onMessage(@PathParam("name") String name, String message) {
- log.info("[WebSocket] [name={}]收到消息:{}" ,name, message);
- Map<String, SendRequest> sendRequestMap = MyConnect.getSendRequestMap();
- // 判断是否需要指定发送
- String[] split = message.split("=");
- if (split.length > 1){
- if ("heartCheck".equals(split[1])){
- // 如果是心跳,返回对应的心跳信息
- appointSending(name, "heart", null);
- } else if ("msgId".equals(split[1])){
- // 客户端确定收到消息了
- SendRequest sendRequest = sendRequestMap.get(split[0]);
- sendRequest.setRevId(Integer.valueOf(split[2]));
- sendRequestMap.put(name, sendRequest);
- } else {
- if (sendRequestMap.containsKey(name)){
- // 已发送过消息,更新该用户的发送信息
- SendRequest sendRequest = sendRequestMap.get(name);
- Integer newSendId = sendRequest.getSendId() + 1;
- String msgCon = "用户[" + name + "]发来的消息: " + split[1];
- makeMsg(sendRequest, newSendId, msgCon);
- sendRequest.setSendId(newSendId);
- sendRequestMap.put(name, sendRequest);
- appointSending(split[0] , msgCon, sendRequest);
- // appointSending(name , "给用户[" + split[0] + "]发送消息: " + split[1], sendRequest);
- } else {
- // 首次发送消息
- SendRequest sendRequest = new SendRequest(name, split[0], 1, 0);
- String msgCon = "用户[" + name + "]发来的消息: " + split[1];
- makeMsg(sendRequest, 1, msgCon);
- sendRequestMap.put(name, sendRequest);
- appointSending(split[0] , msgCon, sendRequest);
- // appointSending(name , "给用户[" + split[0] + "]发送消息: " + split[1], sendRequest);
- }
- }
- MyConnect.setSendRequestMap(sendRequestMap);
- } else {
- // 群发
- groupSending("用户[" + name + "]的群发消息:" + message);
- }
-
- }
重发消息
- // 建立连接以后检测一下是否有丢失的消息
- Collection<SendRequest> values = MyConnect.getSendRequestMap().values();
- if (!values.isEmpty()){
- for (SendRequest sendRequest : values){
- //这个用户的相关消息
- if (name.equals(sendRequest.getRevName())){
- Integer revId = sendRequest.getRevId();
- // 发送之前未发出的消息
- while (revId < sendRequest.getSendId()){
- Map<Integer, String> msgRequestMap = sendRequest.getMsgRequestMap();
- Integer newId = revId++;
- String msgCon = msgRequestMap.get(newId);
- appointSending(name , msgCon, sendRequest);//发送消息
- }
- }
- }
- }
运行结果

4.小结
通过本次学习,对WebSocket的概念、运行、应用等有了初步的理解,编写了相关demo运行调试后,也大概了解了主要的四个事件运用方法、心跳、重连等。这次的例子中只结合了spirngBoot做尝试,WebSocket还可以结合Netty、Mina等实现通信,后续可以继续了解。
本文涉及的demo示例代码可以点此下载
参考文章:
https://zhuanlan.zhihu.com/p/66771214


