
- 1对 PhD一年级新生有什么建议?
- 2pytorch图像识别(基于识别验证码),读取数据集图片以及使用神经网络进行训练_神经网络验证码识别pytorch
- 3Mac M1芯片安装 MySQL_brew bundle dump
- 4MySQL多表查询表结构设计01_mysql表中查看各表之间的架构设计
- 5Android Gradle 7.1+新版本依赖变化_android pluginmanagement
- 6Android系统开机动画结束进入launcher前黑屏优化_directboot v 黑屏问题
- 7ChatGLM GPU多卡并行训练_chatglm多gpu卡部署
- 8python中open()方法总结_open方法
- 9基于 Web 实现 m3u8 视频播放的简单应用示例_h5 webview m3u8
- 10「实战应用」如何使用图表控件LightningChart创建数据采集系统?(一)
学习大数据,所需要Java基础(9)
赞
踩
网络编程
实现简答客户端和服务器端的交互
相关介绍
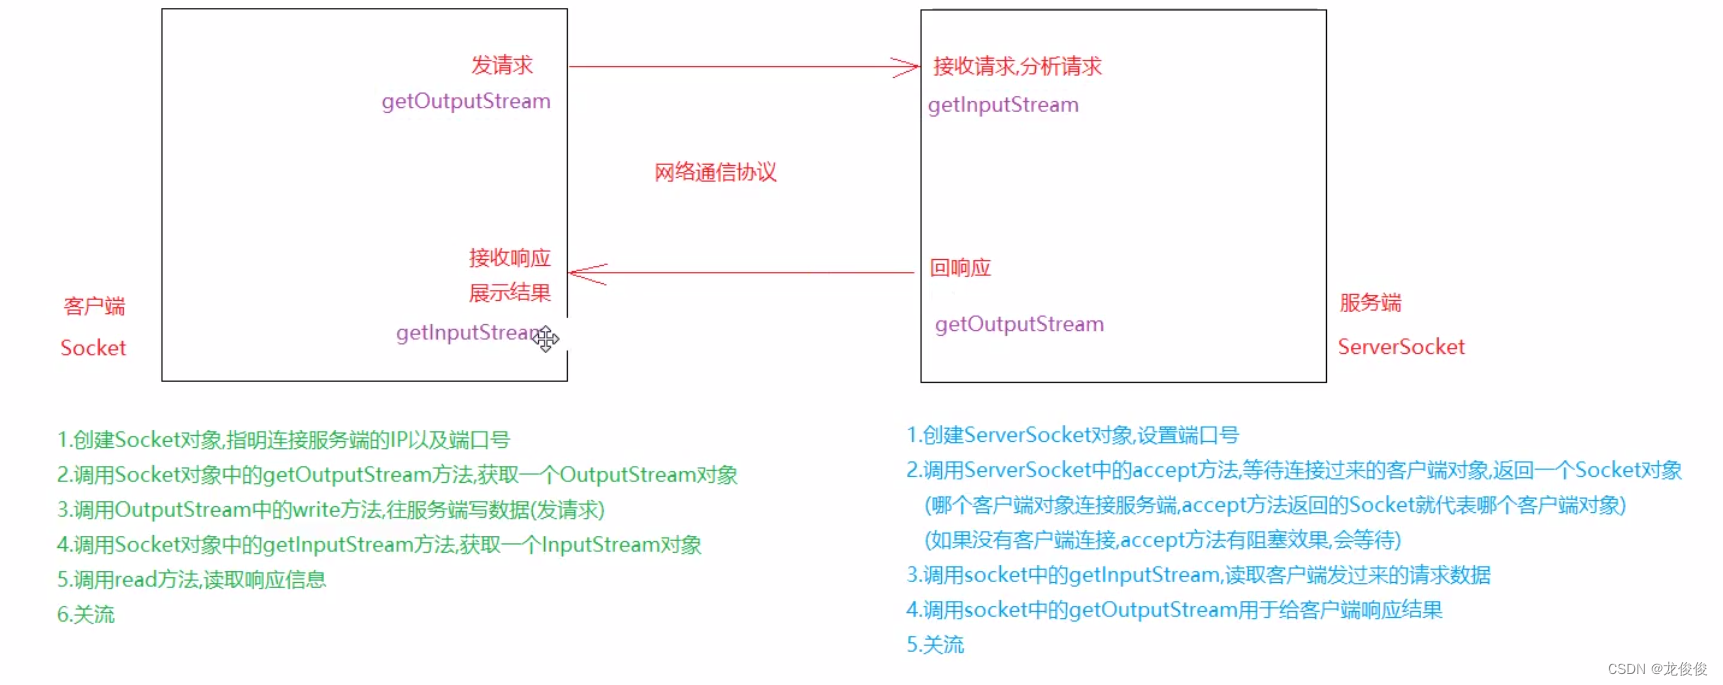
编写客户端
1.创建Socket对象,指明连接服务器端的IP以及端口号
2.调用Socket中的getOutputStream方法,发送请求
3.调用Socket中的getInputStream方法,接收响应
4.关流
public class Client {
    public static void main(String[] args) throws IOException {
//        1.创建Socket对象,指明连接服务器端的IP以及端口号
        final Socket socket = new Socket("127.0.0.1",6666);
//        2.调用Socket中的getOutputStream方法,发送请求
        final OutputStream outputStream = socket.getOutputStream();
        outputStream.write("发送请求,请回应".getBytes(StandardCharsets.UTF_8));
//        3.调用Socket中的getInputStream方法,接收响应
        final InputStream inputStream = socket.getInputStream();
        final byte[] bytes = new byte[1024];
        int len = inputStream.read(bytes);
        System.out.println(new String(bytes,0,len));
//        4.关流
        inputStream.close();
        outputStream.close();
    }
}

- 1
- 2
- 3
- 4
- 5
- 6
- 7
- 8
- 9
- 10
- 11
- 12
- 13
- 14
- 15
- 16
- 17
编写服务端
1.创建ServerSocket。设置端口号
2.调用accept方法等待连接的客户端对象
3.调用socket中的getInputStream用于读取客户端发过来的请求
4.调用socket中的getOutputStream,用于给客户端响应结果
5.关流
public class Server {
    public static void main(String[] args) throws IOException {
        //创建ServerSocket,设置端口号
        final ServerSocket serverSocket = new ServerSocket(6666);
        //调用accept方法等待连接的客户端对象
        final Socket socket = serverSocket.accept();
        //调用socke中的getInputStream,用于读取客户端发过来的请求
        final InputStream inputStream = socket.getInputStream();
        final byte[] bytes = new byte[1024];
        final int read = inputStream.read(bytes);
        System.out.println(new String(bytes,0,read));
        //调用socket中的getOutputStream,用于给客户端相应结果
        final OutputStream outputStream = socket.getOutputStream();
        outputStream.write("给你资源,发送吧".getBytes(StandardCharsets.UTF_8));
        //关流
        inputStream.close();
        outputStream.close();
        socket.close();
        serverSocket.close();
    }
}
- 1
- 2
- 3
- 4
- 5
- 6
- 7
- 8
- 9
- 10
- 11
- 12
- 13
- 14
- 15
- 16
- 17
- 18
- 19
- 20
- 21
- 22
文件上传
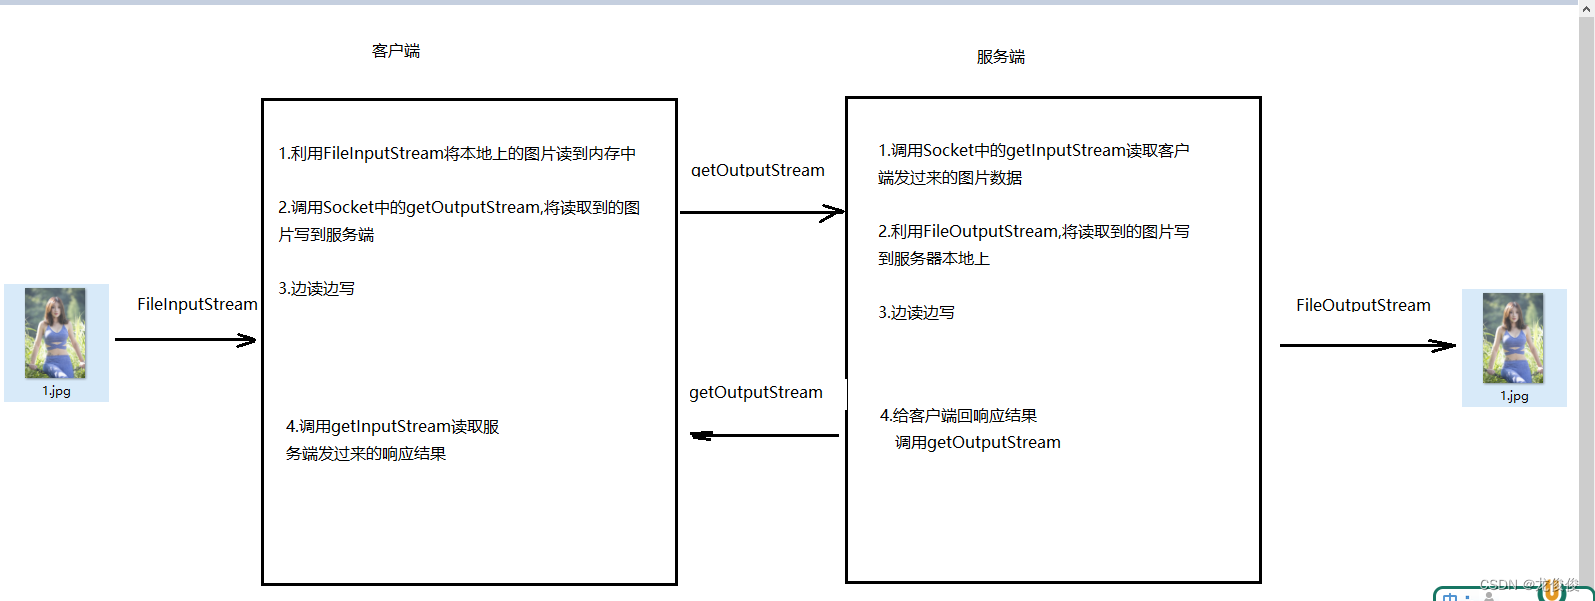
文件上传客户端以及服务器端实现
客户端
public class Client {
    public static void main(String[] args) throws IOException {
        //创建socket对象
        final Socket socket = new Socket("127.0.0.1", 6666);
        //创建FileInputStream,将读取本地上的照片
        final FileInputStream fileInputStream = new FileInputStream("C:\\Users\\94863\\Pictures\\Saved Pictures\\hua.jpg");
        //调用getOutputStream,将读取过来的照片写到服务端
        final OutputStream outputStream = socket.getOutputStream();
        final byte[] bytes = new byte[1024];
        int len;
        while ((len = fileInputStream.read(bytes))!=-1){
            outputStream.write(bytes,0,len);
        }
        //给服务端写一个结束标志
        socket.shutdownOutput();
        System.out.println("==============以下是接收相应的代码=========================");
        //调用getInputStream,读取服务器端相应回来的数据
        final InputStream inputStream = socket.getInputStream();
        final byte[] bytes1 = new byte[1024];
        final int read = inputStream.read(bytes1);
        System.out.println(new String(bytes1,0,read));
        //关流
        inputStream.close();
        outputStream.close();
        fileInputStream.close();
        socket.close();
    }
}
- 1
- 2
- 3
- 4
- 5
- 6
- 7
- 8
- 9
- 10
- 11
- 12
- 13
- 14
- 15
- 16
- 17
- 18
- 19
- 20
- 21
- 22
- 23
- 24
- 25
- 26
- 27
- 28
服务器端
public class Server {
    public static void main(String[] args) throws IOException {
        //创建ServerSocket对象,设置端口号
        final ServerSocket serverSocket = new ServerSocket(6666);
        //调用accept方法,等待连接的客户端
        final Socket socket = serverSocket.accept();
        //调用getInputStream读取客户端发过来额照片
        final InputStream inputStream = socket.getInputStream();
        //创建FileOutStream,将读取过来的照片写到本地上
        final String name = System.currentTimeMillis() + "" + new Random().nextInt() + ".jpg";
        final FileOutputStream fileOutputStream = new FileOutputStream("D:\\Ajava\\"+name);
        final byte[] bytes = new byte[1024];
        int len;
        while ((len = inputStream.read(bytes))!=-1){
            fileOutputStream.write(bytes,0,len);
        }
        System.out.println("============以下代码为相应代码===================");
        //响应数据
        final OutputStream outputStream = socket.getOutputStream();
        outputStream.write("上传成功".getBytes(StandardCharsets.UTF_8));
        //关流
        outputStream.close();
        fileOutputStream.close();
        inputStream.close();
        socket.close();
        serverSocket.close();
    }
}
- 1
- 2
- 3
- 4
- 5
- 6
- 7
- 8
- 9
- 10
- 11
- 12
- 13
- 14
- 15
- 16
- 17
- 18
- 19
- 20
- 21
- 22
- 23
- 24
- 25
- 26
- 27
- 28
文件上传服务器端实现(多线程)
public class Server_muti {
    public static void main(String[] args) throws IOException {
        //创建ServerSocket对象,设置端口号
        final ServerSocket serverSocket = new ServerSocket(6666);
        while (true) {
            //调用accept方法,等待连接的客户端
            final Socket socket = serverSocket.accept();
            new Thread(new Runnable() {
                @Override
                public void run() {
                    final InputStream inputStream;
                    try {
                        //调用getInputStream读取客户端发过来额照片
                        inputStream = socket.getInputStream();
                        //创建FileOutStream,将读取过来的照片写到本地上
                        final String name = System.currentTimeMillis() + "" + new Random().nextInt() + ".jpg";
                        final FileOutputStream fileOutputStream = new FileOutputStream("D:\\Ajava\\" + name);
                        final byte[] bytes = new byte[1024];
                        int len;
                        while ((len = inputStream.read(bytes)) != -1) {
                            fileOutputStream.write(bytes, 0, len);
                        }
                        System.out.println("============以下代码为相应代码===================");
                        //响应数据
                        final OutputStream outputStream = socket.getOutputStream();
                        outputStream.write("上传成功".getBytes(StandardCharsets.UTF_8));
                        //关流
                        outputStream.close();
                        fileOutputStream.close();
                        inputStream.close();
                        socket.close();
                        serverSocket.close();
                    } catch (IOException e) {
                        e.printStackTrace();
                    }
                }
            }).start();

        }
    }
    }
- 1
- 2
- 3
- 4
- 5
- 6
- 7
- 8
- 9
- 10
- 11
- 12
- 13
- 14
- 15
- 16
- 17
- 18
- 19
- 20
- 21
- 22
- 23
- 24
- 25
- 26
- 27
- 28
- 29
- 30
- 31
- 32
- 33
- 34
- 35
- 36
- 37
- 38
- 39
- 40
- 41
文件上传服务器端(连接池版本)
public class Server_pools {
    public static void main(String[] args) throws IOException {
        //创建ServerSocket对象,设置端口号
        final ServerSocket serverSocket = new ServerSocket(6666);
        final ExecutorService executorService = Executors.newFixedThreadPool(10);
        while (true){
            //调用accept方法,等待连接的客户端
            final Socket socket = serverSocket.accept();
            executorService.submit(new Runnable() {
                @Override
                public void run() {
                    InputStream inputStream = null;
                    FileOutputStream fileOutputStream = null;
                    OutputStream outputStream = null;
                    //调用getInputStream读取客户端发过来额照片
                    try {
                        inputStream = socket.getInputStream();
                        //创建FileOutStream,将读取过来的照片写到本地上
                        final String name = System.currentTimeMillis() + "" + new Random().nextInt() + ".jpg";
                        fileOutputStream = new FileOutputStream("D:\\Ajava\\" + name);
                        final byte[] bytes = new byte[1024];
                        int len;
                        while ((len = inputStream.read(bytes)) != -1) {
                            fileOutputStream.write(bytes, 0, len);
                        }
                        System.out.println("============以下代码为相应代码===================");
                        //响应数据
                        outputStream = socket.getOutputStream();
                        outputStream.write("上传成功".getBytes(StandardCharsets.UTF_8));
                        //关流
                        outputStream.close();
                        fileOutputStream.close();
                        inputStream.close();
                        socket.close();
                    } catch (IOException e) {
                        e.printStackTrace();
                    }
                }
            });
        }
    }
}
- 1
- 2
- 3
- 4
- 5
- 6
- 7
- 8
- 9
- 10
- 11
- 12
- 13
- 14
- 15
- 16
- 17
- 18
- 19
- 20
- 21
- 22
- 23
- 24
- 25
- 26
- 27
- 28
- 29
- 30
- 31
- 32
- 33
- 34
- 35
- 36
- 37
- 38
- 39
- 40
- 41
- 42
- 43
关闭资源工具类
我们创建一个工具类,以便快速关闭资源
public class CloseUtils {
    public  static void close(InputStream is, FileOutputStream fos, OutputStream os, Socket so)
    {
        if (os != null){
            try {
                os.close();
            } catch (IOException e) {
                e.printStackTrace();
            }
        }
        if (fos != null){
            try {
                fos.close();
            } catch (IOException e) {
                e.printStackTrace();
            }
        }
        if (is != null){
            try {
                is.close();
            } catch (IOException e) {
                e.printStackTrace();
            }
        }
        if (so != null){
            try {
                so.close();
            } catch (IOException e) {
                e.printStackTrace();
            }
        }
    }
}
- 1
- 2
- 3
- 4
- 5
- 6
- 7
- 8
- 9
- 10
- 11
- 12
- 13
- 14
- 15
- 16
- 17
- 18
- 19
- 20
- 21
- 22
- 23
- 24
- 25
- 26
- 27
- 28
- 29
- 30
- 31
- 32
- 33
BS架构服务器案例
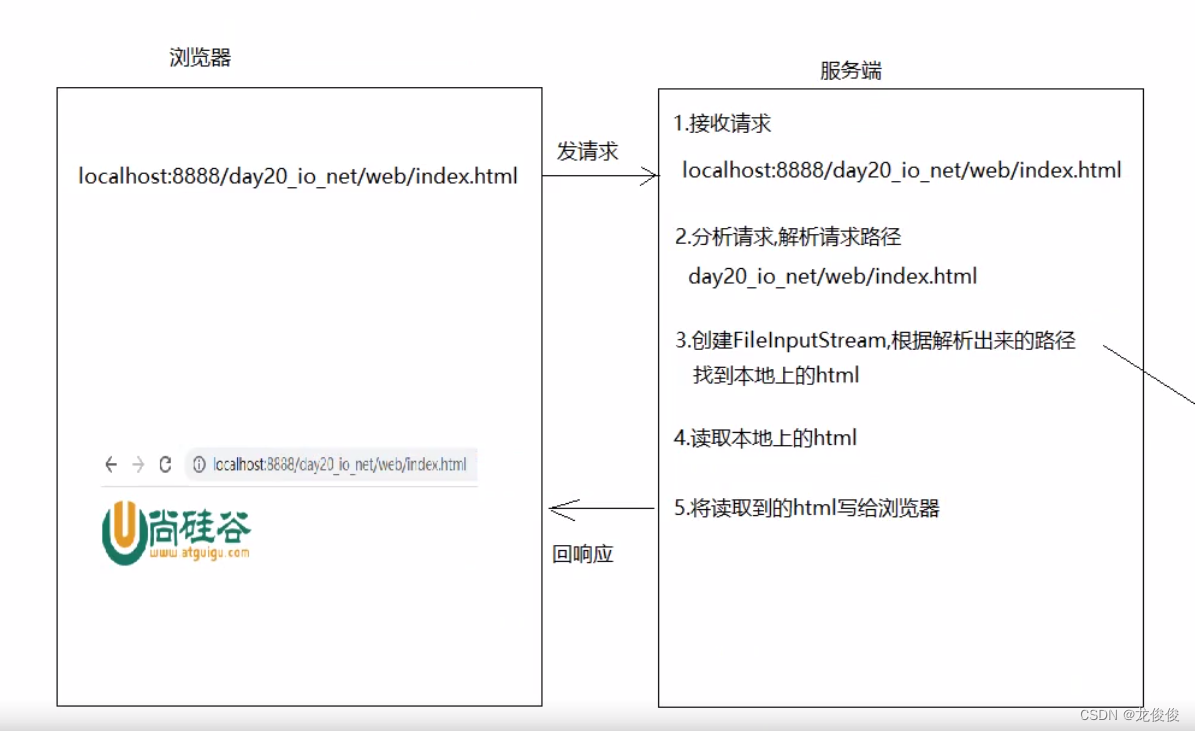
案例分析
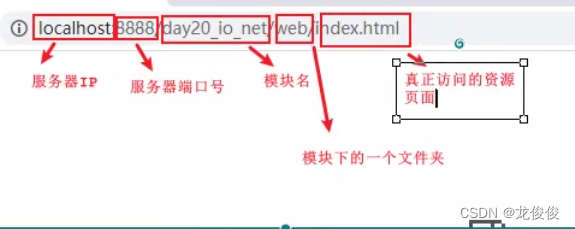
BS结构服务器代码实现
public class bstest {
    public static void main(String[] args) throws IOException {
        //创建ServerSocket对象
        final ServerSocket serverSocket = new ServerSocket(8888);
        while (true) {
            //调用accept方法接收客户端
            final Socket socket = serverSocket.accept();
            //调用getInputStream用于读取浏览器发过来的请求
            final InputStream inputStream = socket.getInputStream();
            /*
          1.描述:需要将is对象转成BufferedReader对象
                然后调用BufferedReader中的readLine方法读取请求信息第一行

          2.怎么将InputStream转成BufferedReader?
            只需要将InputStream想办法塞到BufferedReader的构造中即可

          3.BufferedReader构造:
            BufferedReader(Reader r)
                           Reader是抽象类,需要传递子类,我们可以传递InputStreamReader
                           而InputStreamReader的构造正好可以传递InputStream
          4.如何转:
            new BufferedReader(new InputStreamReader(InputStream is))
         */
            final BufferedReader bufferedReader = new BufferedReader(new InputStreamReader(inputStream));
            String s = bufferedReader.readLine();
            String s2 = s.split(" ")[1];
            String path = s2.substring(1);
            //创建FileInputStream对象
            final FileInputStream fileInputStream = new FileInputStream(path);
            //调用getOutputStream 将读取到的html写到浏览器
            final OutputStream outputStream = socket.getOutputStream();
            //写相应信息给浏览器
            outputStream.write("HTTP/1.1 200 OK\r\n".getBytes());
            outputStream.write("Content-Type:text/html\r\n".getBytes());
            outputStream.write("\r\n".getBytes());
            byte[] bytes = new byte[1024];
            int len;
            while ((len = fileInputStream.read(bytes)) != -1) {
                outputStream.write(bytes, 0, len);
            }
            //关流
            outputStream.close();
            fileInputStream.close();
            bufferedReader.close();
            inputStream.close();
            socket.close();
        }
    }}
- 1
- 2
- 3
- 4
- 5
- 6
- 7
- 8
- 9
- 10
- 11
- 12
- 13
- 14
- 15
- 16
- 17
- 18
- 19
- 20
- 21
- 22
- 23
- 24
- 25
- 26
- 27
- 28
- 29
- 30
- 31
- 32
- 33
- 34
- 35
- 36
- 37
- 38
- 39
- 40
- 41
- 42
- 43
- 44
- 45
- 46
- 47
- 48
- 49
Junit单元测试
Junit介绍
1.概述:单元测试 ,用于测试一个方法的,属于第三方工具,所以使用需要导jar包,在一定程度上可以代替main方法
2.作用:单独测试一个方法,看看此方法能不能跑通
Junit的基本使用(重点)
1.导包
2.在方法时写:@test
3.执行:
a.双击方法名,右键,点run
b.在方法的左边有一个绿色的小摁钮,点击它,点run
public class test01 {
    @Test
    public void add(){
        System.out.println("添加新功能");
    }
    @Test
    public void deltet(){
        System.out.println("删除功能");
    }
}
- 1
- 2
- 3
- 4
- 5
- 6
- 7
- 8
- 9
- 10
- 11
Junit的注意事项
1.静态方法不能使用@Test
2.带参数的方法不能使用@Test
3.带返回值的方法不能使用@Test
Junit相关注解
1.@Before:在@Test之前执行,有多少个@Test一起执行,@Before就执行多少次
2.@After:在@Test之后执行,有多少个@Test一起执行,@After就执行多少次
3.@Before:一般都用于初始化数据
@After:一般用于关闭资源
public class test01 {
    @Test
    public void add(){
        System.out.println("添加新功能");
    }
    @Test
    public void deltet(){
        System.out.println("删除功能");
    }
    @Test
    public void update(){
        System.out.println("修改功能");
    }
    @Before
    public void before(){
        System.out.println("我是before功能");
    }
    @After
    public void after(){
        System.out.println("我是After功能");
    }
}
- 1
- 2
- 3
- 4
- 5
- 6
- 7
- 8
- 9
- 10
- 11
- 12
- 13
- 14
- 15
- 16
- 17
- 18
- 19
- 20
- 21
- 22
@Test以后怎么使用
对商品进行更删改查
public class CategoryImpl {
    public void add(String s){
        System.out.println("添加商品分类"+s);
    }
    public void delete(int id){
        System.out.println("id为" + id + "被删除");
    }
    public void update(int id){
        System.out.println("id为"+ id + "被修改");
    }
}
- 1
- 2
- 3
- 4
- 5
- 6
- 7
- 8
- 9
- 10
- 11
public class test02 {
    @Test
    //测试add功能
    public void add(){
        new CategoryImpl().add("服装");
    }
    @Test
    //测试删除功能
    public void delete(){
        new CategoryImpl().delete(0001);
    }
}
- 1
- 2
- 3
- 4
- 5
- 6
- 7
- 8
- 9
- 10
- 11
- 12
类的加载时机
1.new对象
2.new子类对象(new子类对象先初始化父类)
3.执行main方法
4.调用静态成员
5.利用反射反射这个类
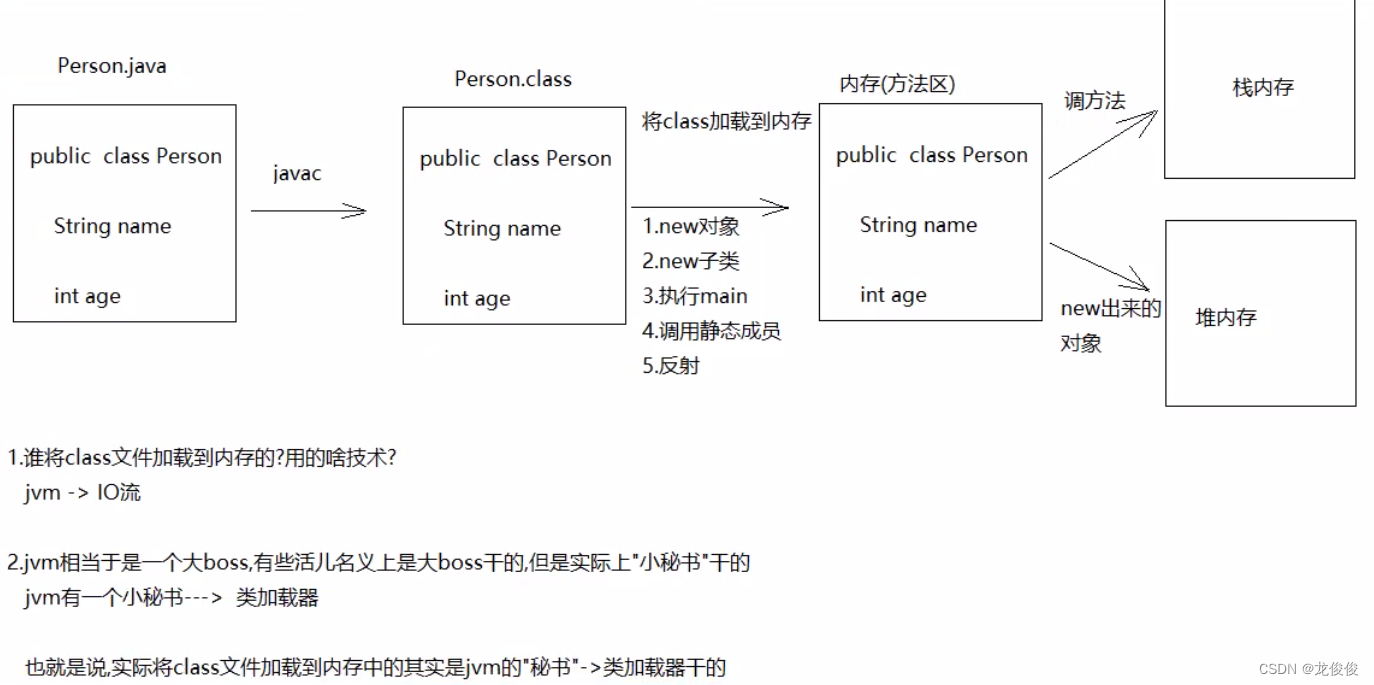
类加载器(了解)_ClassLoader
1.概述:在jvm中,负责将本地上的class文件加载到内存的对象_ClassLoader
2.分类:
BootStrapClassLoader:根类加载器—》C语言写的,我们获取不到的也称之为引导类加载器,负载Java的核心类加载,比如
System,String等 jre/lib/rt.jar下的类都是核心类
ExtClassLoader:负责类加载器,负载jre的扩展目录中的jar包的加载,在jdk中jre的lib目录下的ext目录
AppClassLoader:系统类加载器,负责在居民启动时,加载来自java命令的class文件(自定义类)
以及classPath环境变量所指定的jar包(第三方jar包)
不同的类加载器负责加载不同的类
3.三者的关系:AppClassLoader的父类加载器时ExtClassLoader
ExtClassLoader的父类加载器时BootStrapClassLoader
但是:他们从代码级别上来看,没有子父类继承关系 ---- 他们都有一个共同的父类---- ClassLoader
4.获取类加载对象
类名.class.getClassLoader()
5.获取类加载器对象对应的父类加载器
ClassLoader类中的方法:ClassLoader
getParent() ----- 没啥用
6.双亲委派(全盘负责委托机制)
a.Person类中有一个String
Person本身是AppClassLoader加载
String是BootStrapClassLoader加载
b.加载顺序
Person本身是App加载,按道理来说String也是App加载,但是app加载String的时候,先询问Ext是否加载,Ext负责加载的是拓展类, 再询问boot是否加载,boot负责加载核心类,所以String被加载
再比如
a.Test是app加载,person按理来说也是app加载,但是app先问ext要不要加载
ext说不负责加载自定义类,我找boot去,boot一看,我不负责加载自定义类->perosn
app一看,两个爹都不加载,我自己加
b.结论:两个双亲都不加载,app才自己加载
比如:如果来了一个DNSNameService,我就想直接加载DNSNameService(扩展类),
本身ext要加载,但是先问boot,如果boot不加载,ext再加载
7.类加载器的cache(缓存)机制(拓展):一个类加载到内存之后,缓存中也会保存一份,后面如果在使用此类,如果缓存中保存了这个类,就直接返回他,如果没有才加载这个类,下一次如果有其他类在使用的时候就不会重新加载了,直接去缓存中拿,所以这就是为什么每个类只加载一次,内存只有一份的原因
8.所以,类加载器的双亲委派和缓存机制共同早就了加载类的特点,每个类只在内存中加载一次
public class test03 {
    public static void main(String[] args) {
        boot();
        ext();
        app();
    }
    public static void boot(){
        final ClassLoader classLoader = Integer.class.getClassLoader();
        System.out.println(classLoader);
    }
    public static void ext(){
        final ClassLoader classLoader = DNSNameService.class.getClassLoader();
        System.out.println("classLoader = " + classLoader);
    }
    public static void app(){
        final ClassLoader classLoader = test01.class.getClassLoader();
        System.out.println("classLoader = " + classLoader);
    }
}
- 1
- 2
- 3
- 4
- 5
- 6
- 7
- 8
- 9
- 10
- 11
- 12
- 13
- 14
- 15
- 16
- 17
- 18
- 19
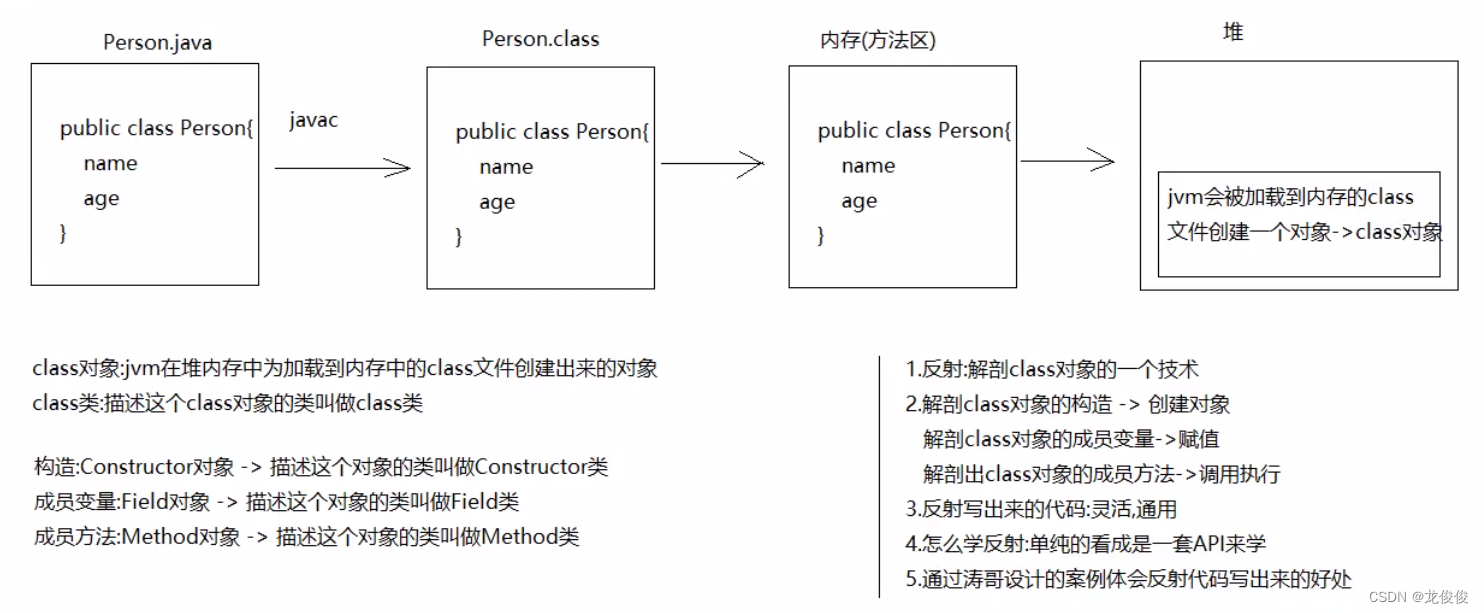
反射
class类的以及class对象的介绍以及反射介绍
1.class对象:jvm在堆内存中为加载到内存中的class文件创建出来的对象
2.class类:描述这个class对象额类叫做class类
反射之获取class对象
1.方法1:new对象,调用Object中的方法 Class getClass()
2.方法2:不管是基本类型还是引用类型,都有一个静态成员class
3.方式3:class类中的方法 static Class<?> forName(String className)
className:类的全限定名 — 包名.类名
public class test04 {
    public static void main(String[] args) throws ClassNotFoundException {
//        1.方法1:new对象,调用Object中的方法  Class getClass()
        final Person person = new Person();
        Class class1 = person.getClass();
        System.out.println(class1);
//        2.方法2:不管是基本类型还是引用类型,都有一个静态成员class
        final Class<Person> personClass = Person.class;
        System.out.println(personClass);
//        3.方式3:class类中的方法    static Class<?> forName(String className)
//        className:类的全限定名  --- 包名.类名
        final Class<?> aClass = Class.forName("Unitexc.Person");
        System.out.println(aClass);
    }
}
- 1
- 2
- 3
- 4
- 5
- 6
- 7
- 8
- 9
- 10
- 11
- 12
- 13
- 14
- 15
三种获取Class对象的方式最通用的一种
1.Class.forName(“类的全限定名”)
2.原因:参数为String,可以配合配置文件使用
显然最后一种是常用的,我们进行代码事项,首先在相关包下,建立一个File名为pro.properties
内容为: className=Unitexc.Person
public class test05 {
    public static void main(String[] args) throws IOException, ClassNotFoundException {
        final Properties properties = new Properties();
        final Person person = new Person();
        final FileInputStream in = new FileInputStream("D:\\untitled7\\day21\\src\\pro.properties");
        properties.load(in);
        String className = properties.getProperty("className");
        //System.out.println(className);
        final Class<?> aClass = Class.forName(className);
        System.out.println(aClass);
    }
}
- 1
- 2
- 3
- 4
- 5
- 6
- 7
- 8
- 9
- 10
- 11
- 12
获取Class对象中的构造方法
获取所有public的构造对象
class类中的方法
Constructor<?>[] getConstructors() ----- 获取所有public的构造方法
public class test06 {
    public static void main(String[] args) {
        final Class<Person> personClass = Person.class;
        final Constructor<?>[] constructors = personClass.getConstructors();
        for (Constructor<?> constructor : constructors) {
            System.out.println(constructor);
        }
    }
}
- 1
- 2
- 3
- 4
- 5
- 6
- 7
- 8
- 9
获取空参构造_public
Class类中的方法
Constructor getConstructor(Class<?>… parameterTypes)
parameterTypes:是一个可变参数,可以传递0个或者多个参数,传递的是参数类型的class对象
如果获取空参构造,paramTypes不写了
如果获取有参构造,parameterTypes写参数类型的class对象
Constructor类中的方法
T newInstance(Object…initargs)----- 创建对象
initargs:是一个可变参数,可以传递0个或者多个参数,传递的是实参
如果根据空参构造创建对象,initargs不用写了
如果根据有参构造创建对象,initargs需要写实参
public class test07 {
    public static void main(String[] args) throws NoSuchMethodException, InvocationTargetException, InstantiationException, IllegalAccessException {
        final Class<Person> ac = Person.class;
        final Constructor<Person> constructor = ac.getConstructor();
        final Person person = constructor.newInstance();
        System.out.println(person);
    }
}
- 1
- 2
- 3
- 4
- 5
- 6
- 7
- 8
利用空参构创建对象的快捷方式_public
Class类中的方法
T newInstance() 根据空参构造new对象
前提:
被反射的类中必须又public的空参构造
final Person person1 = ac.newInstance();
System.out.println(person1);
- 1
- 2
利用反射获取有参构造并创建对象_public
Class类中的方法
Class类中的方法
Constructor getConstructor(Class<?>… parameterTypes)
parameterTypes:是一个可变参数,可以传递0个或者多个参数,传递的是参数类型的class对象
如果获取空参构造,paramTypes不写了
如果获取有参构造,parameterTypes写参数类型的class对象
Constructor类中的方法
T newInstance(Object…initargs)----- 创建对象
initargs:是一个可变参数,可以传递0个或者多个参数,传递的是实参
如果根据空参构造创建对象,initargs不用写了
如果根据有参构造创建对象,initargs需要写实参
final Class<Person> personClass = Person.class;
        final Constructor<Person> constructor = personClass.getConstructor(String.class,Integer.class);
        final Person li = constructor.newInstance("李云龙", 35);
        System.out.println(li);
- 1
- 2
- 3
- 4

