
热门标签
热门文章
- 1同步FIFO与异步FIFO的基本原理_同步读指针的意义
- 2Linux中实现dhcp功能_dhcp-4.2.5-27.el7.x86_64.rpm
- 3数字艺术的新里程碑:免费ai绘画工具引领你进入未知领域
- 4科研上新 | 第1期:强可控视频生成;定制化样本检索器;用脑电重建视觉感知;大模型鲁棒性评测_ijwihd
- 5mmap虚拟映射(DMA机制)_dma mmap
- 6MySQL:视图
- 7006-动态代理是基于什么原理?
- 8Stable Diffusion结构解析-以图像生成图像!_stable diffusion unet结构
- 9Android Studio超详细安装教程_as安装教程
- 10使用Android Studio 3.0以及新版Gradle转移旧版项目可能遇到的几个坑_as3.0 使用低版本gradle
当前位置: article > 正文
uniapp 微信小程序axios库的封装及使用_axios-miniprogram-adapter
作者:weixin_40725706 | 2024-03-11 12:09:45
赞
踩
axios-miniprogram-adapter
方式一
第一步:安装axios及适配器
安装依赖
需要注意使用uniapp-vue3版本时axios的版本需要0.26.0以下,建议锁版本
- npm i axios@0.26.0 axios-miniprogram-adapter
- &&
- yarn add axios@0.26.0 axios-miniprogram-adapter
axios-miniprogram-adapter这个依赖主要是适配小程序网络请求的适配器,为了解决uniapp 适配axios请求,避免报adapter is not a function错误
第二步:axios二次封装
在utils文件下新建request.js文件
- // axios二次封装
- // yarn add axios-adapter-uniapp import axiosAdapterUniapp from 'axios-adapter-uniapp'
- import { getToken } from "@/utils/auth";
- import axios from "axios";
- // 小程序axios适配器
- import mpAdapter from "axios-miniprogram-adapter";
- axios.defaults.adapter = mpAdapter;
- import { toast, showConfirm, tansParams } from "@/utils/common";
-
- //根据环境变量获取api地址
- let baseURL = process.env.config[process.env.UNI_SCRIPT].VITE_BASE_API;
- // let evnName = process.env.config[process.env.UNI_SCRIPT] 获取当前处于哪个开发环境
- console.log("baseURL:", baseURL, "++++++++++++++++++++++++");
-
- class HttpRequest {
- constructor() {
- this.baseURL = baseURL; // 从环境变量中获取api地址
- this.timeout = 300000;
- }
- mergeOptions(options) {
- return {
- baseURL,
- timeout: 300000,
- ...options,
- };
- }
- request(options) {
- const instance = axios.create();
- this.setInterceptors(instance);
- const opts = this.mergeOptions(options);
- return instance(opts);
- }
- get(url, data = {}, outHeaders = {}) {
- // console.log(data, "data+++++++++++++");
-
- return this.request({
- dataType: "json",
- method: "get",
- url,
- params: { ...data }, // get参数可以直接展开
- headers: {},
- });
- }
- post(url, data = {}, outHeaders = {}) {
- // 请求体中 {}
- return this.request({
- method: "post",
- url,
- data, // post要求必须传入data属性
- headers: {},
- });
- }
-
- // 设置拦截器
- setInterceptors(instance) {
- // 请求拦截器
- instance.interceptors.request.use((config) => {
- const noLoading = config.headers["NO-LOADING"];
- // 是否需要设置 token
- const isToken = config.headers["ISTOKEN"] || false;
- if (getToken() && isToken) {
- config.header["Authorization"] = `Bearer ${getToken()}`;
- }
- if (!noLoading) {
- uni.showLoading({
- title: "加载中...",
- });
- }
- config.headers = {
- ...config.headers,
- };
- //console.log('config',config)
- return config;
- });
- // 响应拦截器
- instance.interceptors.response.use(
- (res) => {
- const noLoading = res.config.headers["NO-LOADING"];
- if (!noLoading) {
- uni.hideLoading();
- }
- let { data } = res;
- // console.log("请求获取data", data)
- if (data) {
- if (data.code === 200) {
- //console.log('data=============', data)
- return Promise.resolve(data);
- } else {
- showConfirm({
- content: data.msg,
- showCancel: false,
- }).then((res) => {
- /* if (res.confirm) {
- store.dispatch("LogOut").then((res) => {
- uni.reLaunch({ url: "/pages/login" });
- });
- } */
- });
- return Promise.resolve(data);
- }
- }
- },
- (err) => {
- console.log("axios报错", err);
- uni.hideLoading();
- return Promise.reject(err);
- }
- );
- }
- }
-
- export default new HttpRequest();

方式二
在request.js文件中做axios适配,不需要安装axios-miniprogram-adapter适配插件
- // axios二次封装
- import { getToken } from "@/utils/auth";
- import { toast, showConfirm, tansParams } from "@/utils/common";
- //映入axios相关
- import axios from "axios";
- import settle from "axios/lib/core/settle";
- import buildURL from "axios/lib/helpers/buildURL";
- import buildFullPath from "axios/lib/core/buildFullPath"; //解决axios0.19.0以上版本无法请求问题
-
- //根据环境变量获取api地址
- let baseURL = process.env.config[process.env.UNI_SCRIPT].VITE_BASE_API;
- // let evnName = process.env.config[process.env.UNI_SCRIPT] 获取当前处于哪个开发环境
- console.log("baseURL:", baseURL, "++++++++++++++++++++++++");
-
- //解决uniapp 适配axios请求,避免报adapter is not a function错误
- axios.defaults.adapter = function (config) {
- return new Promise((resolve, reject) => {
- const fullurl = buildFullPath(config.baseURL, config.url);
- uni.request({
- method: config.method.toUpperCase(),
- url: buildURL(fullurl, config.params, config.paramsSerializer),
- header: config.headers,
- data: config.data,
- dataType: config.dataType,
- responseType: config.responseType,
- sslVerify: config.sslVerify,
- complete: function complete(response) {
- response = {
- data: response.data,
- status: response.statusCode,
- errMsg: response.errMsg,
- header: response.header,
- config,
- };
-
- settle(resolve, reject, response);
- },
- });
- });
- };
-
- class HttpRequest {
- constructor() {
- this.baseURL = baseURL; // 从环境变量中获取api地址
- this.timeout = 300000;
- }
- // ...上面已贴出封装方式
- }
-
- export default new HttpRequest();
第三步: 创建接口配置js文件
在src目录下创建api文件夹,目录结构如下图
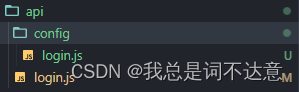
config文件下login.js文件内容
- export default {
- captchaImage: "/captchaImage"
- }
api文件下直接子级login.js文件内容
- import axios from '@/utils/axios'
- import login from './config/login'
-
- // 获取验证码
- export const captchaImageGet = () => axios.get(login.captchaImage)
-
第四步:调取接口
login.vue
- <template>
- <view class="normal-login-container"> </view>
- </template>
-
- <script setup>
- import { captchaImageGet } from '@/api/login'
-
- // 获取图形验证码
- function getCode() {
- captchaImageGet().then((res) => {
- console.log(res, 'res')
- })
- }
-
- //或者
-
- const getCode = async () => {
- let res = await captchaImageGet()
- console.log(res, 'res')
- }
-
- getCode()
- </script>
-
- <style lang="scss">
- </style>
声明:本文内容由网友自发贡献,不代表【wpsshop博客】立场,版权归原作者所有,本站不承担相应法律责任。如您发现有侵权的内容,请联系我们。转载请注明出处:https://www.wpsshop.cn/w/weixin_40725706/article/detail/218980
推荐阅读
相关标签

