
- 1上采样(upsampling)方法总结
- 2深度探究自然语言处理中大模型的微调技术与优化策略
- 3python进行数据预处理的4个重要步骤_机器学习数据预处理流程
- 4程序员迷茫:30岁以上的“大龄程码农”出路在哪?java码农该怎么办?_30岁程序员的出路
- 5Service Weaver:Google开源基于分布式应用程序开发的框架,重新定义微服务边界_google的新框架service weaver
- 6Python基础(十二)——循环语句_循环语句编程python例子
- 7uniapp登陆页面功能_uniapp功能页面
- 8巧用ChatGPT高效搞定Excel数据分析【文末送书】_gpt4可以对于excel文件进行调整 对于文件内部的信息进行整合
- 9使用vue计算斐波那契数列的第n项
- 10说走就走的「Windows」—— Windows To Go 制作详解_wintogo制作教程
HBase实践_habse如何查看值的历史版本
赞
踩
HBase实践
1.下载HBase
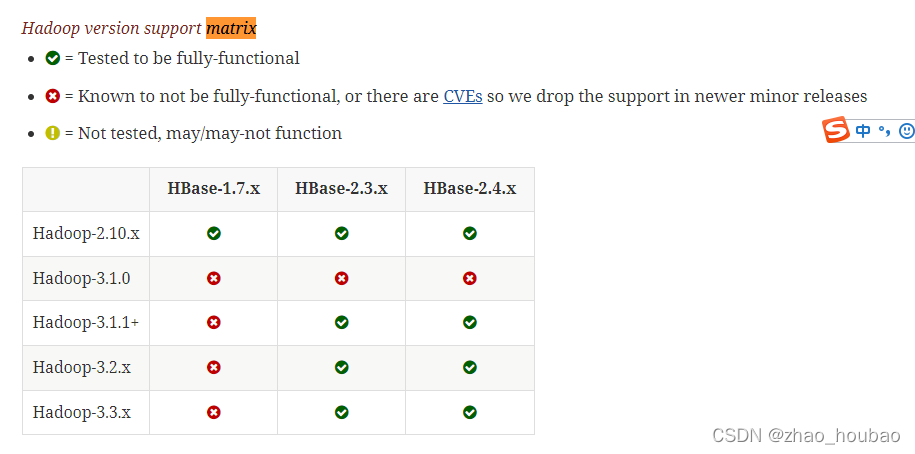
查看版本号对应的java,Hadoop
https://hbase.apache.org/book.html#configuration
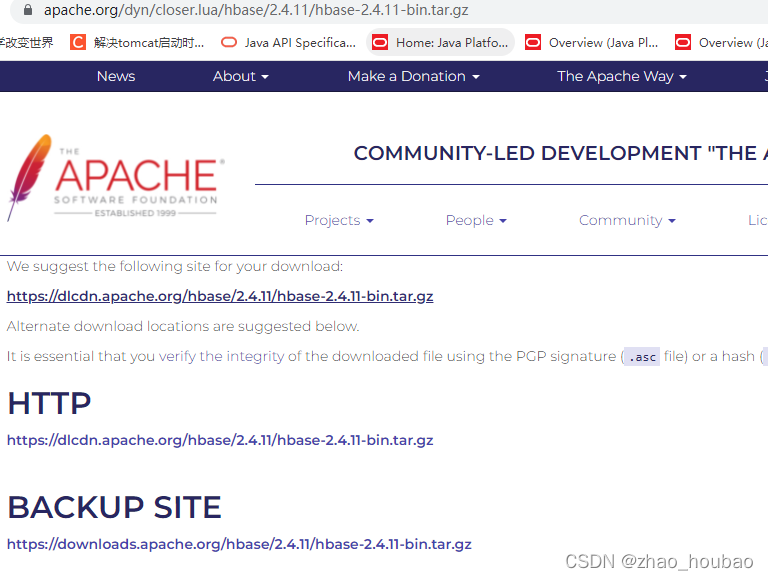
下载地址:https://archive.apache.org/dist/hbase/stable/
我下载的版本是stable版本:


2.HBase2.4.10安装
1.1 解压安装包hbase-2.2.2-bin.tar.gz至路径 /usr/local,命令如下:
cd ~/Downloads/
- 1
解压到/usr/local下
sudo tar -zxf ./hbase-2.4.11-bin.tar.gz -C /usr/local
- 1
- 2
1.2 将解压的文件名hbase-2.4.10改为hbase,以方便使用,命令如下:
cd /usr/local
- 1
sudo mv ./hbase-2.4.11 ./hbase
- 1
下面把hbase目录权限赋予给当前用户:houbao更改为当前用户
sudo chown -R houbao ./hbase
- 1
- 2
1.3 配置环境变量
vim ~/.bashrc
- 1
export HADOOP_HOME=/usr/local/hadoop
export HBASE_HOME=/usr/local/hbase#新添加的
export JAVA_HOME=/usr/lib/jvm/jdk1.8.0_321

export SCALA_HOME=/usr/local/scala
export SPARK_HOME=/usr/local/spark

export JRE_HOME=${JAVA_HOME}/jre

export CLASSPATH=.:${JAVA_HOME}/lib:${JRE_HOME}/lib
#新修改的
export PATH=${JAVA_HOME}/bin:${SCALA_HOME}/bin:${SPARK_HOME}/bin:${HADOOP_HOME}/bin:${HADOOP_HOME}/sbin:${HBASE_HOME}/bin:$PATH
- 1
- 2
- 3
- 4
- 5
- 6
- 7
- 8
- 9
- 10
- 11
- 12
编辑完成后,再执行source命令使上述配置在当前终端立即生效,命令如下:
source ~/.bashrc
- 1
1.4查看HBase版本,确定hbase安装成功,命令如下:
hbase version
- 1
3.HBase配置(伪分布)
1.配置/usr/local/hbase/conf/hbase-env.sh。命令如下:
sudo vim /usr/local/hbase/conf/hbase-env.sh
- 1
配置JAVA_HOME,HBASE_CLASSPATH,HBASE_MANAGES_ZK.
HBASE_CLASSPATH设置为本机HBase安装目录下的conf目录(即/usr/local/hbase/conf)
export JAVA_HOME=/usr/lib/jvm/jdk1.8.0_321
export HBASE_MANAGES_ZK=true
export HBASE_DISABLE_HADOOP_CLASSPATH_LOOKUP="true"
- 1
- 2
- 3
- 4
2.配置/usr/local/hbase/conf/hbase-site.xml
用命令vi打开并编辑hbase-site.xml,命令如下:
sudo vim /usr/local/hbase/conf/hbase-site.xml
- 1
修改hbase.rootdir,指定HBase数据在HDFS上的存储路径;将属性hbase.cluter.distributed设置为true。假设当前Hadoop集群运行在伪分布式模式下,在本机上运行,且NameNode运行在9000端口。
 <configuration>
     <property>
  <name>hbase.rootdir</name>
  <value>hdfs://localhost:9000/hbase</value>
</property>
        <property>
        <name>hbase.tmp.dir</name>
        <value>/usr/local/hbase/tmp</value>
    </property>
        <property>
                <name>hbase.cluster.distributed</name>
                <value>true</value>
        </property>
        <property>
        <name>hbase.unsafe.stream.capability.enforce</name>
        <value>false</value>
    </property>
</configuration>

- 1
- 2
- 3
- 4
- 5
- 6
- 7
- 8
- 9
- 10
- 11
- 12
- 13
- 14
- 15
- 16
- 17
- 18
- 19
hbase.rootdir指定HBase的存储目录;hbase.cluster.distributed设置集群处于分布式模式.
另外,上面配置文件中,hbase.unsafe.stream.capability.enforce这个属性的设置,是为了避免出现启动错误。也就是说,如果没有设置hbase.unsafe.stream.capability.enforce为false,那么,在启动HBase以后,会出现无法找到HMaster进程的错误,启动后查看系统启动日志(/usr/local/hbase/logs/hbase-hadoop-master-ubuntu.log),会发现如下错误:
2020-01-25 15:04:56,916 ERROR [master/localhost:16000:becomeActiveMaster] master.HMaster: Failed to become active master
java.lang.IllegalStateException: The procedure WAL relies on the ability to hsync for proper operation during component failures, but the underlying filesystem does not support doing so. Please check the config value of 'hbase.procedure.store.wal.use.hsync' to set the desired level of robustness and ensure the config value of 'hbase.wal.dir' points to a FileSystem mount that can provide it.
- 1
- 2
3.接下来测试运行HBase
启动hadoop
start-dfs.sh
- 1
输入命令jps,能看到NameNode,DataNode和SecondaryNameNode都已经成功启动,表示hadoop启动成功,截图如下:

第二步:切换目录至/usr/local/hbase(如果按照我的要求配置了环境变量,可以不切换);再启动HBase.命令如下:
start-hbase.sh
- 1

选择yes
输入jps

进入shell界面
hbase shell
- 1
今天关闭HBase时,输入stop-hbase.sh一直处于等待状态
解决方法:
先输入
hbase-daemon.sh stop master
hbase-daemons.sh stop regionserver
- 1
- 2
再输入:stop-hbase.sh就可以关闭HBase集群了。
二、 编程实践
1. 利用Shell命令
1.1 HBase中创建表
HBase中用create命令创建表,具体如下:进入shell
hbase shell
- 1
create 'student','Sname','Ssex','Sage','Sdept','course'
- 1
报错
ERROR: KeeperErrorCode = NoNode for /hbase/master
- 1
端口对应起来:9000
ERROR: org.apache.hadoop.hbase.ipc.ServerNotRunningYetException: Server is not running yet
原因是由于hadoop的安全模式打开了,解决方法:
hdfs dfsadmin -safemode leave
hdfs dfsadmin -safemode leave
- 1

搜了一圈,有人说是Hadoop版本3.3.x高了导致的兼容问题,要么就是hdfs进入安全模式了,但是实际上通过对hbase/conf/hbase-env.sh修改,去掉注释export HBASE_DISABLE_HADOOP_CLASSPATH_LOOKUP="true"后,可以再试试,成功执行。
————————————————
版权声明:本文为CSDN博主「网名很难取诶」的原创文章,遵循CC 4.0 BY-SA版权协议,转载请附上原文出处链接及本声明。
原文链接:https://blog.csdn.net/u011946741/article/details/122477894

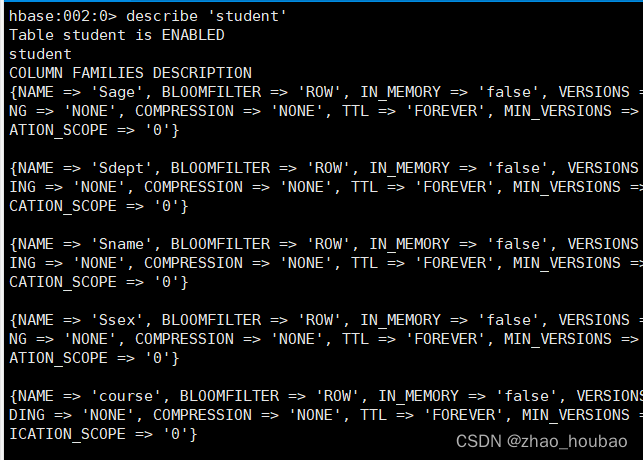
1.1.1查看表
describe 'student'
- 1
1.2 HBase数据库基本操作
- 添加数据
put 'student','95001','Sname','LiYing'
put 'student','95001','course:math','80'
- 1
- 2
2.删除数据
delete 'student','95001','Ssex'
- 1
查验
get 'student','95001'
- 1
\2. deleteall命令
deleteall 'student','95001'
- 1
\2. scan命令
scan 'student'
- 1
- 删除表
删除表有两步,第一步先让该表不可用,第二步删除表。
disable 'student'
drop 'student'
- 1
- 2
1.3 查询表历史数据
查询表的历史版本,需要两步。
1、在创建表的时候,指定保存的版本数(假设指定为5)
create 'teacher',{NAME=>'username',VERSIONS=>5}
- 1
2、插入数据然后更新数据,使其产生历史版本数据,注意:这里插入数据和更新数据都是用put命令
put 'teacher','91001','username','Mary'
put 'teacher','91001','username','Mary1'
put 'teacher','91001','username','Mary2'
put 'teacher','91001','username','Mary3'
put 'teacher','91001','username','Mary4'
put 'teacher','91001','username','Mary5'
- 1
- 2
- 3
- 4
- 5
- 6
3、查询时,指定查询的历史版本数。默认会查询出最新的数据。(有效取值为1到5)
get 'teacher','91001',{COLUMN=>'username',VERSIONS=>5}
- 1
1.4 退出HBase数据库表操作
最后退出数据库操作,输入exit命令即可退出,注意:这里退出HBase数据库是退出对数据库表的操作,而不是停止启动HBase数据库后台运行。
exit
- 1
HBase Java API编程实践
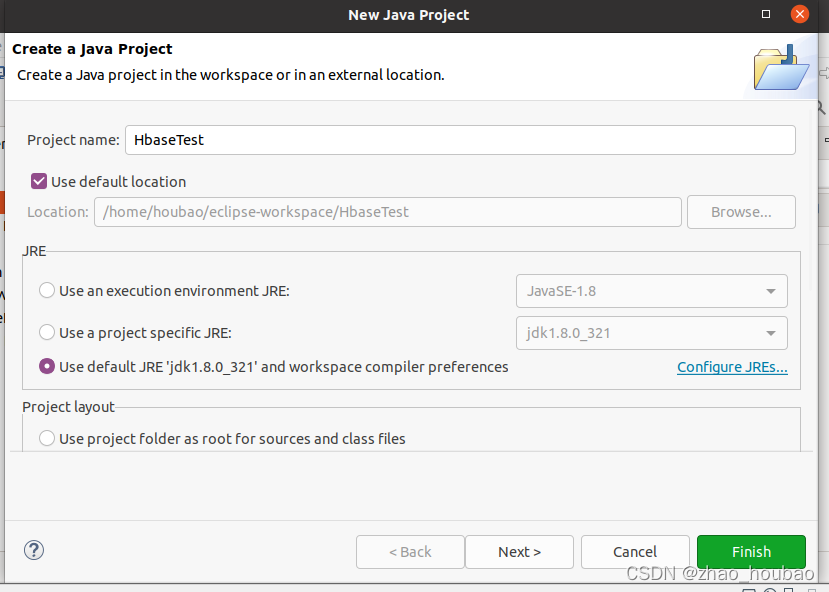
创建HBase项目:
创建包:
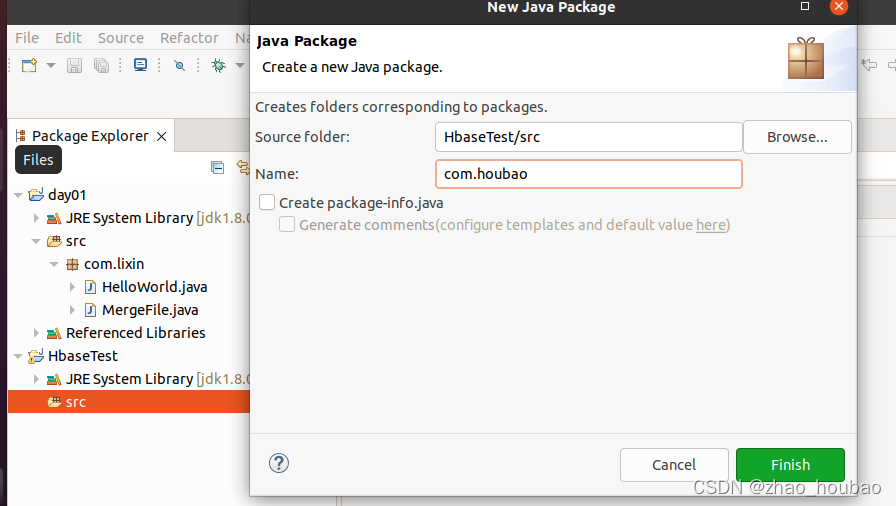
new class文件ExampleForHBase

源码:
package com.houbao;

import org.apache.hadoop.conf.Configuration;
import org.apache.hadoop.hbase.*;
import org.apache.hadoop.hbase.client.*;
import org.apache.hadoop.hbase.util.Bytes;

import java.io.IOException;
public class ExampleForHBase {
    public static Configuration configuration;
    public static Connection connection;
    public static Admin admin;
    public static void main(String[] args)throws IOException{
        init();
        createTable("student",new String[]{"score"});
        insertData("student","zhangsan","score","English","69");
        insertData("student","zhangsan","score","Math","86");
        insertData("student","zhangsan","score","Computer","77");
        getData("student", "zhangsan", "score","English");
        close();
    }

    public static void init(){
        configuration  = HBaseConfiguration.create();
        configuration.set("hbase.rootdir","hdfs://localhost:9000/hbase");
        try{
            connection = ConnectionFactory.createConnection(configuration);
            admin = connection.getAdmin();
        }catch (IOException e){
            e.printStackTrace();
        }
    }

    public static void close(){
        try{
            if(admin != null){
                admin.close();
            }
            if(null != connection){
                connection.close();
            }
        }catch (IOException e){
            e.printStackTrace();
        }
    }

    public static void createTable(String myTableName,String[] colFamily) throws IOException {
        TableName tableName = TableName.valueOf(myTableName);
        if(admin.tableExists(tableName)){
            System.out.println("talbe is exists!");
        }else {
            TableDescriptorBuilder tableDescriptor = TableDescriptorBuilder.newBuilder(tableName);
            for(String str:colFamily){
                ColumnFamilyDescriptor family =
ColumnFamilyDescriptorBuilder.newBuilder(Bytes.toBytes(str)).build();
                tableDescriptor.setColumnFamily(family);
            }
            admin.createTable(tableDescriptor.build());
        }
    }

    public static void insertData(String tableName,String rowKey,String colFamily,String col,String val) throws IOException {
        Table table = connection.getTable(TableName.valueOf(tableName));
        Put put = new Put(rowKey.getBytes());
        put.addColumn(colFamily.getBytes(),col.getBytes(), val.getBytes());
        table.put(put);
        table.close();
    }

    public static void getData(String tableName,String rowKey,String colFamily, String col)throws  IOException{
        Table table = connection.getTable(TableName.valueOf(tableName));
        Get get = new Get(rowKey.getBytes());
        get.addColumn(colFamily.getBytes(),col.getBytes());
        Result result = table.get(get);
        System.out.println(new String(result.getValue(colFamily.getBytes(),col==null?null:col.getBytes())));
        table.close();
    }
}
- 1
- 2
- 3
- 4
- 5
- 6
- 7
- 8
- 9
- 10
- 11
- 12
- 13
- 14
- 15
- 16
- 17
- 18
- 19
- 20
- 21
- 22
- 23
- 24
- 25
- 26
- 27
- 28
- 29
- 30
- 31
- 32
- 33
- 34
- 35
- 36
- 37
- 38
- 39
- 40
- 41
- 42
- 43
- 44
- 45
- 46
- 47
- 48
- 49
- 50
- 51
- 52
- 53
- 54
- 55
- 56
- 57
- 58
- 59
- 60
- 61
- 62
- 63
- 64
- 65
- 66
- 67
- 68
- 69
- 70
- 71
- 72
- 73
- 74
- 75
- 76
- 77
- 78
- 79
java compiler 更改为1.8

增加jar包:“Add External JARs…”按钮。
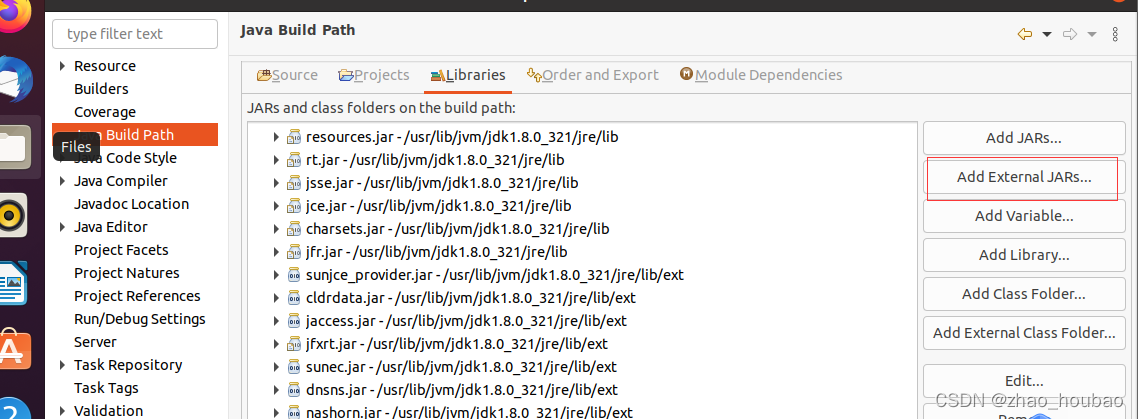
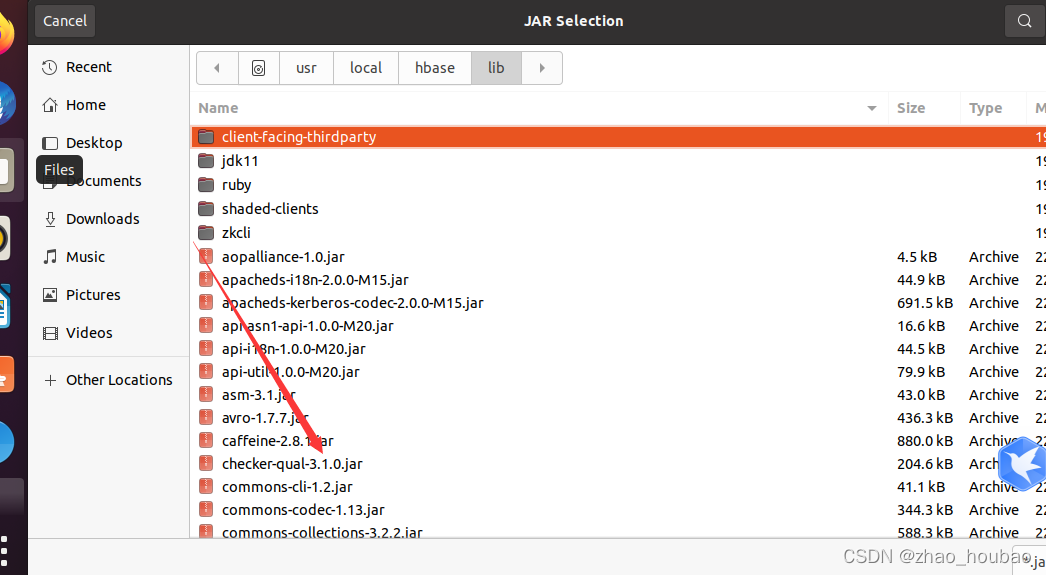
1,进入到“/usr/local/hbase/lib”目录,选中该目录下的所有jar文件(注意,不要选中client-facing-thirdparty、ruby、shaded-clients和zkcli这四个目录),然后,点击界面底部的“OK”按钮。
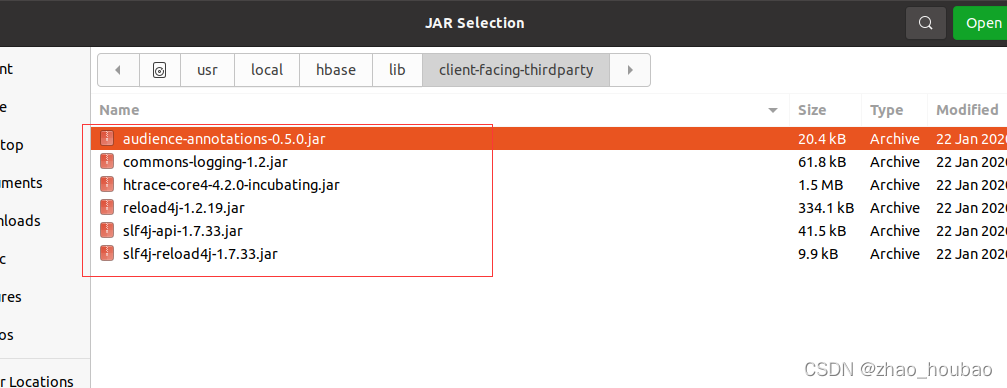
2.然后,在“JAR Selection”界面中(如下图所示),点击进入到“client-facing-thirdparty”目录下。
run as java application
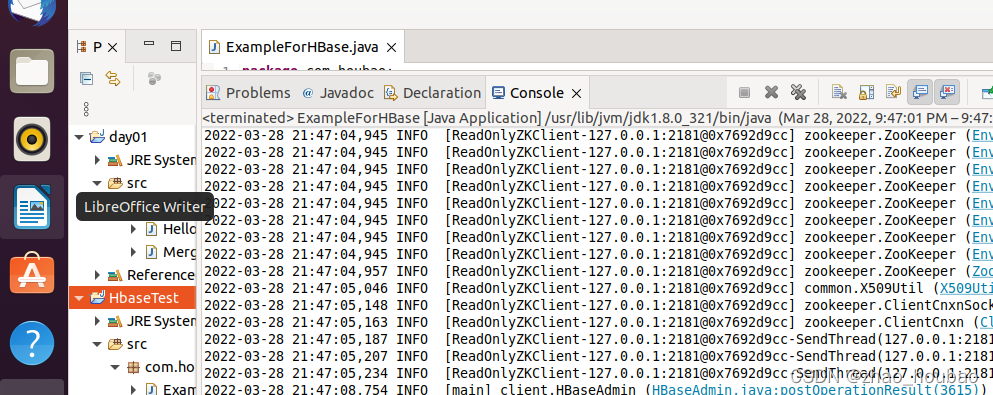
程序运行成功以后,如下图所示,会在运行结果中出现“69”。
- 1
这时,可以到HBase Shell交互式环境中,使用如下命令查看student表是否创建成功:
- 1
hbase> list
- 1
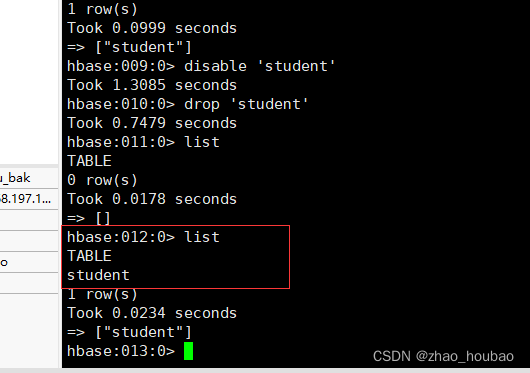
再在HBase Shell交互式环境中,使用如下命令查看student表中的数据:

hbase> scan ‘student’
- 1

关闭HBASE->关闭Hadoop
stop-hbase.sh
- 1

查看进程
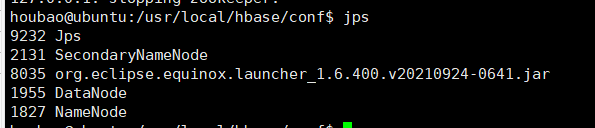
关闭Hadoop
stop-dfs.sh
- 1
查看进程
jps
- 1
果中出现“69”。
- 1
这时,可以到HBase Shell交互式环境中,使用如下命令查看student表是否创建成功:
- 1
hbase> list
再在HBase Shell交互式环境中,使用如下命令查看student表中的数据:
hbase> scan ‘student’
- 1
- 2
- 3
- 4
- 5
- 6
关闭HBASE->关闭Hadoop
stop-hbase.sh
- 1
查看进程

关闭Hadoop
stop-dfs.sh
- 1
查看进程
jps
- 1


