当前位置:   article > 正文

小程序图片上传功能_小程序post方式上传图片

小程序post方式上传图片

小程序代码:

UpImages.wxml

<button bindtap='uploadPhoto'>拍照选取照片上传</button>

 简单画一个页面,使用按钮调小程序默认的upload(page, path)方法,默认支持单次上传一张图片,可修改

 Upimages.js

  1. Page({
  2. data: {
  3. imgData: []
  4. },
  5. uploadPhoto() { // 拍摄或从相册选取上传
  6. let that = this;
  7. wx.chooseImage({
  8. count: 1, // 默认9
  9. sizeType: ['compressed'], // 可以指定是原图还是压缩图,默认二者都有
  10. sourceType: ['album', 'camera'], // 可以指定来源是相册还是相机,默认二者都有
  11. success(res) {
  12. let tempFilePaths = res.tempFilePaths; // 返回选定照片的本地路径列表
  13. that.upload(that, tempFilePaths);
  14. }
  15. })
  16. },
  17. upload(page, path) { // 上传图片
  18. wx.showToast({
  19. icon: "loading",
  20. title: "正在上传……"
  21. });
  22. wx.uploadFile({
  23. url: '', //本地后端接口
  24. filePath: path[0],
  25. name: 'file',
  26. header: {
  27. "Content-Type": "multipart/form-data" //必须是multipart/form-data格式才能上传文件
  28. },
  29. formData: {
  30. //和服务器约定的token, 一般也可以放在header中
  31. 'session_token': wx.getStorageSync('session_token')
  32. },
  33. success(res) {
  34. console.log(res)
  35. if (res.statusCode != 200) {
  36. wx.showModal({
  37. title: '提示',
  38. content: '上传失败',
  39. showCancel: false
  40. });
  41. return;
  42. } else {
  43. wx.showModal({
  44. title: '提示',
  45. content: '上传成功',
  46. success: function (res) {
  47. if (res.confirm) { //这里是点击了确定以后
  48. console.log('用户点击确定')
  49. wx.navigateTo({
  50. url: "../index/index" //这里是上传成功后确定返回页面
  51. })
  52. } else { //这里是点击了取消以后
  53. console.log('用户点击取消')
  54. wx.navigateTo({
  55. url: "../index/index" //这里是上传成功后取消返回页面
  56. })
  57. }
  58. }
  59. })
  60. }
  61. },
  62. fail(e) {
  63. wx.showModal({
  64. title: '提示',
  65. content: '上传失败',
  66. showCancel: false
  67. });
  68. },
  69. complete() {
  70. wx.hideToast(); //隐藏Toast
  71. }
  72. })
  73. }
  74. })

 后端接收

我目前使用的是SSM框架,需要在springmvc.xml添加配置

 springmvc.xml

  1. <!-- 配置文件上传相关 -->
  2. <!--配置文件解析器对象,有了它就可以进行文件上传-->
  3. <!-- 配置文件解析器-->
  4. <!-- 此处id为固定写法,不能随便取名-->
  5. <bean id="multipartResolver" class="org.springframework.web.multipart.commons.CommonsMultipartResolver">
  6. <property name="maxUploadSize" value="1048576"></property>
  7. </bean>

 Controller层代码

  1. //接收小程序上传的图片
  2. @RequestMapping(value = "/upload", method = {RequestMethod.POST, RequestMethod.GET})
  3. @ResponseBody
  4. public String[] uploadfile(MultipartFile[] file, HttpServletRequest request) {
  5. //本地服务器图片文件地址
  6. String dir = "D:\\images";
  7. String[] b = null;
  8. for (MultipartFile files : file) {
  9. String filename = files.getOriginalFilename();
  10. String suffix = filename.substring(filename.lastIndexOf("."));
  11. String path = filename;
  12. //创建要保存文件的路径
  13. String time = new Date().getTime() + "." + suffix;
  14. String[] a = {path, time};
  15. File dirFile = new File(dir, time);
  16. if (!dirFile.exists()) {
  17. dirFile.mkdirs();
  18. }
  19. try {
  20. //将文件写入创建的路径
  21. files.transferTo(dirFile);
  22. return a;
  23. } catch (IOException e) {
  24. e.printStackTrace();
  25. }
  26. }
  27. return b;
  28. }

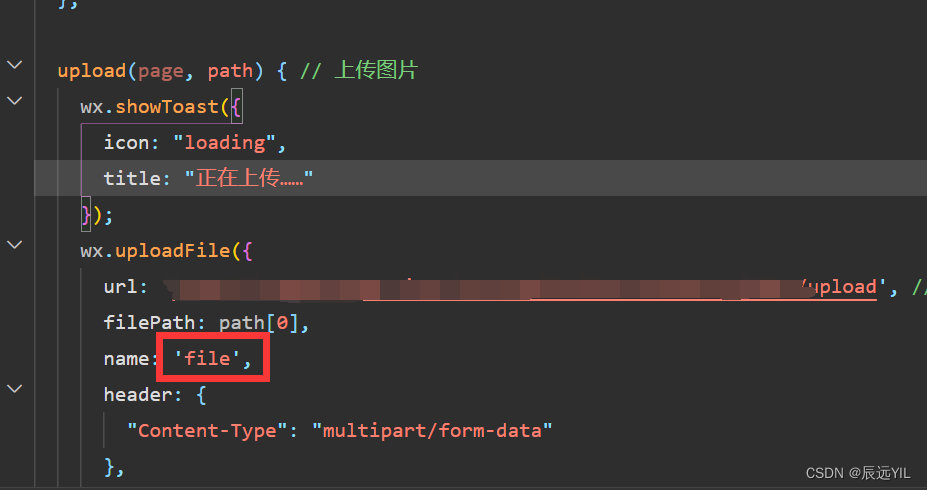
 记得最重要的一点:小程序的名称file和后台Controller接收的名称file必须一致才能把图片传输到后台

声明:本文内容由网友自发贡献,版权归原作者所有,本站不承担相应法律责任。如您发现有侵权的内容,请联系我们。转载请注明出处:【wpsshop博客】
推荐阅读
相关标签
  

闽ICP备14008679号