
热门标签
热门文章
- 1Flutter的TabController和bottomNavigationBar组合使用_flutter tabcontroller
- 2mysql 查询空格_mysql查询字段中带空格的值的sql语句
- 3GPU并行编程方法_gpu使用vsipl库
- 4【记录一个问题】cuda核函数可能存在栈溢出,导致main()函数退出后程序卡死30秒CUDA...
- 5wget常用命令汇总_使用wget-ssl命令时通过指定网卡设备
- 6[ 目标检测 ] 经典网络模型5——YOLO-v1 详解与复现_yolov1代码复现
- 7Android视角看鸿蒙第五课(module.json5中的各字段含义之deviceTypes,deliveryWithInstall,installationFree)
- 8pytorch 实现图像分类+web部署_pytorch模型部署到web
- 9《代码大全》笔记_代码笔记
- 10VirtualBox7.0|ubuntu22.04|conda23|jupyter notebook集成环境安装配置及国内源更换-保姆级配置教程_ubuntu安装virtualbox7
当前位置: article > 正文
阿里云 MQTT协议 AT指令 ESP8266-01S 数据上下传输_mqtt协议格式 esp8266
作者:Monodyee | 2024-03-17 22:04:49
赞
踩
mqtt协议格式 esp8266
printf重定义资料来自江科大自动化协---<<stm32入门教程>>---<<串口发送+接收>>一节视频讲解
1、调试ESP8266
细节请看b站这个up主的视频阿里云+ESP8266+STM32远程点灯(流程讲解)
阿里云平台配置细节请看10分钟玩转阿里云物联网平台设备接入、管理、运维
这里只记录一下大概内容,方便日后调试。
1、用USB转串口工具连接ESP8266,先调通esp8266到阿里云端的线路(此步在后续调试esp8266时也尤为重要,因为这样不需要反复修改代码反复烧写,只需几个AT指令)
| ESP8266 | USB转串口工具 |
|---|---|
| 3.3 | 3.3 |
| GND | GND |
| TX | RX |
| RX | TX |
注意:有时会出现接线正确发送不出指令的情况,网上查到的原因是,USB转串口工具输出的3.3V电压驱动能力不行,带不动ESP8266,可以更换其他稳定的供电设备,我手边没有万用表,没法测量验证,但是更换电源可以解决此问题;另外官方文件说ESP8266供电电压范围是3.0V-3.6V,我器件尝试接过5V电压,ESP8266没有烧坏,但发热明显,保守期间不要尝试此接法。
| AT | |
| AT+RST | 重启模块 |
| AT+RESTORE | 恢复出厂设置--擦除所有保存在flash中的参数 |
| AT+CWMODE=1 | 设置wifi模式-----AP模式 |
| AT+CIPSNTPCFG=1,8,"ntp1.aliyun.com" | 设置时域和SNTP服务器 |
| AT+CWJAP="wifiname","password" | 连接AP |
| AT+MQTTUSERCFG=0,1,"NULL","username","passwd",0,0,"" | |
| AT+MQTTCLIENTID=0,"ClientId" | |
| AT+MQTTCONN=0,"mqttHostUrl",1883,1 | |
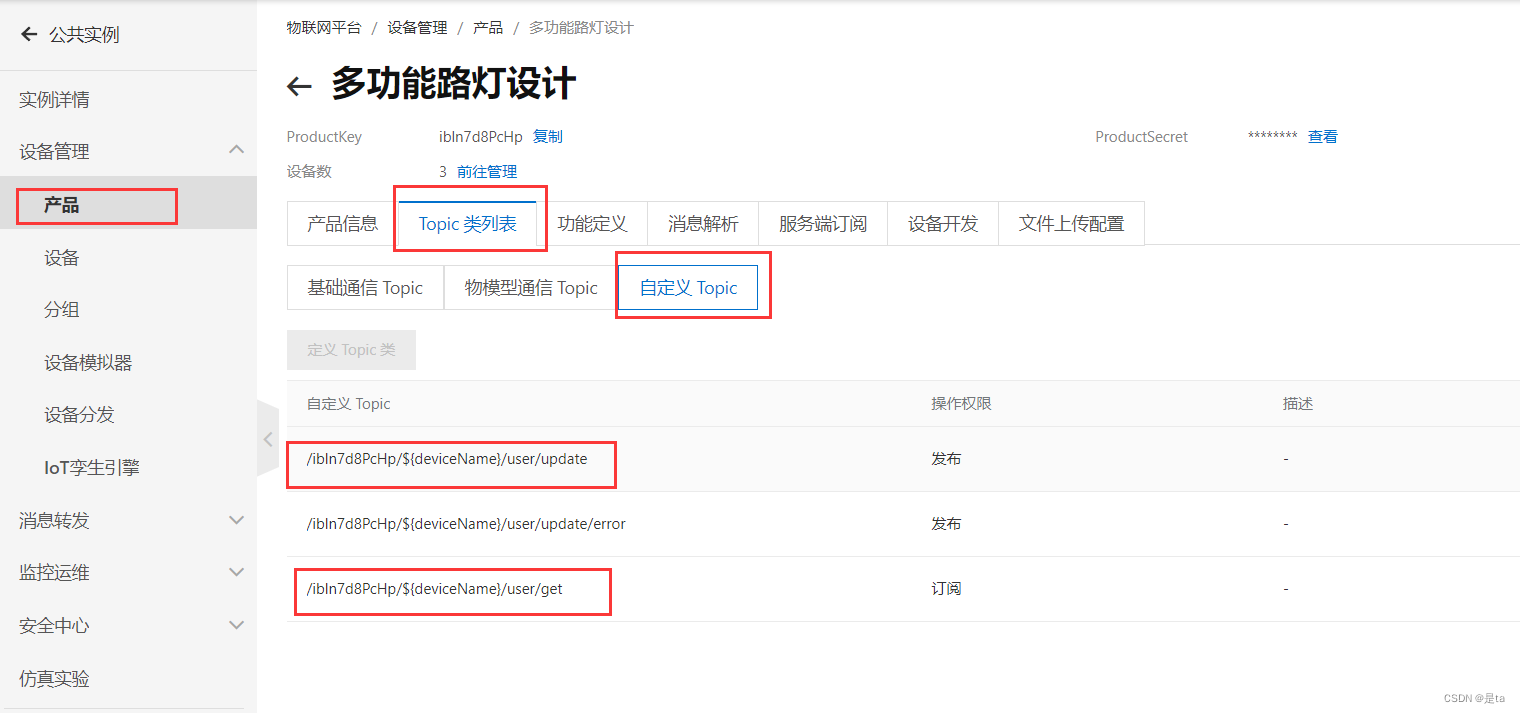
| AT+MQTTSUB=0,"/{ProductKey}/{DeviceName}/user/get",1 | 订阅自定义topic |
| AT+MQTTPUB=0,"/{ProductKey}/{DeviceName}/user/update","{\"temp\":50.5}",1,0 | 发布自定义Topic |
| AT+MQTTSUB=0,"/sys/{ProductKey}/{DeviceName}/thing/service/property/set",1 | 订阅物模型 |
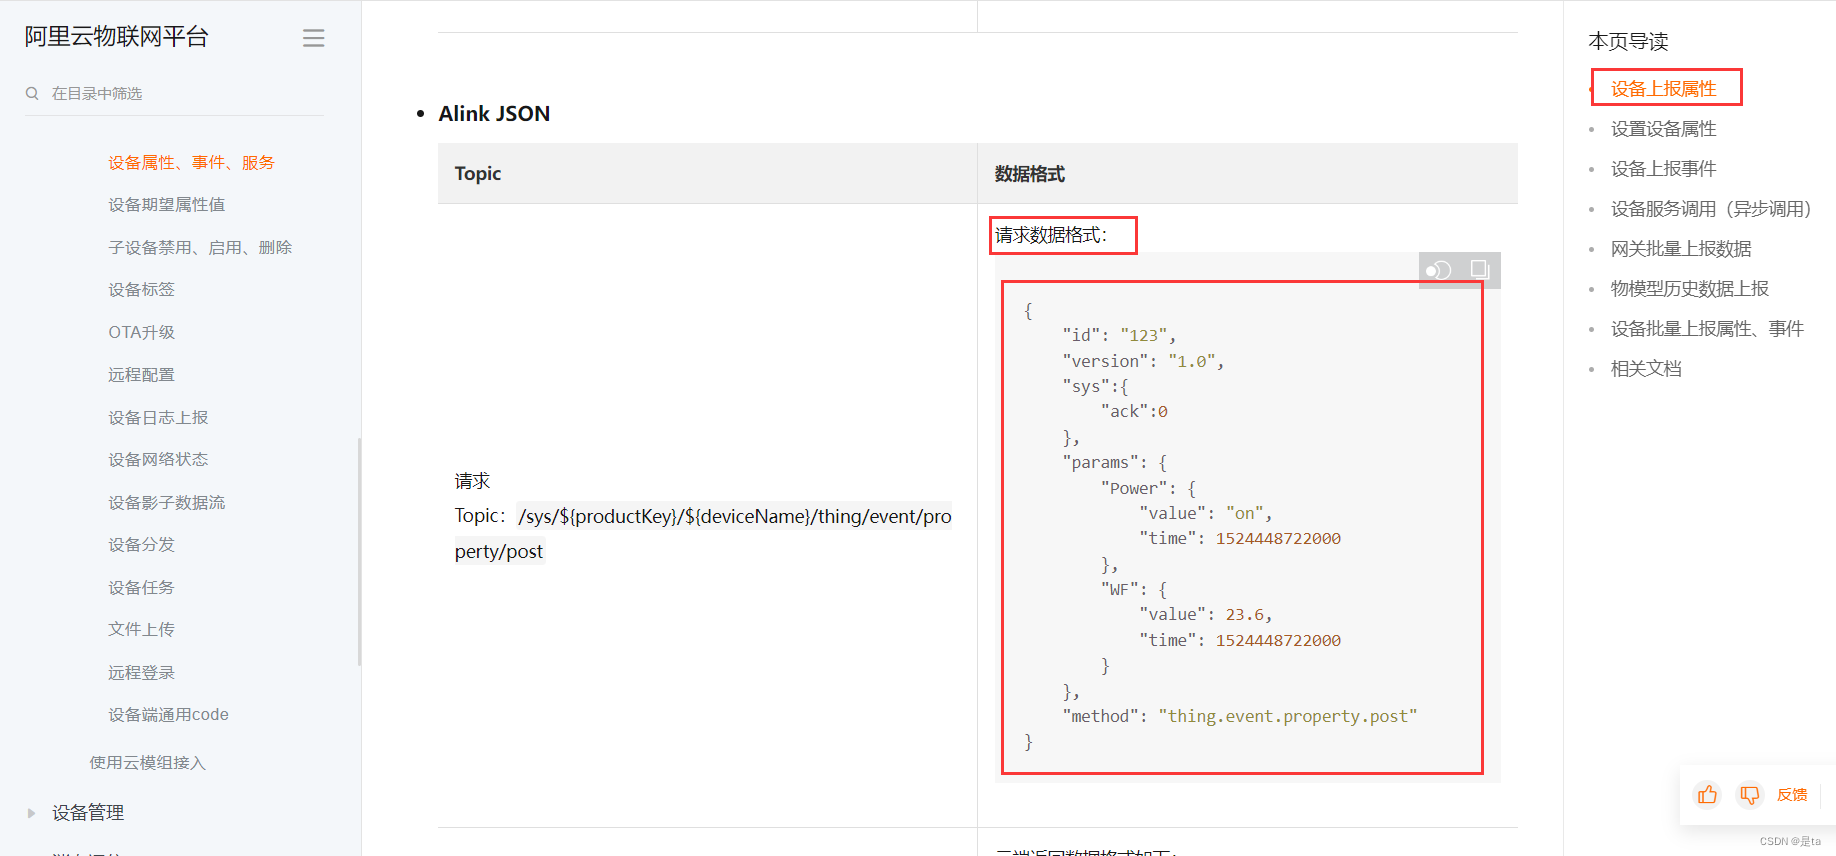
| AT+MQTTPUB=0,"/sys/{ProductKey}/{DeviceName}/thing/event/property/post","{\"params\":{\"EnvironmentTemperature\":35}}",1,0 | 上报设备属性 |
Clientld需要在‘,’之前加转义字符 '\'
例:
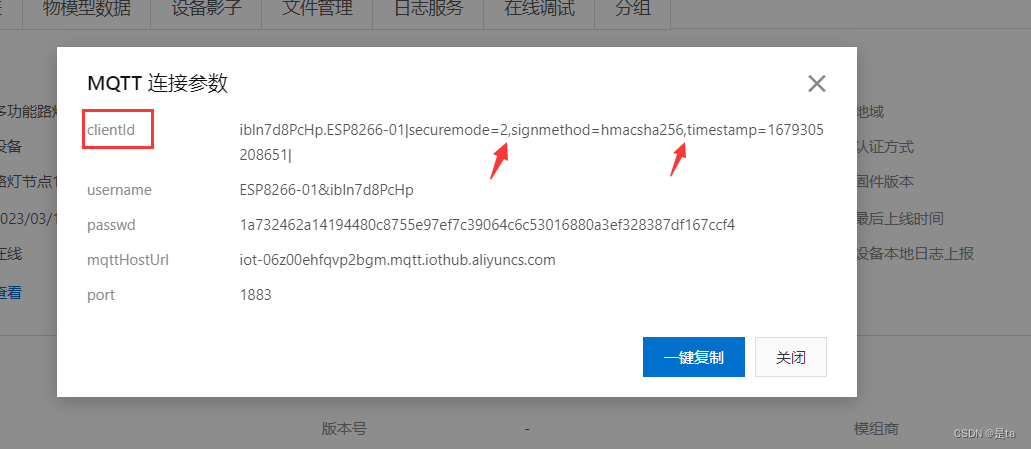
指令中topic:
2、用stm32调试esp8266
| STM32 | ESP8266 | USB转串口工具 |
|---|---|---|
| 3.3 | 3.3 | |
| GND | GND | GND |
| RX | TX | RX |
| TX | RX |
可以使用面包板,对线路进行拓展,将ESP8266的TX同时接到STM32和串口工具的RX引脚,方便使用电脑的串口调试软件观察ESP8266的配置状态,方便调试。
ESP8266的初始化函数(用STM32的串口发送AT指令给ESP8266)
- //初始化ESP8266连接到阿里云函数
- void ESP8266_Init(void)
- {
- OLED_ShowString(1,1,"loading...");
- //1
- Serial_String("AT+RST\r\n");
- ESP_FeedBack(1);
- Delay_ms(2000);
- //2
- Serial_String("AT+RESTORE\r\n");
- ESP_FeedBack(2);
- Delay_ms(2000);
- //3
- Serial_String("AT+CWMODE=1\r\n");
- ESP_FeedBack(3);
- Delay_ms(2000);
- //4
- Serial_String("AT+CIPSNTPCFG=1,8,\"ntp1.aliyun.com\"\r\n");//加转义字符
- ESP_FeedBack(4);
- Delay_ms(3000);
- //5
- Serial_String("AT+CWJAP=\"LAPTOP\",\"asdfghjkl\"\r\n");//加转义字符
- ESP_FeedBack(5);
- Delay_ms(3000);
- //6
- Serial_String("AT+MQTTUSERCFG=0,1,\"NULL\",\"ESP8266-01&ibln7d8PcHp\",\"e0ae924e8007d0259c7a7d31bd3f01fd1bfdc270b8e689fa757e4f23de4cccb4\",0,0,\"\"\r\n");
- ESP_FeedBack(6);
- Delay_ms(5000);
- //7
- Serial_String("AT+MQTTCLIENTID=0,\"ibln7d8PcHp.ESP8266-01|securemode=2\\,signmethod=hmacsha256\\,timestamp=1679206129784|\"\r\n");
- ESP_FeedBack(7);
- Delay_ms(5000);
- //8
- Serial_String("AT+MQTTCONN=0,\"iot-06z00ehfqvp2bgm.mqtt.iothub.aliyuncs.com\",1883,1\r\n");
- ESP_FeedBack(8);
- Delay_ms(5000);
- //9
- // Serial_String("/ibln7d8PcHp/ESP8266-01/user/get\",1\r\n");
- // ESP_FeedBack(9);
- // Delay_ms(5000);
- //10订阅物模型
- Serial_String("AT+MQTTSUB=0,\"/sys/ibln7d8PcHp/ESP8266-01/thing/service/property/set\",1\r\n");
- ESP_FeedBack(9);
- Delay_ms(5000);
-
- }

ESP8266日志接收函数(STM32接收ESP8266发送回来的日志数据,分析数据做出初始化反馈)
- //查看错误反馈函数
- void ESP_FeedBack(uint8_t t)
- {
- Delay_ms(1000);
- if( strstr((const char *)ESP8266_To_Serial,"ERROR") )
- {
- Refresh_DMA();//刷新DMA缓冲区以及计数器
- memset(ESP8266_To_Serial,0,100);//将数组清零
- OLED_ShowString(2,1,"ERR:");
- OLED_ShowNum(2,4+t,t,1);
- }
- }
main.c
- int main(void)
- {
- OLED_Init();
- Serial_Init();//初始化串口2配置
- USART_DMA_Init();//初始化DMA转运USART2_RX配置
- ESP8266_Init();//ESP8266连接服务器
-
- while(1)
- {
- i++;
- //一次发送多个物模型数据
- printf("AT+MQTTPUB=0,\"/sys/ibln7d8PcHp/ESP8266-01/thing/event/property/post\",\"{\\\"params\\\":{\\\"EnvironmentTemperature\\\":%d},\\\"LightLux\\\":%d,\\\"AirSpeed\\\":%d}}\",1,0\r\n",i,i+1,i+2);
-
- //一次发送一个物模型数据
- printf("AT+MQTTPUB=0,\"/sys/ibln7d8PcHp/ESP8266-01/thing/event/property/post\",\"{\\\"params\\\":{\\\"LightLux\\\":%d}}\",1,0\r\n",i);
- // printf("AT+MQTTPUB=0,\"/sys/ibln7d8PcHp/ESP8266-01/thing/event/property/post\",\"{\\\"params\\\":{\\\"LightLux\\\":%d}}\",1,0\r\n",i);
- Delay_ms(10000);//延时10秒
- }
- }
请求数据格式要求:
发送数据时需要使用变量,若直接使用串口发送函数,则不能存在变量,因此解决此问题需要重定义printf函数实现。步骤如下:
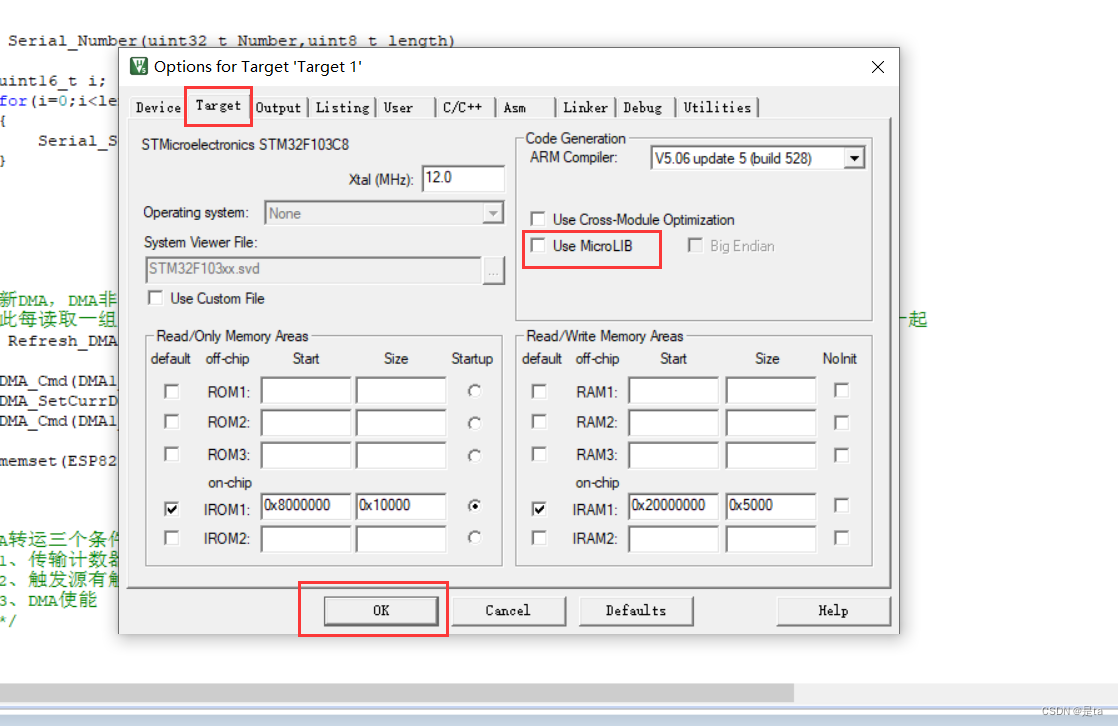
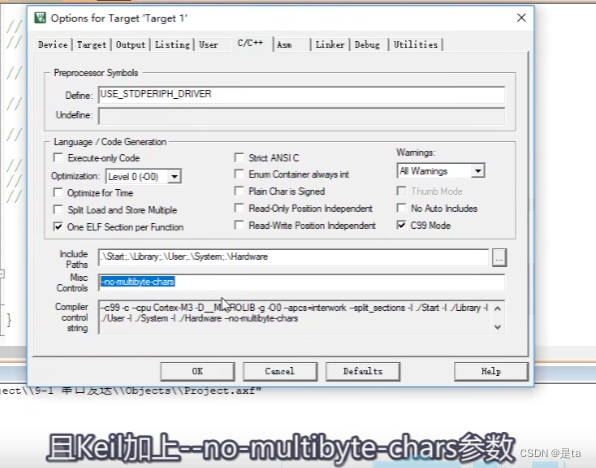
1、在keil中使用printf之前需要线设置一下
2、 打印函数
方法一:重定向printf
将printf打印的东西输出到串口
重写fputc()函数,因为printf函数使用时也是调用fputc函数一个个的打印。fputc函数发送到串口,printf函数自然也就打印输出到了串口
重写fputc函数:
- #include <stdio.h>
-
- int fputc(int ch,FILE *f)
- {
- Serial_SendByte(ch);//这里调用自己写的串口发送字节函数
- return ch;
- }
-
-
- //主函数
- void main(void)
- {
- printf("NUm=%d\n",666);
-
- while(1)
- {
-
- }
-
- }
方法二:用sprintf函数(此处是实现打印到串口的第二种方法)
sprintf函数不需要重定义,因为此函数第一个参数是指定打印位置
sprintf函数作用是把格式化字符输出到一个字符串里
- #include <stdio.h>
-
- char string[100];//定义一个足够大的缓存空间
-
- sprintf(string,"NUM=5d\n",666);//输出到string中
方法三:封装sprintf函数(此方法用到了可变参数列表,记录下来只是学习一下)
- void Serial_printf(char *format,...)
- {
- char string[100];
- va_list arg;//存放可变参数列表的变量
- va_start(arg,format)//从format开始存放参数列表到arg中
- vsprintf(string,format,arg);//打印格式 这里up解释是sprintf只能接收直接写的参数
- va_end(arg);//释放arg空间
- Serial_SendByte(string);//调用自己写的串口发送字节函数
- }
keil修改一下配置
声明:本文内容由网友自发贡献,不代表【wpsshop博客】立场,版权归原作者所有,本站不承担相应法律责任。如您发现有侵权的内容,请联系我们。转载请注明出处:https://www.wpsshop.cn/w/Monodyee/article/detail/258271
推荐阅读
相关标签

