
热门标签
热门文章
- 1Redis 数据类型及其常见使用场景_redis数据类型应用场景
- 2python calendar.isleap_python中calendar
- 3【STM32】步进电机及其驱动(ULN2003驱动28BYJ-48丨按键控制电机旋转)_stm32步进电机
- 4brew无法make python2.7.8_brew install python2.7.8
- 5在使用python中的使用 shapely 时报错_cannot import name lgeos
- 6卷积操作基础----笔记(一)_输入大小为25*25步长为2
- 7开源堡垒机JumpServer远程命令执行漏洞复现
- 8LeetCode 每日一题 Day 202-209
- 9Python爬取天气数据及可视化分析!_python天气数据的爬取与分析
- 10深入了解Redission分布式锁原理以及可重入锁的原理_redission百科
当前位置: article > 正文
对某APP的逆向之旅(1)_游团app逆向
作者:IT小白 | 2024-06-23 16:02:37
赞
踩
游团app逆向
最近在研究游戏辅助相关的技术,因此有了下面的文章。
前面的准备工作,再此就不多介绍了,直接进入主题。
java层代码如下:
    static {
        System.loadLibrary("encode");
    }

    public static int a(Context arg4) {
        if(Thread.currentThread().getName().equals("main")) {
            throw new IllegalStateException("runRootCommand can\'t run on main thread.");
        }

        int v0 = -1;
        try {
            String v1 = String.valueOf(arg4.getFilesDir().getAbsolutePath()) + "/gearcorez";
            String v2 = System.getProperty("os.arch");
            if(v2 != null && !v2.contains("arm")) {
                return v0;
            }

            RootManager.a(arg4, "gearcore", v1);
            RootManager.a(arg4, "speedman", arg4.getFilesDir() + "/libspeedman.so");
            String v0_2 = String.valueOf(arg4.getFilesDir().getAbsolutePath()) + "/gearcore";
            RootManager.decode(arg4.getApplicationContext(), v1, v0_2);
            v0 = RootManager.a(arg4.getApplicationContext(), v0_2);
            ag.a("suc=" + v0);
        }
        catch(IOException v0_1) {
            IOException v1_1 = v0_1;
            v0 = -2;
            v1_1.printStackTrace();
        }

        arg4.deleteFile("gearcore");
        return v0;
    }
- 1
- 2
- 3
- 4
- 5
- 6
- 7
- 8
- 9
- 10
- 11
- 12
- 13
- 14
- 15
- 16
- 17
- 18
- 19
- 20
- 21
- 22
- 23
- 24
- 25
- 26
- 27
- 28
- 29
- 30
- 31
- 32
- 33
可以看到加载了encode动态库,并在函数a(Context arg4)中进行处理。过程为首先通过RootManager.a(, ,)函数进行文件拷贝,然后通过RootManager.decode函数进行解密,最后通过函数RootManager.a(,)运行解密后的文件。
其中函数RootManager.a(, ,)如下:
private static void a(Context arg5, String arg6, String arg7) {
        int v3;
        BufferedInputStream v1 = new BufferedInputStream(arg5.getAssets().open(arg6));
        FileOutputStream v2 = new FileOutputStream(arg7);
        byte[] v0 = new byte[4096];
        try {
            while(true) {
            label_6:
                v3 = v1.read(v0);
                if(v3 != -1) {
                    goto label_14;
                }

                v2.flush();
                break;
            }
        }
        catch(Throwable v0_1) {
            goto label_17;
        }

        v2.close();
        v1.close();
        return;
        try {
        label_14:
            v2.write(v0, 0, v3);
            goto label_6;
        }
        catch(Throwable v0_1) {
        label_17:
            v2.close();
            v1.close();
            throw v0_1;
        }
    }
- 1
- 2
- 3
- 4
- 5
- 6
- 7
- 8
- 9
- 10
- 11
- 12
- 13
- 14
- 15
- 16
- 17
- 18
- 19
- 20
- 21
- 22
- 23
- 24
- 25
- 26
- 27
- 28
- 29
- 30
- 31
- 32
- 33
- 34
- 35
- 36
- 37
将assets中文件拷贝到指定目录中,函数比较简单。
本节,我们主要来分析下解密函数
IDA载入encode动态库文件,来到decode函数处
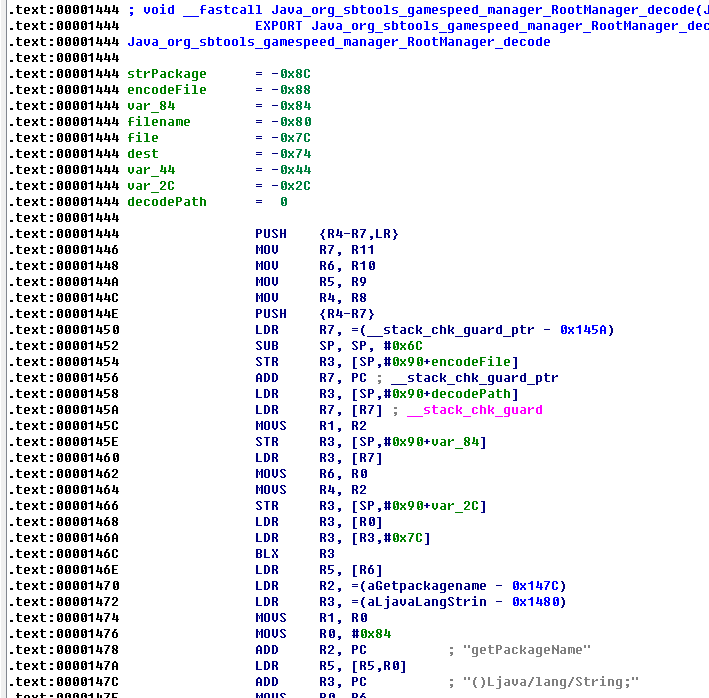
F5,其中参数名和变量名,是我修改过的,这个根据个人习惯,分析时修改即可。
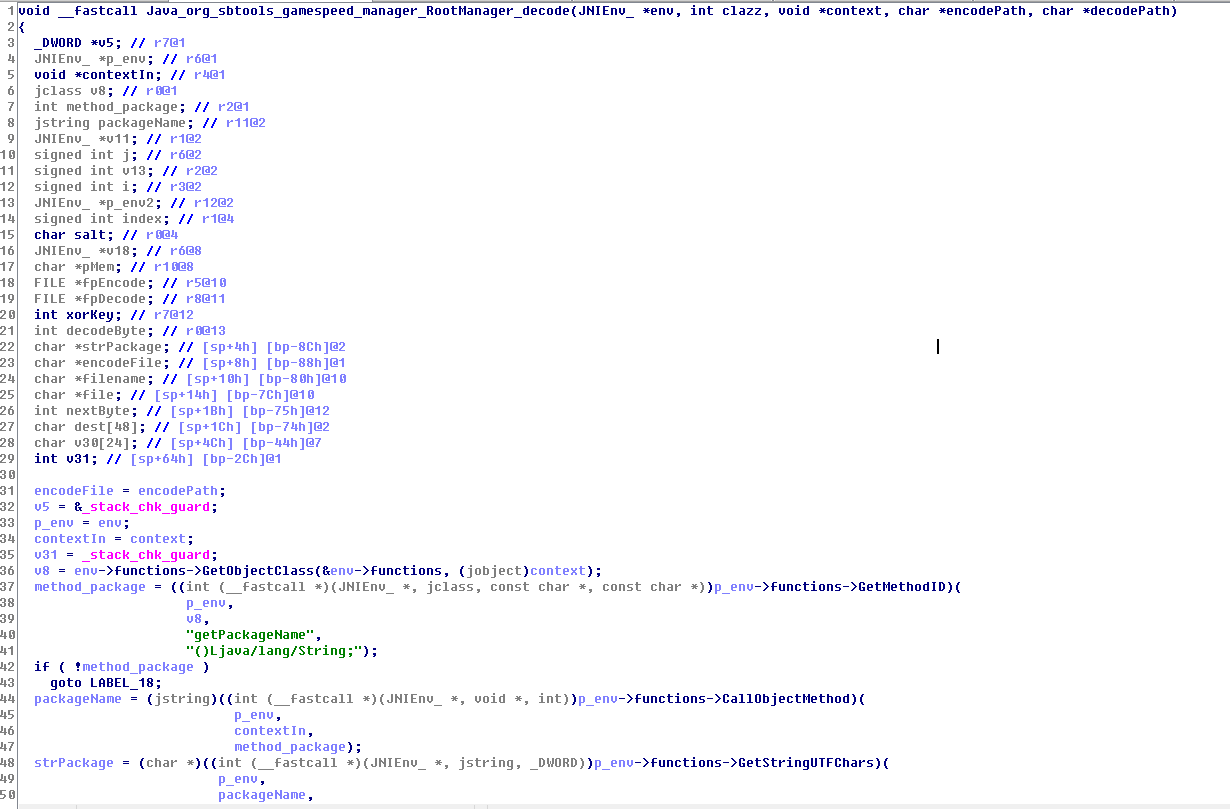
获取包名
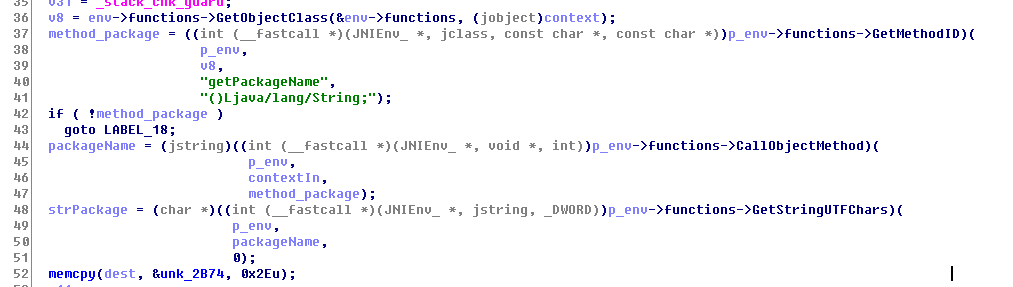
然后,通过一个算法解密字符串,算法如下:
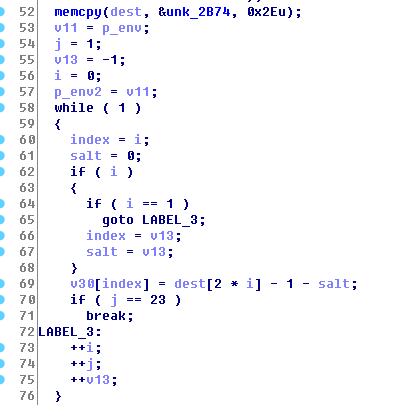
然后,将解密后的字符传和包名比较,根据比较结果,进行文件的解密操作。
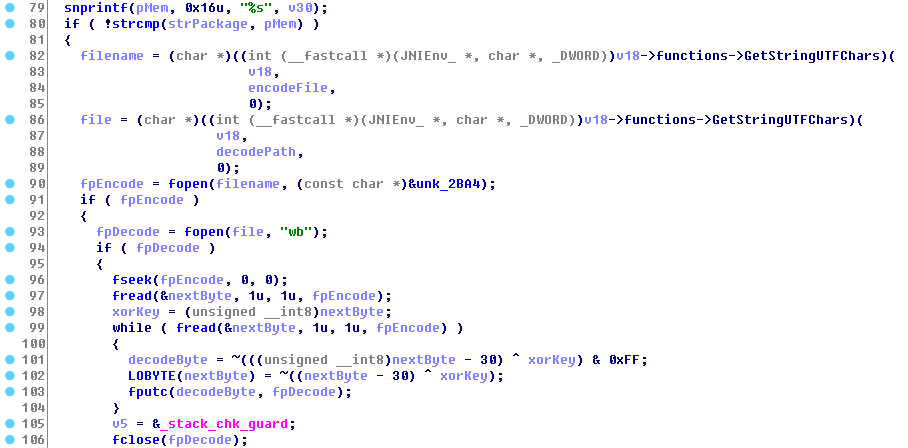
最后,附上算法还原后的代码(我也写到了so文件中),如下:
static unsigned char key[48] = { 0x70,0,0xc8,0,0x74,0,0x6a,0,0x32,0,
                                 0x78,0,0x68,0,0x7b,0,0x77,0,0x78,0,
                                 0x76,0,0x7e,0,0x3a,0,0x74,0,0x6f,0,
                                 0x7c,0,0x75,0,0x84,0,0x82,0,0x78,0,
                                 0x79,0,0x79,0,0x16,0,0};

JNIEXPORT void JNICALL Java_example_com_applications_MainActivity_decode(JNIEnv *env, jobject obj, jobject context, jstring encodePath, jstring decodePath)
{
    char temp[48];
    char decodeKey[24];
    //Context的类
    jclass context_clazz = env->GetObjectClass(context);
    // 得到 getPackageName 方法的 ID
    jmethodID methodId_package = env->GetMethodID(context_clazz, "getPackageName", "()Ljava/lang/String;");
    if (methodId_package != NULL)
    {
        // 获得当前应用的包名
        jstring appPackageName = (jstring)env->CallObjectMethod(context, methodId_package);
        const char* strPackage = env->GetStringUTFChars(appPackageName, 0);
        LOGD("package name: %s", strPackage);
        memcpy(temp, key, 0x2e);

        int value = -1, index = 0, salt = 0;
        for (int i = 0, j = 1; j < 23; ++i, ++j, ++value)
        {
            salt = 0;
            index = i;
            if (i > 0)
            {
                if (i == 1)
                    continue;
                index = value;
                salt = value;
            }

            decodeKey[index] = temp[2 * i] - 1 - salt;
        }

        char* pMem = NULL;
        pMem = (char*)malloc(0x16);
        snprintf(pMem, 0x16, "%s", decodeKey);
        LOGD("decodeKey: %s", decodeKey);

        //简单的保护工作
        if (!strcmp(strPackage, pMem))
        {
            const char* strEncodePath = env->GetStringUTFChars(encodePath, 0);
            const char* strDecodePath = env->GetStringUTFChars(decodePath, 0);
            FILE *fpEncode = fopen(strEncodePath, "rb");
            if (fpEncode)
            {
                FILE *fpDecode = fopen(strDecodePath, "wb");
                if (fpDecode)
                {
                    fseek(fpEncode, 0, 0);
                    uint8_t nextByte;
                    fread(&nextByte, 1, 1, fpEncode);
                    uint8_t xorKey = nextByte;
                    uint8_t decodeByte;

                    while (fread(&nextByte, 1, 1, fpEncode))
                    {
                        decodeByte = ~((nextByte - 30) ^ xorKey) & 0xFF;
                        nextByte = decodeByte;
                        fputc(decodeByte, fpDecode);
                    }

                    fclose(fpDecode);
                    chmod(strDecodePath, 0x1ED);
                }
                fclose(fpEncode);
            }
            remove(strEncodePath);
            env->ReleaseStringUTFChars(encodePath, strEncodePath);
            env->ReleaseStringUTFChars(decodePath, strDecodePath);
            env->ReleaseStringUTFChars(appPackageName, strPackage);
            free(pMem);
        }
        else
        {
            env->ReleaseStringUTFChars(appPackageName, strPackage);
            free(pMem);
        }
    }
}- 1
- 2
- 3
- 4
- 5
- 6
- 7
- 8
- 9
- 10
- 11
- 12
- 13
- 14
- 15
- 16
- 17
- 18
- 19
- 20
- 21
- 22
- 23
- 24
- 25
- 26
- 27
- 28
- 29
- 30
- 31
- 32
- 33
- 34
- 35
- 36
- 37
- 38
- 39
- 40
- 41
- 42
- 43
- 44
- 45
- 46
- 47
- 48
- 49
- 50
- 51
- 52
- 53
- 54
- 55
- 56
- 57
- 58
- 59
- 60
- 61
- 62
- 63
- 64
- 65
- 66
- 67
- 68
- 69
- 70
- 71
- 72
- 73
- 74
- 75
- 76
- 77
- 78
- 79
- 80
- 81
- 82
- 83
- 84
- 85
其中上面解密后的字符串为

分析过程比较简单,仅供娱乐!
声明:本文内容由网友自发贡献,不代表【wpsshop博客】立场,版权归原作者所有,本站不承担相应法律责任。如您发现有侵权的内容,请联系我们。转载请注明出处:https://www.wpsshop.cn/w/IT小白/article/detail/750001
推荐阅读

相关标签

