
- 1Microsoft Office Word导出高清PDF步骤
- 2人工智能在信息系统安全中的运用(1),网络安全实战项目视频_人工智能在信息安全中的实现方式有哪些
- 3解决iTerm中‘zsh-syntax-highlighting‘找不到的问题_plugin 'zsh-syntax-highlighting' not found
- 4NetworkManager的前世今生
- 5Npm常用命令有哪些_npm run dev之前有过命令是?
- 6快速解决浏览器访问http或者不安全https 地址栏出现不安全或者Not secure_chrome not secure
- 7如何连接python和neo4j
- 8十大经典排序算法(全面总结+Java代码实现)_for(int j = 1; j < r; ++j)
- 9基于Python网易云音乐评论数据爬取+清洗+分析可视化 计算机毕业设计(附源码)✅_爬取网易云音乐热评
- 10从零开始学习大模型-第一章-大模型是什么_大模型如何学习
JDBC连接mysql
赞
踩
1、数据库驱动
驱动:声卡、显卡、数据库。
驱动由数据库厂商提供。
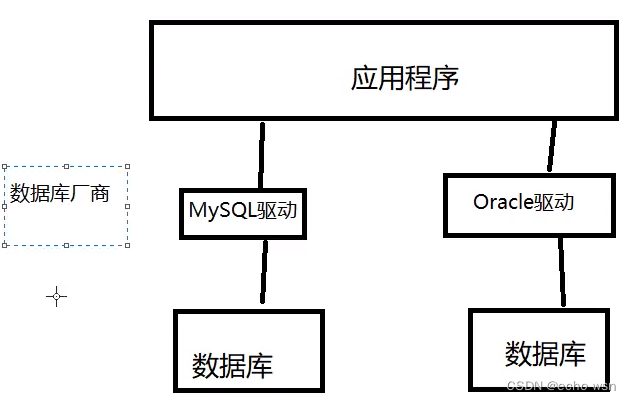
程序会通过数据库驱动和数据库交互。
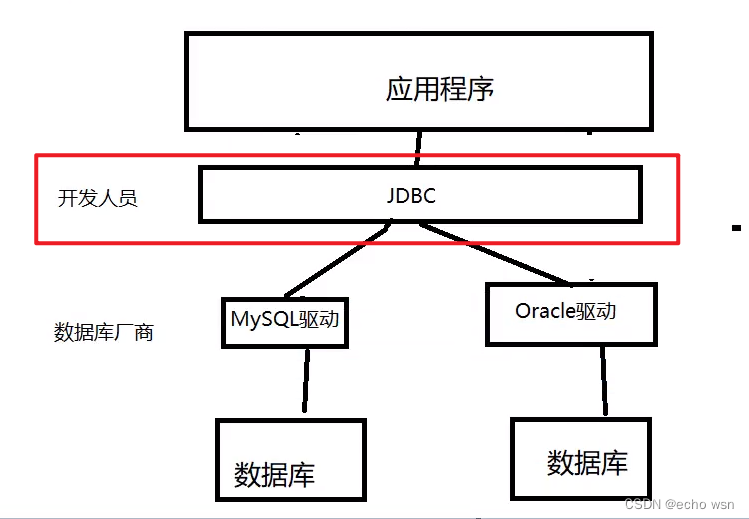
2、JDBC
SUN公司为了简化开发人员的操作(对数据库的统一),提供了一个(java操作数据库的)规范,俗称JDBC。规范的实现由厂商去做。对于开发人员,我们只需要会JDBC即可。
除了java自带的java.sql和javaxsql两个包外,还需要导入mysql-connector-java-5.1.47.jar包
下载地址:MySQL :: Download MySQL Connector/J (Archived Versions)
3、第一个JDBC程序
3.1、创建测试库数据库
- CREATE DATABASE jdbcStudy CHARACTER SET utf8 COLLATE utf8_general_ci;
-
- USE jdbcStudy;
-
- CREATE TABLE users (
- id INT ,
- `name` VARCHAR(40),
- `password` VARCHAR(40),
- `email` VARCHAR(60),
- birthday DATE,
- PRIMARY KEY (`id`)
- )
- INSERT INTO users (`id`,`name`,`password`,`email`,`birthday`)VALUE(1,'zhangsan','123456','zs@sina.com','1980-02-21'),
- (2,'lisi','123456','lisi@sina.com','1980-08-01'),(3,'wangmazi','123456','wangmazi@sina.com','1980-12-12'),(4,'hehe','123456','hehe@sina.com','1980-04-22');
-
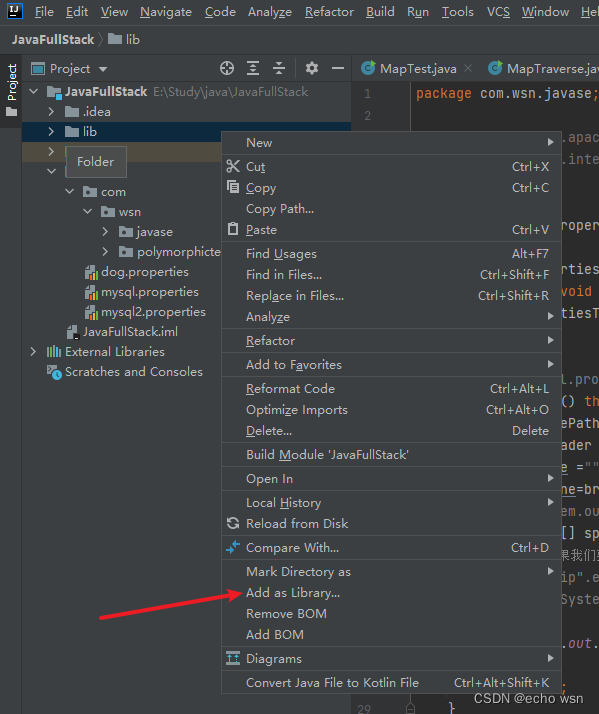
3.2、导入数据库驱动
在项目下建一个lib目录,将jar包粘贴到目录下,然后右键lib目录,选择add as library才算导入。
3.3、编写测试代码
- public class JdbcTest01 {
- public static void main(String[] args) throws SQLException, ClassNotFoundException {
- new JdbcTest01().m1();
- }
- public void m1() throws ClassNotFoundException, SQLException {
- //1.加载驱动
- Class.forName("com.mysql.jdbc.Driver"); //固定写法 背
-
- //2.用户信息和url
- //?userUnicode=true&characterEncoding=utf8&useSSL=true 分别是支持中文编码,设定中文字符集,ssl使用安全的连接
- //ssl这里之所以设置false是因为SQL版本大于connect版本,就要设置成false
- String url ="jdbc:mysql://localhost:3306/jdbcstudy?userUnicode=true&characterEncoding=utf8&useSSL=false"; //固定写法 背
- String username = "root";
- String password = "123456";
-
- //3.连接成功,返回一个数据库对象
- //connection这个对象就代表数据库(jdbcstudy)
- Connection connection = DriverManager.getConnection(url,username,password);
-
- //4.执行sql的对象
- //通过connection对象的createStatement方法创建一个Statement类型的对象
- Statement statement = connection.createStatement();
-
- //5.执行sql的对象去执行sql,可能存在结果,查看返回结果。
- //通过statement对象的executeQuery方法传入sql执行,返回ResultSet类型的结果集。
- String sql="SELECT * FROM users;";
- ResultSet resultSet = statement.executeQuery(sql);//这个结果集封装了我们全部的查询结果
-
- while(resultSet.next()){
- System.out.println(resultSet.getObject("id"));
- System.out.println(resultSet.getObject("name"));
- System.out.println(resultSet.getObject("password"));
- System.out.println(resultSet.getObject("email"));
- System.out.println(resultSet.getObject("birthday"));
- }
-
- //6.释放连接
- //倒着释放资源,最后用的先释放
- resultSet.close();
- statement.close();
- connection.close();
- }
- }

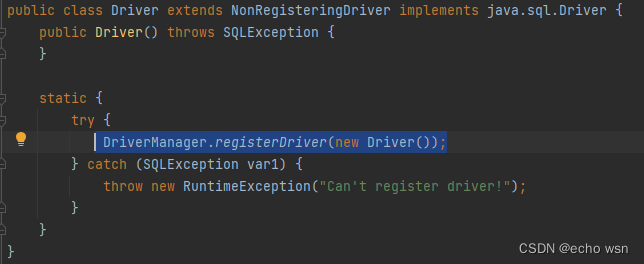
- DriverManager:
- // 原来的写法:DriverManager.registerDriver(new com.mysql.jdbc.Driver);
- // 为什么用Class.forName加载,因为用Class.forName加载实际上就是去加载Driver类的静态代码块,里面就是上面的那个写法,如果用原来的写法,就相当注册(registerDriver)了两次驱动。
- Class.forName("com.mysql.jdbc.Driver"); //固定写法 加载驱动
Driver源码:
- URL
- String url ="jdbc:mysql://localhost:3306/jdbcstudy?userUnicode=true&characterEncoding=utf8&useSSL=false";
-
- //mysql默认端口号3306
- //jdbc:mysql://主机地址:端口号/数据库名?参数1&参数2&参数3
-
- //oracle默认端口号1521
- //jdbc:oracle:thin:@localhost:1521:sid
ssl这里之所以设置false是因为SQL版本大于connect版本,就要设置成false,问题详见:解决Exception in thread “main“ com.mysql.jdbc.exceptions.jdbc4.CommunicationsException: Communications-CSDN博客
- DriverManager
- Connection connection = DriverManager.getConnection(url,username,password);//连接数据库,返回一个数据库对象
-
- //connection代表数据库
- //这个对象可以做:
- //数据库设置自动提交 connection.setAutoCommit()
- //事务提交 connection.commit()
- //事务回滚 connection.rollback()
- Statement(执行sql对象 )
PrepareStatement也是执行sql对象但与前者有区别,后面会说到
- Statement statement = connection.createStatement();//创建一个执行sql对象 Statement
-
- String sql="SELECT * FROM users;";//编写sql
-
- statement.execute(sql);//执行所有sql
- statement.executeQuery(sql);//执行查询sql,返回一个结果集ResultSet
- statement.executeUpdate(sql);//执行更新,插入,删除sql都用这个,返回一个受影响的行数
- statement.executeBatch();//执行批处理sql,多条sql一块
-
- //
- ResultSet(查询sql的结果集:封装了所有的查询结果)
- resultSet.getObject(sql);//在不知道列类型的情况下使用
- //如果知道类型就用指定的类型
- resultSet.getString(sql);
- resultSet.getInt(sql);
- resultSet.getFloat(sql);
- resultSet.getDouble(sql);
- resultSet.getDate(sql);
遍历相关:
- resultSet.next();//下移,并返回当前结果
- resultSet.beforeFirst();//移动到最前面
- resultSet.afterLast();//移动到最后面
- resultSet.previous();//移动到前一行
- resultSet.absolute(row);//移动到指定行
- 释放资源(必须做)
- resultSet.close();
- statement.close();
- connection.close();
4、statement对象
Jdbc中的statement对象用于向数据库发送SQL语句,想完成对数据库的增删改查,只需要通过这个对象向数据库发送增删改查语句即可。
Statement对象的executeUpdate方法,用于向数据库发送增、删、改的sq|语句, executeUpdate执行完后, 将会返回一个整数(即增删改语句导致了数据库几行数据发生了变化)。
Statement.executeQuery方法用于向数据库发生查询语句,executeQuery方法返回代表查询结果的ResultSet对象。
CRUD操作-create
使用executeUpdate(String sql)方法完成数据添加操作,示例操作:
- Statement statement = connection.createStatement();
- String sql = "insert into user(...) values(...)";
- int num = statement.executeUpdate(sql);
- if(num>0){
- System.out.println("插入成功");
- }
CRUD操作-delete
使用executeUpdate(String sql)方法完成数据删除操作,示例操作:
- Statement statement = connection.createStatement();
- String sql = "delete from user where id =1";
- int num = statement.executeUpdate(sql);
- if(num>0){
- System.out.println("删除成功");
- }
CURD操作-read
使用executeUpdate(String sql)方法完成数据查询操作,示例操作:
- Statement statement = connection.createStatement();
- String sql = "select * from user where id =1";
- ResultSet rs= statement.executeQuery(sql);
- if(rs.next()){
- System.out.println("");
- }
5、提取工具类
-
为什么要提取工具类:
因为jdbc从开始连接数据库到最后释放,变的只有中间sql的执行操作,所以将加载驱动,连接数据库等操作提出来可以节省代码。
5.1、具体操作:
-
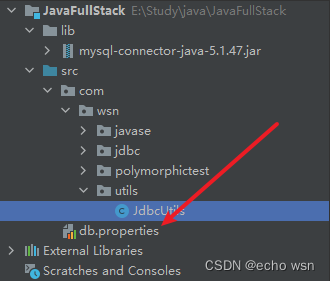
创建一个utils工具包,用于存放项目所有工具类。

-
在utils工具包下面创建JdbcUtils工具类

- public class JdbcUtils {
- private static String driver;
- private static String url;
- private static String username;
- private static String password;
- static {
- try {
- InputStream in = JdbcUtils.class.getClassLoader().getResourceAsStream("db.properties");
- Properties properties = new Properties();
- properties.load(in);
- driver = properties.getProperty("driver");
- url = properties.getProperty("url");
- username = properties.getProperty("username");
- password = properties.getProperty("password");
- //1.驱动只用加载一次,所以放在static下
- Class.forName(driver);
- } catch (IOException | ClassNotFoundException e) {
- e.printStackTrace();
- }
- }
- //2.获取连接
- public static Connection getConnection() throws SQLException {
- return DriverManager.getConnection(url,username,password);
- }
- //3.释放资源 注意顺序
- public static void release(Connection conn, Statement statement, ResultSet resultSet) {
- if (resultSet!=null){
- try {
- resultSet.close();
- } catch (SQLException throwables) {
- throwables.printStackTrace();
- }
- }
- if (statement!=null){
- try {
- statement.close();
- } catch (SQLException throwables) {
- throwables.printStackTrace();
- }
- }
- if (conn!=null){
- try {
- conn.close();
- } catch (SQLException throwables) {
- throwables.printStackTrace();
- }
- }
- }
- }
-
提取配置信息
在这个例子中,为了低耦合,我们也需要将操作数据库的信息提出来到配置信息中方便以后随时更改。
在src目录下创建file为db.properties将数据库相关配置信息保存。
- driver=com.mysql.jdbc.Driver
- url=jdbc:mysql://localhost:3306/jdbcstudy?useUnicode=true&characterEncoding=utf8&useSSL=false
- username=root
- password=123456
5.2、编写增删改查类
在上面我们已经将数据库工具类提取出来,下面我们可以增删改查类也写出来。
- 增
- public class TestInsert {
- public static void main(String[] args) {
- Connection conn= null;
- Statement sta= null;
- ResultSet res= null;
-
- try {
- conn = JdbcUtils.getConnection();//获取连接
- sta = conn.createStatement();//获得sql的执行对象
- String sql = "insert into users(id,`name`,password,email,birthday)value(6,'wangshaonan','123456','hvri1@qq.com','2000.12.21')";
- int i = sta.executeUpdate(sql);
- if (i>0){
- System.out.println("插入成功");
- }
- } catch (SQLException throwables) {
- throwables.printStackTrace();
- }finally {
- JdbcUtils.release(conn,sta,null);
- }
- }
- }
-
- 删
- public class TestDelete {
- public static void main(String[] args) {
- Connection conn =null;
- Statement sta = null;
- try {
- conn = JdbcUtils.getConnection();//连接数据库
- sta = conn.createStatement();
- String sql = "DELETE FROM users WHERE id = 5";
- int i = sta.executeUpdate(sql);
- if (i>0){
- System.out.println("删除成功");
- }
- } catch (SQLException throwables) {
- throwables.printStackTrace();
- }finally {
- JdbcUtils.release(conn,sta,null);
- }
- }
- }
-
- 改
- public class TestUpdate {
- public static void main(String[] args) {
- Connection conn=null;
- Statement sta=null;
- try {
- conn = JdbcUtils.getConnection();
- sta = conn.createStatement();
- String sql = "UPDATE `users` SET `name` = 'zhangzhitao' WHERE id =3";
- int i = sta.executeUpdate(sql);
- if(i>0){
- System.out.println("修改成功");
- }
- } catch (SQLException throwables) {
- throwables.printStackTrace();
- }finally {
- JdbcUtils.release(conn,sta,null);
- }
- }
- }
-
- 查
- public class TestSelect {
- public static void main(String[] args) {
- Connection conn = null;
- Statement sta = null;
- ResultSet res = null;
- try {
- conn = JdbcUtils.getConnection();
- sta = conn.createStatement();
- String sql ="SELECT * FROM `users`";
- res = sta.executeQuery(sql);
- while (res.next()){
- System.out.println(res.getInt("id"));
- System.out.println(res.getString("name"));
- System.out.println(res.getString("password"));
- System.out.println(res.getString("email"));
- System.out.println(res.getString("birthday"));
- }
- } catch (SQLException throwables) {
- throwables.printStackTrace();
- }finally {
- JdbcUtils.release(conn,sta,res);
- }
- }
- }
7、SQL注入的问题
sql注入问题本质就是字符串的拼接。
- public class TestSQL注入问题 {
- public static void main(String[] args) {
- //m1("lisi","123456")正常登录
- //传入'or' 1=1
- // 让sql语句变为SELECT * FROM `users` WHERE `name` = '' OR 1=1 AND `password` = '123456'即可注入获取全部的用户名和密码
- m1(" 'or' 1=1","123456");//sql注入
- }
- public static void m1 (String username,String password){
- Connection conn = null;
- Statement sta = null;
- ResultSet res = null;
- try {
- conn = JdbcUtils.getConnection();
- sta = conn.createStatement();
- String sql ="SELECT * FROM `users` WHERE `name` = '"+username+"' AND `password` = '"+password+"'";
- res = sta.executeQuery(sql);
- while (res.next()){
- System.out.println(res.getString("name"));
- System.out.println(res.getString("password"));
- }
- } catch (SQLException throwables) {
- throwables.printStackTrace();
- }finally {
- JdbcUtils.release(conn,sta,res);
- }
- }
- }
8、PreparedStatement对象
8.1、编写增删改查类
下面四个例子使用的是上面的工具类:
PreparedStatement可以防止SQL注入,原因是把传递进来的参数当作字符,单引号等转义字符直接被转义忽略。
- 增
- public class TestInsertPreparedStatement {
- public static void main(String[] args){
- Connection conn=null;
-
- try {
- conn = JdbcUtils.getConnection();
- String sql = "INSERT INTO `users`(`id`,`name`,`password`,`email`,`birthday`)VALUE(?,?,?,?,?)";
- PreparedStatement sta = conn.prepareStatement(sql);
- sta.setInt(1,6);
- sta.setString(2,"xiaohong");
- sta.setString(3,"123456");
- sta.setString(4,"123455@qq.com");
- sta.setString(5,"1980-12-21");
- int i = sta.executeUpdate();
- if (i>0){
- System.out.println("插入成功");
- }
- } catch (SQLException throwables) {
- throwables.printStackTrace();
- }finally {
- JdbcUtils.release(conn,sta,null);
- }
- }
- }
-
-
- 删
- public class TestDelectPreparedStatement {
- public static void main(String[] args){
- Connection conn=null;
-
- try {
- conn = JdbcUtils.getConnection();
- String sql = "DELETE FROM users WHERE id = ?";
- PreparedStatement sta = conn.prepareStatement(sql);
- sta.setInt(1,6);//第一个参数代表占位符,第二个参数是传入id
- int i = sta.executeUpdate();
- if (i>0){
- System.out.println("删除成功");
- }
- } catch (SQLException throwables) {
- throwables.printStackTrace();
- }finally {
- JdbcUtils.release(conn,sta,null);
- }
- }
- }
-
- 改
- public class TestUpdatePreparedStatement {
- public static void main(String[] args){
- Connection conn=null;
-
- try {
- conn = JdbcUtils.getConnection();
- String sql = "UPDATE `users` SET `name` = ? WHERE id =?";
- PreparedStatement sta = conn.prepareStatement(sql);
- sta.setString(1,"xiaohong");//第一个参数代表占位符,第二个参数是传入username
- sta.setInt(2,5);//第一个参数代表占位符,第二个参数是传入id
- int i = sta.executeUpdate();
- if (i>0){
- System.out.println("修改成功");
- }
- } catch (SQLException throwables) {
- throwables.printStackTrace();
- }finally {
- JdbcUtils.release(conn,sta,null);
- }
- }
- }
-
- 查
- public class TestSelectPreparedStatement {
- public static void main(String[] args){
- Connection conn = null;
- PreparedStatement sta = null;
- ResultSet res =null;
- try {
- conn = JdbcUtils.getConnection();
- String sql = "SELECT * FROM `users` WHERE `name` = ? AND `password` = ?";
- sta = conn.prepareStatement(sql);
- sta.setString(1,"xiaohong");//第一个参数代表占位符,第二个参数是传入id
- sta.setString(2,"123456");//第一个参数代表占位符,第二个参数是传入password
- res = sta.executeQuery();
- while(res.next()){
- System.out.println(res.getString("name"));
- System.out.println(res.getString("password"));
- }
- } catch (Exception throwables) {
- throwables.printStackTrace();
- }finally {
- JdbcUtils.release(conn,sta,res);
- }
- }
- }
-
8.2、将PreparedStatement提取到工具类
配置信息:
- driver=com.mysql.jdbc.Driver
- url=jdbc:mysql://localhost:3306/jdbcstudy?useUnicode=true&characterEncoding=utf8&useSSL=false
- datebase="jdbcstudy"
- username=root
- password=123456
工具类:
- /*
- * 1.这个JDBC工具类包含了数据库的 加载,连接,PreparedStatement的创建,释放资源。
- * 2.PreparedStatement这里用的是预加载的方式,调用时需要传入sql语句,然后set值,然后exe执行语句,可以防止sql注入
- * 3.下面还有注释里的另一个PreparedStatement方法是用new的方式创建对象,返回的也是这个对象,调用注释里的方法只能去执行sql语句,不能预加载
- * */
- public class JdbcUtilsP {
-
- private static String driver;
- private static String url;
- private static String username;
- private static String password;
- private static String datebase;
-
- static {
- try {
-
- InputStream in = JdbcUtils.class.getClassLoader().getResourceAsStream("db.properties");
- Properties properties = new Properties();
- properties.load(in);
-
- driver = properties.getProperty("driver");
- url = properties.getProperty("url");
- username = properties.getProperty("username");
- password = properties.getProperty("password");
- datebase = properties.getProperty("datebase");
-
- //1.驱动只用加载一次,所以放在static下
- Class.forName(driver);
-
- } catch (IOException | ClassNotFoundException e) {
- e.printStackTrace();
- }
- }
- //2.获取连接
- public static Connection getConnection() throws SQLException {
- Connection conn = DriverManager.getConnection(url, username, password);
- return conn;
-
- }
- //3.创建PreparedStatement
- public static com.mysql.jdbc.PreparedStatement getPreparedStatement( String sql) {
- PreparedStatement ps =null;
- try {
- Connection conn = JdbcUtilsP.getConnection();
- ps = conn.prepareStatement(sql);
- } catch (SQLException throwables) {
- throwables.printStackTrace();
- }
- return (com.mysql.jdbc.PreparedStatement) ps;
- }
- // //3.创建PreparedStatement
- // public static com.mysql.jdbc.PreparedStatement getPreparedStatement1() {
- // com.mysql.jdbc.PreparedStatement ps =null;
- // try {
- // ps = new com.mysql.jdbc.PreparedStatement((MySQLConnection) getConnection(),datebase);
- // } catch (SQLException throwables) {
- // throwables.printStackTrace();
- // }finally {
- // return ps;
- // }
- // }
-
- //4.释放资源 注意顺序
- public static void release(Connection conn, PreparedStatement ps, ResultSet resultSet) {
- if (resultSet!=null){
- try {
- resultSet.close();
- } catch (SQLException throwables) {
- throwables.printStackTrace();
- }
- }
- if (ps!=null){
- try {
- ps.close();
- } catch (SQLException throwables) {
- throwables.printStackTrace();
- }
- }
- if (conn!=null){
- try {
- conn.close();
- } catch (SQLException throwables) {
- throwables.printStackTrace();
- }
- }
- }
- }
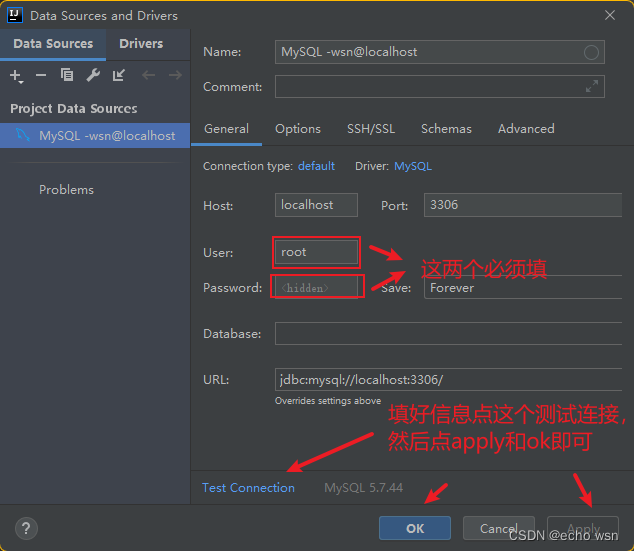
9、使用IDEA连接数据库
1.如图,找到idea右侧侧边栏的Database,依次按图中的顺序操作。

2..如图,弹出对话框,依次按图中的顺序操作。
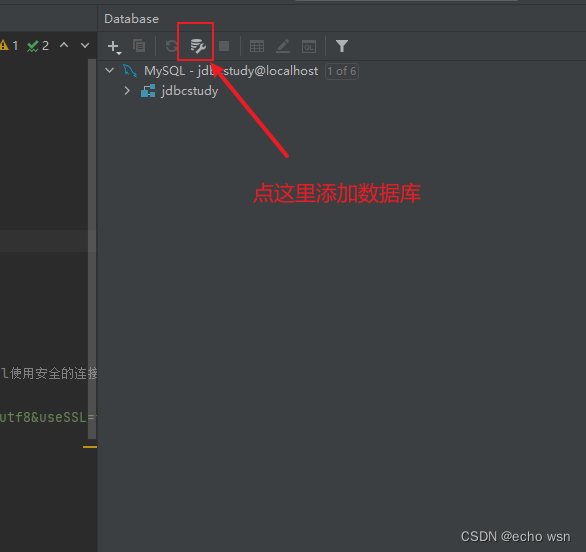
3.如图,如果要添加其他数据库,按图中的顺序操作。
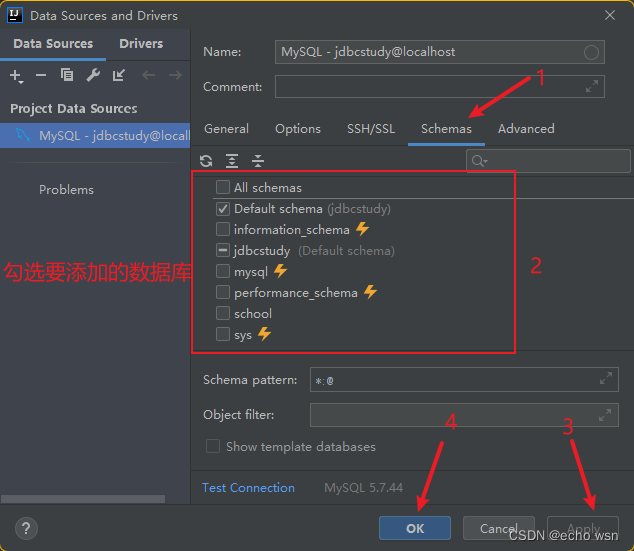
4.如图,弹出对话框,依次按图中的顺序操作。
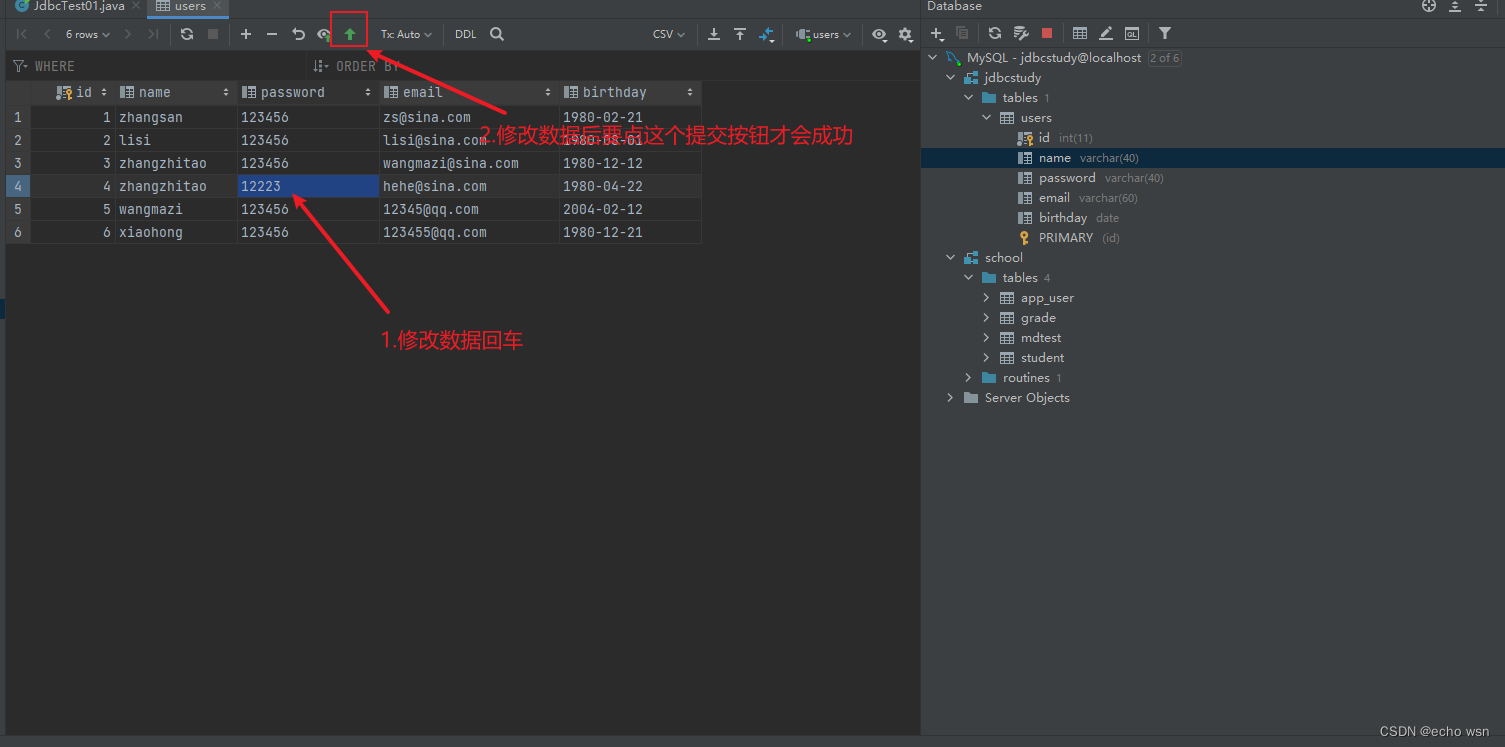
5.如图,修改表中的数据后要点击提交才会成功。
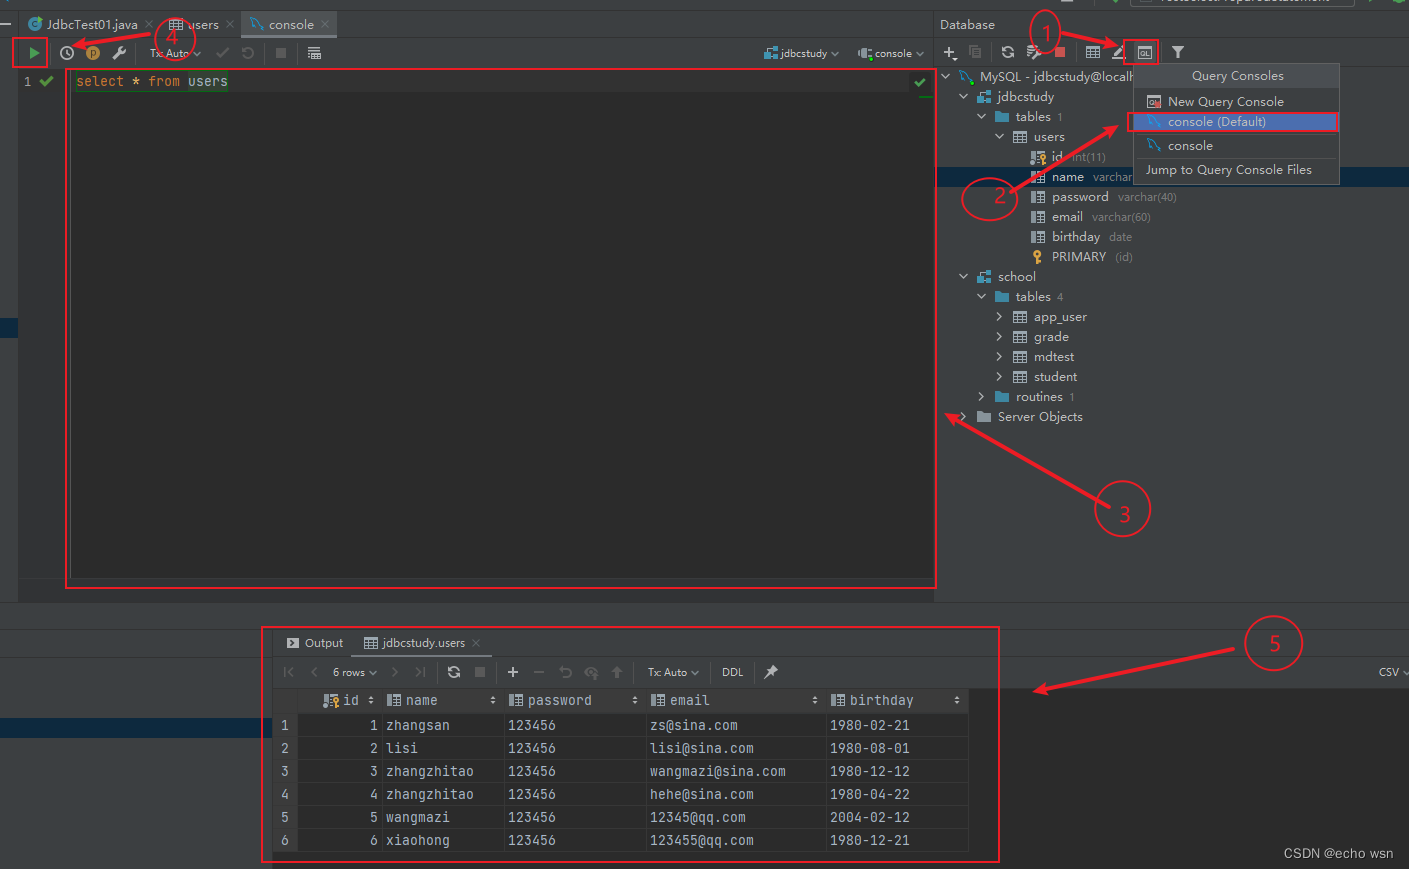
6.如图,需要使用命令行,依次按图中的顺序操作。
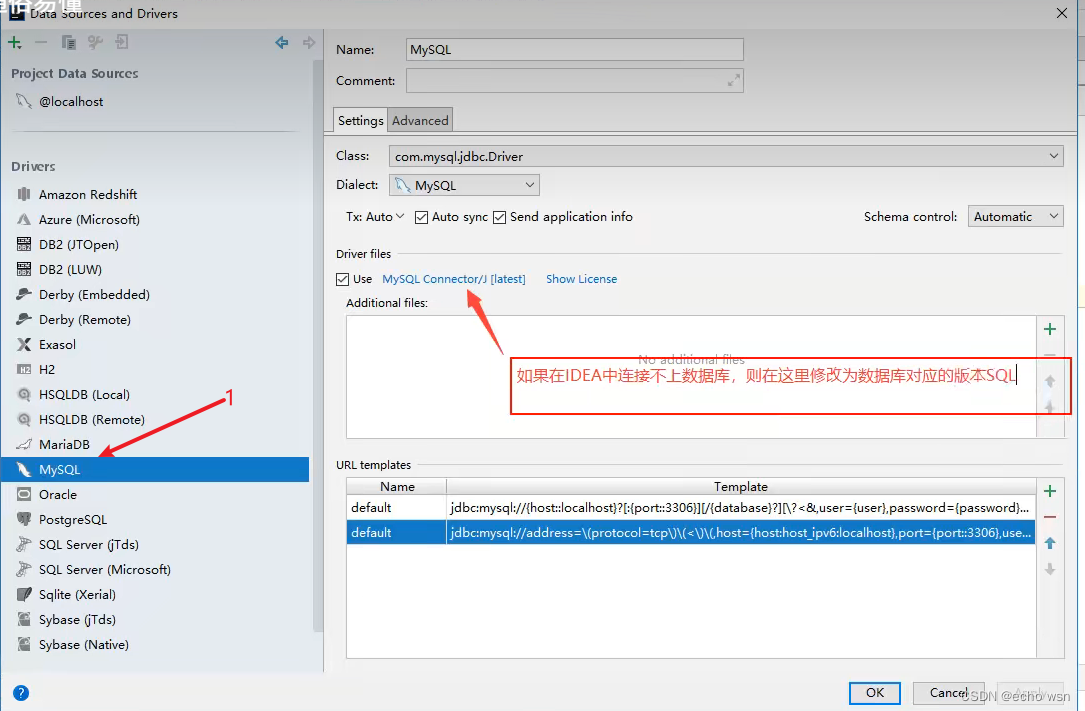
7.如果第二步测试连接失败,有可能是下图的原因。
10、操作事务
- public class Transaction {
- public static void main(String[] args) {
- Connection conn = null;
- PreparedStatement sta =null;
- ResultSet res = null;
-
- try {
- conn = JdbcUtils.getConnection();
- //1.关闭自动提交,自动会开启事务
- conn.setAutoCommit(false);//开启事务
-
- String sql1 = "update account set money-100 where name ='A' ";
- sta = conn.prepareStatement(sql1);
- sta.executeUpdate();
-
- String sql2 = "update account set money-100 where name ='B' ";
- sta = conn.prepareStatement(sql2);
- sta.executeUpdate();
- //2.业务完毕,提交事务
- conn.commit();
- System.out.println("成功");
- } catch (SQLException throwables) {
- try {
- //3.数据回滚,如果不写这个也会回滚,不过为了显式定义,写出来较好
- conn.rollback();//如果有异常,就会回滚数据
- } catch (SQLException e) {
- e.printStackTrace();
- }
- throwables.printStackTrace();
- }finally {
- JdbcUtils.release(conn,sta,res);
- }
- }
- }
11、数据库连接池
11.1、关于数据库连接池
1.数据库操作流程:数据库连接----执行完毕-----释放资源。
2.其中:数据库连接到释放资源的过程十分浪费系统资源。
3.所以有了池化技术:准备一些预先的资源,过来就连接预先准备好的。
4.举例说明:例如去银行取钱,不用池化技术,就是一个人去办业务,先是开门,然后办理业务,然后走了关门,如果再来人,也是这样的操作,一直重复的去开门关门。这显然不符合现实规律。正确的操作应该是一个人去办业务,银行会预先由几个业务员等待,人来了先是开门,然后办业务,然后走人,门不会关,继续等下一个人,直到我们什么时候下班才会真正的关门。
5.对于数据库也是如此,我们要考虑的是“业务员”(连接数)要设置多少才合适,应该是常用连接数是多少,我们最小链接数就应该设置多少。
6.开源数据实现:DBCP、C3P0、Druid。
使用了这些数据库连接池之后,我们在项目开发中就不需要编写连接数据库的代码了。
11.2、DBCP:
在书写代码方面为我们简化了工具类代码,不需要用Properties一个一个从配置文件中读取信息初始化,而是加载完properties文件后,直接用dataSource = BasicDataSourceFactory.createDataSource(properties);创建数据源。且不需要加载驱动。第二步的连接数据库也不需要用DriverManager,而是直接使用dataSource去getgetConnection()连接数据库。
- 需要用到的jar包:commons-dbcp-1.4.jar、commons-pool-1.6.jar。
- 具体操作:
1.配置文件dbcpconfig.properties
- #连接设置,这里面的名字是DBCP数据源中定义好的
- driverClassName=com.mysql.jdbc.Driver
- url=jdbc:mysql://localhost:3306/jdbcstudy?useUnicode=true&characterEncoding=utf8&useSSL=false
-
- username=root
- password=123456
- #<!-- 初始化连接-->
- initialSize=10
-
- #最大连接数量
- maxActive=50
-
- #最大空闲连接
- maxIdle=20
-
- #最小空闲连接
- minIdle=5
-
- #超时等待时间以毫秒为单位/s
- maxWait=60000
-
- #JDBC驱动建立连接时附带的连接属性属性的格式必须为这样:[属性名=property;]
- #注意:“user” 与 “password” 两个属性会被明确地传递,因此这里不需要包含他们。
- connectionProperties=useUnicode=true;characterEncoding=utf8
-
- #指定由连接池所创建的连接的自动提交(auto-commit)状态。
- defaultAutoCommit=true
-
- #driver default 指定由连接池所创建的连接的事务级别(TransactionIsolation)。
- #可用值为下列之一:(详情可见javadoc。)NONE,READ_UNCOMMITTED, READ_COMMITTED, REPEATABLE_READ, SERIALIZABLE
- defaultTransactionIsolation=READ_UNCOMMITTED
2.编写工具类JdbcUtils_DBCP
- public class JdbcUtils_DBCP {
- private static DataSource dataSource = null;
-
- static {
- try {
- InputStream in=JdbcUtils.class.getClassLoader().getResourceAsStream("dbcpconfig.properties");//读取配置文件
- Properties properties = new Properties();
- properties.load(in);
- //创建数据源 工厂模式
- dataSource = BasicDataSourceFactory.createDataSource(properties);
- } catch (Exception e) {
- e.printStackTrace();
- }
- }
- //2.获取连接
- public static Connection getConnection() throws SQLException {
- return dataSource.getConnection();//从数据源获取连接
- }
- //3.创建PreparedStatement
- public static PreparedStatement getPreparedStatement( String sql) {
- PreparedStatement ps =null;
- try {
- Connection conn = JdbcUtils_DBCP.getConnection();
- ps = conn.prepareStatement(sql);
- } catch (SQLException throwables) {
- throwables.printStackTrace();
- }
- return ps;
- }
-
- //4.释放资源 注意顺序
- public static void release(Connection conn, PreparedStatement ps, ResultSet resultSet) {
- if (resultSet!=null){
- try {
- resultSet.close();
- } catch (SQLException throwables) {
- throwables.printStackTrace();
- }
- }
- if (ps!=null){
- try {
- ps.close();
- } catch (SQLException throwables) {
- throwables.printStackTrace();
- }
- }
- if (conn!=null){
- try {
- conn.close();
- } catch (SQLException throwables) {
- throwables.printStackTrace();
- }
- }
- }
- }
-
3.测试代码
- public class TestDBCP {
- public static void main(String[] args) throws SQLException {
- Connection conn = JdbcUtils_DBCP.getConnection();
- String sql = "insert into `users`(`id`,`name`,`password`,`email`,`birthday`)value(?,?,?,?,?)";
- PreparedStatement ps = JdbcUtils_DBCP.getPreparedStatement(sql);
- ps.setInt(1,7);
- ps.setString(2,"sss");
- ps.setString(3,"123456");
- ps.setString(4,"3425@qq.com");
- ps.setString(5,"1999-09-09");
- int i = ps.executeUpdate();
- if (i>0){
- System.out.println("插入成功");
- }
-
- JdbcUtils_DBCP.release(conn,ps,null);
- }
- }
11.3、C3P0:
在书写代码上,相较于DBCP,C3P0更加简化了代码,连加载properties文件都不需要了,静态代码直接用dataSource= new ComboPooledDataSource("MySQL");一句代码即可,然后剩下的代码同前面一样。
- 需要用到的jar包:c3p0-0.9.5.5.jar、mchange-commons-java-5.1.47.jar。
- 具体操作:
1.配置文件c3p0-config.xml
- <?xml version="1.0" encoding="UTF-8"?>
- <c3p0-config>
- <default-config>
- <!--
- C3P0的缺省(默认)配置,
- 如果在代码中是 ComboPooledDataSource cp = new ComboPooledDataSource(); 这样写是default-config的配置
- -->
- <property name="driverClass">com.mysql.jdbc.Driver</property>
- <property name="jdbcUrl">jdbc:mysql://localhost:3306/jdbcsstudy?useUnicode=true&characterEncoding=utf8&useSSL=false</property>
- <property name="user">root</property>
- <property name="password">123456</property>
-
-
- <!--当连接池中的连接耗尽的时候c3p0一次同时获取的连接数。Default: 3 -->
- <property name="acquireIncrement">3</property>
-
- <!--初始化时获取三个连接,取值应在minPoolSize与maxPoolSize之间。Default: 10 这些都是自己定义 -->
- <property name="initialPoolSize">10</property>
-
- <!-- 连接的最大空闲时间,default: 30 -->
- <property name="maxIdleTime">30</property>
-
- <!--连接池中保留的最大连接数。Default: 100 -->
- <property name="maxPoolSize">100</property>
-
- <!--连接池中保留的最小连接数。Default: 15 -->
- <property name="minPoolSize">15</property>
- </default-config>
-
-
-
- <!--
- C3P0的命名配置,
- 如果在代码中是 ComboPooledDataSource cp = new ComboPooledDataSource("MySQL"); 这样写是default-config的配置
- -->
- <named-config name="MySQL">
- <property name="driverClass">com.mysql.jdbc.Driver</property>
- <property name="jdbcUrl">jdbc:mysql://localhost:3306/jdbcstudy?useUnicode=true&characterEncoding=utf8&useSSL=false</property>
- <property name="user">root</property>
- <property name="root">123456</property>
-
- <property name="acquireIncrement">3</property>
- <property name="initialPoolSize">10</property>
- <property name="maxIdleTime">30</property>
- <property name="maxPoolSize">100</property>
- <property name="minPoolSize">10</property>
- </named-config>
-
-
- <!-- 所以下面想什么配置就写什么配置 -->
- </c3p0-config>
2.编写工具类JdbcUtils_C3P0
- public class JdbcUtils_C3P0 {
- private static ComboPooledDataSource dataSource=null;
-
- static {
- try {
- /* //代码配置,麻烦不用
- dataSource = new ComboPooledDataSource();
- dataSource.setDriverClass("com.mysql.jdbc.Driver");
- dataSource.setUser("root");
- dataSource.setPassword("123456");
- dataSource.setMaxPoolSize(100);
- dataSource.setMinPoolSize(10);*/
-
- //配置文件的配法,我们只要导入xml文件,写个一句就好了
- dataSource= new ComboPooledDataSource("MySQL");//这里的参数不写用的是配置文件中默认的数据源,如有其他需求,就传入需要的named-config
- } catch (Exception e) {
- e.printStackTrace();
- }
- }
- //2.获取连接
- public static Connection getConnection() throws SQLException {
- return dataSource.getConnection();//从数据源中获取连接
- }
-
- //3.释放资源
- public static void release(Connection conn, Statement st, ResultSet rs) {
- if (rs!=null){
- try {
- rs.close();
- } catch (SQLException e) {
- e.printStackTrace();
- }
- }
- if (st!=null){
- try {
- st.close();
- } catch (SQLException e) {
- e.printStackTrace();
- }
- }
- if (conn!=null){
- try {
- conn.close();
- } catch (SQLException e) {
- e.printStackTrace();
- }
- }
- }
-
- }
3.测试代码
- public class TestC3P0 {
- public static void main(String[] args) {
- Connection conn = null;
- PreparedStatement ps = null;
- ResultSet rs = null;
-
- try {
- conn = JdbcUtils_C3P0.getConnection();
- String sql = "INSERT INTO users(`id`,`NAME`,`PASSWORD`,`email`,`birthday`) VALUES(?,?,?,?,?)";
- ps = conn.prepareStatement(sql);
-
- ps.setInt(1, 27);
- ps.setString(2, "我爱你");
- ps.setString(3, "1314");
- ps.setString(4, "804328977@qq.com");
- ps.setDate(5, new Date(new java.util.Date().getTime()));
- int i = ps.executeUpdate();
- if (i > 0) {
- System.out.println("插入成功o(*▽*)q");
- }
- } catch (SQLException e) {
- e.printStackTrace();
- } finally {
- JdbcUtils_DBCP.release(conn, ps, rs);
- }
- }
- }

