
热门标签
热门文章
- 1VBA combox/listbox 控件响应鼠标滚轮事件
- 2Tensorflow中的模型保存与加载_python tensorflow保存和调用pkl格式模型
- 3随机森林如何评估特征重要性_随机森林 特征重要性
- 4装了无数遍的 Android Studio安装教程(一篇就够)_android studio安装复杂
- 5【Android】线程池缓存简介_安卓单线程缓存池
- 6永磁同步电机矢量控制(三)——电流环转速环 PI 参数整定_pi调节器怎么测试
- 7数学原理-逻辑回归通俗易懂版(二分类与多分类)_多分类逻辑回归对数似然
- 8vue el-input输入数字保留两位小数_el-input 保留两位小数
- 9常见的开源游戏引擎_neoengine
- 10Unity 登录注册时 限制发送验证码次数功能的解决方案_unityid验证码为什么发不到手机
当前位置: article > 正文
uniapp——网络请求的封装、全局样式,全局变量、传值(父子组件,不同页面等)_uniapp网络请求封装和全局配置
作者:IT小白 | 2024-03-22 01:15:47
赞
踩
uniapp网络请求封装和全局配置
一、网络请求的封装
根据thorUI开源框架给出的代码进行封装,还有如果需要token来请求的话,需要自己去获取token,然后写到
代码:
const tui = {
	delayed: null,
	//接口地址
	interfaceUrl: function() {
		return 'https://www.thorui.cn'
	},
	/**
	 * 请求数据处理
	 * @param string url 请求地址
	 * @param string method 请求方式: GET or POST
	 * @param {*} postData 请求参数
	 * @param bool isDelay 是否延迟显示loading
	 * @param bool isForm 数据格式-> true: 'application/x-www-form-urlencoded'; false:'application/json'
	 * @param bool hideLoading 是否隐藏loading-->true: 隐藏  false:显示
	 */
	request: function(url, method, postData, isDelay, isForm, hideLoading, useToken) {
		//接口请求
		let loadding = false;
		// console.log("请求==",tui.interfaceUrl() + url,useToken)
		tui.delayed && uni.hideLoading();
		clearTimeout(tui.delayed);
		tui.delayed = null;
		if (!hideLoading) {
			tui.delayed = setTimeout(() => {
				uni.showLoading({
					mask: false,
					title: '请稍候...',
					success(res) {
						loadding = true
					}
				})
			}, isDelay ? 1000 : 0)
		}

		return new Promise((resolve, reject) => {
			uni.request({
				url: tui.interfaceUrl() + url,
				data: postData,
				header: {
					'content-type': isForm ? 'application/x-www-form-urlencoded' : 'application/json',
					'Authorization': useToken ? tui.getToken() : ''
				},
				method: method, //'GET','POST'
				dataType: 'json',
				success: (res) => {
					console.log("请求tool成功", res)
					clearTimeout(tui.delayed)
					tui.delayed = null;
					if (loadding && !hideLoading) {
						uni.hideLoading()
					}
					resolve(res.data)
				},
				fail: (res) => {
					clearTimeout(tui.delayed)
					tui.delayed = null;
					tui.toast("网络不给力,请稍后再试~")
					reject(res)
				}
			})
		})
	},
}

//对外导出方法
module.exports = {
	request: tui.request,

}

// 使用代码(可以只写前面的三个参数) :
// let postData = {}
// util.request("/Home/GetStatus", "GET", postData, true, null, false, false).then((res) => {
// 	console.log(res)
// 	if (res.code == 100) {
// 		console.log()
// 	} else {

// 	}
// }).catch((res) => {
// 	console.log("请求失败", res)
// })
- 1
- 2
- 3
- 4
- 5
- 6
- 7
- 8
- 9
- 10
- 11
- 12
- 13
- 14
- 15
- 16
- 17
- 18
- 19
- 20
- 21
- 22
- 23
- 24
- 25
- 26
- 27
- 28
- 29
- 30
- 31
- 32
- 33
- 34
- 35
- 36
- 37
- 38
- 39
- 40
- 41
- 42
- 43
- 44
- 45
- 46
- 47
- 48
- 49
- 50
- 51
- 52
- 53
- 54
- 55
- 56
- 57
- 58
- 59
- 60
- 61
- 62
- 63
- 64
- 65
- 66
- 67
- 68
- 69
- 70
- 71
- 72
- 73
- 74
- 75
- 76
- 77
- 78
- 79
- 80
- 81
- 82
- 83
怎么在其他地方使用:
const util = require('@/utils/requestTool.js');
- 1
// 使用代码(可以只写前面的三个参数) :
// let postData = {}
// util.request("/Home/GetStatus", "GET", postData, true, null, false, false).then((res) => {
// 	console.log(res)
// 	if (res.code == 100) {
// 		console.log()
// 	} else {

// 	}
// }).catch((res) => {
// 	console.log("请求失败", res)
// })
- 1
- 2
- 3
- 4
- 5
- 6
- 7
- 8
- 9
- 10
- 11
- 12
二、全局样式
在App.vue的style标签里面可以写入全局的样式,在其他的类中都可以直接调用,不需要引用。
如果想引入别人的样式作为全局样式:
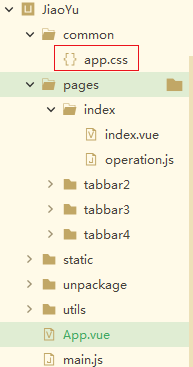
在App.vue的style标签里添加:@import ‘./common/app.css’;
结构图:
三、全局变量
以下是 App.vue 中定义globalData的相关配置:
<script>
    export default {
        globalData: {
            text: '111222'
        }
    }
</script>
- 1
- 2
- 3
- 4
- 5
- 6
- 7
js中操作获取值globalData的方式如下: getApp().globalData.text
js中操作赋值globalData的方式如下: getApp().globalData.text = ‘test’
如果需要把globalData的数据绑定到页面上,可在页面的onShow页面生命周期里进行变量重赋值。
globalData是简单的全局变量,如果使用状态管理,请使用vuex(main.js中定义)
四、传值
1、全局变量形式(参照上面第三点)—略
2、使用vuex状态管理工具来传值
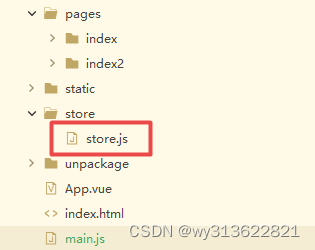
第一、安装npm install vuex --save
第二、新建一个store.js,如下图
代码为:
import Vue from 'vue'
import Vuex from 'vuex'
Vue.use(Vuex);

const state = {
	name: 'Mr Wang'
};
const mutations = {
	newName(state, msg) {
		state.name = msg
	}
}

export default new Vuex.Store({
	state,
	mutations
})
- 1
- 2
- 3
- 4
- 5
- 6
- 7
- 8
- 9
- 10
- 11
- 12
- 13
- 14
- 15
- 16
- 17
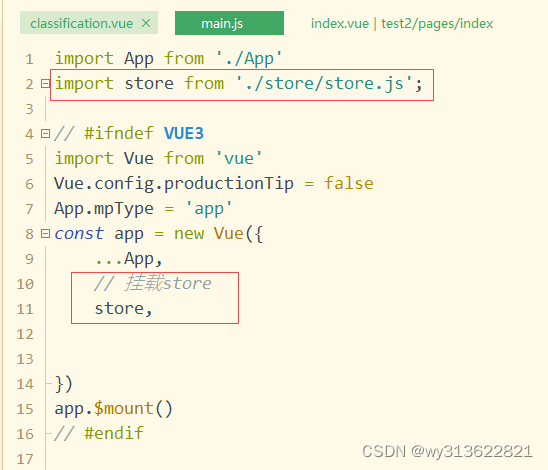
第三、在main.js里加上import store from ‘./store/store.js’; 和 挂载 store
第四、存值:
this.$store.commit('newName',"我是===")
- 1
第五、取值
let aa=this.$store.state.name
- 1
3、使用localStorage来传值(比较方便简单)
存:localStorage.setItem(‘tolist’,“需要传的值hello world!!”);
取:let aa=localStorage.getItem(‘tolist’)
如果是数组需要使用数组转字符串:JSON.stringify(list),在需要取的地方再使用字符串转数组
声明:本文内容由网友自发贡献,不代表【wpsshop博客】立场,版权归原作者所有,本站不承担相应法律责任。如您发现有侵权的内容,请联系我们。转载请注明出处:https://www.wpsshop.cn/w/IT小白/article/detail/284190
推荐阅读