
Vue3 中组件的使用(上)_vue3引入组件
赞
踩
前言:
在编写vue里的SPA(Single Page Application单页面应用)时,我们始终绕不开组件的使用,Vue3 里有一些重要更新,在这里分享给大家。
一、什么是组件
组件(Component)是 Vue.js 最强大的功能之一。
组件可以扩展 HTML 元素,封装可重用的代码。
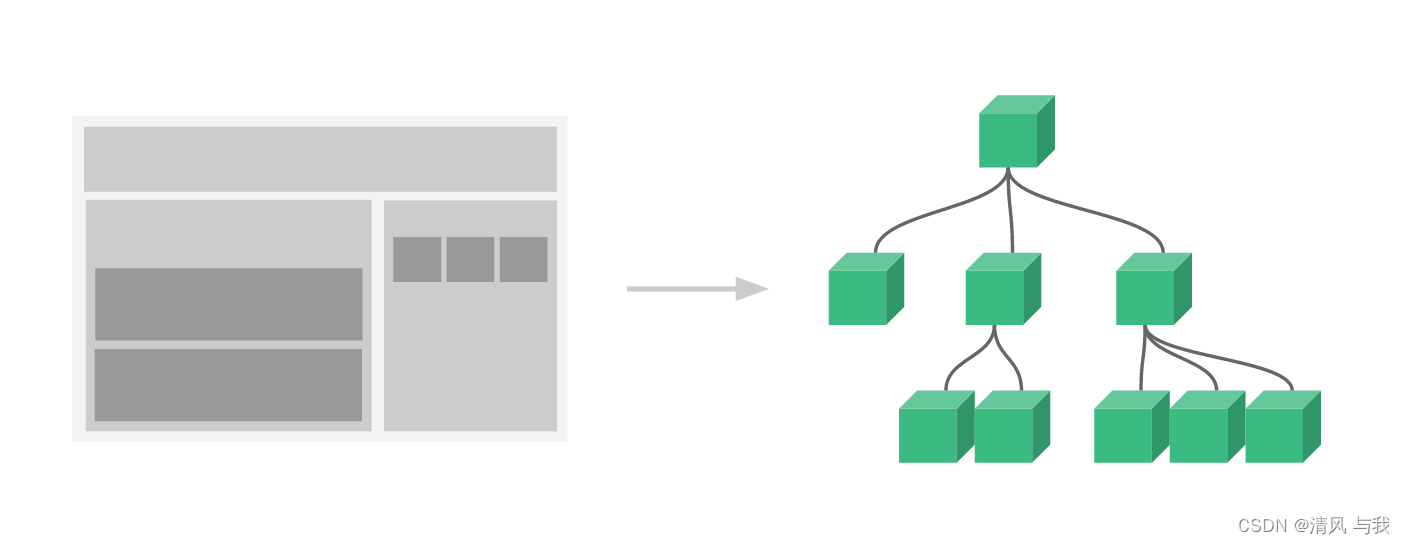
组件系统让我们可以用独立可复用的小组件来构建大型应用,几乎任意类型的应用的界面都可以抽象为一个组件树:
组件就相当于页面的零件,当做正常的标签使用,不过能够进行自定义的数据传输和事件监听。
组件内也能使用其他的组件,任意处都能够使用。
二、注册组件
一个 Vue 组件在使用前需要先被 “注册”,这样 Vue 才能在渲染模板时找到其对应的实现;组件注册有两种方式:全局注册、局部注册
1. 全局注册
可使用 app.component(name, Component)注册组件的方法,在此应用的任意组件的模板中使用
name:注册的名字Component:需要注册的组件
// 在 main.js 中注册全局组件
import { createApp } from 'vue'
import App from './App.vue'
// 1:引入需要被注册的组件
import Login from './components/Login.vue'

const app = createApp(App)

// 2:全局注册组件
app.component('MLogin', Login)

app.mount('#app')
- 1
- 2
- 3
- 4
- 5
- 6
- 7
- 8
- 9
- 10
- 11
- 12
// 我们使用注册的组件
<template>
    <h3>登录系统</h3>
    <!-- 使用全局注册的组件 -->
    <MLogin />
</template>
- 1
- 2
- 3
- 4
- 5
- 6
2. 局部注册
局部注册的组件需要在使用它的父组件中显式导入,并且只能在该父组件中使用
在组合式
API中的<script setup>内,直接导入的组件就可以在模板中直接可用,无需注册。
<script setup>
// 1:引入需要注册的组件,无需注册
import LoginVue from './components/Login.vue';
</script>

<template>
    <h3>登录系统</h3>
    <!-- 2:使用全局注册的组件 -->
    <LoginVue />
</template>
- 1
- 2
- 3
- 4
- 5
- 6
- 7
- 8
- 9
- 10
二、传递数据【父 -> 子】
如果父组件向子组件进行传递数据,那么我们需要在子组件中声明 props 来接收传递数据的属性,可采用字符串数组式或对象式来声明 props
父组件向子组件传递数据,在使用组件
let 的标签上采用属性方式传递的 props 值,可使用 v-bind: 或 : 来绑定属性
组件中 props 中的数据是只读的,不可直接更改,只能通过父组件进行更改
声明与使用
- 在选项式
API中
1. 我们可以提供props选项来声明接收传递的数据
2. 在JS中可使用this.$props来访问声明的自定义的属性
3. 在视图模板中,可直接访问props中声明的自定义属性- 在组合式
API中
1. 我们可以采用defineProps宏来声明接收传递的数据
2. 在JS中可使用defineProps返回的对象来访问声明的自定义的属性
3. 在视图模板中,可直接访问defineProps中声明的自定义属性
1. 字符串数组的形式
// 字符串数组的形式
<script setup>

// 使用 defineProps 宏来声明
defineProps(['flat', 'title'])

</script>
- 1
- 2
- 3
- 4
- 5
- 6
- 7
例子:
// 父组件
<script setup>
import { ref } from 'vue';
import ButtonVue from './components/Button.vue';

let isError = ref(false) // 主题
let isFlat = ref(false) // 阴影
let btnText = ref('普通按钮') // 按钮文本
</script>

<template>
    主题:<input type="checkbox" v-model="isError">
    阴影:<input type="checkbox" v-model="isFlat">
    按钮文本:<input type="text" v-model="btnText">
    <hr>
    <!-- 父向子传值,可采用属性的方式赋值 -->
    <ButtonVue :title="btnText" :error="isError" :flat="isFlat"/>
</template>

- 1
- 2
- 3
- 4
- 5
- 6
- 7
- 8
- 9
- 10
- 11
- 12
- 13
- 14
- 15
- 16
- 17
- 18
// 子组件
<script setup>
// 声明接收父组件传递的属性值:自定义属性
let propsData = defineProps(['title', 'error', 'flat'])

function showPropsData() {
    // 在 JS 中,需要通过 defineProps 返回对象来访问 props 的内容
    console.log(propsData)
    console.log(propsData.title)
    console.log(propsData.error)
    console.log(propsData.flat)
}

function changeErrorProps() {
    // 不能直接修改 props 的数据,因为是只读的
    propsData.error = !propsData.error
}
</script>


<template>
    <!-- 在视图模板上,可直接使用 props 中的属性 -->
    <button :class="{ error, flat }" @click="showPropsData" @mousedown.right="changeErrorProps">
        {{ title }}
    </button>
</template>


<style>
button {
    border: none;
    padding: 12px 25px;
}

.error {
    background-color: rgb(197, 75, 75);
    color: white;
}

.flat {
    box-shadow: 0 0 10px grey;
}
</style>
- 1
- 2
- 3
- 4
- 5
- 6
- 7
- 8
- 9
- 10
- 11
- 12
- 13
- 14
- 15
- 16
- 17
- 18
- 19
- 20
- 21
- 22
- 23
- 24
- 25
- 26
- 27
- 28
- 29
- 30
- 31
- 32
- 33
- 34
- 35
- 36
- 37
- 38
- 39
- 40
- 41
- 42
- 43
2. 对象的形式
对象形式声明的 props,可以对传来的值进行校验,如果传入的值不满足类型要求,会在浏览器控制台中抛出警告来提醒使用者
对象形式声明的 props,key 是 prop 的名称,值则为约束的条件
对象中的属性:
type:类型,如String、Number、Boolean、Array、Object、Date、Function、Symbol
default:默认值;对象或者数组应当用工厂函数返回
required:是否必填,布尔值
validator:自定义校验,函数类型
<script>
// 对象的形式
    defineProps({
        // 基础类型检查
        // (给出 `null` 和 `undefined` 值则会跳过任何类型检查)
        propA: Number,
        // 多种可能的类型
        propB: [String, Number],
        // 必传,且为 String 类型
        propC: {
            type: String,
            required: true
        },
        // Number 类型的默认值
        propD: {
            type: Number,
            default: 100
        },
        // 对象类型的默认值
        propE: {
            type: Object,
            // 对象或数组的默认值
            // 必须从一个工厂函数返回。
            // 该函数接收组件所接收到的原始 prop 作为参数。
            default(rawProps) {
                return { message: 'hello' }
            }
        },
        // 自定义类型校验函数
        propF: {
            validator(value) {
                // The value must match one of these strings
                return ['success', 'warning', 'danger'].includes(value)
            }
        },
        // 函数类型的默认值
        propG: {
            type: Function,
            // 不像对象或数组的默认,这不是一个工厂函数。这会是一个用来作为默认值的函数
            default() {
                return 'Default function'
            }
        }
    })
</script>
- 1
- 2
- 3
- 4
- 5
- 6
- 7
- 8
- 9
- 10
- 11
- 12
- 13
- 14
- 15
- 16
- 17
- 18
- 19
- 20
- 21
- 22
- 23
- 24
- 25
- 26
- 27
- 28
- 29
- 30
- 31
- 32
- 33
- 34
- 35
- 36
- 37
- 38
- 39
- 40
- 41
- 42
- 43
- 44
- 45
例子:
// 父组件
<script setup>
import { ref } from 'vue';
import ButtonVue from './components/Button.vue';

let isError = ref(false) // 主题
let isFlat = ref(false) // 阴影
let btnText = ref('普通按钮') // 按钮文本
</script>

<template>
    主题:<input type="checkbox" v-model="isError">
    阴影:<input type="checkbox" v-model="isFlat">
    按钮文本:<input type="text" v-model="btnText">
    <hr>
    <!-- 父向子传值,可采用属性的方式赋值 -->
    <ButtonVue :title="btnText" :error="isError" :flat="isFlat"/>
</template>
- 1
- 2
- 3
- 4
- 5
- 6
- 7
- 8
- 9
- 10
- 11
- 12
- 13
- 14
- 15
- 16
- 17
- 18
// 子组件
<script setup>
// 声明接收父组件传递的属性值:自定义属性
let propsData = defineProps({
    title: {
        type: String,
        required: true
    },
    error: Boolean,
    flat: Boolean,
    tips: {
        type: String,
        default: '我是一个普通的按钮'
    }
})

function showPropsData() {
    // 在 JS 中,需要通过 defineProps 返回对象来访问 props 的内容
    console.log(propsData)
    console.log(propsData.title)
    console.log(propsData.error)
    console.log(propsData.flat)
}

function changeErrorProps() {
    // 不能直接修改 props 的数据,因为是只读的
    propsData.error = !propsData.error
}
</script>


<template>
    <!-- 在视图模板上,可直接使用 props 中的属性 -->
    <button :title="tips" :class="{ error, flat }" @click="showPropsData" @mousedown.right="changeErrorProps">
        {{ title }}
    </button>
</template>


<style>
button {
    border: none;
    padding: 12px 25px;
}

.error {
    background-color: rgb(197, 75, 75);
    color: white;
}

.flat {
    box-shadow: 0 0 10px grey;
}
</style>
- 1
- 2
- 3
- 4
- 5
- 6
- 7
- 8
- 9
- 10
- 11
- 12
- 13
- 14
- 15
- 16
- 17
- 18
- 19
- 20
- 21
- 22
- 23
- 24
- 25
- 26
- 27
- 28
- 29
- 30
- 31
- 32
- 33
- 34
- 35
- 36
- 37
- 38
- 39
- 40
- 41
- 42
- 43
- 44
- 45
- 46
- 47
- 48
- 49
- 50
- 51
- 52
- 53
- 54
注意:
- 所有
prop默认都是可选的,除非声明了required: true- 除
Boolean外的未传递的可选prop将会有一个默认值undefinedBoolean类型的未传递prop将被转换为false;- 当
prop的校验失败后,Vue会抛出一个控制台警告【在开发模式下】- 注意
prop的校验是在组件实例被创建之前
1. 在选项式API中,实例的属性(比如data、computed等) 将在default或validator函数中不可用
2. 在组合式API中,defineProps宏中的参数不可以访问<script setup>中定义的其他变量,因为在编译时整个表达式都会被移到外部的函数中
特别提醒:
关于
Boolean类型转换:
为了更贴近原生boolean attributes的行为,声明为Boolean类型的props有特别的类型转换规则
如声明时:defineProps({ error: Boolean })
传递数据时:
-<MyComponent error/>:相当于<MyComponent :error="true" />
-<MyComponent />:相当于<MyComponent :error="false" />
三、组件事件【子 -> 父】
有的时候,父组件在使用子组件时,子组件如何给父组件传值呢?
- 子组件声明自定义的事件
- 子组件中触发自定义事件(可传值)
- 父组件使用子组件时监听对应的自定义事件,并执行父组件中的函数(获取子组件传递的值)
1. 字符串数组式声明自定义事件
- 在选项式
API中,子组件可通过emits选项来声明自定义的事件 - 在组合式
API中,子组件可通过defineEmits()宏来声明自定义的事件
字符串数组式声明自定义事件
采用字符串数组可以声明简单的自定义事件:
<script setup>
    defineEmits(['inFocus', 'submit'])
</script>
- 1
- 2
- 3
对象式声明自定义事件
采用对象式声明自定义事件,还可以进行校验传递的参数是否符合预期要求
对象式声明自定义事件中,属性名为自定义事件名,属性值则是是否验证传递的参数:
- 属性值为
null则不需要验证 - 属性值为函数时,参数为传递的数据,函数返回
true则验证通过,返回false则验证失败,验证失败可以用警告语句提示开发者【注意:无论是true还是false都会继续执行下去的,父组件都会获取到传递的值】
<script setup>
defineEmits({
    autoEvent1: null, // 无需校验
    // 需要校验,param 可以是多个参数,返回布尔值来表明事件是否合法
    autoEvent2: (param) => {
        // true 则通过
        // false 则不通过,可以在控制台输入警告语句
    }
})
</script>
- 1
- 2
- 3
- 4
- 5
- 6
- 7
- 8
- 9
- 10
2. 【子组件】触发组件事件
在选项式 API 中,可通过组件当前实例 this.$emit(event, ...args) 来触发当前组件自定义的事件
在组合式 API 中,可调用 defineEmits 宏返回的 emit(event, ...args) 函数来触发当前组件自定义的事件
其中上方两个参数分别为:
event:触发事件名,字符串类型...args:传递参数,可没有,可多个
<script setup>

// 自定义事件,并返回 emit 函数
const emit = defineEmits(['changeAge'])

function emitAgeEvent() {
    // 触发自定义事件 changeAge,并传递参数 1,20
    emit('changeAge', 1, 20)
}
</script>

<template>
    <button @click="emitAgeEvent">触发自定义事件</button>
    <hr>
    <!-- 触发自定义事件 changeAge,并传递参数 30 -->
    <button @click="emit('changeAge', 30)">触发自定义事件</button>
</template>
- 1
- 2
- 3
- 4
- 5
- 6
- 7
- 8
- 9
- 10
- 11
- 12
- 13
- 14
- 15
- 16
- 17
3. 【父组件】监听子组件自定义事件
使用 v-on:event="callback" 或者 @event="callback" 来监听子组件是否触发了该事件
event:事件名字(camelCase形式命名的事件,在父组件中可以使用kebab-case形式来监听)callback:回调函数,如果子组件触发该事件,那么在父组件中执行对应的回调函数,回调函数声明参数可自动接收到触发事件传来的值
<script setup>
import { ref } from 'vue';

import ButtonVue from './components/Button.vue';

let startAge = ref(0)
let endAge = ref(0)

// 子组件触发事件的回调函数
function addAge(start_age, end_age) {
    console.log('----------------');
    console.log(start_age)
    console.log(end_age)
    startAge.value = start_age
    endAge.value = end_age
}
</script>

<template>
    <h3>
        开始年龄:{{ startAge }}
    </h3>
    <h3>
        结束年龄:{{ endAge }}
    </h3>

    <!-- 使用引入的组件,并通过属性传递数据 -->
    <ButtonVue @change-age="addAge" />
</template>
- 1
- 2
- 3
- 4
- 5
- 6
- 7
- 8
- 9
- 10
- 11
- 12
- 13
- 14
- 15
- 16
- 17
- 18
- 19
- 20
- 21
- 22
- 23
- 24
- 25
- 26
- 27
- 28
- 29
4. 组件事件例子
字符串数组式声明自定义事件
// 父组件
<script setup>
import { reactive } from 'vue';
import StudentVue from './components/Student.vue';

let student = reactive({
    name: 'Jack',
    age: 18,
    sex: '男'
})

// 获取子组件传递值
function getNewAge(newAge) {
    console.log('年龄的新值:' + newAge)
    student.age = newAge
}
function getNewAgeAndName(newAge, newName) {
    console.log('年龄的新值:' + newAge)
    console.log('名字的新值:' + newName)
    student.age = newAge
    student.name = newName
}
function getNewStudent(stu){
    console.log('学生新值:');
    console.log(stu);
    student.age = stu.age
    student.name = stu.name
    student.sex = stu.sex
}
</script>

<template>
    {{ student }}
    <hr>
    <StudentVue
                @change-student="getNewStudent"
                @change-age-and-name="getNewAgeAndName"
                @change-age="getNewAge" />
</template>
- 1
- 2
- 3
- 4
- 5
- 6
- 7
- 8
- 9
- 10
- 11
- 12
- 13
- 14
- 15
- 16
- 17
- 18
- 19
- 20
- 21
- 22
- 23
- 24
- 25
- 26
- 27
- 28
- 29
- 30
- 31
- 32
- 33
- 34
- 35
- 36
- 37
- 38
- 39
// 子组件
<script setup>
// 自定义事件
let emit = defineEmits(['changeAge', 'changeAgeAndName', 'changeStudent'])

function emitEventAge() {
    // 选项式通过 this.$emit 触发自定义事件,并传值
    emit('changeAge', 30)
}

</script>

<template>
    <button @click="emitEventAge">更改年龄</button>
    <br>
    <br>
    <button @click="emit('changeAgeAndName', 10, 'Annie')">
        更改年龄和名字
    </button>
    <br>
    <br>
    <button @click="emit('changeStudent', { age: 40, name: 'Drew', sex: '男' })">
        更改学生(验证通过)
    </button>
    <br>
    <br>
    <button @click="emit('changeStudent', { age: -10, name: 'Tom', sex: '男' })">
        更改学生(验证失败)
    </button>
</template>
- 1
- 2
- 3
- 4
- 5
- 6
- 7
- 8
- 9
- 10
- 11
- 12
- 13
- 14
- 15
- 16
- 17
- 18
- 19
- 20
- 21
- 22
- 23
- 24
- 25
- 26
- 27
- 28
- 29
- 30
对象式声明自定义事件
// 父组件
<script setup>
import { reactive } from 'vue';
import StudentVue from './components/Student.vue';

let student = reactive({
    name: 'Jack',
    age: 18,
    sex: '男'
})

// 获取子组件传递值
function getNewAge(newAge) {
    console.log('年龄的新值:' + newAge)
    student.age = newAge
}
function getNewAgeAndName(newAge, newName) {
    console.log('年龄的新值:' + newAge)
    console.log('名字的新值:' + newName)
    student.age = newAge
    student.name = newName
}
function getNewStudent(stu){
    console.log('学生新值:');
    console.log(stu);
    student.age = stu.age
    student.name = stu.name
    student.sex = stu.sex
}
</script>

<template>
    {{ student }}
    <hr>
    <StudentVue
                @change-student="getNewStudent"
                @change-age-and-name="getNewAgeAndName"
                @change-age="getNewAge" />
</template>
- 1
- 2
- 3
- 4
- 5
- 6
- 7
- 8
- 9
- 10
- 11
- 12
- 13
- 14
- 15
- 16
- 17
- 18
- 19
- 20
- 21
- 22
- 23
- 24
- 25
- 26
- 27
- 28
- 29
- 30
- 31
- 32
- 33
- 34
- 35
- 36
- 37
- 38
- 39
// 子组件
<script setup>
// 自定义事件
let emit = defineEmits({
    changeAge: null, // 无需验证
    changeAgeAndName: null, // 无需验证
    changeStudent: stu => {
        if (stu.age <= 0) {
            console.warn('年龄不得小于等于0')
            // false:验证不通过,会有警告语句,父组件依旧可以获取该值
            return false
        }
        // true:验证通过
        return true
    }
})

function emitEventAge() {
    // 选项式通过 this.$emit 触发自定义事件,并传值
    emit('changeAge', 30)
}

</script>

<template>
    <button @click="emitEventAge">更改年龄</button>
    <br>
    <br>
    <button @click="emit('changeAgeAndName', 10, 'Annie')">
        更改年龄和名字
    </button>
    <br>
    <br>
    <button @click="emit('changeStudent', { age: 40, name: 'Drew', sex: '男' })">
        更改学生(验证通过)
    </button>
    <br>
    <br>
    <button @click="emit('changeStudent', { age: -10, name: 'Tom', sex: '男' })">
        更改学生(验证失败)
    </button>
</template>
- 1
- 2
- 3
- 4
- 5
- 6
- 7
- 8
- 9
- 10
- 11
- 12
- 13
- 14
- 15
- 16
- 17
- 18
- 19
- 20
- 21
- 22
- 23
- 24
- 25
- 26
- 27
- 28
- 29
- 30
- 31
- 32
- 33
- 34
- 35
- 36
- 37
- 38
- 39
- 40
- 41
- 42
总结:
以上就是 Vue3 中组件的使用(上),不懂得也可以在评论区里问我或私聊我询问,以后会持续发布一些新的功能,敬请关注。
我的其他文章:https://blog.csdn.net/weixin_62897746?type=blog

