
- 1DBeaver快捷键_dbeaver格式化sql语句快捷键
- 2社招两年半10个公司28轮面试面经(含字节、拼多多、美团、滴滴......)_社招面经
- 3深入解读鸿蒙Stage模型(1),2024年最新HarmonyOS鸿蒙应用开发案例教程pdf_鸿蒙应用模型
- 4java哈希_java实现哈希表
- 5数据结构:图文详解 树与二叉树(树与二叉树的概念和性质,存储,遍历)_数与二叉树
- 6零门槛 领阿里云定制T 《快速玩转机器学习PAI-DSW》10月14日正式开始_阿里云机器学习pai-dsw几点开始
- 7OpenHarmony 关闭息屏方式总结_openharmony休眠
- 8Windows下Nginx下载安装部署教程(实测有效)_windows nginx下载
- 9核心算法模板_核心算法设计怎么写
- 10苹果电脑可以玩的单机游戏有哪些 Mac可以玩Steam吗 Mac电脑运行Windows游戏_mac电脑能玩什么游戏
一文带你全面体验八种状态管理库
赞
踩
动手点关注

干货不迷路
写在前面
状态管理库伴随着数据驱动类框架诞生以来,一直都是个带争议的话题,社区里关于这个方向的讨论文章也是数不胜数,本文写作的目的并不是去详细解答每一款状态库的设计原理和最佳实践,而是希望能从全局视角出发,更全面的了解当下主流状态库的使用体验,同时引导读者告别选择困难症,避免陷入主观臆断,在有充分知识储备的背景下,去提升状态库在实际项目中的选用标准,正所谓:小孩子才做选择题,成年人当然是全都要,项目里可以不用,但是技术上不能不懂!

开荒劈道
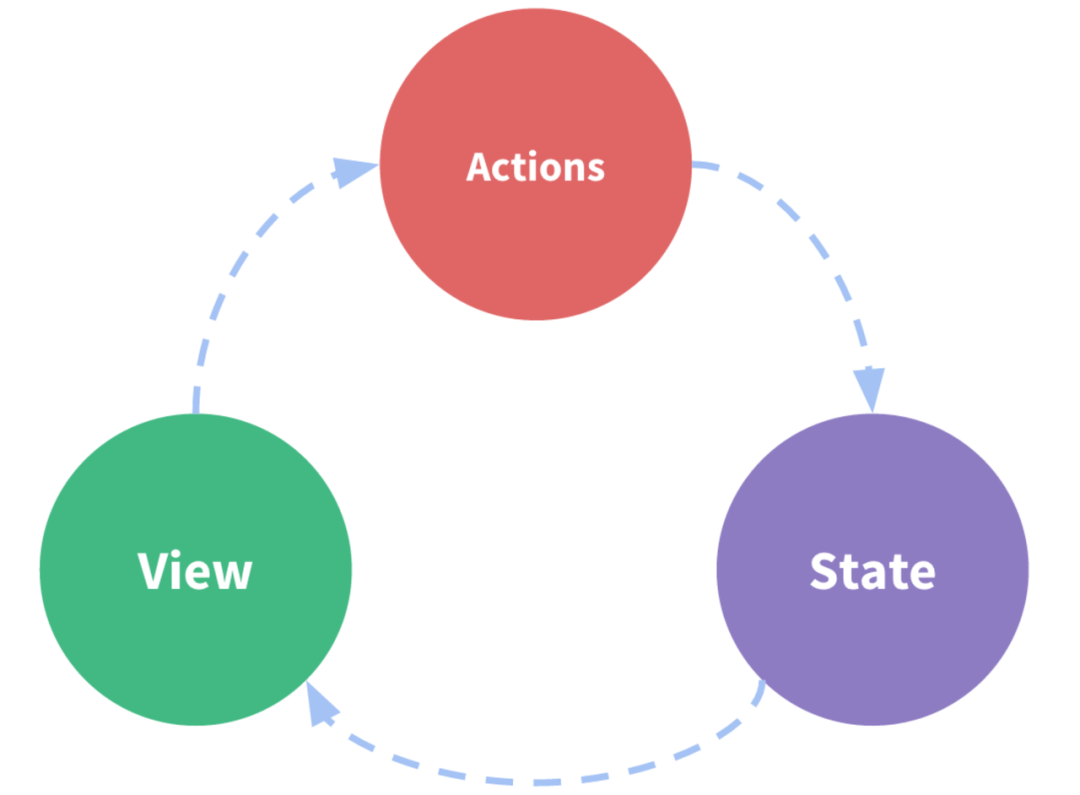
一直以来,随着前端项目的日趋复杂,如何更优雅的处理页面中数据展示和状态变化就成了各个框架要解决的核心问题,以 2015 年为分水岭,前期的前端框架大都以操作 DOM 为核心,搭配各种命令来简化页面中的数据处理,主要思想以命令式编程为主;2015 年以后,React 框架开始步入成熟并引入了 class组件 + setState 的写法,带来现代前端框架的一次大革命,其解决问题的核心思路是:把之前围绕 DOM 操作的过程式命令变为针对状态的声明式描述,即:UI=f(State) , 同时也带火了数据驱动设计、函数式编程以及 ES6,Babel,Webpack、ESM 等一系列优秀的开发工具链,从那时起,前端开发全家桶的思想开始深入人心,脱口即出的用语从“用户体验提升”变成了“前端工程化落地”。

混沌年代
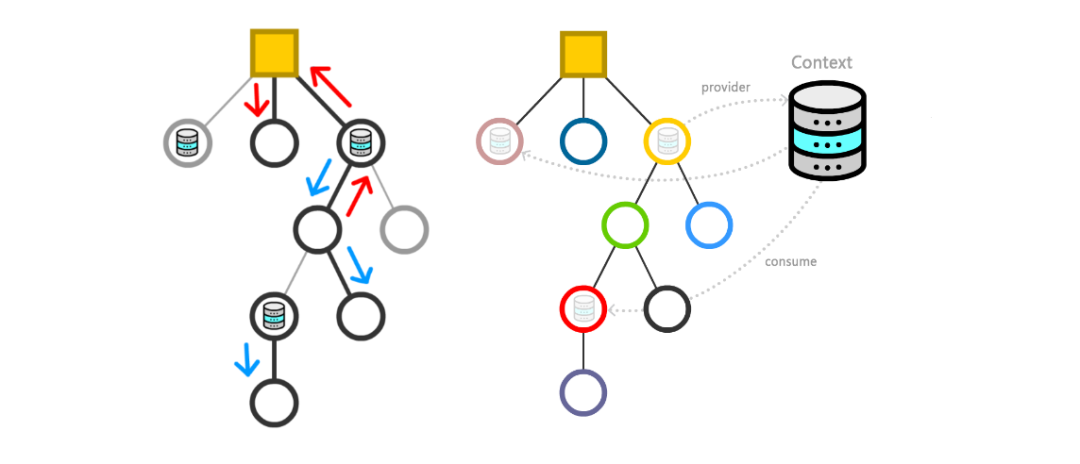
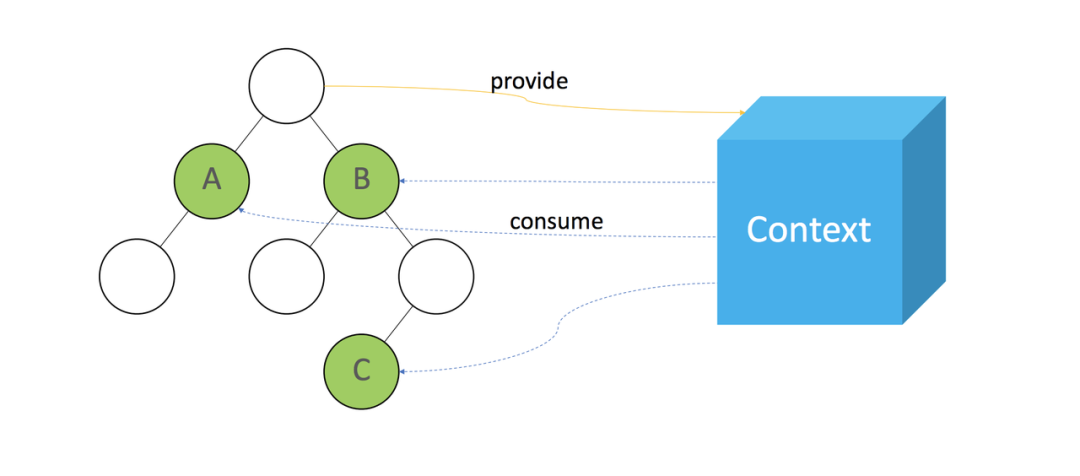
伴随着工程化思想的推进落地,前端开发的复杂度也日趋增加,为了更好的应对大规模生产的实际需要,各大框架都会引入组件化(component)的概念,化整为零,简化代码维护成本,同时考虑到数据的变化和流动性,又提出了单向数据流(unidirectional data flow)的思想,即数据是通过 Props 属性由上向下(由父及子)的进行传递的,只能从一个方向来修改状态。当页面嵌套结构简单时,通过层层传递的通信方式能勉强接受,但是遇到业务组件过深的时候,就会感受到被地狱式层级支配的恐惧,于是,React 开始引入了 Context,一个用于解决组件 "跨级" 通信的官方方案,共享那些被认为对于一个组件树而言是“全局”的数据,这也是全局状态管理工具的最早原型。
原力觉醒
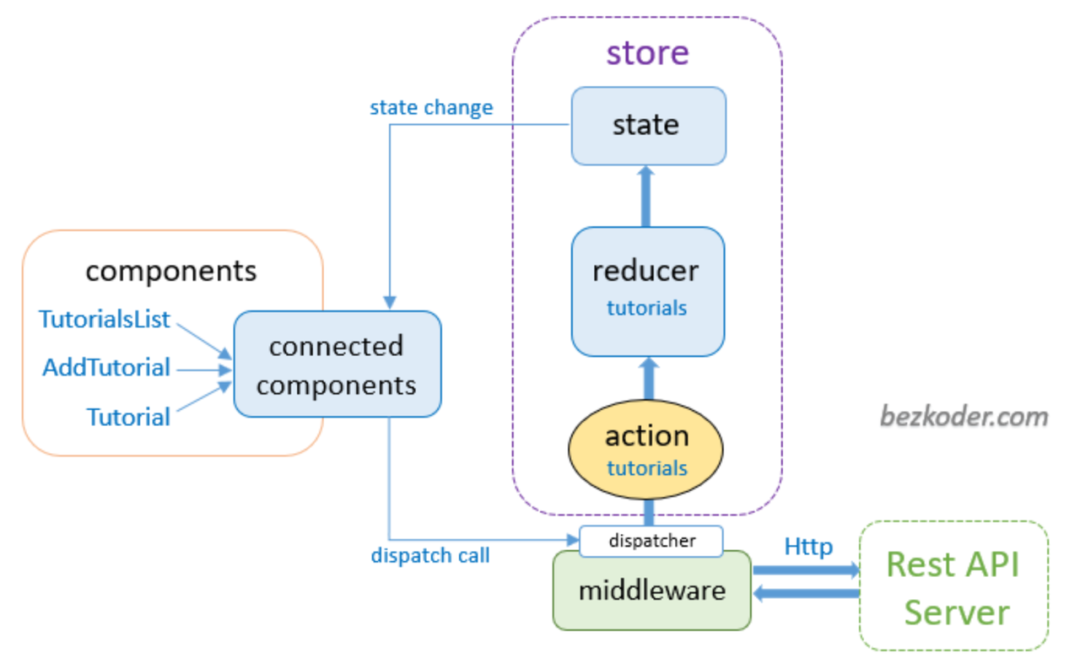
回归本源,所谓的各种状态管理工具要解决的最核心问题即:优雅地实现跨层级组件间的数据通信和状态共享,与之相呼应也会产生一些额外的副产品,例如:清晰地管理状态变化,优雅地拆分代码逻辑,兼顾同步和异步逻辑处理等,化繁为简就是如下三个处理阶段:Actions <=> State <=> View。
考虑到核心库本身的简单高效,状态库的解决方案会类似 Router 库一样,下放到社区生态中去维护,这样就带来两个局面:
非官方,React 社区出现了百舸争流的局面(隔壁家Vue做了收敛,由官方团队统一提供)
非强制,状态库使用权下放给开发者,用它有一万种理由,不用两种理由:工程不复杂 / 有hooks

此外,由于实现思想的不同,状态库的设计又引出了多种流派,但是要解决的问题也绕不开如下环节,所以掌握了处理数据流变化的设计模式,上手任何一款状态库都是能很快找到窍门的。

基本概念:
URL - 访问页面时,路由上数据的即时获取和存储(多为 param,query 等)
API Server - 从本地端发起请求拿到服务端数据(可思考远端数据是否需要都进入统一数据源)
Data - 本地数据源,一般在状态库中称为 Store,存放需要通信用的所有状态数据
View - 呈现数据变化最终态的页面,对应到 JSX 或者 Template,需秉承最小更新原则
Action - 当需要改变数据时,不允许直接改变,应当操作 Action 来完成,需兼顾同步/异步
通用设计:

一、结构(Structure) :一般有三种构造方式来组织状态数据的存放。
global: 全局式,也被称作单一数据源,将所有的数据放到一个大对象中,关键词:
combineReducers();multiple stores: 多数据源模式,将状态存放到多个数据源中,可在多个地方使用消费,关键词:
useStore();atomic state: 原子状态,与创建对象形式的存储不同,针对每一个变量可以是响应式的,通过原子派生的方式来适应复杂的开发场景,关键词:
atom();
二、读取操作(get/read) :约定如何从 Store 中读取需要使用的数据,可以是直接读取源数据(getter),也可以是读取派生数据(selector)。
getter: 使用时直接是 xxx.name,一般可搭配 getter 方法做些额外修饰,实现类似 computed 的效果,多用在 object 或者 class 中;
selector function:派生数据,一般使用方式如下:
useSelector(state => state.counter);由于每次派生出来的结果是一个带逻辑的函数,可以搭配 useMemo,shallow 等方案做些性能优化;
三、更新数据(set/write) :此部分的操作会决定你如何去更新数据状态并最终反应到视图中,同时也会影响你如何封装操作逻辑,此外还需要感知是同步操作还是异步操作,一般有三种方式:
setter: 此类操作方式会尽量贴近 React.useState 里的用法,const [counter, setCounter]=useState(0),支持 setCounter(newValue)和 setCounter(prev=>prev+1)两种操作了
dispatch: 旨在将操作动作和实际数据相分离,dispatch 的触发函数中不需要包含实际处理逻辑,只需要触发类型(type)和更新值(payload);例如:
dispatch({type:'decrement', value: 'newVal'})reactive: 响应式更新,此类操作最简单直接,只需要确保更新动作被包装在 action 函数下,更新操作为:action(counterStore.decrement())即可完成更新动作。
不可变数据: 考虑到数据操作的副作用,一般鼓励使用不可变数据结构来实现数据更新,通常简单的方式可以用 Object.assign(),{...}展开符,复杂的结构可用 immutable.js,immer 等来配套使用,实际项目开发中应避免数据结构嵌套过深。
百花齐放
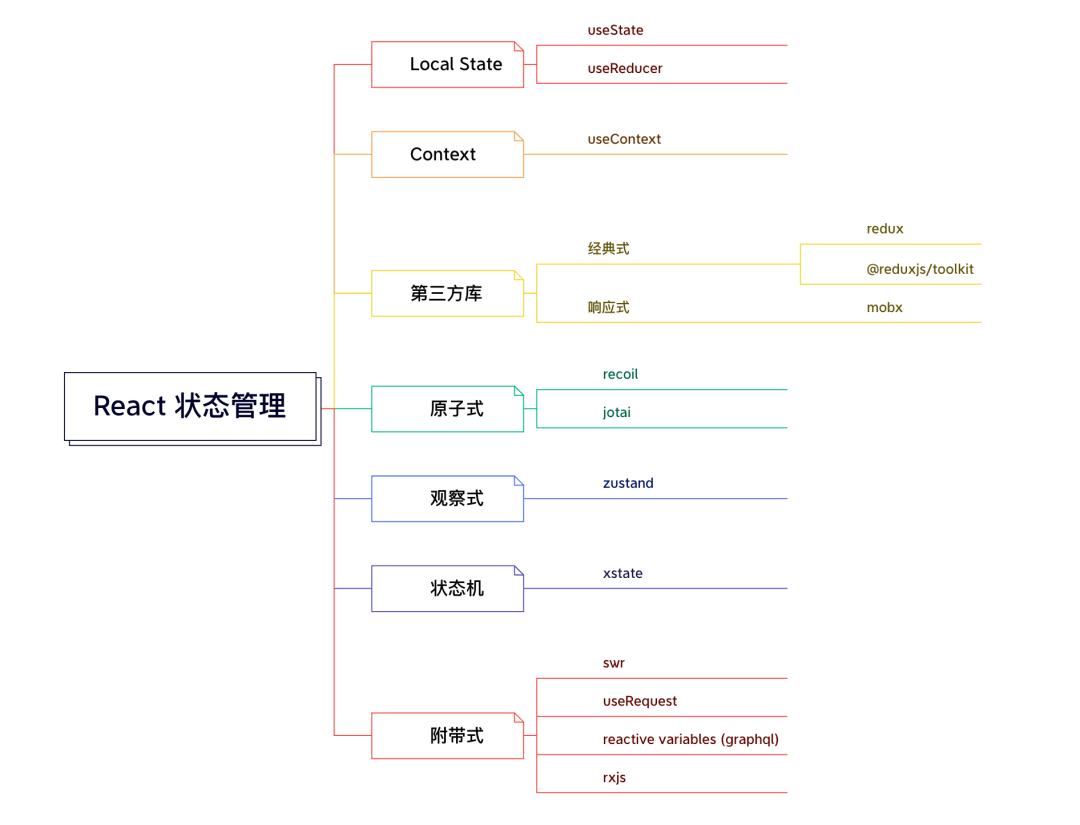
随着 2018 年 React V16.8 的问世,Function Component 一夜之间翻身做主人,同时 Hooks 的概念一经推出即得到了人民群众的一致好评,一大波围绕 Hooks 开展的整风运动随之兴起,追求小而美,上手快的开发理念,也直接影响到了状态管理库的设计,并诞生了一系列新兴作品。
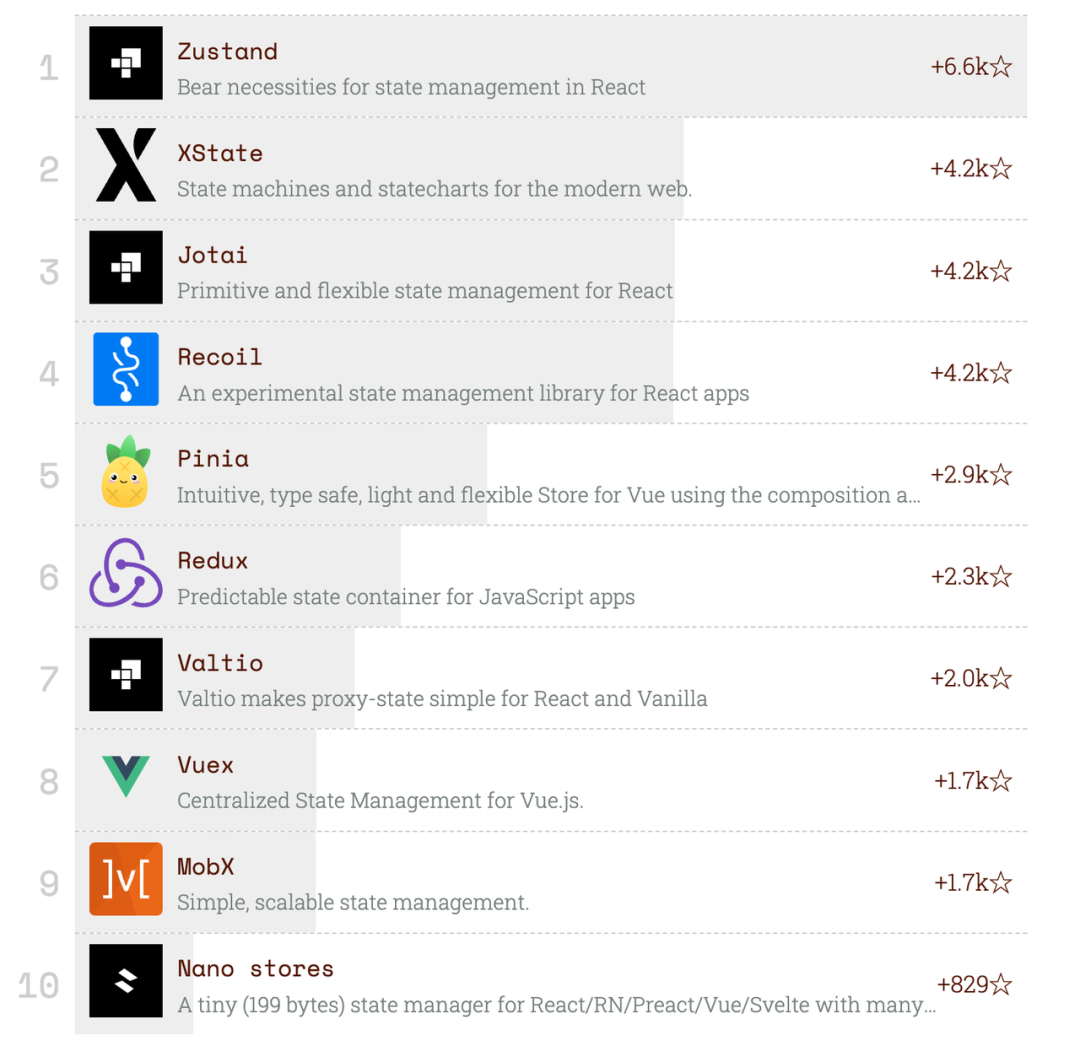
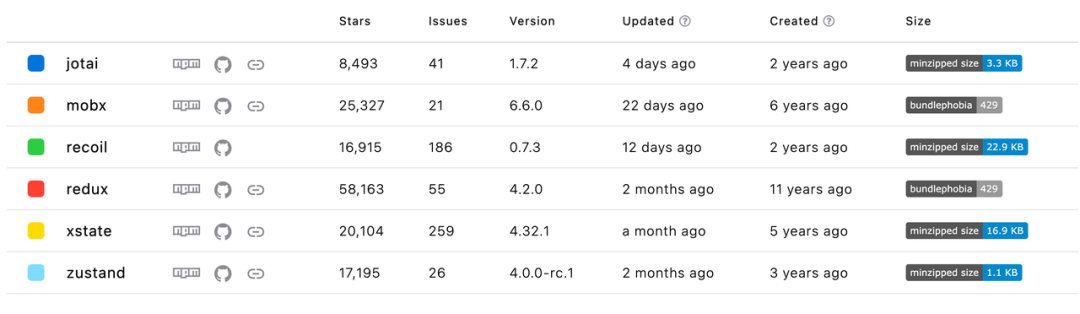
社区下载数据情况:
2021排行榜:https://risingstars.js.org/2021/en
实时数据直达:https://www.npmtrends.com/jotai-vs-mobx-vs-recoil-vs-redux-vs-zustand-vs-xstate

综合下来,一款优秀的状态管理库应当尽量满足如下条件,也可根据业务实际情况做些功能侧重:
TypeScript 类型支持
友好的异步操作
支持优雅分割(中心化 → 去中心化,数据集合 → 元数据)
少重复样板代码
高内聚,低耦合,组件自治优先
支持状态间互相依赖
自带优化,精准更新
丰富的生态体系(middleware,plugin 等)
符合函数式特性(immutable,computed,memoization...)
同时支持 Class 与 Hooks 组件(新旧过渡)
API 清晰简洁,上手简单
综合评测
本文中我们将围绕如下八种状态库的使用进行评测,效果场景均一样,即实现一个简单的数字计算器(同步)和远程数据拉取(异步),重在开发体验以及上手成本,也会对比渲染性能优化的效果。
| 名称 | 地址 | 上手难度 | 一句话概括 |
|---|---|---|---|
| React Context | https://reactjs.org/docs/context.html | 简单 | 官方 API,能用但不完美 |
| mobx | https://mobx.js.org/README.html | 中等 | 将响应式贯彻到底,黑魔法合集 |
| redux | https://redux-toolkit.js.org | 复杂 | 学术经典,老而弥坚 |
| zustand | https://github.com/pmndrs/zustand | 简单 | 后起之秀,大道至简,推荐学习源码 |
| jotai | https://jotai.org/ | 简单 | 和 zustand 一个组织,属于简配版 recoil |
| recoil | https://recoiljs.org/ | 中等 | 原子式思想,FB 旗下工作室出品,但非官方 |
| pinia | https://pinia.vuejs.org/ | 简单 | Vue 的下一代官方状态管理库,Vuex 的替代品 |
| xstate | https://xstate.js.org/docs/ | 复杂 | 微软出品,基于状态机理念设计的状态库 |
友情提示: 上述状态库在社区中都有着不错的口碑和下载量,并在实战中得到了充分验证。无论是哪种库的选用权均在读者自身,但是笔者还是希望能够多些赞许,少些吐槽,毕竟存在即合理,他们代表着社区中优秀开发者的最佳水平,如果都不喜欢,也欢迎加码过来:Show Your Code!
React Context
context 是官方认证的用于解决状态共享的 API,简单直接,开箱即用,如果你的工程规模不大,可以基于此 API 搭配 useReducer,useState 等快速封装一个轻量级的状态管理工具。
核心步骤:
基于 createContext()创建一个全局可访问的 context:
const Context = React.createContext();在业务组件的外层上创建 provider:
<Context.provider value={initialValue}>{children}</Context.provier>在需要消费数据的组件中,通过 useContext 方法获取 value,必须在 propvider 的 children 组件中才能被调用:const value = React.useContext(Context);
代码实现
- import React from "react";
-
- // @byted/hooks: createModel
-
- // from: https://github.com/jamiebuilds/unstated-next
-
-
-
- const EMPTY: unique symbol = Symbol();
-
-
-
- export interface ContainerProviderProps<State = void> {
-
- initialState?: State
-
- children: React.ReactNode
-
- }
-
-
-
- export interface Container<Value, State = void> {
-
- Provider: React.ComponentType<ContainerProviderProps<State>>
-
- useContainer: () => Value
-
- };
-
-
-
- export function createContainer<Value, State = void>(
-
- useHook: (initialState?: State) => Value,
-
- ): Container<Value, State> {
-
- let Context = React.createContext<Value | typeof EMPTY>(EMPTY)
-
-
-
- function Provider(props: ContainerProviderProps<State>) {
-
- let value = useHook(props.initialState)
-
- return <Context.Provider value={value}>{props.children}</Context.Provider>
-
- }
-
-
-
- function useContainer(): Value {
-
- let value = React.useContext(Context)
-
- if (value === EMPTY) {
-
- throw new Error("Component must be wrapped with <Container.Provider>")
-
- }
-
- return value
-
- }
-
-
-
- return { Provider, useContainer }
-
- }
-
-
-
- export function useContainer<Value, State = void>(
-
- container: Container<Value, State>,
-
- ): Value {
-
- return container.useContainer()
-
- }

hooks:
- // hooks
-
- export const useCount = () => {
-
- const [count, setCount] = useState(0)
-
- const [loading, setLoading] = useState(false);
-
- const [list, setList] = useState<User[]>([]);
-
-
-
- const add = useFunction((x: number) => {
-
- setCount(count => count + x)
-
- });
-
-
-
- const minus = useFunction((x: number) =>{
-
- setCount(count => count - x)
-
- });
-
-
-
- const reset = useFunction((x: number) => {
-
- setCount(0);
-
- setList([]);
-
- });
-
-
-
- const fetchList = useFunction(async (id: number) =>{
-
- setLoading(true)
-
- await sleep(1000);
-
- try {
-
- const { data } = await getUserInfo<User[]>({id});
-
- setList(data);
-
- setLoading(false);
-
- return data;
-
- } catch (e){
-
- setLoading(false);
-
- }
-
- })
-
-
-
- return {
-
- count,
-
- add,
-
- minus,
-
- reset,
-
- fetchList,
-
- loading,
-
- list
-
- }
-
- }
-
-
-
- export const CounterModel = createContainer(useCount);
provider:
- // provder
-
- import React from 'react'
-
- import ReactDOM from 'react-dom/client'
-
- import { CounterModel } from './store';
-
- import App from './App'
-
- import './index.css'
-
-
-
- ReactDOM.createRoot(document.getElementById('root')!).render(
-
- <React.StrictMode>
-
- <CounterModel.Provider>
-
- <App />
-
- </CounterModel.Provider>
-
- </React.StrictMode>
-
- )
useContext:
- // use value
-
- import React from "react";
-
- import Count from './Count';
-
- import { CounterModel } from '../models';
-
- import './style.css';
-
-
-
- function App() {
-
- const {
-
- add,
-
- minus,
-
- reset,
-
- fetchList,
-
- list,
-
- loading
-
- // count
-
- } = CounterModel.useContainer();
-
- .....
-
- }
-
-
-
- // rerender
-
- list~loading [] true
-
- Count.tsx:8 count -1
-
- index.tsx:32 list~loading (2) [{…}, {…}] false
-
- Count.tsx:8 count -1
点评反思
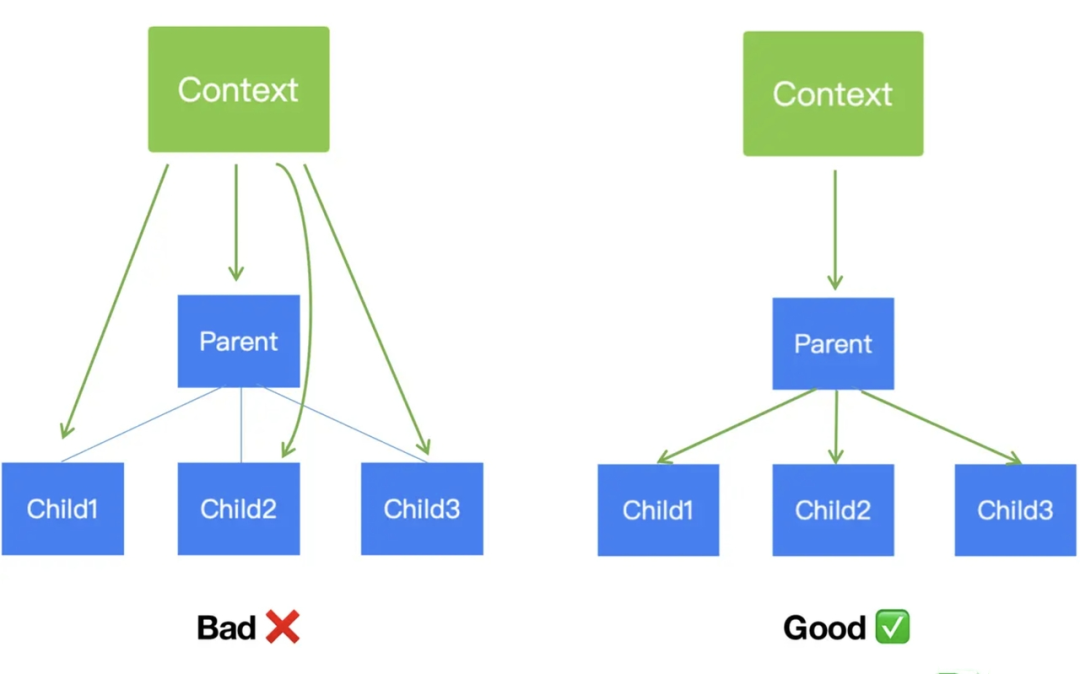
1. 基于 context 的方案最大的隐患(https://codesandbox.io/s/usecontext-usereducer-dk00je)是引入了页面重新渲染的问题, 不同于基于 selector 实现的细粒度响应式更新,context 的值一旦变化,所有调用了 useContext() 的组件均会重新触发渲染更新。由于 context API 并不能细粒度地分析某个组件依赖了 context 里的哪个属性,并且它可以穿透 React.memo 和 dependence 的对比,所以针对频繁引起数据变化的场景,在使用时需格外谨慎。
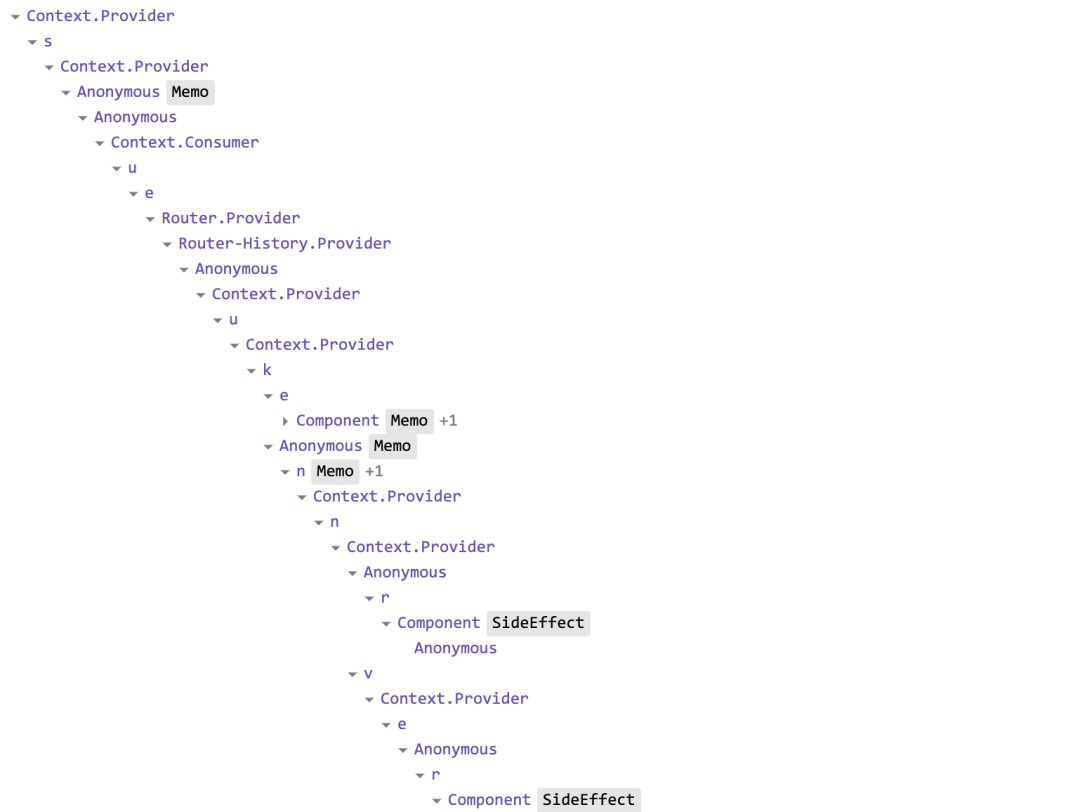
2. Provider 层层嵌套,调试体验极差;同时也不利于复杂 Store 结构的组织,业务量大了以后各种数据和操作混在一块,不做工作空间隔离(分拆成多个 context)容易造成互相覆盖;不同 Provider 之间的数据联动处理也较为繁琐。
小结一下:
context 适合作为一次性共享消费的处理场景,数据结构应到越简单越好,例如:国际化,主题,注册等这类全局变化且需要强制更新的操作。context 的数据管理方案应当作为应用程序数据的一部分而非全局状态管理的通用解决方案。
Redux
“redux 的 store 配置书写太臃肿复杂,又是 configureStore 又是 combineReducers,上手麻烦!”
“各种开发辅助包,各种 middleware,配置一个 redux 的工程比写业务逻辑还复杂!”
“各种样板代码,各种缠绕的代码逻辑,又臭又长,望而却步”
“ Dan Abramov 都跑路去 facebook,作者自己都不玩了,没前途了!!!”
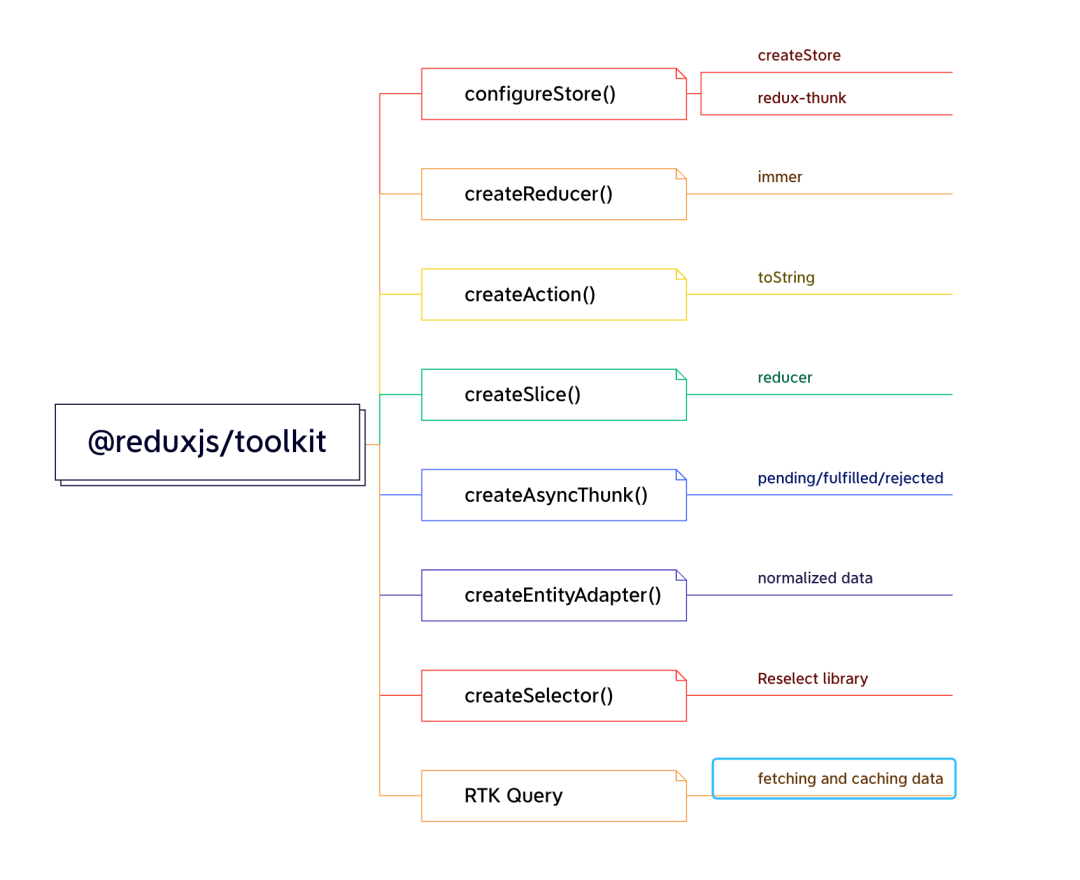
虽然下载数据持续走高,但是业界对于 Redux 的评价一直都不高,区区几百行的代码融入了太多高深的函数编程技巧,活脱脱的一部新手劝退指南。显然 Redux 官方也意识到了这个问题,在后 Dan 时代,新的团队开始着手于解决上述问题,本着类似 create-react-app 一样的精神,尽可能多地提供通用工具,抽象设置过程,打包常见场景工具集,提供最佳实践用例,降低用户的上手门槛,使其更好的使用 Redux,新的这些都体现在:Redux Toolkit(https://redux-toolkit.js.org/tutorials/overview)。
API 概览:
核心步骤
根据业务模块分拆 features,将 state,reudcer 等统一通过
createSlice做好集成并导出;将各个 slice 模块中的 reducer 通过
combineReducers进行集中整合,形成 rootReducer;将 rootReducer 和各个需要用到的 middleware 通过
configureStore集中整合,形成 store;在 React 的 App 组件中包裹 react-redux 的 Provider,并注入 store,
<Provider value={store}>{children}</Provier>在需要用到的组件中通过
useSelector和useDispatch的返回函数实现最终取值调用。
代码实现:
- import { createSlice, PayloadAction, createAsyncThunk } from "@reduxjs/toolkit";
-
-
-
- const initialState: Counter = {
-
- bears: 0,
-
- loading: false,
-
- list: []
-
- };
-
-
-
- export const fetchListAsync = createAsyncThunk(
-
- "fetch/list",
-
- async (userId: number, { rejectWithValue }) => {
-
- await sleep(1000);
-
- try {
-
- const response = await getUserInfo<User[]>({id: userId})
-
- return response.data
-
- } catch (err) {
-
- const error = err as AxiosError<ValidationErrors>
-
- if (!error.response) {
-
- throw err
-
- }
-
- return rejectWithValue(error.response.data)
-
- }
-
- }
-
- );
-
-
-
- export const counterSlice = createSlice({
-
- name: "counter",
-
- initialState,
-
- reducers: {
-
- increment: state => {
-
- // Redux Toolkit allows us to write "mutating" logic in reducers. It
-
- // doesn't actually mutate the state because it uses the Immer library,
-
- // which detects changes to a "draft state" and produces a brand new
-
- // immutable state based off those changes
-
- state.bears += 1;
-
- },
-
- resetValue: state => {
-
- state.bears = 0;
-
- state.list = [];
-
- },
-
- decrement: state => {
-
- state.bears -= 1;
-
- },
-
- incrementByAmount: (state, action: PayloadAction<number>) => {
-
- state.bears += action.payload;
-
- },
-
- setLoading: (state, action: PayloadAction<boolean>) => {
-
- state.loading = action.payload;
-
- }
-
- },
-
-
-
- extraReducers: (builder) => {
-
- builder.addCase(fetchListAsync.pending, (state) => {
-
- state.loading = true;
-
- })
-
- .addCase(fetchListAsync.fulfilled, (state, { payload }) => {
-
- state.loading = false;
-
- state.list = payload;
-
- })
-
- .addCase(fetchListAsync.rejected, (state, action) => {
-
- state.loading = false;
-
- })
-
- }
-
- })
-
-
-
- export const {
-
- increment,
-
- decrement,
-
- incrementByAmount,
-
- resetValue,
-
- } = counterSlice.actions;
combineReducers:
- import { combineReducers } from '@reduxjs/toolkit'
-
- import counterSlice from '../features/counterSlice'
-
- import apiSlice from '../features/apiSlice'
-
-
-
- const rootReducer = combineReducers({
-
- counter: counterSlice.reducer,
-
- [apiSlice.reducerPath]: apiSlice.reducer,
-
- });
-
-
-
- export default rootReducer;
configureStore:
- import { configureStore, Action, ThunkAction } from '@reduxjs/toolkit';
-
- import logger from 'redux-logger'
-
- import rootReducer from "./rootReducer";
-
- import apiSlice from '../features/apiSlice';
-
-
-
- const store = configureStore({
-
- reducer: rootReducer,
-
- middleware: (getDefaultMiddleware) => {
-
- return getDefaultMiddleware().concat([logger, apiSlice.middleware]);
-
- },
-
- })
-
-
-
- export type AppDispatch = typeof store.dispatch;
-
- export type RootState = ReturnType<typeof store.getState>;
-
- export type AppThunk = ThunkAction<void, RootState, unknown, Action<string>>
-
-
-
- export default store
provider:
- import React from 'react';
-
- import ReactDOM from 'react-dom/client';
-
- import App from './App';
-
- import { Provider } from "react-redux";
-
- import store from './store';
-
- import './index.css';
-
-
-
- ReactDOM.createRoot(document.getElementById('root')!).render(
-
- <React.StrictMode>
-
- <Provider store={store}>
-
- <App />
-
- </Provider>
-
- </React.StrictMode>
-
- );
useAppDispatch + useAppSelector:
- import React from "react";
-
- import { useAppDispatch, useAppSelector } from "../store/hooks";
-
- import {
-
- increment,
-
- decrement,
-
- resetValue,
-
- incrementByAmount,
-
- fetchListAsync,
-
- } from "../features/counterSlice";
-
-
-
- import Count from './Count';
-
-
-
- import './style.css'
-
-
-
- function App() {
-
- const dispatch = useAppDispatch();
-
- const loading = useAppSelector(state => state.counter.loading);
-
- const list = useAppSelector(state => state.counter.list);
-
- .....
-
- }
点评反思:
基于 @reduxjs/toolkit 套件提供的 API 写出的代码,相对于以前的 redux 风格已经有了显著提升,代码逻辑也变得更加内聚,同时 redux 多年积累的生态(https://github.com/xgrommx/awesome-redux)能够完整使用,这点还是非常强大的;
使用者要明显感知同步和异步操作,需结合
createSlice.extraReducers + createAsyncThunk协作完成对应功能,使用起来有一定的心智负担;代码组织形式略重,虽然已经简化了很多细节概念但是整体的数据流操作思想没有变化,使用者还是需要系统学习 redux 才能完整上手做项目。
小结一下:
“You may not need to use redux,but you can't replace it by hooks !”
Mobx
mobx 是在与 Redux 的分庭抗争中为数不多的发展良好的一款状态管理库,作者是业界有名的“轮子哥”-Michel Weststrate(https://github.com/mweststrate),他和 Dan 一样,现在也是 React 团队的成员之一(What Can I Say?)。相较于 redux 里鼓励的 immutable,mobx 则坚持走 Reaction,通过透明的函数响应式编程使得状态管理变得简单和可扩展。MobX 背后的哲学很简单:任何源自应用状态的东西都应该自动地获得 , 其中包括UI、数据序列化、与服务器通信等,上手使用简单。

API 概览:
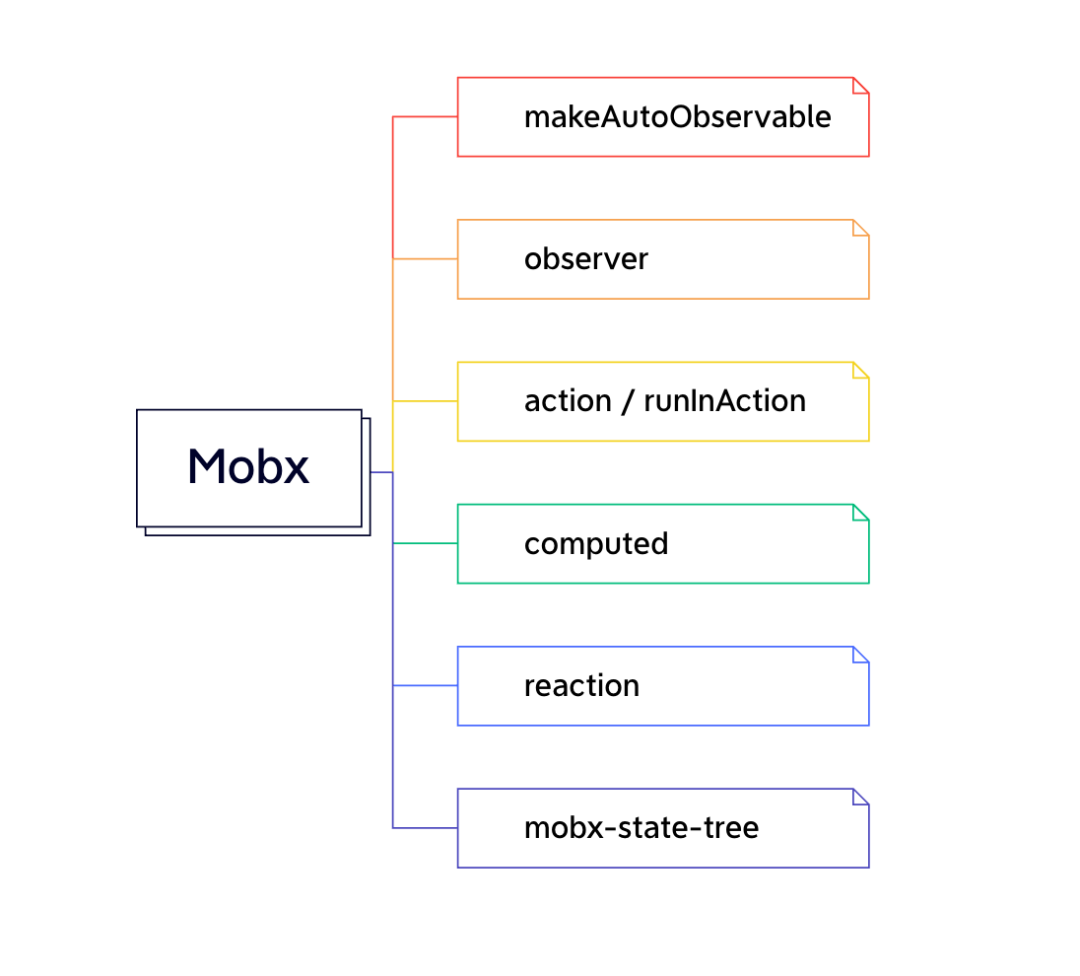
MobX 提供了应用状态优化与 React 组件同步机制,这种机制就是使用响应式虚拟依赖状态,它只有在真正需要的时候才更新并且永远保持最新状态。
核心步骤
根据业务模块分拆成多 store,将需要做响应式更新的字段和方法通过
makeObservable封装到一个 class(object)中并导出,示例参考(https://mobx.js.org/observable-state.html)将各个 store 进行集中整合,形成一个 RootStore;
基于 createContext() 创建 context,并将 rootStore 注入到 context.provider 的 value 中,
<RootStoreContext.Provider value``=``{stores}>{children}</RootStoreContext.Provider>;将 RootStoreContext.Provider 包裹到在 React 的 App 组件外层;
在需要用到的组件中搭配
observer和useStores实现最终调用。
代码实现
- import { makeAutoObservable, runInAction } from "mobx";
-
-
-
- class CounterStore {
-
- constructor() {
-
- makeAutoObservable(this, {},{ autoBind: true });
-
- }
-
-
-
- // properties becomes observables
-
- name = 'counter';
-
-
-
- bears = 0;
-
-
-
- list = [];
-
-
-
- loading = false;
-
-
-
- // `getter` becomes computed (derive) property,
-
- get result() {
-
- return `Result: ${this.bears}`
-
- };
-
-
-
- // `setter` becomes mobx actions
-
- // which is the updater of the stor
-
- set increase(num: number) {
-
- this.bears += num;
-
- };
-
-
-
- set reduce(num: number) {
-
- this.bears -= num;
-
- };
-
-
-
- setLoading(loading: boolean){
-
- this.loading = loading;
-
- };
-
-
-
- reset() {
-
- this.bears = 0;
-
- this.loading = false;
-
- this.list = [];
-
- };
-
-
-
- // async updating is happens within a normal async function
-
- async updateUserList() {
-
- await sleep(1000)
-
- this.loading = true;
-
- const { data } = await getUserInfo<User[]>();
-
- // if you want to update the store, wrap it with the runInAction()
-
- try {
-
- runInAction(() => {
-
- if (data.length > 0 ){
-
- // @ts-ignore
-
- this.list = data;
-
- }
-
- });
-
- } catch (e){
-
- console.error(e);
-
- }
-
- };
-
-
-
- // if you dislike runInAction(), just write a generator function
-
- // underneath, it will be wrapped with a flow() from 'mobx';
-
- // just remember do this when calling from the user land,
-
- // `const res = await flowResult(store.updateFromRemoteFlowVersion())`
-
- *updateDataList() {
-
- this.loading = true;
-
- yield sleep(1000)
-
- try {
-
- const { data } = yield getUserInfo<User[]>();
-
- this.list = data;
-
- this.loading = false;
-
- } catch (e){
-
- this.loading = false;
-
- console.error(e);
-
- }
-
- };
-
- }
-
-
-
- export default CounterStore;
rootStore:
- import React, {createContext, FC, PropsWithChildren} from "react";
-
- import CounterStore from "./counter";
-
-
-
- interface StoreProps {
-
- counterStore: CounterStore
-
- }
-
-
-
- interface Props {
-
- children: PropsWithChildren<React.ReactNode>;
-
- }
-
-
-
- export const RootStoreContext = createContext<StoreProps>(null!);
-
-
-
- const stores = {
-
- counterStore: new CounterStore()
-
- };
-
-
-
- const RootStore: FC<Props> = ({ children }: Props) => {
-
- return <RootStoreContext.Provider value={stores}>{children}</RootStoreContext.Provider>;
-
- };
-
-
-
- export default RootStore;
provider:
- import React from 'react';
-
- import ReactDOM from 'react-dom/client';
-
- import RootStore from './store';
-
- import App from './App';
-
- import './index.css';
-
-
-
- ReactDOM.createRoot(document.getElementById('root')!).render(
-
- <React.StrictMode>
-
- <RootStore>
-
- <App />
-
- </RootStore>
-
- </React.StrictMode>
-
- );
observer + useStores:
- import React from "react";
-
- import { observer } from "mobx-react-lite";
-
- import useStores from '../hooks/useStores';
-
- import Count from './Count';
-
-
-
- import './style.css';
-
-
-
- function App() {
-
- const { counterStore } = useStores();
-
- const { list, loading, updateDataList, reset } = counterStore;
-
- console.log("list~loading", list, loading);
-
- ......
-
- }
-
-
-
- export default observer(App);
点评反思:
mobx 中的响应式更新的理念算是比较创新的一种实践,用过 Vue 的同学应该不会陌生,搭配 observer()内部会自动处理 memo;
整体要学习的概念少,熟悉 4 个基本 api 即可满足大部分需求场景,不用明显感知同步异步操作;
采用多 store 进行数据管理,store 之间的数据联动处理麻烦,需要保持对 rootStore 的引用;
小结一下:
整体上算是一个非常优秀的状态管理库,同时社区的更新适配及时,与 react 的特性演进同步,不会影响太多业务代码风格,在团队中用大量实践落地。
Zustand
这是一股来自东方的神秘力量,维护团队叫:dashi(https://github.com/dai-shi),做了非常多有代表性的 react 周边工具,除了 zustand 外,另一个 jotai 也是出自他们的手笔,代码设计遵循大道至简的理念,同时也吸收了很多社区里的一些方案的精华,其状态管理是可以脱离于 React 组件自身的状态,作为一个可控的第三方存储来使用,既支持将状态保存在一个对象里进行管理,也能创建多 store 来分离维护复杂状态。
API 概览:
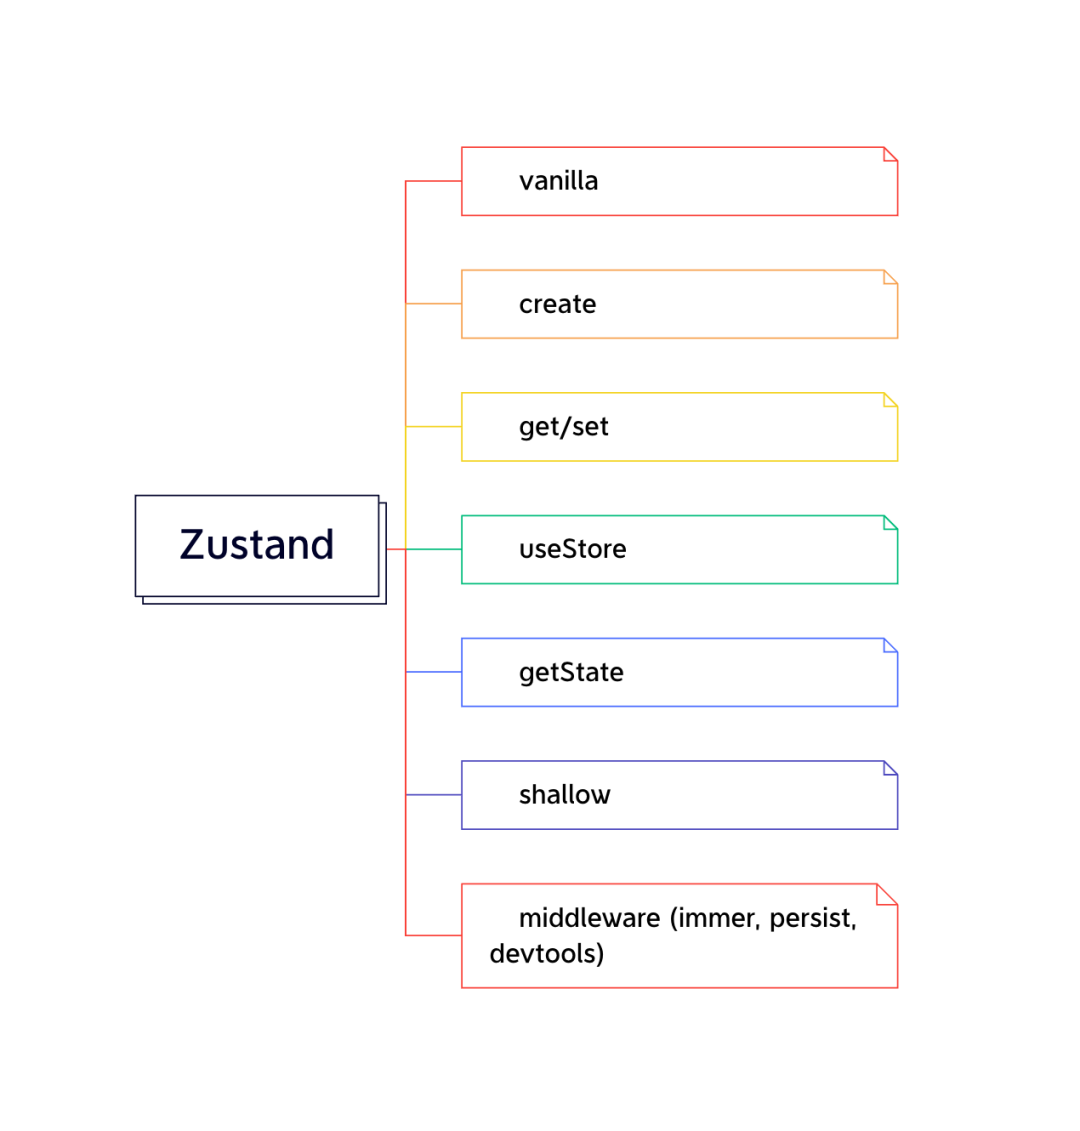
zustand 是一个实现非常精巧的状态管理库,分层合理优雅,中间件实现巧妙,大部分使用特性都在利用 React 语法,代码逻辑清晰简单,除了在生产环境中落地外,也有很强的学习参考价值。
核心步骤
既支持单 store 加类 reducer 的管理方式,也可根据业务模块分拆成多 store,灵活可控;
使用
create((set, get)=> ({....}))方法创建 store 中的数据结构,默认 immutable;像写 hooks 一样写 action 逻辑,不用感知同步还是异步操作;
不需要提供 context provider,不侵入业务设计;
在子组件中使用
useStore()方法实现调用,自带 selector 和 shallow 比较,优化重复渲染;
代码实现
- import create from 'zustand'
-
- import { User, Counter} from './type';
-
- import {getUserInfo, sleep} from "@smt/utils";
-
-
-
- export const useStore = create<Counter>((set, get) => ({
-
- bears: 0,
-
- list: [],
-
- loading: false,
-
- increase: () => set(state => ({ bears: state.bears + 1 })),
-
- reduce: () => set(state => ({ bears: state.bears - 1 })),
-
- reset: () => set({ bears: 0, list: [] }),
-
- setLoading: (val: boolean) => set({ loading: val }),
-
- getData: async () => {
-
- // Read from state in actions
-
- try {
-
- get().setLoading(true);
-
- await sleep(1000);
-
- const { data } = await getUserInfo<User[]>();
-
- set({ list: data, loading: false }) // Object.assing({}, state, nextState)
-
- } catch (e) {
-
- console.error(e);
-
- get().setLoading(false);
-
- }
-
- }
-
- }));
useStore:
- import React from "react";
-
- import shallow from 'zustand/shallow'
-
- import Count from './Count';
-
- import useStore from '../store';
-
-
-
- import './style.css';
-
-
-
- function App() {
-
- // re-renders the component when either state.loading or state.list change;
-
- const { loading, list } = useStore(({ loading, list }) => ({ loading, list }), shallow);
-
- // Getting non-reactive fresh state
-
- const { reduce, increase, getData, reset } = useStore.getState();
-
-
-
- const handleFetchData = () => {
-
- getData();
-
- }
-
-
-
- console.log("loading or list change~", loading, list);
-
- ...
-
- }
-
-
-
- export default App
点评反思
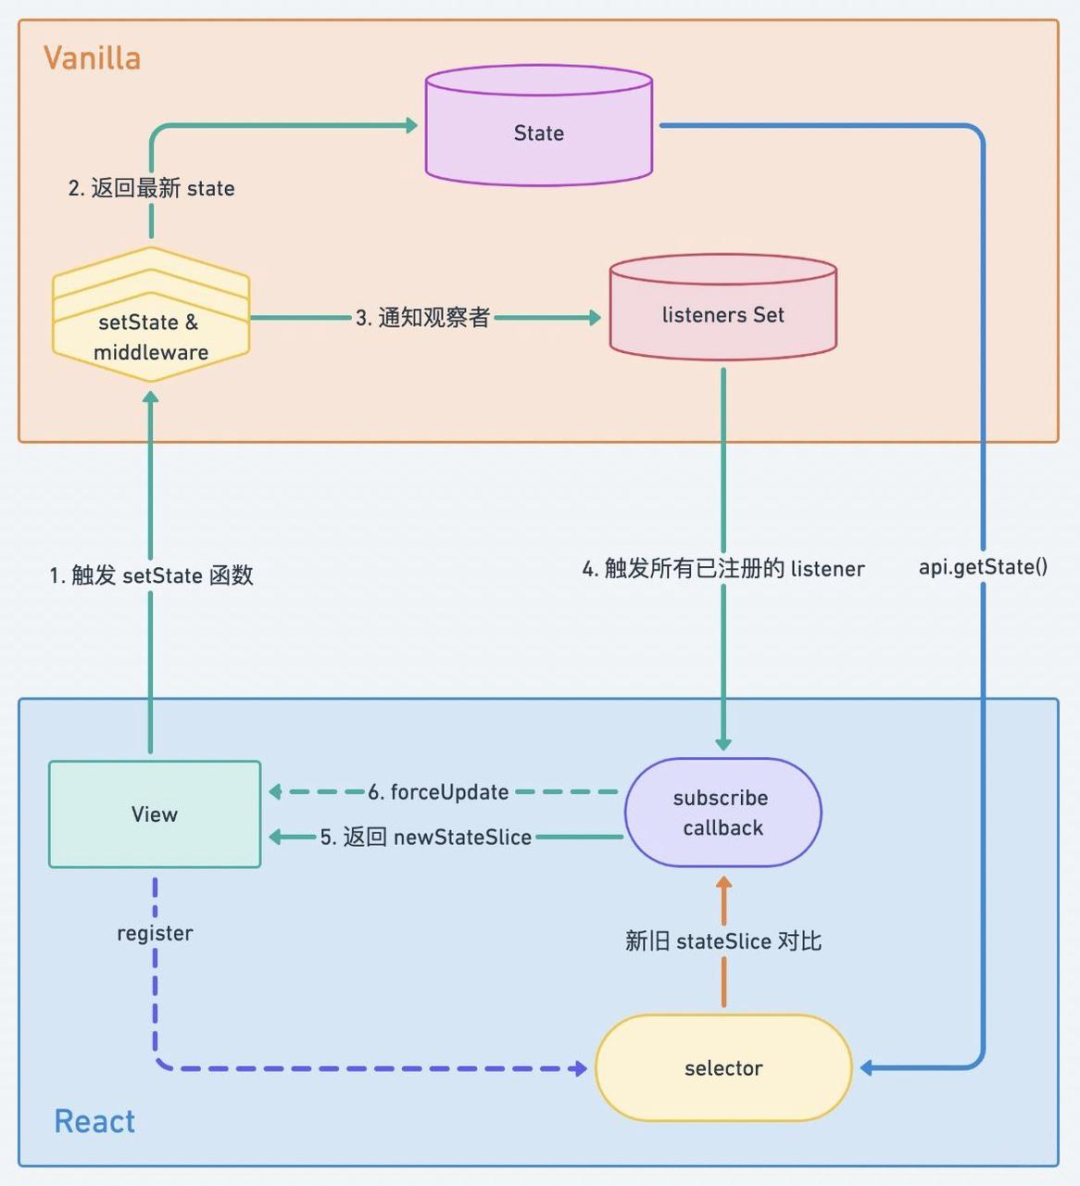
Vanilla 层是发布订阅模式的实现,提供了 setState、subscribe 和 getState 方法,并且前两者提供了 selector 和 equalityFn 参数,以供在只有原生 JS 模式下的正常使用,但 React 的使用过程中基本只会用该模块的发布订阅功能。
React 层是 Zustand 的核心,实现了 reselect 缓存和注册事件的 listener 的功能,并且通过 forceUpdate 对组件进行重渲染。
积极拥抱 hooks,不需要使用 context providers 包裹应用,遵循大道至简的原则,上手简单;
除了官方实现的一些经典 middleware 外,整体生态一般,期待后续会有更多最佳实践。
小结一下:
Zustand 是 2021 年 Star 增长最快的 React 状态管理库,设计理念函数式,全面拥抱 hooks,API 设计的很优雅,对业务的侵入小,学习的心智负担低,推荐使用。
Recoil
recoil 是 facebook 旗下的工作室在 2020 年推出的一个新型的状态管理库,因为和 react 师出同门,所以自然引得了更多的关注,相对于基于对象结构的集中管理状态,recoil 采用的是分散管理原子状态的设计模式,其核心概念只有 Atom(原子状态) 和 Selector(派生状态),掌握即可上手。

API 概览:
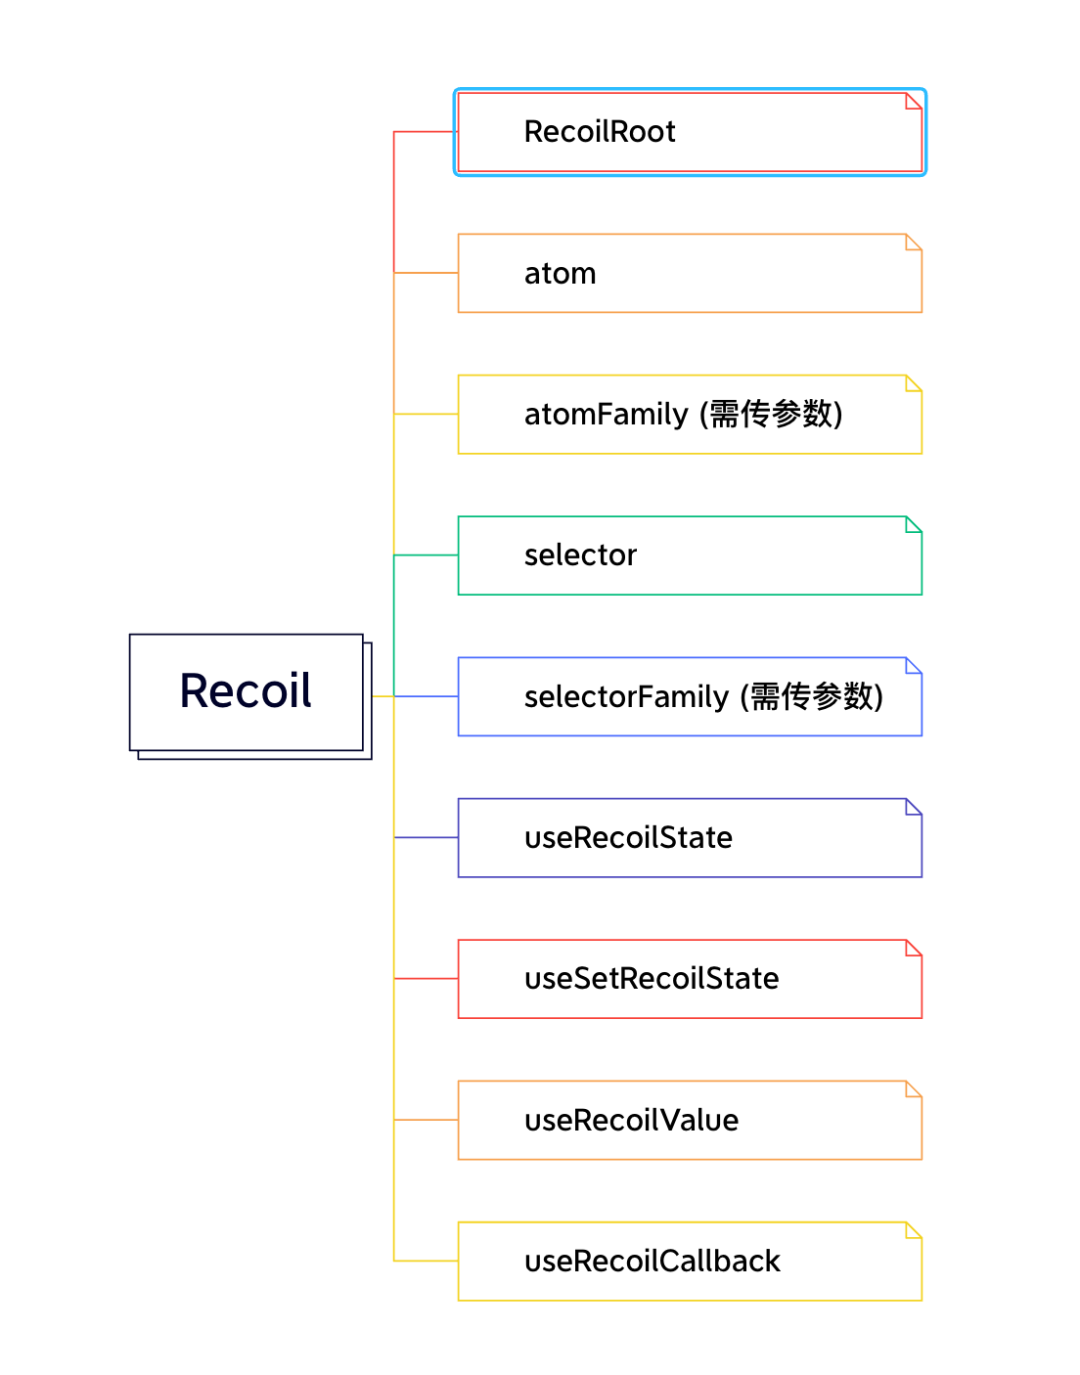
核心步骤:
在 React 的 App 组件中使用
RecoilRoot进行包裹;定义
atom原子状态,需要提供 key 和默认值,可以被任意组件订阅;基于 atom 定义的状态可以使用
selector派生,类似 redux 中的 reselect 或 mobx 的 computed;在组件用可通过 useRecoilState(读/写),useRecoilValue(读),useSetRecoilState(写)操作状态。
不用感知同步异步操作,async get 回调中返回 promise 状态即可,可以与 Suspense 配合使用。
代码实现
- import React from 'react'
-
- import ReactDOM from 'react-dom/client'
-
- import { RecoilRoot } from "recoil";
-
- import App from './App'
-
- import './index.css'
-
-
-
- ReactDOM.createRoot(document.getElementById('root')!).render(
-
- <React.StrictMode>
-
- <RecoilRoot>
-
- <App />
-
- </RecoilRoot>
-
- </React.StrictMode>
-
- )
atom + selector:
- import {atom, selector, selectorFamily, useRecoilCallback} from "recoil";
-
- import { getUserInfo, sleep } from "@smt/utils";
-
- import { User } from "./type";
-
-
-
- export const bearsState = atom<number>({
-
- key: 'bears', // 唯一标识
-
- default: 0, // 默认值
-
- });
-
-
-
- export const loadingState = atom<boolean>({
-
- key: 'loading', // 唯一标识
-
- default: false, // 默认值
-
- });
-
-
-
- export const listState = atom<User[]>({
-
- key: "list",
-
- default: []
-
- });
-
-
-
- export const bearsChangeState = selector({
-
- key: 'bearsStrState',
-
- get: ({get}) => {
-
- const text = get(bearsState);
-
- return text;
-
- },
-
- set:({set, reset, get}, newValue) => {
-
- set(bearsState, newValue)
-
- }
-
- });
-
-
-
- export const userListQuery = () => {
-
- return useRecoilCallback(({ set, snapshot: { getPromise } }) => async (id: number) => {
-
- set(loadingState, true);
-
- await sleep(1000);
-
- const response = await getUserInfo<User[]>({id});
-
- set(loadingState, false);
-
- set(listState, response.data);
-
- }, []);
-
- };
useRecoilValue:
- import React from "react";
-
- import {
-
- useRecoilState,
-
- useRecoilValue,
-
- useSetRecoilState
-
- } from "recoil";
-
- import {
-
- bearsChangeState,
-
- loadingState,
-
- userListQuery,
-
- listState,
-
- userInitQueryState
-
- } from '../store';
-
- import Count from './Count';
-
- import './style.css'
-
-
-
- function App() {
-
- const setText = useSetRecoilState(bearsChangeState);
-
- const [list, setList] = useRecoilState(listState);
-
- const loading = useRecoilValue(loadingState);
-
- const userListFetch = userListQuery();
-
-
-
- const fetchData = () => {
-
- userListFetch(1);
-
- };
-
- ......
-
- }
-
-
-
- export default App
点评反思:
基于 atom()实现的 state 可以做到读与写分离,实现按需渲染;
原子存储的数据相互间无关联,关联的数据使用派生值的方式推导,不用考虑 store 的结构组织;
完全拥抱函数式的
Hooks使用方式,兼顾了读写操作的场景。
小结一下:
Recoil 采用与 React 一样的工作方式与原理,在新特性上支持良好,针对派生数据(Derived data)和异步查询采用纯函数以及高效订阅的方式进行处理,在模式设计和创新性上还是可圈可点的。
Jotai
jotai 是一个非常灵活轻巧的库,和前面的提到的 zustand 师出同门,基于原始 hooks 方式提供基础能力,同时可以灵活组织多个 atom 来创建新的 atom,并支持异步处理。
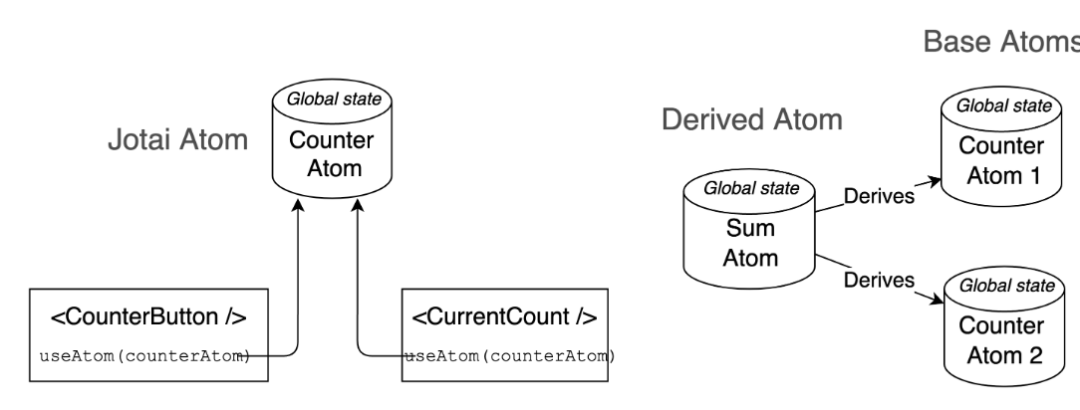
jotai 可以看作是 recoil 的简化版本,都是采用分散管理原子状态的设计模式,但是相较于 recoil 更简洁,不需要显性使用 selector。
API 概览:
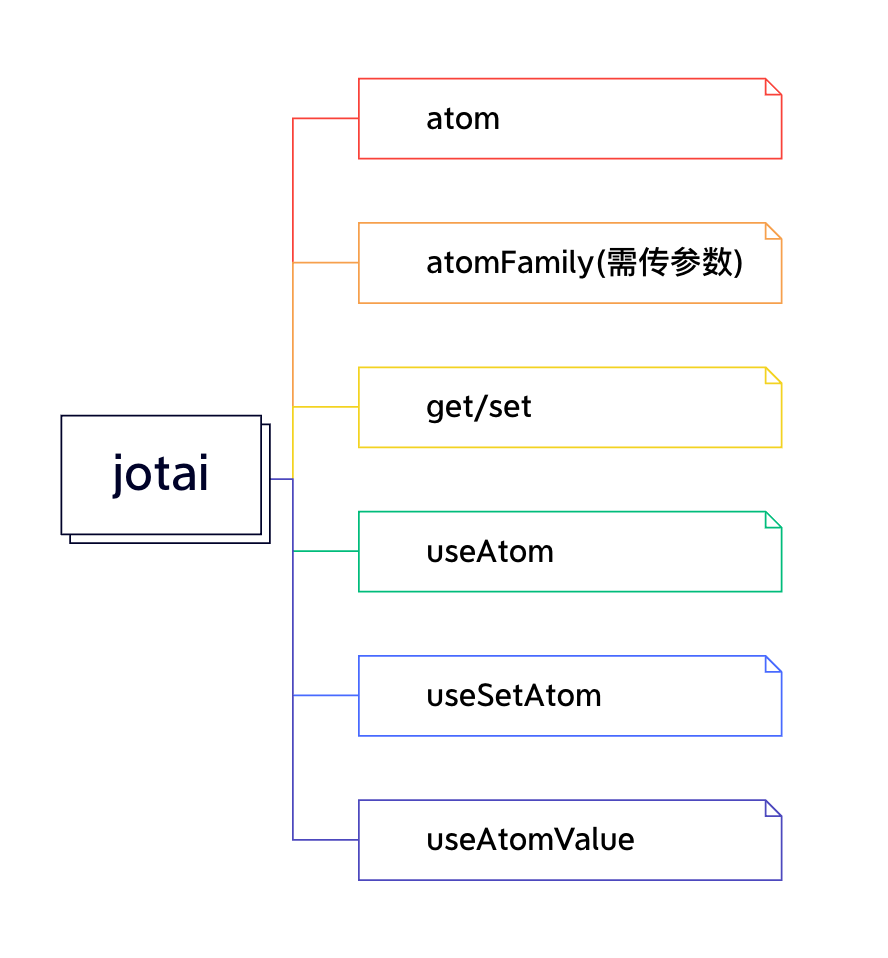
核心步骤:
在 React 的 App 组件中使用
Provider进行包裹;示例(https://jotai.org/docs/basics/primitives)定义
atom原子状态,需要提供默认值,可以被任意组件订阅;基于 atom 定义的状态可以使用
get方法派生,const newAtom = atom(get => get(baseAtom).toUpperCase());在组件用可通过
useAtom(读/写),useAtomValue(读),useSetAtom(写)操作状态。不用感知同步异步操作,async get 回调中返回 promise 状态即可,可以与 Suspense 配合使用。
代码实现:
- import { atom } from "jotai";
-
- import { getUserInfo, sleep } from "@smt/utils";
-
- import { User } from "./type";
-
-
-
- export const listAtom = atom<User[]>([]);
-
- export const bearsAtom = atom<number>(0);
-
- export const bearsRenderAtom = atom<string>((get) => `Result:${get(bearsAtom)}`);
-
- export const loadingAtom = atom<boolean>(false);
-
-
-
- export const fetchListAtom = atom(
-
- (get) => get(listAtom),
-
- async (_get, set, params) => {
-
- set(loadingAtom, true);
-
- await sleep(1000);
-
- try {
-
- const response = await getUserInfo<User[]>(params)
-
- set(listAtom, response.data);
-
- }catch (e){
-
- console.error(e);
-
- }finally {
-
- set(loadingAtom, false);
-
- }
-
- }
-
- )
Provider:
- import React from 'react'
-
- import ReactDOM from 'react-dom/client'
-
- import { Provider } from 'jotai';
-
- import App from './App'
-
- import './index.css'
-
-
-
- ReactDOM.createRoot(document.getElementById('root')!).render(
-
- <React.StrictMode>
-
- <Provider>
-
- <App />
-
- </Provider>
-
- </React.StrictMode>
-
- );
useAtomValue:
- import React from "react";
-
- import { useAtom, useSetAtom, useAtomValue} from "jotai";
-
- import {bearsAtom, loadingAtom, fetchListAtom, listAtom} from '../store';
-
- import Count from './Count';
-
-
-
- import './style.css'
-
-
-
- function App() {
-
- const setText = useSetAtom(bearsAtom);
-
- const [list, fetchList] = useAtom(fetchListAtom);
-
- const setList = useSetAtom(listAtom);
-
- const loading = useAtomValue(loadingAtom);
-
- ......
-
- }
-
-
-
- export default App
点评反思:
原始:API 都是以 Hooks 方式提供,使用方式类似于 useState,useReducer;
灵活:可组合多个 atom 派生出新的 atom,不用感知同步异步;
全面:官方的文档和示例给的都比较丰富,参考上手非常容易。
兼容:可搭配 redux,zustand,xstate 等其他状态库混合使用。
小结一下:
Primitive and flexible state management for React。
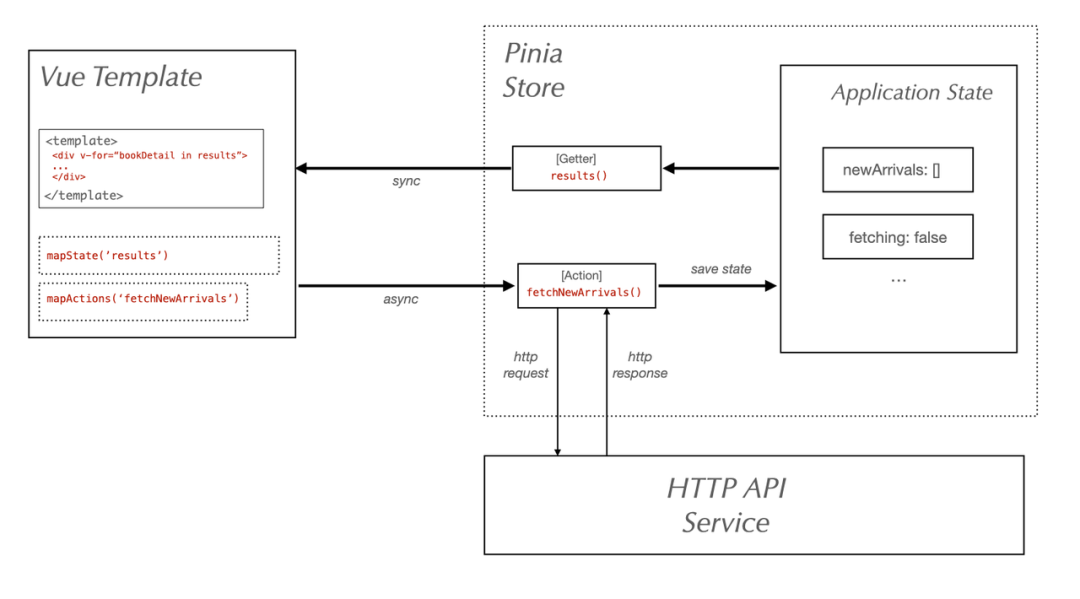
Pinia
Pinia.js (https://pinia.vuejs.org/)是新一代的状态管理器,由 Vue.js团队中成员所开发的,也被认为是下一代的 Vuex,相较于 React 社区的野蛮生长,Vue 团队把状态管理工具收录到了官方团队进行维护,并且尽可能多地降低新用户上手门槛,相对于经典 Vuex 的语法上手会更简单。

API 概览:
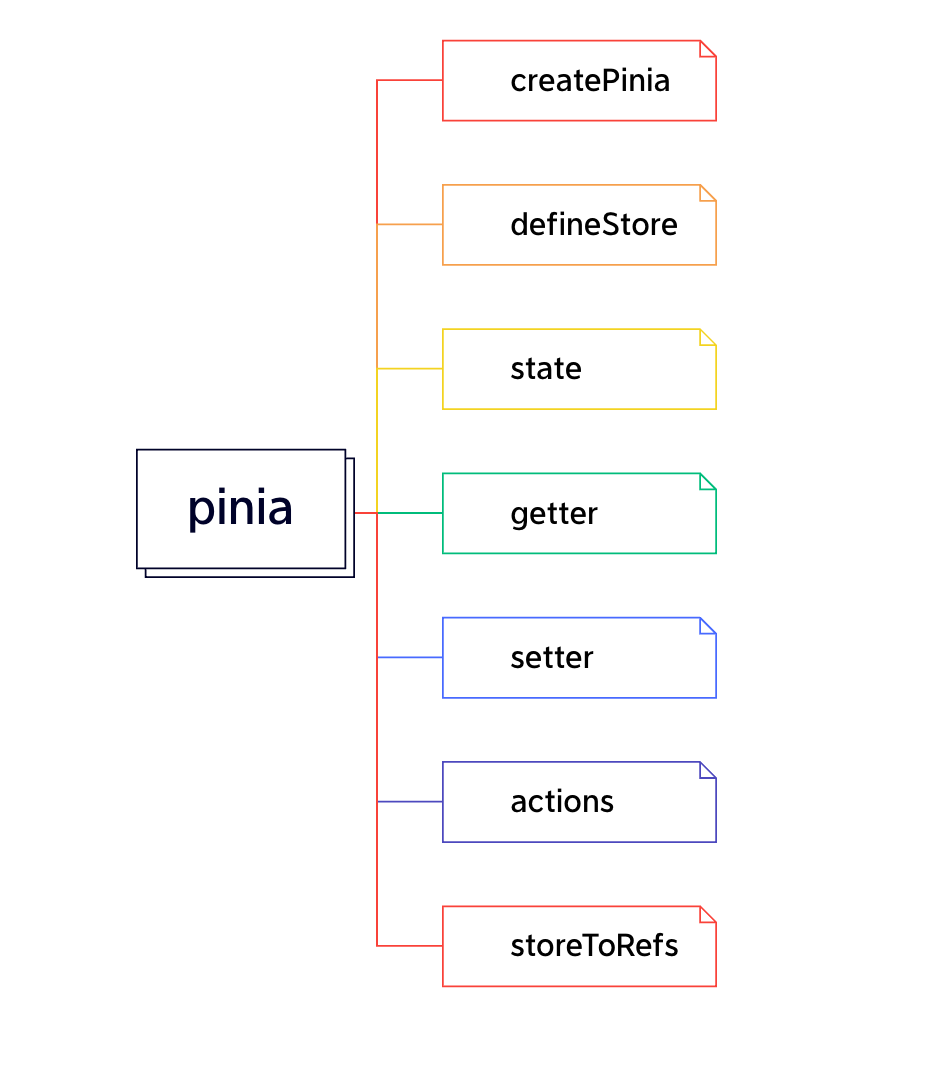
核心步骤:
创建 store:新建 src/store 目录并在其下面基于 createPinia()创建 index.ts,导出 store;
定义 state:基于 defineStore()定义 state 的数据结构;
读写 state:用好 getter,setter,action 三个方法即可,可以参考文档介绍(https://pinia.vuejs.org/core-concepts/getters.html);
使用 state:可以用 useStore()或者 computed()的方式调用,默认对 state 解构会使其失去响应式,可以用 storeToRefs 进行优化处理;
代码实现:
- import { defineStore } from 'pinia';
-
- import { User, Counter } from './type';
-
- import { getUserInfo, sleep } from "@smt/utils";
-
-
-
- export const useCountStore = defineStore({
-
- id: "count",
-
- state: (): Counter => ({
-
- loading: false,
-
- list: [],
-
- bears: 0,
-
- }),
-
- getters: {
-
- getBears(): string {
-
- return `Result:${this.bears}`;
-
- }
-
- },
-
- actions: {
-
- increase() {
-
- this.bears+=1;
-
- },
-
- reduce() {
-
- this.bears-=1;
-
- },
-
- reset() {
-
- this.list = [];
-
- this.bears = 0
-
- },
-
- async updateList(id: number) {
-
- this.loading = true;
-
- await sleep(1000);
-
- const response = await getUserInfo<User[]>({id});
-
- if (response.code === 0){
-
- this.list = response.data;
-
- this.loading = false;
-
- }
-
- return response;
-
- }
-
- },
-
- });
useStore:
- <template>
-
- <h1>{{ msg }}</h1>
-
- <div class="result">count is: {{ bears }}</div>
-
- <pre class='code'>{{ loading ? 'loading...' : JSON.stringify(list) }}</pre>
-
- <div class="btn-box">
-
- <button type="button" @click="handleIncrease">increase</button>
-
- <button type="button" @click="handleReduce">reduce</button>
-
- <button type="button" @click="handleFetch">fetch</button>
-
- <button type="button" @click="handleReset">reset</button>
-
- </div>
-
- </template>
-
-
-
- <script setup lang="ts">
-
- import { ref, defineProps } from "vue"
-
- import { storeToRefs } from 'pinia';
-
- import { useCountStore } from '../store/modules/count';
-
-
-
- defineProps<{ msg: string }>()
-
-
-
- const countStore = useCountStore();
-
-
-
- const { bears, loading, list } = storeToRefs(countStore);
-
-
-
- const handleIncrease = () => {
-
- countStore.increase();
-
- }
-
-
-
- const handleReduce = () => {
-
- countStore.reduce();
-
- }
-
-
-
- const handleFetch = () => {
-
- countStore.updateList(1);
-
- }
-
-
-
- const handleReset = () => {
-
- countStore.reset();
-
- }
-
-
-
- </script>
点评反思:
完整的 typescript 的支持,完美贴合 Vue3 的写法;
去除 mutations,commit,只有 state,getters,actions;
actions 支持同步和异步;
没有模块嵌套,只有 store 的概念,store 之间可以自由使用,更好的代码分割;
小结一下:
没有炫技成分,一切以满足实际需要出发,API 简单,开箱即用,更多操作可直接:上手体验(https://stackblitz.com/github/piniajs/example-vue-3-vite?file=README.md)。
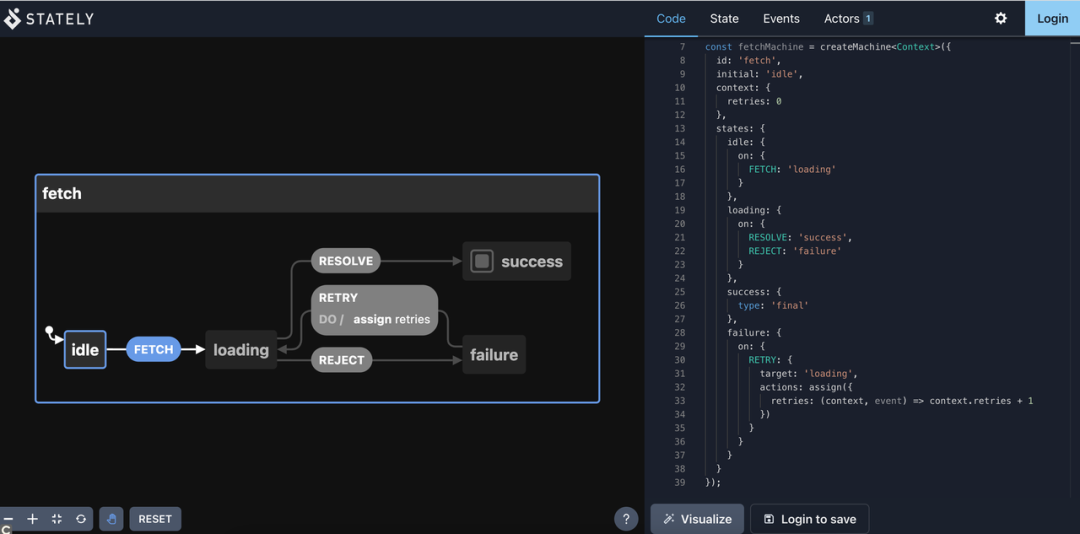
Xstate
XState是一个基于有限状态机的实现的状态管理工具,应对程序中状态变化切换行为的场景,并可以通过图形化的方式转换为状态图(https://stately.ai/viz)的形式,整体功能十分强大,主要适合需要用到频繁切换状态机的场景,例如:红绿灯,游戏场景,订单下单步骤等。
API 概览:
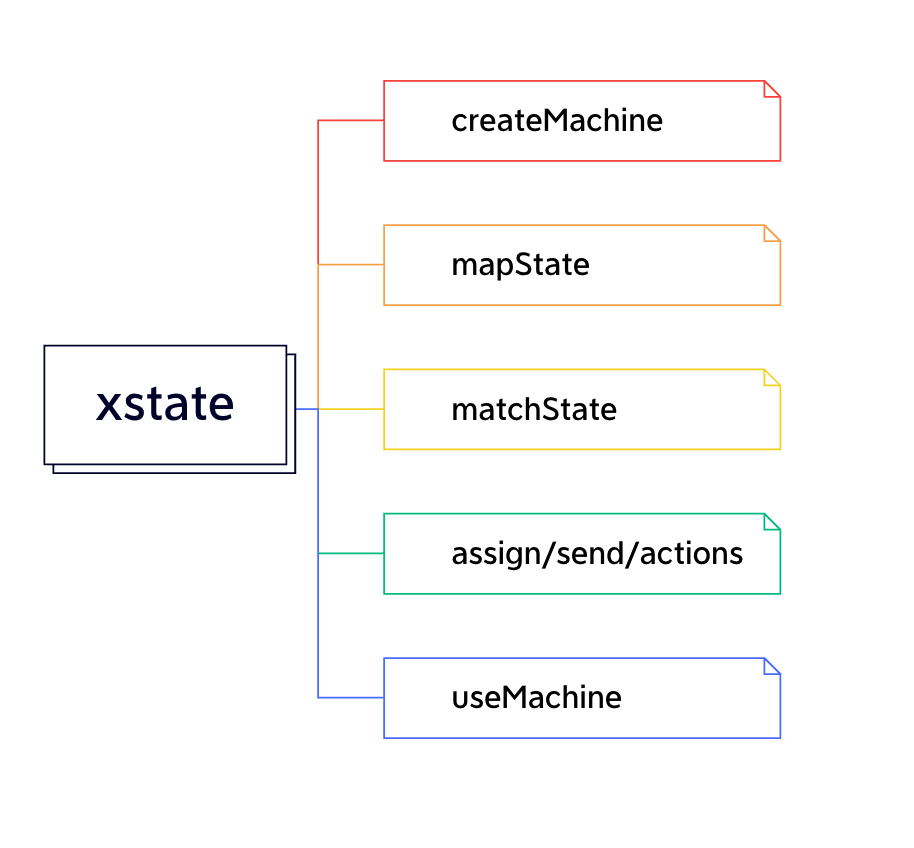
核心步骤:
设计状态机逻辑,需要先了解有限状态定义、状态转移、状态对应行为等基本概念,此外也建议学习状态模式和策略模式;
使用
useMachine()对状态机进行调用;详细学习建议参考:
Xstate简介(https://zhuanlan.zhihu.com/p/408123696)
Xstate实践(https://zhuanlan.zhihu.com/p/412523292)
代码实现:
- interface Count {
-
- count: number;
-
- };
-
-
-
- export const countMachine = createMachine<Count>({
-
- id: "counter",
-
- initial: "init",
-
- context:{
-
- count: 0,
-
- },
-
- states: {
-
- init: {
-
- on: {
-
- ADD: "add",
-
- REDUCE: "reduce",
-
- },
-
- entry: assign({ count: (ctx) => ctx.count = 0 }),
-
- },
-
- add: {
-
- on: {
-
- ADD: {
-
- // target: "add",
-
- actions: assign({ count: (ctx) => ctx.count + 1 }),
-
- },
-
- REDUCE: "reduce",
-
- RESET: "init"
-
- },
-
- entry: assign({ count: (ctx) => ctx.count + 1 }),
-
- },
-
- reduce: {
-
- on: {
-
- REDUCE: {
-
- // target: "reduce",
-
- actions: assign({ count: (ctx) => ctx.count - 1 }),
-
- },
-
- ADD: "add",
-
- RESET: "init"
-
- },
-
- entry: assign({ count: (ctx) => ctx.count - 1 }),
-
- },
-
- },
-
- }, {
-
- actions: {
-
- resetAll: () => console.log('reset all state!')
-
- }
-
- });
useMachine:
- import React from "react";
-
- import { useMachine } from "@xstate/react";
-
- import { countMachine } from '../store';
-
-
-
- import './style.css'
-
-
-
- function App() {
-
- const [state, send] = useMachine(countMachine);
-
- const { count } = state.context;
-
-
-
- console.log('state at:', state.value);
-
-
-
- const inrease = () => {
-
- send("ADD")
-
- };
-
-
-
- const reduce = () => {
-
- send("REDUCE")
-
- };
-
-
-
- const resetAll = () => {
-
- send("RESET")
-
- };
-
- ........
-
- }
点评反思:
Redux 的定位是应用的数据容器,致力于维护状态,主要解决组件通信、状态共享的问题;
XState 更加关注于状态机,致力于状态驱动,但是也可以实现组件通信和状态共享的功能
Xstate 与框架无关,在 React 和 Vue 中均可以无缝集成使用;
小结一下:
xstate 的使用介绍都在官方文档(https://xstate.js.org/docs/guides/actions.html)中,内容详实,介绍全面,建议仔细阅读。
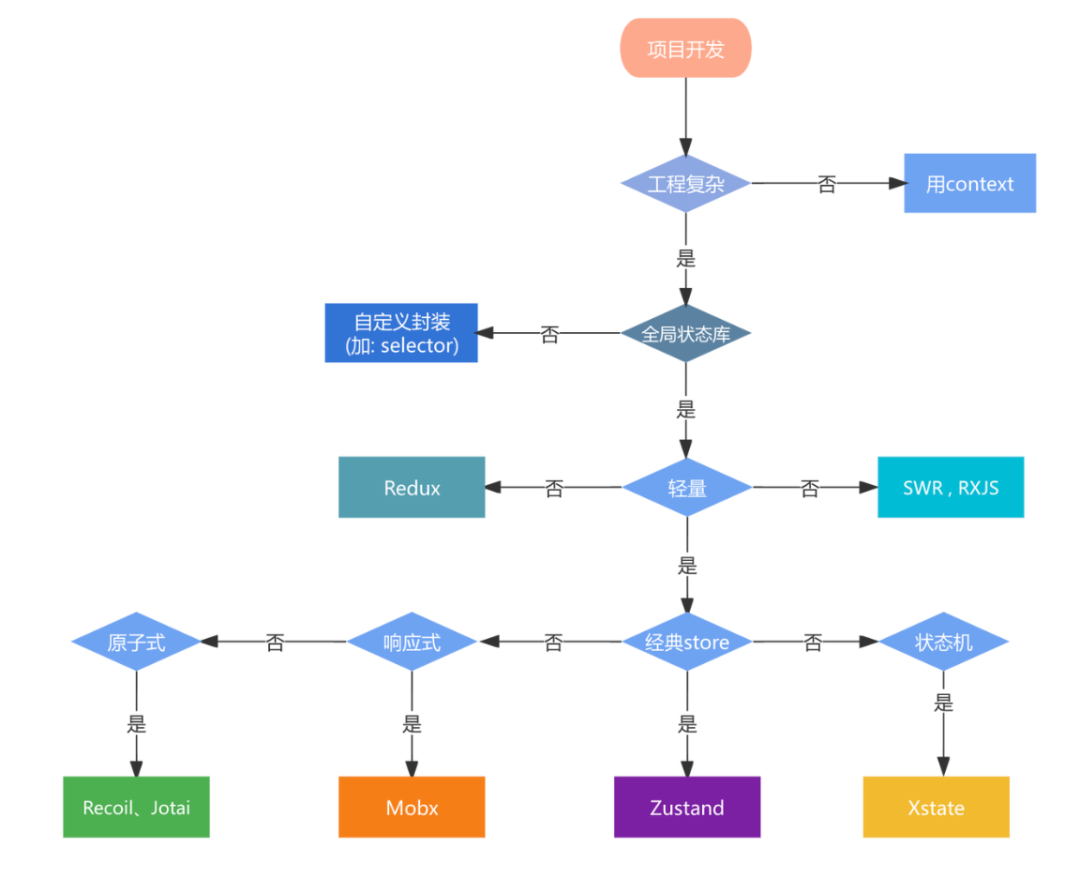
写在最后
结合上面的介绍,不难发现每一种状态库都有自己的特色和使用场景,可以参考如下的流程来选择一款合适的状态库来搭配项目工程,结合实际的使用经验,我们的建议是:即用即走,自治优先,不要让原本为管理全局状态的设计,侵入太多到你的业务开发中!!!
参考资料
[1] React Hooks + Context 做状态管理,能否取代Redux?(https://www.zhihu.com/question/335901795/answer/756082346)
[2] React hooks 第三期: 有 useContext 还需要 Redux 吗?(https://zhuanlan.zhihu.com/p/346616580)
[3] React hooks 状态管理方案解析(https://www.zhihu.com/question/335901795/answer/756082346)
[4] Facebook 新一代 React 状态管理库 Recoil(https://juejin.cn/post/6881493149261250568)
[5] Redux 最佳实践 Redux Toolkit(https://juejin.cn/post/7101688098781659172)
[6] React下一代状态管理库——recoil(https://juejin.cn/post/7006253866610229256)
[7] 精读《zustand源码》(https://zhuanlan.zhihu.com/p/461152248)
[8] Vue3新状态管理工具(https://juejin.cn/post/7071602720469155877)
[9] 还在学 Redux?不妨提前学下它以后的替代品!——Zustand 源码解析(https://zhuanlan.zhihu.com/p/353135461)
[10] XState:都1202年了,不会真有人还在用假的状态管理库吧?(https://zhuanlan.zhihu.com/p/431565113)
[11] Modular Redux - a Design Pattern for Mastering Scalable, Shared State in React(https://www.genui.com/resources/modular-redux)
[12] Managing React State with Zustand(https://dev.to/aaronksaunders/managing-react-state-with-zustand-2e8k)
[13] A Guide to Jotai: the Minimalist React State Management Library(https://dmitripavlutin.com/react-jotai-state-management/)
[14] React state management libraries in 2022(https://www.albertgao.xyz/2022/02/19/react-state-management-libraries-2022/)
[15] The new wave of React state management(https://frontendmastery.com/posts/the-new-wave-of-react-state-management/
One More Thing
看了再多也不如自己动手练一下,zustand 的作者 Daishi Kato 围绕如何实现微状态管理的实践方法写了一本小册,全面介绍了基于 Hooks 实现微状态管理的实践方法,方便读者学习 React 中状态管理的基本模式,并了解如何为您的应用需求选择正确的全局状态管理解决方案,点击阅读原文一键跳转!
 阅读原文,进入开源 repo!


