
热门标签
热门文章
- 12024年腾讯Java高级面试题及答案,【Spring注解驱动开发_java高级工程师面试题和答案2024
- 2淘宝技术这十年_淘宝 xtao社区 轻电商
- 3【Vue】关于ESLint自动修复配置显示---类型不正确,预期为“string“问题如何解决_source.fixall": true类型不正确
- 4AIGC大模型面经汇总,太全了!_aigc面经
- 5C#的String.Split方法_c# string split
- 6StringUtils工具类的使用_stringutils.tocodepoints
- 7Jmeter使用接口传递数据过程图解
- 8【小笔记】streamlit使用笔记_在phcht中运行 streamlit 应用程序 - 知乎
- 9苹果浏览器无法边下边播MP4(谷歌浏览器可以)_safari浏览器不支持video标签
- 10关于post请求的三种参数【params,data,json】_post请求的params
当前位置: article > 正文
springboot + Vue前后端项目(第十记)_spring boot+vue项目
作者:Guff_9hys | 2024-08-22 15:39:08
赞
踩
spring boot+vue项目
1.写在前面
为什么使用token???
在开发过程中,使用token可以提供一种安全的身份验证机制,确保只有经过授权的用户才能访问特定的资源或执行特定的操作。Token可以在用户登录后生成并存储在客户端,然后在每次请求时通过HTTP头部或其他方式发送给服务器进行验证。这种方式相对于传统的基于session的认证方式更加灵活和安全,可以有效防止常见的安全攻击,如跨站点请求伪造(CSRF)和会话劫持等。
2. 使用token
2.1 引入jwt依赖
 <!-- JWT -->
 <dependency>
     <groupId>com.auth0</groupId>
     <artifactId>java-jwt</artifactId>
     <version>3.10.3</version>
 </dependency>
- 1
- 2
- 3
- 4
- 5
- 6
2.2 工具类编写
package com.qingge.springboot.utils;

import cn.hutool.core.date.DateUtil;
import cn.hutool.core.util.StrUtil;
import com.auth0.jwt.JWT;
import com.auth0.jwt.algorithms.Algorithm;
import com.qingge.springboot.entity.User;
import com.qingge.springboot.service.IUserService;
import org.springframework.stereotype.Component;
import org.springframework.web.context.request.RequestContextHolder;
import org.springframework.web.context.request.ServletRequestAttributes;

import javax.annotation.PostConstruct;
import javax.annotation.Resource;
import javax.servlet.http.HttpServletRequest;
import java.util.Date;

@Component
public class TokenUtils {

    private static IUserService staticUserService;

    @Resource
    private IUserService userService;

    // 依赖注入之后、初始化方法调用之前被调用
    @PostConstruct
    public void setUserService() {
        staticUserService = userService;
    }

    /**
     * 生成token
     *
     * @return
     */
    public static String genToken(String userId, String sign) {
        return JWT.create().withAudience(userId) // 将 user id 保存到 token 里面,作为载荷
                .withExpiresAt(DateUtil.offsetHour(new Date(), 2)) // 2小时后token过期
                .sign(Algorithm.HMAC256(sign)); // 以 password 作为 token 的密钥
    }

    /**
     * 获取当前登录的用户信息
     *
     * @return user对象
     */
    public static User getCurrentUser() {
        try {
            HttpServletRequest request = ((ServletRequestAttributes) RequestContextHolder.getRequestAttributes()).getRequest();
            String token = request.getHeader("token");
            if (StrUtil.isNotBlank(token)) {
                String userId = JWT.decode(token).getAudience().get(0);
                return staticUserService.getById(Integer.valueOf(userId));
            }
        } catch (Exception e) {
            return null;
        }
        return null;
    }
}

- 1
- 2
- 3
- 4
- 5
- 6
- 7
- 8
- 9
- 10
- 11
- 12
- 13
- 14
- 15
- 16
- 17
- 18
- 19
- 20
- 21
- 22
- 23
- 24
- 25
- 26
- 27
- 28
- 29
- 30
- 31
- 32
- 33
- 34
- 35
- 36
- 37
- 38
- 39
- 40
- 41
- 42
- 43
- 44
- 45
- 46
- 47
- 48
- 49
- 50
- 51
- 52
- 53
- 54
- 55
- 56
- 57
- 58
- 59
- 60
- 61
Token示例:

2.3 JWT拦截器
项目结构如下:
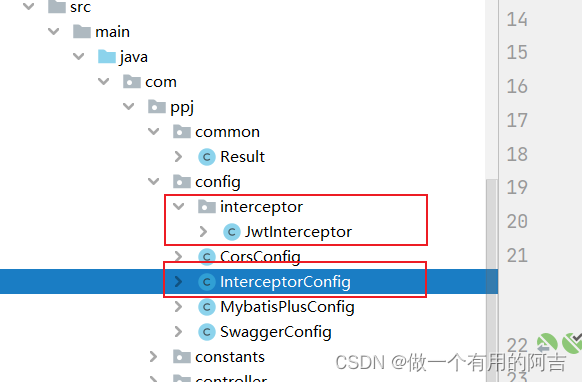
package com.ppj.config.interceptor;

import cn.hutool.core.util.StrUtil;
import com.auth0.jwt.JWT;
import com.auth0.jwt.JWTVerifier;
import com.auth0.jwt.algorithms.Algorithm;
import com.auth0.jwt.exceptions.JWTDecodeException;
import com.auth0.jwt.exceptions.JWTVerificationException;
import com.ppj.constants.Constants;
import com.ppj.entity.User;
import com.ppj.exception.ServiceException;
import com.ppj.service.IUserService;

import org.springframework.beans.factory.annotation.Autowired;
import org.springframework.web.method.HandlerMethod;
import org.springframework.web.servlet.HandlerInterceptor;

import javax.servlet.http.HttpServletRequest;
import javax.servlet.http.HttpServletResponse;

public class JwtInterceptor implements HandlerInterceptor {

    @Autowired
    private IUserService userService;

    @Override
    public boolean preHandle(HttpServletRequest request, HttpServletResponse response, Object handler) {
        String token = request.getHeader("token");

        // 如果不是映射到方法直接通过
        if(!(handler instanceof HandlerMethod)){
            return true;
        }
        // 执行认证
        if (StrUtil.isBlank(token)) {
            throw new ServiceException(Constants.CODE_401, "无token,请重新登录");
        }
        // 获取 token 中的 user id
        String userId;
        try {
            userId = JWT.decode(token).getAudience().get(0);
        } catch (JWTDecodeException j) {
            throw new ServiceException(Constants.CODE_401, "token验证失败,请重新登录");
        }
        // 根据token中的userid查询数据库
        User user = userService.getById(userId);
        if (user == null) {
            throw new ServiceException(Constants.CODE_401, "用户不存在,请重新登录");
        }
        // 用户密码加签验证 token
        JWTVerifier jwtVerifier = JWT.require(Algorithm.HMAC256(user.getPassword())).build();
        try {
            jwtVerifier.verify(token); // 验证token
        } catch (JWTVerificationException e) {
            throw new ServiceException(Constants.CODE_401, "token验证失败,请重新登录");
        }
        return true;
    }
}
- 1
- 2
- 3
- 4
- 5
- 6
- 7
- 8
- 9
- 10
- 11
- 12
- 13
- 14
- 15
- 16
- 17
- 18
- 19
- 20
- 21
- 22
- 23
- 24
- 25
- 26
- 27
- 28
- 29
- 30
- 31
- 32
- 33
- 34
- 35
- 36
- 37
- 38
- 39
- 40
- 41
- 42
- 43
- 44
- 45
- 46
- 47
- 48
- 49
- 50
- 51
- 52
- 53
- 54
- 55
- 56
- 57
- 58
- 59
InterceptorConfig.java
package com.qingge.springboot.config;

import com.qingge.springboot.config.interceptor.JwtInterceptor;
import org.springframework.context.annotation.Bean;
import org.springframework.context.annotation.Configuration;
import org.springframework.web.servlet.config.annotation.InterceptorRegistry;
import org.springframework.web.servlet.config.annotation.WebMvcConfigurer;

@Configuration
public class InterceptorConfig implements WebMvcConfigurer {
    // 添加拦截器
    @Override
    public void addInterceptors(InterceptorRegistry registry) {
        registry.addInterceptor(jwtInterceptor())
                .addPathPatterns("/**")  // 拦截所有请求,通过判断token是否合法来决定是否需要登录
                .excludePathPatterns("/user/login", "/user/register", "/**/export", "/**/import");
    }

    @Bean
    public JwtInterceptor jwtInterceptor() {
        return new JwtInterceptor();
    }

}
- 1
- 2
- 3
- 4
- 5
- 6
- 7
- 8
- 9
- 10
- 11
- 12
- 13
- 14
- 15
- 16
- 17
- 18
- 19
- 20
- 21
- 22
- 23
- 24
2.4 登录方法改动
修改UserServiceImpl中登录方法,登录成功后,设置Token;在UserDTO中添加token属性
package com.ppj.entity.dto;

import lombok.Data;

/**
 * 接受前端登录请求的参数
 */
@Data
public class UserDTO {
    private String username;
    private String password;
    private String nickname;
    private String avatarUrl;
    private String token;
}
- 1
- 2
- 3
- 4
- 5
- 6
- 7
- 8
- 9
- 10
- 11
- 12
- 13
- 14
- 15
@Override
public UserDTO login(UserDTO userDTO) {
    User one = getUserInfo(userDTO);
    if (one != null) {
    BeanUtil.copyProperties(one, userDTO, true);
    // 设置token
    String token = TokenUtils.genToken(one.getId().toString(), one.getPassword());
    userDTO.setToken(token);
    return userDTO;
    } else {
    throw new ServiceException(Constants.CODE_600, "用户名或密码错误");
    }
}
- 1
- 2
- 3
- 4
- 5
- 6
- 7
- 8
- 9
- 10
- 11
- 12
- 13
2.5 前端处理(request.js改动)
// request 拦截器
// 可以自请求发送前对请求做一些处理
// 比如统一加token,对请求参数统一加密
request.interceptors.request.use(config => {
    config.headers['Content-Type'] = 'application/json;charset=utf-8';
    let user = localStorage.getItem("loginUser") ? JSON.parse(localStorage.getItem("loginUser")) : null
    if (user) {
        config.headers['token'] = user.token;  // 设置请求头
    }
    return config
}, error => {
    return Promise.reject(error)
});
- 1
- 2
- 3
- 4
- 5
- 6
- 7
- 8
- 9
- 10
- 11
- 12
- 13
// response 拦截器
// 可以在接口响应后统一处理结果
request.interceptors.response.use(
    response => {
        let res = response.data;
        // 如果是返回的文件
        if (response.config.responseType === 'blob') {
            return res
        }
        // 兼容服务端返回的字符串数据
        if (typeof res === 'string') {
            res = res ? JSON.parse(res) : res
        }
        // 当权限验证不通过的时候,直接跳转到登录页
        if (res.code === '401') {
            router.push("/login")
        }
        return res;
    },
    error => {
        console.log('err' + error) // for debug
        return Promise.reject(error)
    }
)
- 1
- 2
- 3
- 4
- 5
- 6
- 7
- 8
- 9
- 10
- 11
- 12
- 13
- 14
- 15
- 16
- 17
- 18
- 19
- 20
- 21
- 22
- 23
- 24
总结
- 本篇主要的难点是后端如何生成token,如何处理请求是否携带token,没有携带,直接认证失败;携带token,认证token是否正确等逻辑
- 当token认证失败,前端直接让其返回到登录页
声明
项目源于此地址:程序员青戈
写在最后
如果此文对您有所帮助,请帅戈靓女们务必不要吝啬你们的Zan,感谢!!不懂的可以在评论区评论,有空会及时回复。
文章会一直更新
声明:本文内容由网友自发贡献,不代表【wpsshop博客】立场,版权归原作者所有,本站不承担相应法律责任。如您发现有侵权的内容,请联系我们。转载请注明出处:https://www.wpsshop.cn/w/Guff_9hys/article/detail/1016981
推荐阅读
相关标签

