
热门标签
热门文章
- 1安装配置code-server使用https_code-server 127.0.0.1
- 2【建议收藏】Debian系统上安装Docker全流程_debian docker
- 3Recorder︱图像特征检测及提取算法、基本属性、匹配方法_目标检测和图像检索传统特征提取
- 4Linux服务器配置 PC NVR_pcnvr
- 5机器学习多场景实战_机器学习实战
- 6Windows-安全加固安全基线(非常详细)零基础入门到精通,收藏这一篇就够了_windows基线加固
- 7【Springcloud篇】学习笔记十(十七章):Sentinel实现熔断与限流——Hystrix升级_限流框架sentinel
- 8《MySQL必知必会》第二十九章-数据库维护_mysql必知必会数据库维护analyze table
- 9【教学赛】金融数据分析赛题1:银行客户认购产品预测(0.9676)
- 10debian12安装docker
当前位置: article > 正文
Vue3_对接腾讯云COS_大文件分片上传和下载
作者:Gausst松鼠会 | 2024-06-11 02:11:06
赞
踩
Vue3_对接腾讯云COS_大文件分片上传和下载
目录
腾讯云官方文档:
腾讯云官方文档![]() https://cloud.tencent.com/document/product/436/11459
https://cloud.tencent.com/document/product/436/11459
一、腾讯云后台配置
1.登录 对象存储控制台 ,创建存储桶。获取存储桶名称和 地域名称。
2. 登录 访问管理控制台 ,获取您的项目 SecretId 和 SecretKey。
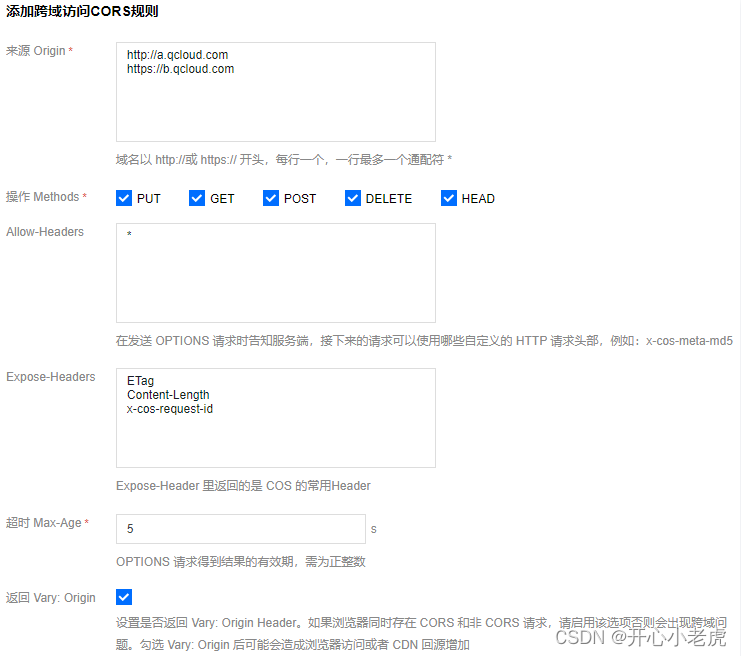
3. 配置 CORS 规则,AllowHeader 需配成*,ExposeHeaders 需要 ETag、Content-Length 以及其他 js 需要读取的 header 字段,如下图所示。操作详情请参见 设置跨域访问 文档。
二、安装SDK
1.script 引入方式
- <!--src为本地路径 根据自己项目目录结构来调整-->
- <script src="../dist/cos-js-sdk-v5.min.js"></script>
2.webpack 引入方式
安装:
npm i cos-js-sdk-v5 --save引入:
- // node引入方式
- const COS = require('cos-js-sdk-v5');
-
- // js引入方式
- import COS from 'cos-js-sdk-v5';
三、文件上传
本案例用npm方式安装SDK,使用js方式引入。文件上传使用的是,高级上传,高级上传接口 uploadFile,自动针对小文件使用简单上传,大文件使用分块上传,性能更好。
腾讯云文件高级上传参数![]() https://cloud.tencent.com/document/product/436/64960#.E9.AB.98.E7.BA.A7.E4.B8.8A.E4.BC.A0
https://cloud.tencent.com/document/product/436/64960#.E9.AB.98.E7.BA.A7.E4.B8.8A.E4.BC.A0
1.new COS 实例
- import COS from "cos-js-sdk-v5";
-
- const cos = new COS({
- // getAuthorization 必选参数
- getAuthorization: function (options, callback) {
-
- callback({
- TmpSecretId: "在控制台查看",
- TmpSecretKey: "在控制台查看",
- SecurityToken: "临时密钥_后端返回来的",
- ExpiredTime: "临时密钥到期时间_后端返回来的", // 时间戳,单位秒,如:1580000000
- });
-
- },
- });
后端获得临时密钥的步骤:
后端获得临时密钥并返给前端![]() https://cloud.tencent.com/document/product/436/14048
https://cloud.tencent.com/document/product/436/14048
2.上传文件
文件上传,我们用的高级上传接口,自动识别,小文件(低于你设置的数据)直接上传,大文件分片上传。
- <template>
- <!-- 上传组件用的el-upload -->
- <el-upload
- class="upload-demo"
- action="#"
- drag
- multiple
- :auto-upload="false"
- :show-file-list="true"
- v-model:file-list="fileList"
- :on-change="
- (file, fileList) => {
- handleChange(file, fileList);
- }
- "
- :on-remove="handleRemove"
- >
- <el-icon class="el-icon--upload"><upload-filled /></el-icon>
- <div class="el-upload__text">拖拽文件到这里或者<em>点击上传</em></div>
- </el-upload>
- </template>
-
-
- <script setup>
-
- import COS from "cos-js-sdk-v5";
- import { computed, reactive } from "vue";
-
- //从后端获得临时密钥的请求接口,换成你自己的
- import { reqCloudInfo } from "@/api";
-
-
- const state = reactive({
- result: "",
- });
-
- //从后端获得请求临时密钥,换成你自己的
- const getData = async () => {
- let result = await reqCloudInfo();
- if (result != undefined) {
- if (result.error_code == 0) {
- state.result = result;
- } else {
- console.log(result);
- }
- }
- };
- getData ();
-
-
- // new 一个COS实例
- const cos = new COS({
- getAuthorization: function (options, callback) {
-
- //credentials ,按照你的后端返回来的数据自行赋值
- let credentials = state.result.datas_info.Credentials;
-
- callback({
- TmpSecretId: credentials.TmpSecretId,
- TmpSecretKey: credentials.TmpSecretKey,
- SecurityToken: credentials.Token,
- ExpiredTime: state.result.datas_info.ExpiredTime, // 时间戳,单位秒,如:1580000000
- });
-
- },
- });
-
-
- // 文件上传 选择文件时触发(:on-change事件)
- const handleChange = (uploadFile, uploadFiles) => {
-
- //cosData ,根据你后端返回的数据自行赋值
- let cosData = state.result.datas_info;
-
- cos.uploadFile(
- {
- Bucket: cosData.Bucket /* 填入您自己的存储桶,必须字段 */,
- Region: cosData.Region /* 存储桶所在地域,例如ap-beijing,必须字段 */,
- Key:
- cosData.Key +
- "/1.jpg" /* 存储在桶里的对象键(例如1.jpg,a/b/test.txt),必须字段 */,
- Body:
- uploadFile.raw /* 必须,上传文件对象,可以是input[type="file"]标签选择本地文件后得到的file对象 */,
- SliceSize: 1024 * 1024 * 5 /* 触发分块上传的阈值,超过5MB使用分块上传,非必须 */,
- onTaskReady: function (taskId) {
- /* 非必须 */
- console.log(taskId);
- },
- onProgress: function (progressData) {
- /* 非必须 */
- console.log(JSON.stringify(progressData));
- },
- onFileFinish: function (err, data, options) {
- /* 非必须 */
- console.log(options.Key + "上传" + (err ? "失败" : "完成"));
- },
- },
- function (err, data) {
- console.log(err || data);
- }
- );
- };
-
-
- </script>
-
- <style scoped></style>

如果报错403:
如果报了“Access Denied.”,就是后端临时密钥权限不对,让他添加相应字段即可。上传文件的,分片上传的,文件读取下载的。
四、文件下载
下载文件到本地:
- import COS from "cos-js-sdk-v5";
-
- const cos = new COS({
- // getAuthorization 必选参数
- getAuthorization: function (options, callback) {
-
- callback({
- TmpSecretId: "在控制台查看",
- TmpSecretKey: "在控制台查看",
- SecurityToken: "临时密钥_后端返回来的",
- ExpiredTime: "临时密钥到期时间_后端返回来的", // 时间戳,单位秒,如:1580000000
- });
-
- },
- });
-
- //文件下载
- cos.getObject(
- {
- Bucket: /* 填入您自己的存储桶,从后端返回的数据获取*/,
- Region: /* 存储桶所在地域,例如ap-beijing*/,
- Key: /*你的key*/,
- DataType: "blob",
- onProgress: function (progressData) {},
- },
- function (err, data) {
- if (data.Body) {
- //通过浏览器下载
- const myBlob = new window.Blob([data.Body], { type: data.Body.type });
- let name = "文件名字通过cosData.Key获取";
- const qrUrl = window.URL.createObjectURL(myBlob);
- var fileLink = document.createElement("a");
- fileLink.href = qrUrl;
- fileLink.setAttribute("download", name);
- document.body.appendChild(fileLink);
- fileLink.click();
- }
- }
- );

声明:本文内容由网友自发贡献,不代表【wpsshop博客】立场,版权归原作者所有,本站不承担相应法律责任。如您发现有侵权的内容,请联系我们。转载请注明出处:https://www.wpsshop.cn/w/Gausst松鼠会/article/detail/701263
推荐阅读
Copyright © 2003-2013 www.wpsshop.cn 版权所有,并保留所有权利。

