
- 1CrossOver for Mac 24.0.0 (mac类虚拟机运行Windows软件)
- 2【HarmonyOS开发】ArkTs关系型和非关系型数据库的存储封装_relationalstore failed to insert data. code:undefi
- 3最新最全的前端面试题集锦之 微信小程序 篇(从基础到高级)_小程序高级面试
- 4Android的.dex、.odex与.oat文件扫盲_base.odex
- 5矩阵运算时⊗和·的区别?_这个符号
- 6【Git】Git使用Gui图形化界面,Git中SSH协议,Idea集成Git_git gui 教程
- 7DumperOptions:配置文件yml读写
- 8C语言刷题(19)
- 9elementUI树形组件el-tree添加层级虚线,指示线_element树形结构加线
- 10性能优化 - likely和unlikely函数
Harmony OS Next(纯血鸿蒙开发):【第二篇】ArkUI、ArkTS语法: 循环控制 & 自定义组件封装 & 自定义构建函数 & 自定义样式函数 & 继承样式封装 &组件通信、状态管理
赞
踩
Harmony OS Next 开发专栏:
点击前往: HarmonyOS开发专栏
一、循环渲染控制
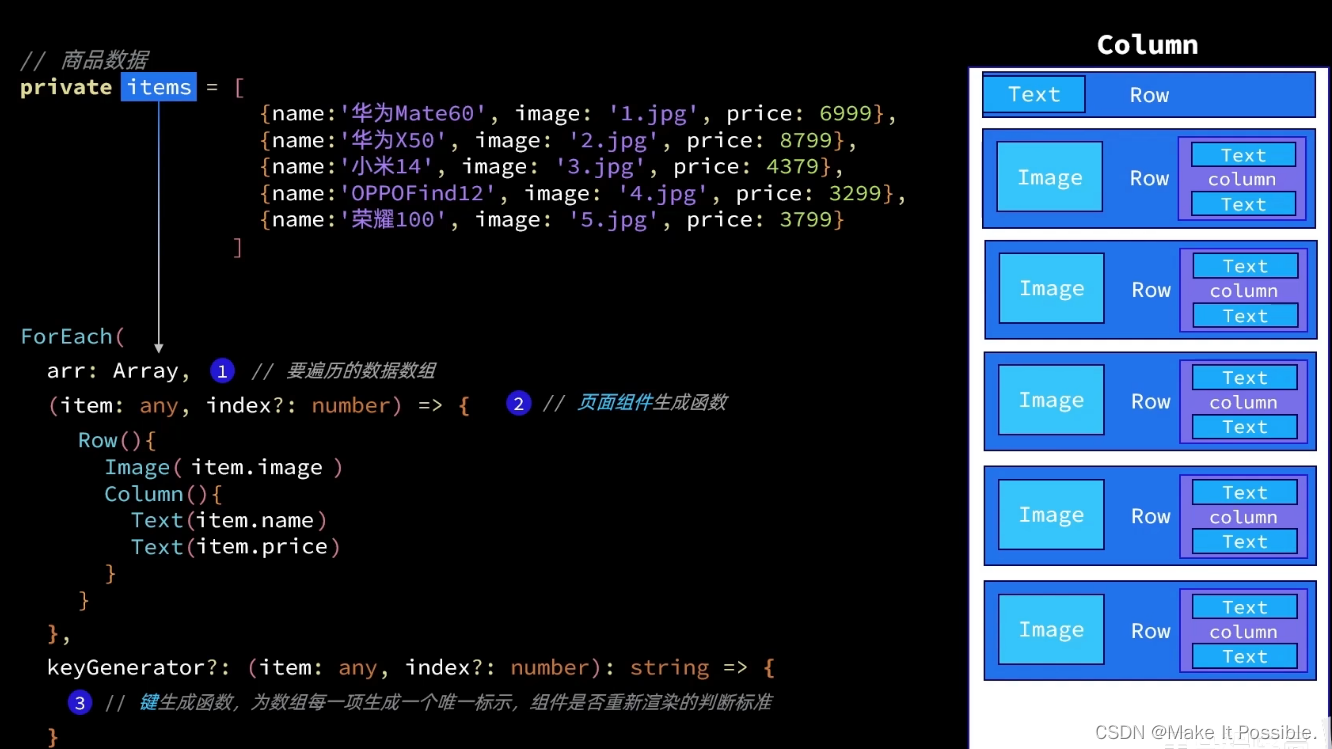
1.1 ForEach
- 重复执行渲染的代码,我们可以放在循环中进行处理,学过vue的都知道v-for,用法就是一样的。
1.2 if else 判断语句
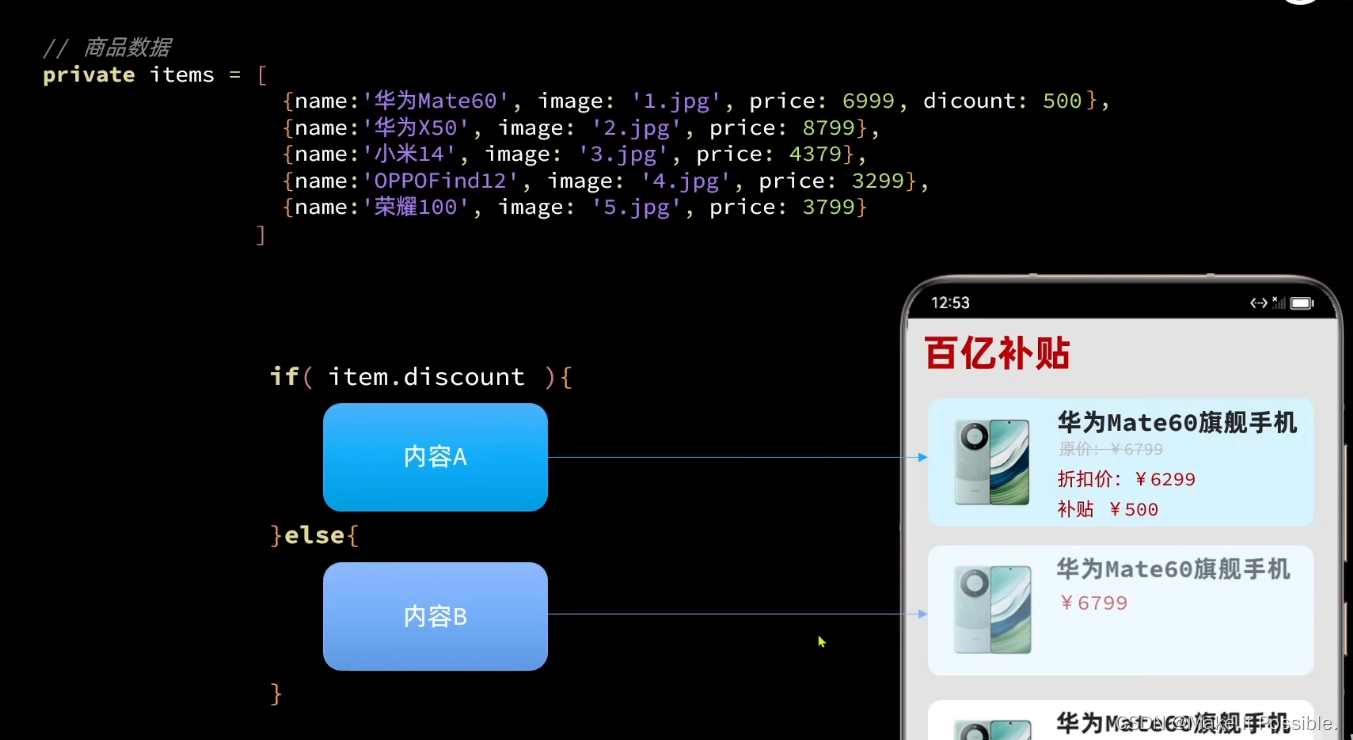
// 实体类
class Item {
  name: string
  image: ResourceStr
  price: number
  discount: number

  // 构造方法
  constructor(name: string, image: ResourceStr, price: number, discount: number) {
    this.name = name
    this.image = image
    this.price = price
    this.discount = discount
  }
}

@Entry
@Component
struct ItemPage {
  // 数据
  private  items: Array<Item> = [
    new Item('华为Mate60Pro', $r('app.media.mate60'), 6999, 1000),
    new Item('华为Mate60Pro', $r('app.media.mate60'), 6999, 0),
    new Item('华为Mate60Pro', $r('app.media.mate60'), 6999, 0),
    new Item('华为Mate60Pro', $r('app.media.mate60'), 6999, 0),
    new Item('华为Mate60Pro', $r('app.media.mate60'), 6999, 0)
  ]

  build() {
    Column({space: 8}) {
      Row() {
        Text('商品列表')
          .fontSize(30)
          .fontWeight(FontWeight.Bold)
      }
      .width('100%')
      .margin({bottom: 20})

      // ForEach
      ForEach(
        this.items,
        (item: Item) => {
          Row({ space: 10}){
            Image(item.image)
              .width(100)
            Column({ space: 4}) {
              if (item.discount) {
                Text(item.name)
                  .fontSize(20)
                  .fontWeight(FontWeight.Bold)
                Text('原价:¥' + item.price)
                  .fontSize(18)
                  .fontColor('#FFCCAA')
                  .decoration({ type: TextDecorationType.LineThrough })
                Text('折扣价:¥' + (item.price - item.discount))
                  .fontSize(18)
                  .fontColor('#FFCCAA')
                Text('补贴:¥' + item.discount)
                  .fontSize(18)
                  .fontColor('#FFCCAA')
              } else {
                Text(item.name)
                  .fontSize(20)
                  .fontWeight(FontWeight.Bold)
                Text('¥' + item.price)
                  .fontSize(18)
                  .fontColor('#FFCCAA')
              }
            }
            .height('100%')
            .alignItems(HorizontalAlign.Start)
          }
          .width('90%')
          .height(120)
          .backgroundColor('#FFF')
          .borderRadius(20)
          .margin({left: 24, right: 24})
          .padding(10)
        },

      )

    }
    .backgroundColor('#EEE')
    .height('100%')
  }
}

- 1
- 2
- 3
- 4
- 5
- 6
- 7
- 8
- 9
- 10
- 11
- 12
- 13
- 14
- 15
- 16
- 17
- 18
- 19
- 20
- 21
- 22
- 23
- 24
- 25
- 26
- 27
- 28
- 29
- 30
- 31
- 32
- 33
- 34
- 35
- 36
- 37
- 38
- 39
- 40
- 41
- 42
- 43
- 44
- 45
- 46
- 47
- 48
- 49
- 50
- 51
- 52
- 53
- 54
- 55
- 56
- 57
- 58
- 59
- 60
- 61
- 62
- 63
- 64
- 65
- 66
- 67
- 68
- 69
- 70
- 71
- 72
- 73
- 74
- 75
- 76
- 77
- 78
- 79
- 80
- 81
- 82
- 83
- 84
- 85
- 86
- 87
- 88
- 89
- 90
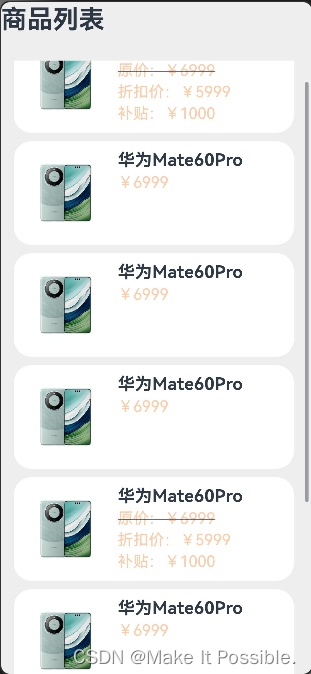
二、List 列表容器

- List 组件内不能直接包含基础组件,所以我们需要使用ListItem进行包裹,里面在进行布局。
  // 使用 List 列表容器包裹
        List({ space: 10}) {
          // ForEach
          ForEach(
            this.items,
            (item: Item) => {
              ListItem() {
                Row({ space: 10}){
                  Image(item.image)
                    .width(100)
                  Column({ space: 4}) {
                    if (item.discount) {
                      Text(item.name)
                        .fontSize(20)
                        .fontWeight(FontWeight.Bold)
                      Text('原价:¥' + item.price)
                        .fontSize(18)
                        .fontColor('#FFCCAA')
                        .decoration({ type: TextDecorationType.LineThrough })
                      Text('折扣价:¥' + (item.price - item.discount))
                        .fontSize(18)
                        .fontColor('#FFCCAA')
                      Text('补贴:¥' + item.discount)
                        .fontSize(18)
                        .fontColor('#FFCCAA')
                    } else {
                      Text(item.name)
                        .fontSize(20)
                        .fontWeight(FontWeight.Bold)
                      Text('¥' + item.price)
                        .fontSize(18)
                        .fontColor('#FFCCAA')
                    }
                  }
                  .height('100%')
                  .alignItems(HorizontalAlign.Start)
- 1
- 2
- 3
- 4
- 5
- 6
- 7
- 8
- 9
- 10
- 11
- 12
- 13
- 14
- 15
- 16
- 17
- 18
- 19
- 20
- 21
- 22
- 23
- 24
- 25
- 26
- 27
- 28
- 29
- 30
- 31
- 32
- 33
- 34
- 35
- 36
- 这里我使用了 ListItem 对基础布局组件进行了包裹。最后我们就能实现超出后能够进行滑动效果了。
三、 自定义组件封装
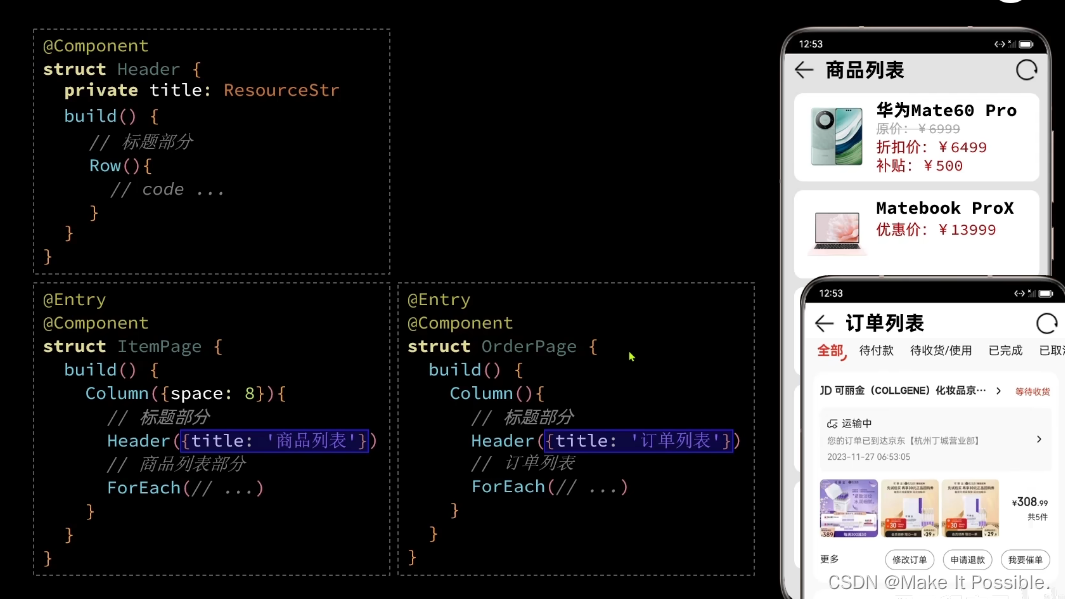
3.1 方法一:局部自定义组件
  // 创建一个自定义组件
  @Component
  struct Header {
    private title: ResourceStr
    build() {
      Row() {
        Image($r('app.media.return'))
          .width(30)
        Text(this.title)
          .fontSize(30)
          .fontWeight(FontWeight.Bold)
          .height(40)
        Blank()
        Image($r('app.media.refresh'))
          .width(30)
      }
      .width('100%')
      .height(30)
    }
  }
- 1
- 2
- 3
- 4
- 5
- 6
- 7
- 8
- 9
- 10
- 11
- 12
- 13
- 14
- 15
- 16
- 17
- 18
- 19
- 20
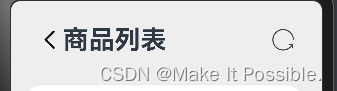
使用自定义组件
        // 调用自定义组件
        Header({ title: '商品列表'})
          .margin(30)   // 修改自定义组件样式
- 1
- 2
- 3
- 4
3.3 方法二:全局自定义组件
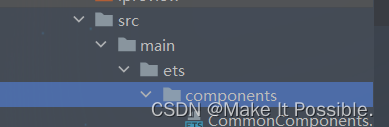
- 创建一个文件夹, 专门用来存放全局组件的文件。
- 这里我们只需要将这个地方的代码使用全局组件进行封装,然后向局部组件一样调用使用,前提是得导出和使用页面的导入。
// 创建一个全局自定义组件
@Component
// 1、全局自定义组件需要我们进行导出 export
export struct Header {
  private title: ResourceStr = ''
  build() {
    Row() {
      Image($r('app.media.return'))
        .width(30)
      Text(this.title)
        .fontSize(30)
        .fontWeight(FontWeight.Bold)
        .height(40)
      Blank()
      Image($r('app.media.refresh'))
        .width(30)
    }
    .width('100%')
    .height(30)
  }
}


// 2、导入全局自定义组件

import {Header} from '../components/CommonComponents'
- 1
- 2
- 3
- 4
- 5
- 6
- 7
- 8
- 9
- 10
- 11
- 12
- 13
- 14
- 15
- 16
- 17
- 18
- 19
- 20
- 21
- 22
- 23
- 24
- 25
- 26
- 27
- 这样以来,只要页面需要使用到这个按钮的,我们就直接拿来使用功能就可以了。
四、自定义构建函数封装
4.1 局部自定义构建函数
- 需要注意的是,局部自定义函数不需要添加 function 函数
- 并且局部页面组件内,调用函数都需要添加 this 关键字访问调用!
从上面代码可以看出了,我们页面结构是不是很臃肿,此时我们使用自定义构建函数解决这个问题是非常好解决的,就和我们其他编程语言里,将代码封装起来,提高可读性
    // 局部自定义构建函数(在页面组件内声明)
    @Builder ItemCard (item: Item) {
      Row({ space: 10}){
        Image(item.image)
          .width(100)
        Column({ space: 4}) {
          if (item.discount) {
            Text(item.name)
              .fontSize(20)
              .fontWeight(FontWeight.Bold)
            Text('原价:¥' + item.price)
              .fontSize(18)
              .fontColor('#FFCCAA')
              .decoration({ type: TextDecorationType.LineThrough })
            Text('折扣价:¥' + (item.price - item.discount))
              .fontSize(18)
              .fontColor('#FFCCAA')
            Text('补贴:¥' + item.discount)
              .fontSize(18)
              .fontColor('#FFCCAA')
          } else {
            Text(item.name)
              .fontSize(20)
              .fontWeight(FontWeight.Bold)
            Text('¥' + item.price)
              .fontSize(18)
              .fontColor('#FFCCAA')
          }
        }
        .height('100%')
        .alignItems(HorizontalAlign.Start)
      }
      .width('90%')
      .height(120)
      .backgroundColor('#FFF')
      .borderRadius(20)
      .margin({left: 15, right: 10})
      .padding(10)
    }
- 1
- 2
- 3
- 4
- 5
- 6
- 7
- 8
- 9
- 10
- 11
- 12
- 13
- 14
- 15
- 16
- 17
- 18
- 19
- 20
- 21
- 22
- 23
- 24
- 25
- 26
- 27
- 28
- 29
- 30
- 31
- 32
- 33
- 34
- 35
- 36
- 37
- 38
- 39
4.2 全局自定义构建函数
// 全局自定义构建函数(在页面组件外声明)
@Builder function ItemCard (item: Item) {
  Row({ space: 10}){
    Image(item.image)
      .width(100)
    Column({ space: 4}) {
      if (item.discount) {
        Text(item.name)
          .fontSize(20)
          .fontWeight(FontWeight.Bold)
        Text('原价:¥' + item.price)
          .fontSize(18)
          .fontColor('#FFCCAA')
          .decoration({ type: TextDecorationType.LineThrough })
        Text('折扣价:¥' + (item.price - item.discount))
          .fontSize(18)
          .fontColor('#FFCCAA')
        Text('补贴:¥' + item.discount)
          .fontSize(18)
          .fontColor('#FFCCAA')
      } else {
        Text(item.name)
          .fontSize(20)
          .fontWeight(FontWeight.Bold)
        Text('¥' + item.price)
          .fontSize(18)
          .fontColor('#FFCCAA')
      }
    }
    .height('100%')
    .alignItems(HorizontalAlign.Start)
  }
  .width('90%')
  .height(120)
  .backgroundColor('#FFF')
  .borderRadius(20)
  .margin({left: 15, right: 10})
  .padding(10)
}
- 1
- 2
- 3
- 4
- 5
- 6
- 7
- 8
- 9
- 10
- 11
- 12
- 13
- 14
- 15
- 16
- 17
- 18
- 19
- 20
- 21
- 22
- 23
- 24
- 25
- 26
- 27
- 28
- 29
- 30
- 31
- 32
- 33
- 34
- 35
- 36
- 37
- 38
- 39
- 两种自定义构建函数的调用方式如下:
 // 使用 List 列表容器包裹
        List({ space: 10}) {
          // ForEach
          ForEach(
            this.items,
            (item: Item) => {
              ListItem() {
                // this.ItemCard(item)   局部调用方式
                // ItemCard(item)        全局调用方式
              }
            },
          )
        }
- 1
- 2
- 3
- 4
- 5
- 6
- 7
- 8
- 9
- 10
- 11
- 12
- 13
五、自定义样式函数封装
5.1 局部样式函数
- 局部样函数和局部自定义构建函数一样,不要使用 function 关键字,使用功能S@tyle装饰器修饰
    // 局部公共样式函数
  @Styles pageStyle () {
    .width('100%')
    .height('100%')
    .backgroundColor('#EEE')
    .padding(20)
  }
- 1
- 2
- 3
- 4
- 5
- 6
- 7
5.2 公共(通用)样式函数
- 注意: @Styles 只能封装公共的通用样式
// 全局公共样式含数据
@Styles function pageStyle () {
  .width('100%')
  .height('100%')
  .backgroundColor('#EEE')
  .padding(20)
}
- 1
- 2
- 3
- 4
- 5
- 6
- 7
- 8
- 调用方式两种都是一样的
就只需要要在我们需要这个样式的组件后面以点的方式进行调用就可以!
.pageStyle() // 调用全局样式函数
- 1
六、 继承样式(特有属性)封装
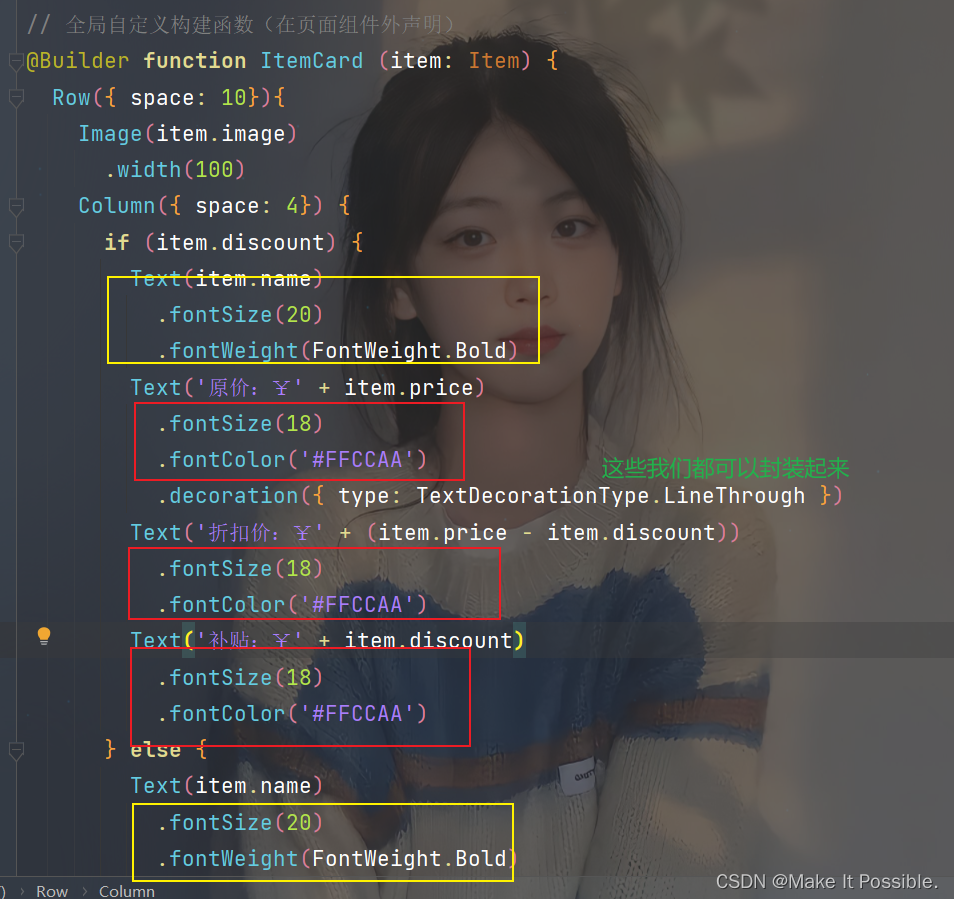
- 你看,红色和黄色框起来的代码完全就是重复的,我们同样的可以进行分装,但是需要注意的是,这个可不是公共通用属性,上面说了不能使用@Styles装饰器进行修饰。
这里我们只能使用@Exdent进行修饰
// 继承属性:全局封装特有属性样式函数
@Extend(Text) function priceText () {
  .fontSize(18)
  .fontColor('#FFCCAA')
}
- 1
- 2
- 3
- 4
- 5
- 调用后如下图所示;
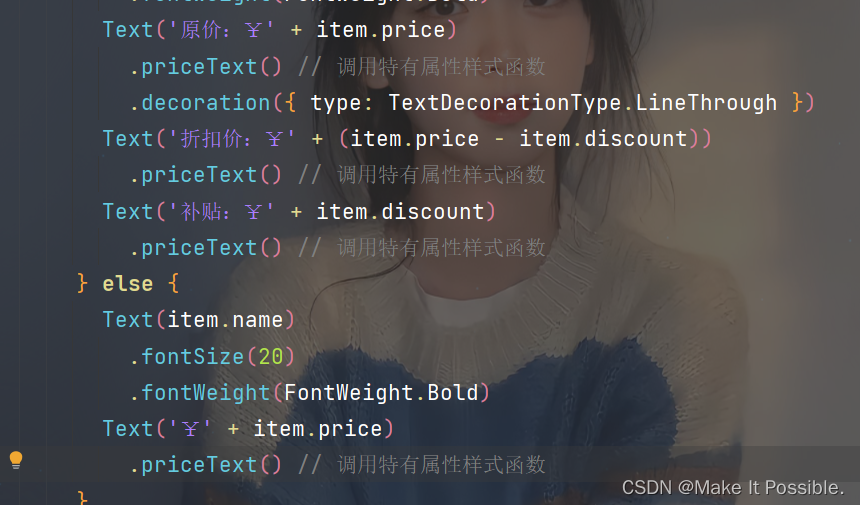
- 是不是方便简洁了很多,主要后期修改只需要修改函数内的就可以了
七、状态管理
7.1 @State
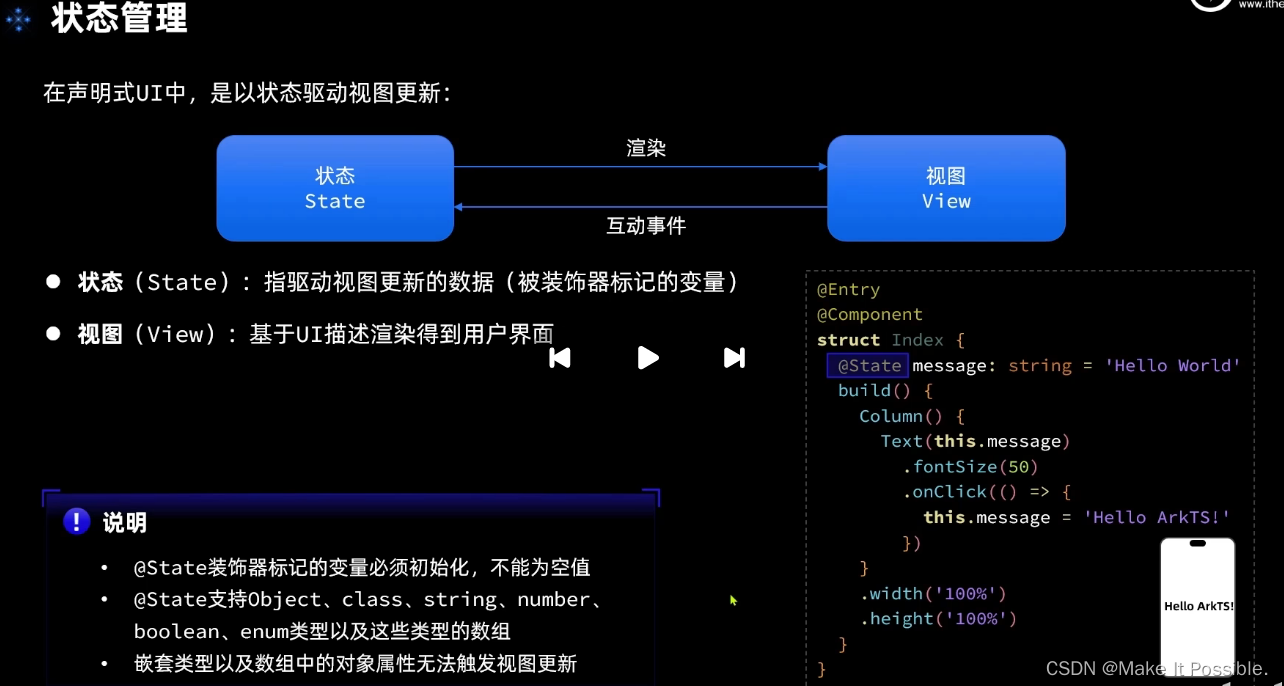
- 注意:
-
- 1、一旦被 @State 修饰的变量,必须进行初始化!
-
- 2、复杂数据类型嵌套的话,数据会改变,但是视图不会及时更新!
-
- 3、数组中元素为对象的时候,对象发生改变,同样的不会影响视图及时跟新!(当然将对象重新赋值是可以的,但是每次都得重新创建对象)
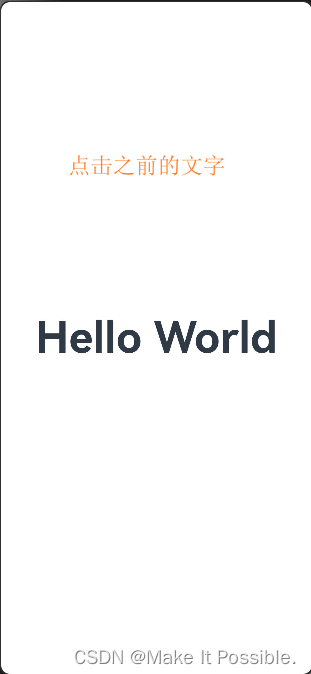
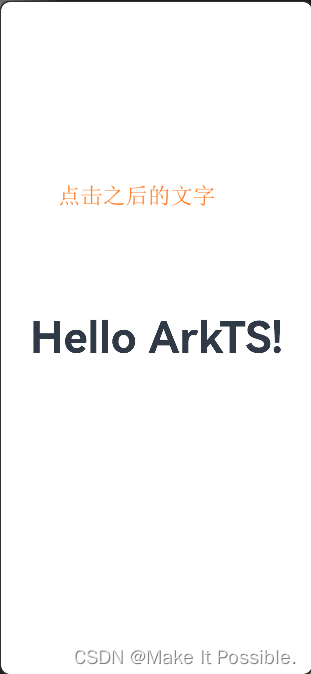
如下代码示例:
```@Entry
@Component
struct StateDemoCode {
  @State message: string = 'Hello World'
  build() {
    Column() {
      Text(this.message)
        .fontSize(50)
        .fontWeight(FontWeight.Bold)
        .onClick(() => {
          this.message = 'Hello ArkTS!'
        })
    }
    .width('100%')
    .height('100%')
    .justifyContent(FlexAlign.Center)
  }
}
- 1
- 2
- 3
- 4
- 5
- 6
- 7
- 8
- 9
- 10
- 11
- 12
- 13
- 14
- 15
- 16
- 17
- 18
- 19
- 20
- 代码中的@State是不是修饰了一个字符串变量,然后我给这个text绑定了一个 onClick点击事件,然后我们点击的时候,就会将默认的 值 变成变量值,也就是说,普通类型的变量我们能够及时跟新视图的。
普通的对象也是可以及时更新的:
/**
 * 状态管理
 */

class Person {
  name: string
  age: number

  constructor (name: string, age: number) {
    this.name = name
    this.age = age
  }
}

@Entry
@Component
struct StateDemoCode {
  @State p: Person = new Person('LiuJinTao', 18)
  build() {
    Column() {
      Text(`姓名${this.p.name} : ${this.p.age}`)
        .fontSize(40)
        .fontWeight(FontWeight.Bold)
        .onClick(() => {
          this.p.age++
        })
    }
    .width('100%')
    .height('100%')
  }
}
- 1
- 2
- 3
- 4
- 5
- 6
- 7
- 8
- 9
- 10
- 11
- 12
- 13
- 14
- 15
- 16
- 17
- 18
- 19
- 20
- 21
- 22
- 23
- 24
- 25
- 26
- 27
- 28
- 29
- 30
- 31
下面是无法及时更新驶入的展示:
  @State p: Person = new Person('LiuJinTao', 18, new Person('yxy', 18)) // 这里就是 嵌套对象


      Text(`姓名${this.p.name} : ${this.p.age}`)
        .fontSize(40)
        .fontWeight(FontWeight.Bold)
        .onClick(() => {
          this.p.age++  // 外层对象元素
        })
      Text(`姓名${this.p.gf.name} : ${this.p.gf.age}`)
        .fontSize(40)
        .fontWeight(FontWeight.Bold)
        .onClick(() => {
          this.p.gf.age++   // 嵌套对象无法及时驱动视图
        })
- 1
- 2
- 3
- 4
- 5
- 6
- 7
- 8
- 9
- 10
- 11
- 12
- 13
- 14
- 15
- 16
-
不是嵌套我们数据更新了,视图就会立马更新,而下面的,我们点击他不会立马更新视图,因为它是嵌套在对象内的对象,所有无法更新视图。
-
数组里面嵌套对象,也是不能及时更新
     ForEach(
        this.gfs,
        (p: Person, index) => {
          Text(`${p.name} : ${p.age}`)
            .fontSize(20)
            .fontWeight(FontWeight.Bold)
            .onClick(() => {
              p.age++   // 修改数组里面的值,视图不会更新哦!
            })
        }
- 1
- 2
- 3
- 4
- 5
- 6
- 7
- 8
- 9
- 10
7.2 状态管理练习
- 效果图如下;
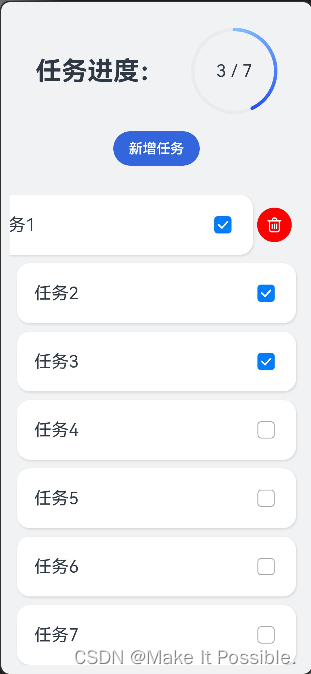
// 任务类
class Task {
  static id: number = 1
  // 任务名称
  name: string = `任务${Task.id++}`
  // 任务状态是否完成
  finished: boolean = false
}

// 统一的卡片样式函数
@Styles function card () {
  .width('95%')
  .padding(20)
  .backgroundColor(Color.White)
  .borderRadius(15)
  .shadow({radius: 6, color: '#1F000000', offsetX: 2, offsetY: 4})
}

// 任务完成样式函数(Text组件特有属性)
@Extend(Text) function finishedTask() {
  .decoration({ type: TextDecorationType.LineThrough})
  .fontColor('#B1B2B1')
}

@Entry
@Component
struct PropPage {
  // 任务总数量
  @State totalTask: number = 0
  // 已完成任务数量
  @State finishTask: number = 0
  // 任务列表
  @State tasks: Task[] = []

  // 局部自定义函数
  handleTaskChange() {
    // 1. 更新总任务
    this.totalTask = this.tasks.length    // 总任务就是数组的长度
    // 2. 更新已完成的任务
    this.finishTask = this.tasks.filter(item => item.finished).length // 通过filter方法过滤 finished状态为true的个数,然后赋值更新!
  }


  build() {
    Column({ space: 10}) {
      // 1. 任务进度
      Row() {
        Text('任务进度:')
          .fontSize(30)
          .fontWeight(FontWeight.Bold)

        // 层叠容器
        Stack(){
          // 进度条组件
          Progress({
            value: this.finishTask,
            total: this.tasks.length, // 最大任务数等于数组长度
            type: ProgressType.Ring
          })
            .width(100)
          // 任务进度对比数
          Row(){
            Text(this.finishTask.toString())
              .fontSize(20)
            Text(" / " + this.totalTask.toString())
              .fontSize(20)
          }
        }


      }
      .width('100%')
      .justifyContent(FlexAlign.SpaceEvenly)
      .margin({top: 20, bottom: 10})

      // 2. 新增任务按钮
      Row(){
        Button('新增任务')
          .width(100)
          .backgroundColor('#36D')
          .onClick(() => {
            // 1. 新增任务条数
            this.tasks.push(new Task())  // 将任务类添加到数组中
            // 2. 更新总任务
            // this.totalTask = this.tasks.length    // 总任务就是数组的长度
            this.handleTaskChange()
          })
      }
      .margin({bottom: 24})

      // 3. 任务状态列表
      List({ space: 10, initialIndex: 0}) {
        // 遍历列表
        ForEach(
          this.tasks,
          (item: Task, index) => {
            ListItem() {
              Row(){
                Text(item.name)
                  .fontSize(20)
                Checkbox()
                  // 是否选中就是取决于开关
                  .select(item.finished)
                  .onChange(change => {

                    // 1. 更新勾选状态值
                    item.finished = change
                    // 3. 更新已完成的任务
                    // this.finishTask = this.tasks.filter(item => item.finished).length // 通过filter方法过滤 finished状态为true的个数,然后赋值更新!

                    this.handleTaskChange()
                  })
              }
              .card()
              .justifyContent(FlexAlign.SpaceBetween)
            }
            // 左滑事件调用按钮模块函数
            .swipeAction({ end: this.DeleteButton(index) })
        })

      }
      .width('100%')
      .alignListItem(ListItemAlign.Center)
      .layoutWeight(1)
    }
    .width('100%')
    .height('100%')
    .backgroundColor('#F1F2F3')
    .padding(10)
  }
  /**
   * DeleteButton 左滑删除按钮局部构建函数
   * @param index
   */
  @Builder DeleteButton (index: number) {
    Button() {
      Image($r('app.media.button_delete'))
        .width(20)
        // SVG图片颜色的设置
        .fillColor(Color.White)
    }
    .width(40)
    .height(40)
    .type(ButtonType.Circle)
    // Button组件按压效果
    .stateEffect(true)
    .backgroundColor(Color.Red)
    .margin(5)
    .onClick(() => {
      // 1、点击删除后,更新任务列表
      this.tasks.splice(index, 1)
      // 2. 调用方法,更新任务进度的总数个完成数量
      this.handleTaskChange()
    })
 }
}
- 1
- 2
- 3
- 4
- 5
- 6
- 7
- 8
- 9
- 10
- 11
- 12
- 13
- 14
- 15
- 16
- 17
- 18
- 19
- 20
- 21
- 22
- 23
- 24
- 25
- 26
- 27
- 28
- 29
- 30
- 31
- 32
- 33
- 34
- 35
- 36
- 37
- 38
- 39
- 40
- 41
- 42
- 43
- 44
- 45
- 46
- 47
- 48
- 49
- 50
- 51
- 52
- 53
- 54
- 55
- 56
- 57
- 58
- 59
- 60
- 61
- 62
- 63
- 64
- 65
- 66
- 67
- 68
- 69
- 70
- 71
- 72
- 73
- 74
- 75
- 76
- 77
- 78
- 79
- 80
- 81
- 82
- 83
- 84
- 85
- 86
- 87
- 88
- 89
- 90
- 91
- 92
- 93
- 94
- 95
- 96
- 97
- 98
- 99
- 100
- 101
- 102
- 103
- 104
- 105
- 106
- 107
- 108
- 109
- 110
- 111
- 112
- 113
- 114
- 115
- 116
- 117
- 118
- 119
- 120
- 121
- 122
- 123
- 124
- 125
- 126
- 127
- 128
- 129
- 130
- 131
- 132
- 133
- 134
- 135
- 136
- 137
- 138
- 139
- 140
- 141
- 142
- 143
- 144
- 145
- 146
- 147
- 148
- 149
- 150
- 151
- 152
- 153
- 154
- 155
- 156
7.2 @Prop 和 @Link
- 我用一个组件管理多个模块是不是很麻烦,代码冗余,可读性太差了,此时我们HarmonyOS也有组件通信一说,父组件、子组件等等的说法:如下如所示:
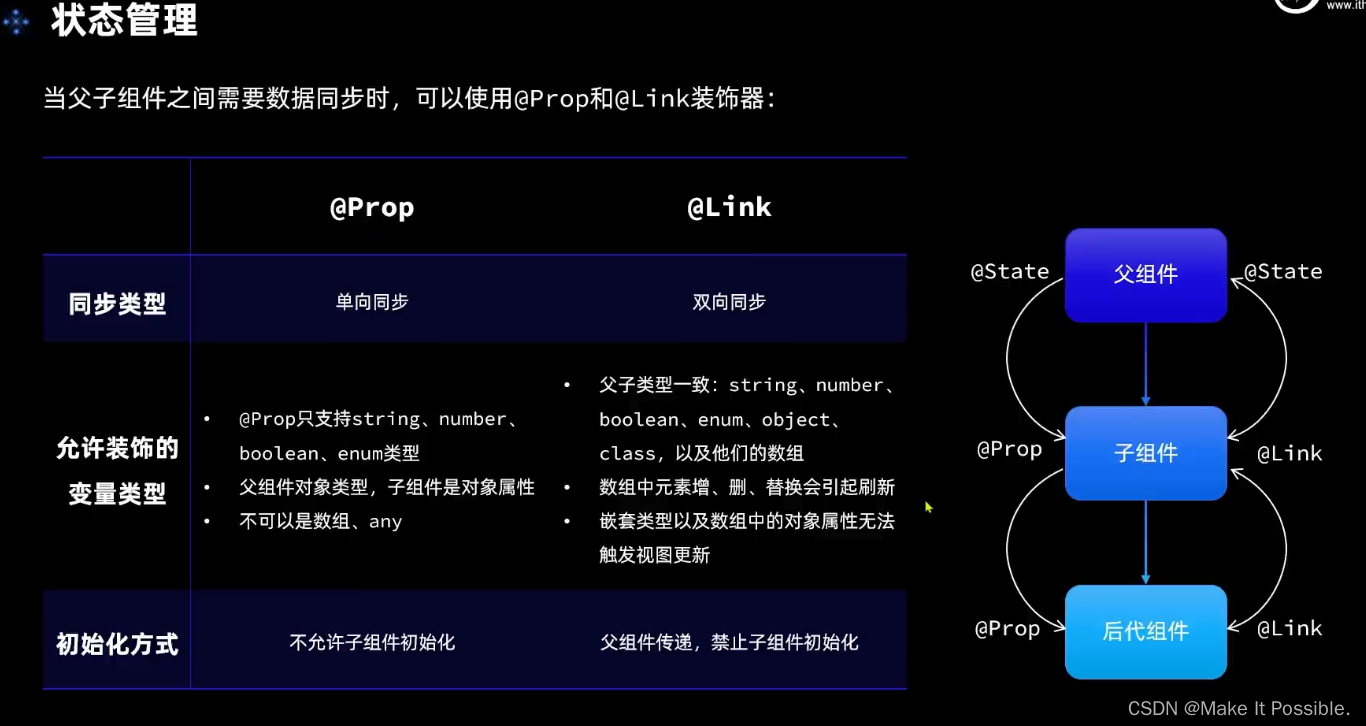
单项数据和双向数据的原理就和深浅拷贝一样
- 针对前面的任务进度管理项目,这里使用组件通信进行分模块的改造
第一步:
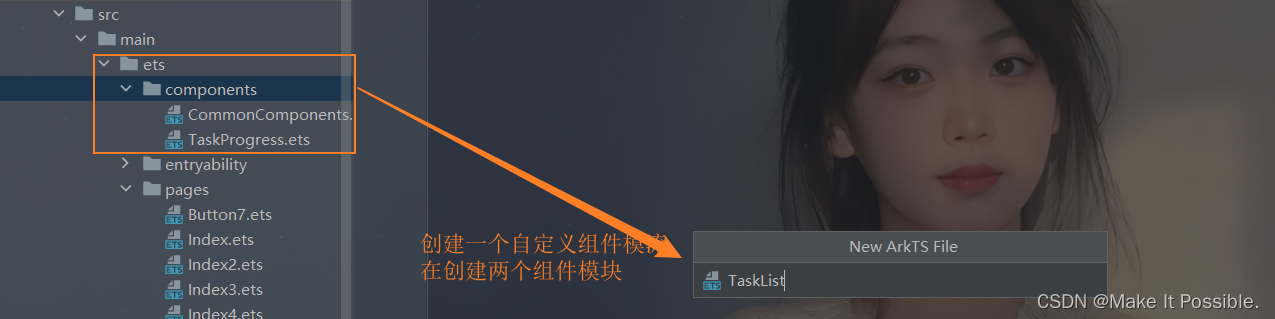
创建完毕就开始对代码改造了:
基于@Prop 和 @ Link组件通信技术进行优化代码:”
首先是任务进度模块
@Component
export struct TaskProgress {
  // 注意: 这里是父组件传递过来的数据,父组件数据被@State修饰,子组件就不能再使用@State修饰了
  // 注意2:@Prop在之前版本是不允许初始化的,可是现在最新版是允许的。新版本两者都可以使用兼容
  @Prop finishTask: number
  @Prop totalTask: number


  build() {
    // 1. 任务进度
    Row() {
      Text('任务进度:')
        .fontSize(30)
        .fontWeight(FontWeight.Bold)

      // 层叠容器
      Stack(){
        // 进度条组件
        Progress({
          value: this.finishTask,
          total: this.totalTask,
          type: ProgressType.Ring
        })
          .width(100)
        // 任务进度对比数
        Row(){
          Text(this.finishTask.toString())
            .fontSize(20)
          Text(" / " + this.totalTask.toString())
            .fontSize(20)
        }
      }


    }
    .width('100%')
    .justifyContent(FlexAlign.SpaceEvenly)
    .margin({top: 20, bottom: 10})
  }
}
- 1
- 2
- 3
- 4
- 5
- 6
- 7
- 8
- 9
- 10
- 11
- 12
- 13
- 14
- 15
- 16
- 17
- 18
- 19
- 20
- 21
- 22
- 23
- 24
- 25
- 26
- 27
- 28
- 29
- 30
- 31
- 32
- 33
- 34
- 35
- 36
- 37
- 38
- 39
- 40
其次就是任务列表模块
/**
 * 任务列表模块
 */
// 任务类
class Task {
  static id: number = 1
  // 任务名称
  name: string = `任务${Task.id++}`
  // 任务状态是否完成
  finished: boolean = false
}

@Component
export struct TaskList {
  // 任务总数量
  @Link totalTask: number //@Link接受的参数必须是引用($),并且不能给初始值
  // 已完成任务数量
  @Link finishTask: number
  // 任务列表
  @State tasks: Task[] = []

  // 局部自定义函数
  handleTaskChange() {
    // 1. 更新总任务
    this.totalTask = this.tasks.length    // 总任务就是数组的长度
    // 2. 更新已完成的任务
    this.finishTask = this.tasks.filter(item => item.finished).length // 通过filter方法过滤 finished状态为true的个数,然后赋值更新!
  }
  build() {
    Column() {
      // 2. 新增任务按钮
      Row() {
        Button('新增任务')
          .width(200)
          .backgroundColor('#36D')
          .onClick(() => {
            // 1. 新增任务条数
            this.tasks.push(new Task()) // 将任务类添加到数组中
            // 2. 更新总任务
            // this.totalTask = this.tasks.length    // 总任务就是数组的长度
            this.handleTaskChange()
          })
      }
      .margin({ bottom: 24 })


      // 3. 任务状态列表
      List({ space: 10, initialIndex: 0}) {
        // 遍历列表
        ForEach(
          this.tasks,
          (item: Task, index) => {
            ListItem() {
              Row(){
                Text(item.name)
                  .fontSize(20)
                Checkbox()
                  // 是否选中就是取决于开关
                  .select(item.finished)
                  .onChange(change => {
                    // 1. 更新勾选状态值
                    item.finished = change
                    // 3. 更新已完成的任务
                    // this.finishTask = this.tasks.filter(item => item.finished).length // 通过filter方法过滤 finished状态为true的个数,然后赋值更新!
                    this.handleTaskChange()
                  })
              }
              .card()
              .justifyContent(FlexAlign.SpaceBetween)
            }
            // 左滑事件调用按钮模块函数
            .swipeAction({ end: this.DeleteButton(index) })
          })

      }
      .width('100%')
      .alignListItem(ListItemAlign.Center)
      .layoutWeight(1)
    }

  }


  /**
   * DeleteButton 左滑删除按钮局部构建函数
   * @param index
   */
  @Builder DeleteButton (index: number) {
    Button() {
      Image($r('app.media.button_delete'))
        .width(20)
          // SVG图片颜色的设置
        .fillColor(Color.White)
    }
    .width(40)
    .height(40)
    .type(ButtonType.Circle)
    // Button组件按压效果
    .stateEffect(true)
    .backgroundColor(Color.Red)
    .margin(5)
    .onClick(() => {
      // 1、点击删除后,更新任务列表
      this.tasks.splice(index, 1)
      // 2. 调用方法,更新任务进度的总数个完成数量
      this.handleTaskChange()
    })
  }
}

// 统一的卡片样式函数
@Styles function card () {
  .width('95%')
  .padding(20)
  .backgroundColor(Color.White)
  .borderRadius(15)
  .shadow({radius: 6, color: '#1F000000', offsetX: 2, offsetY: 4})
}

// 任务完成样式函数(Text组件特有属性)
@Extend(Text) function finishedTask() {
  .decoration({ type: TextDecorationType.LineThrough})
  .fontColor('#B1B2B1')
}
- 1
- 2
- 3
- 4
- 5
- 6
- 7
- 8
- 9
- 10
- 11
- 12
- 13
- 14
- 15
- 16
- 17
- 18
- 19
- 20
- 21
- 22
- 23
- 24
- 25
- 26
- 27
- 28
- 29
- 30
- 31
- 32
- 33
- 34
- 35
- 36
- 37
- 38
- 39
- 40
- 41
- 42
- 43
- 44
- 45
- 46
- 47
- 48
- 49
- 50
- 51
- 52
- 53
- 54
- 55
- 56
- 57
- 58
- 59
- 60
- 61
- 62
- 63
- 64
- 65
- 66
- 67
- 68
- 69
- 70
- 71
- 72
- 73
- 74
- 75
- 76
- 77
- 78
- 79
- 80
- 81
- 82
- 83
- 84
- 85
- 86
- 87
- 88
- 89
- 90
- 91
- 92
- 93
- 94
- 95
- 96
- 97
- 98
- 99
- 100
- 101
- 102
- 103
- 104
- 105
- 106
- 107
- 108
- 109
- 110
- 111
- 112
- 113
- 114
- 115
- 116
- 117
- 118
- 119
- 120
- 121
- 122
- 123
- 124
- 125
最后,我们再页面调用我们自定义的功能模块
import { TaskList } from '../components/TaskList'
import { TaskProgress } from '../components/TaskProgress'

@Entry
@Component
struct PropPage {
  // 任务总数量
  @State totalTask: number = 0
  // 已完成任务数量
  @State finishTask: number = 0

  build() {
    Column({ space: 10 }) {

      // 1、任务进度
      TaskProgress({ totalTask: this.totalTask, finishTask: this.finishTask })

      // 2、任务列表
      TaskList({ totalTask: $totalTask, finishTask: $finishTask })


    }
    .width('100%')
    .height('100%')
    .backgroundColor('#F1F2F3')
    .padding(10)
  }
}
- 1
- 2
- 3
- 4
- 5
- 6
- 7
- 8
- 9
- 10
- 11
- 12
- 13
- 14
- 15
- 16
- 17
- 18
- 19
- 20
- 21
- 22
- 23
- 24
- 25
- 26
- 27
- 28
- 29
- 最后实现的效果是一样的,这样的好处就是便于管理和使用!
- @Link支持复杂数据类型,而@Prop不行
7.3 @Provide装饰器和@Consume装饰器
- 多层组件之间数据的双向传递,父组件不许需要指定传参。
@Provide/@Consume装饰的状态变量有以下特性:
1、Provide装饰的状态变量自动对其所有后代组件可用,即该变量被“provide”给他的后代组件。由此可见,2、Provide的方便之处在于,开发者不需要多次在组件之间传递变量。
后代通过使用@Consume去获取@Provide提供的变量,建立在@Provide和@Consume之间的双向数据同步,与@State/@Link不同的是,前者可以在多层级的父子组件之间传递。
3、Provide和@Consume可以通过相同的变量名或者相同的变量别名绑定,变量类型必须相同。
使用场景
在下面的示例是与后代组件双向同步状态@Provide和@Consume场景。当分别点击CompA和CompD组件内Button时,reviewVotes 的更改会双向同步在CompA和CompD中。
@Component
struct CompD {
  // @Consume装饰的变量通过相同的属性名绑定其祖先组件CompA内的@Provide装饰的变量
  @Consume reviewVotes: number;

  build() {
    Column() {
      Text(`reviewVotes(${this.reviewVotes})`)
      Button(`reviewVotes(${this.reviewVotes}), give +1`)
        .onClick(() => this.reviewVotes += 1)
    }
    .width('50%')
  }
}

@Component
struct CompC {
  build() {
    Row({ space: 5 }) {
      CompD()
      CompD()
    }
  }
}

@Component
struct CompB {
  build() {
    CompC()
  }
}

@Entry
@Component
struct CompA {
  // @Provide装饰的变量reviewVotes由入口组件CompA提供其后代组件
  @Provide reviewVotes: number = 0;

  build() {
    Column() {
      Button(`reviewVotes(${this.reviewVotes}), give +1`)
        .onClick(() => this.reviewVotes += 1)
      CompB()
    }
  }
}
- 1
- 2
- 3
- 4
- 5
- 6
- 7
- 8
- 9
- 10
- 11
- 12
- 13
- 14
- 15
- 16
- 17
- 18
- 19
- 20
- 21
- 22
- 23
- 24
- 25
- 26
- 27
- 28
- 29
- 30
- 31
- 32
- 33
- 34
- 35
- 36
- 37
- 38
- 39
- 40
- 41
- 42
- 43
- 44
- 45
- 46
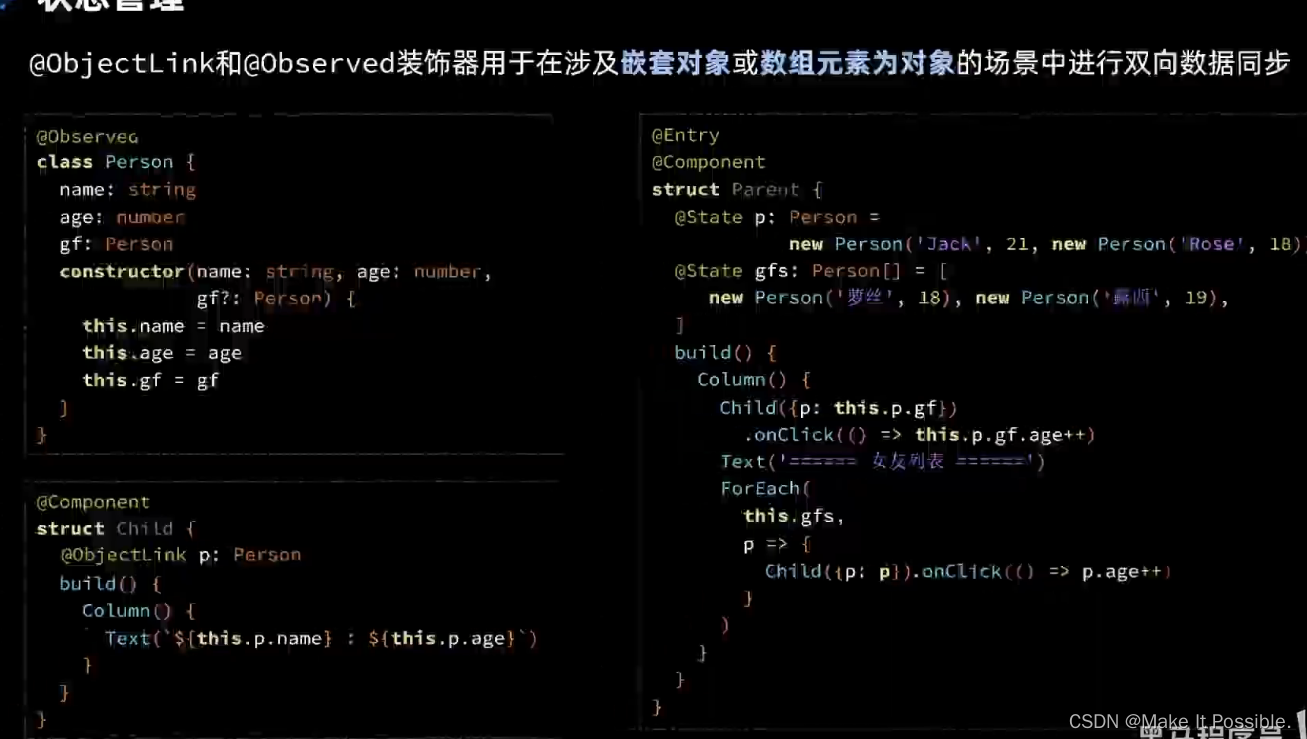
7.4 @Observed装饰器和@ObjectLink装饰器:嵌套类对象属性变化
- 在前面,我们是不是在数据双向绑定的时候,有一个问题,就是我们复杂数据类型数据发生变化的时候,我们的视图不更新,这个问题此时就可以用这个状态管理进行处理,从而解决那个问题。
概述
@ObjectLink和@Observed类装饰器用于在涉及嵌套对象或数组的场景中进行双向数据同步:
被@Observed装饰的类,可以被观察到属性的变化;
子组件中@ObjectLink装饰器装饰的状态变量用于接收@Observed装饰的类的实例,和父组件中对应的状态变量建立双向数据绑定。这个实例可以是数组中的被@Observed装饰的项,或者是class object中的属性,这个属性同样也需要被@Observed装饰。
单独使用@Observed是没有任何作用的,需要搭配@ObjectLink或者@Prop使用。
限制条件
使用@Observed装饰class会改变class原始的原型链,@Observed和其他类装饰器装饰同一个class可能会带来问题。
@ObjectLink装饰器不能在@Entry装饰的自定义组件中使用。
代码展示如下:
// 任务类
@Observed
class Task {
  static id: number = 1
  // 任务名称
  name: string = `任务${Task.id++}`
  // 任务状态是否完成
  finished: boolean = false
}
- 1
- 2
- 3
- 4
- 5
- 6
- 7
- 8
- 9
- 10
// 渲染组件
@Component
struct TaskItem {
  @ObjectLink item: Task
  onTaskChange: () => void = () => {}; // 定义一个函数变量参数,接收父组件传过来的函数

  build() {
    Row() {
      // 是否添加
      if (this.item.finished) {
        Text(this.item.name)
          .fontSize(20)
          .finishedTask()
      } else {
        Text(this.item.name)
          .fontSize(20)
      }

      Checkbox()// 是否选中就是取决于开关
        .select(this.item.finished)
        .onChange(change => {
          // 1. 更新勾选状态值
          this.item.finished = change
          // 3. 更新已完成的任务
          // this.finishTask = this.tasks.filter(item => item.finished).length // 通过filter方法过滤 finished状态为true的个数,然后赋值更新!

          // 添加一个判断,如果传过来参数为空,那么表示函数传递失败,不执行!
          if (this.onTaskChange) {
            this.onTaskChange()
          }
        })
    }
    .card()
    .justifyContent(FlexAlign.SpaceBetween)
  }
- 1
- 2
- 3
- 4
- 5
- 6
- 7
- 8
- 9
- 10
- 11
- 12
- 13
- 14
- 15
- 16
- 17
- 18
- 19
- 20
- 21
- 22
- 23
- 24
- 25
- 26
- 27
- 28
- 29
- 30
- 31
- 32
- 33
- 34
- 35
              // 调用处理后的渲染类
              TaskItem({ item: item, onTaskChange: () => this.handleTaskChange() })
- 1
- 2
这里我们想要嵌套的对象或者数组里面的元素为对象的时候,当嵌套内的对象或者数组元素数据修改了,通过观察我们是无法更新视图的,测试就得使用 @Observed装饰器和@ObjectLink装饰器- 大白话来说就是,@Observed将类或者数据的引用传递给了呗ObjectLink修饰的属性,此时修改引用,那么无论是外层的还是里层的数据都被修改了,视图自然也就会及时更新!

