
- 13D模型的生成式AI_csdnai生成3d模型
- 2python实验12_中文文本分析_python中文文本分析代码例子
- 3低代码平台适用人群及场景_低代码平台应用场景
- 4用Python实现一个图书管理系统(附带源码)_用python编写一个图书馆系统
- 5【LangChain系列 9】Prompt模版——MessagePromptTemplate_chatmessageprompttemplate
- 6spring boot3登录开发-3(2短信验证登录/注册逻辑实现)
- 7高效解决 springBoot 集成 Redis 出现的: Unable to connect to Redis 问题_springboot 连接redis集群redisconnectionfailureexceptio
- 8chatgpt赋能python:Python怎么变大字体提高SEO排名
- 9django校园食堂订餐系统(程序+开题报告)_基于django的餐饮服务系统项目的研究方法
- 10app流量变现对接优量汇,对接流程及变现收益
C#创建启动画面_c#启动画面连续静态图片
赞
踩
- Version A (Quick 'n Dirty): Download demo project - 32 Kb
- Version B (MultiThreaded): Download demo project - 32 Kb
Update 28.01.03
This article has been updated with Chris Austin's suggestion (Thanks Chris! And thanks to Phil Bolduc for the fix on Chris' stuff ;)) and an alternative (multithreaded) approach has been added, based on Jabes idea (Thanks Jabes!).
Introduction
This articles shows how to display a splash screen during your application initialization. This article assumes that you familiar with C# and the VS.NET IDE.
Background
I had put the lot of my initialization code into the main forms OnLoad() override. The code parsed configuration files, created control and the such. When my application started up, it looked like a mess: The main application form just didn't pop up nicely and ready to be used. I decided to create a Splash Screen, which should pop up right after starting the executable. While the splash screen was shown, I wanted to do my initialization and once that was done, I'd hide the splash screen and show the main application window. This article contains various approaches on how it can be realized.
Version A: Quick 'n Dirty
This version was the quick and dirty solution I came up with. Credits to Chris Austin for suggesting the usage of theApplicationContext class.
Preparations
- Create a new empty Windows Forms project.
- Add a new Form (for your splash screen and name it SplashForm).
1. Moving the Applications entry procedure
This is not required, but helps a beginning developer understand that the Main() entry point and the Form1 class into which it is put by default are not necessarily coupled. So let's create a new class called AppLoader and put the entry point in there. Once done, the class should look like this:
- public class AppLoader
- {
- public AppLoader()
- {
- }
- [STAThread]
- static void Main()
- {
- }
- }
Once completed, remove the code from your Form1.cs so that you don't end up having 2 entry points.
2. Creating the Splash Screen
Just create a new Windows Form, place a PictureBox on it and set a couple of properties just to make it look nicer. The form should be centered on the screen (StartPosition), be topmost (TopMost) and shouldn't have a border (FormBorderStyle). As for the PictureBox, set the Dock property to Fill and set the Image property to your splash image. That's it. In real life, you might want to write some code to display the application name, it's version, the registered user and a copyright notice, etc.
3. Modifying the MainForm's code
Now we need to do some modifications to the Form1 class. Since some initialization code can be put into the class constructor (such as reading files, etc.) some can't (like creating controls) since this is not available in the constructor. So you can't for example add controls to a forms Controls collection. Lets add a new public method (e.g. public void PreLoad(){...}). This function should look somewhat like this:
- public void PreLoad()
- {
- if (_Loaded)
- {
- // just return. this code can't execute twice!
- return;
- }
-
- // do your initialization here
- // ...
-
- // flag that we have loaded all we need.
- _Loaded = true;
- }
The _Loaded variable is a private bool, which should be initialized to false. You definitely should check this flag in your main forms OnLoad() override (which is called just before the form is shown the first time). For example:
- protected override void OnLoad(System.EventArgs e)
- {
- if (!_Loaded)
- {
- // good idea to throw an exception here.
- // the form shouldn't be shown w/o being initialized!
- return;
- }
- }
4. Modifying the AppLoader class
Here is the code for the AppLoader class. See the comments for information.
- public class AppLoader
- {
- private static ApplicationContext context;
- private static SplashForm sForm = new SplashForm();
- private static MainForm mForm = new MainForm();
- [STAThread]
-
- static void Main(string[] args)
- {
- // first we retrieve an application context for usage in the
- // OnAppIdle event handler
- context = new ApplicationContext();
-
- // then we subscribe to the OnAppIdle event...
- Application.Idle += new EventHandler(OnAppIdle);
-
- // ...and show our SplashForm
- sForm.Show();
-
- // instead of running a window, we use the context
- Application.Run(context);
- }
-
- private static void OnAppIdle(object sender, EventArgs e)
- {
- if(context.MainForm == null)
- {
- // first we remove the eventhandler
- Application.Idle -= new EventHandler(OnAppIdle);
-
- // here we preload our form
- mForm.PreLoad();
-
- // now we set the main form for the context...
- context.MainForm = mForm;
-
- // ...show it...
- context.MainForm.Show();
-
- // ...and hide the splashscreen. done!
- sForm.Close();
- sForm = null;
- }
- }
- }

Version B: Multithreaded
This version entirely based on Jabes idea. For more information read the Messages below. Thanks again to Jabes for letting me use his stuff in this article!
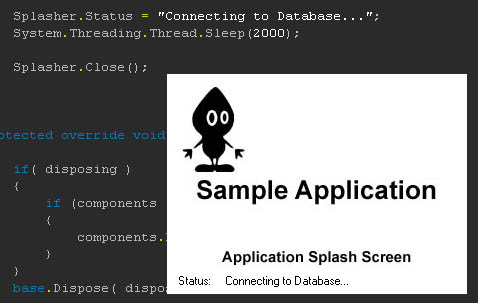
In this version, the SplashForm is shown in a separate thread and displays the current loading status (like in PhotoShop). You will want to multi-thread your splash screen if it is going to be on-screen for any length of time; by running the splash screen from its own message pump, screen redraws and other windows messages are processed correctly giving a more professional impression.
Preparations
- Create a new empty Windows Forms project.
- Add a new Form (for your splash screen and name it SplashForm).
- Repeat the steps from the previous Section which create the AppLoader class containing the entry point for the application. Leave the Method Body for
Main()empty for now. Don't forget to remove theMain()method from the Form1 code!
1. Modify the SplashForm
In order to display the loading status on the form, we need to place a label on the form. For our example we call it lStatusInfo. Additionally we create a get/set Property named StatusInfo. After that we introduce a private string member called _StatusInfo which maps directly to the Property. The Property implementation should look like this:
- public string StatusInfo {
- set {
- _StatusInfo = value;
- ChangeStatusText();
- }
- get {
- return _StatusInfo;
- }
- }
ChangeStatusText() is a helper function which will be called each time the StatusInfo should be updated. It's implementation should look like this:
- public void ChangeStatusText() {
- try {
- if (this.InvokeRequired) {
- this.Invoke(new MethodInvoker(this.ChangeStatusText));
- return;
- }
-
- lStatusInfo.Text = _StatusInfo;
- }
- catch (Exception e) {
- // do something here...
- }
- }
The check for the InvokeRequired property is necessary because controls are not thread safe. So if you call a method on a control from a different thread (then the one which created the control) without marshalling the call into the proper thread, weird things might happen.
That's it. Let's create the Splasher class which maintains Thread creation, start and stop.
2. Creating the Splasher class
The static members Show(), Close() and the Status property can be used as their names suggest to show and close the SplashWindow as well as to update the loading status displayed on the SplashForm (using the StatusInfoProperty previously created).
Here is what the implementation of the class looks like:
- public class Splasher
- {
- static SplashForm MySplashForm = null;
- static Thread MySplashThread = null;
-
- // internally used as a thread function - showing the form and
- // starting the messageloop for it
- static void ShowThread()
- {
- MySplashForm = new SplashForm();
- Application.Run(MySplashForm);
- }
-
- // public Method to show the SplashForm
- static public void Show()
- {
- if (MySplashThread != null)
- return;
-
- MySplashThread = new Thread(new ThreadStart(Splasher.ShowThread));
- MySplashThread.IsBackground = true;
- MySplashThread.ApartmentState = ApartmentState.STA;
- MySplashThread.Start();
- }
-
- // public Method to hide the SplashForm
- static public void Close()
- {
- if (MySplashThread == null) return;
- if (MySplashForm == null) return;
-
- try
- {
- MySplashForm.Invoke(new MethodInvoker(MySplashForm.Close));
- }
- catch (Exception)
- {
- }
- MySplashThread = null;
- MySplashForm = null;
- }
-
- // public Method to set or get the loading Status
- static public string Status
- {
- set
- {
- if (MySplashForm == null)
- {
- return;
- }
-
- MySplashForm.StatusInfo = value;
- }
- get
- {
- if (MySplashForm == null)
- {
- throw new InvalidOperationException("Splash Form not on screen");
- }
- return MySplashForm.StatusInfo;
- }
- }
- }
Ok, let’s look at what we have here:
The Show() method will create a new Thread using the static ShowThread function as a target. This function will simply show the Form and start a MessageLoop for it. The Close() method will again marshal a call to the SplashForms Close() method into the appropriate thread thus causing the form to close. The Status Property can be used to retrieve or update the StatusInfo displayed on the SplashScreen.
Here are some simple examples of their usage:
- ...
- // note that there is no instance required since those functions are static
- Splasher.Show(); // shows the SplashScreen
- // sets the status info displayed on the SplashScreen
- Splasher.Status = "Initializing Database Connection...";
- Splasher.Close(); // closes the SplashScreen
- ...
Modifying the AppLoader class
In order to use the Splasher class we have to modify our AppLoader class appropriately:
- public class AppLoader
- {
- public AppLoader()
- {
-
- }
- [STAThread]
- static void Main(string[] args)
- {
- Splasher.Show();
- DoStartup(args);
- Splasher.Close();
- }
-
- static void DoStartup(string[] args)
- {
- // do whatever you need to do
- Form1 f = new Form1();
- Application.Run(f);
- }
- }
First we show the SplashForm and set the initial StatusInfo text. Then we call DoStartup(), a good place to put any initialization code which doesn't require a form to be created.
Why moving the Startup Code into an extra function you might ask. The answer is simple: Since the Jitter works on a per function basis, it won’t need to do too much code before your Splash-Screen is actually getting shown on the screen.
To ensure that after you main Application form is loaded, it actually gets focused; you might want to put the following statement into the Form1 OnLoad override:
this.Activate();
