
- 1网易终面:4款主流分布式MQ消息队列如何技术选型,2024年最新java电商购物车面试题_rabbitmq和rocketmq对比面试
- 2MySQL介绍_mysql是一个关系型数据库管理系统,用于存储、管理和检索数据。它能够处理大量的数
- 3解密Teradata与中国市场“分手”背后的原因!国产数据库能填补空白吗?_teradata 竞对
- 4访问网站显示不安全怎么办?教您不花一分钱解决!_此站点的连接不安全
- 5十、Git
- 6Python基础库-JSON库_python json库
- 7Unity中UGUI 图片实现鼠标拖拽功能以及松开复位_unity ui 拖拽
- 8基于SSM的图书借阅系统的开发与实现_基于ssm 技术路线
- 92024年最全该死!GitHub上这些C++项目真香_tbox c++,2024年最新卑微打工人_github上c++11开源项目
- 10智能合约与身份验证:区块链技术的创新应用_怎么通过区块链来管理报名某个项目过程中的信息和身份验证
springcloudalibaba实战_spring cloud 阿里巴巴版本
赞
踩
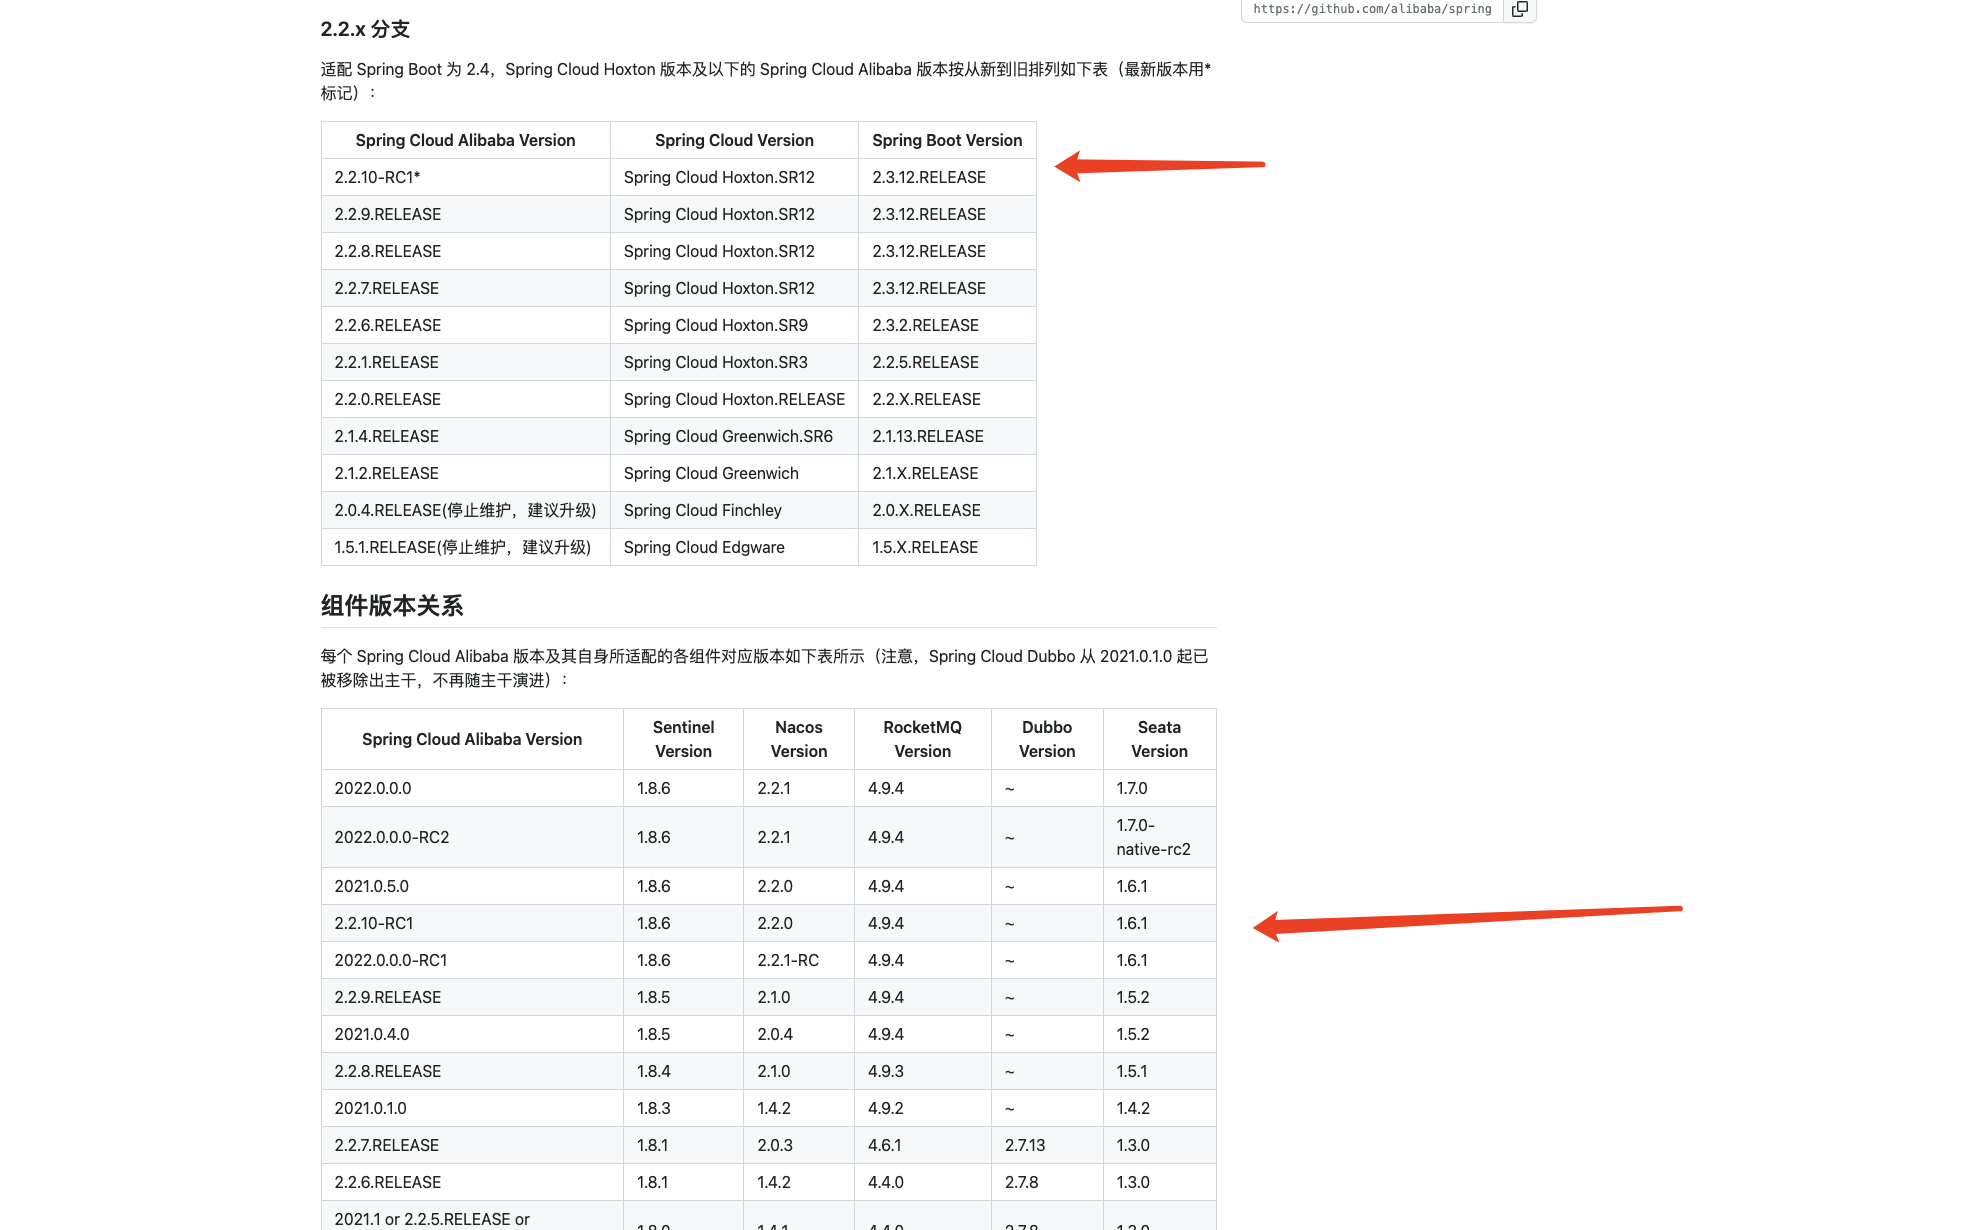
springcloudalibaba实战
地址:https://github.com/alibaba/spring-cloud-alibaba/wiki/%E7%89%88%E6%9C%AC%E8%AF%B4%E6%98%8E
nacos
修改为mysql储存
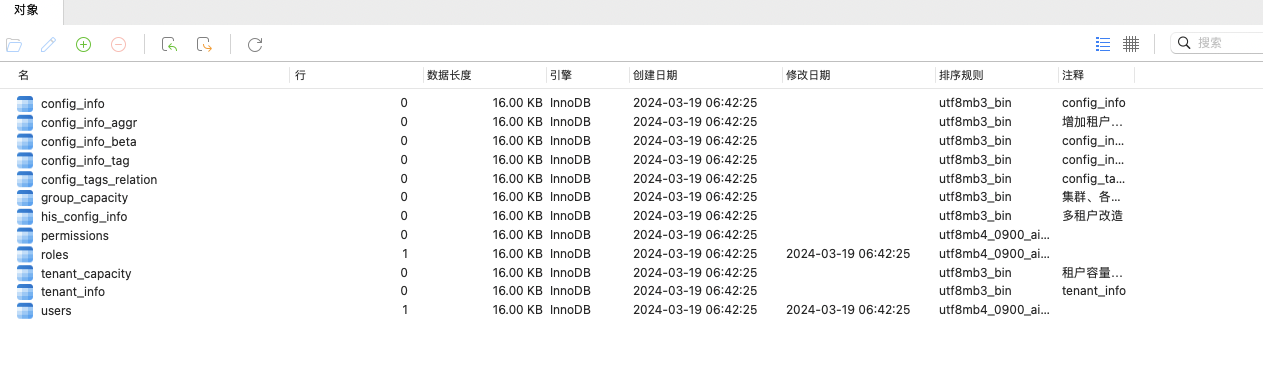
从官网下载nacos,我需要使用mysql储存nacos数据,我目前是2.2.0
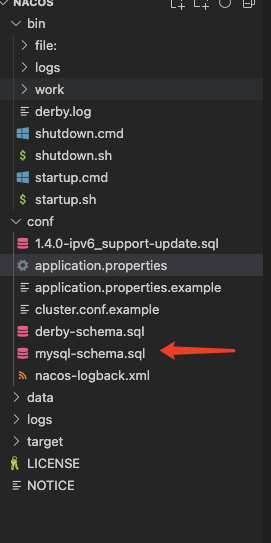
我已经创建好了数据库并执行了SQL
修改nacos/conf/application.properties
这是我修改的部分,我添加了mysql的地址
db.num=1

## Connect URL of DB:
db.url.0=jdbc:mysql://127.0.0.1:3301/nacos?characterEncoding=utf8&connectTimeout=1000&socketTimeout=3000&autoReconnect=true&useUnicode=true&useSSL=false&serverTimezone=UTC
db.user.0=root
db.password.0=123456

### Connection pool configuration: hikariCP
db.pool.config.connectionTimeout=30000
db.pool.config.validationTimeout=10000
db.pool.config.maximumPoolSize=20
db.pool.config.minimumIdle=2
- 1
- 2
- 3
- 4
- 5
- 6
- 7
- 8
- 9
- 10
- 11
- 12
添加secret-key
我发现2.2.0的版本需要添加secret-key,不然就没办法启动,所以这里添加一下,通过java生成
import javax.crypto.KeyGenerator;
import javax.crypto.SecretKey;
import java.security.NoSuchAlgorithmException;

public class SecretKeyGenerator {

public static SecretKey generate() {
    try {
        // 使用AES算法生成256位的SecretKey
        KeyGenerator keyGenerator = KeyGenerator.getInstance("AES");
        keyGenerator.init(256);
        return keyGenerator.generateKey();
    } catch (NoSuchAlgorithmException e) {
        e.printStackTrace();
        return null;
    }
}

public static void main(String[] args) {
    SecretKey secretKey = generate();
    System.out.println(Base64.getEncoder().encodeToString(secretKey.getEncoded()));
}
}

- 1
- 2
- 3
- 4
- 5
- 6
- 7
- 8
- 9
- 10
- 11
- 12
- 13
- 14
- 15
- 16
- 17
- 18
- 19
- 20
- 21
- 22
- 23
修改nacos/conf/application.properties
nacos.core.auth.plugin.nacos.token.secret.key=jKIAmR6A9B0f6nAJ630eKDytchclUijnV/eVDJCftro=
- 1
完整的application.properties,我只修改两个地方剩下的是官方默认的,我没修改
#
# Copyright 1999-2021 Alibaba Group Holding Ltd.
#
# Licensed under the Apache License, Version 2.0 (the "License");
# you may not use this file except in compliance with the License.
# You may obtain a copy of the License at
#
#      http://www.apache.org/licenses/LICENSE-2.0
#
# Unless required by applicable law or agreed to in writing, software
# distributed under the License is distributed on an "AS IS" BASIS,
# WITHOUT WARRANTIES OR CONDITIONS OF ANY KIND, either express or implied.
# See the License for the specific language governing permissions and
# limitations under the License.
#

#*************** Spring Boot Related Configurations ***************#
### Default web context path:
server.servlet.contextPath=/nacos
### Include message field
server.error.include-message=ALWAYS
### Default web server port:
server.port=8848

#*************** Network Related Configurations ***************#
### If prefer hostname over ip for Nacos server addresses in cluster.conf:
# nacos.inetutils.prefer-hostname-over-ip=false

### Specify local server's IP:
# nacos.inetutils.ip-address=


#*************** Config Module Related Configurations ***************#
### If use MySQL as datasource:
### Deprecated configuration property, it is recommended to use `spring.sql.init.platform` replaced.
# spring.datasource.platform=mysql
# spring.sql.init.platform=mysql

### Count of DB:
db.num=1

## Connect URL of DB:
db.url.0=jdbc:mysql://127.0.0.1:3301/nacos?characterEncoding=utf8&connectTimeout=1000&socketTimeout=3000&autoReconnect=true&useUnicode=true&useSSL=false&serverTimezone=UTC
db.user.0=root
db.password.0=123456

### Connection pool configuration: hikariCP
db.pool.config.connectionTimeout=30000
db.pool.config.validationTimeout=10000
db.pool.config.maximumPoolSize=20
db.pool.config.minimumIdle=2

#*************** Naming Module Related Configurations ***************#

### If enable data warmup. If set to false, the server would accept request without local data preparation:
# nacos.naming.data.warmup=true

### If enable the instance auto expiration, kind like of health check of instance:
# nacos.naming.expireInstance=true

### Add in 2.0.0
### The interval to clean empty service, unit: milliseconds.
# nacos.naming.clean.empty-service.interval=60000

### The expired time to clean empty service, unit: milliseconds.
# nacos.naming.clean.empty-service.expired-time=60000

### The interval to clean expired metadata, unit: milliseconds.
# nacos.naming.clean.expired-metadata.interval=5000

### The expired time to clean metadata, unit: milliseconds.
# nacos.naming.clean.expired-metadata.expired-time=60000

### The delay time before push task to execute from service changed, unit: milliseconds.
# nacos.naming.push.pushTaskDelay=500

### The timeout for push task execute, unit: milliseconds.
# nacos.naming.push.pushTaskTimeout=5000

### The delay time for retrying failed push task, unit: milliseconds.
# nacos.naming.push.pushTaskRetryDelay=1000

### Since 2.0.3
### The expired time for inactive client, unit: milliseconds.
# nacos.naming.client.expired.time=180000

#*************** CMDB Module Related Configurations ***************#
### The interval to dump external CMDB in seconds:
# nacos.cmdb.dumpTaskInterval=3600

### The interval of polling data change event in seconds:
# nacos.cmdb.eventTaskInterval=10

### The interval of loading labels in seconds:
# nacos.cmdb.labelTaskInterval=300

### If turn on data loading task:
# nacos.cmdb.loadDataAtStart=false


#*************** Metrics Related Configurations ***************#
### Metrics for prometheus
#management.endpoints.web.exposure.include=*

### Metrics for elastic search
management.metrics.export.elastic.enabled=false
#management.metrics.export.elastic.host=http://localhost:9200

### Metrics for influx
management.metrics.export.influx.enabled=false
#management.metrics.export.influx.db=springboot
#management.metrics.export.influx.uri=http://localhost:8086
#management.metrics.export.influx.auto-create-db=true
#management.metrics.export.influx.consistency=one
#management.metrics.export.influx.compressed=true

#*************** Access Log Related Configurations ***************#
### If turn on the access log:
server.tomcat.accesslog.enabled=true

### The access log pattern:
server.tomcat.accesslog.pattern=%h %l %u %t "%r" %s %b %D %{User-Agent}i %{Request-Source}i

### The directory of access log:
server.tomcat.basedir=file:.

#*************** Access Control Related Configurations ***************#
### If enable spring security, this option is deprecated in 1.2.0:
#spring.security.enabled=false

### The ignore urls of auth
nacos.security.ignore.urls=/,/error,/**/*.css,/**/*.js,/**/*.html,/**/*.map,/**/*.svg,/**/*.png,/**/*.ico,/console-ui/public/**,/v1/auth/**,/v1/console/health/**,/actuator/**,/v1/console/server/**

### The auth system to use, currently only 'nacos' and 'ldap' is supported:
nacos.core.auth.system.type=nacos

### If turn on auth system:
nacos.core.auth.enabled=false

### Turn on/off caching of auth information. By turning on this switch, the update of auth information would have a 15 seconds delay.
nacos.core.auth.caching.enabled=true

### Since 1.4.1, Turn on/off white auth for user-agent: nacos-server, only for upgrade from old version.
nacos.core.auth.enable.userAgentAuthWhite=false

### Since 1.4.1, worked when nacos.core.auth.enabled=true and nacos.core.auth.enable.userAgentAuthWhite=false.
### The two properties is the white list for auth and used by identity the request from other server.
nacos.core.auth.server.identity.key=
nacos.core.auth.server.identity.value=

### worked when nacos.core.auth.system.type=nacos
### The token expiration in seconds:
nacos.core.auth.plugin.nacos.token.cache.enable=false
nacos.core.auth.plugin.nacos.token.expire.seconds=18000
### The default token (Base64 String):
nacos.core.auth.plugin.nacos.token.secret.key=jKIAmR6A9B0f6nAJ630eKDytchclUijnV/eVDJCftro=

### worked when nacos.core.auth.system.type=ldap,{0} is Placeholder,replace login username
#nacos.core.auth.ldap.url=ldap://localhost:389
#nacos.core.auth.ldap.basedc=dc=example,dc=org
#nacos.core.auth.ldap.userDn=cn=admin,${nacos.core.auth.ldap.basedc}
#nacos.core.auth.ldap.password=admin
#nacos.core.auth.ldap.userdn=cn={0},dc=example,dc=org
#nacos.core.auth.ldap.filter.prefix=uid
#nacos.core.auth.ldap.case.sensitive=true


#*************** Istio Related Configurations ***************#
### If turn on the MCP server:
nacos.istio.mcp.server.enabled=false

#*************** Core Related Configurations ***************#

### set the WorkerID manually
# nacos.core.snowflake.worker-id=

### Member-MetaData
# nacos.core.member.meta.site=
# nacos.core.member.meta.adweight=
# nacos.core.member.meta.weight=

### MemberLookup
### Addressing pattern category, If set, the priority is highest
# nacos.core.member.lookup.type=[file,address-server]
## Set the cluster list with a configuration file or command-line argument
# nacos.member.list=192.168.16.101:8847?raft_port=8807,192.168.16.101?raft_port=8808,192.168.16.101:8849?raft_port=8809
## for AddressServerMemberLookup
# Maximum number of retries to query the address server upon initialization
# nacos.core.address-server.retry=5
## Server domain name address of [address-server] mode
# address.server.domain=jmenv.tbsite.net
## Server port of [address-server] mode
# address.server.port=8080
## Request address of [address-server] mode
# address.server.url=/nacos/serverlist

#*************** JRaft Related Configurations ***************#

### Sets the Raft cluster election timeout, default value is 5 second
# nacos.core.protocol.raft.data.election_timeout_ms=5000
### Sets the amount of time the Raft snapshot will execute periodically, default is 30 minute
# nacos.core.protocol.raft.data.snapshot_interval_secs=30
### raft internal worker threads
# nacos.core.protocol.raft.data.core_thread_num=8
### Number of threads required for raft business request processing
# nacos.core.protocol.raft.data.cli_service_thread_num=4
### raft linear read strategy. Safe linear reads are used by default, that is, the Leader tenure is confirmed by heartbeat
# nacos.core.protocol.raft.data.read_index_type=ReadOnlySafe
### rpc request timeout, default 5 seconds
# nacos.core.protocol.raft.data.rpc_request_timeout_ms=5000

#*************** Distro Related Configurations ***************#

### Distro data sync delay time, when sync task delayed, task will be merged for same data key. Default 1 second.
# nacos.core.protocol.distro.data.sync.delayMs=1000

### Distro data sync timeout for one sync data, default 3 seconds.
# nacos.core.protocol.distro.data.sync.timeoutMs=3000

### Distro data sync retry delay time when sync data failed or timeout, same behavior with delayMs, default 3 seconds.
# nacos.core.protocol.distro.data.sync.retryDelayMs=3000

### Distro data verify interval time, verify synced data whether expired for a interval. Default 5 seconds.
# nacos.core.protocol.distro.data.verify.intervalMs=5000

### Distro data verify timeout for one verify, default 3 seconds.
# nacos.core.protocol.distro.data.verify.timeoutMs=3000

### Distro data load retry delay when load snapshot data failed, default 30 seconds.
# nacos.core.protocol.distro.data.load.retryDelayMs=30000

### enable to support prometheus service discovery
#nacos.prometheus.metrics.enabled=true

### Since 2.3
#*************** Grpc Configurations ***************#

## sdk grpc(between nacos server and client) configuration
## Sets the maximum message size allowed to be received on the server.
#nacos.remote.server.grpc.sdk.max-inbound-message-size=10485760

## Sets the time(milliseconds) without read activity before sending a keepalive ping. The typical default is two hours.
#nacos.remote.server.grpc.sdk.keep-alive-time=7200000

## Sets a time(milliseconds) waiting for read activity after sending a keepalive ping. Defaults to 20 seconds.
#nacos.remote.server.grpc.sdk.keep-alive-timeout=20000


## Sets a time(milliseconds) that specify the most aggressive keep-alive time clients are permitted to configure. The typical default is 5 minutes
#nacos.remote.server.grpc.sdk.permit-keep-alive-time=300000

## cluster grpc(inside the nacos server) configuration
#nacos.remote.server.grpc.cluster.max-inbound-message-size=10485760

## Sets the time(milliseconds) without read activity before sending a keepalive ping. The typical default is two hours.
#nacos.remote.server.grpc.cluster.keep-alive-time=7200000

## Sets a time(milliseconds) waiting for read activity after sending a keepalive ping. Defaults to 20 seconds.
#nacos.remote.server.grpc.cluster.keep-alive-timeout=20000

## Sets a time(milliseconds) that specify the most aggressive keep-alive time clients are permitted to configure. The typical default is 5 minutes
#nacos.remote.server.grpc.cluster.permit-keep-alive-time=300000
- 1
- 2
- 3
- 4
- 5
- 6
- 7
- 8
- 9
- 10
- 11
- 12
- 13
- 14
- 15
- 16
- 17
- 18
- 19
- 20
- 21
- 22
- 23
- 24
- 25
- 26
- 27
- 28
- 29
- 30
- 31
- 32
- 33
- 34
- 35
- 36
- 37
- 38
- 39
- 40
- 41
- 42
- 43
- 44
- 45
- 46
- 47
- 48
- 49
- 50
- 51
- 52
- 53
- 54
- 55
- 56
- 57
- 58
- 59
- 60
- 61
- 62
- 63
- 64
- 65
- 66
- 67
- 68
- 69
- 70
- 71
- 72
- 73
- 74
- 75
- 76
- 77
- 78
- 79
- 80
- 81
- 82
- 83
- 84
- 85
- 86
- 87
- 88
- 89
- 90
- 91
- 92
- 93
- 94
- 95
- 96
- 97
- 98
- 99
- 100
- 101
- 102
- 103
- 104
- 105
- 106
- 107
- 108
- 109
- 110
- 111
- 112
- 113
- 114
- 115
- 116
- 117
- 118
- 119
- 120
- 121
- 122
- 123
- 124
- 125
- 126
- 127
- 128
- 129
- 130
- 131
- 132
- 133
- 134
- 135
- 136
- 137
- 138
- 139
- 140
- 141
- 142
- 143
- 144
- 145
- 146
- 147
- 148
- 149
- 150
- 151
- 152
- 153
- 154
- 155
- 156
- 157
- 158
- 159
- 160
- 161
- 162
- 163
- 164
- 165
- 166
- 167
- 168
- 169
- 170
- 171
- 172
- 173
- 174
- 175
- 176
- 177
- 178
- 179
- 180
- 181
- 182
- 183
- 184
- 185
- 186
- 187
- 188
- 189
- 190
- 191
- 192
- 193
- 194
- 195
- 196
- 197
- 198
- 199
- 200
- 201
- 202
- 203
- 204
- 205
- 206
- 207
- 208
- 209
- 210
- 211
- 212
- 213
- 214
- 215
- 216
- 217
- 218
- 219
- 220
- 221
- 222
- 223
- 224
- 225
- 226
- 227
- 228
- 229
- 230
- 231
- 232
- 233
- 234
- 235
- 236
- 237
- 238
- 239
- 240
- 241
- 242
- 243
- 244
- 245
- 246
- 247
- 248
- 249
- 250
- 251
- 252
- 253
- 254
- 255
- 256
- 257
- 258
- 259
- 260
- 261
- 262
- 263
启动nacos
# 在nacos/bin执行
sh startup.sh -m standalone
- 1
- 2
启动成功
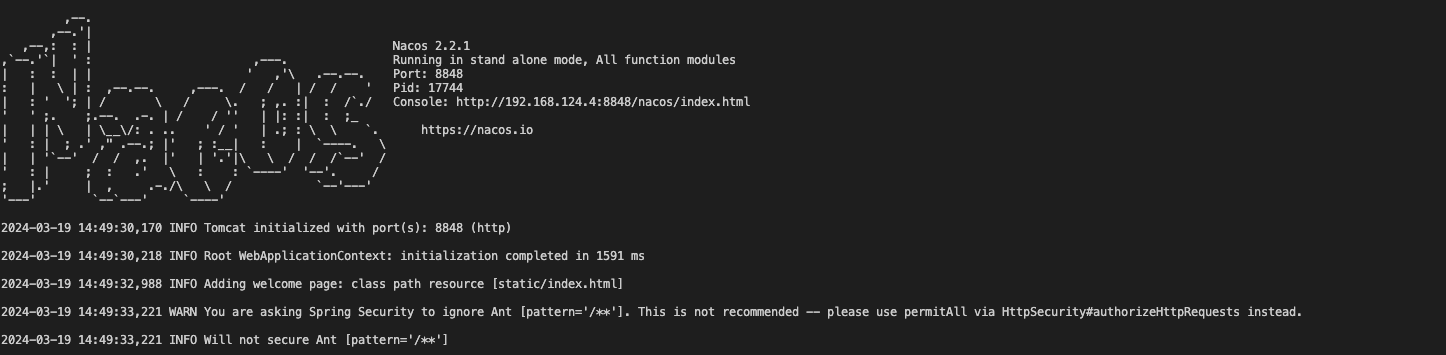
访问地址:http://127.0.0.1:8848/nacos
Springcloudalibaba搭建
可以使用阿里云脚手架快速创建https://start.aliyun.com/
版本管理,项目父pom.xml
 <properties>
        <java.version>1.8</java.version>
        <project.build.sourceEncoding>UTF-8</project.build.sourceEncoding>
        <project.reporting.outputEncoding>UTF-8</project.reporting.outputEncoding>
        <spring-boot.version>2.3.12.RELEASE</spring-boot.version>
        <spring-cloud-alibaba.version>2.2.10-RC1</spring-cloud-alibaba.version>
        <spring.cloud.version>Hoxton.SR12</spring.cloud.version>
    </properties>

<dependencyManagement>
        <dependencies>
            <dependency>
                <groupId>org.springframework.boot</groupId>
                <artifactId>spring-boot-dependencies</artifactId>
                <version>${spring-boot.version}</version>
                <type>pom</type>
                <scope>import</scope>
            </dependency>
            <dependency>
                <groupId>com.alibaba.cloud</groupId>
                <artifactId>spring-cloud-alibaba-dependencies</artifactId>
                <version>${spring-cloud-alibaba.version}</version>
                <type>pom</type>
                <scope>import</scope>
            </dependency>
            <dependency>
                <groupId>org.springframework.cloud</groupId>
                <artifactId>spring-cloud-dependencies</artifactId>
                <version>${spring.cloud.version}</version>
                <type>pom</type>
                <scope>import</scope>
            </dependency>
        </dependencies>
    </dependencyManagement>
- 1
- 2
- 3
- 4
- 5
- 6
- 7
- 8
- 9
- 10
- 11
- 12
- 13
- 14
- 15
- 16
- 17
- 18
- 19
- 20
- 21
- 22
- 23
- 24
- 25
- 26
- 27
- 28
- 29
- 30
- 31
- 32
- 33
- 34
solve服务引入nacos,使用nacos配置中心
resource目录下新建bootstrap.yml
spring:
  cloud:
    nacos:
      config:
        server-addr: 127.0.0.1:8848
        file-extension: yaml
        shared-configs: #公用配置文件
          - data-id: common.yaml
            refresh: true #是否支持自动刷新
  application:
    name: solve
  profiles:
    active: test
- 1
- 2
- 3
- 4
- 5
- 6
- 7
- 8
- 9
- 10
- 11
- 12
- 13
说明:默认匹配规则#{spring.application.name}+#{profiles.active}+文件后缀
在nacos中新建配置文件solve-test.yaml
由于我是集成很多内容后才写的文章,所以配置顺序可能不匹配,如果后续再看文章学习,复制的时候需要自己修改一下层级,不然会有异常
server:
  port: 1020
- 1
- 2
nacos配置中心实时刷新
在nacos中新建一个common.yaml,记住bootstrap.yml里面加了支持实时刷新,然后java代码注解里面也加这个时候才能实时刷新
id:
  20001
- 1
- 2
@RestController
@RequiredArgsConstructor(onConstructor = @__(@Autowired))
@Slf4j
// 实时刷新
@RefreshScope
public class SolveController {

    private final MemberService memberService;

    private final SolveMapper solveMapper;

    @Value("${id:1}")
    private Integer id;

    @GetMapping("token")
    public String getToken() {
        memberService.getToken();
        log.info("Id:{}",id);
        return "success";
    }
}
- 1
- 2
- 3
- 4
- 5
- 6
- 7
- 8
- 9
- 10
- 11
- 12
- 13
- 14
- 15
- 16
- 17
- 18
- 19
- 20
- 21
MybatisPlus
<dependency>
    <groupId>com.baomidou</groupId>
    <artifactId>mybatis-plus-boot-starter</artifactId>
    <version>3.5.3.1</version>
</dependency>
- 1
- 2
- 3
- 4
- 5
nacos里面加上
spring:
  datasource:
    url: jdbc:mysql://127.0.0.1:3301/solve?characterEncoding=utf-8&useSSL=false&serverTimezone=Asia/Shanghai&allowPublicKeyRetrieval=true
    username: root
    password: '123456'
    driver-class-name: com.mysql.cj.jdbc.Driver

mybatis-plus:
  mapper-locations: classpath:mapper/*.xml
  global-config:
    db-config:
      tablePrefix: eyeshield_
  configuration:
    log-impl: org.apache.ibatis.logging.stdout.StdOutImpl
- 1
- 2
- 3
- 4
- 5
- 6
- 7
- 8
- 9
- 10
- 11
- 12
- 13
- 14
启动类加上扫描注解
@SpringBootApplication
@EnableFeignClients
@MapperScan("com.eyeshield.solve.mapper")
public class SolveApplication {
    public static void main(String[] args) {
        SpringApplication.run(SolveApplication.class, args);
    }
}
- 1
- 2
- 3
- 4
- 5
- 6
- 7
- 8
- 9
OpenFeign
<dependency>
    <groupId>org.springframework.cloud</groupId>
    <artifactId>spring-cloud-starter-openfeign</artifactId>
</dependency>
- 1
- 2
- 3
- 4
nacos配置新增
feign:
  sentinel:
  # 从nacos中发现服务
    enabled: true
- 1
- 2
- 3
- 4
定义需要调用的接口,name写服务名就可以,nacos会根据服务名找到服务,剩下的就和常规的方法调用一样了
@FeignClient(name = "member",path = "/")
public interface MemberService {
    @GetMapping("member")
    String getToken();
}
- 1
- 2
- 3
- 4
- 5
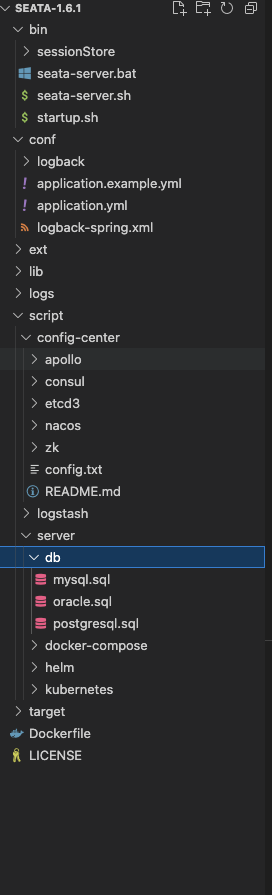
Seata
配置mysql储存+配置中心nacos
下载Seata解压后,采用mysql的方式进行储存,新建一个数据库执行这个SQL
修改application.yml
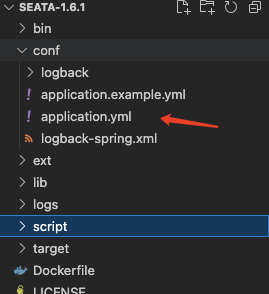
注意这个命名空间是我去nacos新建的,单独新建一个给Seata使用
seata:
  config:
    # support: nacos, consul, apollo, zk, etcd3
    type: nacos
    nacos:
      application: seata-server
      server-addr: 127.0.0.1:8848
      group: DEFAULT_GROUP
      cluster: default
      username: nacos
      password: nacos
      namespace: 83381939-6c1d-4a1f-ae30-ae4d0889dc1a
      data-id: seata-server.properties
  registry:
    # support: nacos, eureka, redis, zk, consul, etcd3, sofa
    type: nacos
    nacos:
      application: seata-server
      server-addr: 127.0.0.1:8848
      group: DEFAULT_GROUP
      cluster: default
      username: nacos
      password: nacos
      namespace: 83381939-6c1d-4a1f-ae30-ae4d0889dc1a
- 1
- 2
- 3
- 4
- 5
- 6
- 7
- 8
- 9
- 10
- 11
- 12
- 13
- 14
- 15
- 16
- 17
- 18
- 19
- 20
- 21
- 22
- 23
- 24
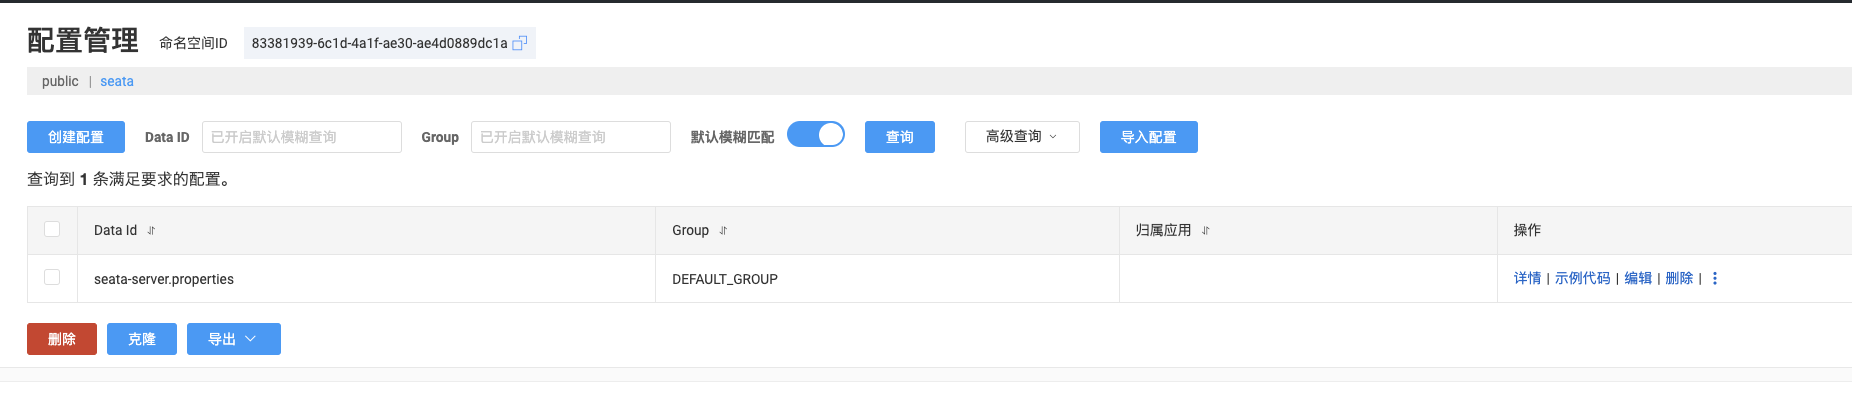
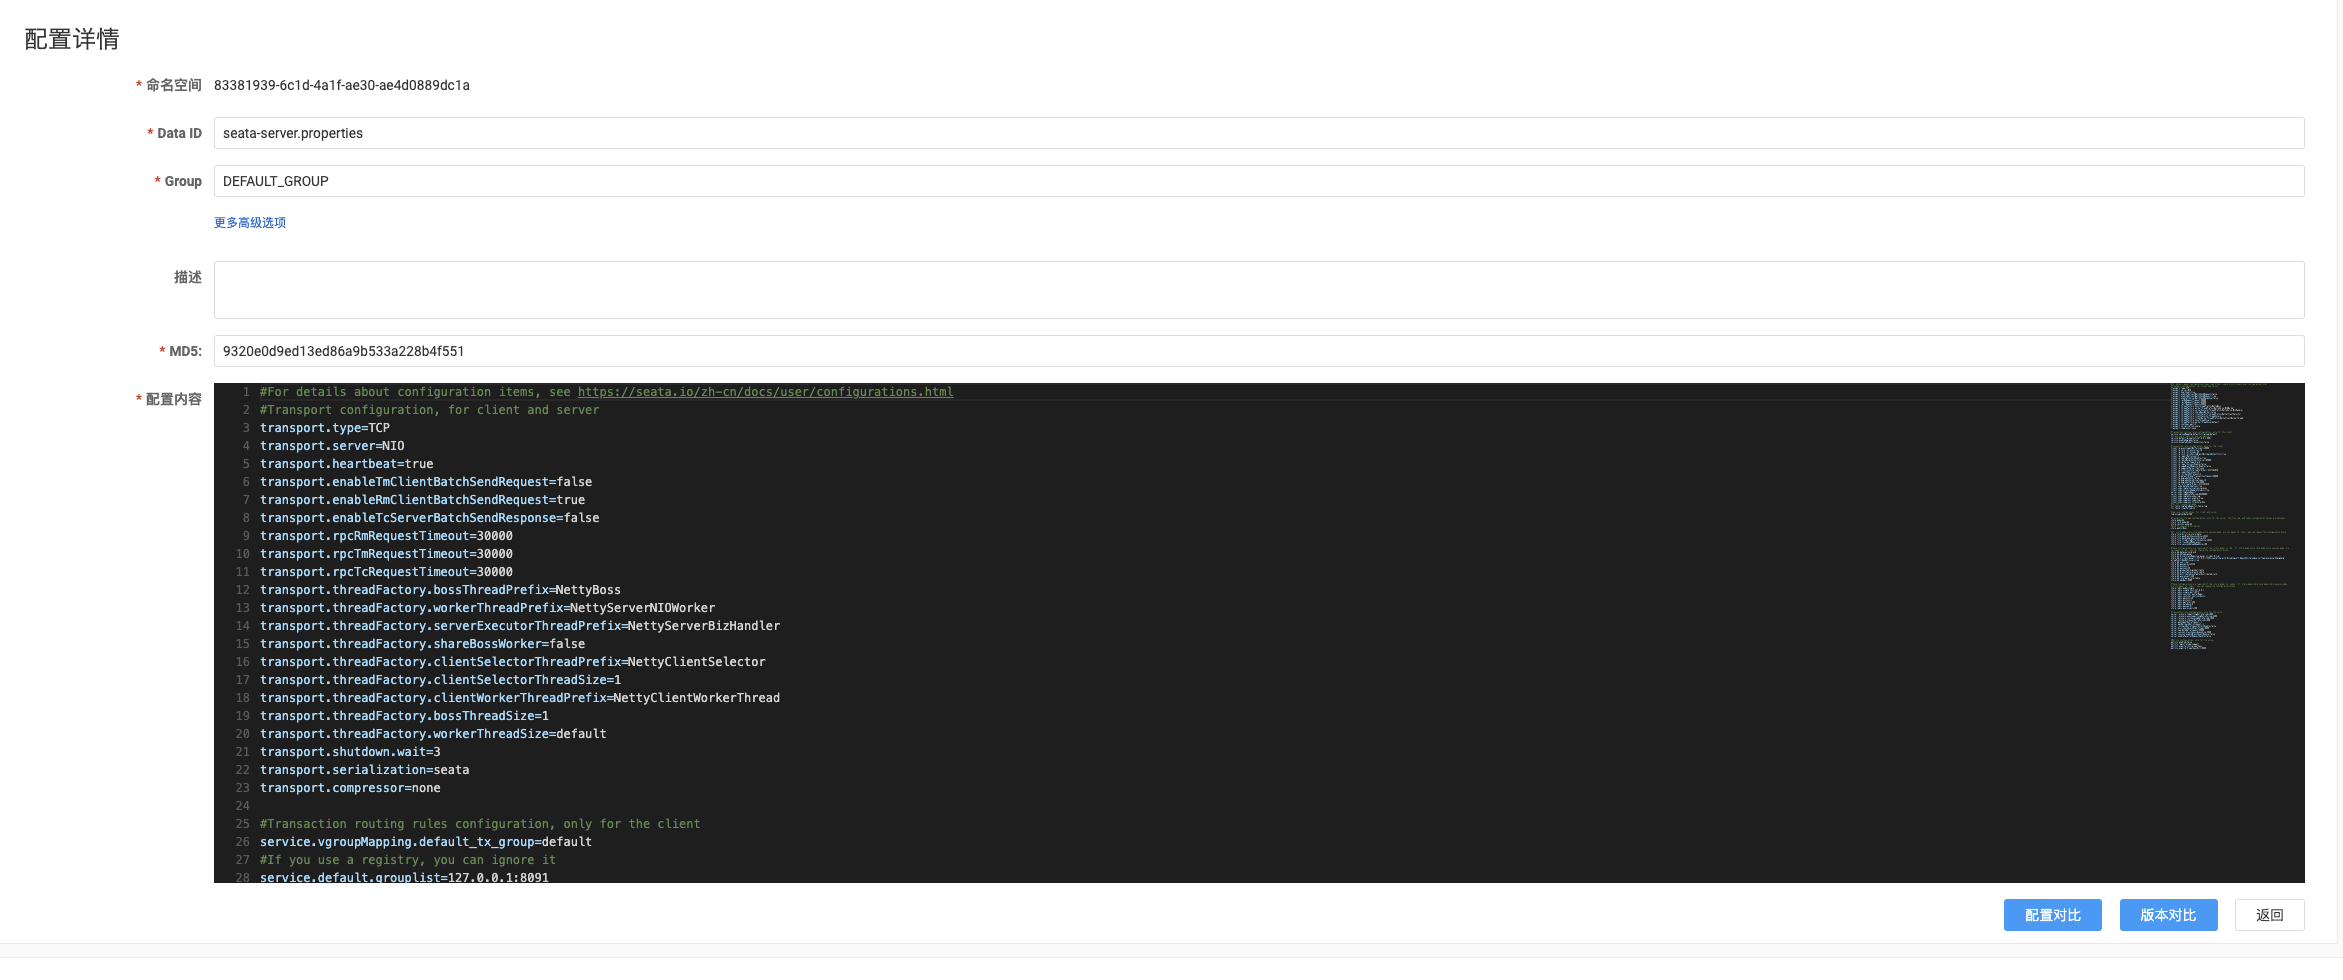
修改config.txt,这个文件是在nacos配置中心使用的,所以改完还得复制到nacos里面,名字就是application.yml里面配置的
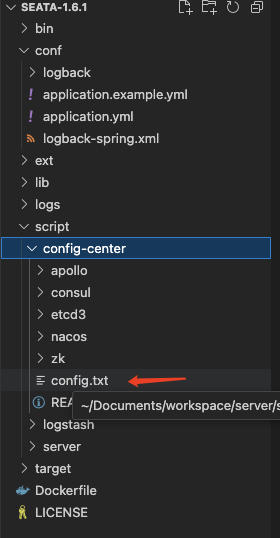
store.mode=db
store.lock.mode=db
store.session.mode=db

store.db.datasource=druid
store.db.dbType=mysql
store.db.driverClassName=com.mysql.jdbc.Driver
store.db.url=jdbc:mysql://127.0.0.1:3301/seata?useUnicode=true&rewriteBatchedStatements=true&allowPublicKeyRetrieval=true
store.db.user=root
store.db.password=123456
- 1
- 2
- 3
- 4
- 5
- 6
- 7
- 8
- 9
- 10
在nacos里面是这样的
启动seata
server/seata-1.6.1/bin目录下执行
sh seata-server.sh
- 1
执行成功会是这个样子,而且不会有报错信息出现
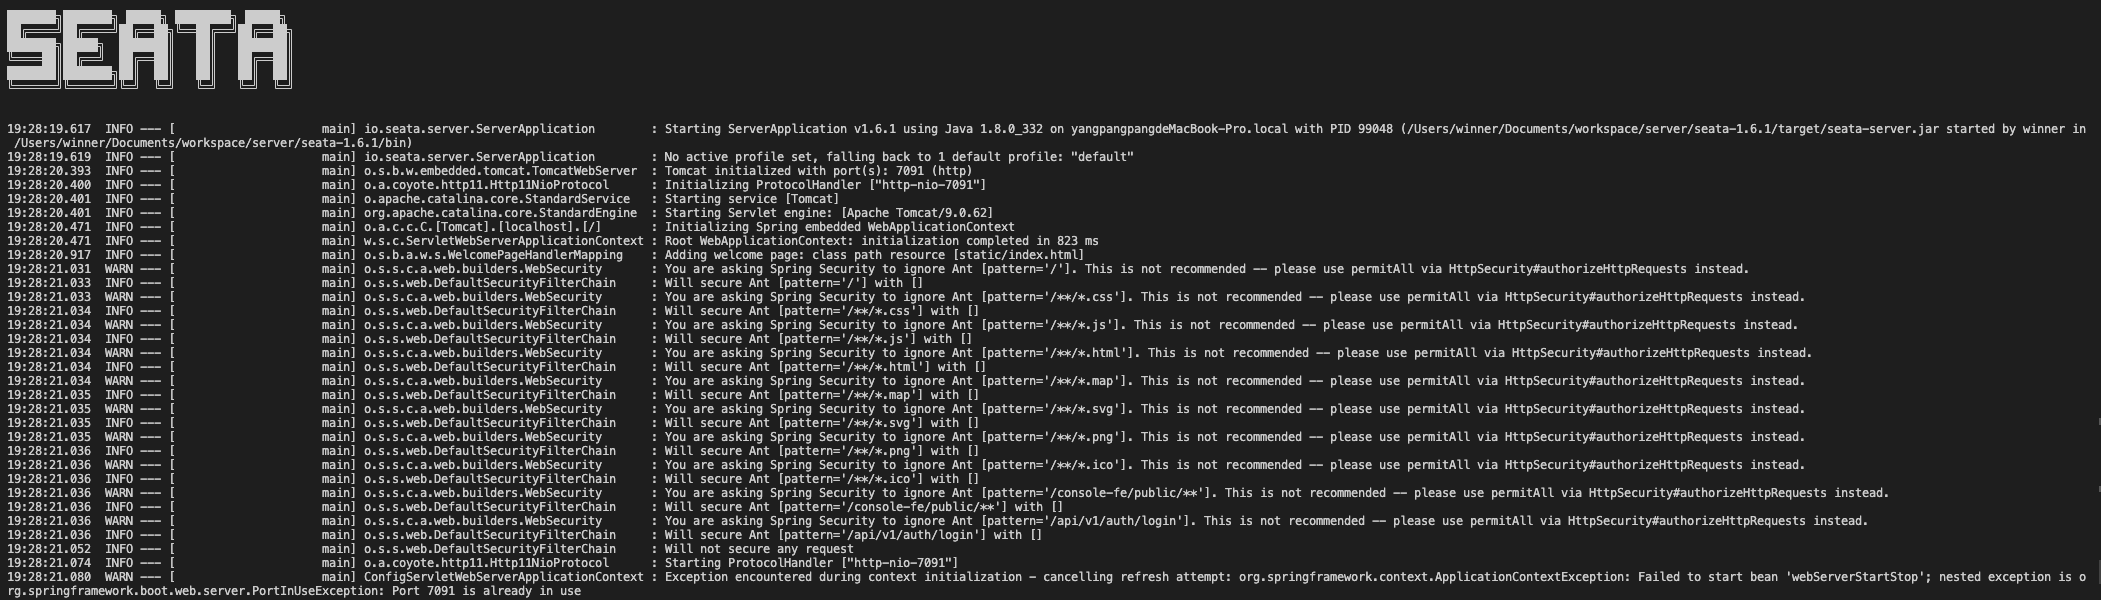
应用会被注册到nacos上面

访问地址:http://127.0.0.1:7091/
集成seata
默认使用AT默认,那么就需要在每个被调用的服务mysql里面添加undo_log表
CREATE TABLE `undo_log` (
  `branch_id` bigint NOT NULL COMMENT 'branch transaction id',
  `xid` varchar(128) NOT NULL COMMENT 'global transaction id',
  `context` varchar(128) NOT NULL COMMENT 'undo_log context,such as serialization',
  `rollback_info` longblob NOT NULL COMMENT 'rollback info',
  `log_status` int NOT NULL COMMENT '0:normal status,1:defense status',
  `log_created` datetime(6) NOT NULL COMMENT 'create datetime',
  `log_modified` datetime(6) NOT NULL COMMENT 'modify datetime',
  UNIQUE KEY `ux_undo_log` (`xid`,`branch_id`),
  KEY `ix_log_created` (`log_created`)
) ENGINE=InnoDB DEFAULT CHARSET=utf8mb4 COLLATE=utf8mb4_0900_ai_ci COMMENT='AT transaction mode undo table';
- 1
- 2
- 3
- 4
- 5
- 6
- 7
- 8
- 9
- 10
- 11
pom.xml
<dependency>
    <groupId>com.alibaba.cloud</groupId>
    <artifactId>spring-cloud-starter-alibaba-seata</artifactId>
</dependency>
- 1
- 2
- 3
- 4
solve服务的nacos配置中心添加
seata:
  application-id: ${spring.application.name}
  # seata 服务分组,要与服务端配置service.vgroup_mapping的后缀对应
  tx-service-group: default_tx_group
  registry:
    # 指定nacos作为注册中心
    type: nacos
    nacos:
      application: seata-server
      server-addr: 127.0.0.1:8848
      namespace: 83381939-6c1d-4a1f-ae30-ae4d0889dc1a
      group: DEFAULT_GROUP

  config:
    # 指定nacos作为配置中心
    type: nacos
    nacos:
      server-addr: 127.0.0.1:8848
      group: DEFAULT_GROUP
      namespace: 83381939-6c1d-4a1f-ae30-ae4d0889dc1a
      data-id: seata-server.properties
- 1
- 2
- 3
- 4
- 5
- 6
- 7
- 8
- 9
- 10
- 11
- 12
- 13
- 14
- 15
- 16
- 17
- 18
- 19
- 20
- 21
由于solve是发起者,所以在发起者添加全局事务注解就可以,注意另外一个服务也是需要集成seata才行的
@RestController
@RequiredArgsConstructor(onConstructor = @__(@Autowired))
@Slf4j
@RefreshScope
public class SolveController {
    // 另外一个服务使用了openFeign
    private final MemberService memberService;

    private final SolveMapper solveMapper;

    @Value("${id:1}")
    private Integer id;

    @GetMapping("token")
    @GlobalTransactional(name = "createOrder", rollbackFor = Exception.class)
    public String getToken() {
        memberService.getToken();
        solveMapper.insert();
        if(true){
            throw new Exception();
        }

        log.info("Id:{}",id);
        return "success";
    }
}
- 1
- 2
- 3
- 4
- 5
- 6
- 7
- 8
- 9
- 10
- 11
- 12
- 13
- 14
- 15
- 16
- 17
- 18
- 19
- 20
- 21
- 22
- 23
- 24
- 25
- 26
执行结果就是两张表的数据都回滚了,而且日志上面会有信息输入本次结果
Sentinel
搭建服务
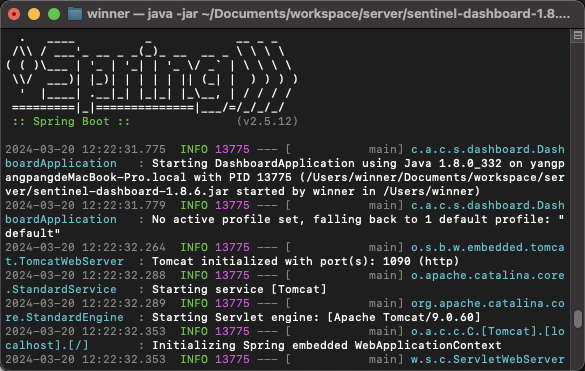
Sentinel搭建比较简单,启动这个jar就可以了
java -jar sentinel-dashboard-1.8.6.jar --server.port=1090
- 1
集成服务
<dependency>
    <groupId>com.alibaba.cloud</groupId>
    <artifactId>spring-cloud-starter-alibaba-sentinel</artifactId>
</dependency>
<!--        规则从nacos获取-->
<dependency>
    <groupId>com.alibaba.csp</groupId>
    <artifactId>sentinel-datasource-nacos</artifactId>
</dependency>
<!-- 服务监控节点 -->
<dependency>
    <groupId>org.springframework.boot</groupId>
    <artifactId>spring-boot-starter-actuator</artifactId>
</dependency>
- 1
- 2
- 3
- 4
- 5
- 6
- 7
- 8
- 9
- 10
- 11
- 12
- 13
- 14
nacos中配置新增
  cloud:
    sentinel:
      transport:
        dashboard: 127.0.0.1:1090
      #服务启动后,直接注册到dashboard
      eager: true
      datasource:   #整合nacos,下发配置
        ds1:
          nacos:
            server-addr: localhost:8848
            dataId: solve-sentinel-flow
            groupId: DEFAULT_GROUP
            ruleType: flow   #流控规则
- 1
- 2
- 3
- 4
- 5
- 6
- 7
- 8
- 9
- 10
- 11
- 12
- 13
默认情况下Sentinel控制台是懒加载,所以需要发起一个请求才能看到
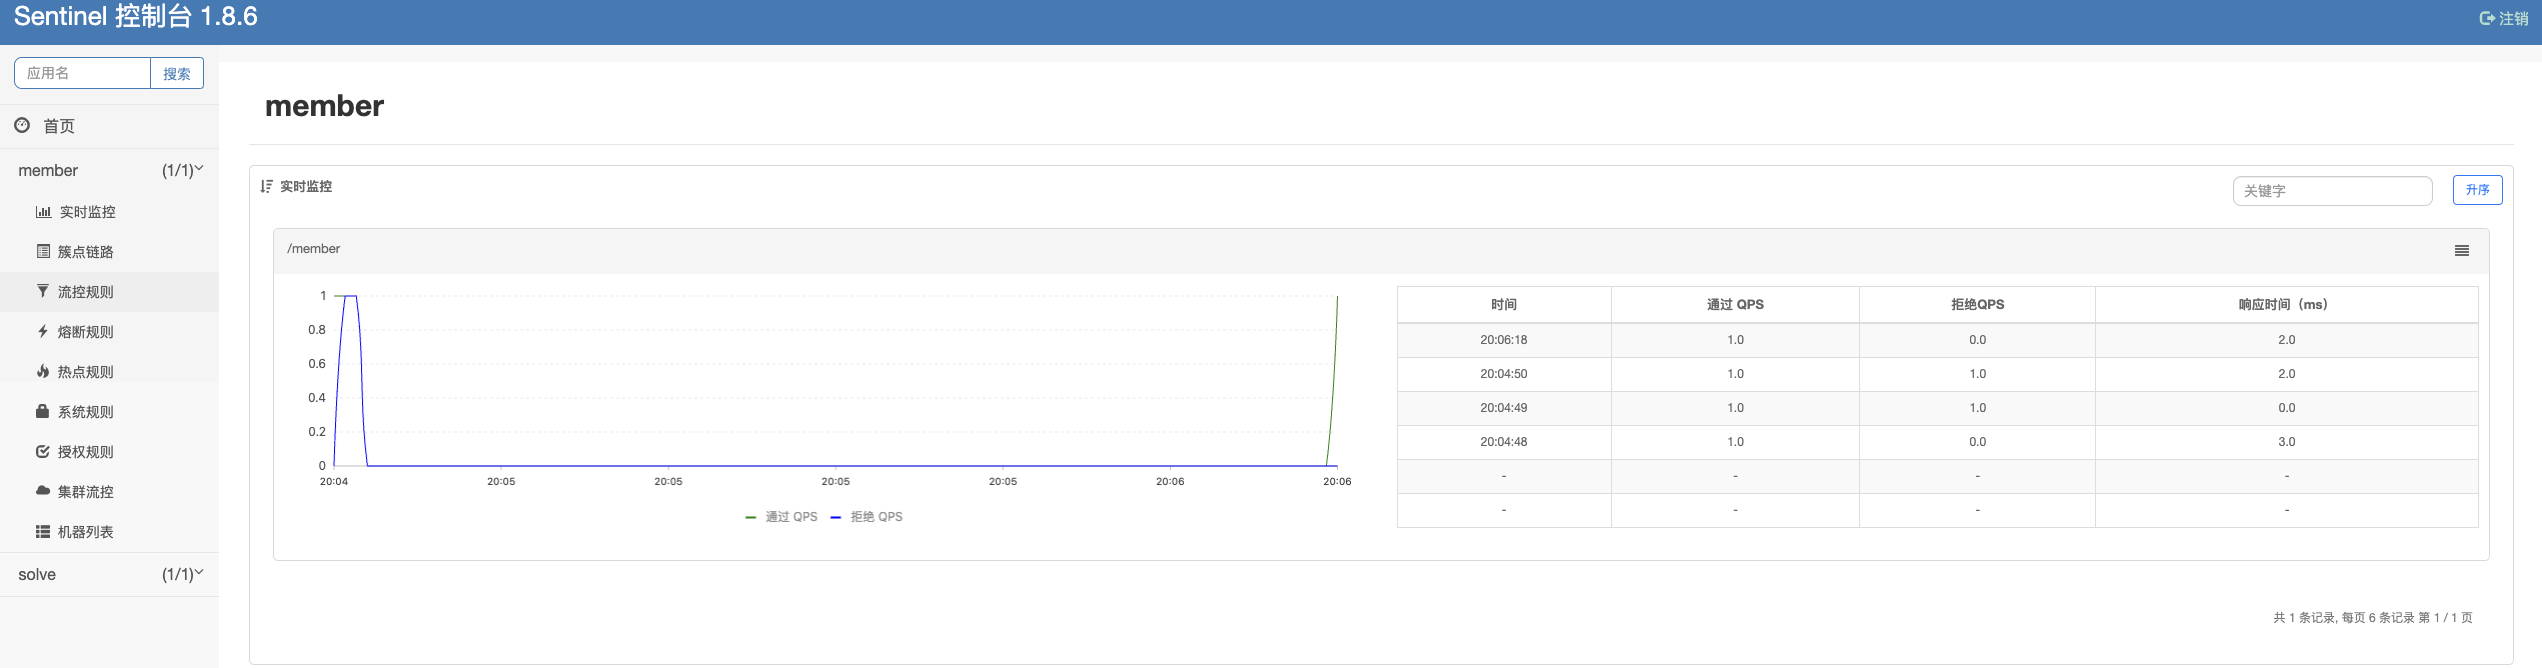
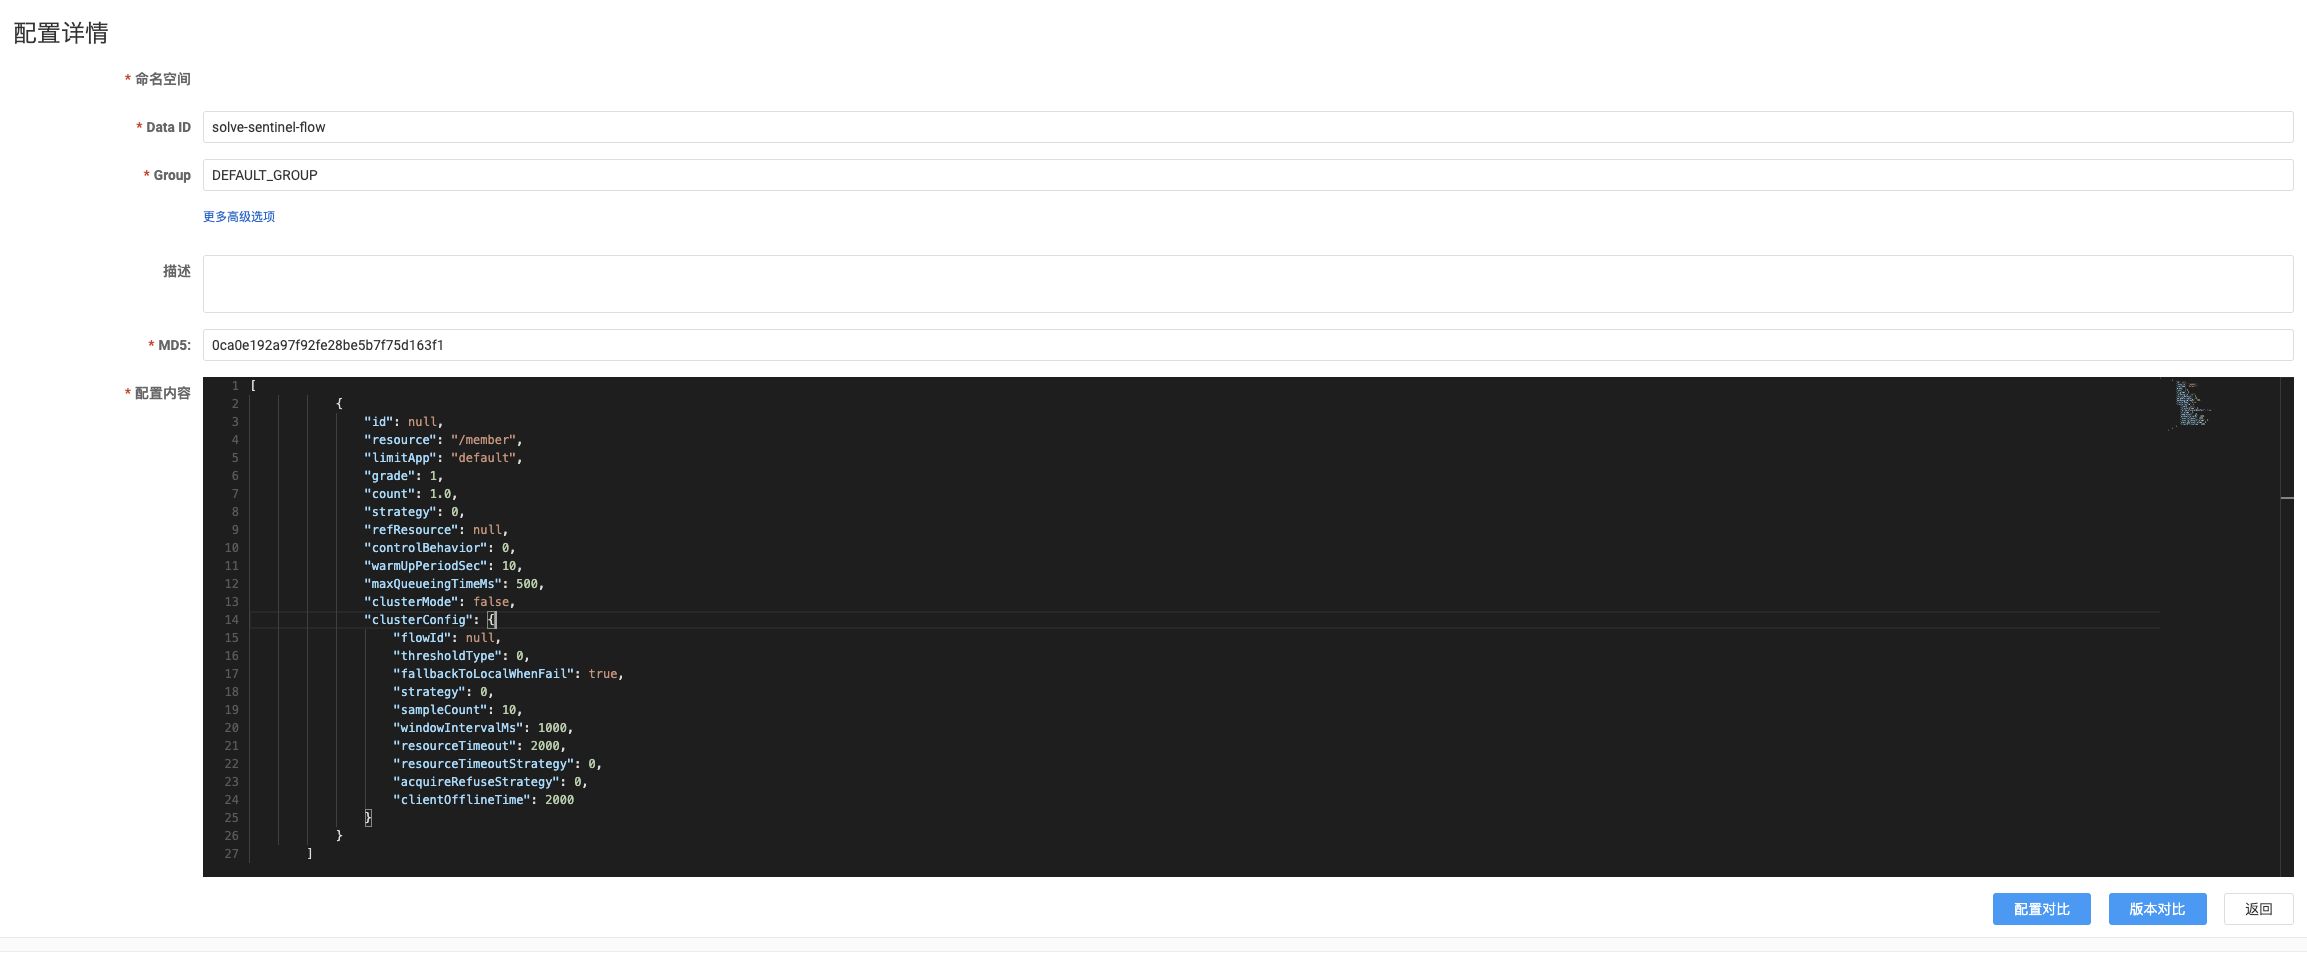
配置一个流控规则,我们通过这个api访问就可以看到当前的规则,这个也适用于我们后续动态写到nacos里面
这里是因为我们开启了监控检查,所以访问自己服务的/actuator/sentinel
比如说:
http://localhost:1021/actuator/sentinel
注意看rules.flowRules
{
    "blockPage": null,
    "appName": "member",
    "consoleServer": [
        {
            "protocol": "HTTP",
            "host": "127.0.0.1",
            "port": 1090
        }
    ],
    "coldFactor": "3",
    "rules": {
        "systemRules": [],
        "authorityRule": [],
        "paramFlowRule": [],
        "flowRules": [
            {
                "id": null,
                "resource": "/member",
                "limitApp": "default",
                "grade": 1,
                "count": 1.0,
                "strategy": 0,
                "refResource": null,
                "controlBehavior": 0,
                "warmUpPeriodSec": 10,
                "maxQueueingTimeMs": 500,
                "clusterMode": false,
                "clusterConfig": {
                    "flowId": null,
                    "thresholdType": 0,
                    "fallbackToLocalWhenFail": true,
                    "strategy": 0,
                    "sampleCount": 10,
                    "windowIntervalMs": 1000,
                    "resourceTimeout": 2000,
                    "resourceTimeoutStrategy": 0,
                    "acquireRefuseStrategy": 0,
                    "clientOfflineTime": 2000
                }
            }
        ],
        "degradeRules": []
    },
    "metricsFileCharset": "UTF-8",
    "filter": {
        "order": -2147483648,
        "urlPatterns": [
            "/**"
        ],
        "enabled": true
    },
    "totalMetricsFileCount": 6,
    "datasource": {
        "ds1": {
            "file": null,
            "nacos": {
                "dataType": "json",
                "ruleType": "FLOW",
                "converterClass": null,
                "serverAddr": "localhost:8848",
                "contextPath": null,
                "username": null,
                "password": null,
                "groupId": "DEFAULT_GROUP",
                "dataId": "solve-sentinel-flow",
                "endpoint": null,
                "namespace": null,
                "accessKey": null,
                "secretKey": null
            },
            "zk": null,
            "apollo": null,
            "redis": null,
            "consul": null
        }
    },
    "clientIp": "192.168.124.4",
    "clientPort": "8720",
    "logUsePid": false,
    "metricsFileSize": 52428800,
    "logDir": "/Users/winner/logs/csp/",
    "heartbeatIntervalMs": 10000
}
- 1
- 2
- 3
- 4
- 5
- 6
- 7
- 8
- 9
- 10
- 11
- 12
- 13
- 14
- 15
- 16
- 17
- 18
- 19
- 20
- 21
- 22
- 23
- 24
- 25
- 26
- 27
- 28
- 29
- 30
- 31
- 32
- 33
- 34
- 35
- 36
- 37
- 38
- 39
- 40
- 41
- 42
- 43
- 44
- 45
- 46
- 47
- 48
- 49
- 50
- 51
- 52
- 53
- 54
- 55
- 56
- 57
- 58
- 59
- 60
- 61
- 62
- 63
- 64
- 65
- 66
- 67
- 68
- 69
- 70
- 71
- 72
- 73
- 74
- 75
- 76
- 77
- 78
- 79
- 80
- 81
- 82
- 83
- 84
nacos中修改规则
使用的就是上面json的数据,这样错误率低一点,说明:现在从Sentinel控制台修改流控规则或者新增是不会生效的,修改或新增的话只能从nacos里面改,不然Sentinel重启后信息就会消失,因为默认情况是储存在内存里面的。目前持久化只有在nacos里面写才能生效
[
  {
    "id": null,
    "resource": "/member",
    "limitApp": "default",
    "grade": 1,
    "count": 1.0,
    "strategy": 0,
    "refResource": null,
    "controlBehavior": 0,
    "warmUpPeriodSec": 10,
    "maxQueueingTimeMs": 500,
    "clusterMode": false,
    "clusterConfig": {
      "flowId": null,
      "thresholdType": 0,
      "fallbackToLocalWhenFail": true,
      "strategy": 0,
      "sampleCount": 10,
      "windowIntervalMs": 1000,
      "resourceTimeout": 2000,
      "resourceTimeoutStrategy": 0,
      "acquireRefuseStrategy": 0,
      "clientOfflineTime": 2000
    }
  }
]
- 1
- 2
- 3
- 4
- 5
- 6
- 7
- 8
- 9
- 10
- 11
- 12
- 13
- 14
- 15
- 16
- 17
- 18
- 19
- 20
- 21
- 22
- 23
- 24
- 25
- 26
- 27
这个配置的名字是上面配置的,也就是solve的配置文件sentinel那行配置的
此时访问QPS大于1就会出现限流
Gateway
需要把gateway注册到nacos上
<dependency>
    <groupId>org.springframework.cloud</groupId>
    <artifactId>spring-cloud-starter-gateway</artifactId>
</dependency>
<dependency>
    <groupId>com.alibaba.cloud</groupId>
    <artifactId>spring-cloud-starter-alibaba-nacos-discovery</artifactId>
</dependency>
<dependency>
    <groupId>com.alibaba.cloud</groupId>
    <artifactId>spring-cloud-starter-alibaba-nacos-config</artifactId>
</dependency>
- 1
- 2
- 3
- 4
- 5
- 6
- 7
- 8
- 9
- 10
- 11
- 12
新建一个bootstrap.yml
spring:
  cloud:
    nacos:
      config:
        server-addr: 127.0.0.1:8848
        file-extension: yaml
  application:
    name: gateway
  profiles:
    active: test
- 1
- 2
- 3
- 4
- 5
- 6
- 7
- 8
- 9
- 10
nacos里面新增一个gateway的配置,然后启动服务就能看到已经注册到nacos了

目前通过gateway就能访问到solve和member服务了,这个路由的配置不写的情况下,默认也是能根据服务名进行转发的
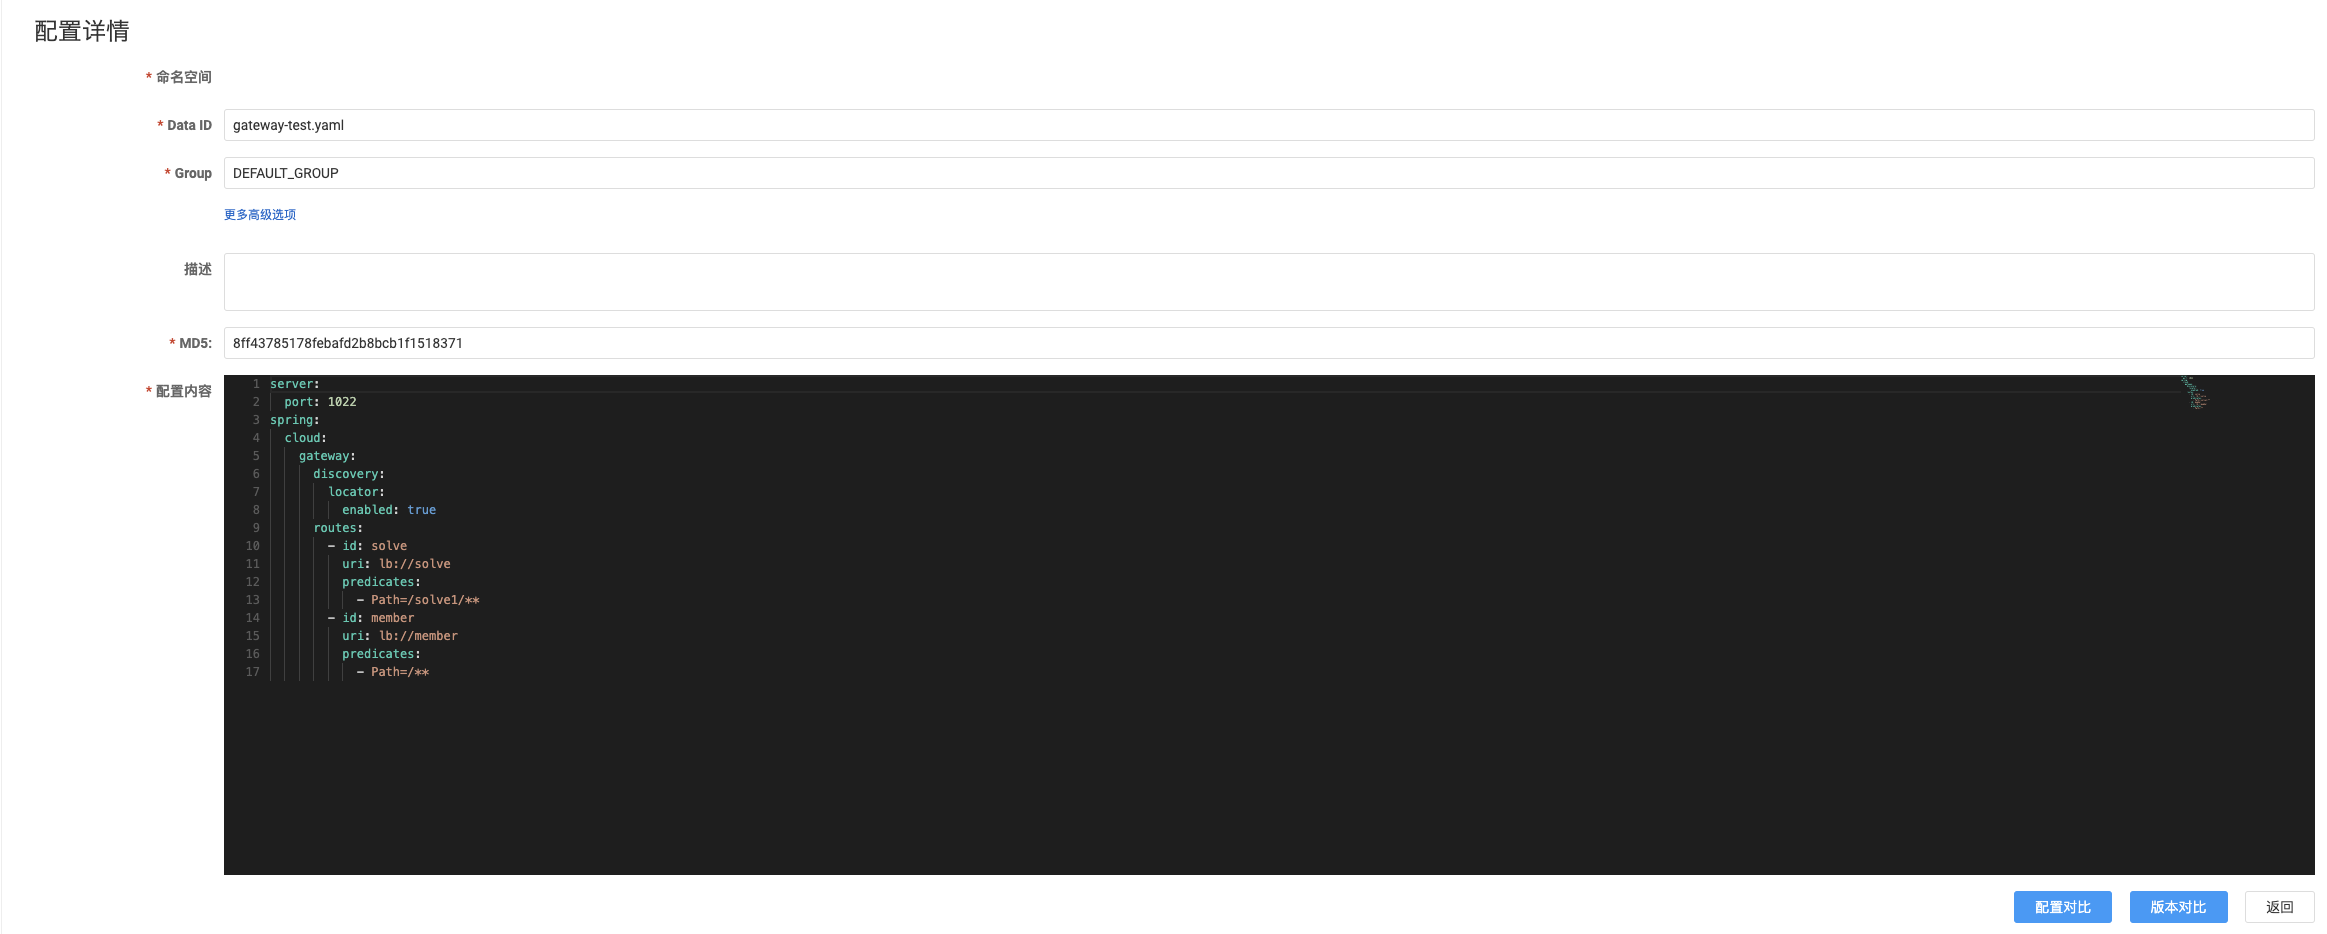
发起访问solve,同样的gateway端口+需要访问的服务名+路径
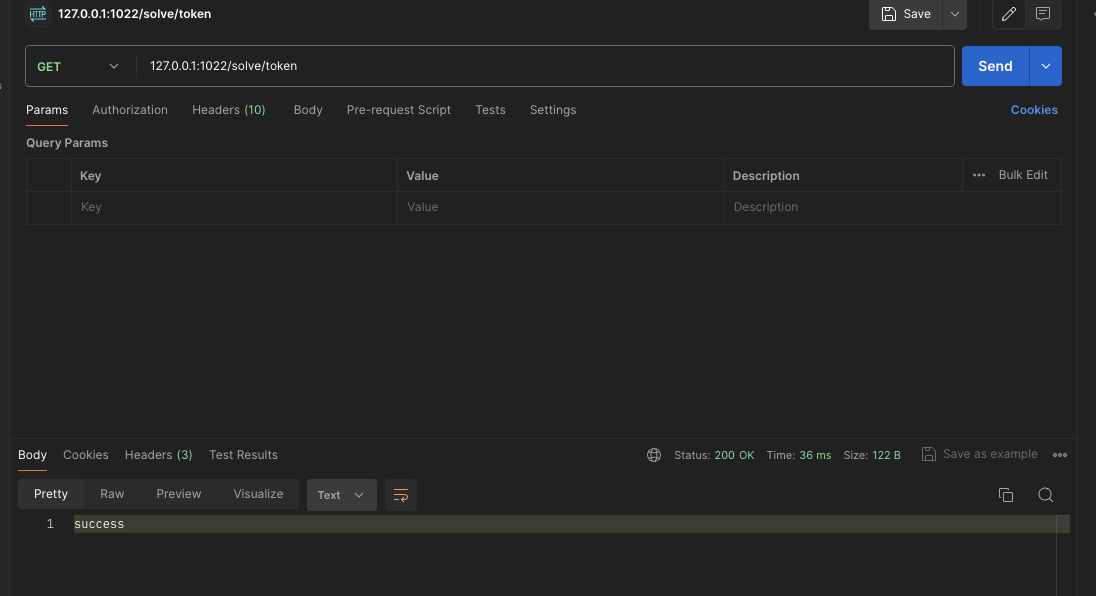
Skywalking
确保安装了jdk8,执行启动apache-skywalking-apm-bin/bin
sh startup.sh
#查看oap日志
tail -100f ../logs/skywalking-oap-server.log
#查看web日志,由于需要从oap获取数据,所以最开始启动的时候web会报错,一会就正常了
tail -100f ../logs/skywalking-webapp.log
- 1
- 2
- 3
- 4
- 5
访问地址:http://127.0.0.1:8080
接收数据的服务是在端口12800,这个就是OAP服务
apache-skywalking-apm-bin/webapp这个目录下application.yml就是web的配置
数据源和web端口都在这里修改
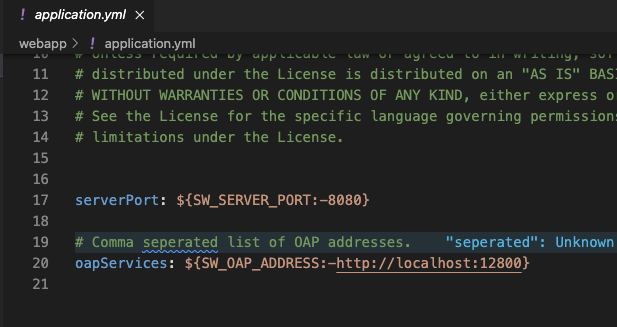
我修改了端口后重新启动web服务,这里重新启动是不需要关闭掉之前服务的
sh webappService.sh
tail -100f ../logs/skywalking-webapp.log
- 1
- 2
可能会看到一些连接的错误是因为尝试去连接12800,其实也就是oap的服务,只要oap服务正常启动就不会有这个报错。
监控Java服务
需要提前下载这个探针skywalking-agent.jar 启动Java服务的时候添加这段信息
-javaagent: 探针地址 -Dskywalking.agent.service_name: 服务名 -Dskywalking.collector.backend_service= 数据上报(默认是使用gRPG)
-javaagent:/Users/winner/Documents/workspace/server/skywalking-agent/skywalking-agent.jar -Dskywalking.agent.service_name=solve -Dskywalking.collector.backend_service=127.0.0.1:11800
- 1
启动的时候会先执行探针加载这些插件,效果如下:

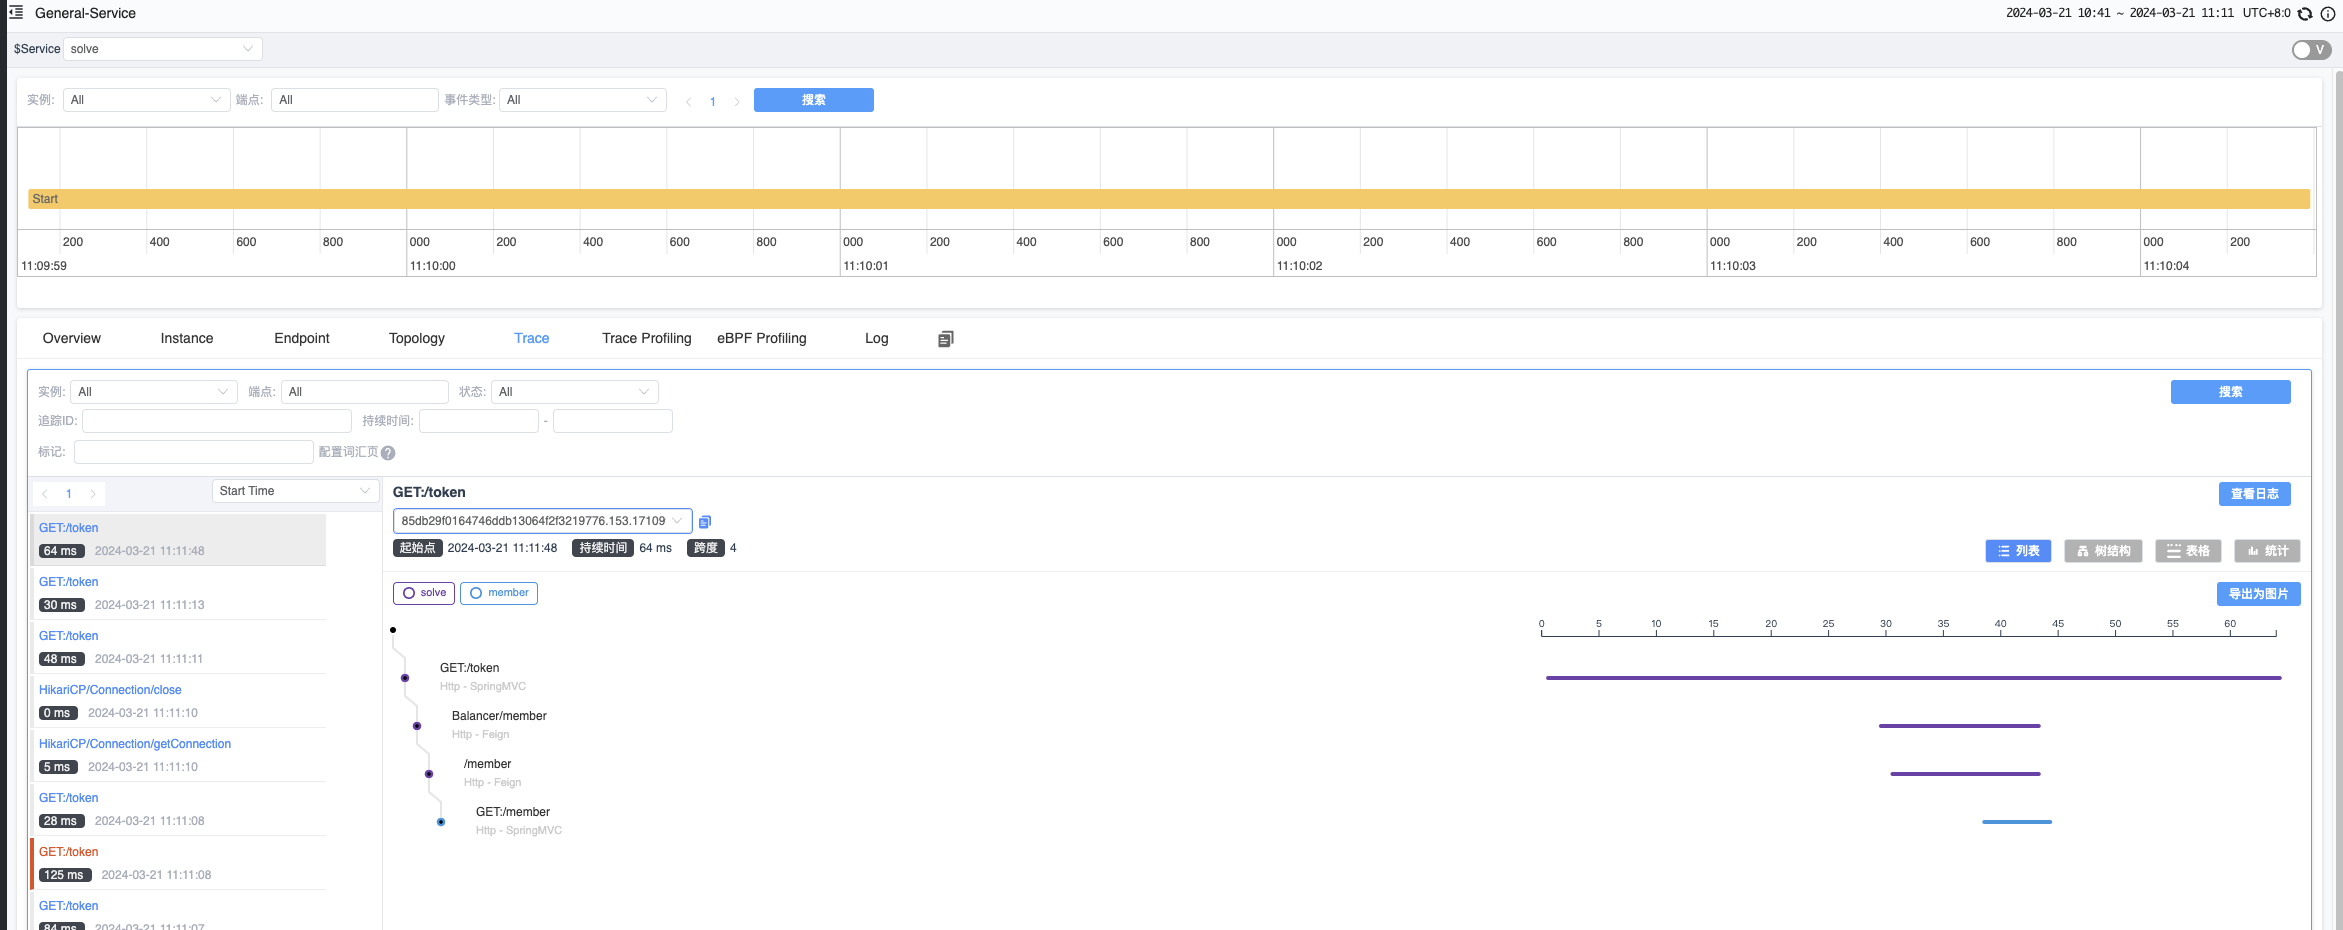
发起请求查看调用链
数据源
默认情况下会内嵌一个h2内存型数据库,这个是储存到内存里面的,所以只要应用重启数据就会消失

es储存
我使用docker-compose去搭建es服务,我本地环境比较乱,用docker会简单一些
# es.yml
version: '3.9'

# 定义服务
services:

  # Elasticsearch 服务配置
  elasticsearch:
    # 使用的镜像
    image: elasticsearch:7.8.0
    # 容器名称
    container_name: elk-es
    # 总是重启容器
    restart: always
    # 环境变量配置
    environment:
      - bootstrap.memory_lock=true
      - "ES_JAVA_OPTS=-Xms512m -Xmx512m"
      - discovery.type=single-node
    # 设置内存锁定的限制
    ulimits:
      memlock:
        soft: -1
        hard: -1
    # 映射容器端口到主机端口
    ports:
      - 9200:9200
    # 定义容器所属的网络
    networks:
      - elk-networks

# 定义网络
networks:
  # elk-networks 网络配置
  elk-networks:
- 1
- 2
- 3
- 4
- 5
- 6
- 7
- 8
- 9
- 10
- 11
- 12
- 13
- 14
- 15
- 16
- 17
- 18
- 19
- 20
- 21
- 22
- 23
- 24
- 25
- 26
- 27
- 28
- 29
- 30
- 31
- 32
- 33
- 34
- 35
- 36
启动容器
docker-compose es.yml up
- 1
首次启动会初始化数据,注意看这里打印出了es的端口,9300

有条件的可以把这两个监控加上
# cerebro.yml
version: '3.8'
services:
  cerebro:
    image: lmenezes/cerebro:0.9.2
    container_name: cerebro
    restart: always
    ports:
      - "9000:9000"
    command:
      - -Dhosts.0.host=http://elk-es:9200
    networks:
      - elk-networks
networks:
  elk-networks:
- 1
- 2
- 3
- 4
- 5
- 6
- 7
- 8
- 9
- 10
- 11
- 12
- 13
- 14
- 15
- 16
# kibana.yml
version: '3.8'
services:
  kibana:
    image: kibana:8.12.2
    container_name: elk-kibana
    environment:
      ELASTICSEARCH_HOSTS: http://elk-es:9200
      I18N_LOCALE: zh-CN
    ports:
      - 5601:5601
    networks:
          - elk-networks
networks:
  elk-networks:
- 1
- 2
- 3
- 4
- 5
- 6
- 7
- 8
- 9
- 10
- 11
- 12
- 13
- 14
- 15
- 16
如果是es7以上的版本这里需要加上7,由于我是7的版本我就没加

需要通过jps找到OAPServerStartUp的pid 然后干掉它,再执行
sh oapService.sh
tail -100f ../logs/skywalking-oap-server.log
- 1
- 2
首次使用es会创建索引,后续skywalking重启数据也不会消失了
日志里面也能看到明确指定了es7

mysql
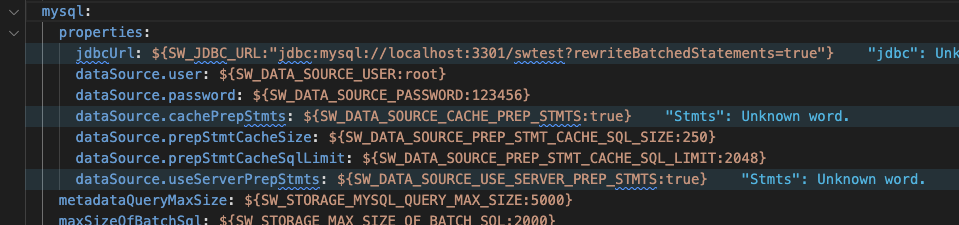
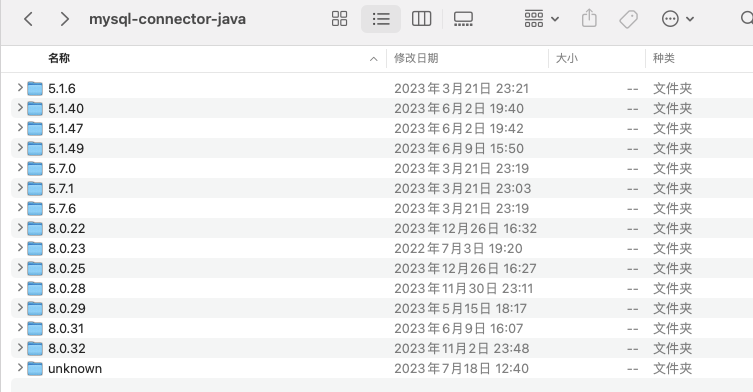
我使用的是mysql8.0的版本,所以这里需要添加驱动到/bin/oap-libs
最好的办法就是从idea的maven仓库里面找到
直接启动
sh oapService.sh
tail -100f ../logs/skywalking-oap-server.log
- 1
- 2
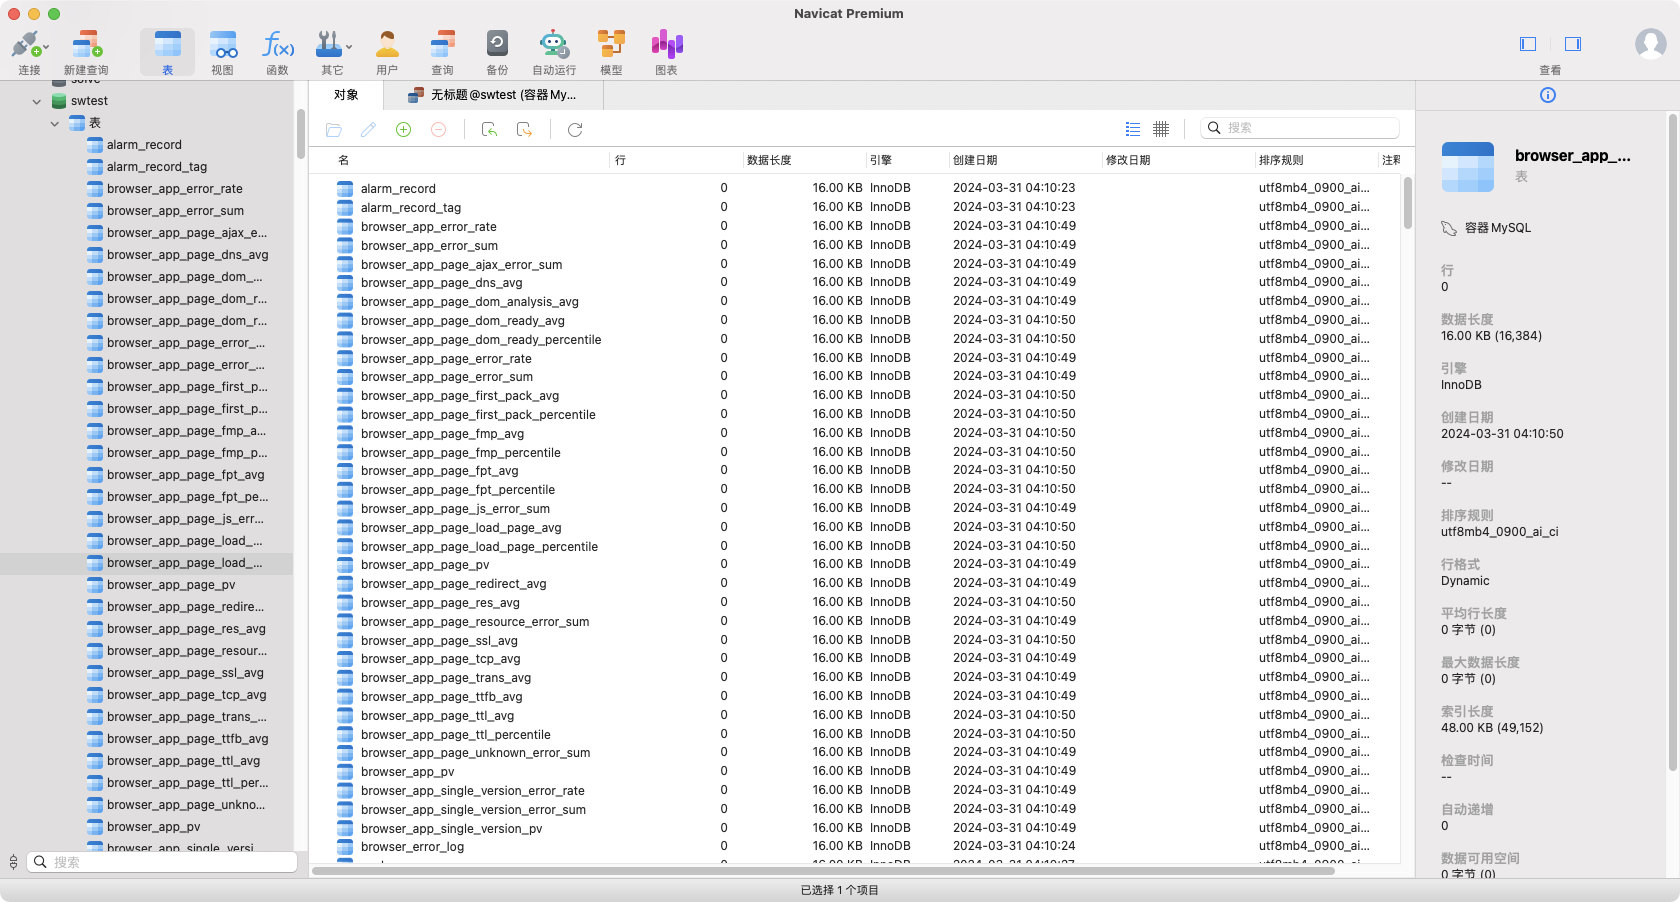
首次使用mysql会创建表

RocketMq
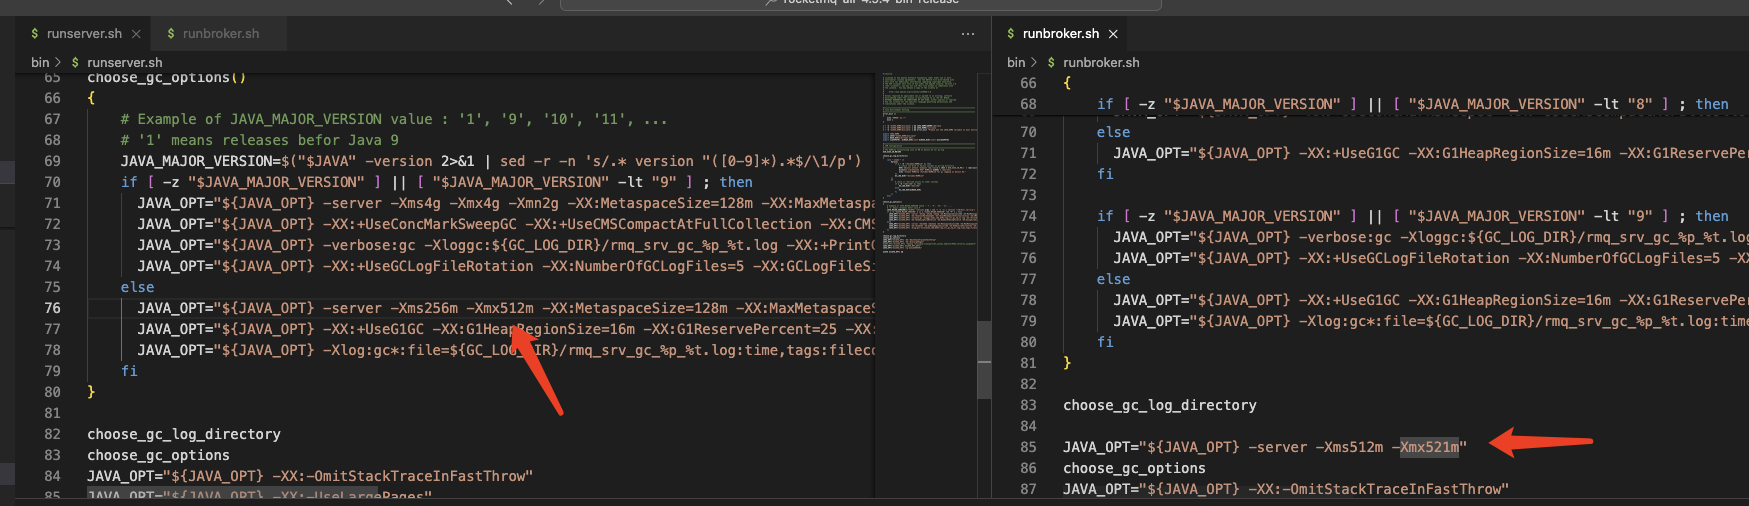
修改配置文件
我对应的版本是4.9.4,下载后执行到bin/runbroker.sh ,bin/runserver.sh分别修改一下xms、xmx大小
启动
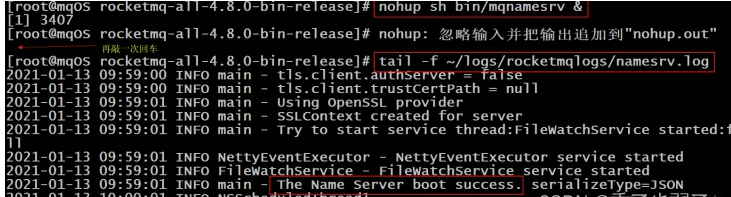
启动NameServer
nohup sh bin/mqnamesrv &
tail -f ~/logs/rocketmqlogs/namesrv.log
- 1
- 2
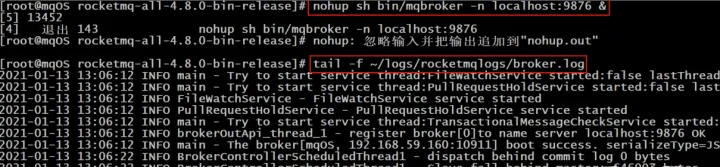
启动broker
nohup sh bin/mqbroker -n localhost:9876 &
tail -f ~/logs/rocketmqlogs/broker.log
- 1
- 2
发送/接收消息测试
发送
export NAMESRV_ADDR=localhost:9876
sh bin/tools.sh org.apache.rocketmq.example.quickstart.Producer
- 1
- 2
接收消息
sh bin/tools.sh org.apache.rocketmq.example.quickstart.Consumer
- 1
关闭Server
[root@mqOS rocketmq]# sh bin/mqshutdown broker
The mqbroker(1740) is running...
Send shutdown request to mqbroker(1740) OK

[root@mqOS rocketmq]# sh bin/mqshutdown namesrv
The mqnamesrv(1692) is running...
Send shutdown request to mqnamesrv(1692) OK
[2]+ 退出 143 nohup sh bin/mqbroker -n localhost:9876
- 1
- 2
- 3
- 4
- 5
- 6
- 7
- 8
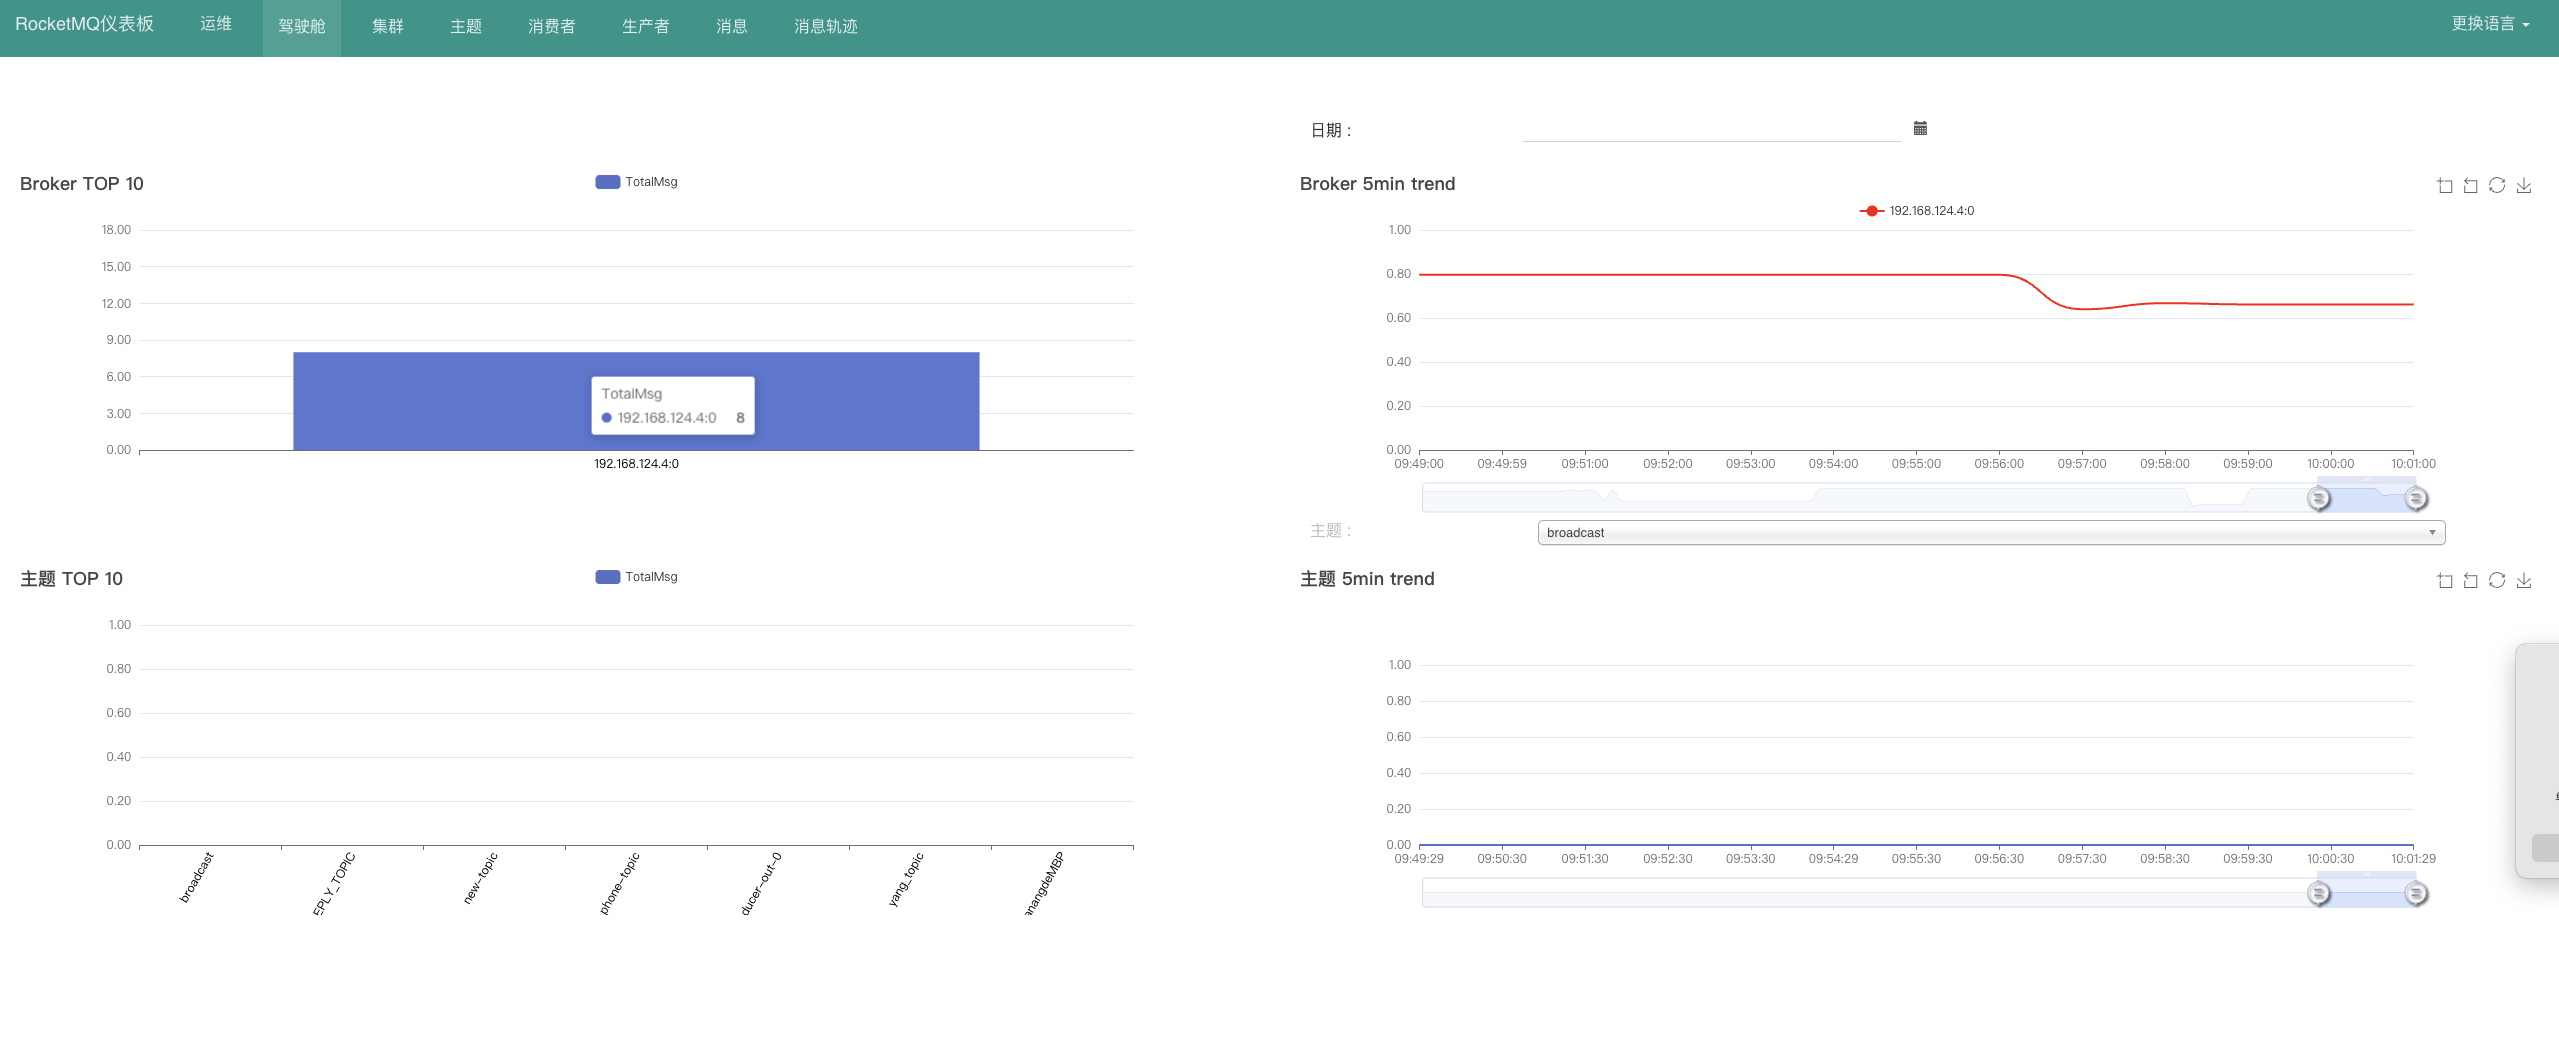
监控
version: '3'
services:
  rocketmq-dashboard:
    image: apacherocketmq/rocketmq-dashboard:latest
    container_name: rocketmq-dashboard
    environment:
    # rocketMq的地址
      JAVA_OPTS: "-Drocketmq.namesrv.addr=192.168.124.4:9876"
    ports:
      - "19080:8080"
    restart: always  # 可以根据需要调整容器的重启策略
- 1
- 2
- 3
- 4
- 5
- 6
- 7
- 8
- 9
- 10
- 11
- 12
还有一种方式直接使用docker命令启动
docker run -d --name rocketmq-dashboard -e "JAVA_OPTS=-Drocketmq.namesrv.addr=192.168.124.4:9876" -p 19080:8080 -t apacherocketmq/rocketmq-dashboard:latest
- 1
访问地址:http://127.0.0.1:19080/#/
集成到springcloudalibaba
<dependency>
      <groupId>com.alibaba.cloud</groupId>
      <artifactId>spring-cloud-starter-stream-rocketmq</artifactId>
  </dependency>
- 1
- 2
- 3
- 4
生产者
stream:
  function:
    definition: consumer
  rocketmq:
    binder:
      name-server: localhost:9876
  bindings:
    output:
      destination: broadcast
- 1
- 2
- 3
- 4
- 5
- 6
- 7
- 8
- 9
Config
public interface CustomChannelBinder {
    /**
     * 发送消息(消息生产者)
     * 绑定配置中的channel名称
     */
    @Output("broadcast")
    MessageChannel sendChannel();

}
- 1
- 2
- 3
- 4
- 5
- 6
- 7
- 8
- 9
SolveController
private final CustomChannelBinder output;

@GetMapping("producer")
public void producer() {
    Message<String> message = MessageBuilder.withPayload("This is a new message.").build();
    output.sendChannel().send(message);
}
- 1
- 2
- 3
- 4
- 5
- 6
- 7
消费者
stream:
  function:
    definition: product
  rocketmq:
    binder:
      name-server: localhost:9876
  bindings:
    output:
      destination: broadcast
- 1
- 2
- 3
- 4
- 5
- 6
- 7
- 8
- 9
Config
import org.springframework.cloud.stream.annotation.Input;
import org.springframework.messaging.MessageChannel;

public interface CustomChannelBinder {
    /**
     * 发送消息(消息生产者)
     * 绑定配置中的channel名称
     */
    @Input("broadcast")
    MessageChannel receiveChannel();

}
- 1
- 2
- 3
- 4
- 5
- 6
- 7
- 8
- 9
- 10
- 11
- 12
启动类添加
@EnableBinding({CustomChannelBinder.class})
- 1
路由Controller
@StreamListener("broadcast")
public void receiveMessage(String message) {
    System.out.println("Received message: " + message);
    // 在这里进行消息的处理逻辑
}
- 1
- 2
- 3
- 4
- 5

