
- 1基于javaweb+jsp的实验室管理系统(JavaWeb JSP MySQL Servlet SSM SpringBoot Layui Ajax)_实验室管理系统java web项目介绍
- 2保障 Google Play 的安全,我们一直在努力_google play 收到的数据会受到临时处理 什么意思
- 3621javaweb期末周大题_javaweb大作业
- 4tkinter库 -- 事件处理_tkinter 快捷键 事件
- 5实战经验分享之移动云快速部署Stable Diffusion SDXL 1.0_sdxl模型部署教程
- 6Python超市管理系统 毕业设计-附源码111042_pycharm开发的ui系统论文
- 7CAD2020软件安装_cad2020百度网盘资源
- 8CAD查找与下载_cad下载 csdn博客
- 9Mybatis框架学习笔记(04)_实验04 mybatis框架:注解方法
- 10Spark学习笔记之-Spark远程调试_spark如何不丢jar包远程连接
郑轻软工大数据实验(手把手教你入门Hadoop、hbase、spark)_大数据技术实验使用hdfs和mapreduce实习分析和预测
赞
踩
写在最前面,如果你只是来找答案的,那么很遗憾,本文尽量避免给出最后结果,本文适合Linux0基础学生,给出详细的环境配置过程,实验本身其实很简单,供大家一起学习交流。
实验1
1.编程实现以下指定功能,并利用Hadoop提供的Shell命令完成相同任务:
-
向HDFS 中上传任意文本文件,如果指定的文件在HDFS中已经存在,由用户指定是追加到原有文件末尾还是覆盖原有的文件;
-
从HDFS中下载指定文件,如果本地文件与要下载的文件名称相同,则自动对下载的文件重命名;
-
将HDFS中指定文件的内容输出到终端中;
-
显示 HDFS中指定的文件的读写权限、大小、创建时间、路径等信息;
-
给定HDFS中某一个目录,输出该目录下的所有文件的读写权限、大小、创建时间、路径等信息,如果该文件是目录,则递归输出该目录下所有文件相关信息;
-
提供一个HDFS内的文件的路径,对该文件进行创建和删除操作。如果文件所在目录不存在,则自动创建目录;
-
提供一个 HDFS的目录的路径,对该目录进行创建和删除操作。创建目录时,如果目录文件所在目录不存在则自动创建相应目录;删除目录时,由用户指定当该目录不为空时是否还删除该目录;
-
向HDFS中指定的文件追加内容,由用户指定内容追加到原有文件的开头或结尾;
-
删除HDFS中指定的文件;
-
删除HDFS中指定的目录,由用户指定目录中如果存在文件时是否删除目录;
-
在 HDFS 中,将文件从源路径移动到目的路径。
自行下载VMware虚拟机(学校给正版软件)
我使用的是Ubuntu镜像
所有资料:https://pan.baidu.com/s/1uXvuWMKPLBb5hXSMnuB3og?pwd=lgf6
本来想把配好的环境也放网盘的 但是配好环境后26g 所以就不传了 大家加油吧

镜像安装需要一些时间,同时去官方或者网盘里下载
下好之后怎么安装呢?当然是看官方文档了
Apache Hadoop 3.3.6 – Hadoop: Setting up a Single Node Cluster.
因为是java体系下的东西,所以你需要确保linux里有jdk才可以启动服务。

带图形化界面还是很方便的,不过我们也经常用终端敲命令(就是windows里的cmd)。
sudo apt-get install openjdk-8-jdk输入用户密码 按y继续
sudo是管理员权限 apt是管理下载包的 下载jdk8
- sudo apt install vim
- sudo apt-get install ssh
- sudo apt-get install pdsh
然后下载一个 vim 文本编辑器和 ssh ,和windows上一样下好东西需要配环境变量,这样打开终端就可以用java命令
vim ~/.bashrc这里要注意,vim对新手很不友好 一定要学会怎么用 后面会频繁用的vim
滑倒最下面 按i进入编辑模式 粘贴
- export JAVA_HOME=/usr/lib/jvm/java-8-openjdk-amd64/
- export PATH=$JAVA_HOME/bin:$PATH
-
- export PDSH_RCMD_TYPE=ssh
然后按 esc 退出编辑模式 再按 :wq 保存退出 如果有权限问题:wq! 强制退出
chmod 777 xxx 命令可以修改权限 7代表可读可写可执行 三个7三个用户组
source ~/.bashrc使用 java -version 看一下有没有成功

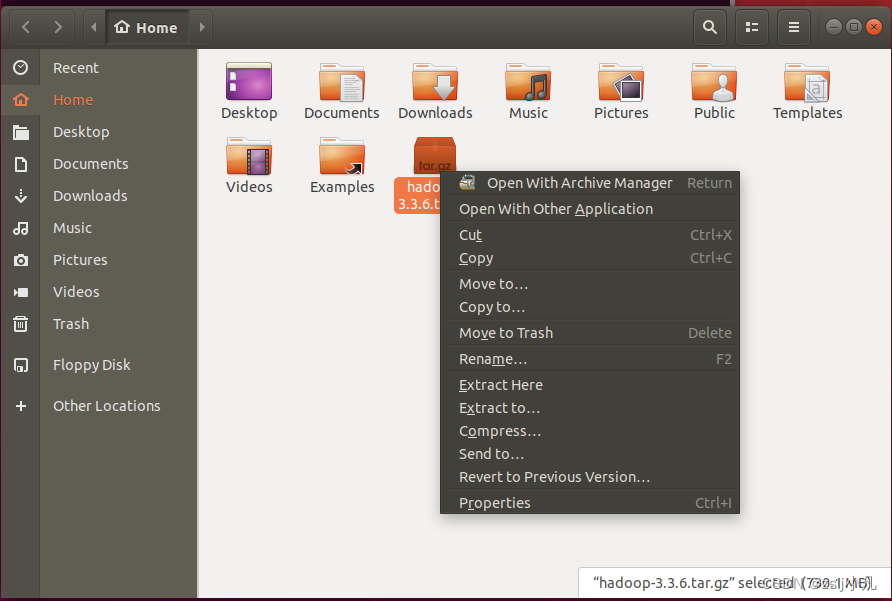
可以使用 tar -zxvf hadoop-3.3.6.tar.gz -C . 解压 -C 注意c是大写 后面写你想解压到的路径
但我们有图形化界面 直接解压 Extract Here 改下名字 hadoop 用命令是mv
进到hadoop根目录里 然后打开一个终端配置dfs
vim etc/hadoop/hadoop-env.sh 到下面找 然后加上java路径
export JAVA_HOME= //你自己java路径vim etc/hadoop/core-site.xml
- <configuration>
- <property>
- <name>fs.defaultFS</name>
- <value>hdfs://localhost:9000</value>
- </property>
- </configuration>
vim etc/hadoop/hdfs-site.xml
- <configuration>
- <property>
- <name>dfs.replication</name>
- <value>1</value>
- </property>
- </configuration>
然后设置ssh
- ssh-keygen -t rsa -P '' -f ~/.ssh/id_rsa
- cat ~/.ssh/id_rsa.pub >> ~/.ssh/authorized_keys
- chmod 0600 ~/.ssh/authorized_keys
- 完了ssh localhost试一下
bin/hdfs namenode -format注意 每次重新启动虚拟机都需要执行这个命令进行格式化 然后才能启动hadoop服务
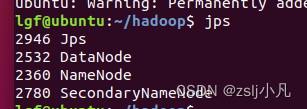
sbin/start-dfs.sh 启动!
jps查看运行状态
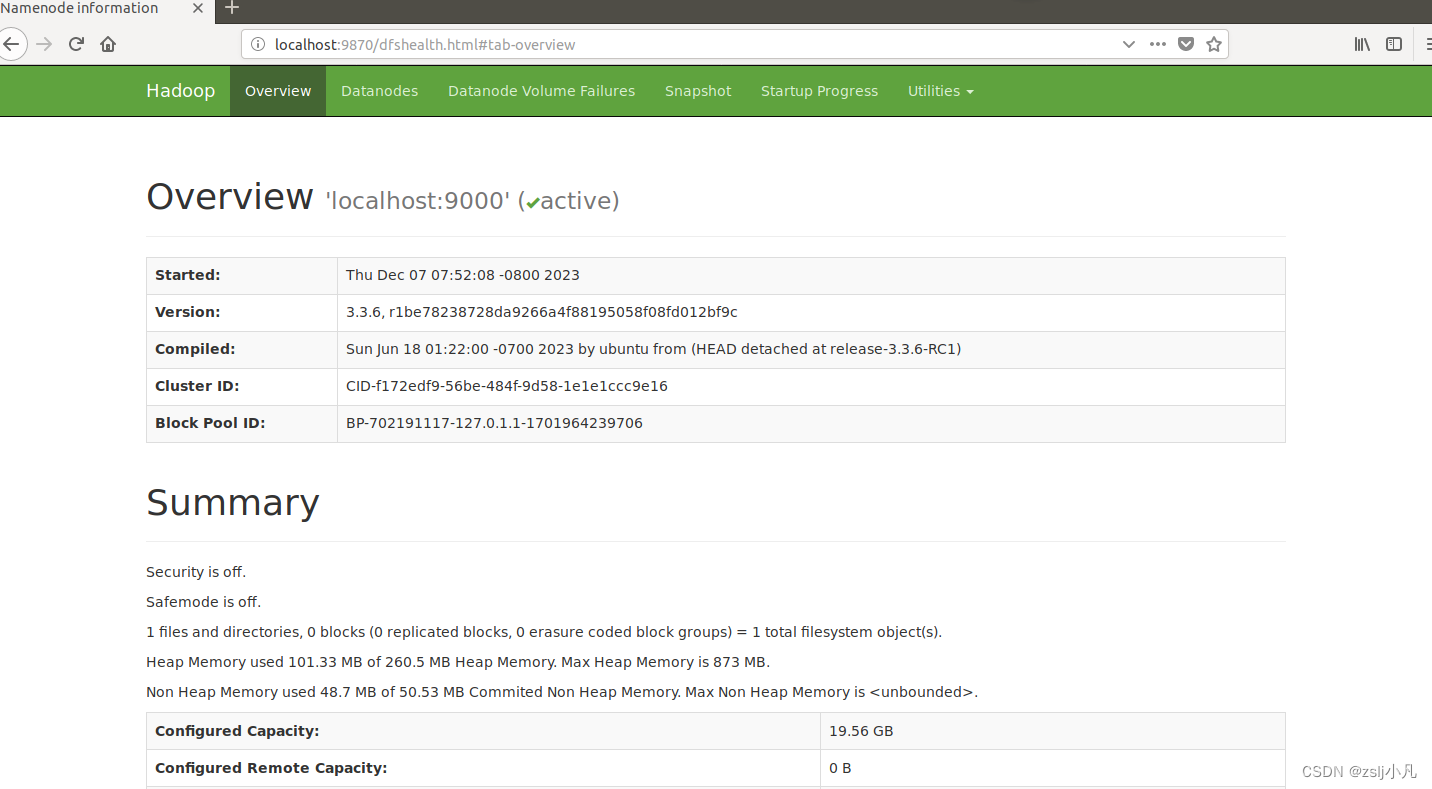
可以使用ifconfig看看本机ip地址 然后在本地浏览器打开
http://localhost:9870/ 或者在虚拟机中的浏览器输入这个网址 如果能打开以下页面 hadoop就配好了
创建两个txt文件 然后配置hdfs环境变量
- vim ~/.bashrc
- export PATH=/home/lgf/hadoop/bin:$PATH //你自己的hadoo路径
- source ~/.bashrc
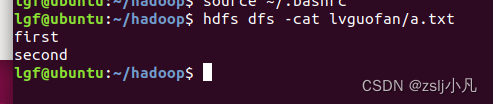
hdfs dfs -mkdir -p lvguofan 创建文件夹
hdfs dfs -put a.txt lvguofan 上传文件
hdfs dfs -cat lvguofan/b.txt 查看文件内容
hdfs dfs -appendToFile ./b.txt lvguofan/a.txt 追加本地文件到hdfs文件中
hdfs dfs -get lvguofan/a.txt c.txt 下载到本地

hdfs dfs -ls -h lvguofan/a.txt 看读写权限、大小、创建时间、路径等信息
hdfs dfs -ls -R 遍历所有文件
hdfs dfs -touch lvguofan/test.txt //所在目录不存在时,创建新的空白文件
hdfs dfs -rm -r lvguofan/test.txt //删除文件
hdfs dfs -mv lvguofan/a.txt lgf/a.txt
其他借鉴chatgpt吧
实验2
1.利用MapReduce编程实现以下功能。
- 文件合并与去重;
- 对输入的多个文件内容进行排序;
- 跟定表示父子关系的表格,挖掘出祖孙关系,并以表格形式输出。
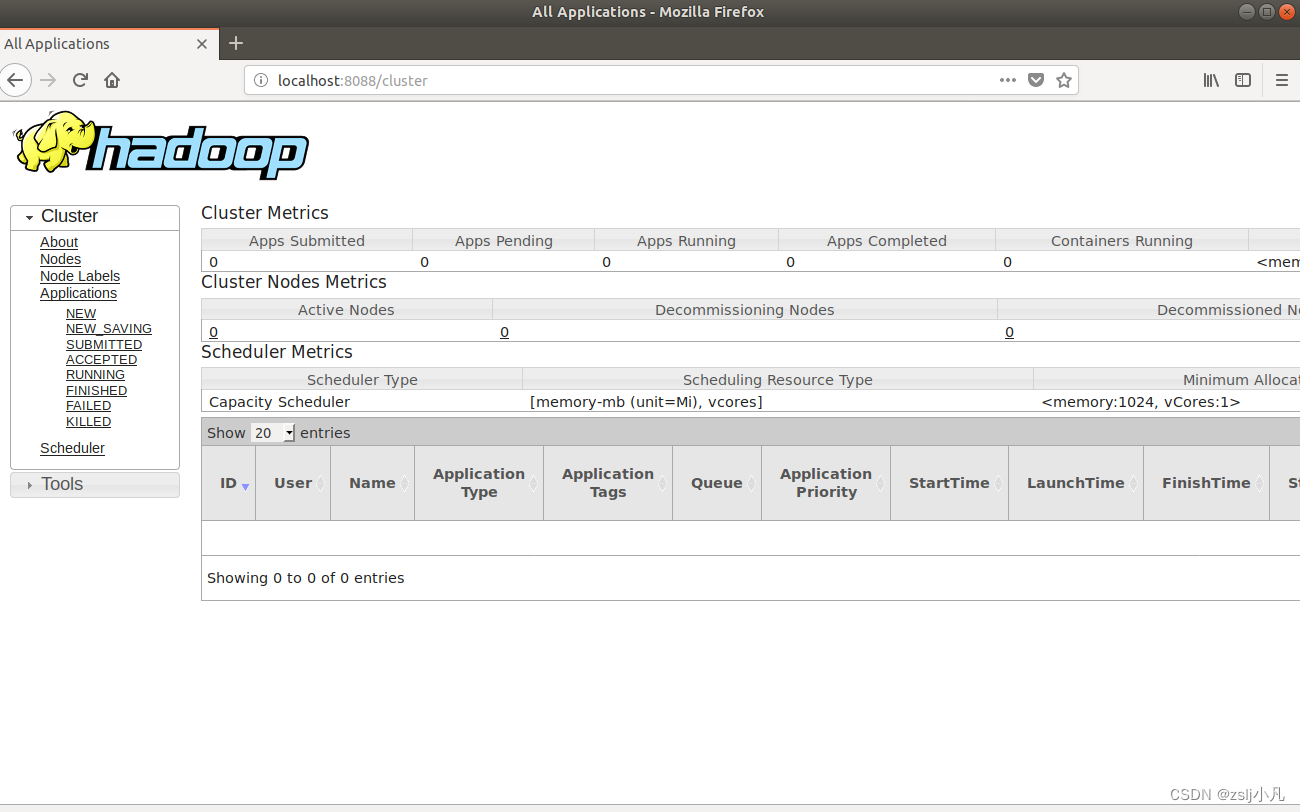
配置yarn 因为mapreduce要用到
vim etc/hadoop/mapred-site.xml
- <configuration>
- <property>
- <name>mapreduce.framework.name</name>
- <value>yarn</value>
- </property>
- <property>
- <name>mapreduce.application.classpath</name>
- <value>$HADOOP_MAPRED_HOME/share/hadoop/mapreduce/*:$HADOOP_MAPRED_HOME/share/hadoop/mapreduce/lib/*</value>
- </property>
- </configuration>
vim etc/hadoop/yarn-site.xml
- <configuration>
- <property>
- <name>yarn.nodemanager.aux-services</name>
- <value>mapreduce_shuffle</value>
- </property>
- <property>
- <name>yarn.nodemanager.env-whitelist</name>
- <value>JAVA_HOME,HADOOP_COMMON_HOME,HADOOP_HDFS_HOME,HADOOP_CONF_DIR,CLASSPATH_PREPEND_DISTCACHE,HADOOP_YARN_HOME,HADOOP_HOME,PATH,LANG,TZ,HADOOP_MAPRED_HOME</value>
- </property>
- </configuration>
sbin/start-yarn.sh 启动!
http://localhost:8088/ 如果能打开 yarn就配好了
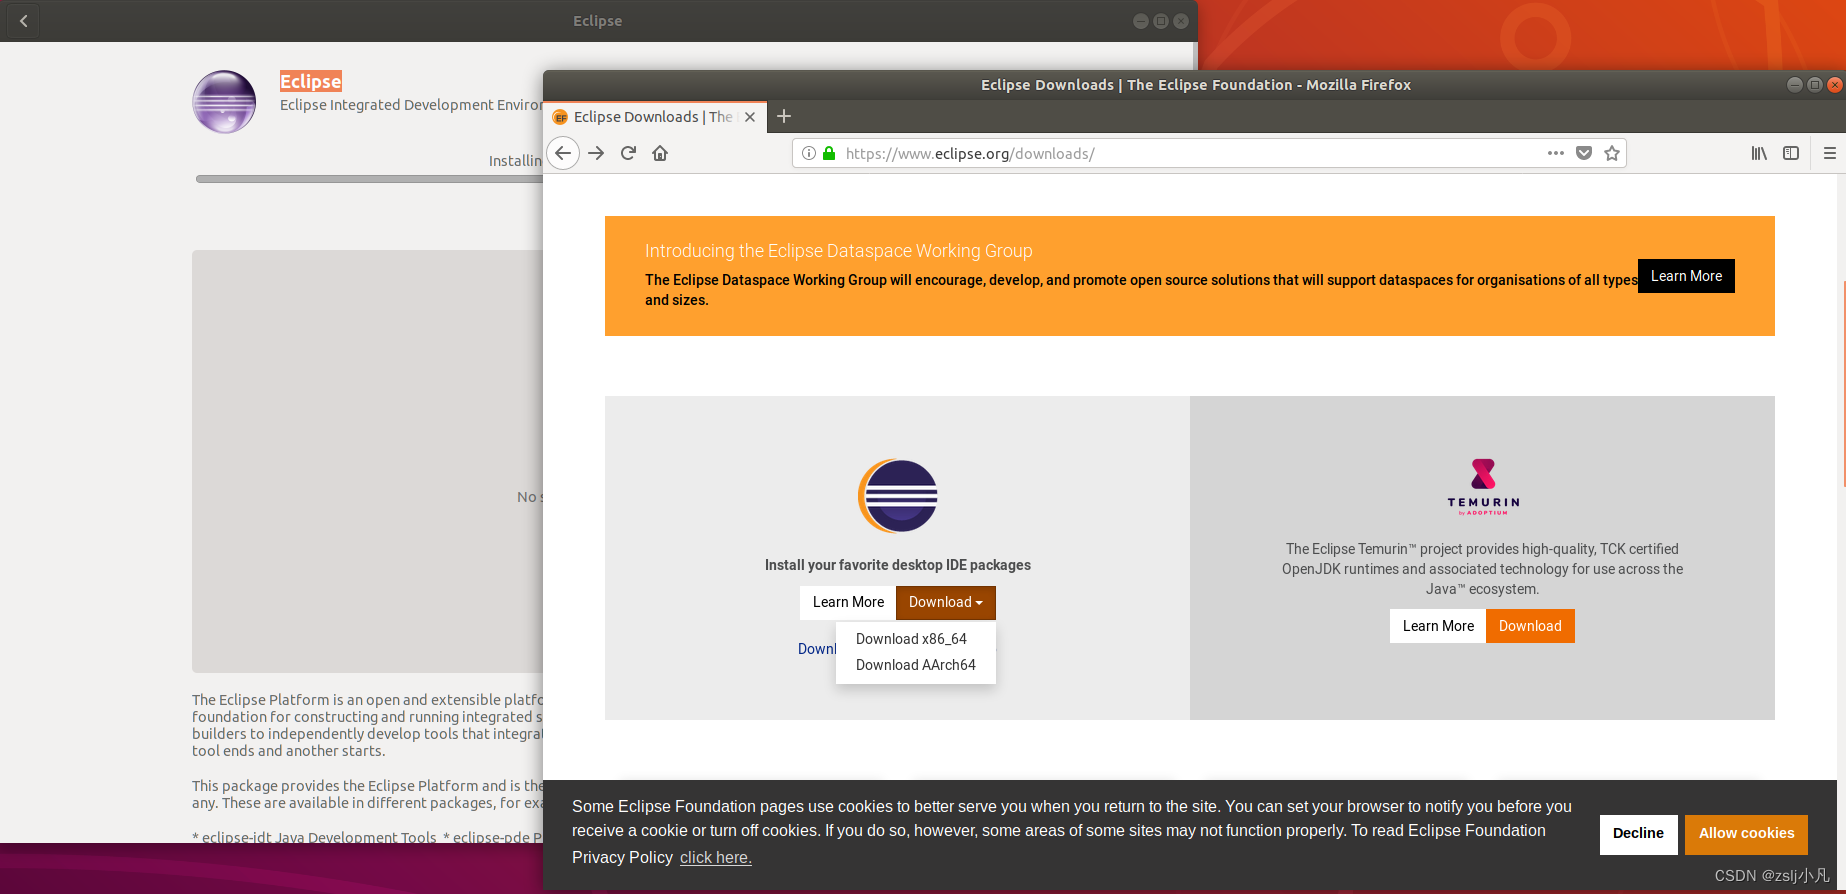
在左侧应用商店或者去官网下载一个Eclipse或者idea
我们用的是x86架构 我用的eclipse 不过也提供idea的安装教程

如果是idea 安装后pwd 记一下路径然后配环境变量

- vim ~/.bashrc
-
- export IDEA_HOME=/home/lgf/idea/idea-IC-233.11799.241/
- export PATH=:$PATH:${IDEA_HOME}/bin
-
- source ~/.bashrc
idea.sh 启动!
和windows的一摸一样 创一个工程可以跑通

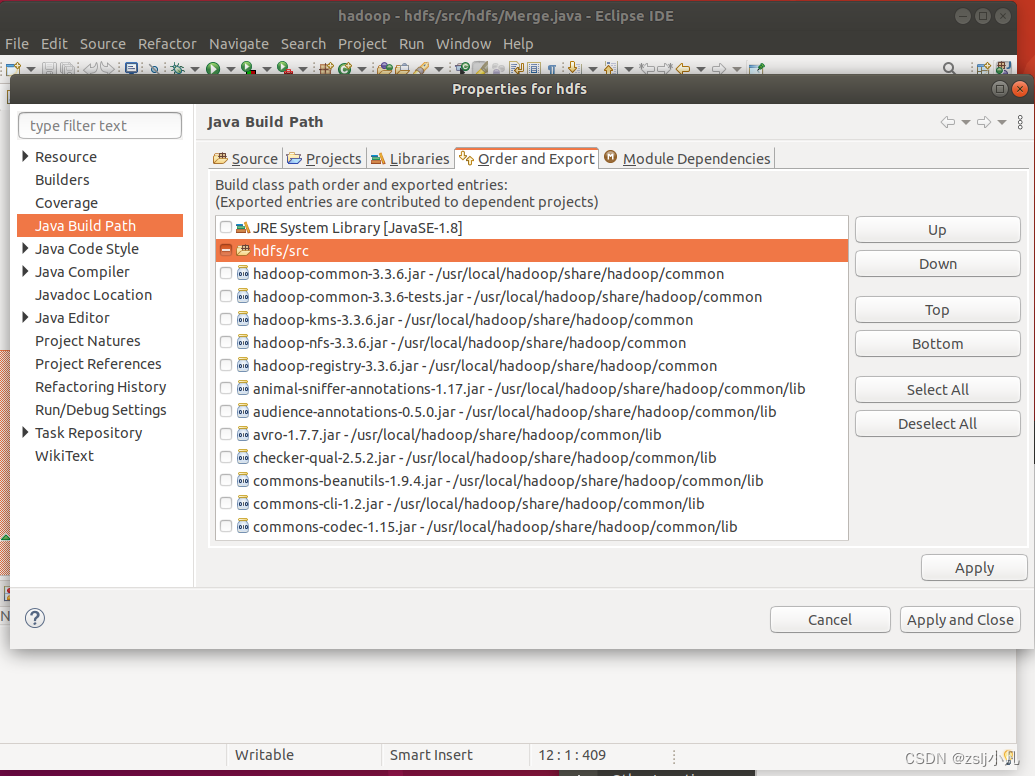
接下来导hadoop根目录里/share/hadoop文件夹中的hdfs、mapreduce、yarn、common的包
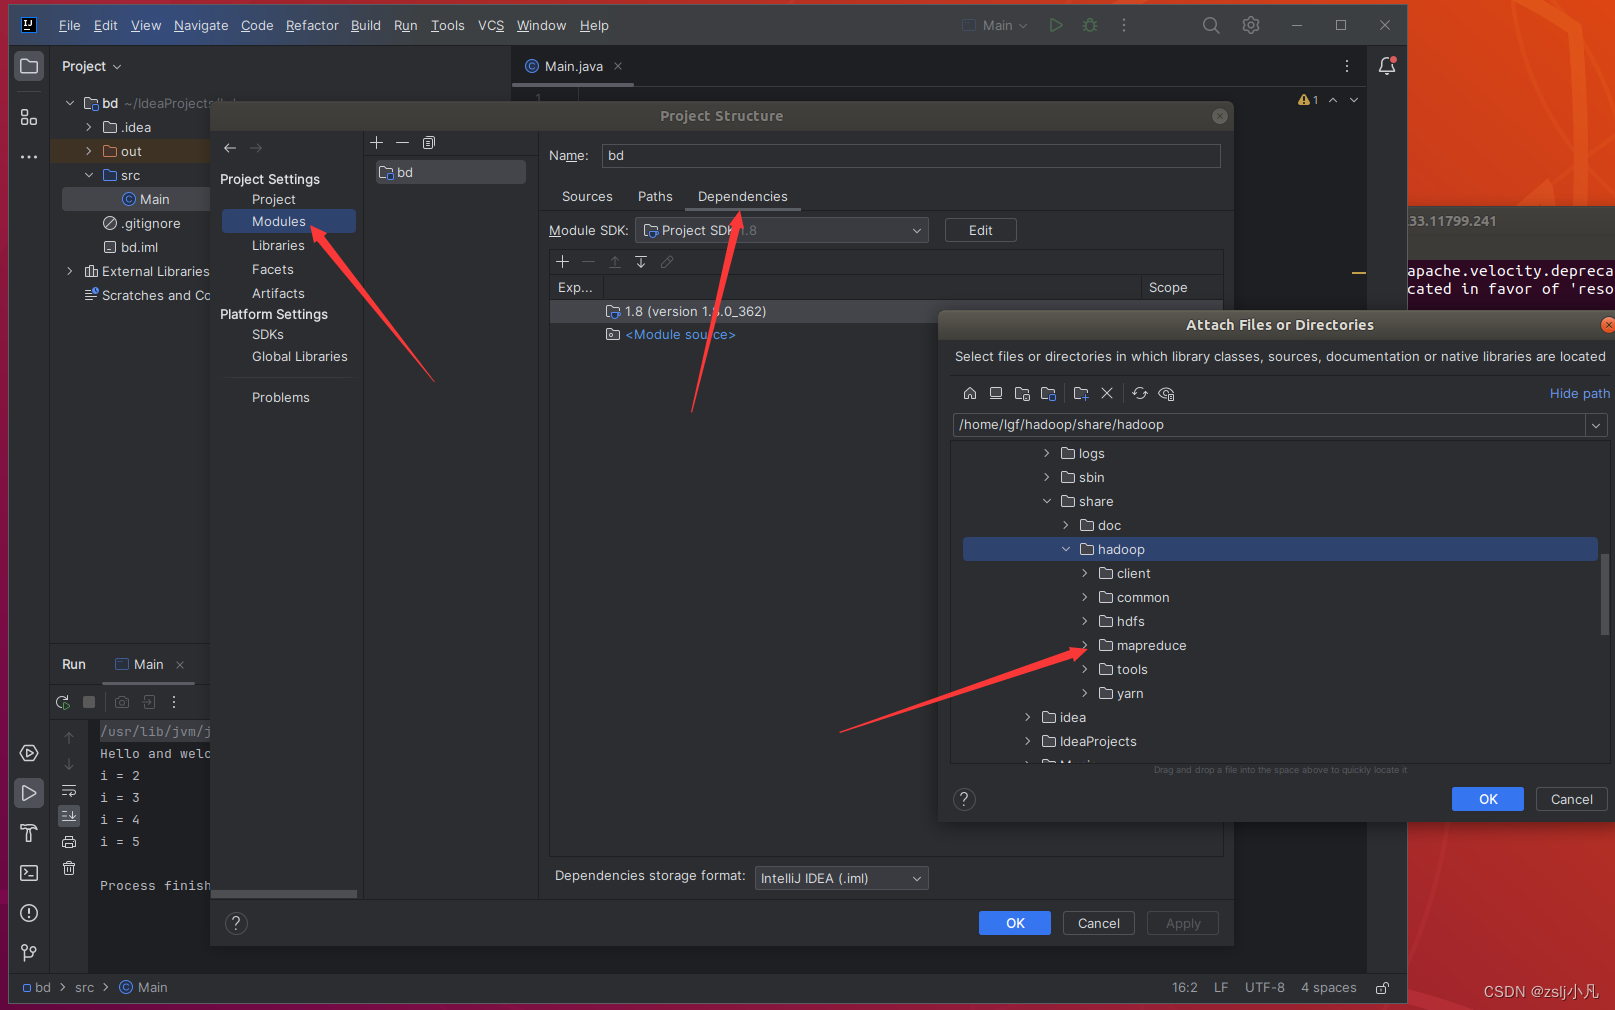
其实可以再下一个maven管理包,就不用导包了,挺麻烦还容易出错的。
如果是eclipse也要导包
数据和代码借鉴头歌大数据
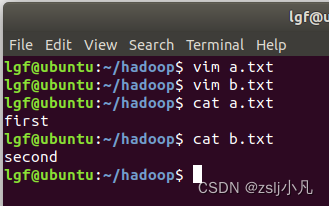
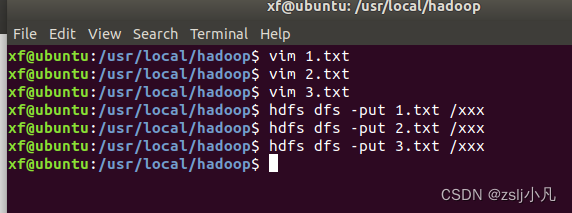
文件合并与去重;
- a.txt
- first
- second
-
- b.txt
- second
- third
- package hdfs;
- import java.io.IOException;
-
- import org.apache.hadoop.conf.Configuration;
- import org.apache.hadoop.fs.Path;
- import org.apache.hadoop.io.Text;
- import org.apache.hadoop.mapreduce.Job;
- import org.apache.hadoop.mapreduce.Mapper;
- import org.apache.hadoop.mapreduce.Reducer;
- import org.apache.hadoop.mapreduce.lib.input.FileInputFormat;
- import org.apache.hadoop.mapreduce.lib.output.FileOutputFormat;
-
- public class Merge {
-
- /**
- * @param args
- * 对A,B两个文件进行合并,并剔除其中重复的内容,得到一个新的输出文件C
- */
- //重载map函数,直接将输入中的value复制到输出数据的key上
- public static class Map extends Mapper<Object, Text, Text, Text>{
- private static Text text = new Text();
- public void map(Object key, Text value, Context context) throws IOException,InterruptedException{
- text = value;
- context.write(text, new Text(""));
- }
- }
-
- //重载reduce函数,直接将输入中的key复制到输出数据的key上
- public static class Reduce extends Reducer<Text, Text, Text, Text>{
- public void reduce(Text key, Iterable<Text> values, Context context ) throws IOException,InterruptedException{
- context.write(key, new Text(""));
- }
- }
-
- public static void main(String[] args) throws Exception{
-
- // TODO Auto-generated method stub
- Configuration conf = new Configuration();
- conf.set("fs.default.name","hdfs://localhost:9000");
- String[] otherArgs = new String[]{"/xxx","/out"}; /* 直接设置输入参数 */
- if (otherArgs.length != 2) {
- System.err.println("Usage: wordcount <in> <out>");
- System.exit(2);
- }
- Job job = Job.getInstance(conf,"Merge and duplicate removal");
- job.setJarByClass(Merge.class);
- job.setMapperClass(Map.class);
- job.setCombinerClass(Reduce.class);
- job.setReducerClass(Reduce.class);
- job.setOutputKeyClass(Text.class);
- job.setOutputValueClass(Text.class);
- FileInputFormat.addInputPath(job, new Path(otherArgs[0]));
- FileOutputFormat.setOutputPath(job, new Path(otherArgs[1]));
- System.exit(job.waitForCompletion(true) ? 0 : 1);
- }
-
- }


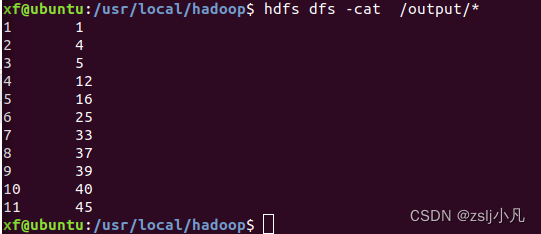
对输入的多个文件内容进行排序;
- 1.txt
- 33
- 37
- 12
- 40
-
- 2.txt
- 4
- 16
- 39
- 5
-
- 3.txt
- 1
- 45
- 25
记得把之前的删了,或者换个位置,别把上个问题的数据也合并了
- package hdfs;
-
- import java.io.IOException;
- import org.apache.hadoop.conf.Configuration;
- import org.apache.hadoop.fs.Path;
- import org.apache.hadoop.io.IntWritable;
- import org.apache.hadoop.io.Text;
- import org.apache.hadoop.mapreduce.Job;
- import org.apache.hadoop.mapreduce.Mapper;
- import org.apache.hadoop.mapreduce.Partitioner;
- import org.apache.hadoop.mapreduce.Reducer;
- import org.apache.hadoop.mapreduce.lib.input.FileInputFormat;
- import org.apache.hadoop.mapreduce.lib.output.FileOutputFormat;
- import org.apache.hadoop.util.GenericOptionsParser;
- public class MergeSort {
- /**
- * @param args
- * 输入多个文件,每个文件中的每行内容均为一个整数
- * 输出到一个新的文件中,输出的数据格式为每行两个整数,第一个数字为第二个整数的排序位次,第二个整数为原待排列的整数
- */
- //map函数读取输入中的value,将其转化成IntWritable类型,最后作为输出key
- public static class Map extends Mapper<Object, Text, IntWritable, IntWritable>{
- private static IntWritable data = new IntWritable();
- public void map(Object key, Text value, Context context) throws IOException,InterruptedException{
- /********** Begin **********/
- String text = value.toString();
- data.set(Integer.parseInt(text));
- context.write(data, new IntWritable(1));
- /********** End **********/
- }
- }
- //reduce函数将map输入的key复制到输出的value上,然后根据输入的value-list中元素的个数决定key的输出次数,定义一个全局变量line_num来代表key的位次
- public static class Reduce extends Reducer<IntWritable, IntWritable, IntWritable, IntWritable>{
- private static IntWritable line_num = new IntWritable(1);
- public void reduce(IntWritable key, Iterable<IntWritable> values, Context context) throws IOException,InterruptedException{
- /********** Begin **********/
- for(IntWritable val : values){
- context.write(line_num, key);
- line_num = new IntWritable(line_num.get() + 1);
- }
- /********** End **********/
- }
- }
- //自定义Partition函数,此函数根据输入数据的最大值和MapReduce框架中Partition的数量获取将输入数据按照大小分块的边界,然后根据输入数值和边界的关系返回对应的Partiton ID
- public static class Partition extends Partitioner<IntWritable, IntWritable>{
- public int getPartition(IntWritable key, IntWritable value, int num_Partition){
- /********** Begin **********/
- int Maxnumber = 65223;//int型的最大数值
- int bound = Maxnumber/num_Partition+1;
- int keynumber = key.get();
- for (int i = 0; i<num_Partition; i++){
- if(keynumber<bound * (i+1) && keynumber>=bound * i){
- return i;
- }
- }
- return -1;
- /********** End **********/
- }
- }
- public static void main(String[] args) throws Exception{
- // TODO Auto-generated method stub
- Configuration conf = new Configuration();
- conf.set("fs.default.name","hdfs://localhost:9000");
- String[] otherArgs = new String[]{"/lgf","/output"}; /* 直接设置输入参数 */
- if (otherArgs.length != 2) {
- System.err.println("Usage: wordcount <in> <out>");
- System.exit(2);
- }
- Job job = Job.getInstance(conf,"Merge and sort");
- job.setJarByClass(MergeSort.class);
- job.setMapperClass(Map.class);
- job.setReducerClass(Reduce.class);
- job.setPartitionerClass(Partition.class);
- job.setOutputKeyClass(IntWritable.class);
- job.setOutputValueClass(IntWritable.class);
- FileInputFormat.addInputPath(job, new Path(otherArgs[0]));
- FileOutputFormat.setOutputPath(job, new Path(otherArgs[1]));
- System.exit(job.waitForCompletion(true) ? 0 : 1);
- }
- }
-
跟定表示父子关系的表格,挖掘出祖孙关系,并以表格形式输出。
- child parent
- Steven Lucy
- Steven Jack
- Jone Lucy
- Jone Jack
- Lucy Mary
- Lucy Frank
- Jack Alice
- Jack Jesse
- David Alice
- David Jesse
- Philip David
- Philip Alma
- Mark David
- Mark Alma
-
- grandchild grandparent
- Steven Alice
- Steven Jesse
- Jone Alice
- Jone Jesse
- Steven Mary
- Steven Frank
- Jone Mary
- Jone Frank
- Philip Alice
- Philip Jesse
- Mark Alice
- Mark Jesse
-
-
- import java.io.IOException;
- import java.util.*;
- import org.apache.hadoop.conf.Configuration;
- import org.apache.hadoop.fs.Path;
- import org.apache.hadoop.io.IntWritable;
- import org.apache.hadoop.io.Text;
- import org.apache.hadoop.mapreduce.Job;
- import org.apache.hadoop.mapreduce.Mapper;
- import org.apache.hadoop.mapreduce.Reducer;
- import org.apache.hadoop.mapreduce.lib.input.FileInputFormat;
- import org.apache.hadoop.mapreduce.lib.output.FileOutputFormat;
- import org.apache.hadoop.util.GenericOptionsParser;
- public class simple_data_mining {
- public static int time = 0;
- /**
- * @param args
- * 输入一个child-parent的表格
- * 输出一个体现grandchild-grandparent关系的表格
- */
- //Map将输入文件按照空格分割成child和parent,然后正序输出一次作为右表,反序输出一次作为左表,需要注意的是在输出的value中必须加上左右表区别标志
- public static class Map extends Mapper<Object, Text, Text, Text>{
- public void map(Object key, Text value, Context context) throws IOException,InterruptedException{
- /********** Begin **********/
- String child_name = new String();
- String parent_name = new String();
- String relation_type = new String();
- String line = value.toString();
- int i = 0;
- while(line.charAt(i) != ' '){
- i++;
- }
- String[] values = {line.substring(0,i),line.substring(i+1)};
- if(values[0].compareTo("child") != 0){
- child_name = values[0];
- parent_name = values[1];
- relation_type = "1";//左右表区分标志
- context.write(new Text(values[1]), new Text(relation_type+"+"+child_name+"+"+parent_name));
- //左表
- relation_type = "2";
- context.write(new Text(values[0]), new Text(relation_type+"+"+child_name+"+"+parent_name));
- //右表
- }
- /********** End **********/
- }
- }
- public static class Reduce extends Reducer<Text, Text, Text, Text>{
- public void reduce(Text key, Iterable<Text> values,Context context) throws IOException,InterruptedException{
- /********** Begin **********/
- if(time == 0){ //输出表头
- context.write(new Text("grand_child"), new Text("grand_parent"));
- time++;
- }
- int grand_child_num = 0;
- String grand_child[] = new String[10];
- int grand_parent_num = 0;
- String grand_parent[]= new String[10];
- Iterator ite = values.iterator();
- while(ite.hasNext()){
- String record = ite.next().toString();
- int len = record.length();
- int i = 2;
- if(len == 0) continue;
- char relation_type = record.charAt(0);
- String child_name = new String();
- String parent_name = new String();
- //获取value-list中value的child
- while(record.charAt(i) != '+'){
- child_name = child_name + record.charAt(i);
- i++;
- }
- i=i+1;
- //获取value-list中value的parent
- while(i<len){
- parent_name = parent_name+record.charAt(i);
- i++;
- }
- //左表,取出child放入grand_child
- if(relation_type == '1'){
- grand_child[grand_child_num] = child_name;
- grand_child_num++;
- }
- else{//右表,取出parent放入grand_parent
- grand_parent[grand_parent_num] = parent_name;
- grand_parent_num++;
- }
- }
- if(grand_parent_num != 0 && grand_child_num != 0 ){
- for(int m = 0;m<grand_child_num;m++){
- for(int n=0;n<grand_parent_num;n++){
- context.write(new Text(grand_child[m]), new Text(grand_parent[n]));
- //输出结果
- }
- }
- }
- /********** End **********/
- }
- }
- public static void main(String[] args) throws Exception{
- // TODO Auto-generated method stub
- Configuration conf = new Configuration();
- conf.set("fs.default.name","hdfs://localhost:9000");
- String[] otherArgs = new String[]{"input","output"}; /* 直接设置输入参数 */
- if (otherArgs.length != 2) {
- System.err.println("Usage: wordcount <in> <out>");
- System.exit(2);
- }
- Job job = Job.getInstance(conf,"Single table join ");
- job.setJarByClass(simple_data_mining.class);
- job.setMapperClass(Map.class);
- job.setReducerClass(Reduce.class);
- job.setOutputKeyClass(Text.class);
- job.setOutputValueClass(Text.class);
- FileInputFormat.addInputPath(job, new Path(otherArgs[0]));
- FileOutputFormat.setOutputPath(job, new Path(otherArgs[1]));
- System.exit(job.waitForCompletion(true) ? 0 : 1);
- }
- }
-
最后一个就不给图了
其实在本地电脑也能用idea 配一下环境 ip地址填虚拟机的 参考下文
windows IDEA连接虚拟机Hadoop集群 - 知乎
实验3
编程实现以下功能,并用Hadoop提供的HBase Shell命令完成相同任务。
借鉴官网教程
Apache HBase ™ Reference Guide
vim conf/hbase-env.sh


bin/start-hbase.sh 启动!
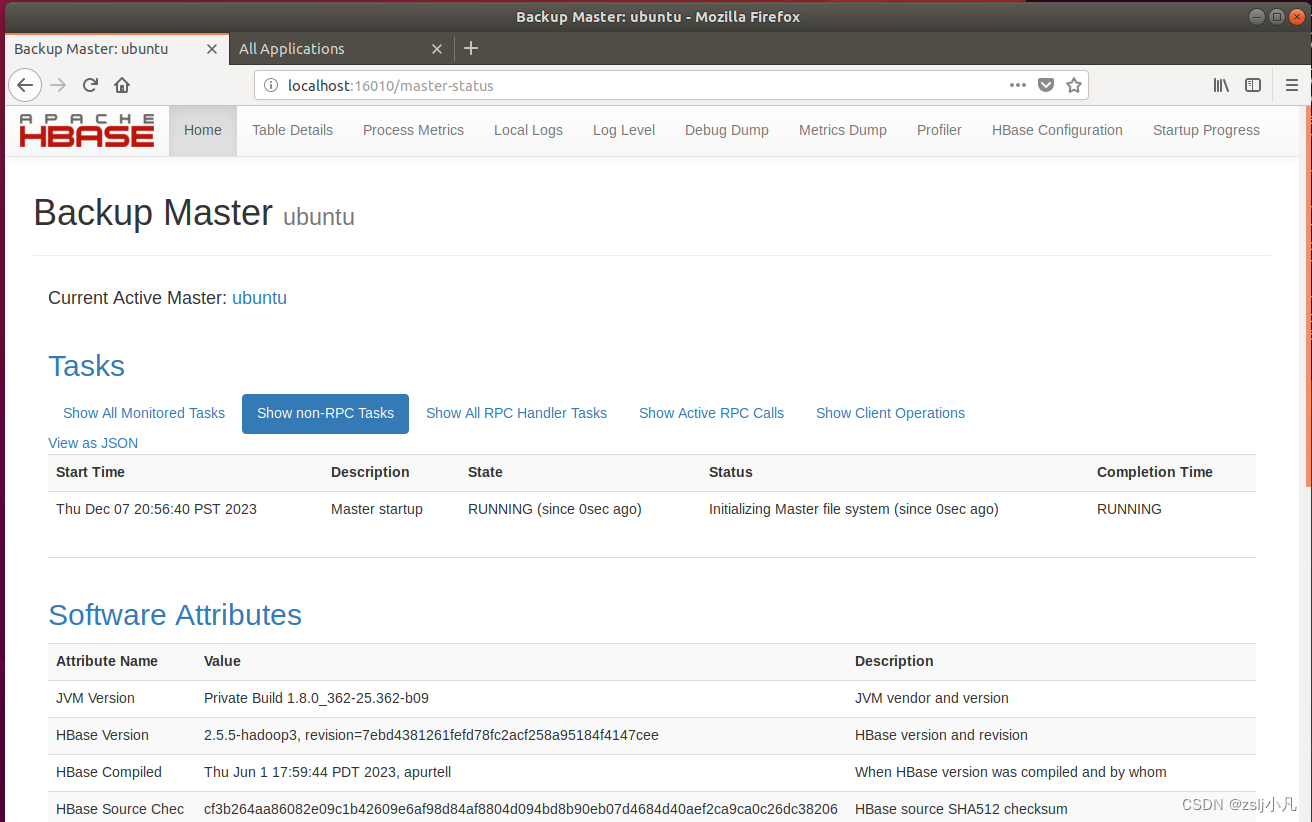
http://localhost:16010/ 如果能打开网页就算成功
bin/hbase shell 就可以进到命令行了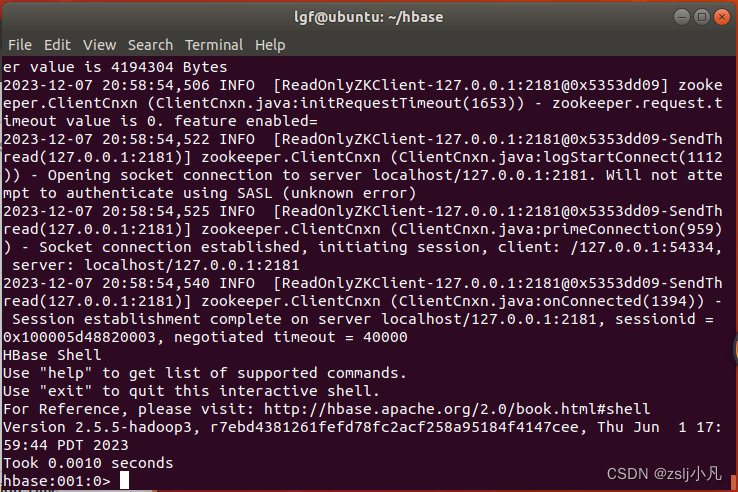
但是感觉命令窗一直断 很慢 搜了好久才解决
vim conf/hbase-site.xml
- <property>
- <name>hbase.wal.provider</name>
- <value>filesystem</value>
- </property>
重启一下
bin/stop-hbase.sh 关闭
bin/start-hbase.sh 启动
新建表
create 'test', 'cf'查看
list 'test'具体信息
describe 'test'插入数据
- put 'test', 'row1', 'cf:a', 'value1'
-
- put 'test', 'row2', 'cf:b', 'value2'
-
- put 'test', 'row3', 'cf:c', 'value3'
查看数据
scan 'test'查看某一行
get 'test', 'row1'删除表中所有行
truncate 'test'删之前需要disable
enable 'test'disable 'test'删除表
drop 'test'统计行数
count 'test'这个hbase也是有java api的 可以在ide上写代码运行
实验4
1.实现以下功能。
- 安装Spark,并分别以单机模式和伪分布式进行配置;
- 使用Spark Shell编写Scala代码,统计一个文本文件的词频;
- 使用PySpark shell编写Python代码,利用泰勒展开公式计算自然常数e=n=0∞1n!
 。
。
安装Spark,并分别以单机模式和伪分布式进行配置;
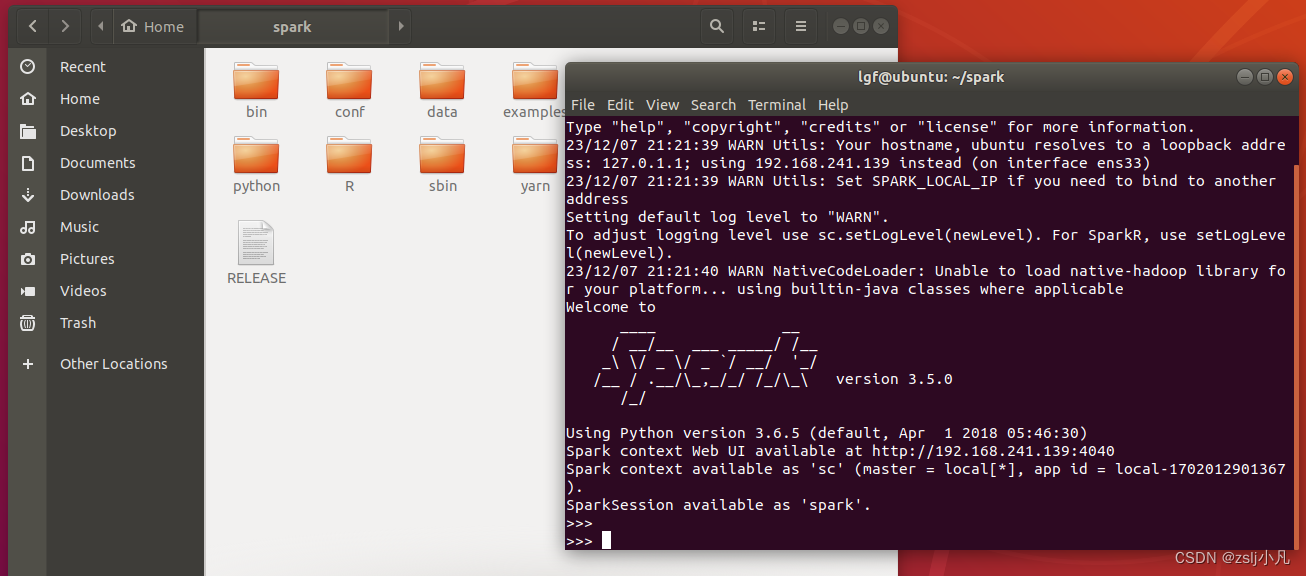
下载解压 Index of /spark/spark-3.5.0
直接 ./bin/spark-shell 启动!
使用Spark Shell编写Scala代码,统计一个文本文件的词频;
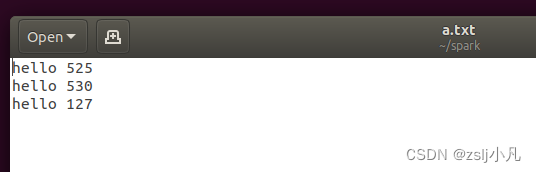 sc.textFile("a.txt").flatMap(_.split(" ")).map((_,1)).reduceByKey(_+_).collect
这就是python 一行代码的事

:quit 退出
使用PySpark shell编写Python代码,利用泰勒展开公式计算自然常数e=n=0∞1n!。
./bin/pyspark 启动!
- import math
-
- def approximated_e(n, x=1):
- E = 0.0
- for i in range(n):
- E = E + (x**i)/math.factorial(i)
- return E
-
-
- e_std = math.e
- print('%.50f' % e_std)
- e_100 = approximated_e(100, 1)
- print('n =100: %.50f %.50f' % (e_100, math.fabs(e_std-e_100)))
这个代码最好一行一行打
def函数一起复制 注意缩进 py没有; 看的是缩进

同时也可以下载conda管理包 再下载一个pycharm,就可以在ide上编写代码了
无力吐槽,不学Linux直接上手,还要在上面部署服务,看任务书还准备搞分布式部署,大部分人根本学不来,所以出一个手把手教程,这个大数据实验算是最难的实验了,如果遇到问题可以私信。

