
- 1Python 可视化
- 2Android Studio 修改应用程序的包名_android studio修改应用包名
- 3Spring - Spring Cloud Gateway网关实战及原理解析_springcloudgateway 原理与实战
- 4win10安装MySQL解压缩版 8.0.15(非转载,较详细)
- 5深信服(scsa认证)学习过程_深信服认证考试内容和网站提供的内容
- 6VScode远程连接调试_vscode远程调试
- 7重温vue写hello world_vue写 hello
- 8kiss原则包括什么_求职干货想让HR瞬间对你产生好感?简历做好这三个原则
- 9二叉排序树查找c语言算法,二叉排序树/二叉查找树 (binary sort tree/ binary search tree)的C语言实现...
- 10一站式Kafka平台解决方案——KafkaCenter_kafkacenter使用
Spring - Spring Cloud Gateway网关实战及原理解析_springcloudgateway 原理与实战
赞
踩
API 网关
API 网关出现的原因是微服务架构的出现,不同的微服务一般会有不同的网络地址,而外部客户端可能需要调用多个服务的接口才能完成一个业务需求,如果让客户端直接与各个微服务通信,会有以下的问题:
- 客户端会多次请求不同的微服务,增加了客户端的复杂性。
- 存在跨域请求,在一定场景下处理相对复杂。
- 认证复杂,每个服务都需要独立认证。
- 难以重构,随着项目的迭代,可能需要重新划分微服务。例如,可能将多个服务合并成一个或者将一个服务拆分成多个。如果客户端直接与微服务通信,那么重构将会很难实施。
- 某些微服务可能使用了防火墙 / 浏览器不友好的协议,直接访问会有一定的困难。
以上这些问题可以借助 API 网关解决。API 网关是介于客户端和服务器端之间的中间层,所有的外部请求都会先经过 API 网关这一层。也就是说,API 的实现方面更多的考虑业务逻辑,而安全、性能、监控可以交由 API 网关来做,这样既提高业务灵活性又不缺安全性,典型的架构图如图所示:

使用 API 网关后的优点如下:
- 易于监控。可以在网关收集监控数据并将其推送到外部系统进行分析。
- 易于认证。可以在网关上进行认证,然后再将请求转发到后端的微服务,而无须在每个微服务中进行认证。
- 减少了客户端与各个微服务之间的交互次数。
API 网关选型
业界的情况:
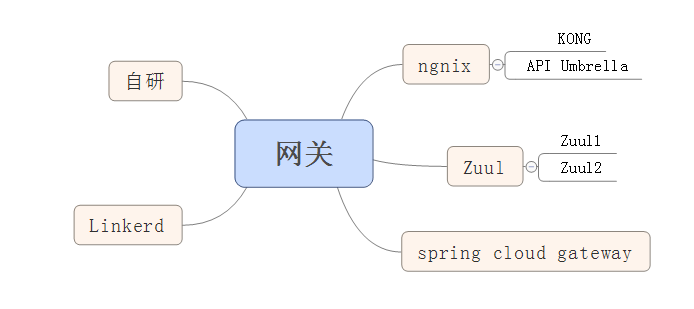
我前面的文章<Netflix网关zuul(1.x和2.x)全解析>已经介绍了zuul1 和zuul2,现在就尝试从实例入手介绍一下spring cloud gateway
首先我们一步步实现一个最简单的网关例子
步骤1:在http://start.spring.io网站上创建一个spring-cloud-gateway-example项目,依赖spring-cloud-gateway,如下图所示

此时生产了一个spring-cloud-gateway-example的空项目包,pom.xml文件如下
- <?xml version="1.0" encoding="UTF-8"?>
- <project xmlns="http://maven.apache.org/POM/4.0.0" xmlns:xsi="http://www.w3.org/2001/XMLSchema-instance"
- xsi:schemaLocation="http://maven.apache.org/POM/4.0.0 http://maven.apache.org/xsd/maven-4.0.0.xsd">
- <modelVersion>4.0.0</modelVersion>
- <parent>
- <groupId>org.springframework.boot</groupId>
- <artifactId>spring-boot-starter-parent</artifactId>
- <version>2.1.3.RELEASE</version>
- <relativePath/> <!-- lookup parent from repository -->
- </parent>
- <groupId>com.example</groupId>
- <artifactId>spring-cloud-gateway-example</artifactId>
- <version>0.0.1-SNAPSHOT</version>
- <name>spring-cloud-gateway-example</name>
- <description>Demo project for Spring Boot</description>
-
- <properties>
- <java.version>1.8</java.version>
- <spring-cloud.version>Greenwich.RELEASE</spring-cloud.version>
- </properties>
-
- <dependencies>
- <dependency>
- <groupId>org.springframework.cloud</groupId>
- <artifactId>spring-cloud-starter-gateway</artifactId>
- </dependency>
-
- <dependency>
- <groupId>org.springframework.boot</groupId>
- <artifactId>spring-boot-starter-test</artifactId>
- <scope>test</scope>
- </dependency>
- </dependencies>
-
- <dependencyManagement>
- <dependencies>
- <dependency>
- <groupId>org.springframework.cloud</groupId>
- <artifactId>spring-cloud-dependencies</artifactId>
- <version>${spring-cloud.version}</version>
- <type>pom</type>
- <scope>import</scope>
- </dependency>
- </dependencies>
- </dependencyManagement>
-
- <build>
- <plugins>
- <plugin>
- <groupId>org.springframework.boot</groupId>
- <artifactId>spring-boot-maven-plugin</artifactId>
- </plugin>
- </plugins>
- </build>
-
- <repositories>
- <repository>
- <id>spring-milestones</id>
- <name>Spring Milestones</name>
- <url>https://repo.spring.io/milestone</url>
- </repository>
- </repositories>
-
- </project>

2.创建一个Route实例的配置类GatewayRoutes
- package com.example.springcloudgatewayexample;
-
- import org.springframework.cloud.gateway.route.RouteLocator;
- import org.springframework.cloud.gateway.route.builder.RouteLocatorBuilder;
- import org.springframework.context.annotation.Bean;
- import org.springframework.context.annotation.Configuration;
- @Configuration
- public class GatewayRoutes {
- @Bean
- public RouteLocator routeLocator(RouteLocatorBuilder builder) {
- return builder.routes()
- .route(r ->
- r.path("/java/**")
- .filters(
- f -> f.stripPrefix(1)
- )
- .uri("http://localhost:8090/helloWorld")
- )
- .build();
- }
- }
当然,也可以不适用配置类,使用配置文件,如下图所示
- spring:
- cloud:
- gateway:
- routes:
- - predicates:
- - Path=/java/**
- filters:
- - StripPrefix=1
- uri: "http://localhost:8090/helloWorld"
不过,为了调试方便,我们使用配置类方式。
此时项目已经完成,足够简单吧。
3.启动此项目
>>因api网关需要转发到一个服务上,本文为http://localhost:8090/helloWorld,那需要先启动我上文<spring boot整合spring5-webflux从0开始的实战及源码解析>,你也可以创建一个普通的web项目,启动端口设置为8090,然后启动。
- . ____ _ __ _ _
- /\\ / ___'_ __ _ _(_)_ __ __ _ \ \ \ \
- ( ( )\___ | '_ | '_| | '_ \/ _` | \ \ \ \
- \\/ ___)| |_)| | | | | || (_| | ) ) ) )
- ' |____| .__|_| |_|_| |_\__, | / / / /
- =========|_|==============|___/=/_/_/_/
- :: Spring Boot :: (v2.1.3.RELEASE)
-
- 2019-02-21 09:29:07.450 INFO 11704 --- [ main] c.e.demo.Spring5WebfluxApplication : Starting Spring5WebfluxApplication on DESKTOP-405G2C8 with PID 11704 (E:\workspaceForCloud\spring5-webflux\target\classes started by dell in E:\workspaceForCloud\spring5-webflux)
- 2019-02-21 09:29:07.455 INFO 11704 --- [ main] c.e.demo.Spring5WebfluxApplication : No active profile set, falling back to default profiles: default
- 2019-02-21 09:29:09.409 INFO 11704 --- [ main] o.s.b.web.embedded.netty.NettyWebServer : Netty started on port(s): 8090
- 2019-02-21 09:29:09.413 INFO 11704 --- [ main] c.e.demo.Spring5WebfluxApplication : Started Spring5WebfluxApplication in 2.304 seconds (JVM running for 7.311)
>>以spring boot方式启动spring-cloud-gateway-example项目,日志如下
- 2019-02-21 10:34:33.435 INFO 8580 --- [ main] trationDelegate$BeanPostProcessorChecker : Bean 'org.springframework.cloud.autoconfigure.ConfigurationPropertiesRebinderAutoConfiguration' of type [org.springframework.cloud.autoconfigure.ConfigurationPropertiesRebinderAutoConfiguration$$EnhancerBySpringCGLIB$$1e059320] is not eligible for getting processed by all BeanPostProcessors (for example: not eligible for auto-proxying)
-
- . ____ _ __ _ _
- /\\ / ___'_ __ _ _(_)_ __ __ _ \ \ \ \
- ( ( )\___ | '_ | '_| | '_ \/ _` | \ \ \ \
- \\/ ___)| |_)| | | | | || (_| | ) ) ) )
- ' |____| .__|_| |_|_| |_\__, | / / / /
- =========|_|==============|___/=/_/_/_/
- :: Spring Boot :: (v2.1.3.RELEASE)
-
- 2019-02-21 10:34:33.767 INFO 8580 --- [ main] e.s.SpringCloudGatewayExampleApplication : No active profile set, falling back to default profiles: default
- 2019-02-21 10:34:34.219 INFO 8580 --- [ main] o.s.cloud.context.scope.GenericScope : BeanFactory id=d98183ec-3e46-38ba-ba4c-e976a1017dce
- 2019-02-21 10:34:34.243 INFO 8580 --- [ main] trationDelegate$BeanPostProcessorChecker : Bean 'org.springframework.cloud.autoconfigure.ConfigurationPropertiesRebinderAutoConfiguration' of type [org.springframework.cloud.autoconfigure.ConfigurationPropertiesRebinderAutoConfiguration$$EnhancerBySpringCGLIB$$1e059320] is not eligible for getting processed by all BeanPostProcessors (for example: not eligible for auto-proxying)
- 2019-02-21 10:34:44.367 INFO 8580 --- [ main] o.s.c.g.r.RouteDefinitionRouteLocator : Loaded RoutePredicateFactory [After]
- 2019-02-21 10:34:44.367 INFO 8580 --- [ main] o.s.c.g.r.RouteDefinitionRouteLocator : Loaded RoutePredicateFactory [Before]
- 2019-02-21 10:34:44.367 INFO 8580 --- [ main] o.s.c.g.r.RouteDefinitionRouteLocator : Loaded RoutePredicateFactory [Between]
- 2019-02-21 10:34:44.367 INFO 8580 --- [ main] o.s.c.g.r.RouteDefinitionRouteLocator : Loaded RoutePredicateFactory [Cookie]
- 2019-02-21 10:34:44.367 INFO 8580 --- [ main] o.s.c.g.r.RouteDefinitionRouteLocator : Loaded RoutePredicateFactory [Header]
- 2019-02-21 10:34:44.368 INFO 8580 --- [ main] o.s.c.g.r.RouteDefinitionRouteLocator : Loaded RoutePredicateFactory [Host]
- 2019-02-21 10:34:44.368 INFO 8580 --- [ main] o.s.c.g.r.RouteDefinitionRouteLocator : Loaded RoutePredicateFactory [Method]
- 2019-02-21 10:34:44.368 INFO 8580 --- [ main] o.s.c.g.r.RouteDefinitionRouteLocator : Loaded RoutePredicateFactory [Path]
- 2019-02-21 10:34:44.368 INFO 8580 --- [ main] o.s.c.g.r.RouteDefinitionRouteLocator : Loaded RoutePredicateFactory [Query]
- 2019-02-21 10:34:44.368 INFO 8580 --- [ main] o.s.c.g.r.RouteDefinitionRouteLocator : Loaded RoutePredicateFactory [ReadBodyPredicateFactory]
- 2019-02-21 10:34:44.368 INFO 8580 --- [ main] o.s.c.g.r.RouteDefinitionRouteLocator : Loaded RoutePredicateFactory [RemoteAddr]
- 2019-02-21 10:34:44.368 INFO 8580 --- [ main] o.s.c.g.r.RouteDefinitionRouteLocator : Loaded RoutePredicateFactory [Weight]
- 2019-02-21 10:34:44.368 INFO 8580 --- [ main] o.s.c.g.r.RouteDefinitionRouteLocator : Loaded RoutePredicateFactory [CloudFoundryRouteService]
- 2019-02-21 10:34:44.920 INFO 8580 --- [ main] o.s.b.web.embedded.netty.NettyWebServer : Netty started on port(s): 8080
- 2019-02-21 10:34:44.923 INFO 8580 --- [ main] e.s.SpringCloudGatewayExampleApplication : Started SpringCloudGatewayExampleApplication in 12.329 seconds (JVM running for 13.126)
4.测试,浏览器访问http://localhost:8080/java/helloWorld
返回hello world !
5.从上面的代码和配置及实例中,我们可以看出spring cloud gateway处理request请求的流程如下所示:
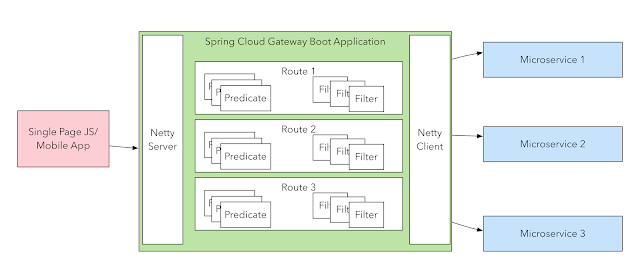
即在最前端,启动一个netty server(默认端口为8080)接受请求,然后通过Routes(每个Route由Predicate(等同于HandlerMapping)和Filter(等同于HandlerAdapter))处理后通过Netty Client发给响应的微服务。
那么在gateway本身最重要的应该是Route(Netty Server和Client已经封装好了),它由RouteLocatorBuilder构建,内部包含Predicate和Filter,
- private Route(String id, URI uri, int order, AsyncPredicate<ServerWebExchange> predicate, List<GatewayFilter> gatewayFilters) {
- this.id = id;
- this.uri = uri;
- this.order = order;
- this.predicate = predicate;
- this.gatewayFilters = gatewayFilters;
- }
那么我们就来探讨一下这两个组件吧
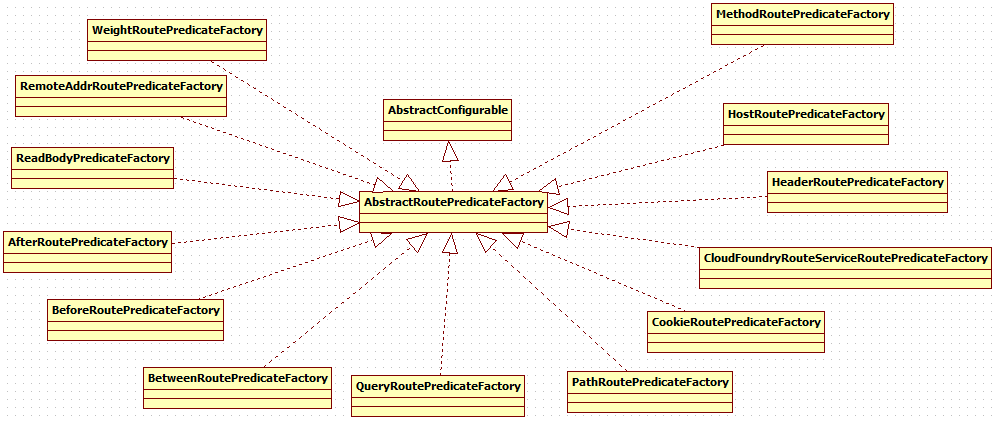
5.1.Predicate
Predicte由PredicateSpec来构建,主要实现有:
- /**
- * A predicate that checks if the path of the request matches the given pattern
- * @param patterns the pattern to check the path against.
- * The pattern is a {@link org.springframework.util.PathMatcher} pattern
- * @return a {@link BooleanSpec} to be used to add logical operators
- */
- public BooleanSpec path(String... patterns) {
- return asyncPredicate(getBean(PathRoutePredicateFactory.class)
- .applyAsync(c -> c.setPatterns(Arrays.asList(patterns))));
- }
PathRoutePredicateFactory中执行
- @Override
- public Predicate<ServerWebExchange> apply(Config config) {
- final ArrayList<PathPattern> pathPatterns = new ArrayList<>();
- synchronized (this.pathPatternParser) {
- pathPatternParser.setMatchOptionalTrailingSeparator(
- config.isMatchOptionalTrailingSeparator());
- config.getPatterns().forEach(pattern -> {
- PathPattern pathPattern = this.pathPatternParser.parse(pattern);
- pathPatterns.add(pathPattern);
- });
- }
- return exchange -> {
- PathContainer path = parsePath(exchange.getRequest().getURI().getPath());
-
- Optional<PathPattern> optionalPathPattern = pathPatterns.stream()
- .filter(pattern -> pattern.matches(path)).findFirst();
-
- if (optionalPathPattern.isPresent()) {
- PathPattern pathPattern = optionalPathPattern.get();
- traceMatch("Pattern", pathPattern.getPatternString(), path, true);
- PathMatchInfo pathMatchInfo = pathPattern.matchAndExtract(path);
- putUriTemplateVariables(exchange, pathMatchInfo.getUriVariables());
- return true;
- }
- else {
- traceMatch("Pattern", config.getPatterns(), path, false);
- return false;
- }
- };
- }
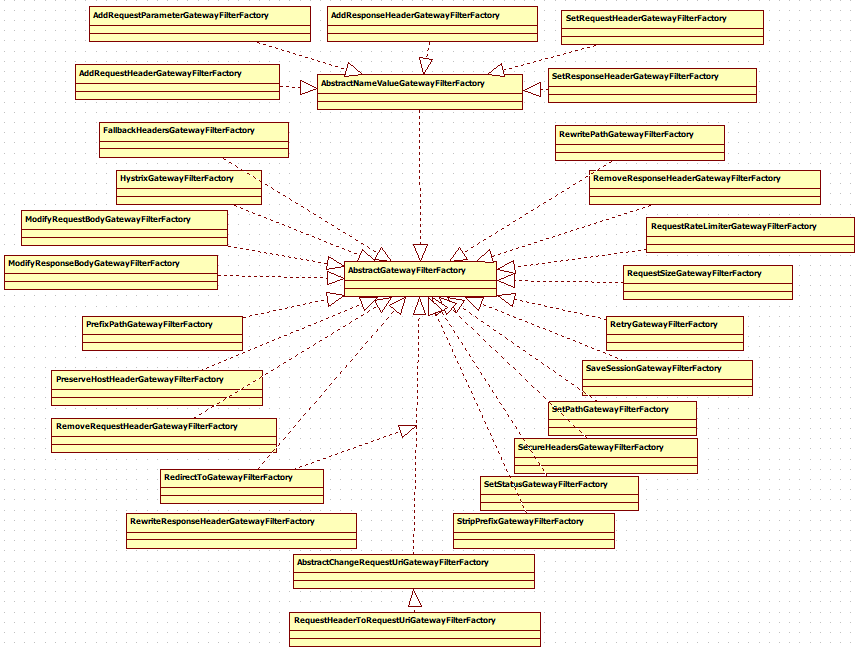
5.2.Filter
Filter分两种,一种GatewayFilter,一种GlobalFilter
5.2.1 GatewayFilter
GatewayFilter由GatewayFilterSpec构建,GatewayFilter的构建器
5.2.2 GlobalFilter
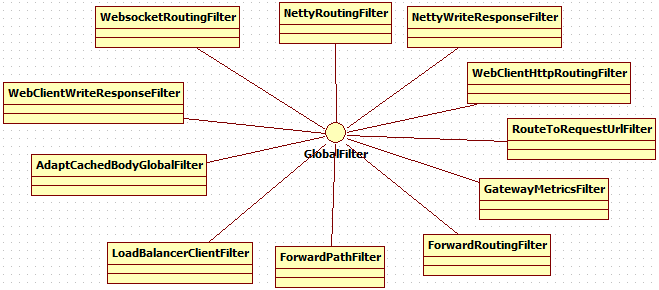
5.3 GlobalFilter和GatewayFilter的联系
FilteringWebHandler.GatewayFilterAdapter代理了GlobalFilter
6.总结
本文从一个spring-cloud-gateway实例入手,深入浅出的介绍了spring-cloud-gateway的组件,并从源码角度给出了实现的原理。
spring-cloud-gateway在最前端,启动一个netty server(默认端口为8080)接受请求,然后通过Routes(每个Route由Predicate(等同于HandlerMapping)和Filter(等同于HandlerAdapter))处理后通过Netty Client发给响应的微服务。
Predicate和Filter的各个实现定义了spring-cloud-gateway拥有的功能。
参考资料:
【1】https://www.infoq.cn/article/comparing-api-gateway-performances
【2】https://dzone.com/articles/spring-cloud-gateway-configuring-a-simple-route


