
- 1LINUX安装JDK1.8(wget rpm)_linux wget jdk1.8
- 2centos常用操作_-bash: firewall-cmd: command not found
- 3微信云托管常见问题FAQ(一)_-606006微信后台云托管错误:不允许未登录模式请求
- 4PyTorch示例——MLP图像分类-手写数字_pytorch mlp
- 5JAVA如何在EXCEL中插入图片_java向excel写入图片
- 6鸿蒙Harmony应用开发—ArkTS声明式开发(容器组件:Badge)
- 7Android Studio Bumblebee | 2021.1.1 发布,快来看看更新了什么_unable to set the global setting: "debug_view_attr
- 8使用$router.push传值及取值的两种方式_$router.push 取query参数
- 9转发 3GPP解读5G第一阶段里程碑:系统架构_3gpp stage介绍
- 10AI领域再出“王炸“----Claude3是否会成为下一个“神“
C#与西门子PLC通讯——手搓S7通讯协议_西门子s7协议和c#对接
赞
踩
本文将尝试从源码角度,使用Tcp/Ip的方式直接与西门子PLC进行交互通讯。
C#与西门子PLC通讯 系列文章目录
往期博客参考 C#与西门子PLC通讯——新手快速入门 C#与西门子PLC通讯——熟手快速入门 建议先看一下这两篇,了解预设背景。
文章目录
前言
知其然,知其所以然。
这篇文章,我们就尝试重复造一个轮子。通过对通讯协议的简要分析,我们能够更好地了解与西门子PLC是如何交互的。最后,我们就运用底层方法,使用Socket通讯将一个数组读取出来,再将数组反转之后写回PLC中。
一、通讯协议
1.1 S7协议位置
首先,参照 ISO-OSI 参考模型,S7 协议位置如下:
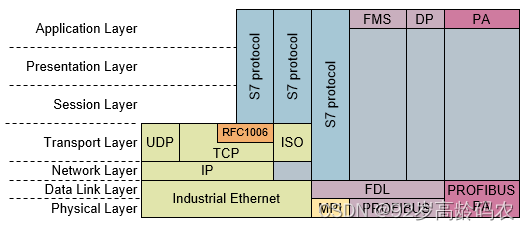
参考西门子官网介绍:S7 协议有哪些属性,优势及特征?
1.2 S7通讯协议
当C#应用程序中与西门子PLC进行通信时,需要经历一系列协议阶段,以确保有效的数据传输和通信。 这些阶段包括TCP/IP协议、TPKT协议、COTP协议和S7连接协议。
- 通信的第一阶段是建立TCP/IP连接的三次握手。这是通信的基础,它确保了数据能够可靠地在客户端和PLC之间传输。+ 一旦TCP/IP连接建立,下一步是使用TPKT协议。如果直接去尝试发送别的信息,就会被PLC踢出去。+ 接下来是COTP协议。COTP协议用于建立和管理连接,它为应用层提供了一种连接导向的通信方式。在COTP外包一层TPKT,这样就可以发送给PLC,完成协议的确认。+ 最后,我们到达S7连接协议阶段,这是与西门子PLC通信的核心协议。从源码来看,这个是一个固定的内容
{ 3, 0, 0, 25, 2, 240, 128, 50, 1, 0, 0, 255, 255, 0, 8, 0, 0, 240, 0, 0, 3, 0, 3, 3, 192};。
网络上有很多写得很好的关于S7通讯协议的介绍和分析,这里就不做复读机啦。
完成上述操作之后,就开启了新世界的大门,在PLC的数据海洋里自由荡漾。
1.3 S7 Net Plus源码赏析
1.3.1 声明对象
/// <summary>
/// 创建一个具备连接所需参数的 PLC 对象。
/// 对于 S7-1200 和 S7-1500,默认值为 rack = 0 和 slot = 0。
/// 如果要连接到外部以太网卡 (CP),则需要 slot > 0。
/// 对于 S7-300 和 S7-400,默认值为 rack = 0 和 slot = 2。
/// </summary>
/// <param name="cpu">PLC 的 CpuType(从枚举中选择)</param>
/// <param name="ip">PLC 的 IP 地址</param>
/// <param name="rack">PLC 的机架号,通常为 0,但请在 Step7 或 TIA Portal 的硬件配置中进行检查</param>
/// <param name="slot">PLC 的 CPU 插槽号,对于 S7-1200 和 S7-1500 通常为 0,对于 S7-300 和 S7-400 通常为 2。
/// 如果使用外部以太网卡,必须相应地设置。</param>
public Plc(CpuType cpu, string ip, Int16 rack, Int16 slot)
    : this(cpu, ip, DefaultPort, rack, slot)
{
}

/// <summary>
/// 创建一个具备连接所需参数的 PLC 对象。
/// 对于 S7-1200 和 S7-1500,默认值为 rack = 0 和 slot = 0。
/// 如果要连接到外部以太网卡 (CP),则需要 slot > 0。
/// 对于 S7-300 和 S7-400,默认值为 rack = 0 和 slot = 2。
/// </summary>
/// <param name="cpu">PLC 的 CpuType(从枚举中选择)</param>
/// <param name="ip">PLC 的 IP 地址</param>
/// <param name="port">用于连接的端口号,默认为 102。</param>
/// <param name="rack">PLC 的机架号,通常为 0,但请在 Step7 或 TIA Portal 的硬件配置中进行检查</param>
/// <param name="slot">PLC 的 CPU 插槽号,对于 S7-1200 和 S7-1500 通常为 0,对于 S7-300 和 S7-400 通常为 2。
/// 如果使用外部以太网卡,必须相应地设置。</param>
public Plc(CpuType cpu, string ip, int port, Int16 rack, Int16 slot)
    : this(ip, port, TsapPair.GetDefaultTsapPair(cpu, rack, slot))
{
    if (!Enum.IsDefined(typeof(CpuType), cpu))
        throw new ArgumentException(
            $"参数 '{nameof(cpu)}' 的值 ({cpu}) 对于枚举类型 '{typeof(CpuType).Name}' 无效。",
            nameof(cpu));

    CPU = cpu;
    Rack = rack;
    Slot = slot;
}

- 1
- 2
- 3
- 4
- 5
- 6
- 7
- 8
- 9
- 10
- 11
- 12
- 13
- 14
- 15
- 16
- 17
- 18
- 19
- 20
- 21
- 22
- 23
- 24
- 25
- 26
- 27
- 28
- 29
- 30
- 31
- 32
- 33
- 34
- 35
- 36
- 37
- 38
- 39
- 40
- 41
- 42
1.3.2 建立连接TcpIp连接
同步方法:
/// <summary>
/// 连接到 PLC 并执行 COTP 连接请求和 S7 通信设置。
/// </summary>
public void Open()
{
    try
    {
        OpenAsync().GetAwaiter().GetResult();
    }
    catch (Exception exc)
    {
        throw new PlcException(ErrorCode.ConnectionError,
            $"无法建立与 {IP} 的连接。\n消息:{exc.Message}", exc);
    }
}
- 1
- 2
- 3
- 4
- 5
- 6
- 7
- 8
- 9
- 10
- 11
- 12
- 13
- 14
- 15
- 16
其中,同步方法会调用异步方法。
/// <summary>
/// 连接到 PLC 并执行 COTP 连接请求和 S7 通信设置。
/// </summary>
/// <param name="cancellationToken">用于监视取消请求的令牌。默认值为 None。
/// 请注意,取消不会以任何方式影响打开套接字,只会在成功建立套接字连接后影响用于配置连接的数据传输。
/// 请注意,取消是建议性/协作性的,不会在所有情况下立即导致取消。</param>
/// <returns>表示异步打开操作的任务。</returns>
public async Task OpenAsync(CancellationToken cancellationToken = default)
{
    var stream = await ConnectAsync(cancellationToken).ConfigureAwait(false);
    try
    {
        await queue.Enqueue(async () =>
        {
            cancellationToken.ThrowIfCancellationRequested();
            await EstablishConnection(stream, cancellationToken).ConfigureAwait(false);
            _stream = stream;

            return default(object);
        }).ConfigureAwait(false);
    }
    catch (Exception)
    {
        stream.Dispose();
        throw;
    }
}
- 1
- 2
- 3
- 4
- 5
- 6
- 7
- 8
- 9
- 10
- 11
- 12
- 13
- 14
- 15
- 16
- 17
- 18
- 19
- 20
- 21
- 22
- 23
- 24
- 25
- 26
- 27
- 28
- 29
ConnectAsync对应TcpIp连接方法:
private async Task<NetworkStream> ConnectAsync(CancellationToken cancellationToken)
{
    tcpClient = new TcpClient();
    ConfigureConnection();

#if NET5_0_OR_GREATER
    await tcpClient.ConnectAsync(IP, Port, cancellationToken).ConfigureAwait(false);
#else
    await tcpClient.ConnectAsync(IP, Port).ConfigureAwait(false);
#endif
    return tcpClient.GetStream();
}
- 1
- 2
- 3
- 4
- 5
- 6
- 7
- 8
- 9
- 10
- 11
- 12
- 13
.Net5 以上会调用await tcpClient.ConnectAsync(IP, Port, cancellationToken).ConfigureAwait(false);。 .Net5 以下会调用await tcpClient.ConnectAsync(IP, Port).ConfigureAwait(false);。
1.3.3 通讯协议交互
OpenAsync中EstablishConnection就是建立TPKT协议、COTP协议和S7连接协议三个通讯握手的阶段。 其中,RequestConnection对应TPKT协议、COTP协议,SetupConnection对应S7连接协议。
private async Task EstablishConnection(Stream stream, CancellationToken cancellationToken)
{
    // 发起TPKT和COTP连接请求
    await RequestConnection(stream, cancellationToken).ConfigureAwait(false);

    // 设置S7连接协议
    await SetupConnection(stream, cancellationToken).ConfigureAwait(false);
}
- 1
- 2
- 3
- 4
- 5
- 6
- 7
- 8
- 9
1.3.3.1 TPKT协议和COTP协议
private async Task RequestConnection(Stream stream, CancellationToken cancellationToken)
{
    // 获取COTP连接请求数据
    var requestData = ConnectionRequest.GetCOTPConnectionRequest(TsapPair);

    // 发送请求并等待响应
    var response = await NoLockRequestTpduAsync(stream, requestData, cancellationToken).ConfigureAwait(false);

    // 检查响应是否为连接确认类型
    if (response.PDUType != COTP.PduType.ConnectionConfirmed)
    {
        throw new InvalidDataException("连接请求被拒绝", response.TPkt.Data, 1, 0x0d);
    }
}

public static byte[] GetCOTPConnectionRequest(TsapPair tsapPair)
{
    // 构建COTP连接请求数据
    byte[] bSend1 = {
        3, 0, 0, 22,   // TPKT
        17,             // COTP 头部长度
        224,            // 连接请求
        0, 0,           // 目标参考
        0, 46,          // 源参考
        0,              // 标志位
        193,            // 参数代码 (源 TASP)
        2,              // 参数长度
        tsapPair.Local.FirstByte, tsapPair.Local.SecondByte,   // 源 TASP
        194,            // 参数代码 (目标 TASP)
        2,              // 参数长度
        tsapPair.Remote.FirstByte, tsapPair.Remote.SecondByte, // 目标 TASP
        192,            // 参数代码 (TPDU 大小)
        1,              // 参数长度
        10              // TPDU 大小 (2^10 = 1024)
    };

    return bSend1;
}
- 1
- 2
- 3
- 4
- 5
- 6
- 7
- 8
- 9
- 10
- 11
- 12
- 13
- 14
- 15
- 16
- 17
- 18
- 19
- 20
- 21
- 22
- 23
- 24
- 25
- 26
- 27
- 28
- 29
- 30
- 31
- 32
- 33
- 34
- 35
- 36
- 37
- 38
- 39
- 40
1.3.3.2 S7连接协议
private async Task SetupConnection(Stream stream, CancellationToken cancellationToken)
{
    // 获取S7连接设置数据
    var setupData = GetS7ConnectionSetup();

    // 发送设置数据并等待响应
    var s7data = await NoLockRequestTsduAsync(stream, setupData, 0, setupData.Length, cancellationToken)
        .ConfigureAwait(false);

    // 检查响应数据是否足够
    if (s7data.Length < 2)
        throw new WrongNumberOfBytesException("响应中未收到足够的数据以进行通信设置");

    // 检查S7 Ack数据
    if (s7data[1] != 0x03)
        throw new InvalidDataException("读取通信设置响应时出现错误", s7data, 1, 0x03);

    if (s7data.Length < 20)
        throw new WrongNumberOfBytesException("响应中未收到足够的数据以进行通信设置");

    // TODO: 检查这是否应该是 UInt16。
    MaxPDUSize = s7data[18] * 256 + s7data[19];
}
// 发送固定的配置信息
private byte[] GetS7ConnectionSetup()
{
    // 构建S7连接设置数据
    return new byte[] {  3, 0, 0, 25, 2, 240, 128, 50, 1, 0, 0, 255, 255, 0, 8, 0, 0, 240, 0, 0, 3, 0, 3,
            3, 192 // 使用 960 PDU 大小
    };
}
- 1
- 2
- 3
- 4
- 5
- 6
- 7
- 8
- 9
- 10
- 11
- 12
- 13
- 14
- 15
- 16
- 17
- 18
- 19
- 20
- 21
- 22
- 23
- 24
- 25
- 26
- 27
- 28
- 29
- 30
- 31
- 32
- 33
1.3.4 同步读命令
1.3.4.1 读方法入口
/// <summary>
/// 读取并解码指定数量的 "VarType" 数据。
/// 可用于读取相同类型的多个连续变量(Word、DWord、Int 等)。
/// 如果读取不成功,请检查 LastErrorCode 或 LastErrorString。
/// </summary>
/// <param name="dataType">内存区域的数据类型,可以是 DB、Timer、Counter、Merker(Memory)、Input、Output。</param>
/// <param name="db">内存区域的地址(如果要读取 DB1,则设置为 1)。对于其他内存区域类型(计数器、定时器等),也必须设置此值。</param>
/// <param name="startByteAdr">起始字节地址。如果要读取 DB1.DBW200,则将此值设置为 200。</param>
/// <param name="varType">要读取的变量的类型</param>
/// <param name="bitAdr">位地址。如果要读取 DB1.DBX200.6,则将此参数设置为 6。</param>
/// <param name="varCount">要读取的变量数量</param>
/// <returns>读取到的数据,如果读取失败则返回 null。</returns>
public object? Read(DataType dataType, int db, int startByteAdr, VarType varType, int varCount, byte bitAdr = 0)
{
    int cntBytes = VarTypeToByteLength(varType, varCount);
    byte[] bytes = ReadBytes(dataType, db, startByteAdr, cntBytes);

    return ParseBytes(varType, bytes, varCount, bitAdr);
}
- 1
- 2
- 3
- 4
- 5
- 6
- 7
- 8
- 9
- 10
- 11
- 12
- 13
- 14
- 15
- 16
- 17
- 18
- 19
- 20
- 21
其中,VarTypeToByteLength用于计算需要读取的字节数
/// <summary>
/// 根据 S7 的 <see cref="VarType"/>(Bool、Word、DWord 等),返回需要读取的字节数。
/// </summary>
/// <param name="varType">变量类型</param>
/// <param name="varCount">变量数量</param>
/// <returns>变量的字节长度</returns>
internal static int VarTypeToByteLength(VarType varType, int varCount = 1)
{
    switch (varType)
    {
        case VarType.Bit:
            return (varCount + 7) / 8;
        case VarType.Byte:
            return (varCount < 1) ? 1 : varCount;
        case VarType.String:
            return varCount;
        case VarType.S7String:
            return ((varCount + 2) & 1) == 1 ? (varCount + 3) : (varCount + 2);
        case VarType.S7WString:
            return (varCount * 2) + 4;
        case VarType.Word:
        case VarType.Timer:
        case VarType.Int:
        case VarType.Counter:
        case VarType.Date:
            return varCount * 2;
        case VarType.DWord:
        case VarType.DInt:
        case VarType.Real:
        case VarType.Time:
            return varCount * 4;
        case VarType.LReal:
        case VarType.DateTime:
            return varCount * 8;
        case VarType.DateTimeLong:
            return varCount * 12;
        default:
            return 0;
    }
}
- 1
- 2
- 3
- 4
- 5
- 6
- 7
- 8
- 9
- 10
- 11
- 12
- 13
- 14
- 15
- 16
- 17
- 18
- 19
- 20
- 21
- 22
- 23
- 24
- 25
- 26
- 27
- 28
- 29
- 30
- 31
- 32
- 33
- 34
- 35
- 36
- 37
- 38
- 39
- 40
- 41
- 42
根据指定的 S7 变量类型和数量,返回需要读取的字节数。不同的变量类型占用不同的字节数,例如 Bit 类型可能只需要 1 个字节,而 Word 类型需要 2 个字节。这个方法用于帮助计算读取变量时需要的字节数。
1.3.4.2 组装读命令前的准备
/// <summary>
/// 从指定索引处的 DB 读取指定数量的字节。处理多于 200 字节的情况,使用多次请求。
/// 如果读取不成功,请检查 LastErrorCode 或 LastErrorString。
/// </summary>
/// <param name="dataType">内存区域的数据类型,可以是 DB、Timer、Counter、Merker(Memory)、Input、Output。</param>
/// <param name="db">内存区域的地址(如果要读取 DB1,则设置为 1)。对于其他内存区域类型(计数器、定时器等),也必须设置此值。</param>
/// <param name="startByteAdr">起始字节地址。如果要读取 DB1.DBW200,则将此值设置为 200。</param>
/// <param name="count">字节数量,如果要读取 120 字节,将此设置为 120。</param>
/// <returns>以数组形式返回字节数据</returns>
public byte[] ReadBytes(DataType dataType, int db, int startByteAdr, int count)
{
    var result = new byte[count];
    ReadBytes(result, dataType, db, startByteAdr);
    return result;
}

/// <summary>
/// 从指定索引处的 DB 读取指定数量的字节。处理多于 200 字节的情况,使用多次请求。
/// 如果读取不成功,请检查 LastErrorCode 或 LastErrorString。
/// </summary>
/// <param name="buffer">用于接收读取字节的缓冲区。<see cref="Span{T}.Length"/> 确定要读取的字节数。</param>
/// <param name="dataType">内存区域的数据类型,可以是 DB、Timer、Counter、Merker(Memory)、Input、Output。</param>
/// <param name="db">内存区域的地址(如果要读取 DB1,则设置为 1)。对于其他内存区域类型(计数器、定时器等),也必须设置此值。</param>
/// <param name="startByteAdr">起始字节地址。如果要读取 DB1.DBW200,则将此值设置为 200。</param>
/// </summary>
public void ReadBytes(Span<byte> buffer, DataType dataType, int db, int startByteAdr)
{
    int index = 0;
    while (buffer.Length > 0)
    {
        // 这适用于 SNAP7 上的 MaxPDUSize-1。但不适用于 MaxPDUSize-0。
        var maxToRead = Math.Min(buffer.Length, MaxPDUSize - 18);
        ReadBytesWithSingleRequest(dataType, db, startByteAdr + index, buffer.Slice(0, maxToRead));
        buffer = buffer.Slice(maxToRead);
        index += maxToRead;
    }
}

private void ReadBytesWithSingleRequest(DataType dataType, int db, int startByteAdr, Span<byte> buffer)
{
    try
    {
        // 首先创建标头
        const int packageSize = 19 + 12; // 19 头部 + 12 用于 1 个请求
        var dataToSend = new byte[packageSize];
        var package = new MemoryStream(dataToSend);
        WriteReadHeader(package);
        BuildReadDataRequestPackage(package, dataType, db, startByteAdr, buffer.Length);
        var s7data = RequestTsdu(dataToSend);
        AssertReadResponse(s7data, buffer.Length);
        s7data.AsSpan(18, buffer.Length).CopyTo(buffer);
    }
    catch (Exception exc)
    {
        throw new PlcException(ErrorCode.ReadData, exc);
    }
}
- 1
- 2
- 3
- 4
- 5
- 6
- 7
- 8
- 9
- 10
- 11
- 12
- 13
- 14
- 15
- 16
- 17
- 18
- 19
- 20
- 21
- 22
- 23
- 24
- 25
- 26
- 27
- 28
- 29
- 30
- 31
- 32
- 33
- 34
- 35
- 36
- 37
- 38
- 39
- 40
- 41
- 42
- 43
- 44
- 45
- 46
- 47
- 48
- 49
- 50
- 51
- 52
- 53
- 54
- 55
- 56
- 57
- 58
ReadBytesWithSingleRequest 方法,用于从 PLC 中进行单次数据读取请求。它执行以下步骤:
- 创建一个用于发送请求的数据包,包括所需的标头信息。+ 调用 WriteReadHeader 方法来添加请求的头部信息,以指定读取的数量和其他相关信息。+ 调用 BuildReadDataRequestPackage 方法来添加包含读取请求的详细信息,如内存类型、内存地址、起始字节地址以及要读取的字节数。+ 发送请求数据包到 PLC 并接收响应数据。+ 验证响应以确保读取成功,并将响应数据中的有效字节复制到提供的 buffer 中。+ 如果出现异常,捕获异常并将其抛出,带有适当的错误代码,以便在发生错误时能够进行适当的处理。
另外,关于var package = new MemoryStream(dataToSend);解读一下: MemoryStream是引用类型。 当创建一个 MemoryStream对象时,实际上创建了一个引用,这个引用指向内存中的某个位置,而不是直接存储数据的位置。 因此, package 和 dataToSend 引用相同的内存位置,在 package 中所做的任何更改都会反映在 dataToSend 中。
1.3.4.3 读命令头的组装
/// <summary>
/// 创建从 PLC 读取字节的标头。
/// </summary>
/// <param name="stream">要写入的流。</param>
/// <param name="amount">要读取的项目数量。</param>
private static void WriteReadHeader(System.IO.MemoryStream stream, int amount = 1)
{
    // 头部大小 19,每个项目 12 字节
    WriteTpktHeader(stream, 19 + 12 * amount);
    WriteDataHeader(stream);
    WriteS7Header(stream, 0x01, 2 + 12 * amount, 0);
    // 功能代码:读取请求
    stream.WriteByte(0x04);
    // 请求的数量
    stream.WriteByte((byte)amount);
}

private static void WriteTpktHeader(System.IO.MemoryStream stream, int length)
{
    stream.Write(new byte[] { 0x03, 0x00 });
    stream.Write(Word.ToByteArray((ushort) length));
}

private static void WriteDataHeader(System.IO.MemoryStream stream)
{
    stream.Write(new byte[] { 0x02, 0xf0, 0x80 });
}

private static void WriteS7Header(System.IO.MemoryStream stream, byte messageType, int parameterLength, int dataLength)
{
    stream.WriteByte(0x32); // S7 协议 ID
    stream.WriteByte(messageType); // 消息类型
    stream.Write(new byte[] { 0x00, 0x00 }); // 保留字段
    stream.Write(new byte[] { 0x00, 0x00 }); // PDU
    stream.Write(Word.ToByteArray((ushort) parameterLength));
    stream.Write(Word.ToByteArray((ushort) dataLength));
}
- 1
- 2
- 3
- 4
- 5
- 6
- 7
- 8
- 9
- 10
- 11
- 12
- 13
- 14
- 15
- 16
- 17
- 18
- 19
- 20
- 21
- 22
- 23
- 24
- 25
- 26
- 27
- 28
- 29
- 30
- 31
- 32
- 33
- 34
- 35
- 36
- 37
- 38
这段代码是用于创建不同协议层的头部数据,以便与 PLC 进行通信。它包括 TPKT 头、数据头和 S7 头。这些头部数据在与 PLC 通信时起着关键作用,确保数据的正确传输和解析。其中,WriteReadHeader 方法用于创建读取请求的头部数据,它包括了读取的数量和其他相关信息。
1.3.4.4 读命令字节包的组装
/// <summary>
/// 创建用于请求从 PLC 读取数据的字节包。您需要指定内存类型(dataType)、要读取的内存地址、字节的起始地址和字节数量。
/// </summary>
/// <param name="stream">要写入读取数据请求的流。</param>
/// <param name="dataType">内存类型(DB、Timer、Counter 等)</param>
/// <param name="db">要读取的内存地址</param>
/// <param name="startByteAdr">字节的起始地址</param>
/// <param name="count">要读取的字节数</param>
private static void BuildReadDataRequestPackage(System.IO.MemoryStream stream, DataType dataType, int db, int startByteAdr, int count = 1)
{
    // 单个数据请求 = 12 字节
    stream.Write(new byte[] { 0x12, 0x0a, 0x10 });
    switch (dataType)
    {
        case DataType.Timer:
        case DataType.Counter:
            stream.WriteByte((byte)dataType);
            break;
        default:
            stream.WriteByte(0x02);
            break;
    }

    stream.Write(Word.ToByteArray((ushort)(count)));
    stream.Write(Word.ToByteArray((ushort)(db)));
    stream.WriteByte((byte)dataType);
    var overflow = (int)(startByteAdr * 8 / 0xffffU); // 处理地址大于 8191 的字节
    stream.WriteByte((byte)overflow);
    switch (dataType)
    {
        case DataType.Timer:
        case DataType.Counter:
            stream.Write(Word.ToByteArray((ushort)(startByteAdr)));
            break;
        default:
            stream.Write(Word.ToByteArray((ushort)((startByteAdr) * 8)));
            break;
    }
}
- 1
- 2
- 3
- 4
- 5
- 6
- 7
- 8
- 9
- 10
- 11
- 12
- 13
- 14
- 15
- 16
- 17
- 18
- 19
- 20
- 21
- 22
- 23
- 24
- 25
- 26
- 27
- 28
- 29
- 30
- 31
- 32
- 33
- 34
- 35
- 36
- 37
- 38
- 39
- 40
- 41
这段代码用于创建用于请求从 PLC 读取数据的字节包。它需要指定内存类型(如 DB、Timer、Counter)、内存地址、字节的起始地址和要读取的字节数。创建的字节包将包含有关读取请求的详细信息,以便与 PLC 进行通信。 组装完成后,则进入RequestTsdu排队等待发送。
1.3.5 同步写命令
1.3.5.1 写方法入口
/// <summary>
/// 接受一个对象作为输入,尝试将其解析为值数组。这可以用于写入许多相同类型的数据。
/// 您必须指定内存区域类型、内存区域地址、字节起始地址和字节数。
/// 如果写入不成功,请检查 LastErrorCode 或 LastErrorString。
/// </summary>
/// <param name="dataType">内存区域的数据类型,可以是 DB、定时器、计数器、Merker(内存)、输入、输出等。</param>
/// <param name="db">内存区域的地址(如果要写入 DB1,应将其设置为 1)。对于其他内存区域类型(例如计数器、定时器等),也必须设置此参数。</param>
/// <param name="startByteAdr">起始字节地址。如果要写入 DB1.DBW200,则为 200。</param>
/// <param name="value">要写入的字节。此参数的长度不能大于 200。如果需要更多,请使用递归。</param>
/// <param name="bitAdr">位的地址(0-7)。</param>
/// </summary>
public void Write(DataType dataType, int db, int startByteAdr, object value, int bitAdr = -1)
{
    if (bitAdr != -1)
    {
        ...//位读取方法
    }
    else WriteBytes(dataType, db, startByteAdr, Serialization.SerializeValue(value));
}
- 1
- 2
- 3
- 4
- 5
- 6
- 7
- 8
- 9
- 10
- 11
- 12
- 13
- 14
- 15
- 16
- 17
- 18
- 19
- 20
这段代码的作用是根据传入的参数,向 PLC 写入数据。它根据数据类型、内存区域地址、字节起始地址、值以及位地址(如果有的话),采取不同的写入方式。如果要写入位数据,会检查值是否为布尔值或整数,并根据情况进行写入。如果不是位数据,会将值序列化后写入指定的内存区域。
1.3.5.2 组装写命令前的准备
/// <summary>
/// 从指定索引开始向 DB 中写入一定数量的字节。对于超过 200 字节的数据,将使用多个请求进行处理。
/// 如果写入不成功,请检查 LastErrorCode 或 LastErrorString。
/// </summary>
/// <param name="dataType">内存区域的数据类型,可以是 DB、定时器、计数器、Merker(内存)、输入、输出等。</param>
/// <param name="db">内存区域的地址(如果要写入 DB1,应将其设置为 1)。对于其他内存区域类型(例如计数器、定时器等),也必须设置此参数。</param>
/// <param name="startByteAdr">起始字节地址。如果要写入 DB1.DBW200,则为 200。</param>
/// <param name="value">要写入的字节。如果超过 200 字节,将进行多个请求。</param>
/// </summary>
public void WriteBytes(DataType dataType, int db, int startByteAdr, byte[] value)
{
    WriteBytes(dataType, db, startByteAdr, value.AsSpan());
}
- 1
- 2
- 3
- 4
- 5
- 6
- 7
- 8
- 9
- 10
- 11
- 12
- 13
- 14
- 15
/// <summary>
/// 从指定索引开始向 DB 中写入一定数量的字节。对于超过 200 字节的数据,将使用多个请求进行处理。
/// 如果写入不成功,请检查 LastErrorCode 或 LastErrorString。
/// </summary>
/// <param name="dataType">内存区域的数据类型,可以是 DB、定时器、计数器、Merker(内存)、输入、输出等。</param>
/// <param name="db">内存区域的地址(如果要写入 DB1,应将其设置为 1)。对于其他内存区域类型(例如计数器、定时器等),也必须设置此参数。</param>
/// <param name="startByteAdr">起始字节地址。如果要写入 DB1.DBW200,则为 200。</param>
/// <param name="value">要写入的字节。如果超过 200 字节,将进行多个请求。</param>
/// </summary>
public void WriteBytes(DataType dataType, int db, int startByteAdr, ReadOnlySpan<byte> value)
{
    int localIndex = 0;
    while (value.Length > 0)
    {
        //TODO: 弄清楚如何在这里使用 MaxPDUSize
        //Snap7 似乎对 PDU 大小超过 256 有问题,即使在连接设置中 Snap7 回复了更大的 PDU 大小。
        var maxToWrite = Math.Min(value.Length, MaxPDUSize - 28); // TODO 仅在 MaxPDUSize 为 480 时测试过
        WriteBytesWithASingleRequest(dataType, db, startByteAdr + localIndex, value.Slice(0, maxToWrite));
        value = value.Slice(maxToWrite);
        localIndex += maxToWrite;
    }
}
- 1
- 2
- 3
- 4
- 5
- 6
- 7
- 8
- 9
- 10
- 11
- 12
- 13
- 14
- 15
- 16
- 17
- 18
- 19
- 20
- 21
- 22
- 23
- 24
/// <summary>
/// 使用单个请求写入数据到 PLC,处理指定内存区域地址中的字节数据。
/// 如果写入不成功,请检查 LastErrorCode 或 LastErrorString。
/// </summary>
/// <param name="dataType">内存区域的数据类型,可以是 DB、定时器、计数器、Merker(内存)、输入、输出等。</param>
/// <param name="db">内存区域的地址(如果要写入 DB1,应将其设置为 1)。对于其他内存区域类型(例如计数器、定时器等),也必须设置此参数。</param>
/// <param name="startByteAdr">起始字节地址。如果要写入 DB1.DBW200,则为 200。</param>
/// <param name="value">要写入的字节数据</param>
/// </summary>
private void WriteBytesWithASingleRequest(DataType dataType, int db, int startByteAdr, ReadOnlySpan<byte> value)
{
    try
    {
        var dataToSend = BuildWriteBytesPackage(dataType, db, startByteAdr, value);
        var s7data = RequestTsdu(dataToSend);

        ValidateResponseCode((ReadWriteErrorCode)s7data[14]);
    }
    catch (Exception exc)
    {
        throw new PlcException(ErrorCode.WriteData, exc);
    }
}
- 1
- 2
- 3
- 4
- 5
- 6
- 7
- 8
- 9
- 10
- 11
- 12
- 13
- 14
- 15
- 16
- 17
- 18
- 19
- 20
- 21
- 22
- 23
- 24
- 25
1.3.5.3 写命令头和字节包的组装
/// <summary>
/// 创建用于写入字节数据到 PLC 的字节数据包。必须指定数据类型(dataType)、内存区域地址(db)、起始字节地址(startByteAdr)和要写入的字节数据(value)。
/// </summary>
/// <param name="dataType">内存区域的数据类型,可以是 DB、定时器、计数器、Merker(内存)、输入、输出等。</param>
/// <param name="db">内存区域的地址(如果要写入 DB1,应将其设置为 1)。对于其他内存区域类型(例如计数器、定时器等),也必须设置此参数。</param>
/// <param name="startByteAdr">起始字节地址。如果要写入 DB1.DBW200,则为 200。</param>
/// <param name="value">要写入的字节数据</param>
/// </summary>
/// <returns>用于写入字节数据的字节数组</returns>
private byte[] BuildWriteBytesPackage(DataType dataType, int db, int startByteAdr, ReadOnlySpan<byte> value)
{
    int varCount = value.Length;
    // 首先创建标头
    int packageSize = 35 + varCount;
    var packageData = new byte[packageSize];
    var package = new MemoryStream(packageData);

    package.WriteByte(3);
    package.WriteByte(0);
    // 完整的包大小
    package.Write(Int.ToByteArray((short)packageSize));
    // 此重载不分配字节数组,它引用程序集的静态数据段
    package.Write(new byte[] { 2, 0xf0, 0x80, 0x32, 1, 0, 0 });
    package.Write(Word.ToByteArray((ushort)(varCount - 1)));
    package.Write(new byte[] { 0, 0x0e });
    package.Write(Word.ToByteArray((ushort)(varCount + 4)));
    package.Write(new byte[] { 0x05, 0x01, 0x12, 0x0a, 0x10, 0x02 });
    package.Write(Word.ToByteArray((ushort)varCount));
    package.Write(Word.ToByteArray((ushort)(db)));
    package.WriteByte((byte)dataType);
    var overflow = (int)(startByteAdr * 8 / 0xffffU); // 处理地址大于 8191 的字
    package.WriteByte((byte)overflow);
    package.Write(Word.ToByteArray((ushort)(startByteAdr * 8)));
    package.Write(new byte[] { 0, 4 });
    package.Write(Word.ToByteArray((ushort)(varCount * 8)));

    // 现在将标头和数据合并
    package.Write(value);

    return packageData;
}
- 1
- 2
- 3
- 4
- 5
- 6
- 7
- 8
- 9
- 10
- 11
- 12
- 13
- 14
- 15
- 16
- 17
- 18
- 19
- 20
- 21
- 22
- 23
- 24
- 25
- 26
- 27
- 28
- 29
- 30
- 31
- 32
- 33
- 34
- 35
- 36
- 37
- 38
- 39
- 40
- 41
- 42
- 43
这段代码的作用是创建用于写入字节数据到 PLC 的字节数据包。 它根据指定的数据类型、内存区域地址、起始字节地址和字节数据构建了一个完整的数据包。然后将数据包和字节数据合并为一个字节数组,以进行写入操作。 组装完成后,则进入RequestTsdu排队等待发送。
二、数据准备
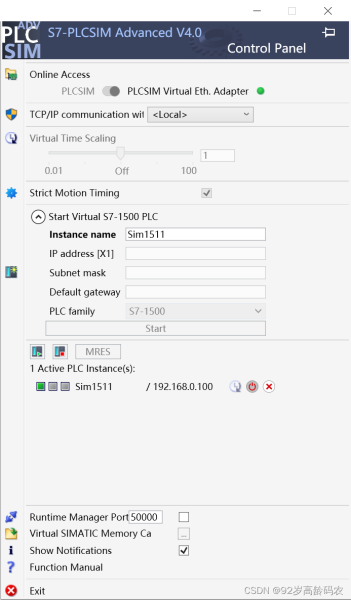
启动西门子PLC仿真器。
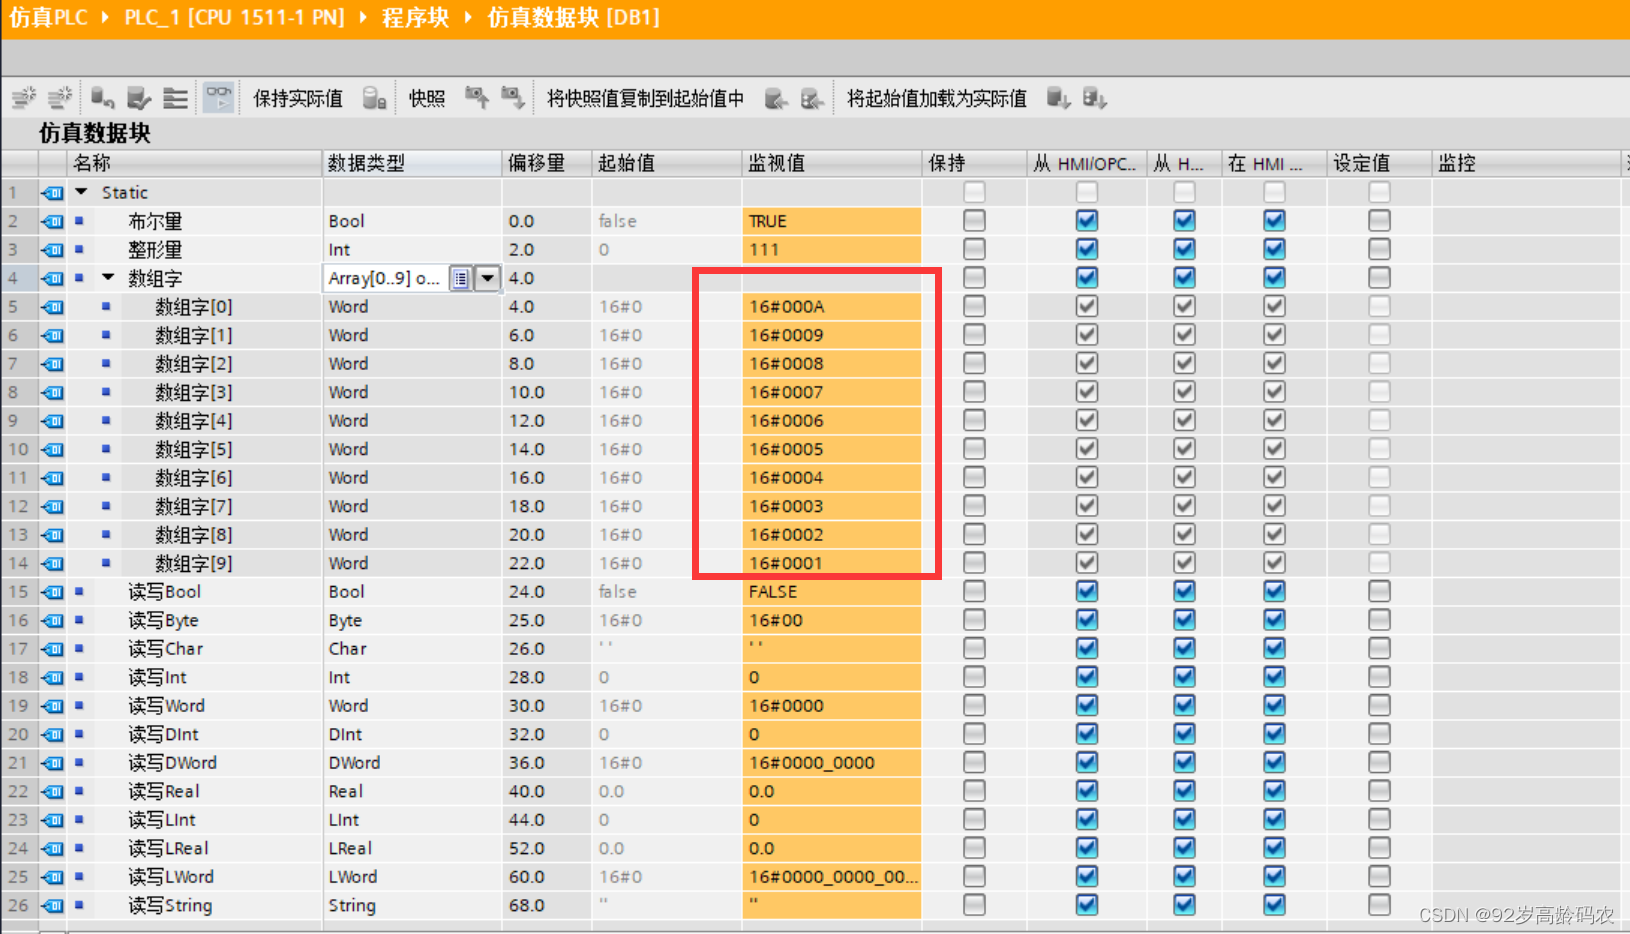
给PLC写入测试数据,例如在熟手快速入门中,对Word数组修改从10到1的值。
三、C#使用Socket 读取PLC数据
3.1 分析
- 首先是机架号rack 、槽号slot。 在TASP中,S71500为
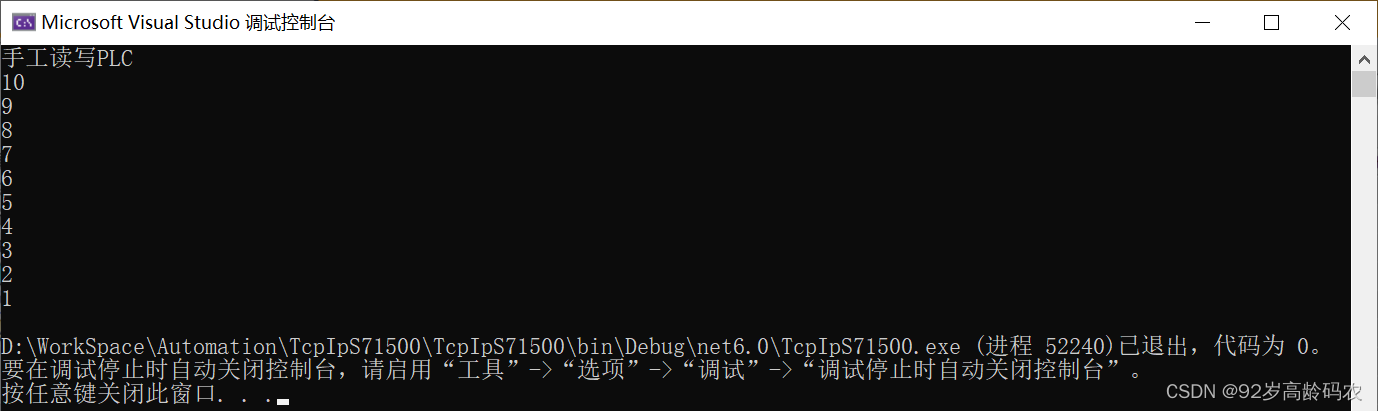
TsapPair(new Tsap(0x01, 0x00), new Tsap(0x03, (byte) ((rack << 5) | slot)))分别对应Source TASP和Destination TASP。 + 其次,交互地址为:DB1.DBW4。读写长度为2 × \times × 10 = 20个字节。 因此,读取的字节数:20;请求点数:10;地址:4(需要改为大端存储)。 + 此外,还需要注意的是,从Send到Receive中间需要有个时间间隔,等待PLC完全发送过来。然而时间间隔难以估计,我们就改用读取到指定长度expectedDataSize就退出while循环。
3.2 源码
using System.Net.Sockets;

namespace TcpIpS71500
{
    internal class Program
    {
        static void Main(string[] args)
        {
            Console.WriteLine("手工读写PLC");

            // 创建套接字并连接到远程设备
            Socket socket = new Socket(AddressFamily.InterNetwork, SocketType.Stream, ProtocolType.Tcp);
            socket.Connect("192.168.0.100", 102);

            // 发送连接请求参数
            byte[] connectionRequestData = {
                    3, 0, 0, 22, //TPKT
                    17,          //COTP Header Length
                    224,         //Connect Request
                    0, 0,        //Destination Reference
                    0, 46,       //Source Reference
                    0,           //Flags
                    193,         //Parameter Code (src-tasp)
                    2,           //Parameter Length
                    1, 0,        //Source TASP
                    194,         //Parameter Code (dst-tasp)
                    2,           //Parameter Length
                    3, 1,        //Destination
                    192,         //Parameter Code (tpdu-size)
                    1,           //Parameter Length
                    10           //TPDU Size (2^10 = 1024)
                };

            socket.Send(connectionRequestData);

            // 接收连接响应
            byte[] connectionResponseData = new byte[22];
            socket.Receive(connectionResponseData);

            // 发送连接设置请求参数
            byte[] connectionSetupData = {
                3, 0, 0, 25, 2, 240, 128, 50, 1, 0, 0, 255, 255, 0, 8, 0, 0, 240, 0, 0, 3, 0, 3,
                3, 192 // 使用960字节的PDU大小
            };
            socket.Send(connectionSetupData);

            // 接收连接设置响应
            // 如果这里不接收,数据还会留在socket缓冲区,导致下次读取时一并传回
            byte[] connectionSetupResponseData = new byte[22];
            socket.Receive(connectionSetupResponseData);

            // 读取PLC中的数据
            // 地址为DB1.DBW4
            byte[] readDataRequest = {
                // TPKT Header
                0x03, 0x00,
                0x00, 0x1f,
                // COTP Header
                0x02, 0xf0, 0x80,
                // S7 Header
                0x32,
                0x01,
                0x00, 0x00,
                0x00, 0x00,
                // 参数部分
                0x00, 0x0e,
                0x00, 0x00,
                // S7参数
                0x04, // 读取功能码
                0x01, // Item分组
                0x12, 0x0a, 0x10,
                0x04, // 数据类型
                0x00, 0x0a, // 请求点数 - 10个
                0x00, 0x01, // DB块编号
                0x84, // DB块
                // 地址(以3个字节表示)
                BitConverter.GetBytes((int)(4 << 3))[2],
                BitConverter.GetBytes((int)(4 << 3))[1],
                BitConverter.GetBytes((int)(4 << 3))[0],
            };
            socket.Send(readDataRequest);

            // 设置预期的数据大小和缓冲区
            int expectedDataSize = 50; // 期望接收的数据大小
            byte[] receivedData = new byte[expectedDataSize];

            int totalReceived = 0; // 已接收的数据大小
            int timeout = 10000; // 超时时间,以毫秒为单位(这里设置为10秒)

            socket.Send(readDataRequest);

            DateTime startTime = DateTime.Now;
            while (totalReceived < expectedDataSize)
            {
                if ((DateTime.Now - startTime).TotalMilliseconds > timeout)
                {
                    // 处理超时,可以抛出异常或执行其他操作
                    Console.WriteLine("接收超时");
                    break;
                }

                int received = socket.Receive(receivedData, totalReceived, expectedDataSize - totalReceived, SocketFlags.None);
                if (received == 0)
                {
                    // 连接已关闭,可以抛出异常或执行其他操作
                    Console.WriteLine("连接已关闭");
                    break;
                }

                totalReceived += received;
            }

            // 提取20个字节的数据
            byte[] extractedBytes = new byte[20];

            // 检查是否有足够的元素可供读取
            if (receivedData.Length >= 30 + 20)
            {
                Array.Copy(receivedData, 30, extractedBytes, 0, 20);

                // 将每两个字节组合为ushort数组
                ushort[] ushortArray = new ushort[extractedBytes.Length / 2];
                for (int i = 0; i < ushortArray.Length; i++)
                {
                    ushortArray[i] = BitConverter.ToUInt16(new byte[] { extractedBytes[2 * i + 1], extractedBytes[2 * i] });
                }

                // 遍历输出到控制台
                foreach (ushort value in ushortArray)
                {
                    Console.WriteLine(value);
                }
            }
            else
            {
                // 处理数组长度不足的情况
                Console.WriteLine("数组长度不足,无法提取20个字节。");
            }

            // 翻转后重新写入PLC
            byte[] reversedBytes = new byte[20];

            for (int i = 0; i < extractedBytes.Length; i += 2)
            {
                reversedBytes[i] = extractedBytes[extractedBytes.Length - i - 2];
                reversedBytes[i + 1] = extractedBytes[extractedBytes.Length - i - 1];
            }
            // 写入PLC中的数据
            // 地址为DB1.DBW4
            byte[] writePrepare = {
                0x03, 0x00,
                0x00, 0x37,   //包长度 = 35 + reversedBytes.Length
                2, 0xf0, 0x80, 0x32, 1, 0, 0,
                0x00, 0x13,   //(ushort)(reversedBytes.Length - 1)
                0x00, 0x0e,
                0x00, 0x18,   //(ushort)(reversedBytes.Length + 4)
                0x05, 0x01, 0x12, 0x0a, 0x10, 0x02,
                0x00, 0x14,   // 请求点数 - 20个Bytes
                0x00, 0x01,   // DB块编号
                0x84,         // DB块
                // 地址(以3个字节表示)
                BitConverter.GetBytes((int)(4 << 3))[2],
                BitConverter.GetBytes((int)(4 << 3))[1],
                BitConverter.GetBytes((int)(4 << 3))[0],
                0, 4,
                0x00, 0xA0
                // value
            };
            byte[] writeDataRequest = writePrepare.Concat(reversedBytes).ToArray();
            socket.Send(writeDataRequest);
            // 接收连接响应
            byte[] writeResponseData = new byte[240];
            socket.Receive(writeResponseData);

            socket.Close();
        }
    }
}
- 1
- 2
- 3
- 4
- 5
- 6
- 7
- 8
- 9
- 10
- 11
- 12
- 13
- 14
- 15
- 16
- 17
- 18
- 19
- 20
- 21
- 22
- 23
- 24
- 25
- 26
- 27
- 28
- 29
- 30
- 31
- 32
- 33
- 34
- 35
- 36
- 37
- 38
- 39
- 40
- 41
- 42
- 43
- 44
- 45
- 46
- 47
- 48
- 49
- 50
- 51
- 52
- 53
- 54
- 55
- 56
- 57
- 58
- 59
- 60
- 61
- 62
- 63
- 64
- 65
- 66
- 67
- 68
- 69
- 70
- 71
- 72
- 73
- 74
- 75
- 76
- 77
- 78
- 79
- 80
- 81
- 82
- 83
- 84
- 85
- 86
- 87
- 88
- 89
- 90
- 91
- 92
- 93
- 94
- 95
- 96
- 97
- 98
- 99
- 100
- 101
- 102
- 103
- 104
- 105
- 106
- 107
- 108
- 109
- 110
- 111
- 112
- 113
- 114
- 115
- 116
- 117
- 118
- 119
- 120
- 121
- 122
- 123
- 124
- 125
- 126
- 127
- 128
- 129
- 130
- 131
- 132
- 133
- 134
- 135
- 136
- 137
- 138
- 139
- 140
- 141
- 142
- 143
- 144
- 145
- 146
- 147
- 148
- 149
- 150
- 151
- 152
- 153
- 154
- 155
- 156
- 157
- 158
- 159
- 160
- 161
- 162
- 163
- 164
- 165
- 166
- 167
- 168
- 169
- 170
- 171
- 172
- 173
- 174
- 175
- 176
- 177
- 178
- 179
- 180
- 181
3.2 运行效果

总结
本篇文章算是《C#与西门子PLC通讯》的番外篇,扒开了S7 Net Plus的神秘外衣,一探底层逻辑,了解了PLC的交互行为和通讯原理。 未来如果想要在一门新出的开发语言中加入相应的通讯库,那么这段篇博文就可以作为参考蓝本。当然,如果技术能力更高,还可以手写一个高并发的轻量级的通讯库。
欢迎交流。
文章来源: https://lukailin.blog.csdn.net/article/details/134088262
版权声明: 本文为博主原创文章,遵循CC 4.0 BY-SA 知识共享协议,转载请附上原文出处链接和本声明。

