
热门标签
热门文章
- 1Vue实现“显示更多”功能--仿简书_vue展示更多
- 2数据驱动,领“杭”未来!2021 CCF大数据与计算智能大赛圆满落幕!
- 3MFC实现Edit输入限制(只允许输入数字,小数点)_mfc中,怎么设置edit只能输入数字和小数点
- 4Python在线和离线安装第三方库_linux xlwings 离线安装
- 5目标检测YOLO系列------YOLO简介_无人机目标检测为什么采用yolo
- 6立体旋转(滚动圆环)_网页 、立体圆形滚动效果
- 7提示语 小程序无图标提示语_微信小程序缺少提示
- 8腾讯云游戏服务器配置有哪些?
- 9RT-Thread线程创建和切换分析_rtthread线程切换
- 10为什么开源大模型终将胜出?_使用claude,win10不支持了
当前位置: article > 正文
TS+Axios的封装(vue3.x环境)_vue3+ts封装axios
作者:代码维护者 | 2024-02-03 15:15:19
赞
踩
vue3+ts封装axios
1. 创建axios实例
- # 项目src下新建utils/request.ts
- # npm i axios 是必须滴
- import axios from 'axios'
-
- const baseURL = 'https://ilovesh.com' // 基地址
- const instance = axios.create({
- baseURL,
- timeout: 3000 // 请求超时时间 (3秒超时)
- })
-
- export { baseURL, instance }
2. 添加拦截器
- // 添加请求拦截器
- instance.interceptors.request.use(
- function (config) {
- // 在发送请求之前做些什么
- return config
- },
- function (error) {
- // 对请求错误做些什么
- return Promise.reject(error)
- }
- )
-
- // 添加响应拦截器
- instance.interceptors.response.use(
- function (response) {
- // 2xx 范围内的状态码都会触发该函数。
- // 对响应数据做点什么
- return response
- },
- function (error) {
- // 超出 2xx 范围的状态码都会触发该函数。
- // 对响应错误做点什么
- return Promise.reject(error)
- }
- )
3. 剥离数据
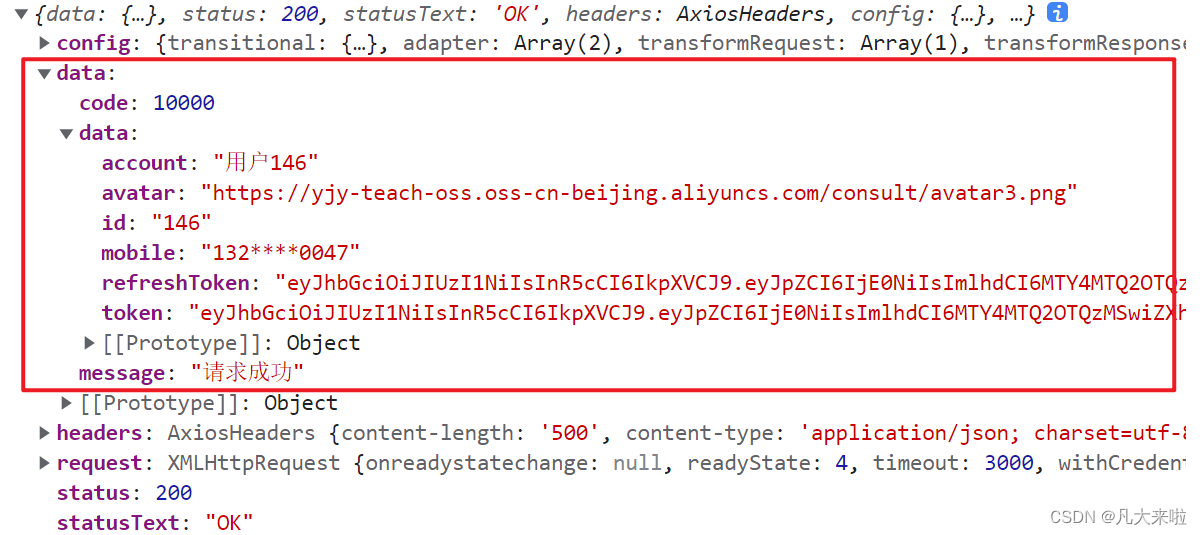
- // 把上图圈出的数据剥离出来
- // 修改响应拦截器的return值
- ...
- function (response) {
- // 2xx 范围内的状态码都会触发该函数。
- // 对响应数据做点什么
- return response.data
- }
- ...
-
4. 请求头携带Token
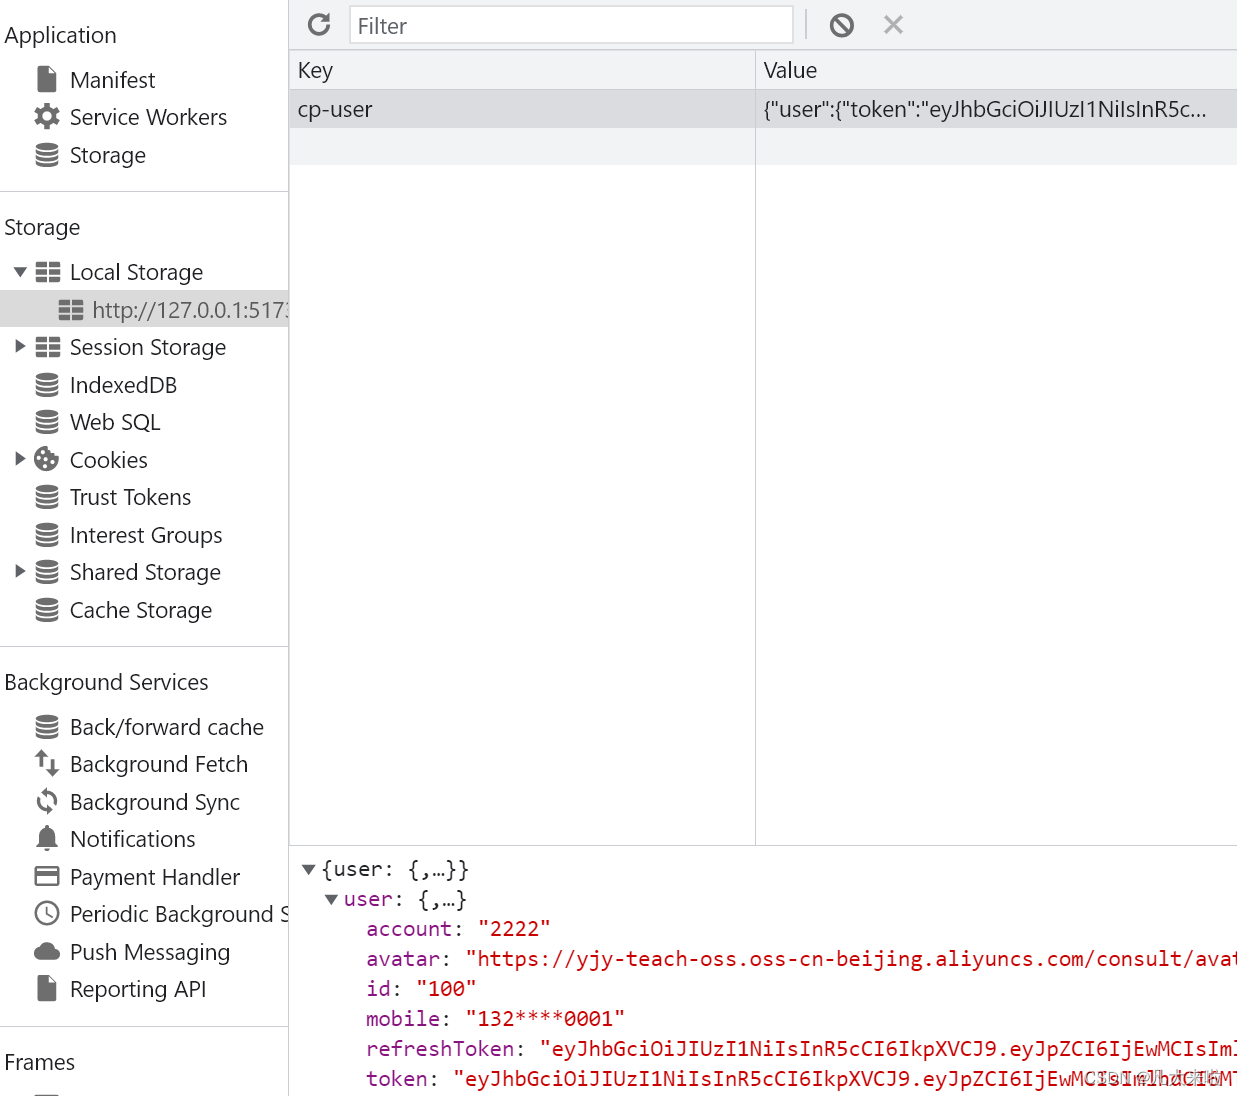
笔者首先在 App.vue 里写了个测试用例,先拿到Token:
- import { instance } from '@/utils/request'
- import { useUserStore } from '@/stores'
-
- // pinia仓库
- const userStore = useUserStore()
-
- instance
- .post('/login/password', {
- mobile: '13230000001',
- password: 'abc12345'
- })
- .then((res) => {
- // 调用仓库里的自定义存储方法 (现在仓库里有Token了)
- userStore.updateUser(res.data)
- })
接下来修改axios实例的请求拦截器(在请求头里携带Token):
- instance.interceptors.request.use(
- function (config) {
- // 在发送请求之前做些什么
- // 获取Pinia仓库
- const userStore = useUserStore()
- const token = userStore.user?.token
- if (token) {
- config.headers.Authorization = `Bearer ${token}`
- }
- return config
- },
- function (error) {
- // 对请求错误做些什么
- return Promise.reject(error)
- }
- )
配置完成后,最好能找个需要Token才能访问的接口测试一下!
5. 业务状态码出错的处理
这里指的是响应是成功的(2xx 范围内的状态码),业务是失败的。笔者这里的业务逻辑成功与否根据code区分,code = 10000 成功,code !== 10000 失败

修改axios实例的响应拦截器:
- // 添加响应拦截器
- instance.interceptors.response.use(
- function (response) {
- // 2xx 范围内的状态码都会触发该函数
- // 对响应数据做点什么
- const { code, message } = response.data
- if (code !== 10000) return Toast(message) // 这里使用vant库的轻提示组件
- return response.data
- },
- function (error) {
- // 超出 2xx 范围的状态码都会触发该函数。
- // 对响应错误做点什么
- return Promise.reject(error)
- }
- )
6. 响应状态码401报错的处理
状态码 401 Unauthorized 代表客户端错误,指的是由于缺乏目标资源要求的身份验证凭证,发送的请求未得到满足。说人话就是“Token失效/出错”!
为了尽可能追求完美,这里的逻辑比较复杂:
① Token失效,使用路由转回登录页
② 假设在 abc 页面访问,这里发现 Token 失效了,我们使用路由转回了登录页;
重新登录成功后,体验好的app会让我回到本来访问的abc页面,并且携带可能的路径参数;
③ 实现方式:把原本的页面路径&参数全部给到query带上,重新登录成功就能完美转回了;
如何获取原本页面的路径&参数?使用 router.currentRoute.value.fullpath
- // 响应拦截器失败的函数内修改
- function (error: AxiosError) {
- // 超出 2xx 范围的状态码都会触发该函数
- // 对响应错误做点什么
- if (error.response?.status === 401) {
- // Pinia里删除用户信息
- const userStore = useUserStore()
- userStore.delUser()
- // 跳转登录,带上接口失效所在页面的地址,登录完成后回跳使用
- router.push({
- path: '/login',
- query: { redirectURL: router.currentRoute.value.fullPath }
- })
- }
- return Promise.reject(error)
- }
7. 封装请求函数&配泛型
- # 使用axios实例的伪代码
- instance({
- method: '',
- url: '',
- params / data (get请求的时候是params,get请求以外的是data)
- })
-
- # 希望封装一个函数,它的使用是 request<泛型>(url, method, 可能有/可能无的接口请求参数)
雏形大概长这样:
- import axios, { AxiosError, type Method } from 'axios'
-
- // 请求工具函数
- const request = (url: string, method: Method = 'get', requestParams?: object) => {
- return instance.request({
- url,
- method,
- [method.toLowerCase() === 'get' ? 'params' : 'data']: requestParams
- })
- }
-
- // 按需导出
- export { baseURL, instance, request }
加上泛型的最终版:
- // 这个需要替换 axios.request 默认的响应成功后的结果类型
- // 之前是:传 { name: string } 然后res是 res = { data: { name: string } }
- // 但现在:在响应拦截器中返回了 res.data 也就是将来响应成功后的结果,和上面的类型一致吗?
- // 所以要:request<数据类型,数据类型>() 这样才指定了 res.data 的类型
- // 但是呢:后台返回的数据结构相同,所以可以抽取相同的类型
- import axios, { AxiosError, type Method } from 'axios'
- type Data<T> = {
- // 内容根据接口返回的规则做修改
- code: number
- message: string
- data: T
- }
- // 请求工具函数
- const request = <T>(url: string, method: Method = 'get', requestParams?: object) => {
- return instance.request<T, Data<T>>({
- url,
- method,
- [method.toLowerCase() === 'get' ? 'params' : 'data']: requestParams
- })
- }
-
- // 按需导出
- export { baseURL, instance, request }
使用范例:
- import { request } from '@/utils/request'
- import type { User } from '@/types/user'
-
- request<User>('/login/password', 'post', {
- mobile: '13230000001',
- password: 'abc12345'
- }).then((res) => {
- // 调用仓库里的自定义存储方法
- userStore.updateUser(res.data)
- })
End-------------------
声明:本文内容由网友自发贡献,不代表【wpsshop博客】立场,版权归原作者所有,本站不承担相应法律责任。如您发现有侵权的内容,请联系我们。转载请注明出处:https://www.wpsshop.cn/article/detail/57133?site
推荐阅读


相关标签

