
热门标签
热门文章
- 1matlab 频域滤波增强,Matlab数字图像处理学习(3)- 频域滤波
- 2AIGC | Embeddings解析之word2vec训练过程演示
- 3Django之菜单排序、路径导航、访问子菜单时二级菜单默认展开、权限精确到按钮级别_django中二级菜单查询
- 4ChatGPT在科研论文的应用:提问命令汇总_chatgpt论文指令
- 5jtag接口_USB接口—Xilinx—JTAG烧写器(电路图、PCB片段、烧写器配置固件)设计方案...
- 6Unity3D开发学习_unity3d系统开发
- 7unity3d 移动平台性能优化专题(12):面板的colider问题和rigibody设置_unity 大量collider的性能问题
- 8【公有云】通过AWS Endpoints从内网访问S3
- 9MATLAB图像的频域低通滤波(灰度图像滤波+彩色图像滤波)_灰度图像带通滤波 matlab
- 10python--集合set_s1={1,2,3},s2=set
当前位置: article > 正文
Spring Boot整合Zookeeper详细教程_springboot zookeeper
作者:算法研究专家 | 2024-02-01 14:09:04
赞
踩
springboot zookeeper
注意我这里用的是官方最稳定的版本3.7.1,版本之间有个别命令是有差距的!
本篇文章的示例SpringBoot和Zookeeper客户端以及zookeeper都是最新版本!
1.Curator介绍
Curator是Netflix公司开源的⼀套zookeeper客户端框架,Curator是对Zookeeper⽀持最好的客户端框架。Curator封装了⼤部分Zookeeper的功能,⽐如Leader选举、分布式锁等,减少了技术⼈员在使⽤Zookeeper时的底层细节开发⼯作。
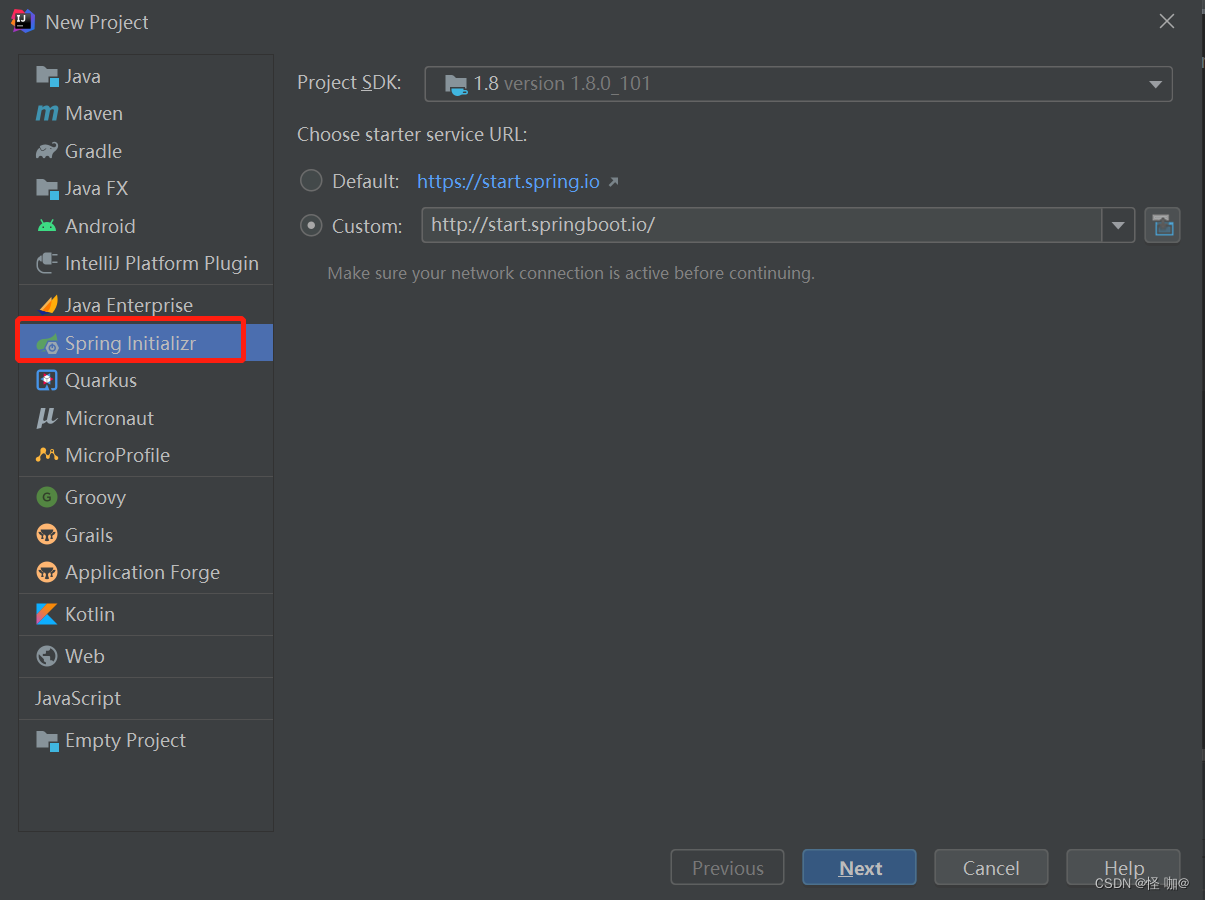
2.创建springboot项目
3.引⼊Curator
<?xml version="1.0" encoding="UTF-8"?>
<project xmlns="http://maven.apache.org/POM/4.0.0" xmlns:xsi="http://www.w3.org/2001/XMLSchema-instance"
         xsi:schemaLocation="http://maven.apache.org/POM/4.0.0 https://maven.apache.org/xsd/maven-4.0.0.xsd">
	<modelVersion>4.0.0</modelVersion>
	<parent>
		<groupId>org.springframework.boot</groupId>
		<artifactId>spring-boot-starter-parent</artifactId>
		<version>2.7.0</version>
		<relativePath/>
	</parent>
	<groupId>com.gzl.cn</groupId>
	<artifactId>spring-boot-curator-zk</artifactId>
	<version>0.0.1-SNAPSHOT</version>
	<name>spring-boot-curator-zk</name>
	<description>Demo project for Spring Boot</description>
	<properties>
		<java.version>1.8</java.version>
	</properties>
	<dependencies>
		<dependency>
			<groupId>org.springframework.boot</groupId>
			<artifactId>spring-boot-starter-web</artifactId>
		</dependency>

		<dependency>
			<groupId>org.springframework.boot</groupId>
			<artifactId>spring-boot-starter-test</artifactId>
			<scope>test</scope>
		</dependency>

        <!--Curator-->
		<dependency>
			<groupId>org.apache.curator</groupId>
			<artifactId>curator-framework</artifactId>
			<version>5.2.1</version>
		</dependency>
		 <dependency>
			<groupId>org.apache.curator</groupId>
			<artifactId>curator-recipes</artifactId>
			<version>5.2.1</version>
		</dependency>
        <!--Zookeeper-->
        <dependency>
			<groupId>org.apache.zookeeper</groupId>
			<artifactId>zookeeper</artifactId>
			<version>3.8.0</version>
		</dependency>

		<dependency>
			<groupId>org.projectlombok</groupId>
			<artifactId>lombok</artifactId>
			<version>1.18.22</version>
			<scope>provided</scope>
		</dependency>

		<!--解决Spring Boot Configuration Annotation Processor not configured提示问题-->
		<dependency>
			 <groupId>org.springframework.boot</groupId>
			 <artifactId>spring-boot-configuration-processor</artifactId>
			 <optional>true</optional>
		</dependency>

		<dependency>
			<groupId>junit</groupId>
			<artifactId>junit</artifactId>
			<scope>4.12</scope>
		</dependency>
	</dependencies>

	<build>
		<plugins>
			<plugin>
				<groupId>org.apache.maven.plugins</groupId>
				<artifactId>maven-resources-plugin</artifactId>
				<version>3.1.0</version>
			</plugin>
			<plugin>
				<groupId>org.springframework.boot</groupId>
				<artifactId>spring-boot-maven-plugin</artifactId>
			</plugin>
		</plugins>
	</build>

</project>
- 1
- 2
- 3
- 4
- 5
- 6
- 7
- 8
- 9
- 10
- 11
- 12
- 13
- 14
- 15
- 16
- 17
- 18
- 19
- 20
- 21
- 22
- 23
- 24
- 25
- 26
- 27
- 28
- 29
- 30
- 31
- 32
- 33
- 34
- 35
- 36
- 37
- 38
- 39
- 40
- 41
- 42
- 43
- 44
- 45
- 46
- 47
- 48
- 49
- 50
- 51
- 52
- 53
- 54
- 55
- 56
- 57
- 58
- 59
- 60
- 61
- 62
- 63
- 64
- 65
- 66
- 67
- 68
- 69
- 70
- 71
- 72
- 73
- 74
- 75
- 76
- 77
- 78
- 79
- 80
- 81
- 82
- 83
- 84
- 85
4.application.yml配置⽂件
application.yml和application.properties是都可以的,只不过他们的格式不一样。
curator:
  #重试retryCount次,当会话超时出现后,curator会每间隔elapsedTimeMs毫秒时间重试一次,共重试retryCount次。
  retryCount: 5
  elapsedTimeMs: 5000
  #服务器信息
  connectString: 127.0.0.1:2181
  #会话超时时间设置
  sessionTimeoutMs: 60000
  #连接超时时间
  connectionTimeoutMs: 5000
- 1
- 2
- 3
- 4
- 5
- 6
- 7
- 8
- 9
- 10
5.读取配置⽂件注入到容器
import lombok.Data;
import org.springframework.boot.context.properties.ConfigurationProperties;
import org.springframework.stereotype.Component;

@Data
@Component
@ConfigurationProperties(prefix = "curator")
public class WrapperZK {
    private int retryCount;
    private int elapsedTimeMs;
    private String connectString;
    private int sessionTimeoutMs;
    private int connectionTimeoutMs;
}
- 1
- 2
- 3
- 4
- 5
- 6
- 7
- 8
- 9
- 10
- 11
- 12
- 13
- 14
6.注⼊CuratorFramework
import org.apache.curator.framework.CuratorFramework;
import org.apache.curator.framework.CuratorFrameworkFactory;
import org.apache.curator.retry.RetryNTimes;
import org.springframework.beans.factory.annotation.Autowired;
import org.springframework.context.annotation.Bean;
import org.springframework.context.annotation.Configuration;

@Configuration
public class CuratorConfig {
    @Autowired
    WrapperZK wrapperZk;

    /**
     * 这里的start就是创建完对象放到容器后,需要调用他的start方法
     *
     * @return
     */
    @Bean(initMethod = "start")
    public CuratorFramework curatorFramework() {
        return CuratorFrameworkFactory.newClient(
                wrapperZk.getConnectString(),
                wrapperZk.getSessionTimeoutMs(),
                wrapperZk.getConnectionTimeoutMs(),
                new RetryNTimes(wrapperZk.getRetryCount(), wrapperZk.getElapsedTimeMs()));
    }
}
- 1
- 2
- 3
- 4
- 5
- 6
- 7
- 8
- 9
- 10
- 11
- 12
- 13
- 14
- 15
- 16
- 17
- 18
- 19
- 20
- 21
- 22
- 23
- 24
- 25
- 26
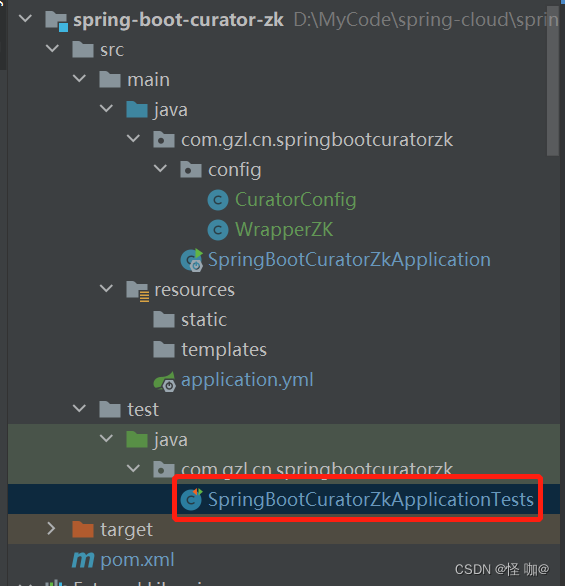
7.添加测试方法
在这里添加测试方法即可!
import org.apache.curator.framework.CuratorFramework;
import org.apache.zookeeper.CreateMode;
import org.junit.jupiter.api.Test;
import org.junit.runner.RunWith;
import org.springframework.beans.factory.annotation.Autowired;
import org.springframework.boot.test.context.SpringBootTest;
import org.springframework.test.context.junit4.SpringRunner;

@RunWith(SpringRunner.class)
@SpringBootTest(classes = SpringBootCuratorZkApplication.class)
class SpringBootCuratorZkApplicationTests {

    @Autowired
    CuratorFramework curatorFramework;

    /**
     * 创建节点
     *
     * @throws Exception
     */
    @Test
    void createNode() throws Exception {
        // 添加持久节点
        String path = curatorFramework.create().forPath("/curator-node");
        System.out.println(String.format("curator create node :%s successfully.", path));

        // 添加临时序号节点,并赋值数据
        String path1 = curatorFramework.create()
                .withMode(CreateMode.EPHEMERAL_SEQUENTIAL)
                .forPath("/curator-node", "some-data".getBytes());
        System.out.println(String.format("curator create node :%s successfully.", path));

        // System.in.read()目的是阻塞客户端关闭,我们可以在这期间查看zk的临时序号节点
        // 当程序结束时候也就是客户端关闭的时候,临时序号节点会消失
        System.in.read();
    }

    /**
     * 获取节点
     *
     * @throws Exception
     */
    @Test
    public void testGetData() throws Exception {
        // 在上面的方法执行后,创建了curator-node节点,但是我们并没有显示的去赋值
        // 通过这个方法去获取节点的值会发现,当我们通过Java客户端创建节点不赋值的话默认就是存储的创建节点的ip
        byte[] bytes = curatorFramework.getData().forPath("/curator-node");
        System.out.println(new String(bytes));
    }

    /**
     * 修改节点数据
     *
     * @throws Exception
     */
    @Test
    public void testSetData() throws Exception {
        curatorFramework.setData().forPath("/curator-node", "changed!".getBytes());
        byte[] bytes = curatorFramework.getData().forPath("/curator-node");
        System.out.println(new String(bytes));
    }

    /**
     * 创建节点同时创建⽗节点
     *
     * @throws Exception
     */
    @Test
    public void testCreateWithParent() throws Exception {
        String pathWithParent = "/node-parent/sub-node-1";
        String path = curatorFramework.create().creatingParentsIfNeeded().forPath(pathWithParent);
        System.out.println(String.format("curator create node :%s successfully.", path));
    }

    /**
     * 删除节点(包含子节点)
     *
     * @throws Exception
     */
    @Test
    public void testDelete() throws Exception {
        String pathWithParent = "/node-parent";
        curatorFramework.delete().guaranteed().deletingChildrenIfNeeded().forPath(pathWithParent);
    }
}
- 1
- 2
- 3
- 4
- 5
- 6
- 7
- 8
- 9
- 10
- 11
- 12
- 13
- 14
- 15
- 16
- 17
- 18
- 19
- 20
- 21
- 22
- 23
- 24
- 25
- 26
- 27
- 28
- 29
- 30
- 31
- 32
- 33
- 34
- 35
- 36
- 37
- 38
- 39
- 40
- 41
- 42
- 43
- 44
- 45
- 46
- 47
- 48
- 49
- 50
- 51
- 52
- 53
- 54
- 55
- 56
- 57
- 58
- 59
- 60
- 61
- 62
- 63
- 64
- 65
- 66
- 67
- 68
- 69
- 70
- 71
- 72
- 73
- 74
- 75
- 76
- 77
- 78
- 79
- 80
- 81
- 82
- 83
- 84
- 85
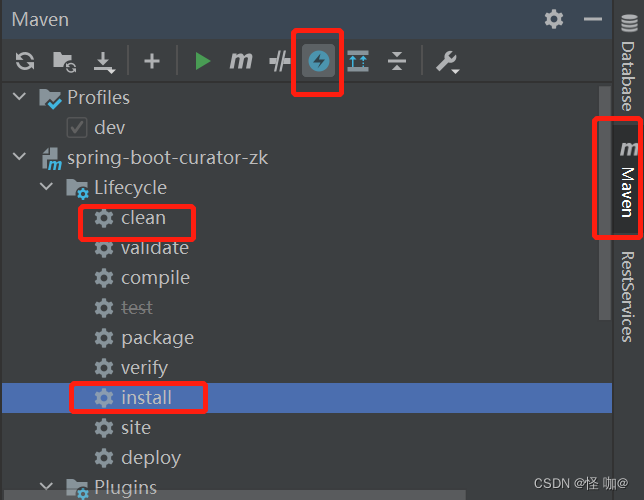
8.执行测试方法报错解决
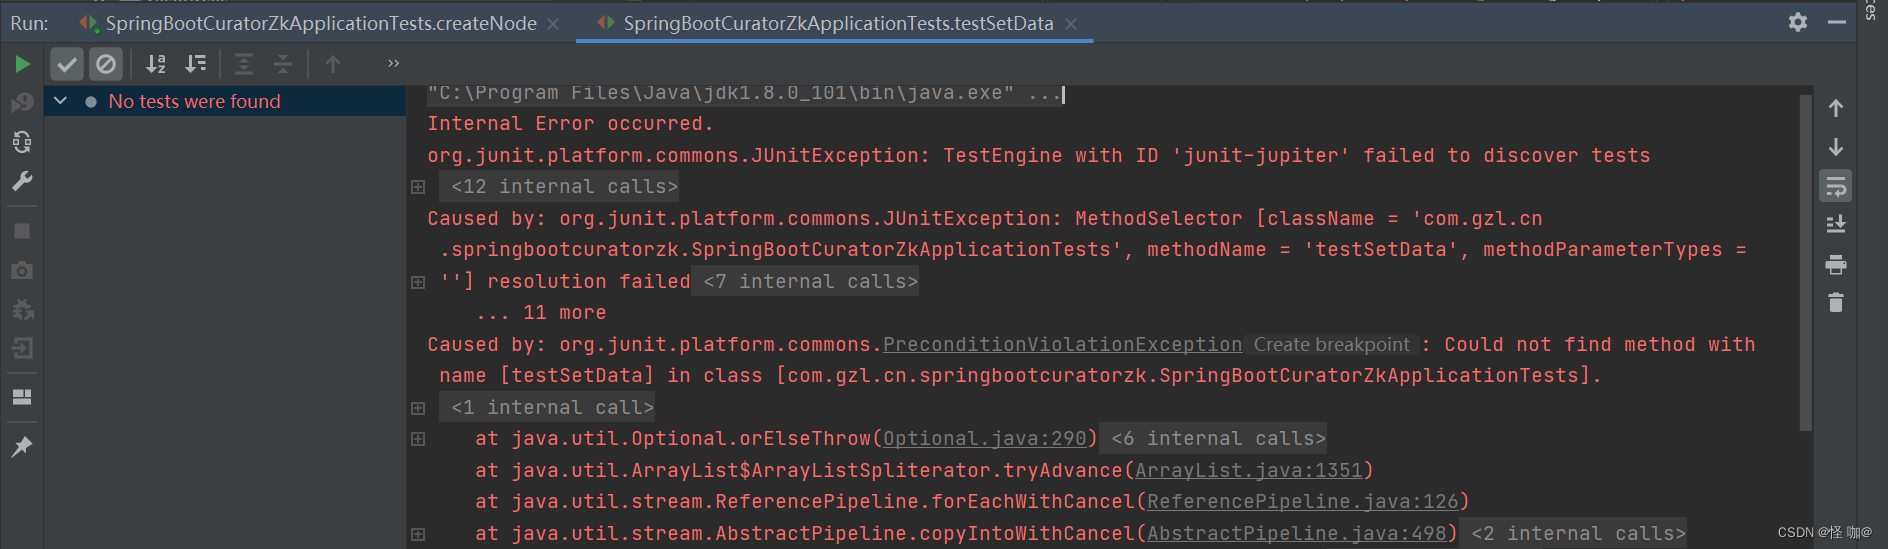
上面那个闪电意思是install的时候跳过maven测试阶段,之所以要跳过测试阶段是因为假如不跳过他会验证测试方法,例如我们创建节点的方法,有时候我们节点已经创建了,但是他还会验证,所以就会报错。
声明:本文内容由网友自发贡献,不代表【wpsshop博客】立场,版权归原作者所有,本站不承担相应法律责任。如您发现有侵权的内容,请联系我们。转载请注明出处:https://www.wpsshop.cn/article/detail/53975
推荐阅读


相关标签

