
- 1Docker Compose的安装,运行及docker-compose.yml 文件_docker-compose.yml 运行
- 2Feign全局异常捕捉以及捕捉原系统抛出的状态码和异常信息_openfeign全局异常捕获
- 3从命令行远程配置 Xfce4 工作区_xfconf-query
- 4【Python】数据分析案例:世界杯数据可视化 | 文末送书_世界杯数据可视化分析论文
- 5C语言printf的输出格式大全及颜色字体打印_c printf 格式大全
- 6AWS Lambda的简介与使用
- 7怎么样检查自己系统上的Python环境中是否有某个包(扩展库)?_python怎么检查是否有某个库
- 8SQL入门书籍内容汇总_sql新手入门书籍
- 9百家cms代审
- 10软件运营服务卷土重来 SaaS模式二次革命_张曦 csdn
JVMTI 实现 springboot jar包的加密(防止反编译)_febytecodeencryptor
赞
踩
1.什么是反编译?
- Java语言的一个非常重要的特点就是与平台的无关性。而使用JVM是实现这一特点的关键。
- JVM的任务就是将Java源代码编译成Java字节码,也就是JVM能够识别的二进制代码,从表面看是将.java文件转化为.class文件。而实际上是将Java源代码转化成一连串二进制数字,这些二进制数字是有格式的,只有JVM能够真确的识别他们到底代表什么意思。
- 由于Java、.net这样的基于虚拟机技术的语言平台,都是采用了Byte Code的二进制结构,因此很容易将ByteCode转化为“抽象语法树”(简称AST,《编译原理》这门课中的概念),然后采用反编译器就可以将AST转换为代码了。
著名的反编译软件 JD-GUI :下载地址
2.什么是JVMTI加密?
Java虚拟机工具接口(JVMTI)提供了一个编程接口,允许您(软件开发人员)创建可以监视和控制Java编程语言应用程序的软件代理。关于JVMTI的官方说明
通俗的说,就是用C++生成动态链接库(DLL),给你指定的二进制的class文件中插入一段数字,进行篡改,使其无法被JD-GUI用简单的AST抽象语法树进行反编译,在运行 jar 包时,再通过DLL文件,消除那段数字,从而实现解密。
3.具体实现
这个博客内有github源码,以及c++的具体讲解,和普通java项目的加解密的实现。
参考博客:https://blog.csdn.net/wangyangzhizhou/article/details/75316826
本文从java的角度,主要讲springboot项目的加解密。
1. 生成 DLL 动态链接库
-
1.2 VS2010 新建DLL项目?
-
1.4 github下载源码,创建DLL项目,将c++ 的 源代码(.cpp)和头文件(.h)复制粘贴进去。
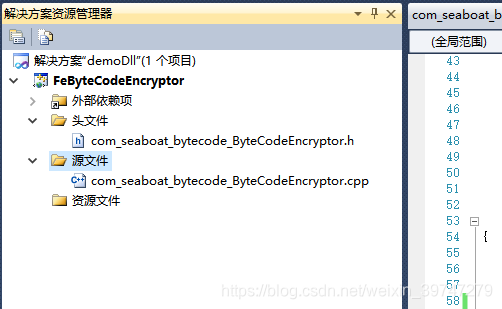
-
1.5 关于头文件 jni.h,jvmti.h,jni_md.h 都在JDK的安装目录。
jni.h 、jvmti.h 在 jdk/include 目录下
jni_md.h 在 jdk/include/linux 目录下
关于头文件的添加。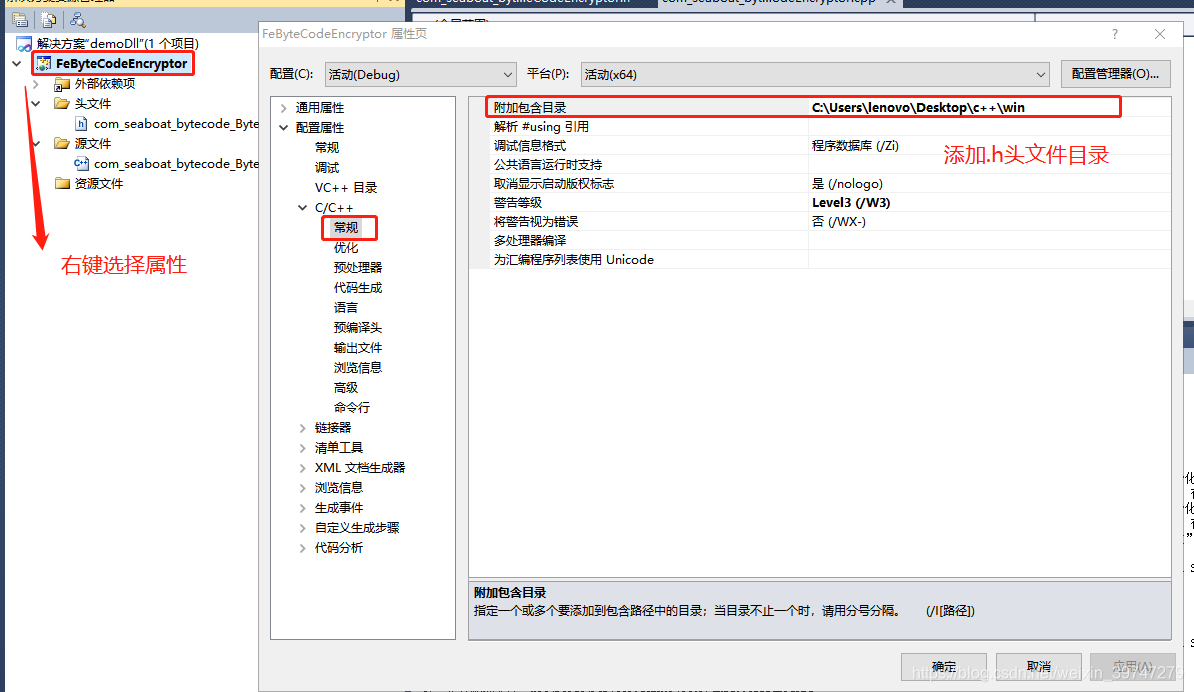
-
1.6 修改 c++ com_seaboat_bytecode_ByteCodeEncryptor.cpp 文件第60行,修改if条件,改成自己解密的包路径。
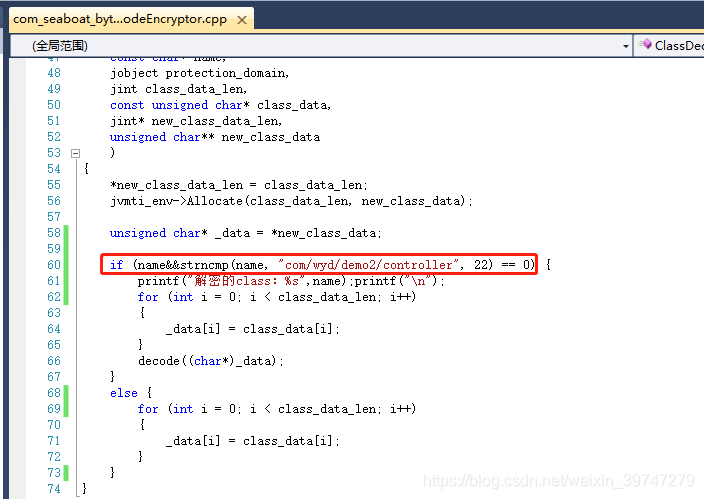
-
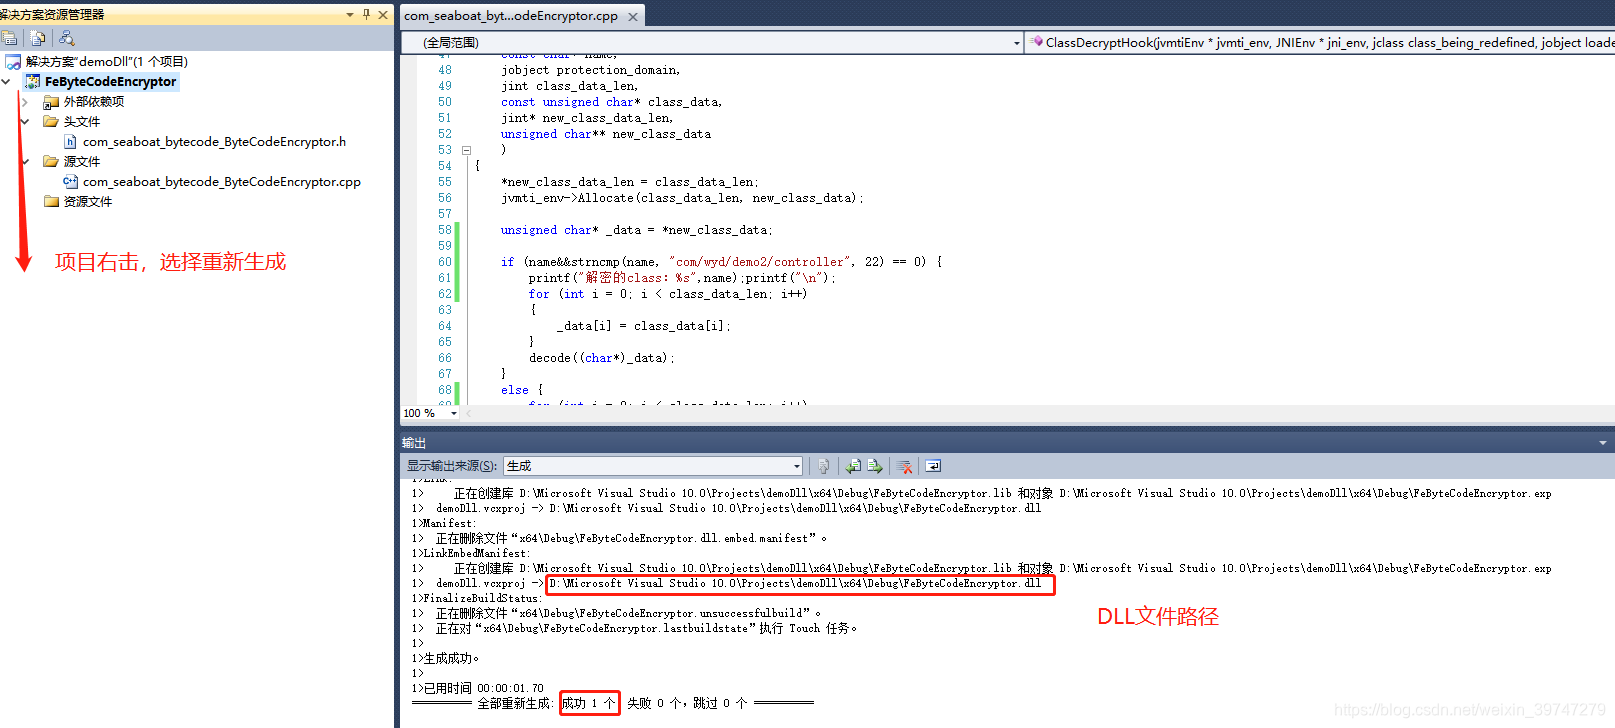
1.7生成DLL文件。
2. 使用java项目对jar包进行加密。
-
2.1 修改 ByteCodeEncryptor.java,加载DLL文件。
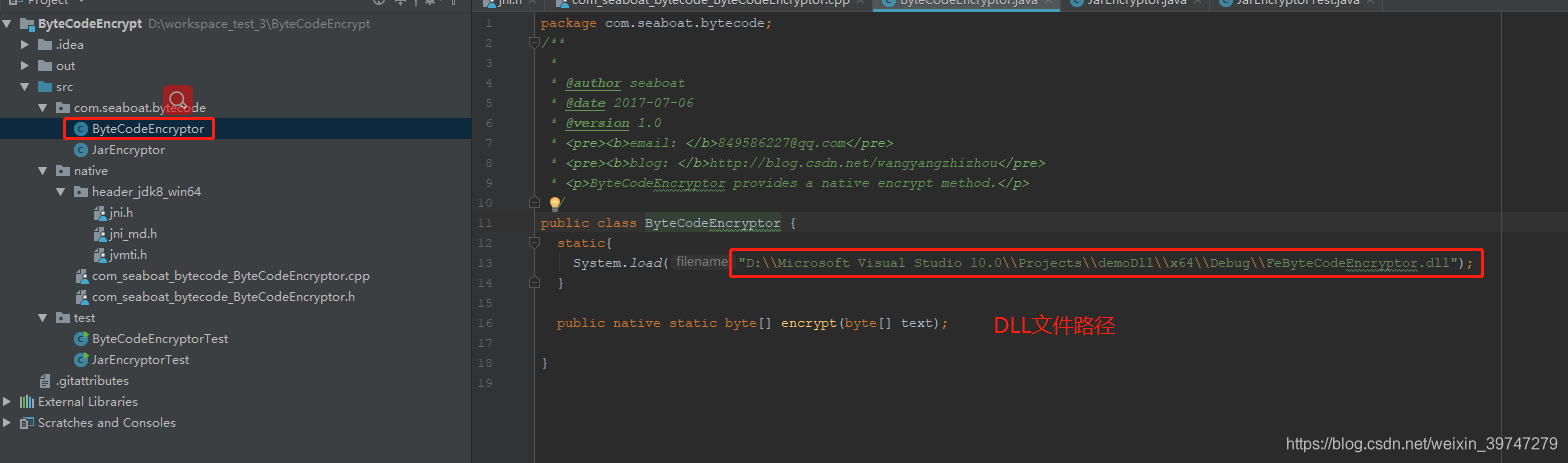
-
2.2 修改 JarEncryptor.java,修改成自己的包路径名。
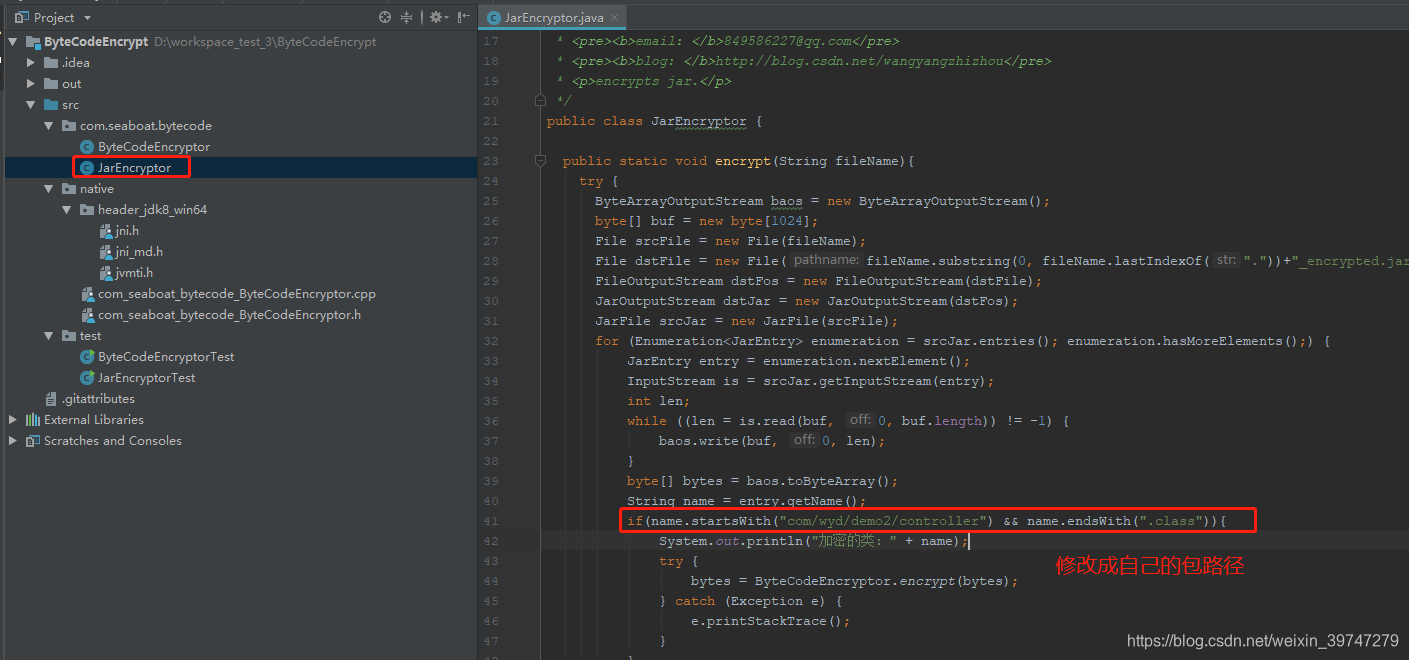
-
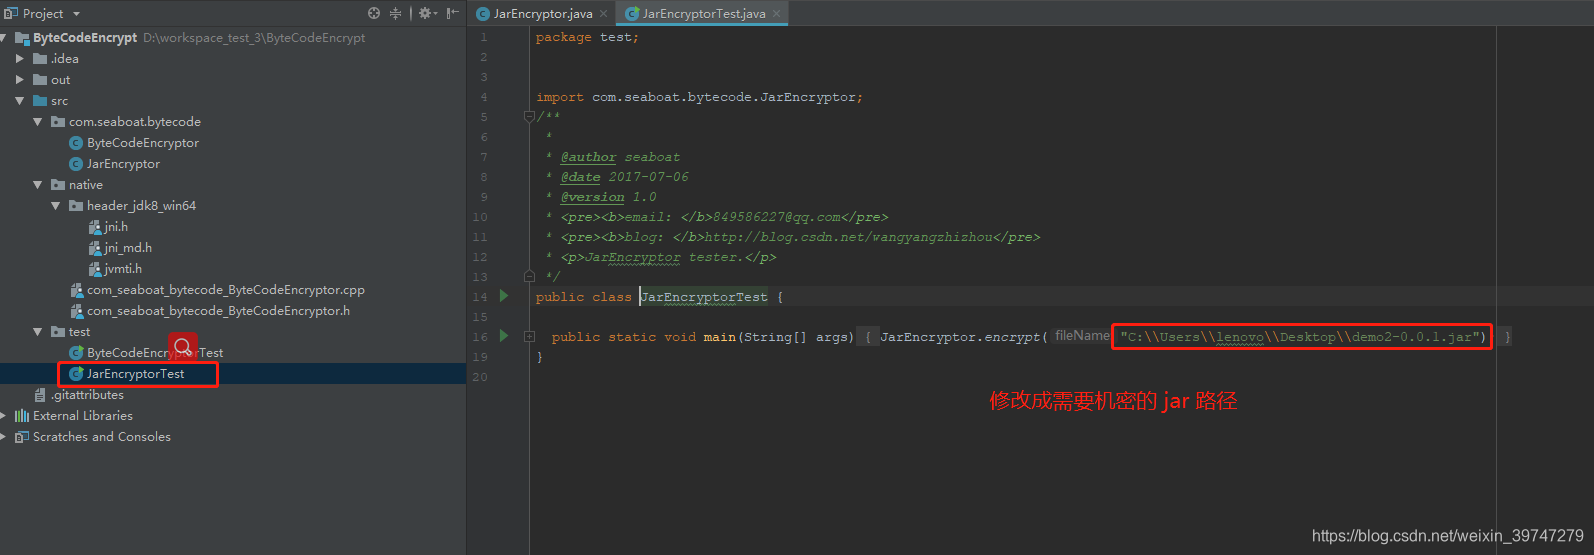
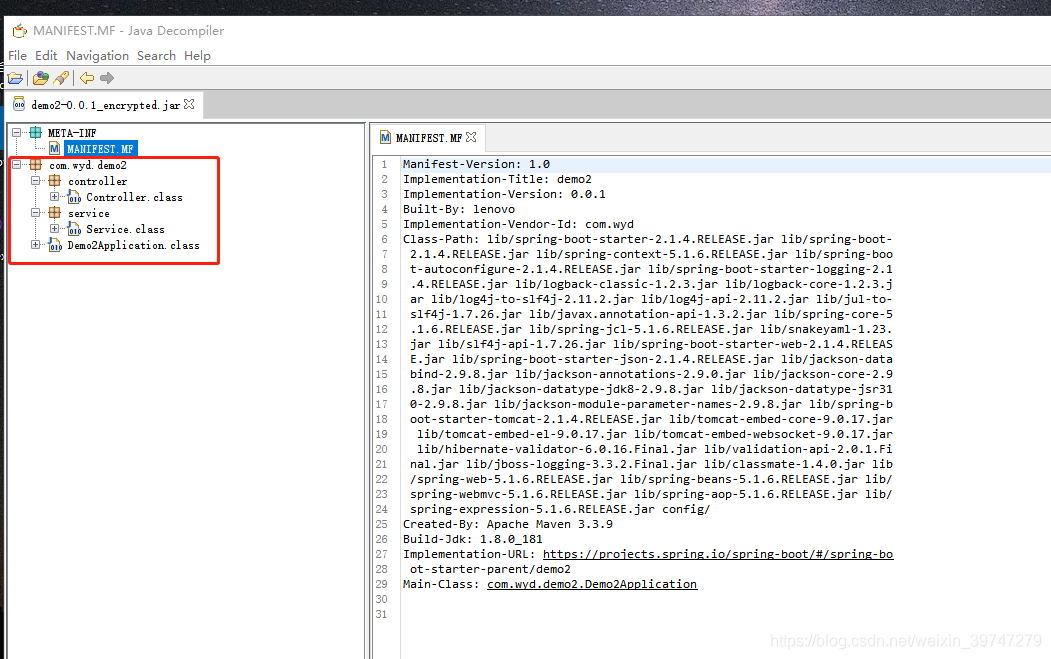
2.3 修改成需要加密的 jar 绝对路径。执行main方法。同路径生成 demo2-0.0.1_encrypted.jar(加密后)
-
2.4 使用 jd-gui-1.4.1.jar 验证是否加密。

-
2.5 发布 jar
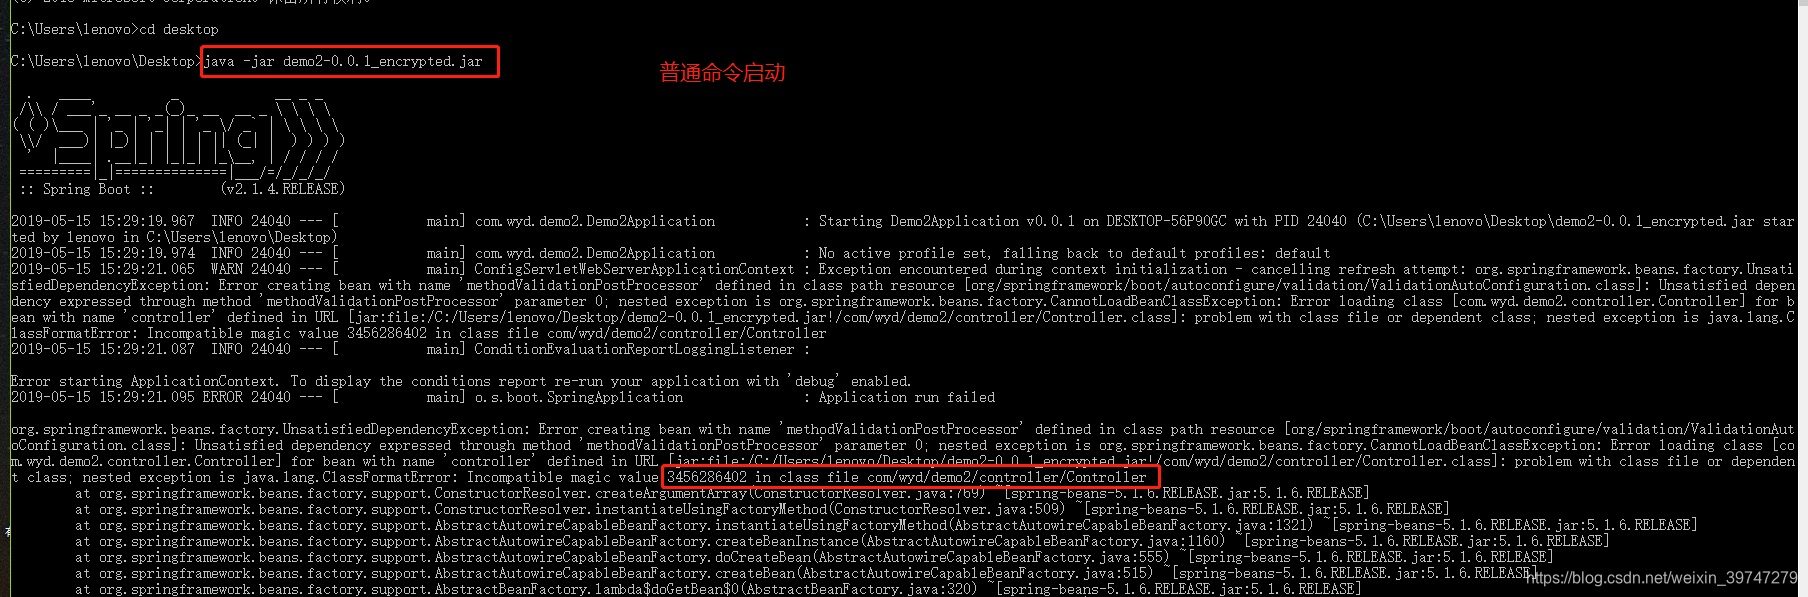
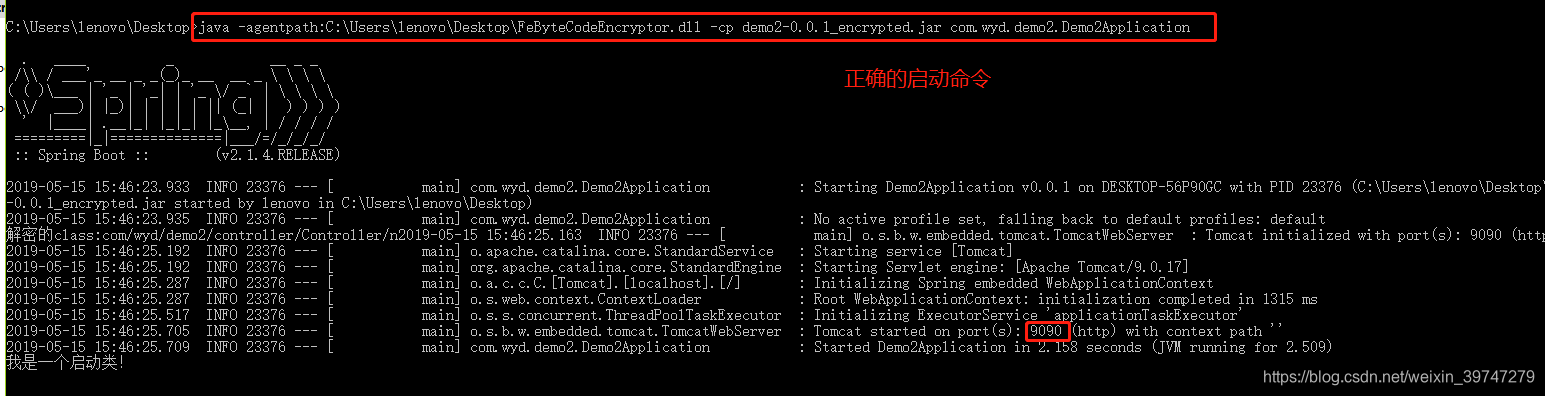
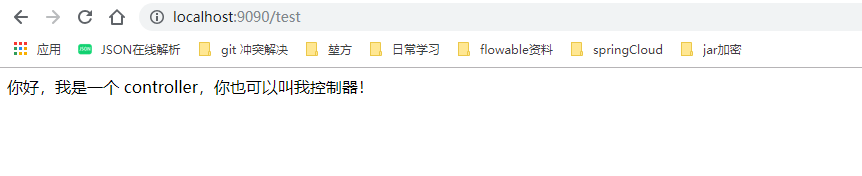
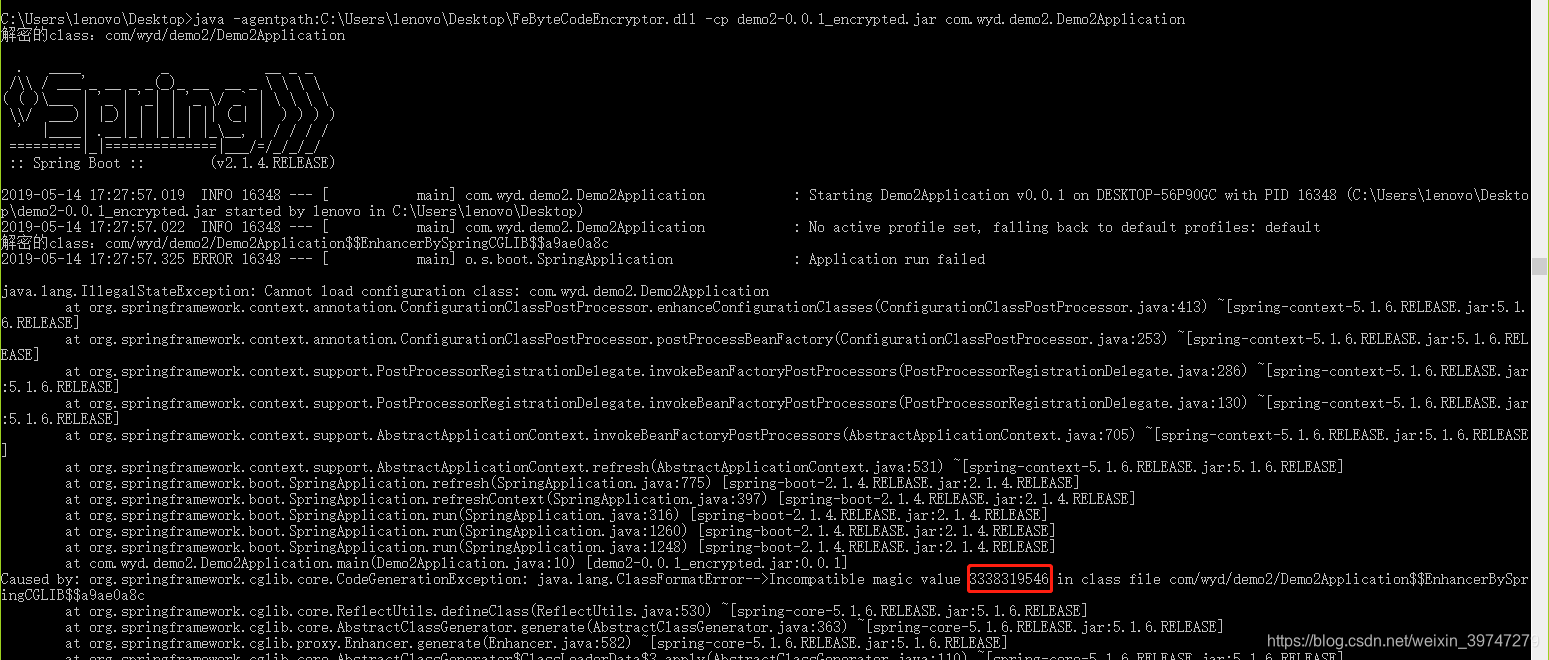
正确的去启动命令:需要加载DLL文件,并且指向启动类。java -agentpath:C:\Users\lenovo\Desktop\FeByteCodeEncryptor.dll -cp demo2-0.0.1_encrypted.jar com.wyd.demo2.Demo2Application浏览器访问接口:
3. springboot打包
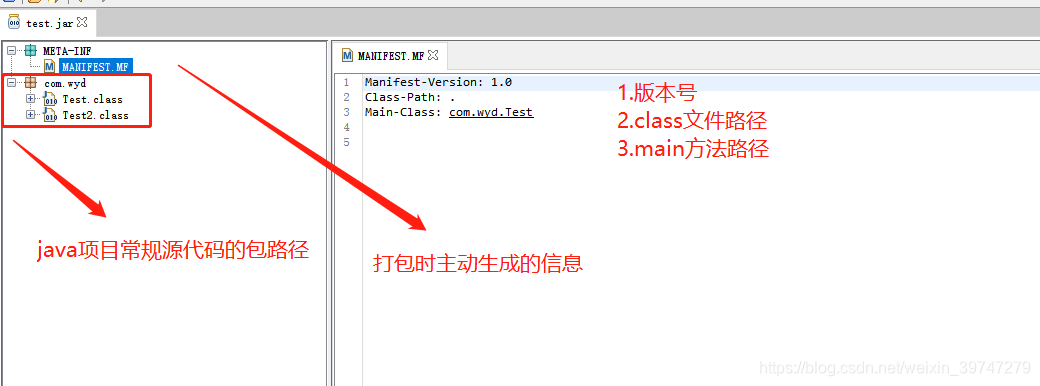
常规java项目的jar包
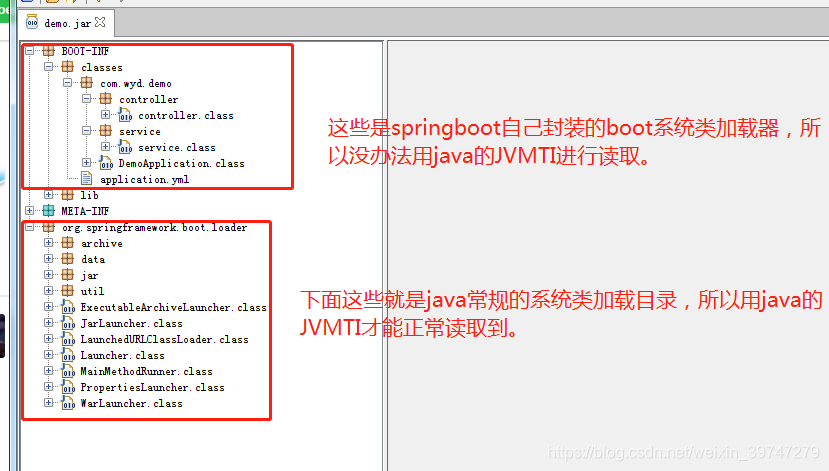
springboot项目的jar包
如果要加密springboot项目,那是不是将加密路径和解密的路径修改成BOOT-INF/classes,是否也就可以呢。
本人测试了一下,加密是可以的,解密不可以(读不到路径)。
- 加密时,读取文件时使用的是JarFile,并且继承的是 ZipFile,将读取包的路径打印出来,可以看出来是一层一层读取,只要if判断条件写完整,只要jar内有,始终都是可以读取到,并进行加密的。
- 解密时,使用的是 jvmtiEventCallbacks 使用c++ 写的语法块,将读取包的路径打印出来,发现并没有读取到BOOT-INF路径,然而就解密失败。下图是部分读取的数据

咨询 sea-boat 技术大佬(十分感谢):
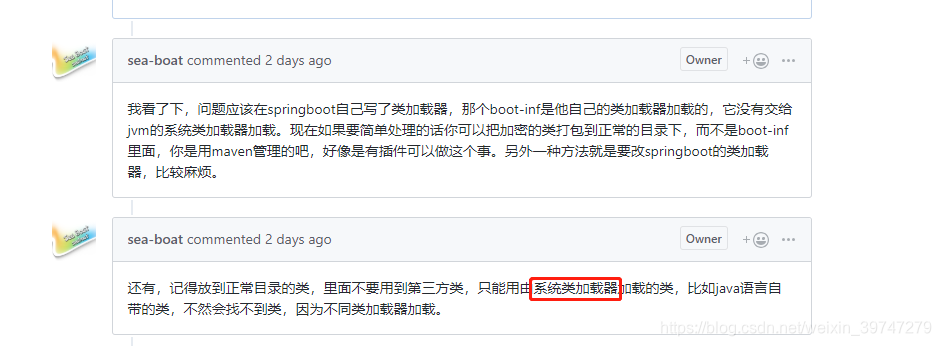
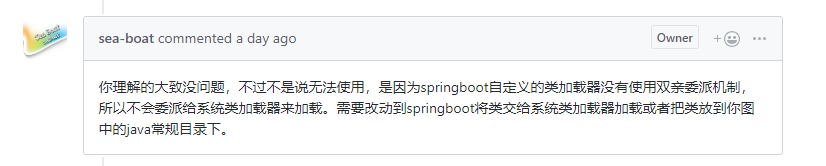
- 由此可知:springboot 将启动类(DemoApplication),依赖包(lib),配置文件(application.yml),源码 一起打包到BOOT-INF/classes路径下,违背了java项目常规的系统加载器,所以 jvmtiEventCallbacks 并没有对 springboot 这种特殊打包方式做优化,俺也做不到呀。所以只能改变springboot的打包结构,优化成普通java项目。
4. 使用 maven 插件 org.apache.maven.plugins 修改打包路径。
-
思路是:打包时,将依赖包和配置文件分离
-
修改pom.xml文件
<?xml version="1.0" encoding="UTF-8"?>
<project xmlns="http://maven.apache.org/POM/4.0.0" xmlns:xsi="http://www.w3.org/2001/XMLSchema-instance"
         xsi:schemaLocation="http://maven.apache.org/POM/4.0.0 http://maven.apache.org/xsd/maven-4.0.0.xsd">
    <modelVersion>4.0.0</modelVersion>
    <parent>
        <groupId>org.springframework.boot</groupId>
        <artifactId>spring-boot-starter-parent</artifactId>
        <version>2.1.4.RELEASE</version>
        <relativePath/> <!-- lookup parent from repository -->
    </parent>
    <groupId>com.wyd</groupId>
    <artifactId>demo2</artifactId>
    <version>0.0.1</version>
    <name>demo2</name>
    <description>Demo project for Spring Boot</description>

    <properties>
        <java.version>1.8</java.version>
        <spring-boot.version>2.1.4.RELEASE</spring-boot.version>
    </properties>

    <dependencies>
        <dependency>
            <groupId>org.springframework.boot</groupId>
            <artifactId>spring-boot-starter</artifactId>
        </dependency>
        <dependency>
            <groupId>org.springframework.boot</groupId>
            <artifactId>spring-boot-starter-test</artifactId>
            <scope>test</scope>
        </dependency>
        <dependency>
            <groupId>org.springframework.boot</groupId>
            <artifactId>spring-boot-starter-web</artifactId>
        </dependency>
    </dependencies>

<!-- springboot自带的打包插件
    <build>
        <plugins>
            <plugin>
                <groupId>org.springframework.boot</groupId>
                <artifactId>spring-boot-maven-plugin</artifactId>
                <configuration>
                    <skip>true</skip>
                </configuration>
            </plugin>
        </plugins>
    </build>-->

    <build>
        <resources>
            <resource>
                <!--指定mapping下的所有xml文件打包在jar中-->
                <targetPath>${project.build.directory}/classes</targetPath>
                <directory>src/main/resources</directory>
                <filtering>true</filtering>
                <includes>
                    <include>mapping/*.xml</include>
                </includes>
            </resource>
            <resource>
                <!--resources下一级的所有.xml .properties文件复制到config目录下-->
                <targetPath>${project.build.directory}/config</targetPath>
                <directory>src/main/resources</directory>
                <filtering>true</filtering>
                <includes>
                    <include>**.xml</include>
                    <include>**.yml</include>
                </includes>
            </resource>
        </resources>
        <plugins>
            <!--maven-dependency插件,将项目所有依赖包放到lib目录下-->
            <plugin>
                <groupId>org.apache.maven.plugins</groupId>
                <artifactId>maven-dependency-plugin</artifactId>
                <executions>
                    <execution>
                        <id>copy-dependencies</id>
                        <phase>package</phase>
                        <goals>
                            <goal>copy-dependencies</goal>
                        </goals>
                        <configuration>
                            <type>jar</type>
                            <includeTypes>jar</includeTypes>
                            <outputDirectory>
                                ${project.build.directory}/lib
                            </outputDirectory>
                        </configuration>
                    </execution>
                </executions>
            </plugin>

            <plugin>
                <groupId>org.apache.maven.plugins</groupId>
                <artifactId>maven-jar-plugin</artifactId>
                <configuration>
                    <classesDirectory>target/classes/</classesDirectory>
                    <archive>
                        <!--生成的jar中,不要包含pom.xml和pom.properties这两个文件-->
                        <addMavenDescriptor>false</addMavenDescriptor>
                        <manifest>
                            <mainClass>com.wyd.demo2.Demo2Application</mainClass>
                            <!-- 打包时 MANIFEST.MF文件不记录的时间戳版本 -->
                            <useUniqueVersions>false</useUniqueVersions>
                            <addClasspath>true</addClasspath>
                            <classpathPrefix>lib/</classpathPrefix>
                        </manifest>
                        <manifestEntries>
                            <!--jar中的MANIFEST.MF文件ClassPath需要添加config目录才能读取到配置文件-->
                            <Class-Path>config/</Class-Path>
                        </manifestEntries>
                    </archive>
                </configuration>
            </plugin>
        </plugins>
    </build>


</project>

- 1
- 2
- 3
- 4
- 5
- 6
- 7
- 8
- 9
- 10
- 11
- 12
- 13
- 14
- 15
- 16
- 17
- 18
- 19
- 20
- 21
- 22
- 23
- 24
- 25
- 26
- 27
- 28
- 29
- 30
- 31
- 32
- 33
- 34
- 35
- 36
- 37
- 38
- 39
- 40
- 41
- 42
- 43
- 44
- 45
- 46
- 47
- 48
- 49
- 50
- 51
- 52
- 53
- 54
- 55
- 56
- 57
- 58
- 59
- 60
- 61
- 62
- 63
- 64
- 65
- 66
- 67
- 68
- 69
- 70
- 71
- 72
- 73
- 74
- 75
- 76
- 77
- 78
- 79
- 80
- 81
- 82
- 83
- 84
- 85
- 86
- 87
- 88
- 89
- 90
- 91
- 92
- 93
- 94
- 95
- 96
- 97
- 98
- 99
- 100
- 101
- 102
- 103
- 104
- 105
- 106
- 107
- 108
- 109
- 110
- 111
- 112
- 113
- 114
- 115
- 116
- 117
- 118
- 119
- 120
- 121
- 122
- 123
- mainClass 指向springboot项目的启动类
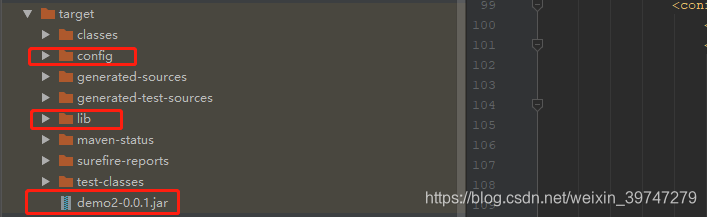
这样springboot项目就成功的将依赖包(lib)和配置文件(cinfig)分离开,变成普通的java项目结构。JVMTI自然可以读取到,并进行加解密。
注意事项
- 启动 jar 包时,要将 lib和config放置到相同路径。
- 不能加密 springboot 启动类。启动报错。
- 如何成功分离配置文件和依赖包,但是源码class没有在最外层,可以用解压软件打开,移动至最外层,不影响使用。
- idea旗舰版集成了 插件 Bytecode Viewer 还是可以不解密看到源码。
下载了 Bytecode-Viewer-2.9.19.jar 验证 下载地址
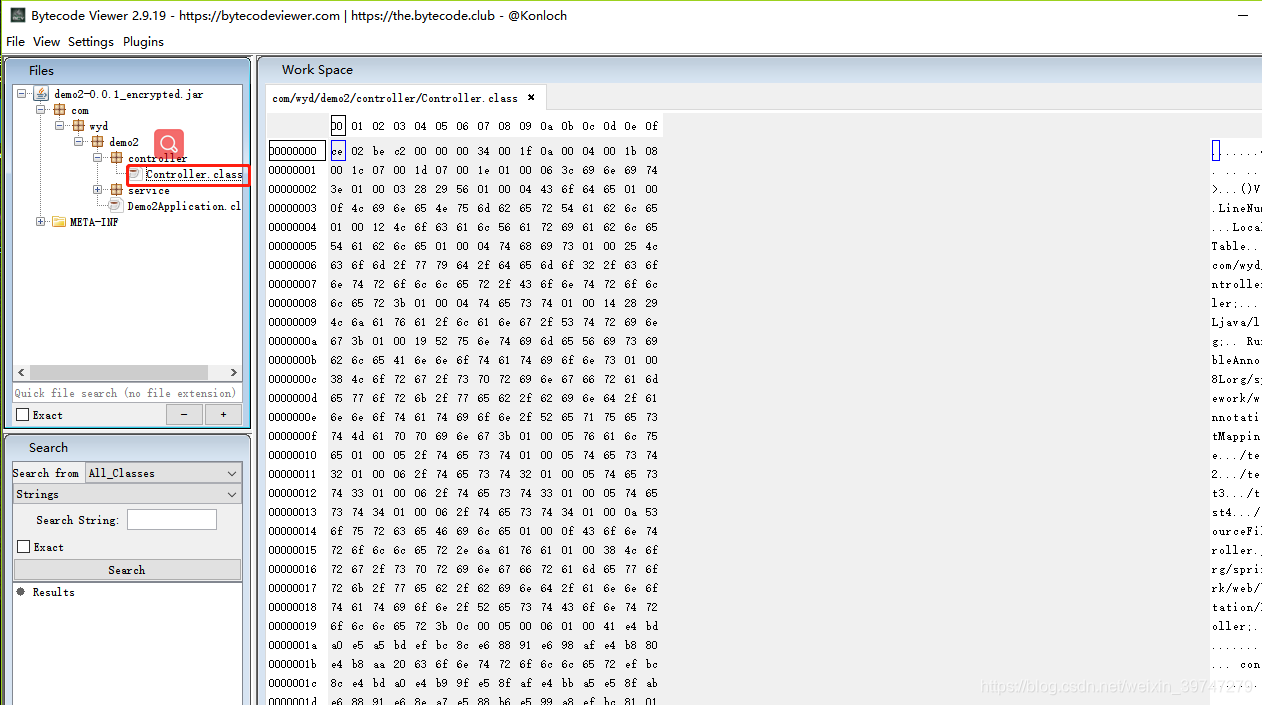
看不到源码,只能看到加密后的二进制。
奇怪的是idea 的插件 Bytecode Viewer 却能看到源码,猜测因为 idea 集成 jvm,直接跳过或者忽略错误 bytecode。
(有时间研究)


