
- 1基于PPYOLOE+的水下生物目标检测_为什么要做水下显著目标检测
- 2密码学——实现GF2^8域上的加法、减法、乘法运算(C/C++实现)_根据提示,在右侧编辑器补充代码,计算两个数在有限域gf(2 8 )上进行乘法运算的结果
- 3云计算与Hadoop期末考试知识点复习
- 4tensorflow使用多个gpu训练
- 5python tabula 使用方法,如何使用tabula-py将PDF转换为CSV?
- 6centos下创建用户并授予指定文件夹的权限_centos文件夹授权
- 7网络协议-MAC地址_IP地址_ARP_ICMP(笔记)_mac地址的网络接口标识符
- 8数十种TensorFlow实现案例汇集:代码+笔记_tensorflow 案例场景
- 9快速上手Vue+SpringBoot+Element UI+Mybatis-PLUS+Echarts_前后端springboot+vue+element 图表
- 10linux基础06—windows下打不开wsl的ubuntu的子系统_wsl 打不开了
在springboot中创建webservice服务_springboot webservice
赞
踩
最近因为业务的需要,甲方让我在项目中提供webservice接口,在创建webservice的过程中,遇到了许多的坑,躺了许多雷,为了避免大家采坑,现整理如下。
首先是springboot的pom.xml文件,主要是引入以下依赖
- <dependency>
- <groupId>javax.xml.bind</groupId>
- <artifactId>jaxb-api</artifactId>
- <version>2.3.0</version>
- </dependency>
- <dependency>
- <groupId>com.sun.xml.bind</groupId>
- <artifactId>jaxb-impl</artifactId>
- <version>2.3.0</version>
- </dependency>
- <dependency>
- <groupId>com.sun.xml.bind</groupId>
- <artifactId>jaxb-core</artifactId>
- <version>2.3.0</version>
- </dependency>
- <dependency>
- <groupId>javax.activation</groupId>
- <artifactId>activation</artifactId>
- <version>1.1.1</version>
- </dependency>
- <dependency>
- <groupId>org.springframework.boot</groupId>
- <artifactId>spring-boot-starter-web-services</artifactId>
- </dependency>
-
- <dependency>
- <groupId>org.apache.cxf</groupId>
- <artifactId>cxf-spring-boot-starter-jaxws</artifactId>
- <version>3.3.1</version>
- </dependency>
- <dependency>
- <groupId>org.apache.cxf</groupId>
- <artifactId>cxf-rt-transports-http</artifactId>
- <version>3.2.2</version>
- </dependency>
- <dependency>
- <groupId>org.codehaus.woodstox</groupId>
- <artifactId>stax2-api</artifactId>
- <version>4.0.0</version>
- </dependency>
- <dependency>
- <groupId>org.codehaus.woodstox</groupId>
- <artifactId>woodstox-core-asl</artifactId>
- <version>4.4.1</version>
- </dependency>
- <!-- 这个主要是client访问的,但是问题多多-->
- <dependency>
- <groupId>org.apache.axis</groupId>
- <artifactId>axis</artifactId>
- <version>1.4</version>
- </dependency>
-
- <dependency>
- <groupId>axis</groupId>
- <artifactId>axis-jaxrpc</artifactId>
- <version>1.4</version>
- </dependency>
-
- <dependency>
- <groupId>commons-discovery</groupId>
- <artifactId>commons-discovery</artifactId>
- <version>0.2</version>
- </dependency>
- <dependency>
- <groupId>wsdl4j</groupId>
- <artifactId>wsdl4j</artifactId>
- <version>1.6.3</version>
- </dependency>

我的jdk环境是jdk11,所以要引入最开始的4个依赖。
还有,springboot的版本不能太高,我原先的版本是2.3.3,跑不起来,后来在网上查到是版本不兼容导致的问题,于是把springboot的版本降到2.0.1,后来才跑起来。
<parent>
<groupId>org.springframework.boot</groupId>
<artifactId>spring-boot-starter-parent</artifactId>
<version>2.0.1.RELEASE</version>
<!--<version>2.3.3.RELEASE</version>-->
<relativePath /> <!-- lookup parent from repository -->
</parent>
然后,新建webservice的接口文件,如下所示:
- package com.mango.jkm.webservice;
-
- import java.util.List;
-
- import javax.jws.WebMethod;
- import javax.jws.WebParam;
- import javax.jws.WebService;
-
- @WebService(name = "Wbceshijk", targetNamespace = "http://server.webservice.example.com")
- public interface Wbceshijk {
- @WebMethod
- String emrService(@WebParam(name = "data") String data,@WebParam(name = "data2") String data2);
- @WebMethod
- String student1111(@WebParam(name = "data") String data,@WebParam(name = "data2") String data2);
- @WebMethod
- String aboutstudent(@WebParam(name="student") Student student);
- @WebMethod
- String studentlist(List<Student> list1);
- }
然后是接口的实现类
- package com.mango.jkm.webservice;
-
- import java.util.List;
-
- import javax.jws.WebParam;
- import javax.jws.WebService;
-
- import org.springframework.stereotype.Component;
-
- @Component
- @WebService( targetNamespace = "http://server.webservice.example.com",
- endpointInterface = "com.mango.jkm.webservice.Wbceshijk")
- public class Webserviceceshi implements Wbceshijk{
-
- @Override
- public String emrService( String data,String data2) {
- if(null == data || "".equals(data.trim())){
- return "传入的参数为空";
- }
- return "data="+data+"@data2="+data2;
- }
-
- @Override
- public String student1111(String data, String data2) {
- // TODO 自动生成的方法存根
- return "22222data="+data+"@data2="+data2;
- }
-
- @Override
- public String aboutstudent(Student student) {
- // TODO 自动生成的方法存根
- System.out.println(student==null);
- return "student.getName()="+student.getName();
- }
-
- @Override
- public String studentlist(List<Student> list1) {
- // TODO 自动生成的方法存根
- return "list1.size()="+list1.size();
- }
-
-
- }
再然后是webservice的配置相关
- package com.mango.jkm.webservice;
-
- import javax.xml.ws.Endpoint;
-
- import org.apache.cxf.Bus;
- import org.apache.cxf.bus.spring.SpringBus;
- import org.apache.cxf.jaxws.EndpointImpl;
- import org.apache.cxf.transport.servlet.CXFServlet;
- import org.springframework.beans.factory.annotation.Autowired;
- import org.springframework.boot.web.servlet.ServletRegistrationBean;
- import org.springframework.context.annotation.Bean;
- import org.springframework.context.annotation.Configuration;
-
- @Configuration
- public class WebServiceConfig {
-
- @Autowired
- private Wbceshijk serverServiceDemo;
-
- /**
- * Apache CXF 核心架构是以BUS为核心,整合其他组件。
- * Bus是CXF的主干, 为共享资源提供一个可配置的场所,作用类似于Spring的ApplicationContext,这些共享资源包括
- * WSDl管理器、绑定工厂等。通过对BUS进行扩展,可以方便地容纳自己的资源,或者替换现有的资源。默认Bus实现基于Spring架构,
- * 通过依赖注入,在运行时将组件串联起来。BusFactory负责Bus的创建。默认的BusFactory是SpringBusFactory,对应于默认
- * 的Bus实现。在构造过程中,SpringBusFactory会搜索META-INF/cxf(包含在 CXF 的jar中)下的所有bean配置文件。
- * 根据这些配置文件构建一个ApplicationContext。开发者也可以提供自己的配置文件来定制Bus。
- */
- @Bean(name = Bus.DEFAULT_BUS_ID)
- public SpringBus springBus() {
- return new SpringBus();
- }
-
- /**
- * 此方法作用是改变项目中服务名的前缀名,此处127.0.0.1或者localhost不能访问时,请使用ipconfig查看本机ip来访问
- * 此方法被注释后, 即不改变前缀名(默认是services), wsdl访问地址为 http://127.0.0.1:8080/services/ws/api?wsdl
- * 去掉注释后wsdl访问地址为:http://127.0.0.1:8080/soap/ws/api?wsdl
- * http://127.0.0.1:8080/soap/列出服务列表 或 http://127.0.0.1:8080/soap/ws/api?wsdl 查看实际的服务
- * 新建Servlet记得需要在启动类添加注解:@ServletComponentScan
- *
- * 如果启动时出现错误:not loaded because DispatcherServlet Registration found non dispatcher servlet dispatcherServlet
- * 可能是springboot与cfx版本不兼容。
- * 同时在spring boot2.0.6之后的版本与xcf集成,不需要在定义以下方法,直接在application.properties配置文件中添加:
- * cxf.path=/service(默认是services)
- */
- // @Bean
- // public ServletRegistrationBean dispatcherServlet() {
- // return new ServletRegistrationBean(new CXFServlet(), "/soap/*");
- // }
-
- @Bean
- public Endpoint endpoint() {
- EndpointImpl endpoint = new EndpointImpl(springBus(), serverServiceDemo);
- endpoint.publish("/ws/api");
- return endpoint;
- }
- }
然后我在aplication.yml文件中添加了配置信息(非必要)
cxf:
path: /service
这个是Student类
- package com.mango.jkm.webservice;
-
- import java.io.Serializable;
-
- import javax.xml.bind.annotation.XmlAccessType;
-
- import javax.xml.bind.annotation.XmlAccessorType;
- import javax.xml.bind.annotation.XmlRootElement;
- import javax.xml.bind.annotation.XmlType;
-
- @XmlRootElement(name="Student")
- @XmlAccessorType(XmlAccessType.FIELD)
- @XmlType(propOrder={"name", "address","age"})
- public class Student implements Serializable {
- /**
- *
- */
- private static final long serialVersionUID = 3428504463675931746L;
- public String name;
- public String address;
- public String age;
-
- public String getName() {
- return name;
- }
-
- public void setName(String name) {
- this.name = name;
- }
-
- public String getAddress() {
- return address;
- }
-
- public void setAddress(String address) {
- this.address = address;
- }
-
- public String getAge() {
- return age;
- }
-
- public void setAge(String age) {
- this.age = age;
- }
-
- @Override
- public String toString() {
- return "#" + this.name + "#";
- }
- }
然后,启动springboot,访问对应的地址http://localhost:8081/service/ws/api?wsdl,得到熟悉的界面,可以看到webservice也启动成功了(webservice的端口号就是springboot项目自己的端口号)

然后,可以用soupui工具进行访问,
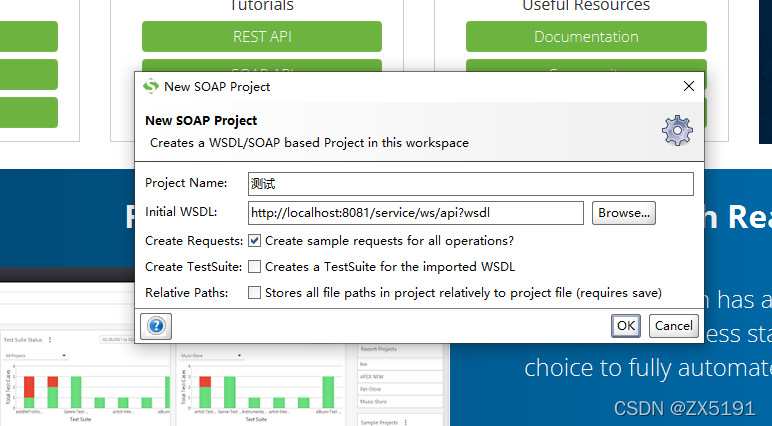
点击ok,就可以看到在接口文件中定义的4个方法

点击里面的emrService节点的request1,进行测试,可以看到返回数据结果

我感觉webservice也是post方式接口,因为我用apipost工具进行测试,body里放左侧的请求的xml,得到完全相同的的结果,为了验证我的猜想,我用springboot自带的RestTemplate类发送了一次post请求,发现也是得到了右侧的返回内容,这是我的测试类
- package com.mango.jkm.webservice;
-
- import javax.xml.namespace.QName;
- import javax.xml.rpc.ParameterMode;
- import javax.xml.rpc.encoding.XMLType;
-
- import org.apache.axis.client.Call;
- import org.apache.axis.client.Service;
- import org.apache.axis.encoding.ser.BeanDeserializerFactory;
- import org.apache.axis.encoding.ser.BeanSerializerFactory;
- import org.springframework.http.HttpEntity;
- import org.springframework.http.HttpHeaders;
- import org.springframework.http.MediaType;
- import org.springframework.http.ResponseEntity;
- import org.springframework.web.client.RestTemplate;
-
- import com.alibaba.fastjson.JSONObject;
-
-
- public class WbClient {
- public static void invokeService3() {
- try {
- //1、直接引用远程的wsdl文件
- String endpoint = "http://localhost:8081/service/ws/api?wsdl";
- Service service = new Service();
- Call call = (Call) service.createCall(); //创建服务
- call.setTargetEndpointAddress(endpoint);
- //2、定义报名和接口方法
- QName qn=new QName("http://server.webservice.example.com", //wsdl文件中的targetNamespace
- "aboutstudent");
- call.setOperationName(qn);
-
- //3、设置参数
-
-
- Student student=new Student();
- student.setName("张小鑫");
- student.setAddress("sssss");
- student.setAge("10");
- call.registerTypeMapping(Student.class,qn,
- new BeanSerializerFactory(Student.class, qn),
- new BeanDeserializerFactory(Student.class, qn));
- call.addParameter("student",
- new QName("http://server.webservice.example.com", "Student"), javax.xml.rpc.ParameterMode.IN);
- // call.addParameter("student", org.apache.axis.encoding.XMLType.XSD_ANYTYPE,
- // javax.xml.rpc.ParameterMode.IN);//接口的参数
- call.setReturnType(org.apache.axis.encoding.XMLType.XSD_STRING);//设置返回类型
-
- call.setUseSOAPAction(true);
- String result = (String)call.invoke(new Object[]{student});
- System.out.println("result="+result);
-
-
- } catch (Exception e) {
- e.printStackTrace();
- }
-
- }
- public static void invokeService_2(){
-
- try {
- //1、直接引用远程的wsdl文件
- String endpoint = "http://localhost:8081/service/ws/api?wsdl";
- Service service = new Service();
- Call call = (Call) service.createCall(); //创建服务
- call.setTargetEndpointAddress(endpoint);
- //2、定义报名和接口方法
- call.setOperationName(new QName("http://server.webservice.example.com", //wsdl文件中的targetNamespace
- "emrService") //接口实现功能的方法
- );
-
- //3、设置参数
- call.addParameter("data", XMLType.XSD_STRING,ParameterMode.IN);// 接口的参数
- call.addParameter("data2",XMLType.XSD_STRING,ParameterMode.IN);// 接口的参数
- call.setReturnType(XMLType.XSD_STRING);// 设置返回类型
-
-
-
- //4、给方法传递参数,并且调用方法
- String result = (String) call.invoke(new Object[] {"1111" ,"2222"});
- System.out.println("result="+result);
- } catch (Exception e) {
- e.printStackTrace();
- }
-
- //
- }
- public static void restfangwen() {
- RestTemplate restTemplate = new RestTemplate();
- HttpHeaders headers = new HttpHeaders();
- headers.setContentType(MediaType.APPLICATION_XML);
- String xml="<soapenv:Envelope xmlns:soapenv=\"http://schemas.xmlsoap.org/soap/envelope/\" xmlns:ser=\"http://server.webservice.example.com\">\r\n"
- + " <soapenv:Header/>\r\n"
- + " <soapenv:Body>\r\n"
- + " <ser:aboutstudent>\r\n"
- + " <!--Optional:-->\r\n"
- + " <student>\r\n"
- + " <!--Optional:-->\r\n"
- + " <name>zx</name>\r\n"
- + " <!--Optional:-->\r\n"
- + " <address>address</address>\r\n"
- + " <!--Optional:-->\r\n"
- + " <age>18</age>\r\n"
- + " </student>\r\n"
- + " </ser:aboutstudent>\r\n"
- + " </soapenv:Body>\r\n"
- + "</soapenv:Envelope>";
- HttpEntity requestEntity = new HttpEntity<>(xml, headers);
- ResponseEntity<String> resEntity = restTemplate.postForEntity("http://localhost:8081/service/ws/api",
- requestEntity, String.class);
- String result=resEntity.getBody();
-
- System.out.println("str="+result);
- }
- public static void main(String[] args) {
- WbClient.restfangwen();
- }
- }
在这个测试类中,我访问的是webservice里的aboutstudent方法,能得到对应的返回内容
str=<soap:Envelope xmlns:soap="http://schemas.xmlsoap.org/soap/envelope/"><soap:Body><ns2:aboutstudentResponse xmlns:ns2="http://server.webservice.example.com"><return>student.getName()=zx</return></ns2:aboutstudentResponse></soap:Body></soap:Envelope>
用axis能访问emrService方法,并且返回正确的数据。如果输入参数不是java基本类型而是类的话,怎么弄都不好使,网上各种办法都不好使,我也不知道为啥。各位大神如果你们成功了,就请在留言区说一下,小弟不胜感激。


