
热门标签
热门文章
- 1Unity shader Reflect 取反问题_shader取相反
- 2vue脚手架在vue.config.js文件中配置scss全局变量_vue.config.js scss
- 3狂神说Docker进阶版_k8s 狂神
- 4ScheduledThreadPoolExecutor源码解读(二)——ScheduledFutureTask时间调度执行任务(延迟执行、周期性执行)_delayedexecute
- 5linux terminal 命令--chown&chgrp&chmod_terminal chmod
- 6后端开发实践:Spring Boot项目模板_springboot项目模板
- 7解读大模型的微调
- 8素数距离问题--以为存储素数表会更快,结果sqrt更快
- 9【Linux从入门到精通】Linux常用基础指令(上)
- 10为 Ubuntu22.04 系统添加中文输入法_ubuntu22.04中文输入法
当前位置: article > 正文
springboot整合springsercurity_spring boot ser
作者:odstu | 2024-02-01 13:24:55
赞
踩
spring boot ser
(一) 修改用户名密码
简介
Spring Security 基于 Spring 框架,提供了一套 Web 应用安全性的完整解决方案。一般来说,Web 应用的安全性包括用户认证(Authentication)和用户授权(Authorization)两个部分。用户认证指的是验证某个用户是否为系统中的合法主体,也就是说用户能否访问该系统。用户认证一般要求用户提供用户名和密码。系统通过校验用户名和密码来完成认证过程。用户授权指的是验证某个用户是否有权限执行某个操作。在一个系统中,不同用户所具有的权限是不同的。比如对一个文件来说,有的用户只能进行读取,而有的用户可以进行修改。一般来说,系统会为不同的用户分配不同的角色,而每个角色则对应一系列的权限。
代码如下:
- 导入对应坐标,web+security
<!--    web-->
        <dependency>
            <groupId>org.springframework.boot</groupId>
            <artifactId>spring-boot-starter-web</artifactId>
        </dependency>

<!--    spring安全控制    -->
        <dependency>
            <groupId>org.springframework.boot</groupId>
            <artifactId>spring-boot-starter-security</artifactId>
        </dependency>
    </dependencies>
- 1
- 2
- 3
- 4
- 5
- 6
- 7
- 8
- 9
- 10
- 11
- 12
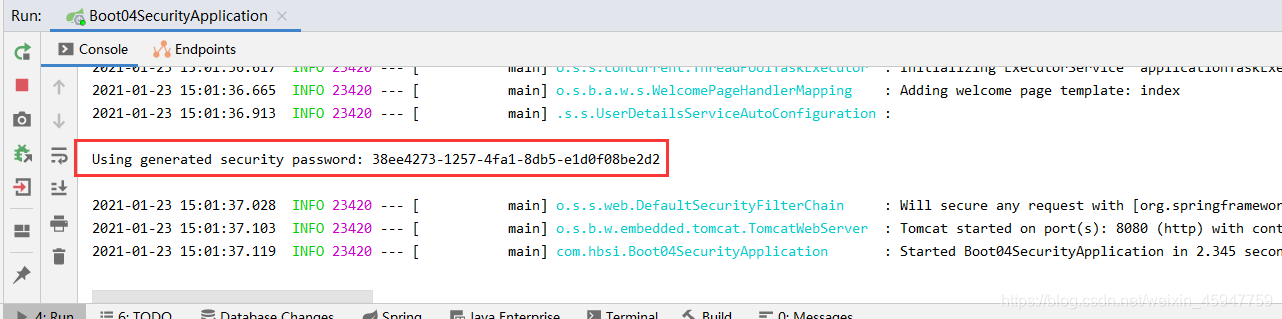
2.1 默认用户名: user,启动工程,控制台会输出,security随机生成的密码 如图:
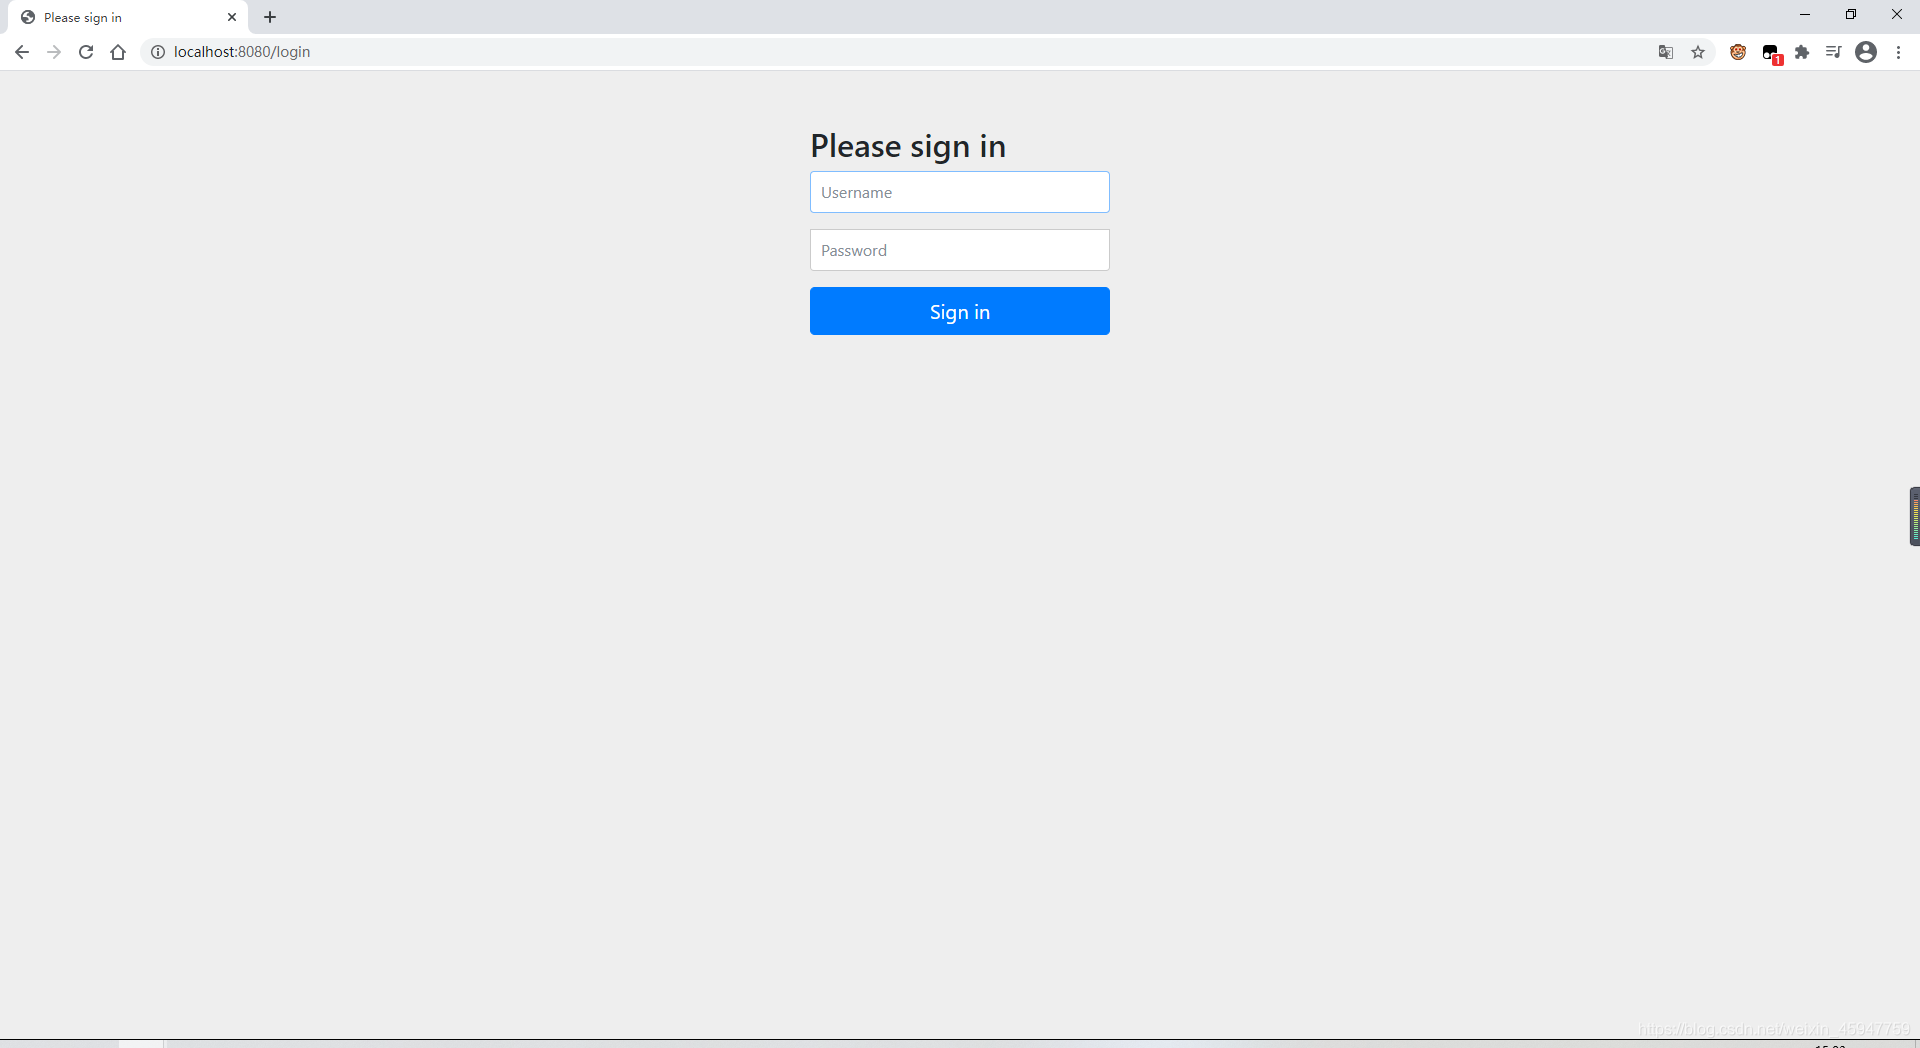
2.2 访问项目根路径 localhost:8080,发现跳到了登录页
- 基本原理分析:
- SpringSecurity本质是一个过滤器链
- FilterSecurityInterceptor :权限过滤器,基本位于过滤链的最底部
- ExceptionTranslationFilter :异常过滤器,处理认证授权过程中抛出的异常
- UsernamePasswordAuthenticationFilter :对/login的POST请求做拦截,校验表单中用户名,密码。
- 两个重要接口
- UserDetailsService:进行查询数据库账号密码的过程
- 创建类继承 UsernamePasswordAuthenticationFilter,重写三个方法
- 创建UserDetailsService实现类,编写查询数据库过程,返回User对象,这个User对象是security框架提供的
- PasswordEncoder:数据加密接口(加密密码)
- UserDetailsService:进行查询数据库账号密码的过程
- SpringSecurity本质是一个过滤器链
- 设置登录的用户名和密码:三种方式
- 配置文件 applicaiton.yml:
spring: security: user: name: admin password: 123123 ```- 1
- 2
- 3
- 4
- 5
- 6
- 配置类:编写配置类,继承WebSecurityConfigurerAdapter
@Configuration
public class SecurityConfig extends WebSecurityConfigurerAdapter {

    @Override//认证
    protected void configure(AuthenticationManagerBuilder auth) throws Exception {
//        密码加密器,它实现了 PasswordEncoder 接口
        BCryptPasswordEncoder passwordEncoder = new BCryptPasswordEncoder();
        String password = passwordEncoder.encode("zhangsan");

        auth.inMemoryAuthentication() //内存中进行校验
                .withUser("zhangsan").password(password).roles("vip1");
    }

    @Bean //由于加密时需要用到 PasswordEncoder接口,所以要放到容器中,否则报错
    public PasswordEncoder passwordEncoder(){
        return new BCryptPasswordEncoder();
    }
}
- 1
- 2
- 3
- 4
- 5
- 6
- 7
- 8
- 9
- 10
- 11
- 12
- 13
- 14
- 15
- 16
- 17
- 18
- 自定义编写实现类 (重点、常用)
- 配置类:
@Configuration public class SecurityConfig extends WebSecurityConfigurerAdapter { @Autowired //注入服务层, UserDetailsService userDetailsService; @Override//身份验证管理器生成器 protected void configure(AuthenticationManagerBuilder auth) throws Exception { auth.userDetailsService(userDetailsService).passwordEncoder(passwordEncoder()); } @Bean //由于加密时需要用到 PasswordEncoder接口,所以要放到容器中,否则报错 public PasswordEncoder passwordEncoder() { return new BCryptPasswordEncoder(); } }- 1
- 2
- 3
- 4
- 5
- 6
- 7
- 8
- 9
- 10
- 11
- 12
- 13
- 14
- 15
- 16
- 服务层:这里应该查询数据库,因为麻烦所以不查了
@Service("userDetailsService") public class MyUserDetailsService implements UserDetailsService { @Override public UserDetails loadUserByUsername(String s) throws UsernameNotFoundException { // 1. 查看源码发现 Security的User类 需要传入用户名 密码 Collection 集合 // 2. 调用工具类中commaSeparatedStringToAuthorityList()方法创建权限集合 List<GrantedAuthority> list = AuthorityUtils.commaSeparatedStringToAuthorityList("vip"); return new User("student",new BCryptPasswordEncoder().encode("student"),list); } }- 1
- 2
- 3
- 4
- 5
- 6
- 7
- 8
- 9
- 10
- 配置类:
- 配置文件 applicaiton.yml:
Security的异常
- DaoAuthenticationProvider中存在UsernameNotFoundException 等异常,查询数据库如果User为空,可以抛出(根具需求)
(2) 授权及自定义登录页、无权限访问页
代码如下
- 配置类中 重写父类的 configure(HttpSecurity http) 方法
// 授权 /** * login.html中form表单提交地址为 /user/login * .formLogin() * .loginPage("/login.html") 更改登录页面为自己编写的登录页 * .loginProcessingUrl("/user/login")登录访问路径 * .defaultSuccessUrl("/test/index").permitAll() 登录成功后,跳转路径 * * * .authorizeRequests().antMatchers( //授权:哪些路径需要什么角色访问 * 1. hasAuthority():当前用户具有指定的权限,返回true,否则 fals * 2. hasAnyAuthority():当前用户具有其中一个权限, 逗号分 * 3. hasRole() 方法 可查看源码,创建对象权限时,权限前缀为:ROLE_xx * 4. hasAnyRole:同 3,逗号分隔 * 5. anyRequest().authenticated()//所有请求都被访问 * 6. csrf().disable();//关闭csrf防护 */ protected void configure(HttpSecurity http) throws Exception { http.formLogin() //登录页面设置 .loginPage("/login.html") // .loginProcessingUrl("/user/login") .defaultSuccessUrl("/test/index").permitAll() .and().authorizeRequests() .antMatchers("/","/user/login").permitAll() .antMatchers("/vip1/").hasRole("vip1") // .antMatchers("/test/index").hasAuthority("admins") // .antMatchers("/test/index").hasAnyAuthority("admins,student") // .antMatchers("/test/index").hasRole("admins") // .antMatchers("/test/index").hasAnyRole("admins","sale") .anyRequest().authenticated() .and().csrf().disable(); // static目录下创建html页面 指定无权限访问页 http.exceptionHandling().accessDeniedPage("/denied.html"); }- 1
- 2
- 3
- 4
- 5
- 6
- 7
- 8
- 9
- 10
- 11
- 12
- 13
- 14
- 15
- 16
- 17
- 18
- 19
- 20
- 21
- 22
- 23
- 24
- 25
- 26
- 27
- 28
- 29
- 30
- 31
- 32
- 33
- 34
- 35
- 36
- 测试省略…
(3)认证授权注解使用
授权:
-
配置类 或 主程序类添加注解 @EnableGlobalMethodSecurity() 详细见注释
/** * 认证授权注解使用 * 步骤: * 1. 启动类(配置类) 开启注解(需要哪个注解就开启哪个注解)@EnableGlobalMethodSecurity() * 2. 在controller的方法上面使用注解,设置角色 * 注解: * 1. @Secured:用户具有某个角色可以访问方法 * * 需要开启 securedEnabled = true, * 2. @PreAuthorize:注解适合进入方法前的权限验证,可以将登录用户的 roles/permissions参数传到方法中 * * 需要开启 prePostEnabled = true * * @PreAuthorize("hasAnyRole('ROLE_admins','ROLE_sale')") * 3. @PostAuthorize("hasAnyAuthority('admins')"):执行方法后,返回试图前 进行判断 * * 适合验证带有返回值的权限 */ @Controller public class SecurityTestController { // @Secured({"ROLE_sale","ROLE_admin1"}) // @PreAuthorize("hasAnyAuthority('admins')") // @PostAuthorize("hasAnyAuthority('admins')") @ResponseBody @RequestMapping("/update") @PostAuthorize("hasAnyAuthority('admins')") public String update() { System.out.println("test running..."); return "hello update"; } }- 1
- 2
- 3
- 4
- 5
- 6
- 7
- 8
- 9
- 10
- 11
- 12
- 13
- 14
- 15
- 16
- 17
- 18
- 19
- 20
- 21
- 22
- 23
- 24
- 25
- 26
- 27
- 28
- 前三个权限注解测试省略,
-
存在两个拦截器注解
-
@PostFilter:对方法返回数据进行过滤
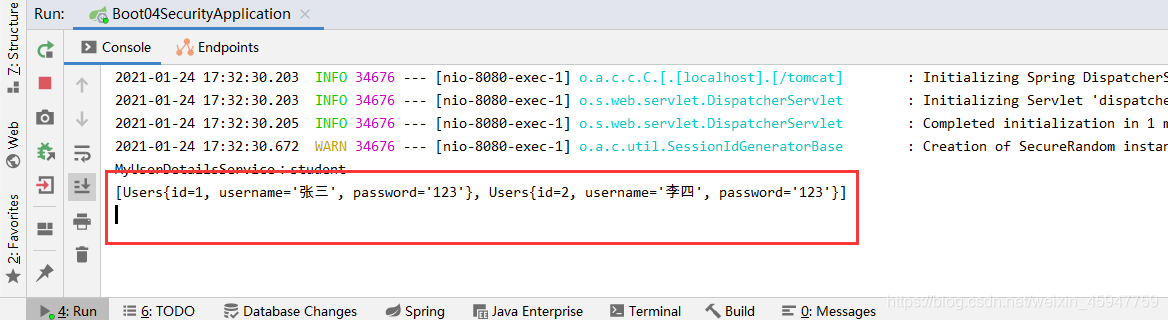
/* 测试: 1. 添加@PostFilter注解 --> filterObject为内置对象 2. list集合内传入两条数据 */ @ResponseBody @RequestMapping("/update") @PreAuthorize("hasAnyAuthority('student')") @PostFilter("filterObject.username == '张三'") // 若用户名为 张三 则放行 public List<Users> update() { List<Users> list = new ArrayList<>(); list.add(new Users(1,"张三","123")); list.add(new Users(2,"李四","123")); System.out.println(list); return list; }- 1
- 2
- 3
- 4
- 5
- 6
- 7
- 8
- 9
- 10
- 11
- 12
- 13
- 14
- 15
- 16
- 17
- 18
- 19
- 控制台输出
- 访问页面:
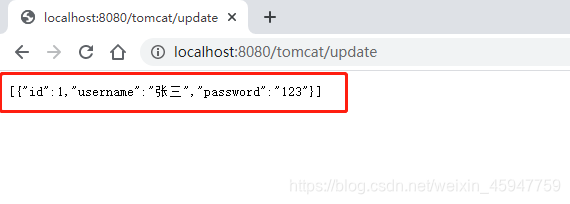
- 测试成功,说明在执行完方法后,返回视图前,该注解会拦截掉不匹配的数据
-
@PreFilter: 对传入方法数据进行过滤
- 该测试方法同上,请自行测试,
-
(4)注销、记住我功能
-
注销功能: 在配置类中protected void configure(HttpSecurity http) 方法配置
- http.logout().logoutUrl("/logout").logoutSuccessUrl("/");
- 退出时进行的其它功能,查看LogoutConfigurer.class

-
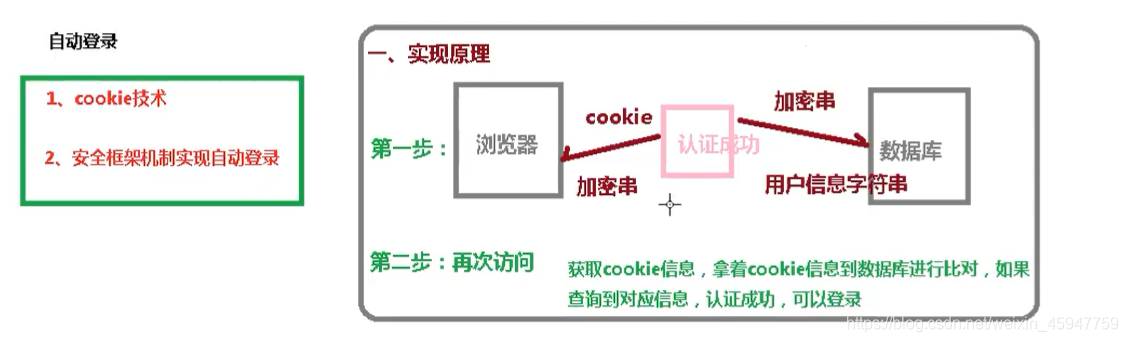
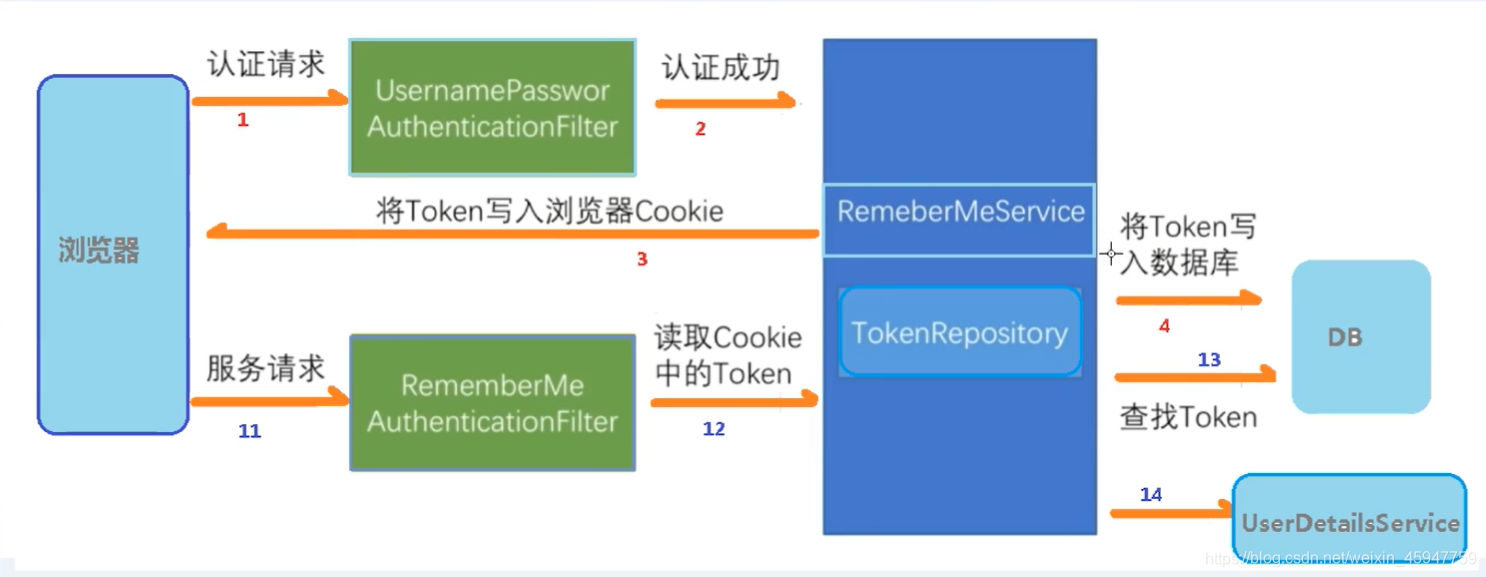
记住我功能
-
实现原理
-
具体实现步骤
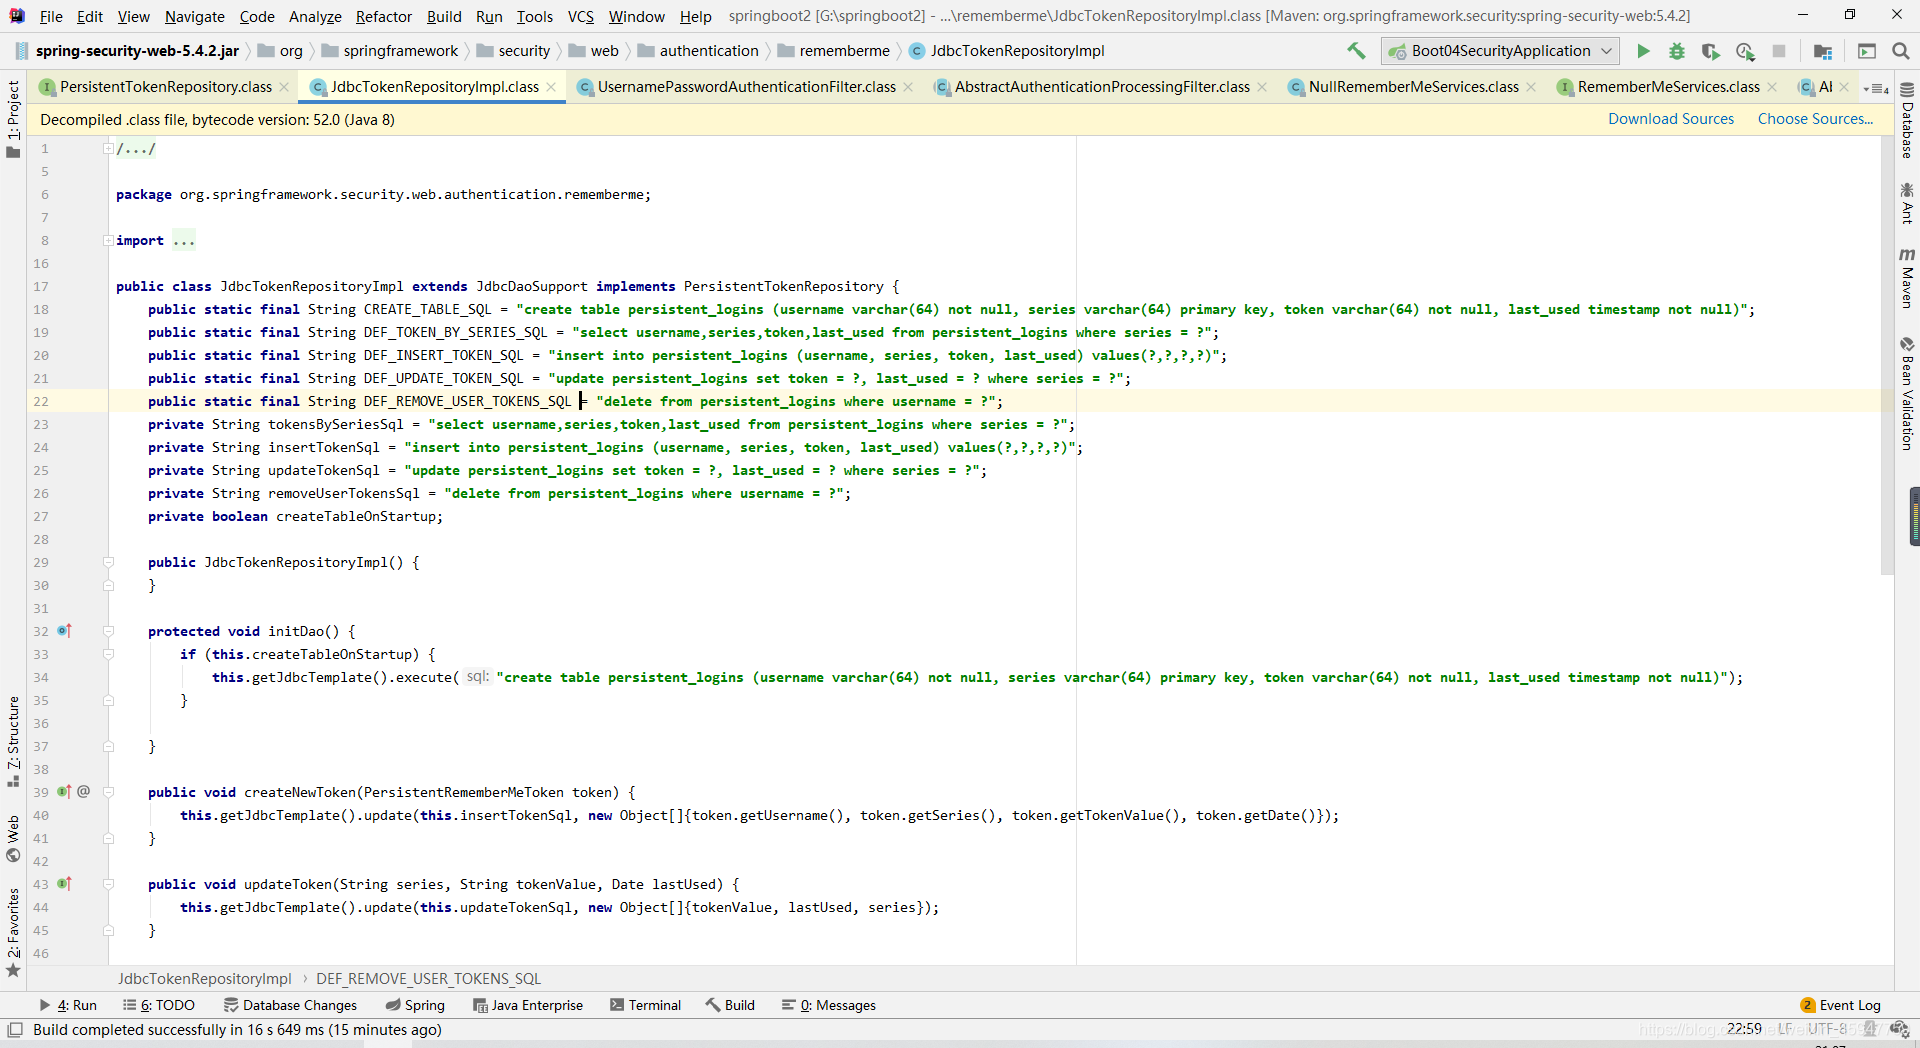
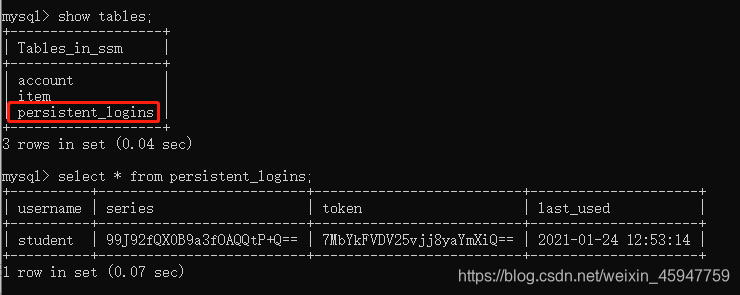
- 创建数据库表 persistent_logins 查看JdbcTokenRepositoryImpl源码发现也可以不创建,底层自动创建(配置即可)
- 由于涉及数据库,所以需要导入mybatis或其它,配置文件完成数据库配置(此步骤省略)
- 配置类注入数据源,配置操作数据库对象
@Autowired private DataSource dataSource; @Bean public PersistentTokenRepository persistentTokenRepository(){ //操作数据库对象, JdbcTokenRepositoryImpl jdbcTokenRepository = new JdbcTokenRepositoryImpl(); jdbcTokenRepository.setDataSource(dataSource);//设置数据源,因为需要操作数据库 jdbcTokenRepository.setCreateTableOnStartup(true); //启动时自动创建表,如果存在该表则报错 return jdbcTokenRepository; }- 1
- 2
- 3
- 4
- 5
- 6
- 7
- 8
- 9
- 10
- 配置类中 protected void **configure(HttpSecurity http)**方法设置自动登录配置
// 自动登录 http.rememberMe().tokenRepository(persistentTokenRepository()) //注入上面的数据库操作对象 .tokenValiditySeconds(60) //设置有效时长 (秒) .userDetailsService(userDetailsService); //注入userDetailsService,用于获取登录的用户- 1
- 2
- 3
- 4
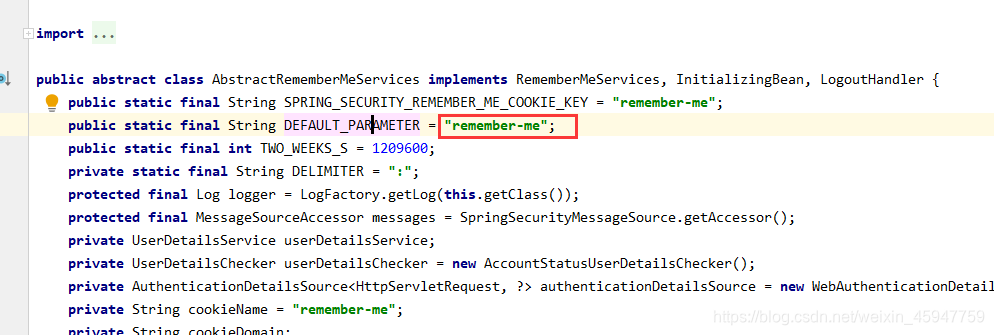
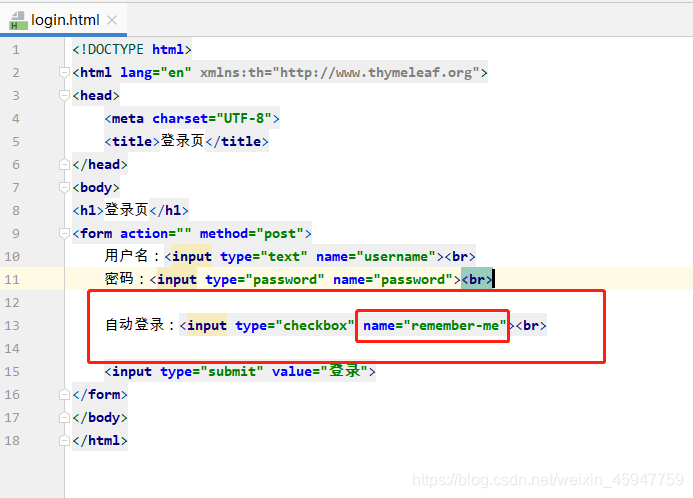
- 登录页面添加复选框,查看源码发现 name 必须为 remember-me,
- 创建数据库表 persistent_logins 查看JdbcTokenRepositoryImpl源码发现也可以不创建,底层自动创建(配置即可)
-
启动项目进行测试:选择记住我登录成功后,查看数据库,发现成功自动创建表,并存在数据
关闭浏览器,重新访问其它页面,无需登录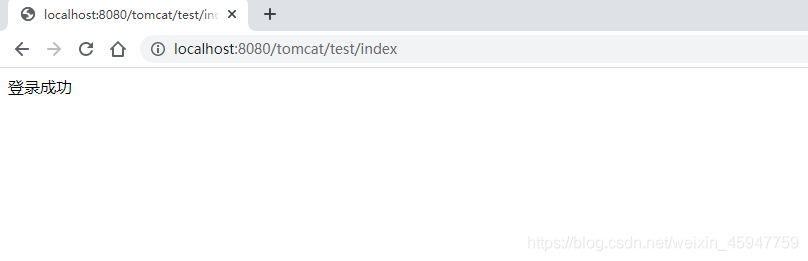
本文内容由网友自发贡献,转载请注明出处:https://www.wpsshop.cn/article/detail/53888
推荐阅读


相关标签

