
- 1c语言如何建立一个查找函数,C语言:自定义一个查找字串的功能函数,类似于
中的strstr()... - 2STM32 ST-Link Utility使用教程
- 3基于Java+SpringBoot+Vue前后端分离书店购书系统设计与实现(有视频教程)_如何获取springboot小项目的设计书
- 4科普初步了解大模型_大模型的产生
- 5Docker快速入门——Docker-Compose
- 6Scrum敏捷开发企业培训-敏捷研发管理
- 7Codeforces Round #698 (Div. 2)-C. Nezzar and Symmetric Array-题解_codeforces round #698 (div. 2) 题解
- 8Java中byte与String的相互转化_java byte string
- 9bat文件如何创建lnk
- 10Spark安装配置(本地模式、伪分布式、集群模式--standalone,yarn模式)_spark standalone spark_history_opts 不用hdfs
SpringBoot多数据源最佳实践_spring 多数据源
赞
踩
写在文章开头
你好,我叫sharkchili,目前还是在一线奋斗的Java开发,经历过很多有意思的项目,也写过很多有意思的文章,是CSDN Java领域的博客专家,也是Java Guide的维护者之一,非常欢迎你关注我的公众号:写代码的SharkChili,这里面会有笔者精心挑选的并发、JVM、MySQL数据库专栏,也有笔者日常分享的硬核技术小文。
为什么需要spring boot多数据源
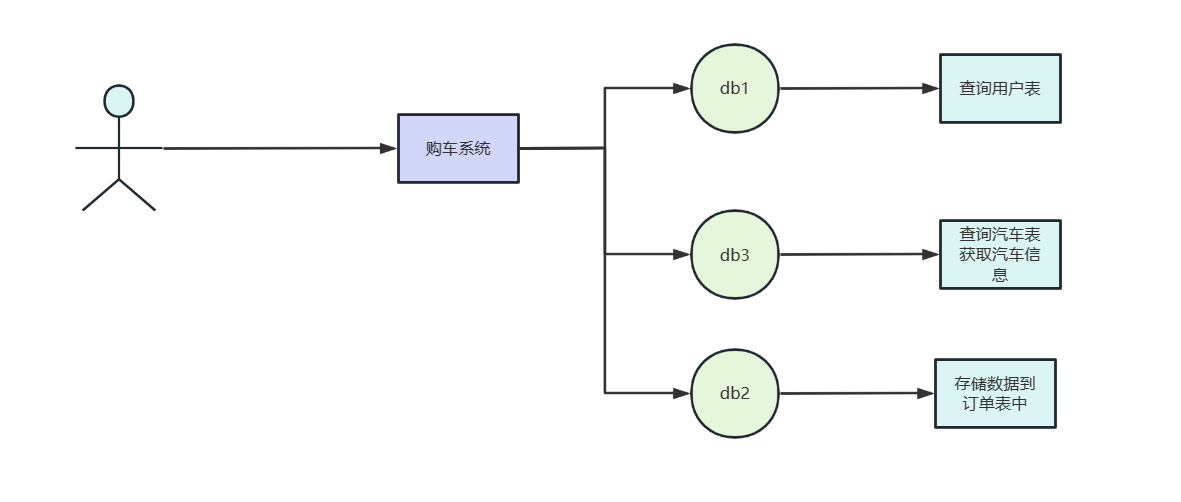
最常见的场景就是单体架构系统需要跨库进行业务增删改查,例如一个购车系统可能需要查询用户信息,然后在进行购买汽车的逻辑。而用户表和汽车表可能不在一个数据库中。
如下图所示,可能一个购买汽车的下单流程为:
- 用户提交请求。
- 基于id到数据源1查询当前用户信息。
- 基于汽车id到数据源3查询汽车信息。
- 将用户id、汽车id、数量存到数据源2订单表中。
面对这种数据源,我们不妨了解一下spring数据源加载原理,寻找可以扩展的点从而完成多数据源切换完成该业务需求的开发。
了解spring数据源加载原理
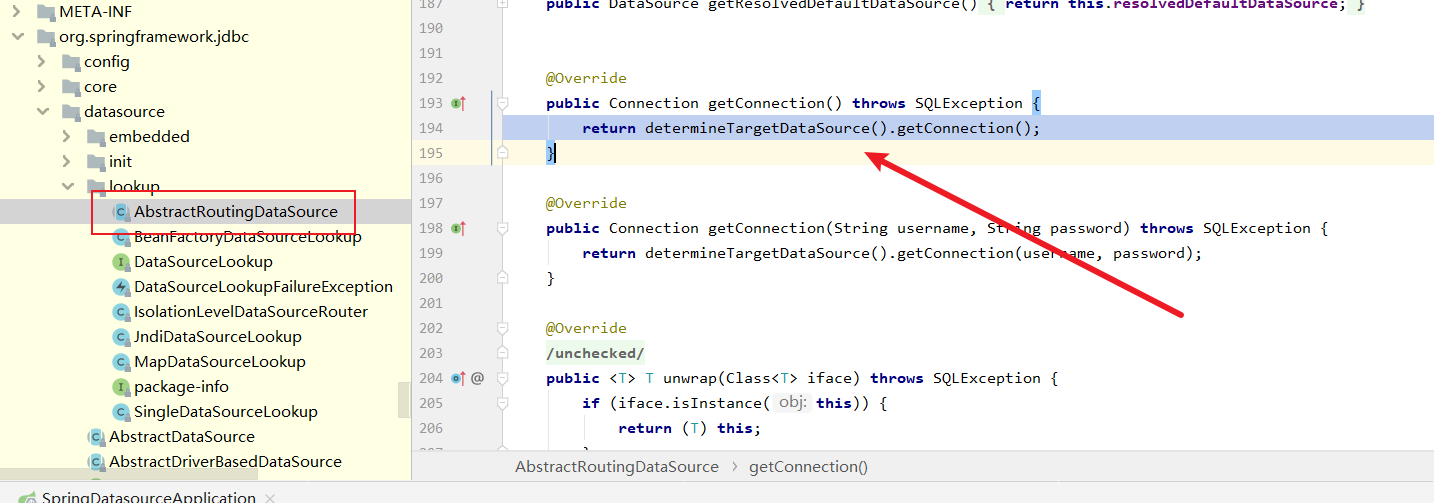
我们在调试spring数据源的时候看到这么一个类AbstractRoutingDataSource的类,它的类图如下所示:
数据源加载整体流程解析
可以看到它用到了InitializingBean这个接口,说明在bean加载完成之后肯定有进行一些相关数据源的操作,我们不妨看看源码。

我们在AbstractRoutingDataSource看到这个方法的实现,如下所示,可以看到它的逻辑很简单:
- 从
targetDataSources获取到数据源的key的value存到resolvedDataSources,作为后续数据源切换时用到的材料。 - 如果
resolvedDefaultDataSource不为空,则将当前项目的defaultTargetDataSource设置为defaultTargetDataSource。
@Override
	public void afterPropertiesSet() {
		if (this.targetDataSources == null) {
			throw new IllegalArgumentException("Property 'targetDataSources' is required");
		}

		//将targetDataSources的值存到resolvedDataSources中,作为后续切换的依据。
		this.resolvedDataSources = CollectionUtils.newHashMap(this.targetDataSources.size());
		this.targetDataSources.forEach((key, value) -> {
			Object lookupKey = resolveSpecifiedLookupKey(key);
			DataSource dataSource = resolveSpecifiedDataSource(value);
			this.resolvedDataSources.put(lookupKey, dataSource);
		});
//如果resolvedDefaultDataSource 不为空,则将当前项目的defaultTargetDataSource 设置为defaultTargetDataSource
		if (this.defaultTargetDataSource != null) {
			this.resolvedDefaultDataSource = resolveSpecifiedDataSource(this.defaultTargetDataSource);
		}
	}

- 1
- 2
- 3
- 4
- 5
- 6
- 7
- 8
- 9
- 10
- 11
- 12
- 13
- 14
- 15
- 16
- 17
- 18
了解spring boot启动时数据源的基本流程之后,我们再来了解一下这个加载的细节。
遍历targetDataSources时,对key和value解析流程
上面整体流程时提到,spring会从targetDataSources中取出数据源的key和value进行解析然后存放到resolvedDataSources,这里我们不妨看看实现细节。
首先是resolveSpecifiedLookupKey方法,源码如下,可以看到代码实现很简单,原原本本返回出去即可。
protected Object resolveSpecifiedLookupKey(Object lookupKey) {
		return lookupKey;
	}
- 1
- 2
- 3
再来看看resolveSpecifiedDataSource,逻辑也很简单,如果传进来的数据源配置是字符串类型,说明是配置中取到的,需要用dataSourceLookup转换成数据源类,如果本身就是DataSource类直接返回即可。
protected DataSource resolveSpecifiedDataSource(Object dataSource) throws IllegalArgumentException {
		if (dataSource instanceof DataSource) {
			return (DataSource) dataSource;
		}
		else if (dataSource instanceof String) {
			return this.dataSourceLookup.getDataSource((String) dataSource);
		}
		else {
			throw new IllegalArgumentException(
					"Illegal data source value - only [javax.sql.DataSource] and String supported: " + dataSource);
		}
	}
- 1
- 2
- 3
- 4
- 5
- 6
- 7
- 8
- 9
- 10
- 11
- 12
spring何时决定使用哪个数据源
这里我们不妨随便拿一段mybatis查询的业务代码来debug了解一下细节,以笔者为例笔者就在下面这段代码中插入一个断点。
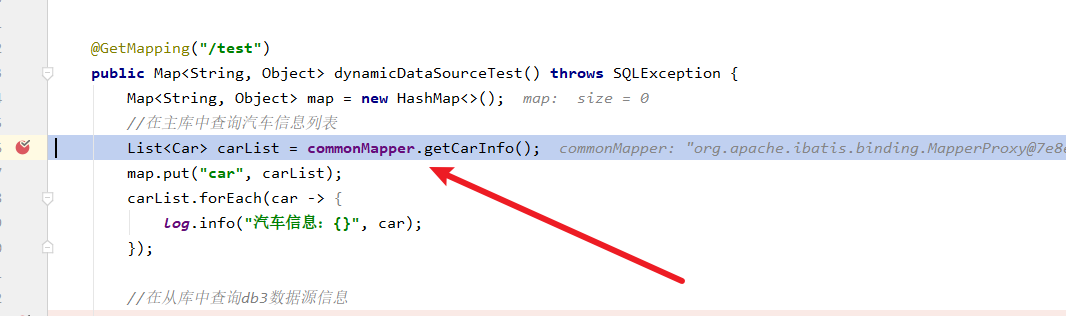
然后在debug过程中走到了一个DataSourceUtils工具类,调用一个getConnection方法,可以看出这个操作就是和数据源相关的。
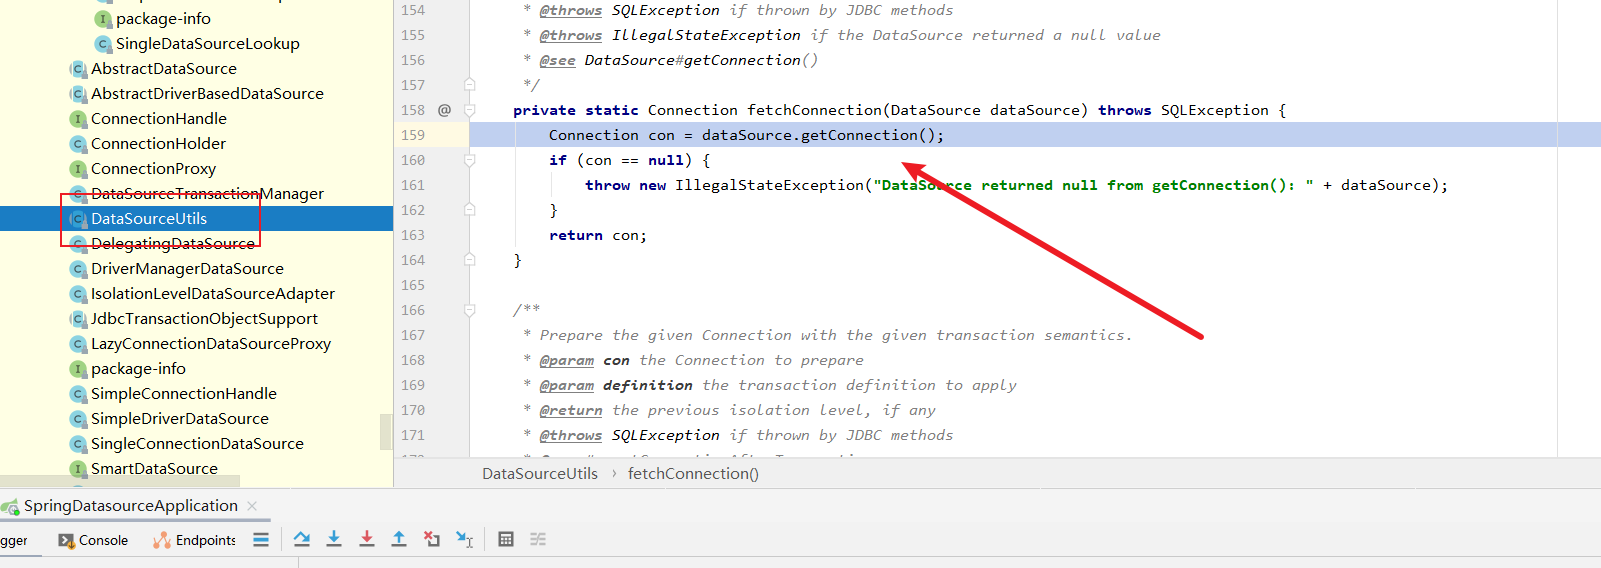
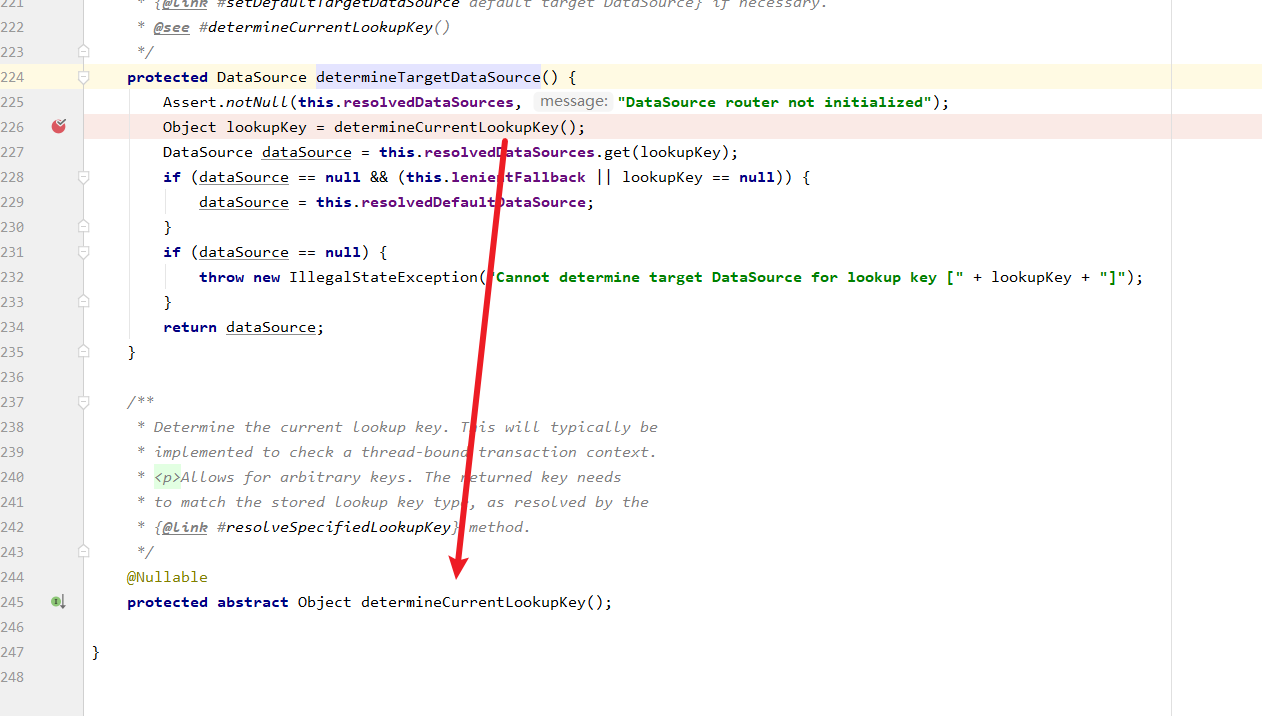
我们步入查看逻辑,于是我们的代码又来到了AbstractRoutingDataSource,可以看到一个determineTargetDataSource方法,我们猜想这个可能就和数据源切换有关系。
重点来了,笔者这里将代码贴出来,可以看到determineTargetDataSource的逻辑:
- 获取当前web应用用到key。
- 拿着key到上文启动时存放数据源键值对的resolvedDataSources获取数据源。
- 返回数据源出去,然后代码会调用getConnection建立连接。
protected DataSource determineTargetDataSource() {
		Assert.notNull(this.resolvedDataSources, "DataSource router not initialized");
		Object lookupKey = determineCurrentLookupKey();
		DataSource dataSource = this.resolvedDataSources.get(lookupKey);
		if (dataSource == null && (this.lenientFallback || lookupKey == null)) {
			dataSource = this.resolvedDefaultDataSource;
		}
		if (dataSource == null) {
			throw new IllegalStateException("Cannot determine target DataSource for lookup key [" + lookupKey + "]");
		}
		return dataSource;
	}
- 1
- 2
- 3
- 4
- 5
- 6
- 7
- 8
- 9
- 10
- 11
- 12
我们查看代码细节,可以看到determineCurrentLookupKey是一个抽象类,默认情况下有个单数据源的实现类,所以如果我们希望动态切换数据源,完完全全可以继承这个类,然后实现动态数据源切换逻辑,从而实现spring多数据源动态切换,一个功能在多个数据源中查询的逻辑。
功能实现思路
从源码中了解了spring的设计思路之后,我们现在就不妨设计一下多数据源切换的实现思路。首先是技术实现上:
- maven引入相关依赖。
- 编写多数据源的配置。
- 编写配置类将数据源加载到spring容器中。
- 编写一个线程数据源管理类,分别存放每一个请求线程的数据源key值。
- 编写一个数据源管理类,负责加载项目运行时的数据源加载和存放。
- 继承AbstractRoutingDataSource重写determineCurrentLookupKey基于线程数据源管理类实现获取最新数据源的逻辑。
业务实现上:
- 编写用户信息查询功能。
- 编写汽车信息查询功能。
- 编写下单信息存储功能。
好了,话不多说,现在就开始实现这个需求。
基于spring boot实现多数据源配置步骤
引入相关依赖
首先我们创建好一个spring boot脚手架之后引入下面这些依赖,这步骤没有什么特殊的地方,读者按需复制即可。
<!--web模块依赖-->
		<dependency>
			<groupId>org.springframework.boot</groupId>
			<artifactId>spring-boot-starter-web</artifactId>
		</dependency>
		<!--spring核心aop模块依赖-->
		<dependency>
			<groupId>org.springframework.boot</groupId>
			<artifactId>spring-boot-starter-aop</artifactId>
		</dependency>
		<!--德鲁伊数据源连接池依赖-->
		<dependency>
			<groupId>com.alibaba</groupId>
			<artifactId>druid-spring-boot-starter</artifactId>
			<version>1.2.8</version>
		</dependency>
		<!--mybatis依赖-->
		<dependency>
			<groupId>org.mybatis.spring.boot</groupId>
			<artifactId>mybatis-spring-boot-starter</artifactId>
			<version>2.2.2</version>
		</dependency>
		<!--mysql驱动-->
		<dependency>
			<groupId>mysql</groupId>
			<artifactId>mysql-connector-java</artifactId>
			<version>5.1.49</version>
		</dependency>
		<!--lombok模块依赖-->
		<dependency>
			<groupId>org.projectlombok</groupId>
			<artifactId>lombok</artifactId>
			<optional>true</optional>
		</dependency>
- 1
- 2
- 3
- 4
- 5
- 6
- 7
- 8
- 9
- 10
- 11
- 12
- 13
- 14
- 15
- 16
- 17
- 18
- 19
- 20
- 21
- 22
- 23
- 24
- 25
- 26
- 27
- 28
- 29
- 30
- 31
- 32
- 33
- 34
常量定义
/**
 * 数据源配置常量类
 */
public class CommonConstant {
    /**
     * 默认数据源标识
     */
    public static final String MASTER = "master";
    /**
     * 从数据源标识
     */
    public static final String SLAVE = "slave";
}
- 1
- 2
- 3
- 4
- 5
- 6
- 7
- 8
- 9
- 10
- 11
- 12
- 13
编写数据源配置类将数据源加载到容器中
这一步我们首先需要编写配置,如下所示,我们将多个数据源的信息添加到yml文件中。
spring:
  datasource:
    druid:
      type: com.alibaba.druid.pool.DruidDataSource
      master:
        url: jdbc:mysql://rm-xxxxxxx.mysql.rds.aliyuncs.com:3306/db1?useUnicode=true&characterEncoding=utf-8&useSSL=false
        username: xxxxxx
        password: xxxxx
        driver-class-name: com.mysql.jdbc.Driver
      slave:
        url: jdbc:mysql://rm-xxxxxxxxxx.mysql.rds.aliyuncs.com:3306/db2?useUnicode=true&characterEncoding=utf-8&useSSL=false
        username: xxxxxxx
        password: xxxxxxxx
        driver-class-name: com.mysql.jdbc.Driver
- 1
- 2
- 3
- 4
- 5
- 6
- 7
- 8
- 9
- 10
- 11
- 12
- 13
- 14
然后我们编写一个DruidConfig配置类,将上面master和slave库和数据源的bean绑定并存到spring容器中。
/**
 * 数据源配置类
 */
@Configuration
@MapperScan("com.example.springdatasource.mapper")
public class DruidConfig {

    /**
     * 主库数据源bean,和spring.datasource.druid.master配置绑定
     * @return
     */
    @Bean(name = CommonConstant.MASTER)
    @ConfigurationProperties("spring.datasource.druid.master")
    public DataSource masterDataSource()
    {
        DruidDataSource master = DruidDataSourceBuilder.create().build();
        return master;
    }

    /**
     * 从库数据源bean,和spring.datasource.druid.slave绑定
     * @return
     */
    @Bean(name = CommonConstant.SLAVE)
    @ConfigurationProperties("spring.datasource.druid.slave")
    public DataSource slaveDataSource()
    {
        DruidDataSource slave = DruidDataSourceBuilder.create().build();
        return slave;
    }

    /**
     * 动态数据源bean
     * @return
     */
    @Bean
    @Primary
    public DynamicDataSource dynamicDataSource()
    {
        //创建一个存放数据源的map
        Map<Object, Object> dataSourceMap = new HashMap<>(2);
        //将上述两个数据源存放到map中
        dataSourceMap.put(CommonConstant.MASTER,masterDataSource());
        dataSourceMap.put(CommonConstant.SLAVE,slaveDataSource());


        //设置动态数据源,默认为master配置的数据源,并指定数据源的map
        DynamicDataSource dynamicDataSource = new DynamicDataSource();
        dynamicDataSource.setDefaultTargetDataSource(masterDataSource());
        dynamicDataSource.setTargetDataSources(dataSourceMap);


        //将数据源信息备份在defineTargetDataSources中
        dynamicDataSource.setDefineTargetDataSources(dataSourceMap);

        return dynamicDataSource;
    }
}
- 1
- 2
- 3
- 4
- 5
- 6
- 7
- 8
- 9
- 10
- 11
- 12
- 13
- 14
- 15
- 16
- 17
- 18
- 19
- 20
- 21
- 22
- 23
- 24
- 25
- 26
- 27
- 28
- 29
- 30
- 31
- 32
- 33
- 34
- 35
- 36
- 37
- 38
- 39
- 40
- 41
- 42
- 43
- 44
- 45
- 46
- 47
- 48
- 49
- 50
- 51
- 52
- 53
- 54
- 55
- 56
- 57
- 58
多线程数据源管理类
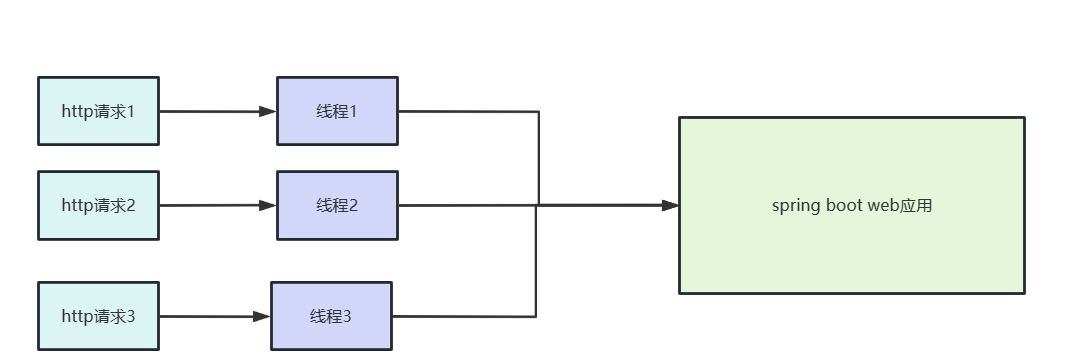
我们都知道在spring boot这个web应用中,每一个请求都会以线程的形式发起调用,所以需要保证每一个线程之间的数据源互不干扰,我们就必须编写一个保证线程安全的工具存储每个线程当前的数据源key。
所以我们编写了一个DynamicDataSourceHolder 通过ThreadLocal实现线程间的数据源隔离。
/**
 * 数据源切换处理类
 *
 */
@Slf4j
public class DynamicDataSourceHolder {
    /**
     * 为每个线程存放当前数据源的ThreadLocal
     */
    private static final ThreadLocal<String> DYNAMIC_DATASOURCE_KEY = new ThreadLocal<>();

    /**
     * 为当前线程切换数据源
     */
    public static void setDynamicDataSourceKey(String key) {
        log.info("数据源切换key:{}", key);
        DYNAMIC_DATASOURCE_KEY.set(key);
    }

    /**
     * 获取动态数据源的名称,默认情况下使用mater数据源
     */
    public static String getDynamicDataSourceKey() {
        String key = DYNAMIC_DATASOURCE_KEY.get();
        if (ObjectUtils.isEmpty(key)) {
            key = CommonConstant.MASTER;
        }
        log.info("获取数据源,key:{}", key);
        return key;
    }

    /**
     * 将ThreadLocal置空,移除当前数据源
     */
    public static void removeDynamicDataSourceKey() {
        log.info("移除数据源:{}", DYNAMIC_DATASOURCE_KEY.get());
        DYNAMIC_DATASOURCE_KEY.remove();
    }
}
- 1
- 2
- 3
- 4
- 5
- 6
- 7
- 8
- 9
- 10
- 11
- 12
- 13
- 14
- 15
- 16
- 17
- 18
- 19
- 20
- 21
- 22
- 23
- 24
- 25
- 26
- 27
- 28
- 29
- 30
- 31
- 32
- 33
- 34
- 35
- 36
- 37
- 38
- 39
- 40
数据源管理类(重点)
我们后续可能用到不止两个的数据库,所以我们可能会将数据源的信息保存到数据源中,考虑到这一点,我们编写了一个数据源管理类,负责将用户从数据库中查出来的数据源信息存到容器中。
为了做到这一点,我们首先需要编写一个数据源的类,记录一下数据库查出来的数据源信息。
/**
 * 数据源对象类
 */
public class DataSourceInfo {

    private String userName;
    private String passWord;
    private String url;
    private String dataSourceKey;

    public String getUserName() {
        return userName;
    }

    public void setUserName(String userName) {
        this.userName = userName;
    }

    public String getPassWord() {
        return passWord;
    }

    public void setPassWord(String passWord) {
        this.passWord = passWord;
    }

    public String getUrl() {
        return url;
    }

    public void setUrl(String url) {
        this.url = url;
    }

    public String getDataSourceKey() {
        return dataSourceKey;
    }

    public void setDataSourceKey(String dataSourceKey) {
        this.dataSourceKey = dataSourceKey;
    }

    @Override
    public String toString() {
        return "DataSourceInfo{" +
                "userName='" + userName + '\'' +
                ", passWord='" + passWord + '\'' +
                ", url='" + url + '\'' +
                ", dataSourceKey='" + dataSourceKey + '\'' +
                '}';
    }
}
- 1
- 2
- 3
- 4
- 5
- 6
- 7
- 8
- 9
- 10
- 11
- 12
- 13
- 14
- 15
- 16
- 17
- 18
- 19
- 20
- 21
- 22
- 23
- 24
- 25
- 26
- 27
- 28
- 29
- 30
- 31
- 32
- 33
- 34
- 35
- 36
- 37
- 38
- 39
- 40
- 41
- 42
- 43
- 44
- 45
- 46
- 47
- 48
- 49
- 50
- 51
- 52
然后我们就来编写数据源管理类,实现数据源加载和保存的逻辑,代码含义笔者都已详尽注释,读者可以自行查阅。
/**
 * 数据源管理工具类
 */
@Slf4j
@Component
public class DataSourceUtil {

    @Resource
    DynamicDataSource dynamicDataSource;

    /**
     * 测试数据源是否可用,如果可用即直接返回
     * @param dataSourceInfo
     * @return
     * @throws SQLException
     */
    public DruidDataSource createDataSourceConnection(DataSourceInfo dataSourceInfo) throws SQLException {
        //创建数据源对象
        DruidDataSource druidDataSource = new DruidDataSource();
        druidDataSource.setUrl(dataSourceInfo.getUrl());
        druidDataSource.setUsername(dataSourceInfo.getUserName());
        druidDataSource.setPassword(dataSourceInfo.getPassWord());
        druidDataSource.setBreakAfterAcquireFailure(true);
        druidDataSource.setConnectionErrorRetryAttempts(0);
        try {
            //尝试连接数据源
            druidDataSource.getConnection(2000);
            log.info("数据源:{}连接成功", JSONUtils.toJSONString(dataSourceInfo));
            return druidDataSource;
        } catch (SQLException e) {
            log.error("数据源 {} 连接失败,用户名:{},密码 {}",dataSourceInfo.getUrl(),dataSourceInfo.getUserName(),dataSourceInfo.getPassWord());
            return null;
        }
    }

    /**
     * 将外部数据源存到dynamicDataSource并调用afterPropertiesSet刷新
     * @param druidDataSource
     * @param dataSourceName
     */
    public void addDefineDynamicDataSource(DruidDataSource druidDataSource, String dataSourceName){
        Map<Object, Object> defineTargetDataSources = dynamicDataSource.getDefineTargetDataSources();
        //存到defineTargetDataSources这个map中
        defineTargetDataSources.put(dataSourceName, druidDataSource);
        dynamicDataSource.setTargetDataSources(defineTargetDataSources);
        //调用afterPropertiesSet重新遍历map中的数据源键值对存到resolvedDataSources中
        dynamicDataSource.afterPropertiesSet();
    }
}
- 1
- 2
- 3
- 4
- 5
- 6
- 7
- 8
- 9
- 10
- 11
- 12
- 13
- 14
- 15
- 16
- 17
- 18
- 19
- 20
- 21
- 22
- 23
- 24
- 25
- 26
- 27
- 28
- 29
- 30
- 31
- 32
- 33
- 34
- 35
- 36
- 37
- 38
- 39
- 40
- 41
- 42
- 43
- 44
- 45
- 46
- 47
- 48
- 49
最新数据源获取类
到上述步骤为止,我们已经编写动态数据源应用的行为,那么我们又该如何获取最新的数据源呢?还记得我们上文编写的DynamicDataSourceHolder吗?它通过ThreadLocal将可以得到当前线程的数据源的key,所以我们完全可以基于这个类编写一个DynamicDataSource,而DynamicDataSource则是继承AbstractRoutingDataSource重写determineCurrentLookupKey从而实现在运行时切换数据源。
@Data
@AllArgsConstructor
@NoArgsConstructor
public class DynamicDataSource extends AbstractRoutingDataSource {
    //备份所有数据源信息,
    private Map<Object, Object> defineTargetDataSources;

    /**
     * 返回当前线程需要用到的数据源bean
     */
    @Override
    protected Object determineCurrentLookupKey() {
        return DynamicDataSourceHolder.getDynamicDataSourceKey();
    }
}
- 1
- 2
- 3
- 4
- 5
- 6
- 7
- 8
- 9
- 10
- 11
- 12
- 13
- 14
- 15
- 16
集成mybatis
到上述步骤,动态数据源的东西我们都准备好了,为了保证教程的完整性,我们索性将mybatis集成一下。
首先编写一个mapper,所以接口的含义如下。
@Mapper
public interface CommonMapper{


    //到db1查询用户信息
    User getUserInfo(String id);
    //到db2查询其他配置的数据源的信息
    DataSourceInfo getNewDataSourceInfo(String sourceKey);
     //到db3查询汽车信息
    Car getCarInfo(String id);
}
- 1
- 2
- 3
- 4
- 5
- 6
- 7
- 8
- 9
- 10
- 11
- 12
xml文件如下所示
<?xml version="1.0" encoding="UTF-8"?>
<!DOCTYPE mapper PUBLIC "-//mybatis.org//DTD Mapper 3.0//EN" "http://mybatis.org/dtd/mybatis-3-mapper.dtd">
<mapper namespace="com.example.springdatasource.mapper.CommonMapper">


    <select id="getCarInfo" resultType="com.example.springdatasource.dto.Car">
        select * from car where id=#{id}
    </select>

    <select id="getNewDataSourceInfo" resultType="com.example.springdatasource.dto.DataSourceInfo">
        select * from datasourceinfo where dataSourceKey=#{sourceKey}
    </select>

    <select id="getUserInfo" resultType="com.example.springdatasource.dto.User">
        select * from user where  id=#{id}
    </select>
</mapper>
- 1
- 2
- 3
- 4
- 5
- 6
- 7
- 8
- 9
- 10
- 11
- 12
- 13
- 14
- 15
- 16
- 17
然后mybatis-config.xml配置如下,完全空的。
<?xml version="1.0" encoding="utf-8"?>
<!DOCTYPE configuration PUBLIC "-//mybatis.org//DTD Config 3.0//EN"
        "http://mybatis.org/dtd/mybatis-3-config.dtd">
<configuration>

</configuration>
- 1
- 2
- 3
- 4
- 5
- 6
最后是
mybatis:
  # dto包路径
  type-aliases-package: com.example.springdatasource.dto
  # xml文件路径
  mapperLocations: classpath:mapper/*Mapper.xml
  # xml文件路径
  configLocation: classpath:mapper/mybatis-config.xml
- 1
- 2
- 3
- 4
- 5
- 6
- 7
- 8
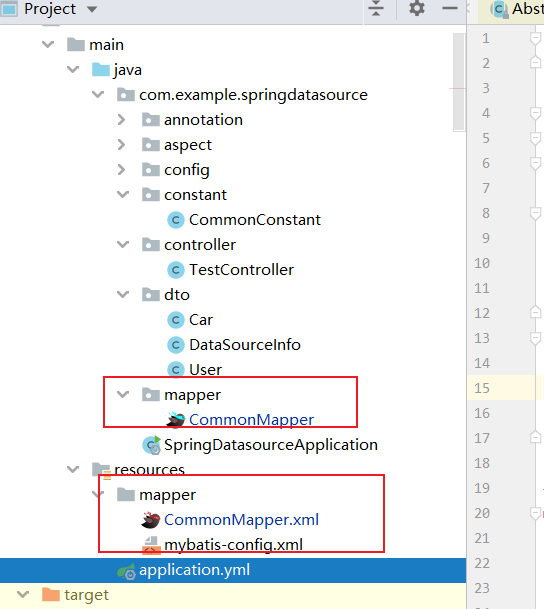
文件结构如下所示
业务功能准备
上面我们提到了汽车类和用户类,所以我们需要编写一下dto来描述一下这些类,首先是汽车类的代码。
@Getter
@Setter
@ToString
@NoArgsConstructor
public class Car {

    private String id;
    private String name;
    long price;

}
- 1
- 2
- 3
- 4
- 5
- 6
- 7
- 8
- 9
- 10
- 11
- 12
然后是用户类的代码
@Getter
@Setter
@ToString
@NoArgsConstructor
public class User {
    private String id;
    private String name;


}
- 1
- 2
- 3
- 4
- 5
- 6
- 7
- 8
- 9
- 10
- 11
数据库准备
还记得我们上文所说的需求描述吗?有3个数据源:
- db1有一张用户表,存储用户信息。
- db2有一张数据源表,存储其他的数据源的信息。
- db2有一张订单表,存储用户订单的信息。
- db3有一张汽车表,存储汽车的信息。
所以我们分别要到这几个数据源中建立这几张表,首先是db1的用户表,建表sql如下所示:
-- db1.`user` definition

CREATE TABLE `user` (
  `name` varchar(100) DEFAULT NULL,
  `id` varchar(100) DEFAULT NULL
) ENGINE=InnoDB DEFAULT CHARSET=utf8;
- 1
- 2
- 3
- 4
- 5
- 6
然后我们再插入两条数据:
INSERT INTO db1.`user` (name, id) VALUES('xiaoming', '1');
INSERT INTO db1.`user` (name, id) VALUES('xiaowang', '2');
- 1
- 2
- 3
同理我们到db2创建数据源信息表:
-- db2.datasourceinfo definition

CREATE TABLE `datasourceinfo` (
  `userName` varchar(100) CHARACTER SET utf8 COLLATE utf8_general_ci DEFAULT NULL,
  `passWord` varchar(100) CHARACTER SET utf8 COLLATE utf8_general_ci DEFAULT NULL,
  `url` varchar(500) CHARACTER SET utf8 COLLATE utf8_general_ci DEFAULT NULL,
  `dataSourceKey` varchar(100) CHARACTER SET utf8 COLLATE utf8_general_ci DEFAULT NULL
) ENGINE=InnoDB DEFAULT CHARSET=utf8;
- 1
- 2
- 3
- 4
- 5
- 6
- 7
- 8
同理订单表制作一张,其中uid为用户id,cid为汽车id。
CREATE TABLE db2.`order` (
	uid varchar(100) NULL,
	cid varchar(100) NULL,
	total varchar(100) NULL
)
ENGINE=InnoDB
DEFAULT CHARSET=utf8
COLLATE=utf8_general_ci;
- 1
- 2
- 3
- 4
- 5
- 6
- 7
- 8
- 9
初始化一条db3的数据源信息:
INSERT INTO db2.datasourceinfo (userName, passWord, url, dataSourceKey) VALUES('xxxxxx', 'xxxxxxx', 'jdbc:mysql://rm-xxxxxx.mysql.rds.aliyuncs.com:3306/db3?useUnicode=true&characterEncoding=utf-8&useSSL=false', 'slave2');
- 1
- 2
最后就是db3的汽车表信息了
-- db3.car definition

CREATE TABLE `car` (
  `id` varchar(100) DEFAULT NULL,
  `name` varchar(100) DEFAULT NULL,
  `price` bigint(20) DEFAULT NULL
) ENGINE=InnoDB DEFAULT CHARSET=utf8;
- 1
- 2
- 3
- 4
- 5
- 6
- 7
- 8
然后创建一条数据
INSERT INTO db3.car (id, name, price) VALUES('1', '法拉利', 1000000);
- 1
- 2
编写测试控制器
自此我们所有的工作都准备好了,接下来就开始写业务代码了,我们要写一个用户下单购买汽车的流程:
- 查询用户。
- 查询汽车。
- 如果都存在则创建订单,并保存到数据库。
- 返回成功标识。
代码如下,虽然调试一下功能确实没问题。但不难看到笔者都是手动实现数据源切换,将业务和非业务代码耦合在一起,非常不方便。
 @Resource
    private DataSourceUtil dataSourceUtil;
    @Resource
    private CommonMapper commonMapper;


    @PostMapping("/orderCar")
    public boolean dynamicDataSourceTest(@RequestBody Map<String,Object> params) throws SQLException {
        Map<String, Object> map = new HashMap<>();
        //在主库中查询汽车信息列表
        User user = commonMapper.getUserInfo((String) params.get("uid"));
        if (user==null){
            throw new RuntimeException("用户不存在");
        }


        //在从库中查询db3数据源信息
        DynamicDataSourceHolder.setDynamicDataSourceKey(CommonConstant.SLAVE);
        DataSourceInfo dataSourceInfo = commonMapper.getNewDataSourceInfo("slave2");
        map.put("dataSource", dataSourceInfo);
        log.info("数据源信息:{}", dataSourceInfo);
        //尝试db3的连接是否可用
        DruidDataSource druidDataSource = dataSourceUtil.createDataSourceConnection(dataSourceInfo);


        Car car=null;

        if (Objects.nonNull(druidDataSource)) {
            //如果db3可用则直接将db3存到动态数据源map中
            dataSourceUtil.addDefineDynamicDataSource(druidDataSource, dataSourceInfo.getDataSourceKey());
            //切换当前数据源为db3
            DynamicDataSourceHolder.setDynamicDataSourceKey(dataSourceInfo.getDataSourceKey());
            //在新的数据源中查询用户信息
             car = commonMapper.getCarInfo((String) params.get("cid"));
            if (car==null){
                throw new RuntimeException("汽车不存在");
            }
        }

        //切回数据源源2
        DynamicDataSourceHolder.setDynamicDataSourceKey(CommonConstant.SLAVE);
        Map<String,Object> orderInfo=new HashMap<>();
        orderInfo.put("uid",user.getId());
        orderInfo.put("cid",car.getId());
        orderInfo.put("total",car.getPrice());
        commonMapper.saveOrderInfo(orderInfo);

        return true;
    }
- 1
- 2
- 3
- 4
- 5
- 6
- 7
- 8
- 9
- 10
- 11
- 12
- 13
- 14
- 15
- 16
- 17
- 18
- 19
- 20
- 21
- 22
- 23
- 24
- 25
- 26
- 27
- 28
- 29
- 30
- 31
- 32
- 33
- 34
- 35
- 36
- 37
- 38
- 39
- 40
- 41
- 42
- 43
- 44
- 45
- 46
- 47
- 48
- 49
基于注解优化代码逻辑
所以我们希望用AOP来优化上述手动切换数据源的情况,实现思路如下:
- 定义一个注解,记录数据源信息。
- 编写一个切面,拦截有该注解的类或者方法根据注解的值自动切换数据源。
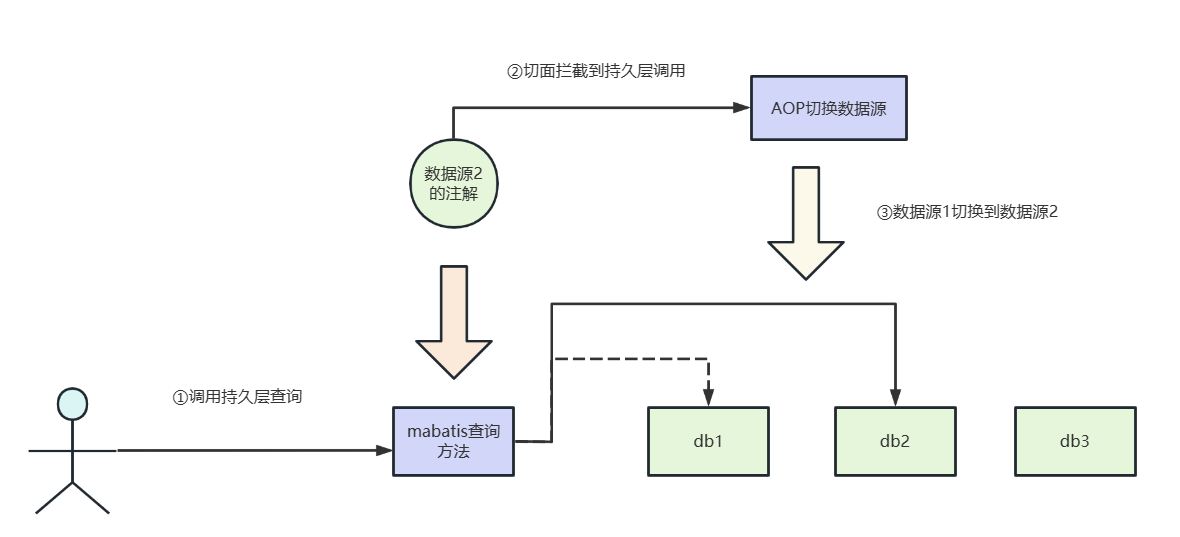
所以首先编写一个注解,该注解专门记录当前方法或者类用到了数据源的key。
@Target({ ElementType.METHOD, ElementType.TYPE })
@Retention(RetentionPolicy.RUNTIME)
@Documented
@Inherited
public @interface Ds
{
    /**
     * 切换数据源名称
     */
    public String value() default CommonConstant.MASTER;
}
- 1
- 2
- 3
- 4
- 5
- 6
- 7
- 8
- 9
- 10
- 11
然后我们针对注解,编写一个切面,通过获取注解的value决定切换到哪个数据源。
@Aspect
@Component
public class DataSourceAspect {

    // 设置Ds注解的切点表达式,所有Ds都会触发当前环绕通知
    @Pointcut("@annotation(com.example.springdatasource.annotation.Ds)")
    public void dynamicDataSourcePointCut(){

    }

    //环绕通知
    @Around("dynamicDataSourcePointCut()")
    public Object around(ProceedingJoinPoint joinPoint) throws Throwable{
        //获取数据源的key
        String key = getDefineAnnotation(joinPoint).value();
        //将数据源设置为该key的数据源
        DynamicDataSourceHolder.setDynamicDataSourceKey(key);
        try {
            return joinPoint.proceed();
        } finally {
            //使用完成后切回master
            DynamicDataSourceHolder.removeDynamicDataSourceKey();
        }
    }

    /**
     * 先判断方法的注解,后判断类的注解,以方法的注解为准
     * @param joinPoint
     * @return
     */
    private Ds getDefineAnnotation(ProceedingJoinPoint joinPoint){
        MethodSignature methodSignature = (MethodSignature) joinPoint.getSignature();
        Ds dataSourceAnnotation = methodSignature.getMethod().getAnnotation(Ds.class);
        if (Objects.nonNull(methodSignature)) {
            return dataSourceAnnotation;
        } else {
            Class<?> dsClass = joinPoint.getTarget().getClass();
            return dsClass.getAnnotation(Ds.class);
        }
    }

}
- 1
- 2
- 3
- 4
- 5
- 6
- 7
- 8
- 9
- 10
- 11
- 12
- 13
- 14
- 15
- 16
- 17
- 18
- 19
- 20
- 21
- 22
- 23
- 24
- 25
- 26
- 27
- 28
- 29
- 30
- 31
- 32
- 33
- 34
- 35
- 36
- 37
- 38
- 39
- 40
- 41
- 42
然后我们修改一下mapper
@Mapper
public interface CommonMapper {


    @Ds("master")
    User getUserInfo(String id);


    @Ds("slave")
    DataSourceInfo getNewDataSourceInfo(String sourceKey);
    @Ds("slave")
    int saveOrderInfo(Map<String,Object> orderInfo);

    @Ds("slave2")
    Car getCarInfo(String id);
}
- 1
- 2
- 3
- 4
- 5
- 6
- 7
- 8
- 9
- 10
- 11
- 12
- 13
- 14
- 15
- 16
- 17
- 18
然后我们的业务代码就可以简化了。
@PostMapping("/orderCar2")
    public boolean orderCar2(@RequestBody Map<String,Object> params) throws SQLException {
        Map<String, Object> map = new HashMap<>();
        //在主库中查询汽车信息列表
        User user = commonMapper.getUserInfo((String) params.get("uid"));
        if (user==null){
            throw new RuntimeException("用户不存在");
        }


        //在从库中查询db3数据源信息
        DataSourceInfo dataSourceInfo = commonMapper.getNewDataSourceInfo("slave2");
        map.put("dataSource", dataSourceInfo);
        log.info("数据源信息:{}", dataSourceInfo);
        //尝试db3的连接是否可用
        DruidDataSource druidDataSource = dataSourceUtil.createDataSourceConnection(dataSourceInfo);


        Car car=null;

        if (Objects.nonNull(druidDataSource)) {
            dataSourceUtil.addDefineDynamicDataSource(druidDataSource,dataSourceInfo.getDataSourceKey());
            //在新的数据源中查询用户信息
            car = commonMapper.getCarInfo((String) params.get("cid"));
            if (car==null){
                throw new RuntimeException("汽车不存在");
            }
        }

        //切回数据源源2
        Map<String,Object> orderInfo=new HashMap<>();
        orderInfo.put("uid",user.getId());
        orderInfo.put("cid",car.getId());
        orderInfo.put("total",car.getPrice());
        commonMapper.saveOrderInfo(orderInfo);

        return true;
    }
- 1
- 2
- 3
- 4
- 5
- 6
- 7
- 8
- 9
- 10
- 11
- 12
- 13
- 14
- 15
- 16
- 17
- 18
- 19
- 20
- 21
- 22
- 23
- 24
- 25
- 26
- 27
- 28
- 29
- 30
- 31
- 32
- 33
- 34
- 35
- 36
- 37
- 38
- 39
自此SpringBoot多数据源实践就完成了。
我们可以做得更好
本文基于AOP完成多数据源的灵活切换,确保一个简单注解即可实现数据源切换,但还是存在一个多数据源事务问题,笔者也会在后续的文章中迭代补充,对此感兴趣或者需要源码的读者可以关注笔者微信:写代码的SharkChili,回复:多数据源源码,即可获取本文的完整源码示例:

参考文献
SpringBoot整合多数据源,动态添加新数据源并切换(保姆级教程):https://juejin.cn/post/7222186286563737655#heading-5


