
热门标签
热门文章
- 1Mixtral 8X7B MoE模型基于阿里云人工智能平台PAI实践合集_mixtral_7bx2_moe
- 2首页热卖推荐商品显示axios异步请求数据动态渲染实现
- 3Java中的JUnit是什么?如何使用JUnit进行单元测试_java程序运行中出现juint
- 4【Pytorch】搭建一个简单的泰坦尼克号预测模型
- 5【愚公系列】软考中级-软件设计师 016-数据结构(数组、矩阵和广义表)
- 6c#调用QQ开启临时会话
- 7python3爬虫实战(五):为爬虫添加GUI图像界面_图形化配置爬虫案例
- 8docker镜像与容器基本的基本操作_docker ps和docker images
- 9C语言封装自己的日志函数_c语言封装日志模块的函数接口,方便后面项目中直接使用
- 10探索TVM:深度学习模型编译与部署的前沿与实践【文末送书-14】
当前位置: article > 正文
Ubuntu16(Centos7) docker 和 nvidia-docker 的安装及使用_centos 添加nvidia-docker的源
作者:代码艺术创作者 | 2024-01-30 14:54:15
赞
踩
centos 添加nvidia-docker的源
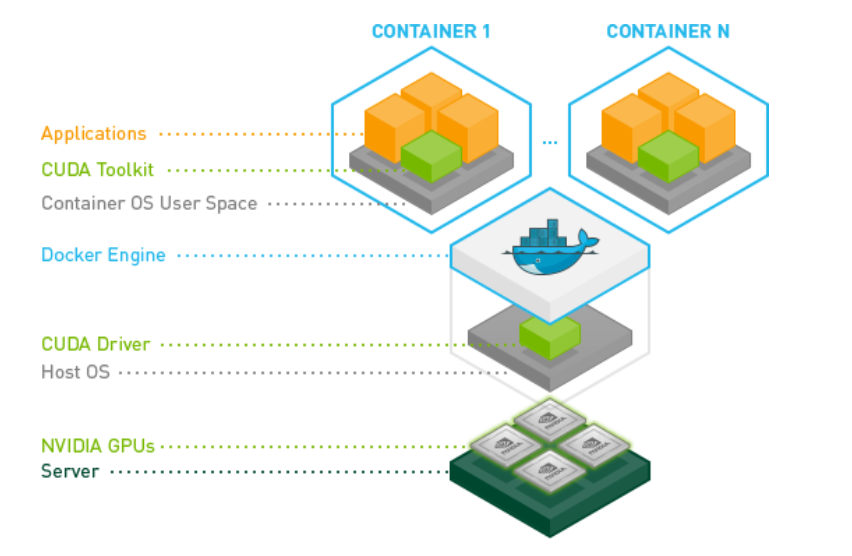
一、docker 简介
- Docker 使用容器创建虚拟环境,它能与系统的其余部分隔离开来且能够与其主机共享资源(访问目录、使用 GPU、连接到互联网等)
- Docker 的三大核心概念:镜像(Image)、容器(Container)、仓库(Docker Hub)
- 镜像(Image):类似系统盘,它是构建容器的模板,通过一个镜像我们可以构造出很多相互独立但运行环境一样的容器
- 容器(Container):基于某个镜像生成且动态运行的实例(可类比运行起来的操作系统)
- 仓库(Docker Hub):类似代码仓库,是 Docker 官方提供的用于集中存储、管理镜像的服务
二、使用 .deb 包离线安装 docker
- 卸载旧版本的 docker:
sudo apt-get remove docker docker-engine docker.io containerd runc - 查看系统内核版本和发行代号:
1、uname -a Linux su 4.15.0-45-generic #48~16.04.1-Ubuntu SMP Tue Jan 29 18:03:48 UTC 2019 x86_64 x86_64 x86_64 GNU/Linux 2、lsb_release -a No LSB modules are available. Distributor ID: Ubuntu Description: Ubuntu 16.04.6 LTS Release: 16.04 Codename: xenial- 1
- 2
- 3
- 4
- 5
- 6
- 7
- 8
- 9
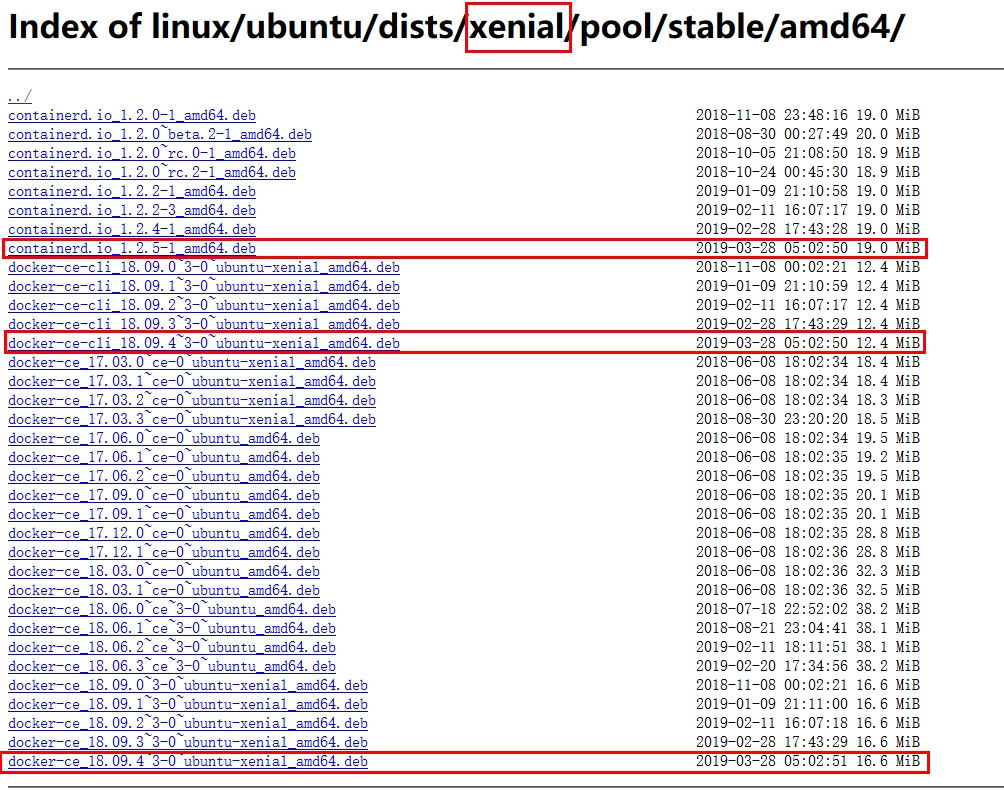
- 打开 https://download.docker.com/linux/ubuntu/dists/ ,进入上述代号
xenial目录,然后再进入pool/stable/,选择机器所属架构(amd64、arm64、armhf、ppc64el、ppc64le、s390x 等),进入下载列表复制下面三个文件的链接使用wget -c url进行下载(百度网盘链接:https://pan.baidu.com/s/1KBRpUbaykZil54hfSi8bTA
提取码:54jq)
- 安装 docker
sudo dpkg -i containerd.io_1.2.5-1_amd64.debsudo dpkg -i docker-ce-cli_18.09.4~3-0~ubuntu-xenial_amd64.debsudo dpkg -i docker-ce_18.09.4~3-0~ubuntu-xenial_amd64.deb
- 验证安装是否成功以及查看 docker 的版本和信息
sudo docker run hello-worldsudo docker versionsudo docker info
- 创建 docker 组并添加用户:在不带 sudo 的情况下运行 docker 命令
sudo groupadd docker:create the docker groupsudo adduser $USER docker or sudo usermod -aG docker $USER:add your user to the docker group,$USER 是获取当前用户名reboot now:make sure that your group membership is re-evaluateddocker run hello-world:verify that you can run docker commands without sudo
- 卸载 docker
sudo apt-get purge docker-ce:uninstall the Docker CE packagesudo rm -rf /var/lib/docker:delete all images, containers, and volumes
三、安装 nvidia-docker
1、在线安装
# Add the package repositories
curl -s -L https://nvidia.github.io/nvidia-docker/gpgkey | \
  sudo apt-key add -

distribution=$(. /etc/os-release;echo $ID$VERSION_ID)

curl -s -L https://nvidia.github.io/nvidia-docker/$distribution/nvidia-docker.list | \
  sudo tee /etc/apt/sources.list.d/nvidia-docker.list

sudo apt-get update

# Install nvidia-docker and reload the Docker daemon configuration
sudo apt-get install -y nvidia-docker  # 安装 1.0 版本,2.0 版本有点问题
sudo pkill -SIGHUP dockerd

# install nvidia-docker-plugin
sudo apt-get install nvidia-modprobe

- 1
- 2
- 3
- 4
- 5
- 6
- 7
- 8
- 9
- 10
- 11
- 12
- 13
- 14
- 15
- 16
- 17
2、离线安装
- 在 nvidia-docker 官方 release 平台 https://github.com/NVIDIA/nvidia-docker/releases 上下载
nvidia-docker_1.0.1-1_amd64.deb包(百度网盘下载链接: https://pan.baidu.com/s/1V8pCzBSDFCgK_-ri5ZsUbg 提取码: 5a3w) sudo dpkg -i nvidia-docker_1.0.1-1_amd64.deb # 可能会报错,尝试在线安装成功
四、查看 docker 和 nvidia-docker 的状态并设置开机自启动
# 启动 docker 和 nvidia-docker 引擎并设置开机启动
sudo systemctl start docker
sudo systemctl enable docker  # It starts automatically on DEB-based distributions. On RPM-based distributions, you need to start it manually using the appropriate systemctl or service command.
sudo systemctl start nvidia-docker
sudo systemctl enable nvidia-docker

# 查看 docker 和 nvidia-docker 的状态看是否安装成功
systemctl status docker
systemctl status nvidia-docker

# 启动、停止、重启 docker
systemctl start docker
systemctl stop docker
systemctl restart docker
- 1
- 2
- 3
- 4
- 5
- 6
- 7
- 8
- 9
- 10
- 11
- 12
- 13
- 14
五、镜像、容器以及 Docker Hub 镜像源
1、镜像相关命令
# 从 docker hub 中搜寻镜像
docker search ubuntu16.04

# 从 docker hub 拉取镜像,如果不显示的指定 TAG,默认选择 latest 标签
docker pull NAME[:TAG]
docker pull ubuntu or docker pull ubuntu:16.04

# 载入镜像
docker load -i BJAI.img or docker load < BJAI.img

# 查看所有镜像信息
docker images

# 删除镜像(停止容器、删除容器、删除镜像)
docker rmi image_id

# 从运行的容器创建新镜像
docker commit CHANGED_CONTAINER_ID NEW_REPO:NEW_TAG

# 保存镜像
docker save -o new_name.img NEW_REPO:NEW_TAG

# 上传镜像
docker push NAME:TAG  # 默认上传到 docker hub 官方仓库,首次需要配置和登录
docker push REGISTY_HOST:REGISTY_HOST/NAME:TAG  # 上传到私有仓库,已经存在该镜像,则会增量更新
eg:docker push 111.111.111.111:5000/tf114:v1

# 使用 tag 命令添加镜像标签(类似软链接)
docker tag OLD_REPO:OLD_TAG NEW_REPO:NEW_TAG
- 1
- 2
- 3
- 4
- 5
- 6
- 7
- 8
- 9
- 10
- 11
- 12
- 13
- 14
- 15
- 16
- 17
- 18
- 19
- 20
- 21
- 22
- 23
- 24
- 25
- 26
- 27
- 28
- 29
2、容器相关命令
# 创建容器、挂载目录并运行
nvidia-docker run --name=tf2 --net=host --restart=always --privileged -v /home/manzp:/root/manzp -it tf2:v1 bash
	--name: 容器临时名称,不能重复
	--net: 网络模式,host 或者 none
	--restart: 在容器退出时总是重启容器
	--privileged: 具有较高权限,可以使用宿主机所有的设备,如磁盘
	-v: /home/manzp:/root/manzp 将宿主机目录(/home/manzp)映射到容器目录(/root/manzp),容器可以共享宿主机目录下的内容
	-it: 以交互模式运行容器
	-d: 后台运行
	$IMG=tf2:v1 镜像名称,格式为:(仓库:标签)或镜像 ID
	$CMD=bash 入口命令
	--cpu-shares=0: 允许容器使用 CPU 资源的相对权重,默认值为 1024,设置为 0 表示使用 1024
    --cpus=2:允许容器使用几个线程的 CPU(N*100%,不一定分布在同一块 CPU 上,可能用 4×50%),默认为全部的资源
    --cpuset-cpus="0-3": 允许容器使用哪几个 CPU
    --memory: 内存使用限制, 数字需要使用整数,对应的单位是 b, k, m, g中的一个
    --memory-swap: Swap=memory+memory-swap: '-1' to enable unlimited swap
    --shm-size="32g": 启动容器时设置共享内存空间,解决 out of shared memory


# 注意:-v 可以使用多次,映射多个目录,如果容器中没有相应的目录,则会新建。

# 查看当前容器CPU、内存资源等的使用情况
docker stats

# 退出容器
CTRL+D 或 exit

# 查看所有容器、查看运行中的容器
docker ps -a
docker ps

# 进入运行中的容器
docker exec -it container_id bash

# 启动容器、停止容器、删除容器
docker start container_id
docker stop container_id
docker rm container_id

# 复制文件到容器中
docker cp -rf 主机文件路径  容器id:容器中路径

# 复制容器中文件到主机
docker cp -rf 容器id:容器中路径 主机文件路径
- 1
- 2
- 3
- 4
- 5
- 6
- 7
- 8
- 9
- 10
- 11
- 12
- 13
- 14
- 15
- 16
- 17
- 18
- 19
- 20
- 21
- 22
- 23
- 24
- 25
- 26
- 27
- 28
- 29
- 30
- 31
- 32
- 33
- 34
- 35
- 36
- 37
- 38
- 39
- 40
- 41
- 42
- 43
- 44
3、Docker Hub 镜像源更改
cd  /etc/docker  # 在 docker 中备份 daemon.json 文件到本地

# 按 i, 删除其中所有内容,然后插入中科大的源,保存退出
sudo vim daemon.json
# 可以一次添加多个镜像源、私有仓库及 nvidia-container-runtime
{
    "registry-mirrors": [
        "https://docker.mirrors.ustc.edu.cn",  # 中科大的源
        "https://registry.docker-cn.com",  # 中国区官方源
        "https://hub-mirror.c.163.com",  # 网易的源
        "https://aji9675d.mirror.aliyuncs.com"  # 阿里的源(需要先在 https://cr.console.aliyun.com/cn-hangzhou/instances/mirrors 注册)
    ],
    "insecure-registries": [
        "ip:port"
    ],
    "runtimes": {
        "nvidia": {
            "path": "nvidia-container-runtime",
            "runtimeArgs": []
        }
    }

}


# reload and restart
sudo systemctl daemon-reload
sudo systemctl restart docker

# 查看 Registry Mirrors 以及  Default Runtime 是否已经生效
docker info

>>> 可输出系统的各种参数信息
Client:
 Debug Mode: false

Server:
 Containers: 2
  Running: 2
  Paused: 0
  Stopped: 0
 Images: 8
 Server Version: 19.03.8
 Storage Driver: overlay2
  Backing Filesystem: <unknown>
  Supports d_type: true
  Native Overlay Diff: true
 Logging Driver: json-file
 Cgroup Driver: cgroupfs
 Plugins:
  Volume: local
  Network: bridge host ipvlan macvlan null overlay
  Log: awslogs fluentd gcplogs gelf journald json-file local logentries splunk syslog
 Swarm: inactive
 Runtimes: nvidia runc
 Default Runtime: nvidia
 Init Binary: docker-init
 containerd version: 7ad184331fa3e55e52b890ea95e65ba581ae3429
 runc version: dc9208a3303feef5b3839f4323d9beb36df0a9dd
 init version: fec3683
 Security Options:
  apparmor
  seccomp
   Profile: default
 Kernel Version: 4.15.0-45-generic
 Operating System: Ubuntu 16.04.6 LTS
 OSType: linux
 Architecture: x86_64
 CPUs: 12
 Total Memory: 31.34GiB
 Name: su
 ID: QLU7:2HA5:JLDL:6IOT:VM67:4BB5:CUMM:BUFK:PKMR:GMAW:6FUG:JLCZ
 Docker Root Dir: /var/lib/docker
 Debug Mode: false
 Registry: https://index.docker.io/v1/
 Labels:
 Experimental: false
 Insecure Registries:
  127.0.0.0/8
 Registry Mirrors:
  https://docker.mirrors.ustc.edu.cn/
  https://registry.docker-cn.com/
  https://hub-mirror.c.163.com/
 Live Restore Enabled: false

WARNING: No swap limit support
- 1
- 2
- 3
- 4
- 5
- 6
- 7
- 8
- 9
- 10
- 11
- 12
- 13
- 14
- 15
- 16
- 17
- 18
- 19
- 20
- 21
- 22
- 23
- 24
- 25
- 26
- 27
- 28
- 29
- 30
- 31
- 32
- 33
- 34
- 35
- 36
- 37
- 38
- 39
- 40
- 41
- 42
- 43
- 44
- 45
- 46
- 47
- 48
- 49
- 50
- 51
- 52
- 53
- 54
- 55
- 56
- 57
- 58
- 59
- 60
- 61
- 62
- 63
- 64
- 65
- 66
- 67
- 68
- 69
- 70
- 71
- 72
- 73
- 74
- 75
- 76
- 77
- 78
- 79
- 80
- 81
- 82
- 83
- 84
- 85
- 86
六、centos7 下 docker 和 nvidia-docker 的安装过程
- centos7 下的安装过程和 ubuntu16 类似,相关的 rpm 安装包及安装命令如下:
- docker rpm 百度网盘下载链接: https://pan.baidu.com/s/1HYZPhMWsV4kPIxpkikEnAA 提取码: dkwj
- nvidia-docker rpm 百度网盘下载链接: https://pan.baidu.com/s/1yrbgDw4OLbjF7sBc0F1nvA 提取码: u41c
sudo yum install /path/to/package.rpm或sudo rpm -Uvh /path/to/*.rpm --nodeps --force- 离线时安装 centos everything 备用:百度网盘下载链接: https://pan.baidu.com/s/1o62pKp2knCWUm3VtCfKJUg 提取码: i7wy
七、参考资料
0、Docker-从入门到实践(第三版)
0、Docker 菜鸟教程
1、https://docs.docker.com/install/linux/docker-ce/ubuntu/
2、https://docs.docker.com/install/linux/docker-ce/centos/
3、https://docs.docker.com/install/linux/linux-postinstall/
4、https://github.com/NVIDIA/nvidia-docker
5、https://github.com/NVIDIA/nvidia-container-runtime
6、中科大 Docker 镜像使用帮助
7、Docker 中国官方镜像加速
8、阿里云 Docker 镜像加速
9、史上最全(全平台)docker安装方法!
10、https://download.docker.com/linux/ubuntu/dists/xenial/pool/stable/amd64/
11、Docker: 限制容器可用的内存
12、Docker: 限制容器可用的 CPU
13、Docker IO资源限制
声明:本文内容由网友自发贡献,不代表【wpsshop博客】立场,版权归原作者所有,本站不承担相应法律责任。如您发现有侵权的内容,请联系我们。转载请注明出处:https://www.wpsshop.cn/article/detail/47021
推荐阅读

相关标签

