
热门标签
热门文章
- 1Dubbo集群容错方案
- 2npm i 卡在reify:rxjs: timing reifyNode
- 3基于粤嵌gec6818开发板嵌入式电子相册,智能家居,音乐播放,灯光控制,2048游戏_粤嵌开发板相册
- 4python网站开发案例_基于Python-Flask实现的网站例子
- 5【附源码】Java计算机毕业设计校园订餐管理系统(程序+LW+部署)_学校食堂管理系统javaweb课程设计
- 6Ubuntu18.04安装docker和docker-compose_ubuntu18.04安装docker-compose
- 7【Microsoft Message Queuing远程代码执行漏洞(CVE-2023-21554)漏洞修复】
- 8[Python] 机器学习 - 常用数据集(Dataset)之糖尿病(diabetes)数据集介绍,数据可视化和使用案例
- 9Vue3的几款UI组件库:Naive UI、Element Plus、 Ant Design Vue、Arco Design_ant-design-vue3级联组件
- 10模板匹配 解决模板旋转以及重复检测问题_模板匹配如何针对旋转
当前位置: article > 正文
STM32 1-5
作者:算法编织者 | 2024-01-30 11:55:22
赞
踩
STM32 1-5
目录
继续
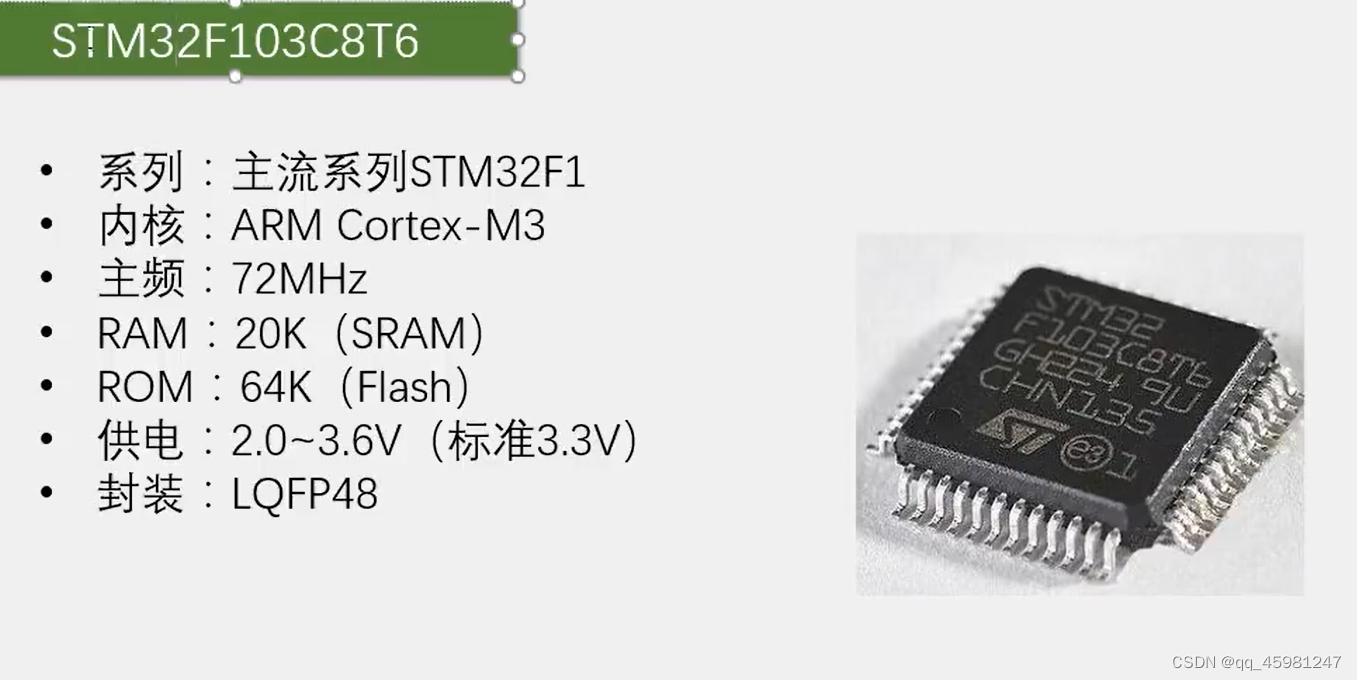
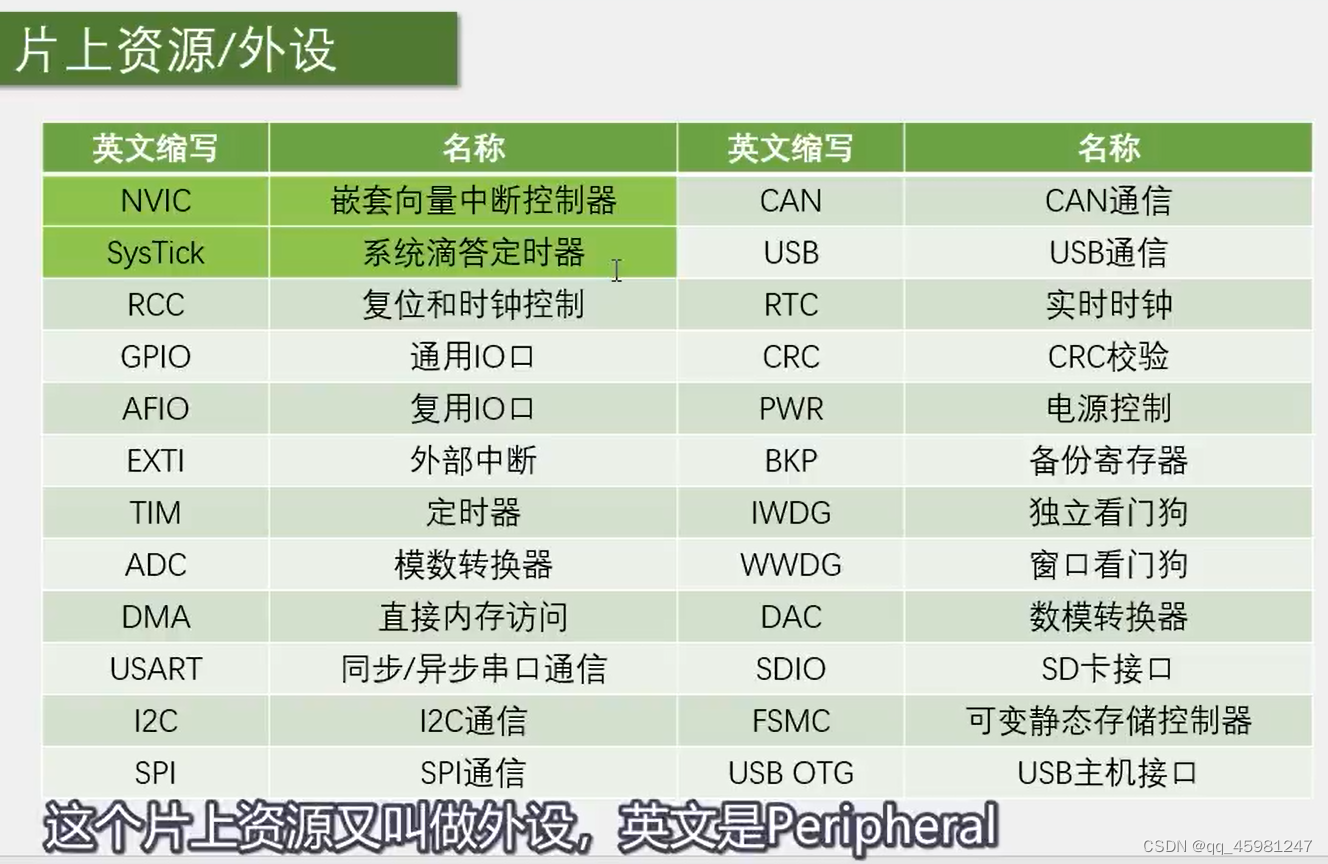
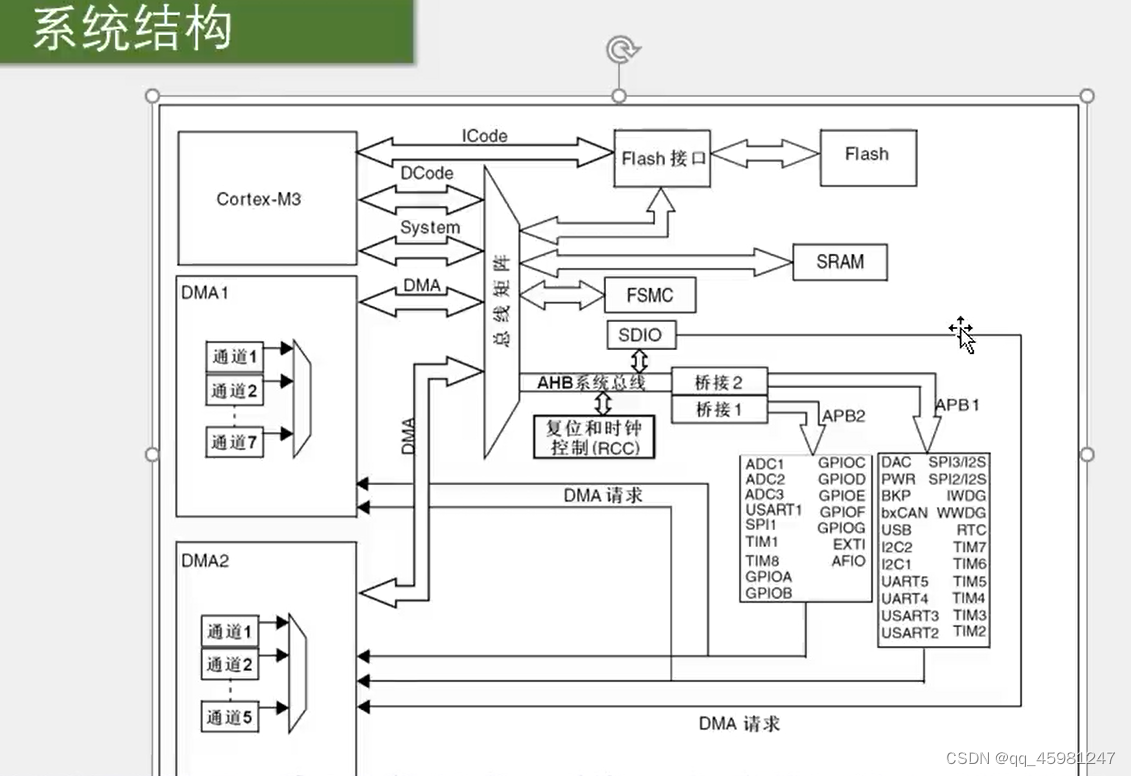
STM32简介


点亮PC13LED
main.c
- #include "stm32f10x.h" // Device header
-
- int main(void)
- {
- //方式二:
- RCC_APB2PeriphClockCmd(RCC_APB2Periph_GPIOC, ENABLE);
- //配置GPIOC的时钟
-
- GPIO_InitTypeDef GPIO_InitStructure;//配置结构体
- GPIO_InitStructure.GPIO_Mode = GPIO_Mode_Out_PP;//设置通用推挽输出
- GPIO_InitStructure.GPIO_Pin = GPIO_Pin_13;//配置13针脚
- GPIO_InitStructure.GPIO_Speed = GPIO_Speed_50MHz;//配置速度
- GPIO_Init(GPIOC, &GPIO_InitStructure);
- //配置端口模式
-
- GPIO_SetBits(GPIOC, GPIO_Pin_13);//将其置为高电平
- //GPIO_ResetBits(GPIOC, GPIO_Pin_13);//将其置为低电平
- //配置高低电平
-
- /*****************************************/
- //方式一:
- //PC13有一个灯,这个灯低电平才会亮
- //RCC ->APB2ENR = 0x00000010;//GPIO都是APB2的外设,APB2ENR是
- //APB2时钟使能寄存器,IOPCEN为使能位,将其设置为1,打开时钟
-
- //GPIOC ->CRH = 0x00300000;//配置PC13口模式,端口配置高寄存器
- //(GPIOx_CRH),配置CNF13以及MODE13,
-
- //GPIOC ->ODR = 0x00002000;//端口输出数据寄存器GPIOx_ODR,
- //为ODR13进行配置高低电平,0x00002000灭,0x00000000亮
-
- while(1)
- {
-
- }
- }

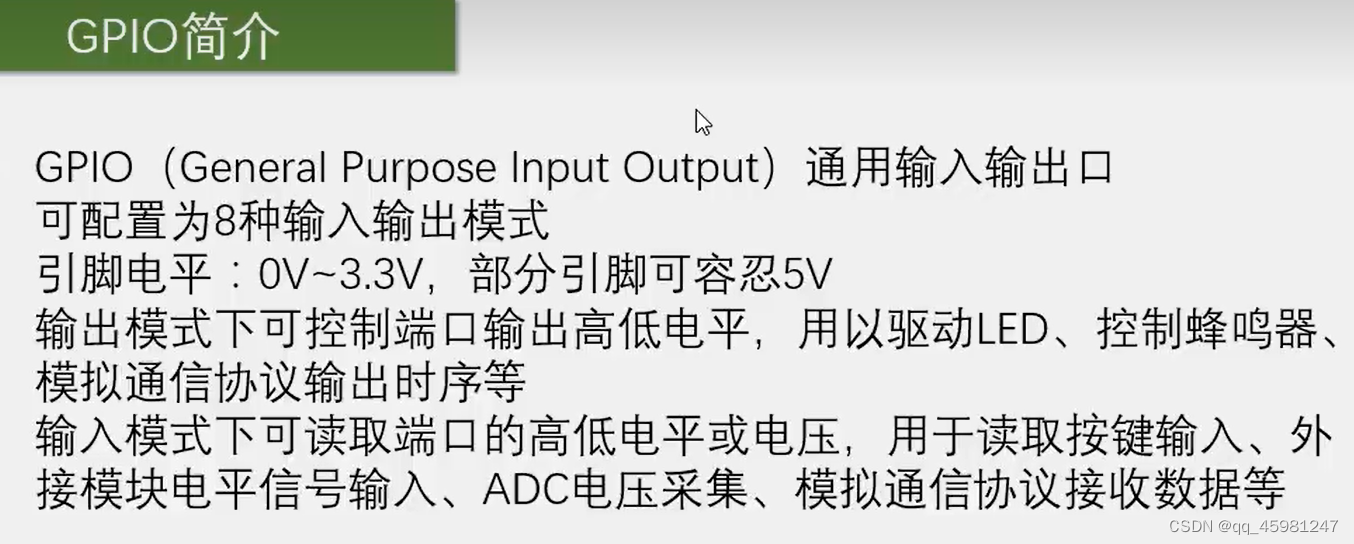
GPIO
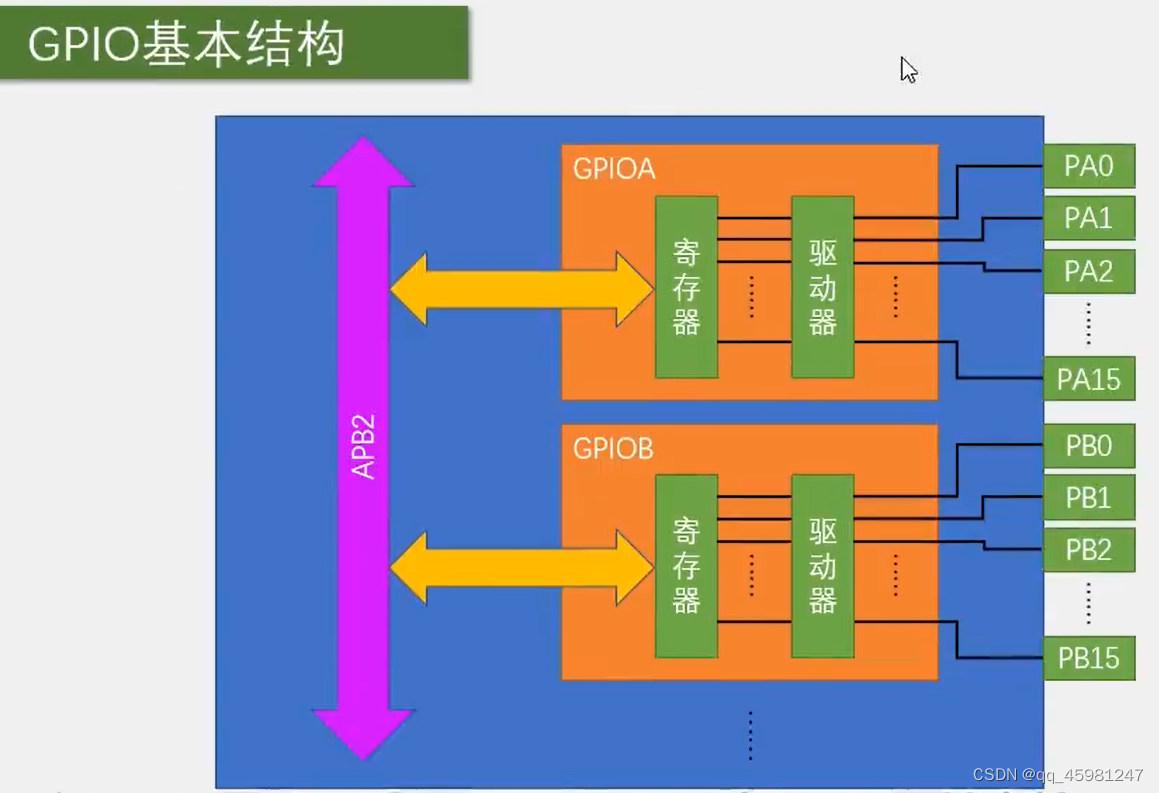


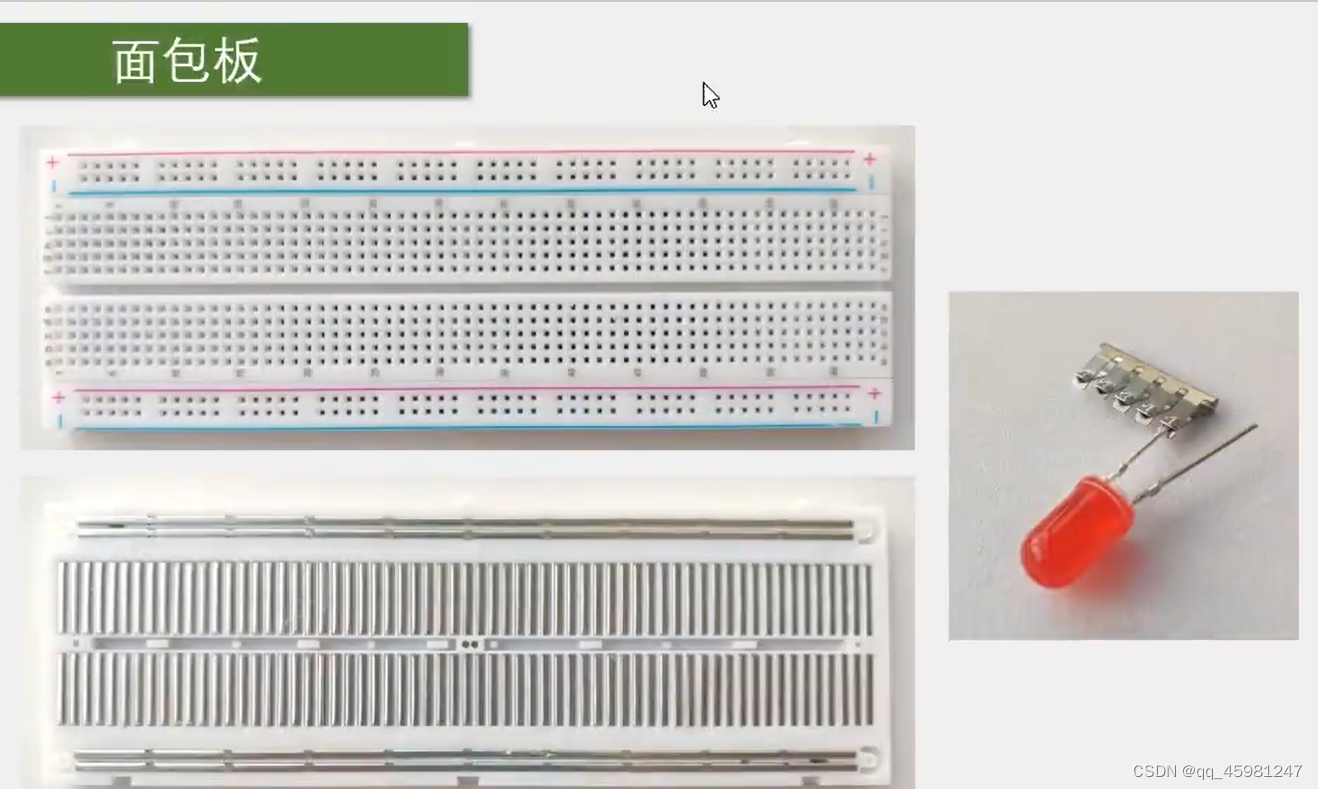
面包板两端横向是相通的,内部是纵向相通
LED闪烁
main.c
- #include "stm32f10x.h" // Device header
- #include "Delay.h"
-
- int main(void)
- {
- RCC_APB2PeriphClockCmd(RCC_APB2Periph_GPIOA,ENABLE);
- //第一步:使用RCC开启GPIO时钟
-
- GPIO_InitTypeDef GPIO_InitStructure;
- GPIO_InitStructure.GPIO_Mode = GPIO_Mode_Out_PP;
- GPIO_InitStructure.GPIO_Pin = GPIO_Pin_0;
- GPIO_InitStructure.GPIO_Speed = GPIO_Speed_50MHz;
- GPIO_Init(GPIOA,&GPIO_InitStructure);
- //第二步:使用GPIO_Init()初始化GPIO
-
- //GPIO_ResetBits(GPIOA,GPIO_Pin_0);//灯亮
- //GPIO_SetBits(GPIOA,GPIO_Pin_0);//灯灭
- //GPIO_WriteBit(GPIOA,GPIO_Pin_0,Bit_RESET);//灯亮
- //GPIO_WriteBit(GPIOA,GPIO_Pin_0,Bit_SET);//灯灭
- //第三步:使用输出或者输入的函数控制GPIO口
- while(1)
- {
- GPIO_ResetBits(GPIOA,GPIO_Pin_0);
- Delay_ms(100);
- GPIO_SetBits(GPIOA,GPIO_Pin_0);
- Delay_ms(100);
-
- GPIO_WriteBit(GPIOA,GPIO_Pin_0,Bit_RESET);
- Delay_ms(500);
- GPIO_WriteBit(GPIOA,GPIO_Pin_0,Bit_SET);
- Delay_ms(500);
-
- GPIO_WriteBit(GPIOA,GPIO_Pin_0,(BitAction)0);
- Delay_ms(500);
- GPIO_WriteBit(GPIOA,GPIO_Pin_0,(BitAction)1);
- Delay_ms(500);
- }
- }
-
LED流水灯
main.c
- #include "stm32f10x.h" // Device header
- #include "Delay.h"
-
- int main(void)
- {
- RCC_APB2PeriphClockCmd(RCC_APB2Periph_GPIOA,ENABLE);
- //第一步:使用RCC开启GPIO时钟
-
- GPIO_InitTypeDef GPIO_InitStructure;
- GPIO_InitStructure.GPIO_Mode = GPIO_Mode_Out_PP;//推挽输出
- GPIO_InitStructure.GPIO_Pin = GPIO_Pin_All;//初始化所有端口
- GPIO_InitStructure.GPIO_Speed = GPIO_Speed_50MHz;
- GPIO_Init(GPIOA,&GPIO_InitStructure);
- //第二步:使用GPIO_Init()初始化GPIO
-
- //GPIO_ResetBits(GPIOA,GPIO_Pin_0);//灯亮
- //GPIO_SetBits(GPIOA,GPIO_Pin_0);//灯灭
- //GPIO_WriteBit(GPIOA,GPIO_Pin_0,Bit_RESET);//灯亮
- //GPIO_WriteBit(GPIOA,GPIO_Pin_0,Bit_SET);//灯灭
- //第三步:使用输出或者输入的函数控制GPIO口
- while(1)
- {
- // GPIO_Write(GPIOA,~0x0001);
- // Delay_ms(500);
- // GPIO_Write(GPIOA,~0x0002);
- // Delay_ms(500);
- // GPIO_Write(GPIOA,~0x0004);
- // Delay_ms(500);
- // GPIO_Write(GPIOA,~0x0008);
- // Delay_ms(500);
- // GPIO_Write(GPIOA,~0x0010);
- // Delay_ms(500);
- // GPIO_Write(GPIOA,~0x0020);
- // Delay_ms(500);
- // GPIO_Write(GPIOA,~0x0040);
- // Delay_ms(500);
- // GPIO_Write(GPIOA,~0x0080);
- // Delay_ms(500);
-
- unsigned char i ;
-
- for( i = 0 ; i < 8 ;i++)
- {
- GPIO_Write(GPIOA,~(0x0001 << i));
- Delay_ms(500);
- }
- }
-
- }
-
蜂鸣器
main.c
- #include "stm32f10x.h" // Device header
- #include "Delay.h"
-
- int main(void)
- {
- RCC_APB2PeriphClockCmd(RCC_APB2Periph_GPIOB,ENABLE);
- //第一步:使用RCC开启GPIO时钟
-
- GPIO_InitTypeDef GPIO_InitStructure;
- GPIO_InitStructure.GPIO_Mode = GPIO_Mode_Out_PP;//推挽输出
- GPIO_InitStructure.GPIO_Pin = GPIO_Pin_12;//初始化12端口
- GPIO_InitStructure.GPIO_Speed = GPIO_Speed_50MHz;
- GPIO_Init(GPIOB,&GPIO_InitStructure);
- //第二步:使用GPIO_Init()初始化GPIO
-
- //GPIO_ResetBits(GPIOA,GPIO_Pin_0);//灯亮
- //GPIO_SetBits(GPIOA,GPIO_Pin_0);//灯灭
- //GPIO_WriteBit(GPIOA,GPIO_Pin_0,Bit_RESET);//灯亮
- //GPIO_WriteBit(GPIOA,GPIO_Pin_0,Bit_SET);//灯灭
- //第三步:使用输出或者输入的函数控制GPIO口
- while(1)
- {
- GPIO_ResetBits(GPIOB,GPIO_Pin_12);
- Delay_ms(100);
- GPIO_SetBits(GPIOB,GPIO_Pin_12);
- Delay_ms(100);
- GPIO_ResetBits(GPIOB,GPIO_Pin_12);
- Delay_ms(100);
- GPIO_SetBits(GPIOB,GPIO_Pin_12);
- Delay_ms(700);
- }
-
- }
-


按键控制LED
key.c
- #include "stm32f10x.h" // Device header
- #include "Delay.h"
-
- /**
- * @brief 初始化位于PB1以及PB11按键
- * @param 无
- * @retval 无
- */
- void Key_Init(void)//配置按键
- {
- RCC_APB2PeriphClockCmd(RCC_APB2Periph_GPIOB,ENABLE);
-
- GPIO_InitTypeDef GPIO_InitStructure;
- GPIO_InitStructure.GPIO_Mode = GPIO_Mode_IPU;//需要读取按键,设置上拉输入
- GPIO_InitStructure.GPIO_Pin = GPIO_Pin_1 | GPIO_Pin_11;
- GPIO_InitStructure.GPIO_Speed = GPIO_Speed_50MHz;//输出速度,输入不影响
- GPIO_Init(GPIOB,&GPIO_InitStructure);
- }
-
- /**
- * @brief 获取所按下的键值
- * @param 无
- * @retval KeyNum 按下的键值
- */
- uint8_t Key_GetNum(void)
- {
- uint8_t KeyNum = 0;
- if(GPIO_ReadInputDataBit(GPIOB,GPIO_Pin_1) == 0)
- {
- Delay_ms(20);
- while(GPIO_ReadInputDataBit(GPIOB,GPIO_Pin_1) == 0)
- //此时处于一直按下的状态
- Delay_ms(20);
- KeyNum = 1;
- }
- if(GPIO_ReadInputDataBit(GPIOB,GPIO_Pin_11) == 0)
- {
- Delay_ms(20);
- while(GPIO_ReadInputDataBit(GPIOB,GPIO_Pin_11) == 0)
- //此时处于一直按下的状态
- Delay_ms(20);
- KeyNum = 2;
- }
- return KeyNum;
- }
LED.c
- #include "stm32f10x.h" // Device header
-
- /**
- * @brief 打开GPIO时钟,并进行初始化
- * @param 无
- * @retval 无
- */
- void LED_Init(void)
- {
- RCC_APB2PeriphClockCmd(RCC_APB2Periph_GPIOA,ENABLE);
- //第一步:使用RCC开启GPIO时钟
-
- GPIO_InitTypeDef GPIO_InitStructure;
- GPIO_InitStructure.GPIO_Mode = GPIO_Mode_Out_PP;
- GPIO_InitStructure.GPIO_Pin = GPIO_Pin_1 | GPIO_Pin_2;
- GPIO_InitStructure.GPIO_Speed = GPIO_Speed_50MHz;
- GPIO_Init(GPIOA,&GPIO_InitStructure);
- //第二步:使用GPIO_Init()初始化GPIO
-
- // GPIO_SetBits(GPIOA,GPIO_Pin_1 | GPIO_Pin_2);
- }
-
- /**
- * @brief 将位于PA1端口电平置零
- * @param 无
- * @retval 无
- */
- void LED1_On(void)
- {
- GPIO_ResetBits(GPIOA,GPIO_Pin_1);
- }
-
- /**
- * @brief 将位于PA1端口电平置一
- * @param 无
- * @retval 无
- */
- void LED1_Off(void)
- {
- GPIO_SetBits(GPIOA,GPIO_Pin_1);
- }
-
- /**
- * @brief 查看PA1端口电平并将其翻转
- * @param 无
- * @retval 无
- */
- void LED1_Turn(void)
- {
- if(GPIO_ReadOutputDataBit(GPIOA,GPIO_Pin_1) == 0)//查看当前端口输出
- {
- GPIO_SetBits(GPIOA,GPIO_Pin_1);//将其置一
- }
- else
- {
- GPIO_ResetBits(GPIOA,GPIO_Pin_1);//将其置零
- }
- }
-
- /**
- * @brief 将位于PA2端口电平置零
- * @param 无
- * @retval 无
- */
- void LED2_On(void)
- {
- GPIO_ResetBits(GPIOA,GPIO_Pin_2);
- }
-
- /**
- * @brief 将位于PA1端口电平置一
- * @param 无
- * @retval 无
- */
- void LED2_Off(void)
- {
- GPIO_SetBits(GPIOA,GPIO_Pin_2);
- }
-
- /**
- * @brief 查看PA2端口电平并将其翻转
- * @param 无
- * @retval 无
- */
- void LED2_Turn(void)
- {
- if(GPIO_ReadOutputDataBit(GPIOA,GPIO_Pin_2) == 0)//查看当前端口输出
- {
- GPIO_SetBits(GPIOA,GPIO_Pin_2);//将其置一
- }
- else
- {
- GPIO_ResetBits(GPIOA,GPIO_Pin_2);//将其置零
- }
- }
main.c
- #include "stm32f10x.h" // Device header
- #include "Delay.h"
- #include "LED.h"
- #include "Key.h"
-
- uint8_t KeyNum;
-
- int main(void)
- {
- LED_Init();
- Key_Init();
-
- while(1)
- {
- KeyNum = Key_GetNum();//获取键值
- if(KeyNum == 1)//如果键1按下,则翻转LED1电平
- {
- LED1_Turn();
- }
- if(KeyNum == 2)//如果键2按下,则翻转LED1电平
- {
- LED2_Turn();
- }
-
- }
-
- }
-
光敏传感器控制蜂鸣器
LightSensor.c
- #include "stm32f10x.h" // Device header
-
- /**
- * @brief 初始化端口在PB^13光敏传感器
- * @param 无
- * @retval 无
- */
- void LightSensor_Init(void)
- {
- RCC_APB2PeriphClockCmd(RCC_APB2Periph_GPIOB,ENABLE);
- //第一步:使用RCC开启GPIO时钟
-
- GPIO_InitTypeDef GPIO_InitStructure;
- GPIO_InitStructure.GPIO_Mode = GPIO_Mode_IPU;//上拉输入
- GPIO_InitStructure.GPIO_Pin = GPIO_Pin_13;
- GPIO_InitStructure.GPIO_Speed = GPIO_Speed_50MHz;
- GPIO_Init(GPIOB,&GPIO_InitStructure);
- //第二步:使用GPIO_Init()初始化GPIO
- }
-
- /**
- * @brief 获得当前光敏传感器输入电平
- * @param 无
- * @retval 返回周围光线情况
- */
- uint8_t LightSensor_Get(void)
- {
-
- return GPIO_ReadInputDataBit(GPIOB,GPIO_Pin_13);
- //周围暗的时候输入1;亮的时候输入0
- //周围暗的时候输出0;亮的时候输出1
- }
Buzzer.c
- #include "stm32f10x.h" // Device header
-
- /**
- * @brief 打开GPIO时钟,并进行初始化
- * @param 无
- * @retval 无
- */
- void Buzzer_Init(void)
- {
- RCC_APB2PeriphClockCmd(RCC_APB2Periph_GPIOB,ENABLE);
- //第一步:使用RCC开启GPIO时钟
-
- GPIO_InitTypeDef GPIO_InitStructure;
- GPIO_InitStructure.GPIO_Mode = GPIO_Mode_Out_PP;
- GPIO_InitStructure.GPIO_Pin = GPIO_Pin_12;
- GPIO_InitStructure.GPIO_Speed = GPIO_Speed_50MHz;
- GPIO_Init(GPIOB,&GPIO_InitStructure);
- //第二步:使用GPIO_Init()初始化GPIO
-
- GPIO_SetBits(GPIOB,GPIO_Pin_12);
- }
-
- /**
- * @brief 将位于PB12端口电平置零
- * @param 无
- * @retval 无
- */
- void Buzzer_On(void)
- {
- GPIO_ResetBits(GPIOB,GPIO_Pin_12);
- }
-
- /**
- * @brief 将位于PB12端口电平置一
- * @param 无
- * @retval 无
- */
- void Buzzer_Off(void)
- {
- GPIO_SetBits(GPIOB,GPIO_Pin_12);
- }
-
- /**
- * @brief 查看PB12端口电平并将其翻转
- * @param 无
- * @retval 无
- */
- void Buzzer_Turn(void)
- {
- if(GPIO_ReadOutputDataBit(GPIOB,GPIO_Pin_12) == 0)//查看当前端口输出
- {
- GPIO_SetBits(GPIOB,GPIO_Pin_12);//将其置一
- }
- else
- {
- GPIO_ResetBits(GPIOB,GPIO_Pin_12);//将其置零
- }
- }
-
main.c
- #include "stm32f10x.h" // Device header
- #include "Delay.h"
- #include "Buzzer.h"
- #include "LightSensor.h"
-
- int main(void)
- {
- Buzzer_Init();
- LightSensor_Init();
-
- while(1)
- {
- if(LightSensor_Get() == 1)//比较暗的时候
- {
- Buzzer_On();
- }
- else{
- Buzzer_Off();
- }
- }
-
- }
-
OLED调试工具

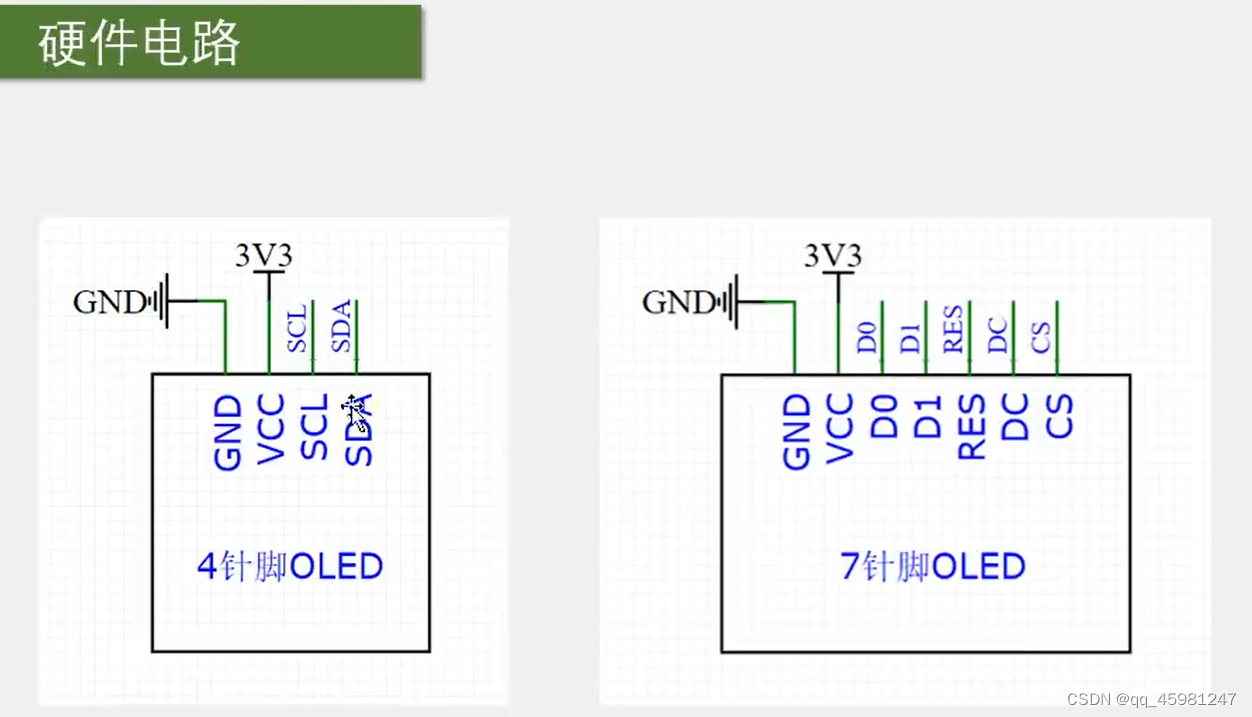

OLED显示
OLED.c
- #include "stm32f10x.h"
- #include "OLED_Font.h"
-
- /*引脚配置*/
- #define OLED_W_SCL(x) GPIO_WriteBit(GPIOB, GPIO_Pin_8, (BitAction)(x))
- #define OLED_W_SDA(x) GPIO_WriteBit(GPIOB, GPIO_Pin_9, (BitAction)(x))
-
- /*引脚初始化*/
- void OLED_I2C_Init(void)
- {
- RCC_APB2PeriphClockCmd(RCC_APB2Periph_GPIOB, ENABLE);
-
- GPIO_InitTypeDef GPIO_InitStructure;
- GPIO_InitStructure.GPIO_Mode = GPIO_Mode_Out_OD;
- GPIO_InitStructure.GPIO_Speed = GPIO_Speed_50MHz;
- GPIO_InitStructure.GPIO_Pin = GPIO_Pin_8;
- GPIO_Init(GPIOB, &GPIO_InitStructure);
- GPIO_InitStructure.GPIO_Pin = GPIO_Pin_9;
- GPIO_Init(GPIOB, &GPIO_InitStructure);
-
- OLED_W_SCL(1);
- OLED_W_SDA(1);
- }
-
- /**
- * @brief I2C开始
- * @param 无
- * @retval 无
- */
- void OLED_I2C_Start(void)
- {
- OLED_W_SDA(1);
- OLED_W_SCL(1);
- OLED_W_SDA(0);
- OLED_W_SCL(0);
- }
-
- /**
- * @brief I2C停止
- * @param 无
- * @retval 无
- */
- void OLED_I2C_Stop(void)
- {
- OLED_W_SDA(0);
- OLED_W_SCL(1);
- OLED_W_SDA(1);
- }
-
- /**
- * @brief I2C发送一个字节
- * @param Byte 要发送的一个字节
- * @retval 无
- */
- void OLED_I2C_SendByte(uint8_t Byte)
- {
- uint8_t i;
- for (i = 0; i < 8; i++)
- {
- OLED_W_SDA(Byte & (0x80 >> i));
- OLED_W_SCL(1);
- OLED_W_SCL(0);
- }
- OLED_W_SCL(1); //额外的一个时钟,不处理应答信号
- OLED_W_SCL(0);
- }
-
- /**
- * @brief OLED写命令
- * @param Command 要写入的命令
- * @retval 无
- */
- void OLED_WriteCommand(uint8_t Command)
- {
- OLED_I2C_Start();
- OLED_I2C_SendByte(0x78); //从机地址
- OLED_I2C_SendByte(0x00); //写命令
- OLED_I2C_SendByte(Command);
- OLED_I2C_Stop();
- }
-
- /**
- * @brief OLED写数据
- * @param Data 要写入的数据
- * @retval 无
- */
- void OLED_WriteData(uint8_t Data)
- {
- OLED_I2C_Start();
- OLED_I2C_SendByte(0x78); //从机地址
- OLED_I2C_SendByte(0x40); //写数据
- OLED_I2C_SendByte(Data);
- OLED_I2C_Stop();
- }
-
- /**
- * @brief OLED设置光标位置
- * @param Y 以左上角为原点,向下方向的坐标,范围:0~7
- * @param X 以左上角为原点,向右方向的坐标,范围:0~127
- * @retval 无
- */
- void OLED_SetCursor(uint8_t Y, uint8_t X)
- {
- OLED_WriteCommand(0xB0 | Y); //设置Y位置
- OLED_WriteCommand(0x10 | ((X & 0xF0) >> 4)); //设置X位置高4位
- OLED_WriteCommand(0x00 | (X & 0x0F)); //设置X位置低4位
- }
-
- /**
- * @brief OLED清屏
- * @param 无
- * @retval 无
- */
- void OLED_Clear(void)
- {
- uint8_t i, j;
- for (j = 0; j < 8; j++)
- {
- OLED_SetCursor(j, 0);
- for(i = 0; i < 128; i++)
- {
- OLED_WriteData(0x00);
- }
- }
- }
-
- /**
- * @brief OLED显示一个字符
- * @param Line 行位置,范围:1~4
- * @param Column 列位置,范围:1~16
- * @param Char 要显示的一个字符,范围:ASCII可见字符
- * @retval 无
- */
- void OLED_ShowChar(uint8_t Line, uint8_t Column, char Char)
- {
- uint8_t i;
- OLED_SetCursor((Line - 1) * 2, (Column - 1) * 8); //设置光标位置在上半部分
- for (i = 0; i < 8; i++)
- {
- OLED_WriteData(OLED_F8x16[Char - ' '][i]); //显示上半部分内容
- }
- OLED_SetCursor((Line - 1) * 2 + 1, (Column - 1) * 8); //设置光标位置在下半部分
- for (i = 0; i < 8; i++)
- {
- OLED_WriteData(OLED_F8x16[Char - ' '][i + 8]); //显示下半部分内容
- }
- }
-
- /**
- * @brief OLED显示字符串
- * @param Line 起始行位置,范围:1~4
- * @param Column 起始列位置,范围:1~16
- * @param String 要显示的字符串,范围:ASCII可见字符
- * @retval 无
- */
- void OLED_ShowString(uint8_t Line, uint8_t Column, char *String)
- {
- uint8_t i;
- for (i = 0; String[i] != '\0'; i++)
- {
- OLED_ShowChar(Line, Column + i, String[i]);
- }
- }
-
- /**
- * @brief OLED次方函数
- * @retval 返回值等于X的Y次方
- */
- uint32_t OLED_Pow(uint32_t X, uint32_t Y)
- {
- uint32_t Result = 1;
- while (Y--)
- {
- Result *= X;
- }
- return Result;
- }
-
- /**
- * @brief OLED显示数字(十进制,正数)
- * @param Line 起始行位置,范围:1~4
- * @param Column 起始列位置,范围:1~16
- * @param Number 要显示的数字,范围:0~4294967295
- * @param Length 要显示数字的长度,范围:1~10
- * @retval 无
- */
- void OLED_ShowNum(uint8_t Line, uint8_t Column, uint32_t Number, uint8_t Length)
- {
- uint8_t i;
- for (i = 0; i < Length; i++)
- {
- OLED_ShowChar(Line, Column + i, Number / OLED_Pow(10, Length - i - 1) % 10 + '0');
- }
- }
-
- /**
- * @brief OLED显示数字(十进制,带符号数)
- * @param Line 起始行位置,范围:1~4
- * @param Column 起始列位置,范围:1~16
- * @param Number 要显示的数字,范围:-2147483648~2147483647
- * @param Length 要显示数字的长度,范围:1~10
- * @retval 无
- */
- void OLED_ShowSignedNum(uint8_t Line, uint8_t Column, int32_t Number, uint8_t Length)
- {
- uint8_t i;
- uint32_t Number1;
- if (Number >= 0)
- {
- OLED_ShowChar(Line, Column, '+');
- Number1 = Number;
- }
- else
- {
- OLED_ShowChar(Line, Column, '-');
- Number1 = -Number;
- }
- for (i = 0; i < Length; i++)
- {
- OLED_ShowChar(Line, Column + i + 1, Number1 / OLED_Pow(10, Length - i - 1) % 10 + '0');
- }
- }
-
- /**
- * @brief OLED显示数字(十六进制,正数)
- * @param Line 起始行位置,范围:1~4
- * @param Column 起始列位置,范围:1~16
- * @param Number 要显示的数字,范围:0~0xFFFFFFFF
- * @param Length 要显示数字的长度,范围:1~8
- * @retval 无
- */
- void OLED_ShowHexNum(uint8_t Line, uint8_t Column, uint32_t Number, uint8_t Length)
- {
- uint8_t i, SingleNumber;
- for (i = 0; i < Length; i++)
- {
- SingleNumber = Number / OLED_Pow(16, Length - i - 1) % 16;
- if (SingleNumber < 10)
- {
- OLED_ShowChar(Line, Column + i, SingleNumber + '0');
- }
- else
- {
- OLED_ShowChar(Line, Column + i, SingleNumber - 10 + 'A');
- }
- }
- }
-
- /**
- * @brief OLED显示数字(二进制,正数)
- * @param Line 起始行位置,范围:1~4
- * @param Column 起始列位置,范围:1~16
- * @param Number 要显示的数字,范围:0~1111 1111 1111 1111
- * @param Length 要显示数字的长度,范围:1~16
- * @retval 无
- */
- void OLED_ShowBinNum(uint8_t Line, uint8_t Column, uint32_t Number, uint8_t Length)
- {
- uint8_t i;
- for (i = 0; i < Length; i++)
- {
- OLED_ShowChar(Line, Column + i, Number / OLED_Pow(2, Length - i - 1) % 2 + '0');
- }
- }
-
- /**
- * @brief OLED初始化
- * @param 无
- * @retval 无
- */
- void OLED_Init(void)
- {
- uint32_t i, j;
-
- for (i = 0; i < 1000; i++) //上电延时
- {
- for (j = 0; j < 1000; j++);
- }
-
- OLED_I2C_Init(); //端口初始化
-
- OLED_WriteCommand(0xAE); //关闭显示
-
- OLED_WriteCommand(0xD5); //设置显示时钟分频比/振荡器频率
- OLED_WriteCommand(0x80);
-
- OLED_WriteCommand(0xA8); //设置多路复用率
- OLED_WriteCommand(0x3F);
-
- OLED_WriteCommand(0xD3); //设置显示偏移
- OLED_WriteCommand(0x00);
-
- OLED_WriteCommand(0x40); //设置显示开始行
-
- OLED_WriteCommand(0xA1); //设置左右方向,0xA1正常 0xA0左右反置
-
- OLED_WriteCommand(0xC8); //设置上下方向,0xC8正常 0xC0上下反置
-
- OLED_WriteCommand(0xDA); //设置COM引脚硬件配置
- OLED_WriteCommand(0x12);
-
- OLED_WriteCommand(0x81); //设置对比度控制
- OLED_WriteCommand(0xCF);
-
- OLED_WriteCommand(0xD9); //设置预充电周期
- OLED_WriteCommand(0xF1);
-
- OLED_WriteCommand(0xDB); //设置VCOMH取消选择级别
- OLED_WriteCommand(0x30);
-
- OLED_WriteCommand(0xA4); //设置整个显示打开/关闭
-
- OLED_WriteCommand(0xA6); //设置正常/倒转显示
-
- OLED_WriteCommand(0x8D); //设置充电泵
- OLED_WriteCommand(0x14);
-
- OLED_WriteCommand(0xAF); //开启显示
-
- OLED_Clear(); //OLED清屏
- }
main.c
- #include "stm32f10x.h" // Device header
- #include "Delay.h"
- #include "OLED.h"
-
- uint8_t KeyNum;
-
- int main(void)
- {
- OLED_Init();
-
- OLED_ShowChar(1,1,'A');
- OLED_ShowString(1,3,"Hello,world!");
- OLED_ShowNum(2,1,30,2);
- OLED_ShowSignedNum(2,4,300,3);
- OLED_ShowSignedNum(2,9,-300,3);
- OLED_ShowHexNum(3,1,0xAA55,4);
- OLED_ShowBinNum(4,1,0xAA55,16);
-
- OLED_Clear();
-
- while(1)
- {
-
- }
-
- }
-
EXTI外部中断


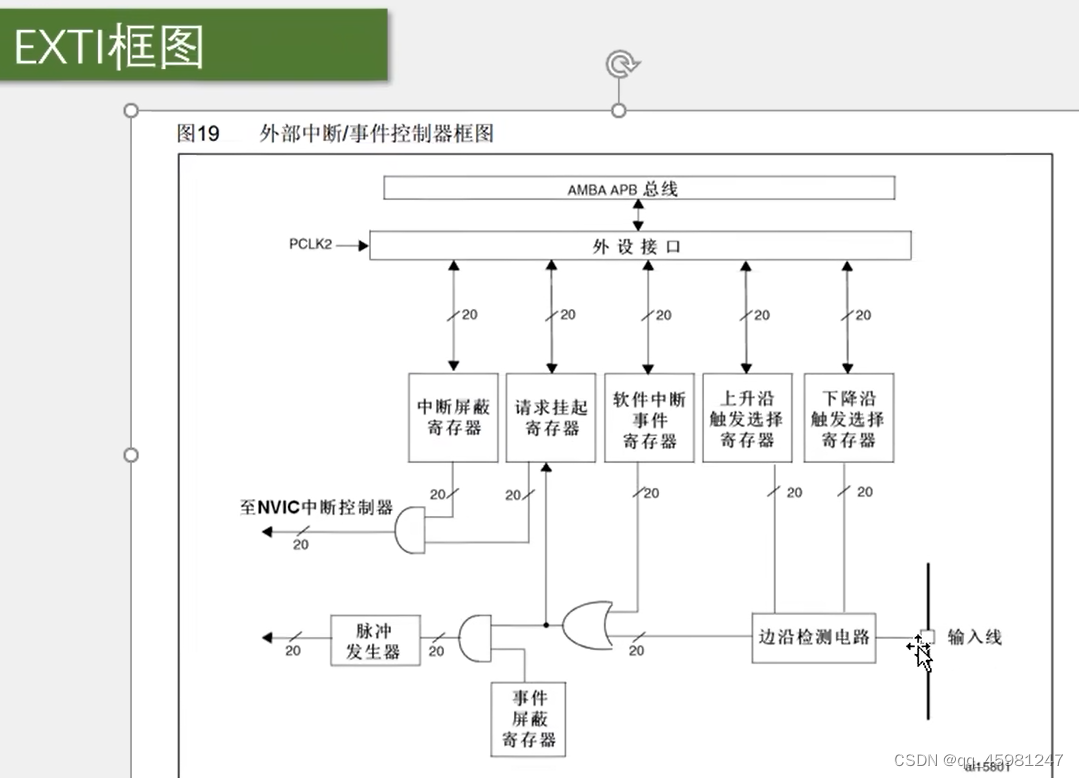
对射式红外传感器计次
Encoder.c
- #include "stm32f10x.h" // Device header
-
- uint16_t CountSensor_Count;
-
- /**
- * 函 数:计数传感器初始化
- * 参 数:无
- * 返 回 值:无
- */
- void CountSensor_Init(void)//初始化
- {
- RCC_APB2PeriphClockCmd(RCC_APB2Periph_GPIOB,ENABLE);
- //开启GPIOB时钟
- RCC_APB2PeriphClockCmd(RCC_APB2Periph_AFIO,ENABLE);
- //开启AFIO时钟
- //EXTI与NVIC不需要开启时钟
-
- //GPIO配置
- GPIO_InitTypeDef GPIO_InitStructure;//外部中断一般选择浮空,上拉或者下拉
- GPIO_InitStructure.GPIO_Mode = GPIO_Mode_IPU;//上拉输入模式
- GPIO_InitStructure.GPIO_Pin = GPIO_Pin_14;
- GPIO_InitStructure.GPIO_Speed = GPIO_Speed_50MHz;
- GPIO_Init(GPIOB,&GPIO_InitStructure);//初始化GPIOB外设
-
- //AFIO配置
- GPIO_EXTILineConfig(GPIO_PortSourceGPIOB,GPIO_PinSource14);
-
- //EXTI配置
- EXTI_InitTypeDef EXTI_InitStructure;
- EXTI_InitStructure.EXTI_Line = EXTI_Line14;//选择中断源位置
- EXTI_InitStructure.EXTI_LineCmd = ENABLE;
- EXTI_InitStructure.EXTI_Mode = EXTI_Mode_Interrupt;//选择事件还是中断
- //EXTI_InitStructure.EXTI_Trigger = EXTI_Trigger_Falling;//下降沿触发(离开后触发+1)
- //EXTI_InitStructure.EXTI_Trigger = EXTI_Trigger_Rising;//上升沿触发
- EXTI_InitStructure.EXTI_Trigger = EXTI_Trigger_Rising_Falling;//上升下降都触发
- EXTI_Init(&EXTI_InitStructure);//初始化EXTI
-
- //NVIC配置
- NVIC_PriorityGroupConfig(NVIC_PriorityGroup_2);//中断分组(两位抢占,两位相应)
- NVIC_InitTypeDef NVIC_InitStructure;
- NVIC_InitStructure.NVIC_IRQChannel = EXTI15_10_IRQn;//选择芯片对应通道
- NVIC_InitStructure.NVIC_IRQChannelCmd = ENABLE;//使能中断通道
- NVIC_InitStructure.NVIC_IRQChannelPreemptionPriority = 1;//0-3
- NVIC_InitStructure.NVIC_IRQChannelSubPriority = 1;//0-3
- NVIC_Init(&NVIC_InitStructure);
-
- }
-
- /**
- * 函 数:获取计数传感器的计数值
- * 参 数:无
- * 返 回 值:计数值,范围:0~65535
- */
- uint16_t CountSensor_Get(void)
- {
- return CountSensor_Count;
- }
-
- /**
- * 函 数:EXTI15_10外部中断函数
- * 参 数:无
- * 返 回 值:无
- * 注意事项:此函数为中断函数,无需调用,中断触发后自动执行
- * 函数名为预留的指定名称,可以从启动文件复制
- * 请确保函数名正确,不能有任何差异,否则中断函数将不能进入
- */
- void EXTI15_10_IRQHandler(void)//中断函数
- {
- if(EXTI_GetITStatus(EXTI_Line14) == SET)//判断是否是来自14号端口的中断
- {
- if(GPIO_ReadInputDataBit(GPIOB,GPIO_Pin_14) == 1 || GPIO_ReadInputDataBit(GPIOB,GPIO_Pin_14) == 0)
- //上升沿若设置为0,则离开加一
- //下降沿若设置为1,则挡住加一
- //若上升下降都触发若设置为 0|1,则挡住加一,离开也加一
- //这里的判断是为了防止数据跳跃幅度大
- //传感器输出高电平灭,输出低电平亮
- //传感器输入高电平亮,输入低电平灭
- {
- CountSensor_Count++;
- }
- EXTI_ClearITPendingBit(EXTI_Line14);//完成中断后清除中断标志位
- }
-
- }
main.c
- #include "stm32f10x.h" // Device header
- #include "Delay.h"
- #include "OLED.h"
- #include "CountSensor.h"
-
- uint8_t KeyNum;
-
- int main(void)
- {
- OLED_Init();
- CountSensor_Init();
-
- OLED_ShowString(1,1,"Count:");
-
-
- while(1)
- {
- OLED_ShowNum(1,7,CountSensor_Get(),5);
- }
-
- }
-
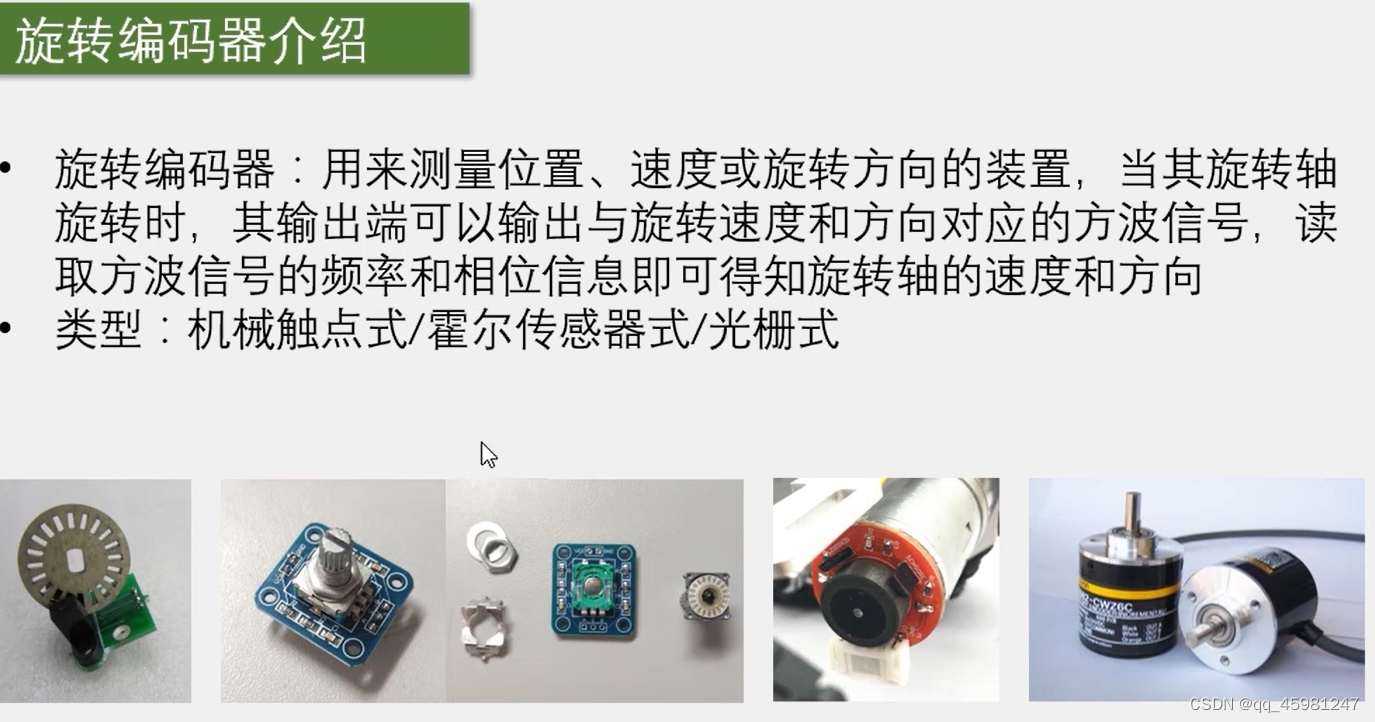
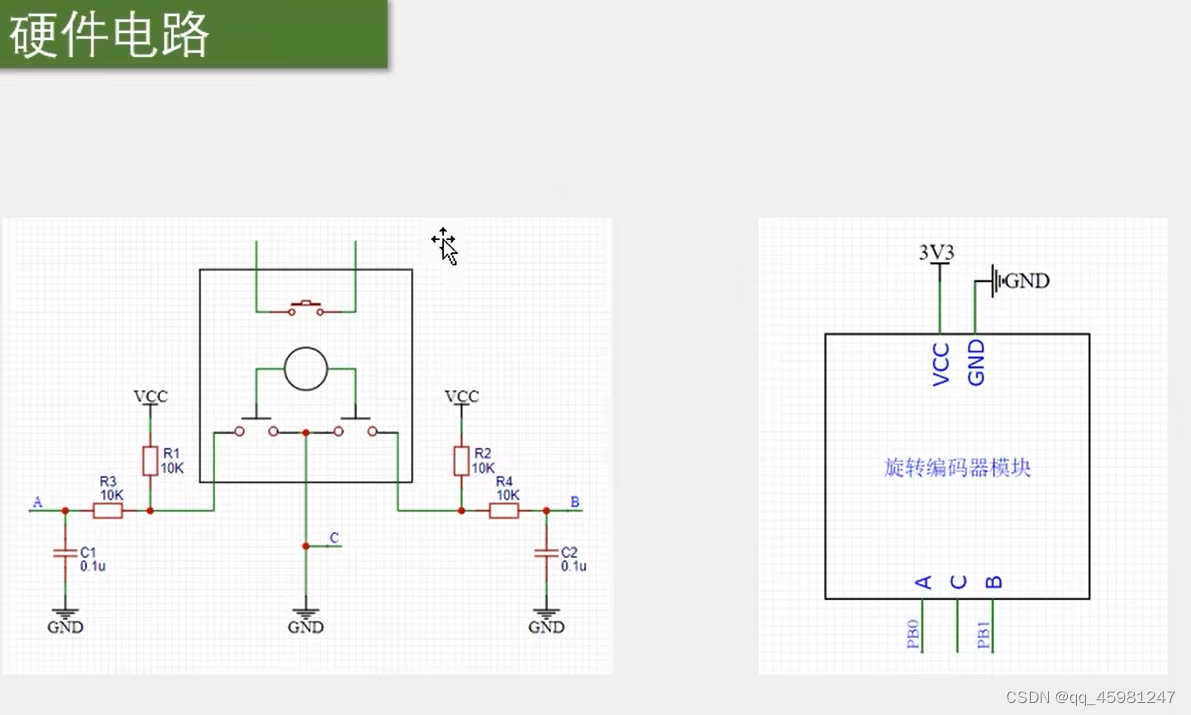
旋转编码器计次
Encoder.c
- #include "stm32f10x.h" // Device header
-
- int16_t Encoder_Count;
-
- /**
- * 函 数:旋转编码器初始化
- * 参 数:无
- * 返 回 值:无
- */
- void Encoder_Init(void)
- {
- RCC_APB2PeriphClockCmd(RCC_APB2Periph_GPIOB,ENABLE);
- //开启GPIOB时钟
- RCC_APB2PeriphClockCmd(RCC_APB2Periph_AFIO,ENABLE);
- //开启AFIO时钟
- //EXTI与NVIC不需要开启时钟
-
- //GPIO配置
- GPIO_InitTypeDef GPIO_InitStructure;//外部中断一般选择浮空,上拉或者下拉
- GPIO_InitStructure.GPIO_Mode = GPIO_Mode_IPU;//上拉输入模式
- GPIO_InitStructure.GPIO_Pin = GPIO_Pin_0 | GPIO_Pin_1;
- GPIO_InitStructure.GPIO_Speed = GPIO_Speed_50MHz;
- GPIO_Init(GPIOB,&GPIO_InitStructure);//初始化GPIOB外设
-
- //AFIO配置
- GPIO_EXTILineConfig(GPIO_PortSourceGPIOB,GPIO_PinSource1);//配置PB^1端口
- GPIO_EXTILineConfig(GPIO_PortSourceGPIOB,GPIO_PinSource0);//配置PB^0端口
-
- //EXTI配置
- EXTI_InitTypeDef EXTI_InitStructure;
- EXTI_InitStructure.EXTI_Line = EXTI_Line0 | EXTI_Line1;//选择中断源位置
- EXTI_InitStructure.EXTI_LineCmd = ENABLE;
- EXTI_InitStructure.EXTI_Mode = EXTI_Mode_Interrupt;//选择事件还是中断
- EXTI_InitStructure.EXTI_Trigger = EXTI_Trigger_Falling;//下降沿触发
- //EXTI_InitStructure.EXTI_Trigger = EXTI_Trigger_Rising;//上升沿触发
- //EXTI_InitStructure.EXTI_Trigger = EXTI_Trigger_Rising_Falling;//上升下降都触发
- EXTI_Init(&EXTI_InitStructure);//初始化EXTI
-
- //NVIC配置
- NVIC_PriorityGroupConfig(NVIC_PriorityGroup_2);//中断分组(两位抢占,两位相应)
- NVIC_InitTypeDef NVIC_InitStructure;
- NVIC_InitStructure.NVIC_IRQChannel = EXTI0_IRQn;//选择芯片端口0对应通道
- NVIC_InitStructure.NVIC_IRQChannelCmd = ENABLE;//使能中断通道
- NVIC_InitStructure.NVIC_IRQChannelPreemptionPriority = 1;//0-3
- NVIC_InitStructure.NVIC_IRQChannelSubPriority = 1;//0-3
- NVIC_Init(&NVIC_InitStructure);
-
- NVIC_InitStructure.NVIC_IRQChannel = EXTI1_IRQn;//选择芯片端口1对应通道
- NVIC_InitStructure.NVIC_IRQChannelCmd = ENABLE;//使能中断通道
- NVIC_InitStructure.NVIC_IRQChannelPreemptionPriority = 1;//0-3
- NVIC_InitStructure.NVIC_IRQChannelSubPriority = 2;//0-3
- NVIC_Init(&NVIC_InitStructure);
- }
-
- /**
- * 函 数:EXTI0外部中断函数
- * 参 数:无
- * 返 回 值:无
- * 注意事项:此函数为中断函数,无需调用,中断触发后自动执行
- * 函数名为预留的指定名称,可以从启动文件复制
- * 请确保函数名正确,不能有任何差异,否则中断函数将不能进入
- */
- void EXTI0_IRQHandler(void)//端口0触发中断(左旋)
- {
- if(EXTI_GetITStatus(EXTI_Line0) == SET)//检查EXTI是否被置位SET,如果置位则进行中断程序
- {
- if(GPIO_ReadInputDataBit(GPIOB,GPIO_Pin_1) == 0)//进行判断另一个引脚
- {
- Encoder_Count--;
- }
- EXTI_ClearITPendingBit(EXTI_Line0);//清除标志位
- }
- }
-
- /**
- * 函 数:EXTI1外部中断函数
- * 参 数:无
- * 返 回 值:无
- * 注意事项:此函数为中断函数,无需调用,中断触发后自动执行
- * 函数名为预留的指定名称,可以从启动文件复制
- * 请确保函数名正确,不能有任何差异,否则中断函数将不能进入
- */
- void EXTI1_IRQHandler(void)//端口1触发中断(右旋)
- {
- if(EXTI_GetITStatus(EXTI_Line1) == SET)//检查EXTI是否被置位SET,如果置位则进行中断程序
- {
- if(GPIO_ReadInputDataBit(GPIOB,GPIO_Pin_0) == 0)//进行判断另一个引脚
- {
- Encoder_Count++;
- }
- EXTI_ClearITPendingBit(EXTI_Line1);//清除标志位
- }
- }
-
- /**
- * 函 数:旋转编码器获取增量值
- * 参 数:无
- * 返 回 值:自上此调用此函数后,旋转编码器的增量值
- */
- int16_t EncoderCount_Get(void)
- {
- int16_t Tmp;
- /*使用Tmp变量作为中继,目的是返回Encoder_Count后将其清零*/
- /*在这里,也可以直接返回Encoder_Count
- 但这样就不是获取增量值的操作方法了
- 也可以实现功能,只是思路不一样*/
- Tmp = Encoder_Count;
- Encoder_Count = 0;
- return Tmp;
- }
main.c
- #include "stm32f10x.h" // Device header
- #include "Delay.h"
- #include "OLED.h"
- #include "Encoder.h"
-
- int16_t Num;
-
-
- int main(void)
- {
- OLED_Init();
- Encoder_Init();
-
- OLED_ShowString(1,1,"Num:");
-
-
- while(1)
- {
- Num += EncoderCount_Get();//这里的函数得到的是对当前数进行操作(加或减)的增量值
- OLED_ShowSignedNum(1,5,Num,5);//这里要显示有符号数
- }
-
- }
-
注意:中断函数中,最好不要执行耗时过长的代码;最好不要在中断函数和主函数中调用相同的函数或操作同一个硬件,尤其的硬件相关函数。尽量操作变量或者标志位,当中断返回时,再对变量进行显示和操作。减少代码间的耦合性,让各部分代码相互独立。
声明:本文内容由网友自发贡献,不代表【wpsshop博客】立场,版权归原作者所有,本站不承担相应法律责任。如您发现有侵权的内容,请联系我们。转载请注明出处:https://www.wpsshop.cn/article/detail/46262
推荐阅读


相关标签

