- 1CentOS 8操作系统Nginx(或Tengine)服务器上安装SSL证书_centos 8.2 64位下载什么ssl证书
- 2RHEL5中实现对用户家目录/home的迁移
- 3MATLAB图像的频域低通滤波(灰度图像滤波+彩色图像滤波)_灰度图像带通滤波 matlab
- 4vue项目中地址带‘#’的问题_vue带#
- 5图像处理:理想低通滤波器、butterworth滤波器(巴特沃斯)、高斯滤波器实现(python)_python 巴特沃斯低通滤波器
- 64.docker之基本三要素(镜像,容器,仓库)_容器镜像 要素
- 7常用Windows系统进程列表 _windows自带的4号进程 都有哪些服务
- 8Unity热更新系列之一: bundle打包和打包策略_unity bundle
- 9[ROS2系列] ORBBEC(奥比中光)AstraPro相机在ROS2进行rtabmap 3D建图_astra pro驱动
- 10Unreal 5 实现UI制作_ue5 创建ui
鸿蒙应用开发学习:获取手机位置信息
赞
踩
一、前言
移动应用中经常需要获取设备的位置信息,因此在鸿蒙应用开发学习中,如何获取手机的位置信息是必修课。之前我想偷懒从别人那里复制黏贴代码,于是在百度上搜了一下,可能是我输入的关键字不对,结果没有找到想要的资料。于是我只能到官网上学习相关的开发文档(位置服务开发指南),自己摸索着做了,经过一番的学习,并在真机上测试,实现了获取手机位置信息的功能。特记之,已备忘。
二、实现方法
1. 首先在module.json5(位于entry/src/main文件夹下)文件中添加应用权限。

- "requestPermissions": [
- {
- "name": "ohos.permission.APPROXIMATELY_LOCATION"
- },
- {
- "name": "ohos.permission.LOCATION"
- }
- ]
2、在pages文件夹下通过“新建-page”创建一个ets文件,在文件中设置一个获取位置的按钮和用于显示位置信息的文本组件(具体代码见最后)
3、在这个ets文件导入 @ohos.geoLocationManager
import geoLocationManager from '@ohos.geoLocationManager'4、实例化LocationRequest对象,用于告知系统该向应用提供何种类型的位置服务,以及位置结果上报的频率。我看了开发文档后,选择了方式二中的代码。
- let requestInfo = {
- 'priority': geoLocationManager.LocationRequestPriority.ACCURACY,
- 'timeInterval': 0,
- 'distanceInterval': 0,
- 'maxAccuracy': 0
- };
5、创建一个函数,这个函数通过点击界面中获取位置按钮来执行。函数实现以下功能:
(1)实例化Callback对象,用于向系统提供位置上报的途径。
(2)启动定位。
(3)获取系统缓存的最近一次历史定位结果。
(4)结束定位。
注:函数中的几个this开头的变量在主程序中以@state方法修饰,用于在文本控件中显示获取到的位置信息。
- getLocation() {
- let locationChange = (location) => {
- console.log('locationChanger: data: ' + JSON.stringify(location));
- };
- geoLocationManager.on('locationChange', requestInfo, locationChange);
- try {
- let location = geoLocationManager.getLastLocation();
- this.mLatitude = location.latitude.toString();
- this.mLongitude = location.longitude.toString();
- this.mAltitude = location.altitude.toString();
- this.mAccuracy = location.accuracy.toString();
- this.mSpeed = location.speed.toString();
- this.mTimeStamp = location.timeStamp.toString();
- this.mDirection = location.direction.toString();
-
- console.log("testTag", "获取到的位置信息:")
- console.log("testTag", "纬度latitude " + this.mLatitude)
- console.log("testTag", "经度longitude " + this.mLongitude)
- console.log("testTag", "海拔(米)altitude " + this.mAltitude)
- console.log("testTag", "精度(米)accuracy " + this.mAccuracy)
- console.log("testTag", "速度(米/秒)speed " + this.mSpeed)
- console.log("testTag", "时间戳timeStamp " + this.mTimeStamp)
- console.log("testTag", "方向direction " + this.mDirection)
- } catch (err) {
- console.error("errCode:" + err.code + ",errMessage:" + err.message);
- }
- geoLocationManager.off('locationChange', locationChange);
- }

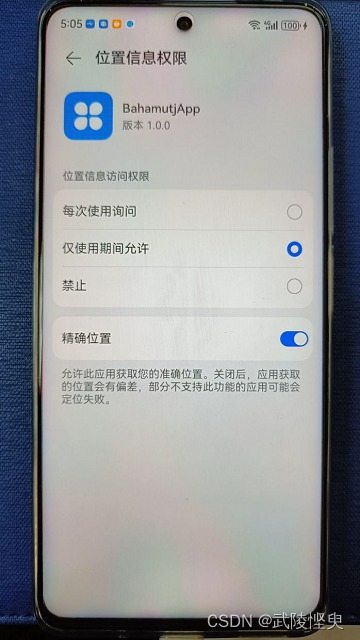
6、真机调试,安装了APP后,需要进入手机的“设置-应用和服务-应用管理”,找到安装的APP,手动将位置信息权限打开。(因为我还没有找到,自动开启权限的方式,只能手动开启)。
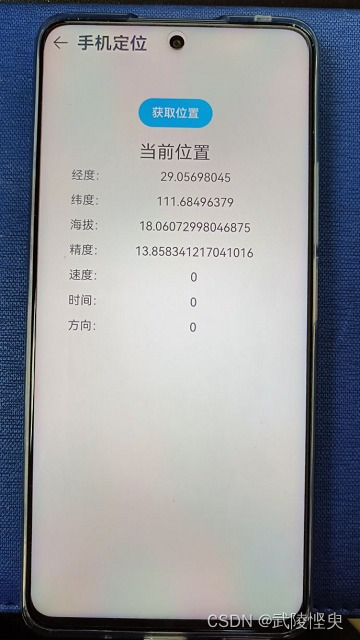
7、运行APP,进入手机定位页面,点击“获取位置”按钮,界面显示出了获取到的相关信息。
三、源代码
最后上我写的ets文件源代码。
- import geoLocationManager from '@ohos.geoLocationManager'
-
-
-
- let requestInfo = {
- 'priority': geoLocationManager.LocationRequestPriority.ACCURACY,
- 'timeInterval': 0,
- 'distanceInterval': 0,
- 'maxAccuracy': 0
- };
-
- @Entry
- @Component
- struct LocationPage {
- @State mLatitude: string = '' // 经度
- @State mLongitude: string = '' // 纬度
- @State mAltitude: string = '' // 海拔(米)
- @State mAccuracy: string = '' // 精度(米)
- @State mSpeed: string = '' //速度(米/秒)
- @State mTimeStamp: string = '' // 时间戳
- @State mDirection: string = '' // 方向
-
- build() {
- Column() {
- Button("获取位置")
- .width(100)
- .backgroundColor($r('app.color.button_bgColor_lightBlue'))
- .margin({ top: 50, bottom: 20 })
- .onClick(() => {
- this.getLocation()
- })
- Text('当前位置')
- .fontSize(24)
- Grid() {
- GridItem() {
- Text('经度:')
- }
-
- GridItem() {
- Text(this.mLatitude)
- }
-
- GridItem() {
- Text('纬度:')
- }
-
- GridItem() {
- Text(this.mLongitude)
- }
-
- GridItem() {
- Text('海拔:')
- }
-
- GridItem() {
- Text(this.mAltitude)
- }
-
- GridItem() {
- Text('精度:')
- }
-
- GridItem() {
- Text(this.mAccuracy)
- }
-
- GridItem() {
- Text('速度:')
- }
-
- GridItem() {
- Text(this.mSpeed)
- }
-
- GridItem() {
- Text('时间:')
- }
-
- GridItem() {
- Text(this.mSpeed)
- }
-
- GridItem() {
- Text('方向:')
- }
-
- GridItem() {
- Text(this.mDirection)
- }
- }
- .columnsTemplate('1fr 4fr')
- .rowsGap(15)
- .padding(10)
- .width('90%')
- }
- .width('100%')
- .backgroundColor('#EAEAEA')
- .padding(10)
- }
-
- // 获取手机当前位置
- getLocation() {
- let locationChange = (location) => {
- console.log('locationChanger: data: ' + JSON.stringify(location));
- };
- geoLocationManager.on('locationChange', requestInfo, locationChange);
- try {
- let location = geoLocationManager.getLastLocation();
- this.mLatitude = location.latitude.toString();
- this.mLongitude = location.longitude.toString();
- this.mAltitude = location.altitude.toString();
- this.mAccuracy = location.accuracy.toString();
- this.mSpeed = location.speed.toString();
- this.mTimeStamp = location.timeStamp.toString();
- this.mDirection = location.direction.toString();
-
- console.log("testTag", "获取到的位置信息:")
- console.log("testTag", "纬度latitude " + this.mLatitude)
- console.log("testTag", "经度longitude " + this.mLongitude)
- console.log("testTag", "海拔(米)altitude " + this.mAltitude)
- console.log("testTag", "精度(米)accuracy " + this.mAccuracy)
- console.log("testTag", "速度(米/秒)speed " + this.mSpeed)
- console.log("testTag", "时间戳timeStamp " + this.mTimeStamp)
- console.log("testTag", "方向direction " + this.mDirection)
- } catch (err) {
- console.error("errCode:" + err.code + ",errMessage:" + err.message);
- }
- geoLocationManager.off('locationChange', locationChange);
- }
-
- }
- Jackson的依赖
2.9.3[详细] 赞
踩