
热门标签
热门文章
- 1SpringBoot进行自然语言处理,利用Hanlp进行文本情感分析
- 2Python代码雨
- 3yolov7改进系列_改进yolo
- 4鸿蒙OS2.0添加加密门禁卡进入卡包_鸿蒙系统新建空白门禁卡
- 52023 亚马逊云科技 re:lnvent 大会探秘: Amazon Connect 全渠道云联络中心
- 6Windows server——部署web服务_windows一键部署web环境
- 7大数据与云计算——部署Hadoop集群并运行MapReduce集群案例(超级详细!)_在hadoop上运行mapreduce
- 8【软考-中级】系统集成项目管理工程师-计算题_系统集成项目管理工程师计算题
- 9VOC/YOLO/COCO数据集格式转换及LabelImg/Labelme/精灵标注助手Colabeler标注工具介绍_coco数据集标注工具
- 10Ubuntu如何使用宝塔面板部署开源论坛HadSky并结合内网穿透远程访问?
当前位置: article > 正文
Android开发自定义水印图片_android 照片水印 模版
作者:AI算法构造者 | 2024-01-30 00:03:54
赞
踩
android 照片水印 模版
上一篇的自定义View中的测量绘制 http://blog.csdn.net/jinjin10086/article/details/54947301
在此基础上,本次在此基础上继续进行学习。
本次的目标是在上一篇的基础上给普通的图片加上水印,实际的应用如csdn上传图片、微信公众号上传图片,都会自动给图片加上水印,当然本次只是给加上水印,可设置水印的颜色,内容,规格大小(small为14号字体,normal为16号字体,big为18号字体)等。
实现的效果如下:
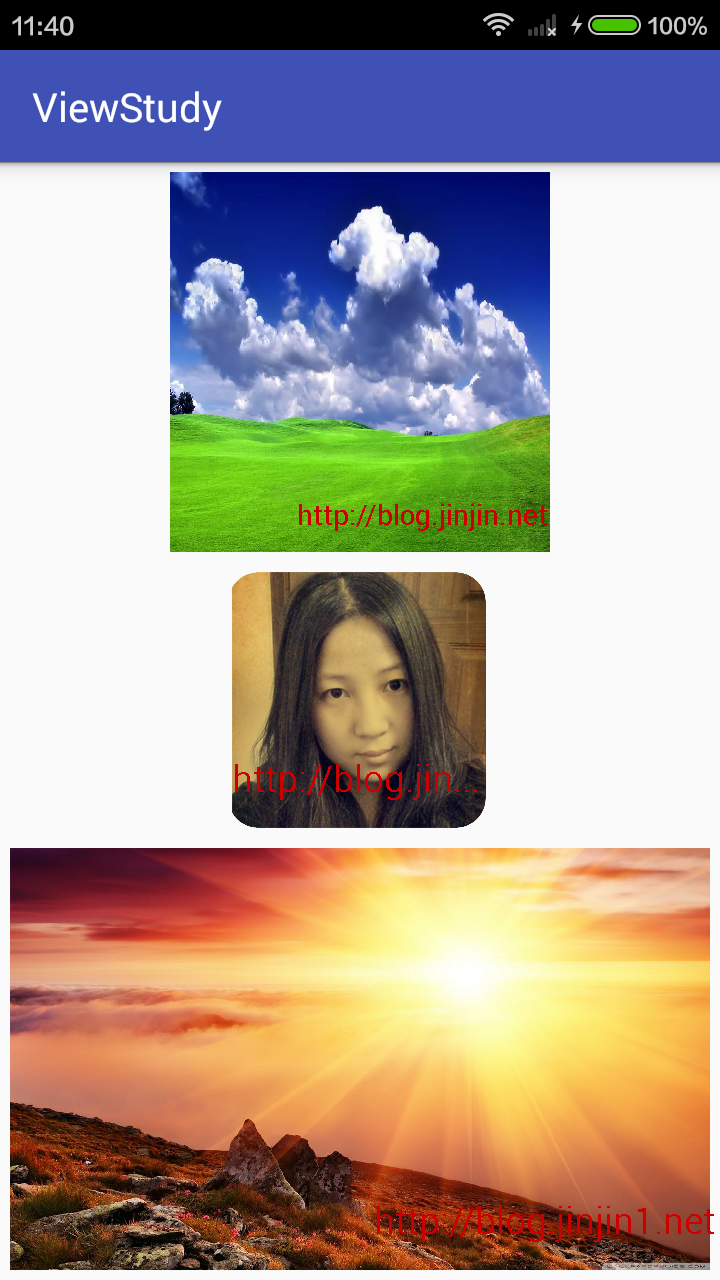
接下来解析具体得实现过程:
1)和上次的一样,继承自View重写其构造方法,如下:
- public DemoImageView01(Context context) {
- this(context,null);
- }
-
- public DemoImageView01(Context context, AttributeSet attrs) {
- this(context, attrs,0);
- }
-
- public DemoImageView01(Context context, AttributeSet attrs, int defStyleAttr) {
- super(context, attrs, defStyleAttr);
-
- }
1,属性的自定义内容:
- <declare-styleable name="DemoImageView01">
- <attr name="image" format="reference"/>
- <attr name="watermark" format="string"/>
- <attr name="watermarkcolor" format="color"/>
- <attr name="watermarksize">
- <enum name="small" value="0" />
- <enum name="normal" value="1" />
- <enum name="big" value="2" />
- </attr>
- </declare-styleable>
3)初始化画笔及绘制范围如下:
- mPaint = new Paint();
- mBound = new Rect();
- mWaterMarkBound = new Rect();
- mPaint.setTextSize(mWatermarkSize);
- mPaint.getTextBounds(mWatermark, 0, mWatermark.length(), mWaterMarkBound);
- @Override
- protected void onMeasure(int widthMeasureSpec, int heightMeasureSpec) {
- int widthMode = MeasureSpec.getMode(widthMeasureSpec);
- int widthSize = MeasureSpec.getSize(widthMeasureSpec);
- int heightMode = MeasureSpec.getMode(heightMeasureSpec);
- int heightSize = MeasureSpec.getSize(heightMeasureSpec);
- if (widthMode == MeasureSpec.EXACTLY){
- mWidth = widthSize;
- }else {
- //图片的宽度 (注:水印覆盖在图片上,不占宽度)
- int desire = getPaddingLeft() + getPaddingRight() + mImageSrc.getWidth();
- mWidth = Math.min(desire,widthSize);
- }
- if (heightMode == MeasureSpec.EXACTLY){
- mHeight = heightSize;
- }else {
- ///图片的宽度 (注:水印覆盖在图片上,不占高度)
- int desire = getPaddingTop() + getPaddingBottom() + mImageSrc.getHeight();
- mHeight = Math.min(desire,heightSize);
- }
- Log.d("test","mWidth" + mWidth);
- Log.d("test","mHeight" + mHeight);
- setMeasuredDimension(mWidth,mHeight);
- }

- @Override
- protected void onDraw(Canvas canvas) {
-
- /*
- 整体绘制区域的规定
- */
- mBound.left = getPaddingLeft();
- mBound.right = mWidth - getPaddingRight();
- mBound.top = getPaddingTop();
- mBound.bottom = mHeight - getPaddingBottom();
-
- mPaint.setStyle(Paint.Style.FILL);
- mPaint.setColor(Color.YELLOW);
- //绘制图片
- canvas.drawBitmap(mImageSrc,null,mBound,mPaint);
-
- mPaint.setTextSize(mWatermarkSize);
- mPaint.getTextBounds(mWatermark,0,mWatermark.length(),mWaterMarkBound);
- mPaint.setColor(mWatermarkColor);
- /*
- 如果水印的宽度 大于整体区域的宽度
- */
- if (mWaterMarkBound.width() > mWidth){
- TextPaint paint = new TextPaint(mPaint);
- String mWaterMarkNow = TextUtils.ellipsize(mWatermark,paint,(float) (mWidth - getPaddingLeft() - getPaddingRight()), TextUtils.TruncateAt.END).toString();
- canvas.drawText(mWaterMarkNow,getPaddingLeft(), mHeight - getPaddingBottom() - mWaterMarkBound.height(), mPaint);
- }else {
- canvas.drawText(mWatermark, mWidth - mWaterMarkBound.width() - getPaddingRight() , mHeight - getPaddingBottom() - mWaterMarkBound.height(), mPaint);
- }
-
- }
- <?xml version="1.0" encoding="utf-8"?>
- <LinearLayout
- xmlns:android="http://schemas.android.com/apk/res/android"
- xmlns:image1="http://schemas.android.com/apk/res-auto"
- xmlns:tools="http://schemas.android.com/tools"
- android:layout_width="match_parent"
- android:layout_height="match_parent"
- android:gravity="center_horizontal"
- android:orientation="vertical"
- tools:context="com.jinjin.viewstudy.viewstudy.MainActivity">
-
-
- <com.jinjin.viewstudy.viewstudy.view.DemoImageView01
- android:layout_width="200dp"
- android:layout_height="200dp"
- android:padding="5dp"
- image1:image="@mipmap/image1"
- image1:watermark="http://blog.jinjin.net"
- image1:watermarkcolor="@android:color/holo_red_dark"
- image1:watermarksize="small"/>
-
-
- <com.jinjin.viewstudy.viewstudy.view.DemoImageView01
- android:layout_width="wrap_content"
- android:layout_height="wrap_content"
- android:padding="5dp"
- image1:image="@mipmap/lmj"
- image1:watermark="http://blog.jinjin1.net"
- image1:watermarkcolor="@android:color/holo_red_dark"
- image1:watermarksize="big"/>
-
- <com.jinjin.viewstudy.viewstudy.view.DemoImageView01
- android:layout_width="wrap_content"
- android:layout_height="wrap_content"
- android:padding="5dp"
- image1:image="@mipmap/image2"
- image1:watermark="http://blog.jinjin1.net"
- image1:watermarkcolor="@android:color/holo_red_dark"
- image1:watermarksize="big"/>
-
- </LinearLayout>
到此,即可实现上述的显示效果。
源码下载:
声明:本文内容由网友自发贡献,不代表【wpsshop博客】立场,版权归原作者所有,本站不承担相应法律责任。如您发现有侵权的内容,请联系我们。转载请注明出处:https://www.wpsshop.cn/article/detail/45697
推荐阅读
![Android Termux安装MySQL,并使用cpolar实现公网安全远程连接[内网穿透]](https://img-blog.csdnimg.cn/fabd1c92d58f4f5b8946e9b8f6b49f50.jpeg?x-oss-process=image/resize,m_fixed,h_300,image/format,png)


相关标签

