
- 1K8S 日志方案
- 2(附源码)springboot学生宿舍管理系统 毕业设计 211955_宿舍管理系统毕业设计
- 3【Linux】Linux之间如何互传文件(详细讲解)_linux把文件传到另一个linux
- 4JavaScript鼠标拖动事件监听使用方法及实例效果_监听鼠标移动
- 5【Elasticsearch篇】详解使用RestClient操作索引库的相关操作
- 6【Python】01快速上手爬虫案例一
- 7深度学习算法应用实战 | 利用 CLIP 模型进行“零样本图像分类”
- 8【C++进阶1--继承】面向对象三大特性之一(附菱形继承讲解
- 9qml学习----------------(progressBar)进度条的学习_qml progress bar 横向为纵向
- 10【Python】文件操作中的a,a+,w,w+几种方式的区别_转_python a+
工业网关开发:Openwrt系统开发流程_openwrt开发
赞
踩
本篇文章介绍了Openwrt嵌入式Linux操作系统的完整开发流程,帮助同样开发网关类的嵌入式工程师提供一个基于开放平台开发的思路。
背景
开发板SOC为HLK-7688A模块:内存DDR2:128MB,SPI Flash:32MB,主芯片:MT7688AN,内核:MIPS24KEc。
从Openwrt官网中了解到当前支持设备MediaTek LinkIt Smart 768符合我们基于HLK-7688A的产品板,代码主干仓库地址:https://www.github.com/openwrt/openwrt。
OP系统编译过程
根据SOC以及板卡实际外设的涉及,选择系统目标以及组件支持:
- 使用git clone命令克隆主干仓库,git checkout 切换到18.06分支。
- 下载完之后执行更新源(Feeds)指令,更新软件包依赖关系:./scripts/feeds update -a
- 执行下载编译固件需要的软件包:./scripts/feeds install -a
- make menuconfig修改代码仓库编译选项。根据我们硬件模块的系统信息,配置目标系统为:MediaTek Ralink MIPS,子目标为MT76x8 based boards,目标概述为MediaTek LinkIt Smart 7688。下图为目标系统选择截图:

- 选择中文配置界面:LUCI—>Theme—> <> luci-theme-openwrt。
LUCI—>modules—>Translations------> <> Chinese。 - SD卡支持:Kernel modules —> Other modules —> <> kmod-sdhci-mt7620
1.5.3文件系统支持(这里我们选择ext4):Kernel modules—>Filesystems—> <> kmod-fs-ext1.6支持mkfs.ext4(用于格式化SD卡): Utilities -> Filesystem—><*> e2fsprogs。
驱动适配
LinkIt smart7688的SD卡检测,默认是高电平。但是普通的SD卡是低电平。所以,要对dts进行修改。打开target/linux/ramips/dts/LINKIT7688.dts,找到下面的表述,将cd-high改成cd-low
			sdhci@10130000 {
        	status = "okay";
			mediatek,cd-low;
        //mediatek,cd-high;
- 1
- 2
- 3
- 4
MT7688/7628分为IoT Device Mode和IoT Gateway Mode,即单网口模式和五网口模式。如要使用UART2,则必须使用单网口模式,需要配置的寄存器。因为需要对串口2做正常使用来驱动外设模块,所以第一需要在./build_dir/target-mipsel_24kc_musl/linux-ramips_mt76x8/linux-4.14.132/arch/mips/ralink/mt7620.c中的prom_soc_init函数中添加如下代码,配置为单网口模式:
	u32 cfg;
	cfg = __raw_readl(sysc + 0x3c);
	cfg |= 0x0f<<17;
	__raw_writel(cfg, sysc + 0x3c);
- 1
- 2
- 3
- 4
第二需要对LINKIT7688.dts修改如下:
        chosen {
                bootargs = "console=ttyS0,57600";
        };

        aliases {
                serial0 =  &uartlite;
        };
- 1
- 2
- 3
- 4
- 5
- 6
- 7
一些涉及普通GPIO的修改。cat /sys/kernel/debug/gpio来查看当前有些GPIO的复用功能,我们使用的是模块43引脚作为普通IO复用,对应的是GPIO19,修改LINKIT7688.dts如下:
        gpio-keys-polled {
                compatible = "gpio-keys-polled";
                #address-cells = <1>;
                #size-cells = <0>;
                poll-interval = <20>;

                wps {
                        label = "reset";
                        gpios = <&gpio0 19 GPIO_ACTIVE_LOW>;
                        linux,code = <0x198>;
                };
        };
		&pwm {
        		status = "disable";
		};
- 1
- 2
- 3
- 4
- 5
- 6
- 7
- 8
- 9
- 10
- 11
- 12
- 13
- 14
- 15
还有一个灯的引脚涉及到了复用,也需要在LINKIT7688.dts文件添加信息如下,定位为普通的IO口可供我们应用控制:
                p4led_an {
                        ralink,group="p4led_an";
                        ralink,function="gpio";
                };
- 1
- 2
- 3
- 4
- 5
Openwrt系统应用开发框架
基于Openwrt的应用开发,可以使用LuCI的框架,添加luci-applications。LuCI是Openwrt的web配置管理界面,相关的定制开发说明在:https://github.com/openwrt/luci/wiki/Documentation.
我们先定制一下LUCI的界面风格主题。我们的主题基于Github上的开源项目luci-theme-rosy的主题修改而成。
Package文件目录如下:
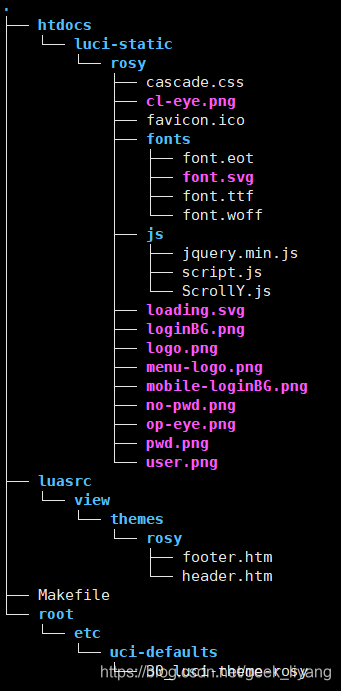
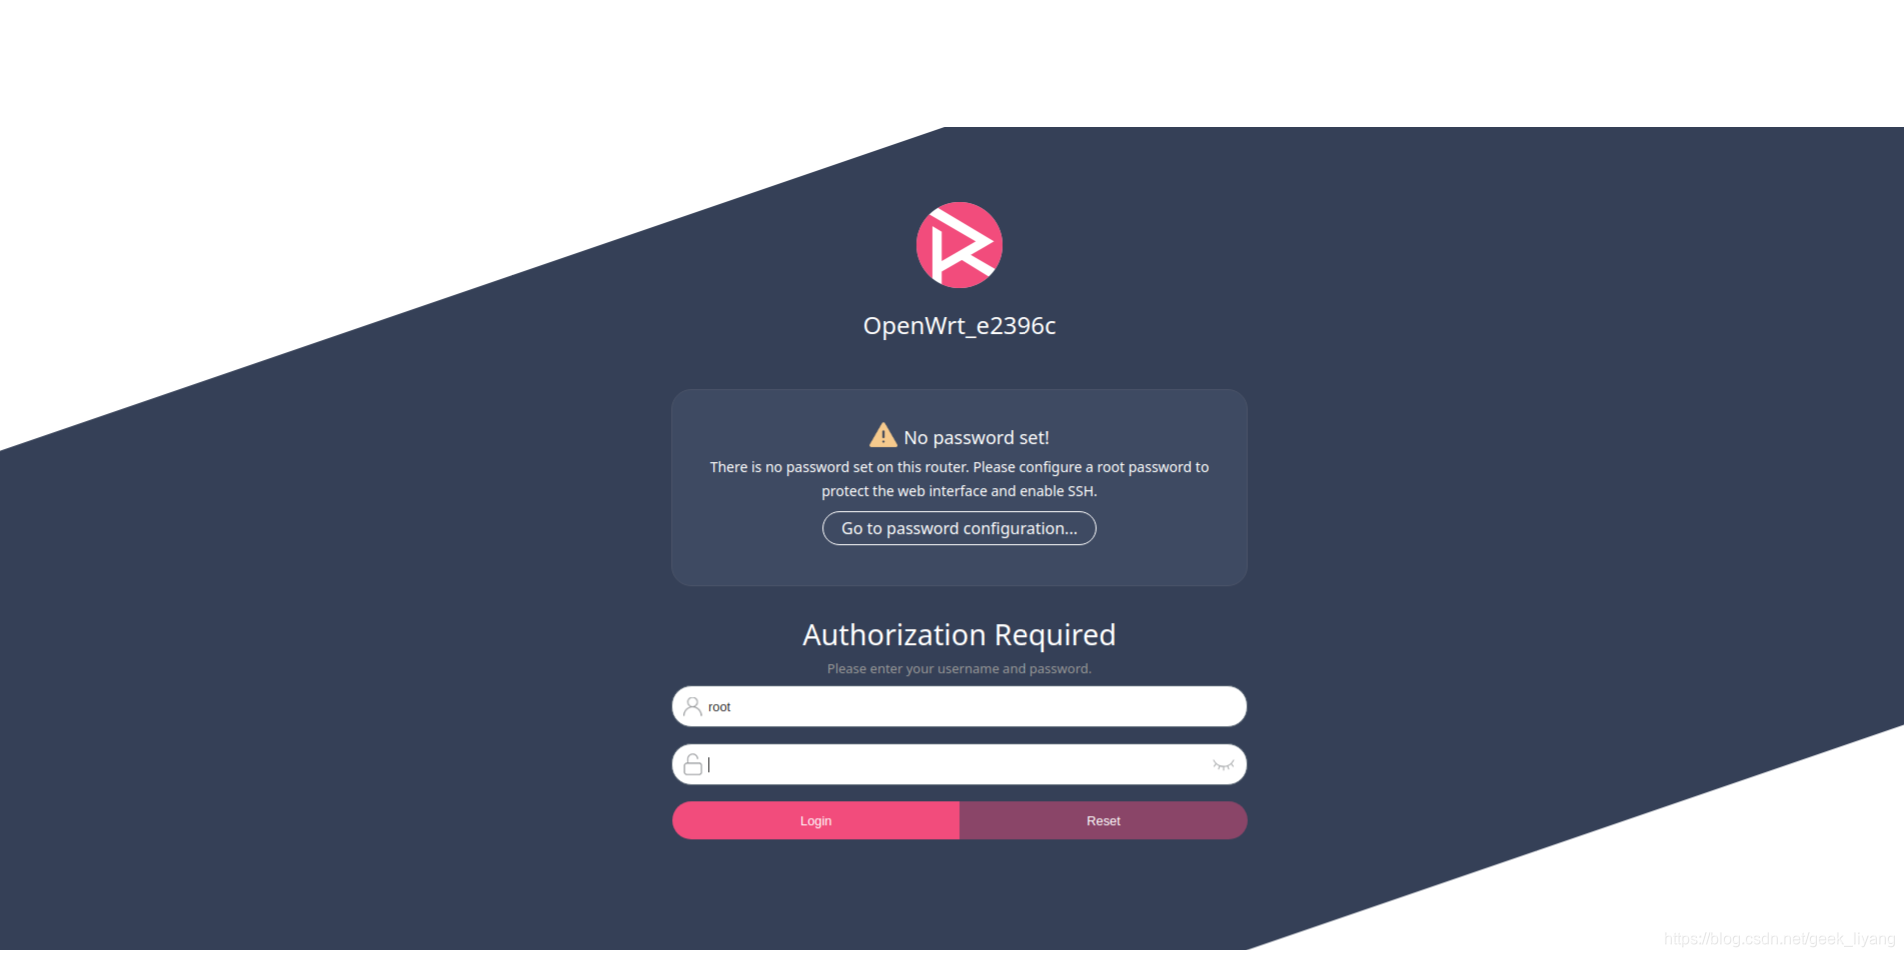
修改logo.png与menu-logo.png为你想要的log。定制footer.htm中footer标签中显示的内容以及超链接的网址。界面效果如图:
在feeds/luci/applications/ 目录下添加我们自定义应用的文件夹,并把准备好的luci相关代码拷贝到相应目录下,相应目录的定义如下:
├── ipkg // 1、包相关
├── luasrc // 2、web界面相关
├── Makefile // 3、编译相关
├── root // 4、/etc/目录下相关文件
└── src // 5、实现功能的主程序
将界面相关的lua文件和我们应用相关的配置文件放到这里(应用源码我没有放在这里,只放了管理界面的相关文件)。底层目录如下:
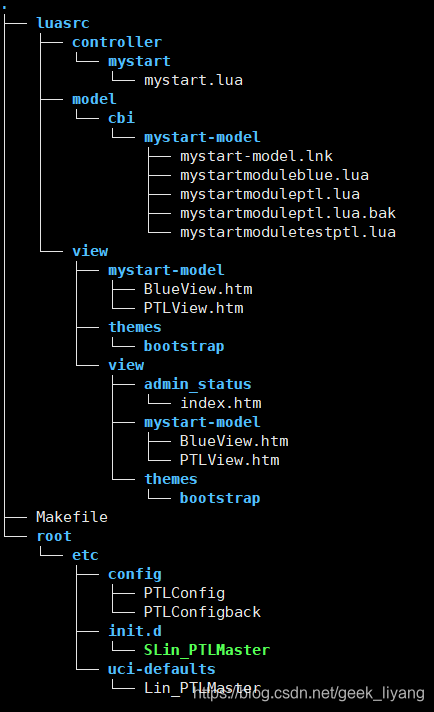
Luci配置界面添加
Luci由系统配置统一接口UCI和轻量级语言lua结合而成。Luci采用MVC(三层架构),系统的luasec下有三个目录 model、 view、 controller, 它们分别对应 M、V、C,Luci提供的API说明在http://openwrt.github.io/luci/api/index.html可以查到,他的三层架构让我们可以不用写Htlm文件就能快速为我们的应用程序开发一个Web配置界面。首先,Controller下面的mystart.lua定义了模块的入口,语法说明如下:
module("luci.controller.mystart.mystart", package.seeall)

function index()
            entry({"admin", "导航名称"}, firstchild(),"导航名称", 60).dependent=false  --添加一个顶层导航
            if  nixio.fs.access("/bin/应用名称") then
                        entry({"admin", "导航名称", "页签名称}, cbi("mystart-model/页面模块定义"),translate("中文名称"), 100)  --在New tab下添加一个子选项View Tab
                        entry({"admin", "Gateway", "pGateway_view"}, template("mystart-model/PTLView"),translate("CAN网关终端管理"), 100)
        end


end
- 1
- 2
- 3
- 4
- 5
- 6
- 7
- 8
- 9
- 10
- 11
model目录下面是LUCI CBI models,CBI模型是Lua文件,描述UCI配置文件的结构,他会将我们config目录下面的配置文件最终解释成Htlm表单里的各个元素,实现通过Web界面来配置我们应用的参数。
local fs = require "nixio.fs"
local m, s,o,z,n,f,g,h

m = Map("配置文件名称", translate("中文翻译"))

s = m:section(TypedSection, "UCI配置文件节点名","Sectio名称","Sectio解释")
s.addremove = false
s.anonymous = true

s:tab("SerSetting","页签名称")

s:taboption("页签名称",Value, "UCI配置元素名称", "配置项页面显示名称") --将UCI的配置元素解释为一个文本框。
s:tab("AdvinceSetting","页签名称")
o = s:taboption("AdvinceSetting", ListValue, "TcpConnectInterval","管理系统重连时间:")--将配置文件中的TcpConnectInterval元素解释为一个下拉框。
--o.default = 0    --off status
o.datatype = "uinteger"
o:value(1000000, "Normal")
o:value(500000, "Fast")
o:value(2000000, "Slow")

- 1
- 2
- 3
- 4
- 5
- 6
- 7
- 8
- 9
- 10
- 11
- 12
- 13
- 14
- 15
- 16
- 17
- 18
- 19
View下边是.htm文件,模拟了一个无线STA动态在线显示,在线显示网关下面接的智能终端状态
<h2><a id="content" name="content"><%:网关连接智能终端总览%></a></h2> <fieldset class="cbi-section"> <legend><%:智能终端动态刷新显示,刷新时间1s%></legend> <table class="cbi-section-table" id="wifi_assoc_table"> <tr class="cbi-section-table-titles"> <th class="cbi-section-table-cell"> </th> <th class="cbi-section-table-cell"><%:CanTunNum%></th> <th class="cbi-section-table-cell"><%:终端地址%></th> <th class="cbi-section-table-cell"><%:终端设备型号%></th> <th class="cbi-section-table-cell"><%:终端版本编号%></th> <th class="cbi-section-table-cell"><%:终端状态%></th> </th> <th class="cbi-section-table-cell"><%:状态更新时间%></th> </tr> <tr class="cbi-section-table-row"> <td colspan="7"><em><br /><%:Collecting data...%></em></td> </tr> </table> </fieldset>
- 1
- 2
- 3
- 4
- 5
- 6
- 7
- 8
- 9
- 10
- 11
- 12
- 13
- 14
- 15
- 16
- 17
- 18
- 19
- 20
- 21
- 22
- 23
- 24
编译安装应用ipk
Openwrt系统采用 ipk 包的形式安装软件。下面是常见的OPKG命令:
- 安装ipk包:opkg install xxxxx.ipk
- 卸载ipk包:opkg remove xxxx.ipk
- 从官网更新可以安装的ipk软件列表:opkg update
- 列出可以安装的ipk包:opkg list
- 列出已经安装ipk包:opkg list-installed
下面我们来编译生成自己的应用程序,首先在源码package/utils/hello_world下把自己的建立编译所需文件如下:

./src/Makefile文件内容如下,使用系统提供的编译器编译hello_world.c:
	all: hello_world
	hello_world: hello_world.o
		$(CC) $(LDFLAGS) hello_world.o -o hello_world
	helloworld.o: hello_world.c
		$(CC) $(CFLAGS) -c hello_world.c
	clean:
	rm *.o hello_world
- 1
- 2
- 3
- 4
- 5
- 6
- 7
./src/hello_world.c内容也比较简单:
#include <stdio.h>

int main(char argc, char *argv[])
{
	int i = 1;
	while(1) {
		//1~10 循环
		printf("Hello world!!!%d\n",i); //打印内容
		if (i < 10) {
			i++;
		} else {
			i = 1;
		}
		sleep(1);// 一秒钟打印一次
	}
	return 0;
}
- 1
- 2
- 3
- 4
- 5
- 6
- 7
- 8
- 9
- 10
- 11
- 12
- 13
- 14
- 15
- 16
- 17
顶层Makefile是基于Openwrt提供模板进行的修改即可:
include $(TOPDIR)/rules.mk

PKG_NAME:=helloworld
PKG_RELEASE:=1
PKG_BUILD_DIR:=$(BUILD_DIR)/$(PKG_NAME)

include $(INCLUDE_DIR)/package.mk

define Package/helloworld
    SECTION:=utils
    CATEGORY:=Utilities
    TITLE:=Helloworld -- prints a snarky message
endef

define Package/helloworld/description
    It's my first package demo.
endef

define Build/Prepare
    echo "Here is Package/Prepare"
    mkdir -p $(PKG_BUILD_DIR)
    $(CP) ./src/* $(PKG_BUILD_DIR)/
endef

define Package/helloworld/install
    echo "Here is Package/install"
    $(INSTALL_DIR) $(1)/bin
    $(INSTALL_BIN) $(PKG_BUILD_DIR)/helloworld $(1)/bin/
endef

$(eval $(call BuildPackage,helloworld))
- 1
- 2
- 3
- 4
- 5
- 6
- 7
- 8
- 9
- 10
- 11
- 12
- 13
- 14
- 15
- 16
- 17
- 18
- 19
- 20
- 21
- 22
- 23
- 24
- 25
- 26
- 27
- 28
- 29
- 30
- 31
最后就是编译和安装了,这里安装可以选择生成ipk,或者直接编译到Openwrt系统固件中,我们下边的流程是生成一个ipk包并安装到Openwrt中。
- openwrt源码根目录,执行make menuconfig。
- 在编译选项中找到helloworld(可以直接查找),选择‘M’进行编译,保存退出。
	Utilities--->
		<M> hello_world.................... Hello world -prints a hello world message
- 1
- 2
- 编译生成ipk包:全部编译: make V=s (速度慢,时间长);单独编译: make package/utils/hello_world/compile V=s(时间短,方便调试)。
- 拷贝ipk包到板子上,执行:opkg install,则会执行之前顶层Makefile定义好的安装序列。
十六宿舍 原创作品,转载必须标注原文链接。
©2023 Yang Li. All rights reserved.
欢迎关注『十六宿舍』,大家喜欢的话,给个声明:本文内容由网友自发贡献,不代表【wpsshop博客】立场,版权归原作者所有,本站不承担相应法律责任。如您发现有侵权的内容,请联系我们。转载请注明出处:https://www.wpsshop.cn/article/detail/43589

Copyright © 2003-2013 www.wpsshop.cn 版权所有,并保留所有权利。

