
- 1按照模板生成文件,Word 或者 Excel
- 224届双非日常实习测开面经-腾讯、字节、英伟达、OPPO、深信服、Red Hat面经大合集_英伟达 面经
- 3java 获取本机cpu占用_java如何获取系统CPU、内存占用
- 42023末最新的 从零开始的Midjourney高效使用技巧总结(二)
- 5pycharm的常用设置_pycharm设置
- 6Android ADB原理及常用命令_adb keyevent
- 7java技能等级证_JAVA技能等级考试(1)
- 8docker build: COPY/ADD报错:not a directory_docker cp not a directory
- 9stable_diffusion_webui docker环境配置
- 10基于支持向量回归和LSTM的短时交通流预测_lstm车流量预测python
go web框架排名_以项目为钥匙开启Go的世界
赞
踩
本文不同于其他Go语言学习的文章,将以项目开发所需为基础,带你飞速踏入Go的世界,成为能独挡一面的强者。当你稍微花几分钟的时间,看完本文的时候,或许你会发现,驾驭Go语言为己所用是如此简单。
山不在高,有仙则名,水不在深,有龙则灵,文不在多,一篇足以。希望我这些小小的经验和用心的分享,能真的帮助到您。
一、Go 语言简介
1 Go 语言介绍
Go 即Golang,是Google公司2009年11月正式对外公开的一门编程语言。
Go是静态强类型语言,是区别于解析型语言的编译型语言。
解析型语言——源代码是先翻译为中间代码,然后由解析器对代码进行解释执行。
编译型语言——源代码编译生成机器语言,然后由机器直接执行机器码即可执行。
2 Go语言特性
- 跨平台的编译型语言
- 语法接近C语言
- 管道(channel),切片(slice),并发(routine)
- 有垃圾回收的机制
- 支持面向对象和面向过程的编程模式
3 Go 语言特色
- 编程模式比较简单,没有复杂的设计模式
- 全部源码编译到一个文件,编译速度很快
- 最新版本也有动态库形式,对跨语言调用的支撑更到位
- 开源框架比较成熟,新崛起的互联网公司都在用
- 如滴滴,uber,百度,阿里巴巴,oppo,vivo等
- 微服务的开发模式下Go语言是新宠
4 Go 擅长领域
- 服务开发,web的api开发,分布式服务集群的开发
- 容器docker是go开源的产品,k8s等这些都是基于go语言的
- 对高并发、高性能的系统和服务支撑,Go语言对比其他语言有更快的开发速度,更高的开发效率
- 独有的语言特性和设计模式routine,channel,sync包支撑了海量并行的支持。
所以能看到这些领域都在使用Go语言:微服务开发模式,api开发,rpc服务开发,游戏服务开发等等
二、框架选择
Go的开发框架比较多,比较知名的几个分别是Gin、BeeGo、Irir、Echo、Revel、Buffalo。对比排名详见: 《Go语言Web框架对比》
框架的选择上,本人主要遵循如下几点原则,分别是:
- star多
- 易上手
- 性能佳
- 持续维护
选择过程不多说,本人最终选择了beego作为本次入手的框架,本文余下内容如无特别说明,均基于此框架。
三、环境部署
1 Go 语言环境安装
安装包下载地址为:https://golang.org/dl/
如果打不开可以使用这个地址:https://golang.google.cn/dl/
【UNIX/Linux/Mac OS X, 和 FreeBSD 安装】
- 下载二进制包:go1.4.linux-amd64.tar.gz
- 将下载的二进制包解压至 /usr/local目录
tar -C /usr/local -xzf go1.12.7.linux-amd64.tar.gz- 将 /usr/local/go/bin 目录添加至PATH环境变量:
export PATH=$PATH:/usr/local/go/bin
注意:MAC 系统下你可以使用 .pkg 结尾的安装包直接双击来完成安装,安装目录在 /usr/local/go/ 下。
本文余下内容如无特别说明,均默认Linux环境
【Windows 系统下安装】
Windows 下可以使用 .msi 后缀(在下载列表中可以找到该文件,如go1.12.7.windows-amd64.msi)的安装包来安装。
默认情况下.msi文件会安装在 c:Go 目录下。你可以将 c:Gobin 目录添加到 PATH 环境变量中。
添加后你需要重启命令窗口才能生效。
安装测试:
创建工作目录 C:>Go_WorkSpace。
- //test.go 文件代码:
- package main
-
- import "fmt"
-
- func main() {
- fmt.Println("Hello, World!")
- }
使用 go 命令执行以上代码输出结果如下:
- C:Go_WorkSpace>go run test.go
-
- Hello, World!
2 Go 语言环境变量
如下环境变量,都是Go编译和运行时必要的,如果安装时没有自动设置好,请务必自己手动添加。
- GOROOT: Go 安装后的根目录(例如:/usr/local/go)
- GOPATH: Go 的工作空间,就是我们的开发和依赖包的目录(例如:~/go)
添加环境变量方法:
- 命令行直接export(对当前终端有效)
- 将export加到
~/.bashrc文件里(对当前用户有效,首次添加后记得source ~/.bashrc一下)
- export GOPATH=~/go
- export GOROOT=/usr/local/go
3 BeeGo 框架
【安装】
安装方式非常简单,只要敲击如下命令即可(bee工具可以快速创建项目和自动监测运行,记得要安装哦):
- go get github.com/astaxie/beego
- # bee 工具
- go get github.com/beego/bee
安装完之后,bee 可执行文件默认存放在$GOPATH/bin里面,所以您需要把$GOPATH/bin添加到您的环境变量PATH中:export PATH=$PATH:$GOPATH/bin
常见问题:
- git 没有安装,请自行安装不同平台的 git,如何安装请看《Git官方安装说明》。
- git https 无法获取,请配置本地的 git,关闭 https 验证:
git config --global http.sslVerify false
【创建项目】
打开终端,进入 $GOPATH/src 所在的目录,用bee工具创建一个项目:bee new firstPro
【目录结构】
这是一个典型的 MVC 架构的应用,main.go 是入口文件。目录结构如下所示:
- .
- ├── conf
- │ └── app.conf
- ├── controllers
- │ └── default.go
- ├── main.go
- ├── models
- ├── routers
- │ └── router.go
- ├── static
- │ ├── css
- │ ├── img
- │ └── js
- │ └── reload.min.js
- ├── tests
- │ └── default_test.go
- └── views
- └── index.tpl
-
- 10 directories, 7 files

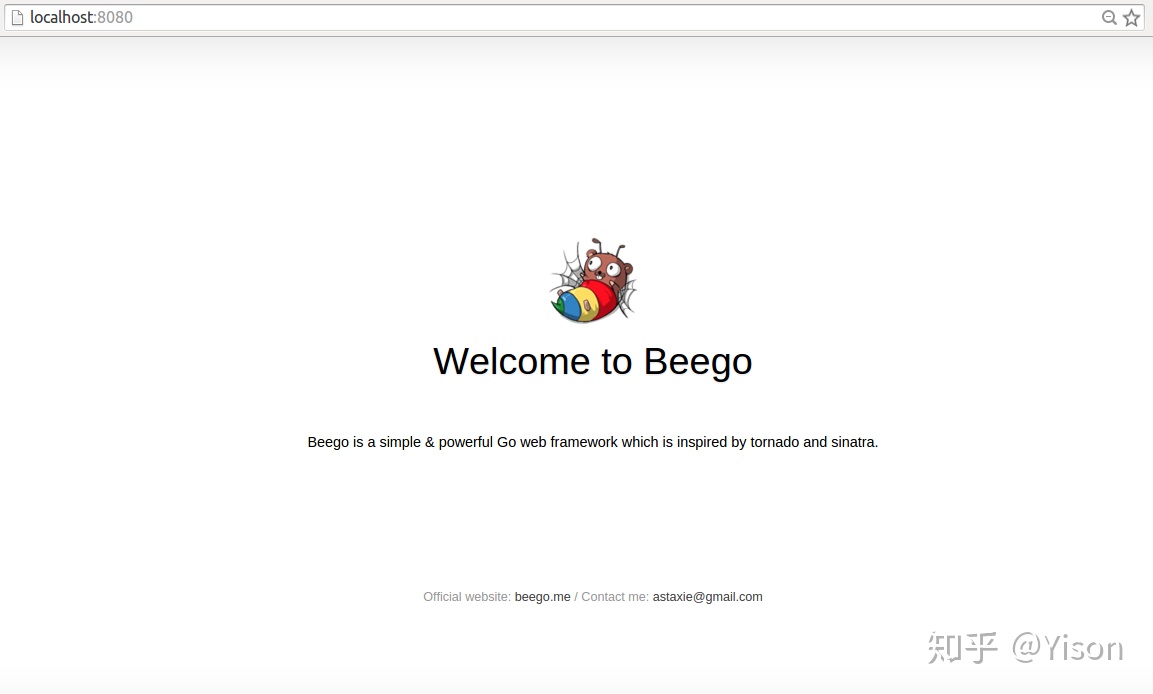
【编译运行】cd $GOPATH/src/firstPro进入我们创建的项目,使用 bee run 来运行该项目,这样我们的应用就在 8080 端口(beego 的默认端口)跑起来了,让我们打开浏览器看看效果吧:
4 命令使用
Go指令
- 下载:
go get - 编译:
go build - 运行:
go run
Bee工具
- 新建项目:
bee api或bee new分别创建 api应用 和 web项目,位于$GOPATH/src目录下 - 运行:
bee run该命令必须在$GOPATH/src/appname下执行 - 打包:
bee pack
以上是一些常用的命令,介绍虽比较简单,但只要大概记住他的作用即可。
没有把所有指令都列出来,因为我们暂时还用不到,这些已经足够我们摆平项目的开发了,其他的指令和高级用法,有兴趣的小伙伴们可以动动手自行查阅。
四、Go 基础语法
1 变量
Go 语言变量名由字母、数字、下划线组成,其中首个字符不能为数字。
【声明变量】
- 使用 var 关键字:
var name type - 一次声明多个变量:
var name1, name2 type - 省略var形式:
name := value
【零值】
指定变量类型,如果没有初始化,则变量默认为零值。
- 数值类型(包括complex64/128)为 0
- 布尔类型为 false
- 字符串为 ""(空字符串)
- 以下几种类型为 nil:
- var a *int
- var a []int
- var a map[string] int
- var a chan int
- var a func(string) int
- var a error // error 是接口
【示例】
- package main
- import "fmt"
- func main() {
- var a string = "yisonli"
- fmt.Println(a)
-
- var b, c int = 1, 2
- fmt.Println(b, c)
-
- d := []int{10,9,8,7}
- fmt.Println(d)
-
- var e = map[string]int{"one":1, "two":2}
- fmt.Println(e)
- }
以上示例输出结果为:
- yisonli
- 1 2
- [10 9 8 7]
- map[one:1 two:2]
2 数据类型
| 类型 | 描述 | | :-- | :-- | | 布尔型 | 布尔型的值只可以是常量 true 或者 false
一个简单的例子:var b bool = true | | 数字类型 | 有符号整型: int、int8、int16、int32、int64 无符号整型: uint、uint8、uint16、uint32、uint64 浮点型: float32、float64 复数: complex64、complex128 其他: byte (类似uint8)、uintptr (存指针)、rune (类似int32) | | 字符串类型 | 一串固定长度的字符连接起来的字符序列,使用 UTF-8 编码标识 Unicode 文本 | | 派生类型 | 包括:
(a) 指针类型(Pointer)
(b) 数组类型
(c) 结构化类型(struct)
(d) Channel 类型
(e) 函数类型
(f) 切片类型
(g) 接口类型(interface)
(h) Map 类型
|
3 函数
Go 语言函数定义格式如下:
- func function_name( [parameter list] ) [return_types] {
- 函数体
- }
函数定义解析:
- func:函数声明关键字
- function_name:函数名称
- parameter list:参数列表
- 参数就像一个占位符,当函数被调用时,你可以将值传递给参数,这个值被称为实际参数。
- 参数列表指定的是参数类型、顺序、及参数个数。
- 参数是可选的,也就是说函数也可以不包含参数。
- return_types:返回类型
- 函数返回一列值, return_types 是该列值的数据类型。
- 有些功能不需要返回值,这种情况下 return_types 不是必须的。
- 函数体:具体的代码逻辑
【示例】
- package main
-
- import "fmt"
-
- func swap(x, y string) (string, string) {
- return y, x
- }
-
- func main() {
- a, b := swap("Golang", "yisonli")
- fmt.Println(a, b)
- }
以上示例输出结果为:
yisonli Golang
4 循环
for循环是一个循环控制结构,可以执行指定次数的循环。Go语言的For循环有3种形式,具体定义如下:
- // 1. 类似 C 语言的 for
- for init; condition; post { }
-
- // 2. 类似 C 的 while
- for condition { }
-
- // 3. 类似 C 的 for(;;)
- for { }
- init: 一般为赋值表达式,给控制变量赋初值;
- condition: 关系表达式或逻辑表达式,循环控制条件;
- post: 一般为赋值表达式,给控制变量增量或减量。
【示例】
- package main
-
- import "fmt"
-
- func main() {
-
- var b int = 7
- var a int
-
- numbers := [6]int{1, 2, 3, 5}
-
- /* for 循环 */
- for a := 0; a < 5; a++ {
- fmt.Printf("a 的值为: %dn", a)
- }
-
- for a < b {
- a++
- fmt.Printf("a 的值为: %dn", a)
- }
-
- for i,x:= range numbers {
- fmt.Printf("第 %d 位 x 的值 = %dn", i,x)
- }
- }
以上示例输出结果为:
- a 的值为: 0
- a 的值为: 1
- a 的值为: 2
- a 的值为: 3
- a 的值为: 4
- a 的值为: 1
- a 的值为: 2
- a 的值为: 3
- a 的值为: 4
- a 的值为: 5
- a 的值为: 6
- a 的值为: 7
- 第 0 位 x 的值 = 1
- 第 1 位 x 的值 = 2
- 第 2 位 x 的值 = 3
- 第 3 位 x 的值 = 5
- 第 4 位 x 的值 = 0
- 第 5 位 x 的值 = 0
5 条件语句
| 语句 | 描述 | | --- | --- | | if 语句 | if 语句 由一个布尔表达式后紧跟一个或多个语句组成。 | | if...else 语句 | if 语句 后可以使用可选的 else 语句,
else 语句中的表达式在布尔表达式为 false 时执行。 | | if 嵌套语句 | 你可以在 if 或 else if 语句中嵌入一个或多个 if 或 else if 语句。 | | switch 语句 | switch 语句用于基于不同条件执行不同动作。 | | select 语句 | select 语句类似于 switch 语句,但是select会随机执行一个可运行的case。
如果没有case可运行,它将阻塞,直到有case可运行。 |
注意:Go 没有三目运算符,所以不支持 ?: 形式的条件判断。
【示例】
- package main
-
- import "fmt"
-
- func main() {
- /* 局部变量定义 */
- var a int = 100;
-
- /* 判断布尔表达式 */
- if a < 20 {
- /* 如果条件为 true 则执行以下语句 */
- fmt.Printf("a 小于 20n" );
- } else {
- /* 如果条件为 false 则执行以下语句 */
- fmt.Printf("a 不小于 20n" );
- }
- fmt.Printf("a 的值为 : %dn", a);
-
- }
以上示例输出结果为:
- a 不小于 20
- a 的值为 : 100
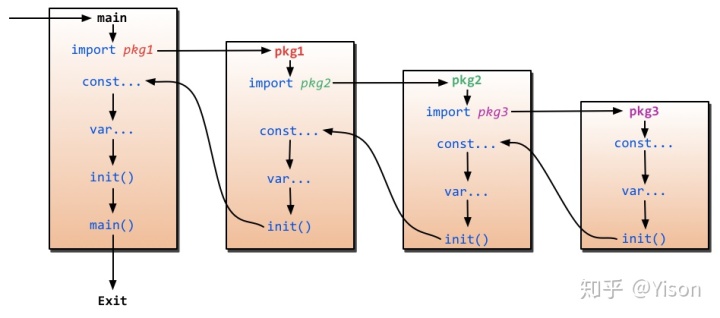
6 Package包
【包的定义和特性】:
- 包是结构化代码的一种方式
- 每个程序都由包(通常简称为 pkg)的概念组成
- 每个 Go 文件都属于且仅属于一个包
- 一个包可以由许多以
.go为扩展名的源文件组成 - 你必须在源文件中非注释的第一行指明这个文件属于哪个包,如:
package main - 每个 Go 应用程序都包含一个名为
main的包 - 通过
import关键字可以将一组包链接在一起,在你的应用中导入后方可使用
【注意事项】:
- 如果你导入了一个包却没有使用它,则会在构建程序时引发错误,如
imported and not used: os,这正是遵循了 Go 的格言:“没有不必要的代码!“。 - 可见性规则
- 当标识符(包括常量、变量、类型、函数名、结构字段等等)以一个大写字母开头,如:Group1,那么使用这种形式的标识符的对象就可以被外部包的 代码所使用(客户端程序需要先导入这个包),这被称为导出(像面向对象语言中的
public); - 标识符如果以小写字母开头,则对包外是不可见的,但是他们在整个包的内部是可见并且可用的(像面向对象语言中的
private)。
7 类型转换
【普通类型转换】
type_name(expression)其中type_name 为类型,expression 为表达式。
【格式化输出】
格式化在逻辑中非常常用。使用格式化函数,要注意写法:
fmt.Sprintf(格式化样式, 参数列表…)- 格式化样式:字符串形式,格式化动词以%开头。
- 参数列表:多个参数以逗号分隔,个数必须与格式化样式中的个数一一对应,否则运行时会报错。
【json转换】
这里说的json其实是json格式的string字符串类型,通常json需要转换成struct结构体、或者转换成map映射,正向转换和反向转换其实会经常用到。
在此,我们需要借助Go的标准库 "encoding/json" 来帮我们完成转换的操作了。
- // struct或map 转成 json字符串
- str, err := json.Marshal(object)
-
- // json字符串 转成 struct或map
- err := json.Unmarshal([]byte(str), &object)
扩展:网上有些Go的开发小伙伴们在抱怨说标准库的json效率比较低,而且有几个不错的开源json库可以提升2-3倍的转换性能。该如何取舍就全凭个人喜好了,有兴趣的小伙伴们可以自行去深入了解,本文就不再展开了。
【示例】
- package main
- import (
- "encoding/json"
- "fmt"
- )
- func main () {
- // 1. 普通类型转换
- var sum int = 17
- var count int = 5
- var mean float32
-
- mean = float32(sum)/float32(count)
- fmt.Printf("mean 的值为: %fn",mean)
- fmt.Println()
-
- // 2. 格式化
- title := fmt.Sprintf("已采集%d个药草, 还需要%d个完成任务。", sum, count)
- fmt.Println(title)
- fmt.Println()
-
- // 3. json字符串 转成 struct或map
- var jsonBlob = [] byte (`[
- { "Name" : "Platypus" , "Order" : "Monotremata" } ,
- { "Name" : "Quoll" , "Order" : "Dasyuromorphia" }
- ]`)
- type Animal struct {
- Name string
- Order string
- }
- var animals [] Animal
- err := json.Unmarshal(jsonBlob, &animals)
- if err != nil {
- fmt.Println("error:", err)
- }
- fmt.Printf("%+vn", animals)
-
- var animalsMap []map[string]interface{}
- err1 := json.Unmarshal(jsonBlob, &animalsMap)
- if err1 != nil {
- fmt.Println("error:", err1)
- }
- fmt.Printf("%+vn", animalsMap)
- fmt.Println()
-
- // 4. struct或map 转成 json字符串
- type ColorGroup struct {
- ID int
- Name string
- Colors [] string
- }
- group := ColorGroup {
- ID : 1 ,
- Name : "Reds" ,
- Colors : [] string {"Crimson", "Red", "Ruby", "Maroon"} ,
- }
- groupStr , err2 := json.Marshal(group)
- if err2 != nil {
- fmt.Println("error:", err2)
- }
- fmt.Printf("%sn", groupStr)
-
- var groupMap = map[string]interface{} {"ID":1,"Name":"Reds","Colors":[] string {"Crimson", "Red", "Ruby", "Maroon"}}
- groupStr1 , err3 := json.Marshal(groupMap)
- if err3 != nil {
- fmt.Println("error:", err3)
- }
- fmt.Printf("%sn", groupStr1)
- }
以上示例输出结果为:
- mean 的值为: 3.400000
-
- 已采集17个药草, 还需要5个完成任务。
-
- [{Name:Platypus Order:Monotremata} {Name:Quoll Order:Dasyuromorphia}]
- [map[Name:Platypus Order:Monotremata] map[Name:Quoll Order:Dasyuromorphia]]
-
- {"ID":1,"Name":"Reds","Colors":["Crimson","Red","Ruby","Maroon"]}
- {"Colors":["Crimson","Red","Ruby","Maroon"],"ID":1,"Name":"Reds"}
五、项目开发 - 必备知识点
根据项目难易程度,需要掌握的技术知识点会有所不同;本文会根据项目中常用的、基础的、必须掌握的功能点,逐个进行讲解和示例,希望我这些小小的经验和用心的分享,能真的帮助到你,让你在Go的世界里翱翔。
1 BeeGo的执行过程
- main 函数是入口函数
- main 引入了一个路由包:
_ "firstPro/routers" - 路由包执行了路由注册,定位了对应的 Controller:
beego.Router("/", &controllers.MainController{}) - Controller 负责完成具体的业务逻辑
2 路由配置
BeeGo支持的路由配置方式有很多,但正因为多所以短时间理解起来会比较难,所以这里只列出了大致的分类,以及最为基本的配置方式。先把简单的理解了,如果个人确实有额外特殊的需求,再另行深入,也会清晰得多。
【基础路由】
普通的Get和Post,参见如下代码:
- beego.Get("/",func(ctx *context.Context){
- ctx.Output.Body([]byte("this is get"))
- })
-
- beego.Post("/save",func(ctx *context.Context){
- ctx.Output.Body([]byte("this is post"))
- })
【RESTful路由】
- // 全匹配, 自动找Controller内对应REST的方法
- beego.Router("/", &controllers.MainController{})
-
- // 自定义规则, 第三个参数就是用来设置对应 method 到函数名
- beego.Router("/api/list",&RestController{},"*:List")
- beego.Router("/api/create",&RestController{},"post:Create")
【注解路由】
用户无需在 router 中注册路由,只需要 Include 相应地 controller,然后在 controller 的 method 方法上面写上 router 注释(// @router)就可以了。
- func init() {
- ns :=
- beego.NewNamespace("/v1",
- beego.NSNamespace("/customer",
- beego.NSInclude(
- &controllers.CustomerController{},
- &controllers.CustomerCookieCheckerController{},
- ),
- ),
- beego.NSNamespace("/cms",
- beego.NSInclude(
- &controllers.CMSController{},
- ),
- ),
- )
- beego.AddNamespace(ns)
- }
注意:为了生成swagger自动化文档,只支持 Namespace+Include 写法的解析,其他写法函数不会自动解析,而且只支持二级解析(一级版本号,二级分别表示应用模块)
3 请求数据处理
【参数获取】
我们经常需要获取用户传递的数据,包括 Get、POST 等方式的请求,beego 里面会自动解析这些数据,你可以通过如下方式获取数据:
- GetString(key string) string
- GetStrings(key string) []string
- GetInt(key string) (int64, error)
- GetBool(key string) (bool, error)
- GetFloat(key string) (float64, error)
【解析到Struct】
适用于Form表单提交的形式,使用方法也很简单,先定义个结构体,然后调用 this.ParseForm(结构体指针) 即可。
注意:
- 定义 struct 时,字段名后如果有 form 这个 tag,则会以把 form 表单里的 name 和 tag 的名称一样的字段赋值给这个字段,否则就会把 form 表单里与字段名一样的表单内容赋值给这个字段。
- 调用 ParseForm 这个方法的时候,传入的参数必须为一个 struct 的指针,否则对 struct 的赋值不会成功并返回 xx must be a struct pointer 的错误。
- 如果要忽略一个字段,有两种办法,一是:字段名小写开头,二是:form 标签的值设置为 -
【原始请求数据】
- 在配置文件
app.conf里设置copyrequestbody = true - 在 Controller 中使用
this.Ctx.Input.RequestBody获取
更多其他的 request 的信息,用户可以通过
this.Ctx.Request 获取
【json参数返回】
在 Controller 中给 this.Data["json"] 赋值, 然后调用 this.ServeJSON() 即可
【示例】
- package controllers
-
- import (
- "github.com/astaxie/beego"
- "fmt"
- )
-
- type MainController struct {
- beego.Controller
- }
-
- type user struct {
- Id int `form:"-"`
- Name interface{} `form:"username"`
- Age int `form:"age"`
- Email string
- }
-
- func (this *MainController) Post() {
- email := this.GetString("Email")
- fmt.Println(email)
-
- body := this.Ctx.Input.RequestBody
- fmt.Printf("%sn", string(body))
-
- u := user{}
- if err := this.ParseForm(&u); err != nil {
- //handle error
- this.Data["json"] = map[string]interface{}{"code":-1, "message":"ParseForm fail", "result":err}
- } else {
- fmt.Printf("%+vn", u)
- this.Data["json"] = map[string]interface{}{"code":0, "message":"ok"}
- }
- this.ServeJSON()
- this.StopRun()
- }
以上示例控制台结果为:
- // 模拟请求:curl -X POST -d "username=yisonli&age=18&Email=yisonli@vip.qq.com" "http://127.0.0.1:8080"
- yisonli@vip.qq.com
- username=yisonli&age=18&Email=yisonli@vip.qq.com
- {Id:0 Name:yisonli Age:18 Email:yisonli@vip.qq.com}
4 数据库
使用数据库前需先装好数据库驱动,其实只要执行 go get -u 指令即可。
已支持数据库驱动:
- MySQL:github.com/go-sql-driver/mysql
- PostgreSQL:github.com/lib/pq
- Sqlite3:github.com/mattn/go-sqlite3
【连接数据库】
1. 将你需要使用的 driver 加入 import 中
- import (
- _ "github.com/go-sql-driver/mysql"
- _ "github.com/lib/pq"
- _ "github.com/mattn/go-sqlite3"
- )
按个人项目需求来选择即可,本文将以mysql为例进行演示和说明
- 以自己实际的数据库配置,初始化并连接数据库
- orm.RegisterDriver("mysql", orm.DRMySQL)
-
- orm.RegisterDataBase("default", "mysql", "root:123456@tcp(127.0.0.1:3306)/test?charset=utf8&loc=Local")
注:
1. loc=Local 是将操作数据库的时区,设置成跟本地时区一样。
2. 如果你想像我一样,在本机运行mysql的服务端,而你又恰好装了Docker,那么恭喜你,只需要一条指令启动docker镜像即可:docker run --name mysqlserver -e MYSQL_ROOT_PASSWORD=123456 -d -i -p 3306:3306 mysql:5.7
【原生CRUD】
- package controllers
-
- import (
- "github.com/astaxie/beego"
- "github.com/astaxie/beego/orm"
- _ "github.com/go-sql-driver/mysql"
- "fmt"
- )
-
- type TestController struct {
- beego.Controller
- }
-
- func (this *TestController) Get() {
- orm.RegisterDriver("mysql", orm.DRMySQL)
- orm.RegisterDataBase("default", "mysql", "root:123456@tcp(127.0.0.1:3306)/test?charset=utf8&loc=Local")
-
- orm.Debug = true //是否开启sql调试,开启时可以打印所有执行的sql语句,不设置时默认为false
- o := orm.NewOrm()
- o.Using("default") //如果连接了多个数据库,此方法可以用来切换,不设置时默认是default的DataBase
-
- var maps []orm.Params
- num1, err1 := o.Raw("SELECT * FROM users").Values(&maps)
- if num1 > 0 && err1 == nil {
- for _,term := range maps{
- fmt.Printf("%+vn",term)
- }
- }
-
- res2, err2 := o.Raw("INSERT INTO `users` (`name`, `age`, `email`) VALUES ('Test', 27, 'test@gmail.com')").Exec();
- if err2 == nil {
- num2, _ := res2.RowsAffected()
- fmt.Println("mysql row affected nums: ", num2)
- }
-
- res3, err3 := o.Raw("UPDATE `users` SET `age`=18 WHERE `name`='Test'").Exec()
- if err3 == nil {
- num3, _ := res3.RowsAffected()
- fmt.Println("mysql row affected nums: ", num3)
- }
-
- res4, err4 := o.Raw("DELETE FROM `users` WHERE `name`='Test'").Exec()
- if err4 == nil {
- num4, _ := res4.RowsAffected()
- fmt.Println("mysql row affected nums: ", num4)
- }
-
- this.Data["json"] = map[string]interface{}{"code":0, "message":"ok"}
- this.ServeJSON()
- }
运行结果:
- [ORM]2019/07/17 15:30:51 -[Queries/default] - [ OK / db.Query / 0.9ms] - [SELECT * FROM users]
- map[email:Lily@qq.com id:1 name:Lily age:18]
- map[id:2 name:Lucy age:20 email:Lucy@gmail.com]
- map[email:Honey@foxmail.com id:3 name:Honey age:30]
- [ORM]2019/07/17 15:30:51 -[Queries/default] - [ OK / db.Exec / 6.9ms] - [INSERT INTO `users` (`name`, `age`, `email`) VALUES ('Test', 27, 'test@gmail.com')]
- mysql row affected nums: 1
- [ORM]2019/07/17 15:30:51 -[Queries/default] - [ OK / db.Exec / 3.1ms] - [UPDATE `users` SET `age`=18 WHERE `name`='Test']
- mysql row affected nums: 1
- [ORM]2019/07/17 15:30:51 -[Queries/default] - [ OK / db.Exec / 6.4ms] - [DELETE FROM `users` WHERE `name`='Test']
- mysql row affected nums: 1
- 2019/07/17 15:30:51.054 [D] [server.go:2741] | 127.0.0.1| 200 | 28.352094ms| match| GET /test/ r:/test
【ORM】
ORM是一个比较强大的功能,他可以让我们的表结构,通过Struct定义的方式表现&关联起来,方便使用。
目前该框架仍处于开发阶段,让我们来看看官网的示例吧:
models.go
- package main
-
- import (
- "github.com/astaxie/beego/orm"
- )
-
- type User struct {
- Id int
- Name string
- Profile *Profile `orm:"rel(one)"` // OneToOne relation
- Post []*Post `orm:"reverse(many)"` // 设置一对多的反向关系
- }
-
- type Profile struct {
- Id int
- Age int16
- User *User `orm:"reverse(one)"` // 设置一对一反向关系(可选)
- }
-
- type Post struct {
- Id int
- Title string
- User *User `orm:"rel(fk)"` //设置一对多关系
- Tags []*Tag `orm:"rel(m2m)"`
- }
-
- type Tag struct {
- Id int
- Name string
- Posts []*Post `orm:"reverse(many)"`
- }
-
- func init() {
- // 需要在init中注册定义的model
- orm.RegisterModel(new(User), new(Post), new(Profile), new(Tag))
- }
main.go
- package main
-
- import (
- "fmt"
- "github.com/astaxie/beego/orm"
- _ "github.com/go-sql-driver/mysql"
- )
-
- func init() {
- orm.RegisterDriver("mysql", orm.DRMySQL)
-
- orm.RegisterDataBase("default", "mysql", "root:root@/orm_test?charset=utf8")
- }
-
- func main() {
- o := orm.NewOrm()
- o.Using("default") // 默认使用 default,你可以指定为其他数据库
-
- profile := new(Profile)
- profile.Age = 30
-
- user := new(User)
- user.Profile = profile
- user.Name = "slene"
-
- fmt.Println(o.Insert(profile))
- fmt.Println(o.Insert(user))
- }
BeeGo还封装了很多高级的查询方法,有兴趣的小伙伴可以额外深入了解一下;因为篇幅有限,这里就不再展开了。
5 Http请求
httplib 库主要用来模拟客户端发送 HTTP 请求,类似于 Curl 工具,支持 JQuery 类似的链式操作。
- // 首先导入包
- import (
- "github.com/astaxie/beego/httplib"
- )
-
- // 然后初始化请求方法,返回对象
- req := httplib.Get("http://yyeer.com/")
-
- // 超时时间、Header头都可以按需设置
- req.SetTimeout(100 * time.Second, 30 * time.Second)
- req.Header("Host","yyeer.com")
-
- // 然后我们就可以获取数据了
- str, err := req.String()
- if err != nil {
- fmt.Println(err)
- }
- fmt.Println(str)
【支持的方法对象】
- Get(url string)
- Post(url string)
- Put(url string)
- Delete(url string)
- Head(url string)
【获取返回结果】
- 返回 Response 对象,
req.Response()方法 - 这个是 http.Response 对象,用户可以自己读取 body 的数据等。
- 返回 bytes,
req.Bytes()方法 - 返回 string,
req.String()方法 - 保存为文件,
req.ToFile(filename)方法 - 解析为 JSON 结构,
req.ToJSON(&result)方法 - 解析为 XML 结构,
req.ToXml(&result)方法
6 Swagger文档
BeeGo框架内自动集成了swagger模块,要使得文档工作,你需要做几个事情,
- 第一开启应用内文档开关,在配置文件中设置:
EnableDocs = true, - 然后在你的 main.go 函数中引入
_ "beeapi/docs"(beego 1.7.0 之后版本不需要添加该引用)。 - 这样你就已经内置了 docs 在你的 API 应用中,然后你就使用
bee run -gendoc=true -downdoc=true, 让我们的 API 应用跑起来 - -gendoc=true 表示每次自动化的 build 文档,
- -downdoc=true 就会自动的下载 swagger 文档查看器
- 最后,router 和 controller 内的配置和注释按照规范编写,即可
【全局注释】
必须设置在 routers/router.go 中,文件的注释,最顶部:
- // @APIVersion 1.0.0
- // @Title mobile API
- // @Description mobile has every tool to get any job done, so codename for the new mobile APIs.
- // @Contact astaxie@gmail.com
- package routers
全局的注释如上所示,是显示给全局应用的设置信息,有如下这些设置
- @APIVersion
- @Title
- @Description
- @Contact
- @TermsOfServiceUrl
- @License
- @LicenseUrl
【应用注释】
- // CMS API
- type CMSController struct {
- beego.Controller
- }
-
- // @Title getStaticBlock
- // @Description get all the staticblock by key
- // @Param key path string true "The email for login"
- // @Success 200 {object} models.ZDTCustomer.Customer
- // @Failure 400 Invalid email supplied
- // @Failure 404 User not found
- // @router /staticblock/:key [get]
- func (c *CMSController) StaticBlock() {
-
- }
首先是 CMSController 定义上面的注释,这个是用来显示这个模块的作用。
接下来就是每一个函数上面的注释,这里列出来支持的各种注释:
- @Title
- 这个 API 所表达的含义,是一个文本,空格之后的内容全部解析为 title
- @Description
- 这个 API 详细的描述,是一个文本,空格之后的内容全部解析为 Description
- @Param
- 参数,表示需要传递到服务器端的参数,有五列参数,使用空格或者 tab 分割,五个分别表示的含义如下
- 参数名
- 参数类型,可以有的值是
formData、query、path、body、header,formData 表示是 post 请求的数据,query 表示带在 url 之后的参数,path 表示请求路径上得参数,例如上面例子里面的 key,body 表示是一个 raw 数据请求,header 表示带在 header 信息中得参数。 - 参数类型
- 是否必须
- 注释
- @Success
- 成功返回给客户端的信息,三个参数,三个参数必须通过空格分隔
- 第一个是 status code。
- 第二个参数是返回的类型,必须使用 {} 包含,
- 第三个是返回的对象或者字符串信息,如果是 {object} 类型,那么 bee 工具在生成 docs 的时候会扫描对应的对象。
- @Failure
- 失败返回的信息,包含两个参数,使用空格分隔
- 第一个表示 status code,
- 第二个表示错误信息
- @router
- 路由信息,包含两个参数,使用空格分隔,
- 第一个是请求的路由地址,支持正则和自定义路由,和之前的路由规则一样,
- 第二个参数是支持的请求方法,放在 [] 之中,如果有多个方法,那么使用 , 分隔。
7 日志
【常规使用】
首先引入包:
- import (
- "github.com/astaxie/beego/logs"
- )
然后添加输出引擎:
- 第一个参数是引擎名:
logs.SetLogger("console")- 第二个参数,用来表示配置信息:
``go logs.SetLogger(logs.AdapterFile,{"filename":"project.log","level":7,"maxlines":0,"maxsize":0,"daily":true,"maxdays":10,"color":true}`)
- > log 支持同时输出到多个引擎,包括:console、file、conn、smtp、es、multifile
-
- 使用方式:
-
- ```go
- beego.Emergency("this is emergency")
- beego.Alert("this is alert")
- beego.Critical("this is critical")
- beego.Error("this is error")
- beego.Warning("this is warning")
- beego.Notice("this is notice")
- beego.Informational("this is informational")
- beego.Debug("this is debug")
【自定义格式】
如果框架自带的日志功能还无法满足你的需求,那可能就得麻烦一点,自定义日志格式。
操作流程大致为:
- 打开要写入的文件,不存在则创建,
os.OpenFile - 创建一个自定义的日志对象
log.New - 使用时按所需格式输出日志
Printf
- File, err := os.OpenFile(logdir, os.O_WRONLY|os.O_CREATE|os.O_APPEND, 0644)
- if nil != err {
- log.Fatal(err)
- }
- MyLog = log.New(io.MultiWriter(File,os.Stderr), "", 0)
-
- MyLog.Printf("自己定义的格式... %sn", 自己定义的参数, fmt.Sprintf(formating, args...))
实际使用时, 可以把
MyLog.Printf 封装成一个全局方法,这样整个项目里都可使用。
8 加解密
加解密在多方对接的时候,经常会用到,所以稍微了解一点也是必要的。
因为这块使用的人比较多,所以只要肯稍微花点时间,在网上都是可以找到答案的。
【MD5】
MD5主要是用作签名,具体生成方法如下:
- import (
- "crypto/md5"
- "encoding/hex"
- )
-
- func MyMd5(Str string, Key string) string {
- md5ctx := md5.New()
- md5ctx.Write([]byte(Str + Key))
- return hex.EncodeToString(md5ctx.Sum(nil))
- }
【AES】
AES主要是用作加解密,还分好几种不同的模式如:ECB、CBC、CFB等。
网上找到一份看起来还不错的《AES的加解密实现》,原谅我的小偷懒(还没有在实际项目验证过),God Bless。
其他还有SHA、DES、RSA等加解密方式,具体就得根据各小伙伴不同项目所需了。
Go Go Go !去吧,你可以的!
9 缓存使用
- // 首先引入包:
- import (
- "github.com/astaxie/beego/cache"
- )
-
- // 然后初始化一个全局变量对象:
- bm, err := cache.NewCache("memory", `{"interval":60}`)
-
- // 然后我们就可以使用bm增删改缓存:
- bm.Put("astaxie", 1, 10*time.Second)
- bm.Get("astaxie")
- bm.IsExist("astaxie")
- bm.Delete("astaxie")
【配置说明】
- memory
- 配置信息如下所示,配置的信息表示 GC 的时间,表示每个 60s 会进行一次过期清理:
{"interval":60}- file
- 配置信息如下所示,配置 CachePath 表示缓存的文件目录,FileSuffix 表示文件后缀,DirectoryLevel 表示目录层级,EmbedExpiry 表示过期设置
{"CachePath":"./cache","FileSuffix":".cache","DirectoryLevel":"2","EmbedExpiry":"120"}- redis
- 配置信息如下所示,redis 采用了库 redigo:
{"key":"collectionName","conn":":6039","dbNum":"0","password":"thePassWord"}key: Redis collection 的名称conn: Redis 连接信息dbNum: 连接 Redis 时的 DB 编号. 默认是0.password: 用于连接有密码的 Redis 服务器.
- memcache
- 配置信息如下所示,memcache 采用了 vitess的库,表示 memcache 的连接地址:
{"conn":"127.0.0.1:11211"}
【示例】
- import (
- "fmt"
- "github.com/astaxie/beego"
- "github.com/astaxie/beego/cache"
- _ "github.com/astaxie/beego/cache/redis"
- "time"
- )
-
- func (this *TestController) Test() {
- bm, err := cache.NewCache("redis", `{"key":"127.0.0.1","conn":":6379","dbNum":"0","password":""}`)
- if err != nil {
- fmt.Println(err)
- }
- fmt.Printf("bm = %+vn",bm)
-
- err1 := bm.Put("yisonli", 1, 10*time.Second)
- if err1 != nil {
- fmt.Println(err1)
- }
- redisValue := bm.Get("yisonli")
- fmt.Printf("redisValue = %sn",redisValue)
-
- this.Ctx.Output.Body([]byte("OK"))
- }
执行效果:
- bm = &{p:0xc000210240 conninfo::6379 dbNum:0 key:127.0.0.1 password: maxIdle:3}
- redisValue = 1
注:
1. 示例中使用了redis作为缓存,如果不依赖beego的cache模块,redis还有很多很好用的数据类型和功能方法,如:Hash散列、List列表、Set集合、SortedSet有序集合。
2. 本机启动redis服务,和上文启动mysql类似,只需要一条指令启动docker镜像即可:docker run --name local-redis -p 6379:6379 -v $PWD/data:/data -d redis redis-server --appendonly yes
10 Session
beego 内置了 session 模块,使用 session 相当方便。
方式1、 在 main 入口函数中设置:beego.BConfig.WebConfig.Session.SessionOn = true
方式2、 通过配置文件配置:sessionon = true
session默认采用 memory 的方式进行存储,如果需要更换别的引擎(以redis为例),需要修改&设置如下配置:
- beego.BConfig.WebConfig.Session.SessionProvider = "redis"
- beego.BConfig.WebConfig.Session.SessionProviderConfig = "127.0.0.1:6379"
【示例】
- func (this *MainController) Get() {
- v := this.GetSession("asta")
- if v == nil {
- this.SetSession("asta", int(1))
- this.Data["num"] = 0
- } else {
- this.SetSession("asta", v.(int)+1)
- this.Data["num"] = v.(int)
- }
- this.Data["Website"] = "beego.me"
- this.Data["Email"] = "astaxie@gmail.com"
- fmt.Printf("%+vn", this.Data)
- this.TplName = "index.tpl"
- }
运行后,多次访问首页的debug输出结果:
- 2019/07/17 20:25:20.235 [I] [asm_amd64.s:1333] http server Running on http://:8080
- map[RouterPattern:/ num:0 Website:beego.me Email:astaxie@gmail.com]
- 2019/07/17 20:25:25.141 [D] [server.go:2741] | 127.0.0.1| 200 | 4.63737ms| match| GET / r:/
- map[num:1 Website:beego.me Email:astaxie@gmail.com RouterPattern:/]
- 2019/07/17 20:25:46.021 [D] [server.go:2741] | 127.0.0.1| 200 | 5.116566ms| match| GET / r:/
- map[RouterPattern:/ num:2 Website:beego.me Email:astaxie@gmail.com]
- 2019/07/17 20:26:00.084 [D] [server.go:2741] | 127.0.0.1| 200 | 1.573909ms| match| GET / r:/
- map[RouterPattern:/ num:3 Website:beego.me Email:astaxie@gmail.com]
- 2019/07/17 20:26:12.470 [D] [server.go:2741] | 127.0.0.1| 200 | 2.652028ms| match| GET / r:/
掌握了以上那么多技能,现在,你对项目的开发有多少把握了呢?
其实,基本已经差不多了,剩下的就是动手实践了。
古人学问无遗力,少壮工夫老始成。
纸上得来终觉浅,绝知此事要躬行。
我是 Yison ,如果我有帮助到你,也请你帮助一下我,随手一个赞对你来说无足轻重,但却是使我不断前行的动力!


