
- 1Linux升级python到3.6_linux 升级python到3.6
- 2JS 下载文件两种方式总结_手机端 js 直接 下载 文件
- 3scanf相关_scanf 运行 输入数字之间用中文的逗号,结果为0?
- 4力扣(LeetCode) -加一(C语言)_力扣lc加一
- 5uniapp实战仿写网易云音乐(二)—promise接口请求的封装和主页功能的实现,组件封装,配置下拉刷新_uniapp仿网易云音乐播放页面代码
- 6java龟兔赛跑_java话说这个世界上有各种各样的兔子和乌龟,但是 研究发现,所有的兔子和乌龟都有
- 7如何在 Python 开发环境中调用 ChatGPT 模型?_如何用python调用chatgpt接口
- 8深度学习100例-卷积神经网络(VGG-16)猫狗识别 | 第21天_tensorflow vgg-16 动物识别
- 9sublime text 3安装nodejs插件_sublime 下载nodejs
- 10linux 查看内存占用率和占用前10的应用_linux查看内存占用前十
博客项目总结
赞
踩
####springboot的详细笔记
详情:https://www.cnblogs.com/swzx-1213/p/12781836.html
一、使用aop日志管理:博客AOP详情
1.导入依赖
 <!--日志依赖-->
        <dependency>
            <groupId>org.slf4j</groupId>
            <artifactId>slf4j-api</artifactId>
            <version>1.7.32</version>
        </dependency>
        <!--切面依赖-->
        <dependency>
            <groupId>org.aspectj</groupId>
            <artifactId>aspectjweaver</artifactId>
            <version>1.8.4</version>
        </dependency>
- 1
- 2
- 3
- 4
- 5
- 6
- 7
- 8
- 9
- 10
- 11
- 12
2.设置切面
@org.aspectj.lang.annotation.Aspect
@Component
public class Aspect {
    private Logger logger = LoggerFactory.getLogger(this.getClass());

    //定义切入点
    @Pointcut("execution(* com.yan.yong.controller.*.*(..))")
    public void log(){}

    @Before("log()")
    public void doBefore(JoinPoint joinPoint){
        ServletRequestAttributes attributes = (ServletRequestAttributes) RequestContextHolder.getRequestAttributes();
        HttpServletRequest request = attributes.getRequest();
        logger.info("--------before------------");
        // 记录下请求内容
//        logger.info("URL : " + request.getRequestURL().toString());
//        logger.info("HTTP_METHOD : " + request.getMethod());
//        logger.info("IP : " + request.getRemoteAddr());
        logger.info("URL: {},HTTP_METHOD : {},IP : {}",request.getRequestURL().toString(),request.getMethod(),request.getRemoteAddr());
        Enumeration<String> enu = request.getParameterNames();
        while (enu.hasMoreElements()) {
            String name = (String) enu.nextElement();
            logger.info("name:{},value:{}", name, request.getParameter(name));
        }
    }

    //获取返回值
    @AfterReturning(returning = "result",pointcut = "log()")
    public void lkj(Object result){
        logger.info("result为:{}",result);
    }

    @After("log()")
    public void after(){
        logger.info("------------after---------");
    }
}

- 1
- 2
- 3
- 4
- 5
- 6
- 7
- 8
- 9
- 10
- 11
- 12
- 13
- 14
- 15
- 16
- 17
- 18
- 19
- 20
- 21
- 22
- 23
- 24
- 25
- 26
- 27
- 28
- 29
- 30
- 31
- 32
- 33
- 34
- 35
- 36
- 37
- 38
二、全局的异常处理(MVC架构)
1.使用到的注解:
@Component 将给全局异常类注入到IOC容器中
@ControllerAdvice 全局异常处理的注解
@ExceptionHandler统一处理某一类异常
@Component
@ControllerAdvice
public class ControllerExceptionHandler {

    private Logger logger = LoggerFactory.getLogger(this.getClass());

    @ExceptionHandler(Exception.class)
    public ModelAndView handler(HttpServletRequest request,Exception e)throws Exception {
        logger.error("URL : {},exceptinMessage :{}",request.getRequestURL(),e.getMessage());
        ModelAndView mv = new ModelAndView();
        mv.addObject("exception",e);//将异常信息返回到前前端页面
        mv.setViewName("error/error");
        return mv;
    }
}
- 1
- 2
- 3
- 4
- 5
- 6
- 7
- 8
- 9
- 10
- 11
- 12
- 13
- 14
- 15
- 16
前端接收(可以通过查看源码进入查看异常信息)
<!DOCTYPE html> <html lang="en" xmlns:th="http://www.thymeleaf.ory"> <head> <meta charset="UTF-8"> <title>Title</title> </head> <body> error <!--接收异常信息--> <div> <div th:utext="'<!--'" th:remove="tag"></div> <div th:utext="'Failed Request URL : ' + ${url}" th:remove="tag"></div> <div th:utext="'Exception message : ' + ${exception.message}" th:remove="tag"></div> <ul th:remove="tag"> <li th:each="st : ${exception.stackTrace}" th:remove="tag"><span th:utext="${st}" th:remove="tag"></span></li> </ul> <div th:utext="'-->'" th:remove="tag"></div> </div> </body> </html>
- 1
- 2
- 3
- 4
- 5
- 6
- 7
- 8
- 9
- 10
- 11
- 12
- 13
- 14
- 15
- 16
- 17
- 18
- 19
- 20
- 21
- 22
- 23
三、全局的异常处理(前后端分离)
在mvc架构的项目中,服务端和客户端之间可以直接进行html的映射,同时也可以直接返回异常信息给客户端。随着技术不断更新迭代,为了降低前后端的耦合性,前后端分离项目时代开启,这时在发一个请求给后端,如果出现异常信息就需要我们在后端使用springboot提供的全局的异常处理,获取异常信息之后,统一将异常信息以json格式发送给前端。
重点掌握
1.统一返回信息类的构造思路
2.404异常的判断
3.自定义异常
4.手动配置spingboot捕捉404
1.构造一个返回“状态码”、“异常信息”和“数据”的类
package com.yan.yong.utils;
import com.yan.yong.handler.DefindException;
import java.util.HashMap;
import java.util.Map;
public class Msg {

    private Integer code;
    private String message;
    Map<String,Object> map = new HashMap<>();

    //成功正常返回json数据
    public static Msg success(){
        Msg msg = new Msg();
        msg.setCode(200);
        msg.setMessage("操作成功");
        return msg;
    }

    //失败正常返回json数据
    public static Msg fail(){
        Msg msg = new Msg();
        msg.setCode(200);
        msg.setMessage("操作成功");
        return msg;
    }

    //返回拿到的数据
    public Msg sendData(String detail,Object object){
        Map<String,Object> map = this.map;
        map.put(detail,object);
        return this;
    }

    //返回自定义异常的提示信息
    public static Msg defindException(DefindException e){
        Msg msg = new Msg();
        msg.setCode(e.getCode());
        msg.setMessage(e.getMessage());
        return msg;
    }

    //返回默认异常的提示信息
    public static Msg defaultException(Integer code,Exception e){
        Msg msg = new Msg();
        msg.setCode(code);
        msg.setMessage(e.getMessage());
        return msg;
    }

    public Map<String, Object> getMap() {
        return map;
    }

    public void setMap(Map<String, Object> map) {
        this.map = map;
    }

    public Integer getCode() {
        return code;
    }
    public void setCode(Integer code) {
        this.code = code;
    }
    public String getMessage() {
        return message;
    }
    public void setMessage(String message) {
        this.message = message;
    }

}
- 1
- 2
- 3
- 4
- 5
- 6
- 7
- 8
- 9
- 10
- 11
- 12
- 13
- 14
- 15
- 16
- 17
- 18
- 19
- 20
- 21
- 22
- 23
- 24
- 25
- 26
- 27
- 28
- 29
- 30
- 31
- 32
- 33
- 34
- 35
- 36
- 37
- 38
- 39
- 40
- 41
- 42
- 43
- 44
- 45
- 46
- 47
- 48
- 49
- 50
- 51
- 52
- 53
- 54
- 55
- 56
- 57
- 58
- 59
- 60
- 61
- 62
- 63
- 64
- 65
- 66
- 67
- 68
- 69
- 70
- 71
- 72
2.自定义异常类
package com.yan.yong.handler;
public class DefindException extends RuntimeException{
    private Integer code;
    private String message;

    public DefindException(Integer code,String message){
        this.code = code;
        this.message = message;
    }
    public Integer getCode() {
        return code;
    }
    @Override
    public String getMessage() {
        return message;
    }
}
- 1
- 2
- 3
- 4
- 5
- 6
- 7
- 8
- 9
- 10
- 11
- 12
- 13
- 14
- 15
- 16
- 17
- 18
3.进行全局异常处理
@Component
@ControllerAdvice
public class ControllerExceptionHandler {

    //控制台打印日志
    private Logger logger = LoggerFactory.getLogger(this.getClass());

    //自动收集自定义异常
    @ExceptionHandler(DefindException.class)
    @ResponseBody
    public Msg defind(HttpServletRequest request, DefindException e){
        logger.info("URL : {}; errorMessage : {}",request.getRequestURL(),e.getMessage());
         return Msg.defindException(e);
    }

    //自动收集默认异常
    @ExceptionHandler(Exception.class)
    @ResponseBody
    public Msg defind(HttpServletRequest request,Exception e){
        logger.info("URL : {}; errorMessage : {}",request.getRequestURL(),e.getMessage());
        if (e instanceof NoHandlerFoundException){
            return Msg.defaultException(404,e);
        }else {
            return Msg.defaultException(500,e);
        }
    }
}
- 1
- 2
- 3
- 4
- 5
- 6
- 7
- 8
- 9
- 10
- 11
- 12
- 13
- 14
- 15
- 16
- 17
- 18
- 19
- 20
- 21
- 22
- 23
- 24
- 25
- 26
- 27
- 28
4.controller层测试
@org.springframework.stereotype.Controller
public class Controller {

    @Autowired
    private Service service;

    //测试500错误
    @GetMapping("/")
    public String index(){
        int i = 5/0;
        return "index";
    }
    //测试自定义异常
    @GetMapping("/str")
    public String index1(){
        String str = null;
        if (str==null){
            throw new DefindException(500,"str为空了");
        }
        return "index";
    }
    //测试正常情况的数据返回
    @GetMapping("/data")
    @ResponseBody
    public Msg index2(){
        int a[][]= new int[2][3];
        for (int i=0;i<2;i++){
            for (int j=0;j<3;j++){
                a[i][j]=(int)(Math.random()*10+1);
            }
        }
        return Msg.success().sendData("data",a);
    }
- 1
- 2
- 3
- 4
- 5
- 6
- 7
- 8
- 9
- 10
- 11
- 12
- 13
- 14
- 15
- 16
- 17
- 18
- 19
- 20
- 21
- 22
- 23
- 24
- 25
- 26
- 27
- 28
- 29
- 30
- 31
- 32
- 33
- 34
- 35
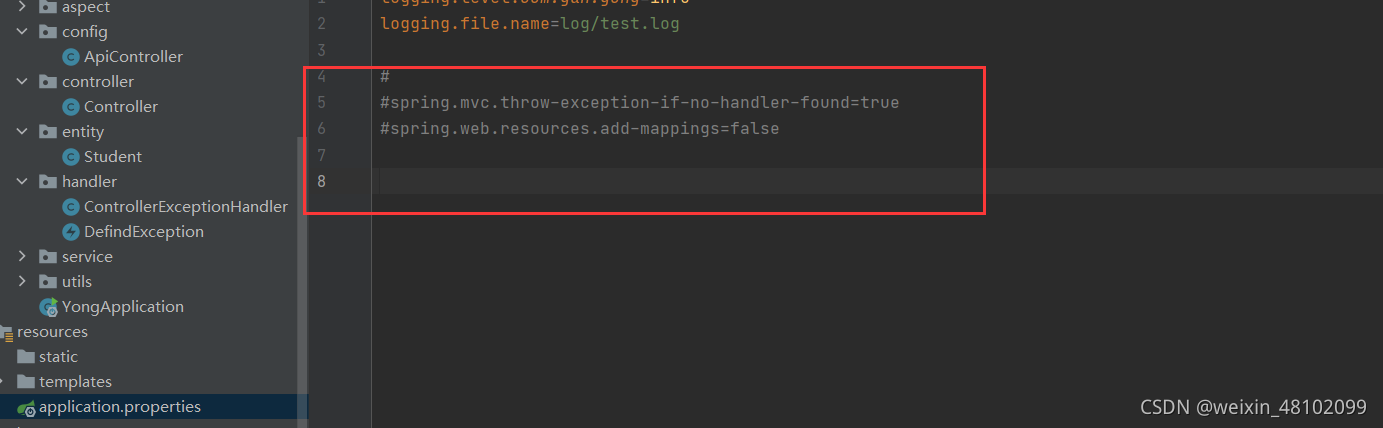
5.注意事项
由于springboot没有拦截404异常的自动配置,需要手动配置
spring.mvc.throw-exception-if-no-handler-found=true
spring.web.resources.add-mappings=false
- 1
- 2
6.测试
1.测试500运行错误

2.测试自定义异常


3.测试正常数据的返回

4.测试404异常

四.接口文档的配置swagger:详情
1.引入依赖
        <dependency>
            <groupId>io.springfox</groupId>
            <artifactId>springfox-swagger2</artifactId>
            <version>2.9.2</version>
        </dependency>
        <dependency>
            <groupId>io.springfox</groupId>
            <artifactId>springfox-swagger-ui</artifactId>
            <version>2.9.2</version>
        </dependency>
- 1
- 2
- 3
- 4
- 5
- 6
- 7
- 8
- 9
- 10
- 11
2.注意事项:
(1)在全局异常处理中关于404的拦截配置会使得静态资源访问不到
(2)如果访问不到可以在swagger配置中添加如下代码
public void addResourceHandlers(ResourceHandlerRegistry registry) {
        registry.addResourceHandler("swagger-ui.html")
                .addResourceLocations("classpath:/META-INF/resources/");

        registry.addResourceHandler("/webjars/**")
                .addResourceLocations("classpath:/META-INF/resources/webjars/");

    }
- 1
- 2
- 3
- 4
- 5
- 6
- 7
- 8
3.编写swagger配置类
package com.yan.yong.config;
import org.springframework.context.annotation.Bean;
import org.springframework.context.annotation.Configuration;
import org.springframework.web.servlet.config.annotation.ResourceHandlerRegistry;
import springfox.documentation.builders.ApiInfoBuilder;
import springfox.documentation.builders.PathSelectors;
import springfox.documentation.builders.RequestHandlerSelectors;
import springfox.documentation.service.ApiInfo;
import springfox.documentation.spi.DocumentationType;
import springfox.documentation.spring.web.plugins.Docket;
import springfox.documentation.swagger2.annotations.EnableSwagger2;
@Configuration
@EnableSwagger2
public class ApiController {
    @Bean
    public Docket createRestApi() {
        return new Docket(DocumentationType.SWAGGER_2)
                // 指定构建api文档的详细信息的方法:apiInfo()
                .apiInfo(apiInfo())
                .select()
                // 指定要生成api接口的包路径
                .apis(RequestHandlerSelectors.basePackage("com.yan.yong.controller"))
                //使用了 @ApiOperation 注解的方法生成api接口文档
                //.apis(RequestHandlerSelectors.withMethodAnnotation(ApiOperation.class))
                .paths(PathSelectors.any())
                //可以根据url路径设置哪些请求加入文档,忽略哪些请求
                .build();
    }

    /**
     * 设置api文档的详细信息
     */
    private ApiInfo apiInfo() {
        return new ApiInfoBuilder()
                // 标题
                .title("Spring Boot集成Swagger2")
                // 接口描述
                .description("swagger核试验场地")
                .version("1.0")
                // 构建
                .build();
    }
    //出现404访问不到的情况
    public void addResourceHandlers(ResourceHandlerRegistry registry) {
        registry.addResourceHandler("swagger-ui.html")
                .addResourceLocations("classpath:/META-INF/resources/");

        registry.addResourceHandler("/webjars/**")
                .addResourceLocations("classpath:/META-INF/resources/webjars/");

    }
}
- 1
- 2
- 3
- 4
- 5
- 6
- 7
- 8
- 9
- 10
- 11
- 12
- 13
- 14
- 15
- 16
- 17
- 18
- 19
- 20
- 21
- 22
- 23
- 24
- 25
- 26
- 27
- 28
- 29
- 30
- 31
- 32
- 33
- 34
- 35
- 36
- 37
- 38
- 39
- 40
- 41
- 42
- 43
- 44
- 45
- 46
- 47
- 48
- 49
- 50
- 51
- 52
4.涉及到的相关注解
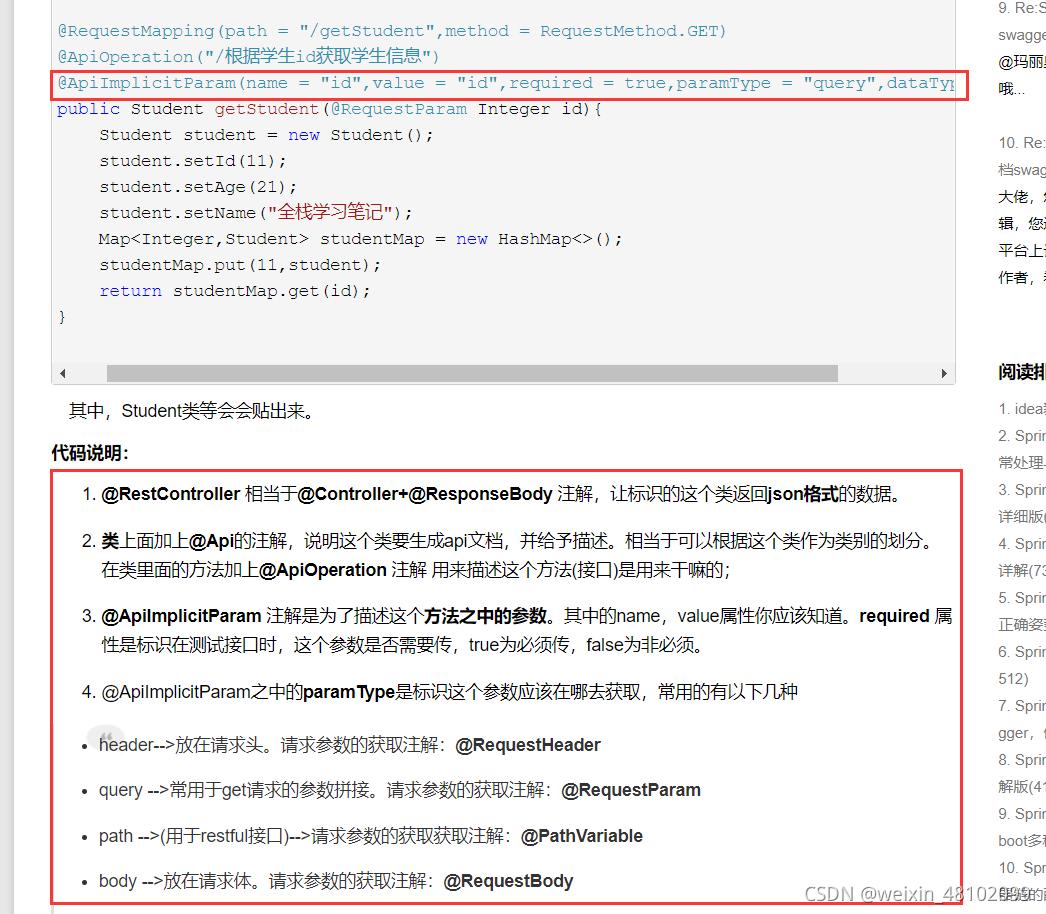
5.在controller中添加相关的注解来描述接口及接口中的参数
(1)get请求(参数不是对象类型的)
   //测试正常情况的数据返回
    @GetMapping("/data/{id}")
    @ApiOperation("获取学生所有信息")//对接口的描述
    @ApiImplicitParam(name = "id",value = "id",required = true, paramType = "path",dataType = "int")//对请求参数的描述
    public Msg index2(@PathVariable("id")Integer id){
        System.out.println("id的值为"+id);
        int a[][]= new int[2][3];
        for (int i=0;i<2;i++){
            for (int j=0;j<3;j++){
                a[i][j]=(int)(Math.random()*10+1);
            }
        }
        return Msg.success().sendData("data",a);
    }
- 1
- 2
- 3
- 4
- 5
- 6
- 7
- 8
- 9
- 10
- 11
- 12
- 13
- 14
- 15
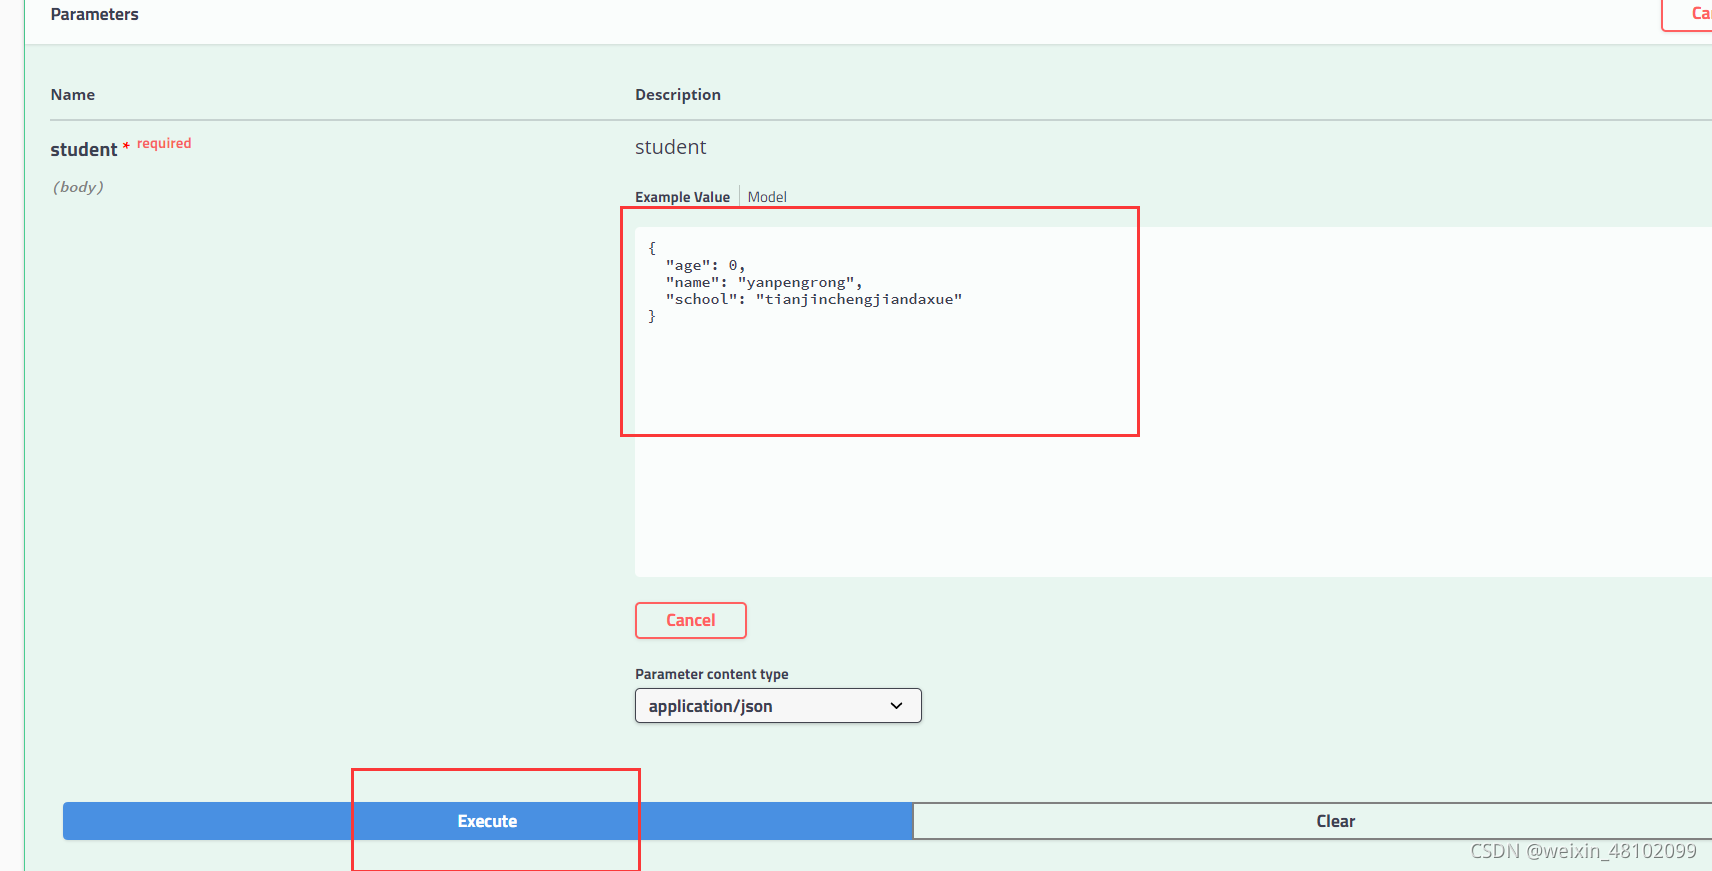
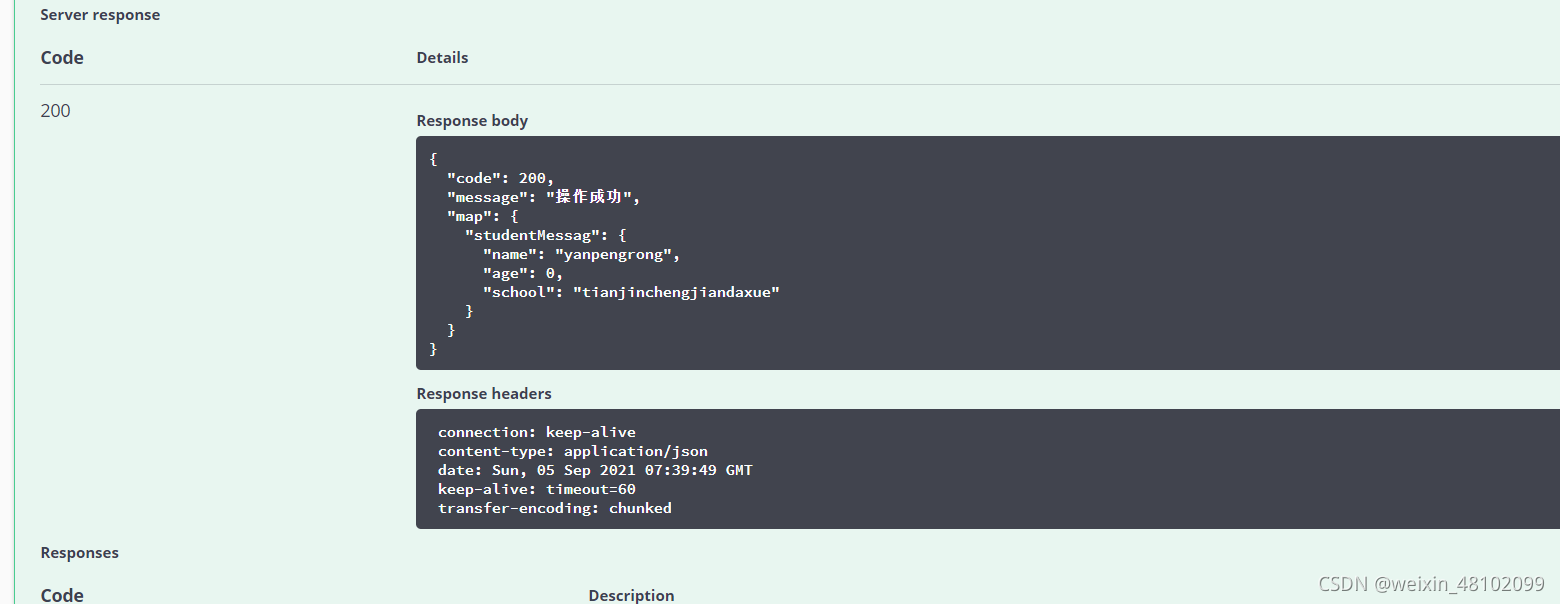
(2)post请求(参数是对象类型的
   @PostMapping("/student")
    @ApiOperation("传入学生信息")//对接口的描述
    public Msg addStudent(@RequestBody Student student){
        System.out.println(student);
        return Msg.success().sendData("studentMessag",student);
    }
- 1
- 2
- 3
- 4
- 5
- 6
- 7
相关实体类
@Data
@ToString
@ApiModel//声明api实体模型
public class Student {
    @ApiModelProperty("学生姓名")
    String name;
    @ApiModelProperty("学生年龄")
    Integer age;
    @ApiModelProperty("所在学校")
    String school;
}
- 1
- 2
- 3
- 4
- 5
- 6
- 7
- 8
- 9
- 10
- 11
- 12
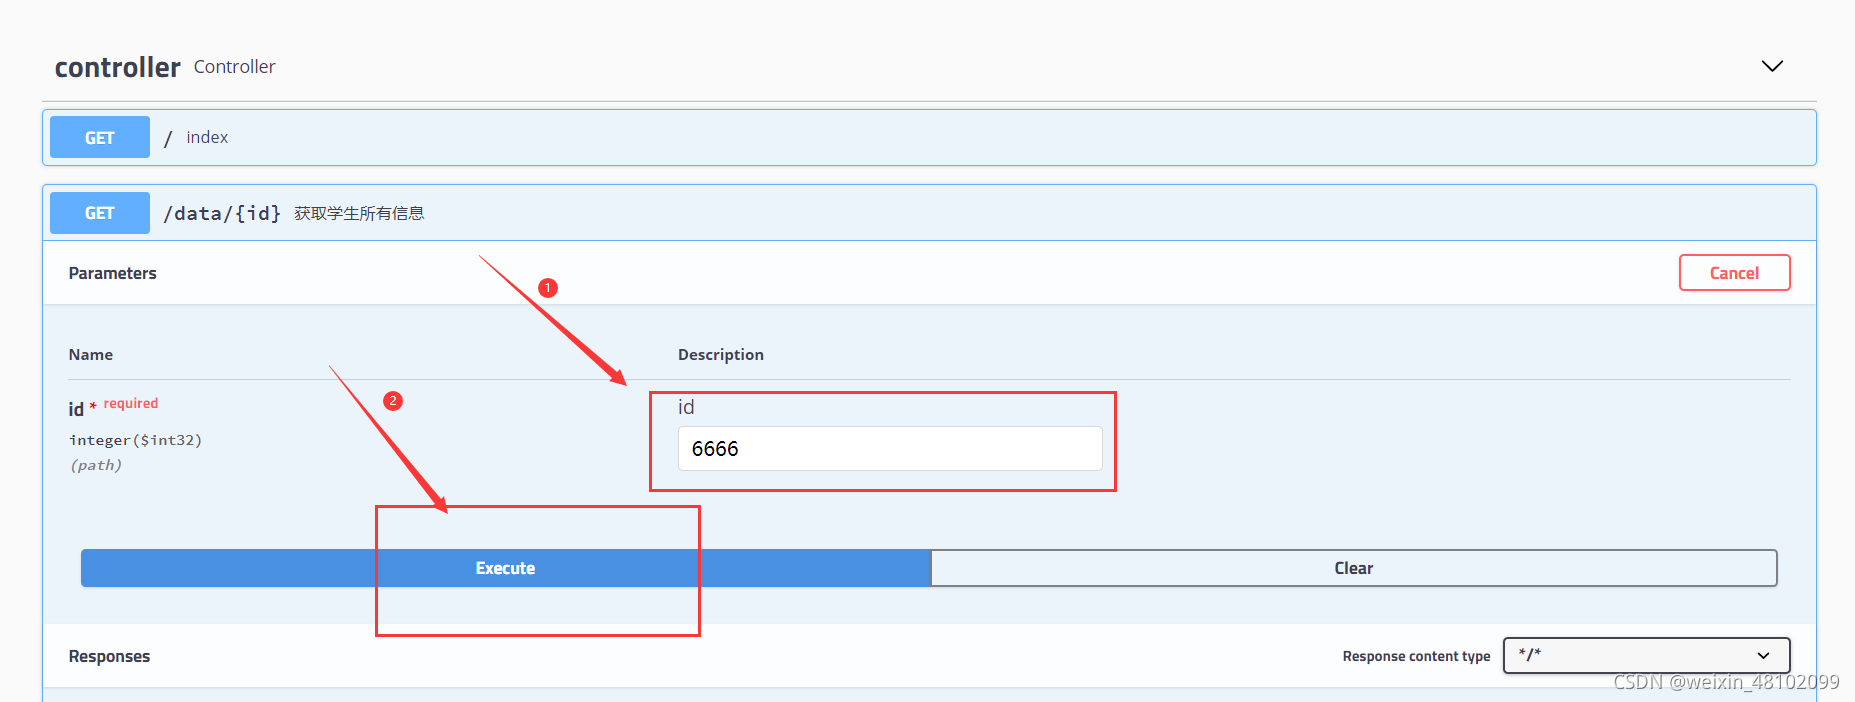
5.测试
(1)测试get请求
(2)测试post请求
返回的数据
五.评论功能的实现
1.sql
根据blog_id和parentId==null来查找父级评论
  <select id="selectParentComment"  resultMap="BaseResultMap">
    select  *
    from t_comment
    where parent_comment_id = -1 and blog_id = #{blogId}
  </select>
- 1
- 2
- 3
- 4
- 5
根据parentId查找对应的子集评论
<!--根据父级评论的id寻找子级评论及该子级评论的父级昵称-->
  <select id="selectCommentByParent" parameterType="java.lang.Integer" resultMap="BaseResultMap">
    select  tc.id id, tc.avatar avatar, tc.content content, tc.create_time create_time, tc.email email, tc.nickname nickname,
            tc.blog_id blog_id, tc.parent_comment_id parent_comment_id,tp.nickname parentNickname,tc.adminComment
    from t_comment tc
    left join  t_comment tp
    on  tc.parent_comment_id = tp.id
    where tc.parent_comment_id = #{id}
  </select>
- 1
- 2
- 3
- 4
- 5
- 6
- 7
- 8
- 9
2.使用递归遍历来对每个父级评论对应的子级评论集合进行分类整理
@Service
public class CommentServiceImpl {

    @Autowired
    private CommentMapper commentMapper;

    public int insertComment(Comment comment){//添加评论
        return commentMapper.insertSelective(comment);
    }

    public List<Comment> listCommentByBlogId(Integer blogId) {//获取所有评论,然后将对评论进行分类,最后返回给controller
        List<Comment> comments1 = commentMapper.selectParentComment(blogId);//查询parent_comment_id为空的一级评论
        combineChildren(comments1);
        System.out.println("一级评论"+comments1);
        return comments1;
    }

    private void combineChildren(List<Comment> comments) {//此处接收一级评论
        for (Comment comment : comments) {
            List<Comment> replys1 = commentMapper.selectCommentByParent(comment.getId());//根据一级评论的id找出对应的二级目录
            for(Comment reply1 : replys1) {
                //循环迭代,找出子代,存放在tempReplys中
                recursively(reply1);
            }
            //修改顶级节点的reply集合为迭代处理后的集合
            comment.setReplyComment(tempReplys);
            //清除临时存放区
            tempReplys = new ArrayList<>();
        }
    }

    //存放迭代找出的所有子代的集合
    private  List<Comment> tempReplys = new ArrayList<>();

    private void recursively(Comment comment) {
        tempReplys.add(comment);//二级评论存放在临时list中
        List<Comment> comment3 = commentMapper.selectCommentByParent(comment.getId());//根据二级评论的id找出是否有对应的三级评论
        if (comment3.size()>0) {//如果存在三级评论继续根据三级评论遍历
            for (Comment reply : comment3) {
                recursively(reply);
//                tempReplys.add(reply);//把查出来的三级评论存放到临时list中
//                List<Comment> comments4 = commentMapper.selectCommentByParent(reply.getId());
//                if (comments4.size()>0) {//如果四级评论还存在一直遍历
//                    recursively(reply);
//                }
            }
        }
    }
}
- 1
- 2
- 3
- 4
- 5
- 6
- 7
- 8
- 9
- 10
- 11
- 12
- 13
- 14
- 15
- 16
- 17
- 18
- 19
- 20
- 21
- 22
- 23
- 24
- 25
- 26
- 27
- 28
- 29
- 30
- 31
- 32
- 33
- 34
- 35
- 36
- 37
- 38
- 39
- 40
- 41
- 42
- 43
- 44
- 45
- 46
- 47
- 48
- 49
还需补充测试文件上下传
这里是引用
六.标签多对多查询功能
1.需要用到的基础知识
1.数字和字符串之间的转化
数字转字符串:String.valueOf(i)
字符串转数字:Integer.parseInt(str)
2.批量查询的动态sql
<!-- 根据剧典id list查询剧典 -->
<select id="selectByIds" resultMap="DramaImageResultMap">
    select * from drama where drama_id in
    <foreach collection="dramaIds" item="dramaId" open="(" close=")" separator=",">
    #{dramaId}
   </foreach>
</select>
- 1
- 2
- 3
- 4
- 5
- 6
- 7
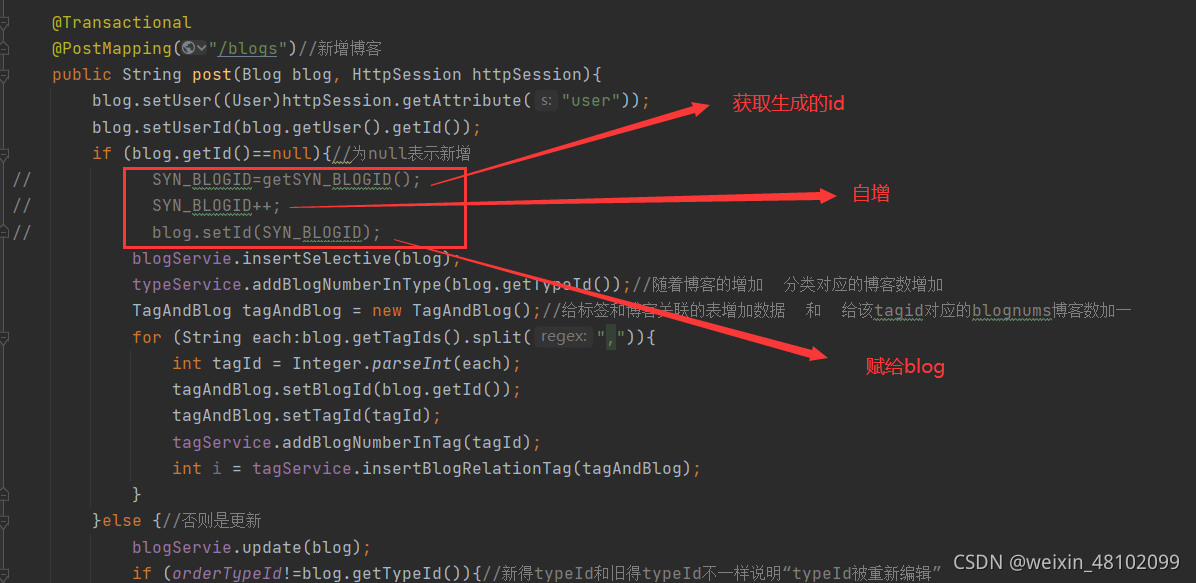
2.博客新增、删除时
由于是博客和标签是多对多的情况,所以在新增一篇博客时需要对三个表同时做变动,即博客表,标签表,关联表,下面我将分别从每个表的角度描述“新增一个博客的实现过程”。
需要说明的一点是:在博客表中我存放标签id的形式是以“字符串的形式”,即一个表字段对应多个标签id

1.博客表新增
当我们新增一个博客,点击发布后,多个标签会以字符串的形式传递到服务器,然后让其映射实体对象接收,通过持久层存到放到数据库中,此过程并无特殊操作部分。


2.标签表和关联表的新增
当新增完博客后,接着需要新增对应的标签和关联表,所以关键问题是如何将字符串类型的标签集,转化成数值型的标签集合。
拿到标签id转化为数值型集合
使用String的split方法将带有逗号分隔符的“字符串标签集合”分割成单个字符,然后通过Integer.parseInt()方法转换成数值型,通过遍历转化成的数值型,这个时候去做相对应的“标签表”和“关联表”的操作
每新增一个博客就需要增加一组相对应的id关联


4.删除
删除操作就容易多了,拿到博客的id,查出与之对应的标签id集合(本篇只针对标签,不含分类模块),根据博客id删除博客,根据标签id集合删除对应“关联表”中的对应关系
除此之外还需要根据标签id在“标签表中”将与标签id对应的“博客数”减一

3.博客修改时
之所以单独将“博客修改”拎出来记录,是因为该模块在操作时比较复杂,而且所有的逻辑代码全是按照自己的思路来的,没有参考标准,我不知道自己这样写是否为最优写法,但是能把该功能跑起来,同时经过多次测试后没有出现错误,还是值得记录一下的。
下面描述一下该模块的正常执行逻辑过程:(只针对标签,不含其他内容)
当我们在修改完标签后,点击提交,在controller中拿到“修改后的”标签,需要判断那些是新增的,那些是舍弃掉的,那些是没有被修改的。
对于新增的: 拿到新增标签对应的id,到“标签表”中给“与之对应的博客数加一”,到“关联表”中新增一组对应关系。
对于舍弃的: 拿到舍弃标签对应的id,到“标签表”中给“与之对应的博客数减一”,到“关联表”中删除一组对应关系。
对于不变的: 保持不变,不做任何操作。
所以该问题的核心就是如何筛选出那些是新增,那些是舍弃,那些是不变的,那么如何将多个标签集合与另一个含有多个标签集合进行对比,然后做出正确的筛选呢?
解决思路:
- 在点击“编辑”进入编辑页面时,根据博客id拿到“字符串形式的标签集合”赋给controller总的静态变量作为“旧的标签集合”,然后再编辑后提交,这时再拿到修改后的“新的标签集合”。
2.将字符串形式的标签集合转化为数值list
3.在找出修改前后需要两个步骤
(1)先遍历旧list,然后再新list中查询,如果新list中包含旧的“标签id”,说明该id没有被换掉,如果新list中不含“标签id”就说明该id是新增的,对于新增的,上文有提到,不做重复。
(2)再遍历新list,然后再旧list中查询,如果旧list中包含旧的“标签id”,说明该id没有被换掉,如果新旧list中不含“标签id”就说明该id是被舍弃掉的,对于舍弃的,上文有提到,不做重复。
具体实现细节如下;


4.博客保存时
记录博客保存主要是涉及到前端的页面展示和代码优化,最主要的是第一遍做的时候我忽略掉了“和前端展示相关的部分”,最后在测试的时候发现有问题,而且还不小,需要对博客新增以及编辑博客的接口进行重构,当时也是全按照自己思路来的,不知道是否为最优,如果有大佬发现我的代码有需要改进的地方,还请不吝赐教,颜某不胜感激。
保存实际上是将编辑的博客以草稿的形式保存,既然是草稿,那就不应该将该草稿展示在前端页面,包括(关联表,标签,分类数据)。
那我当时遇到的问题是什么呢?
既然草稿不能展示在前端页面,那么就不能把相关的分类,标签和关联表的数据存入到数据库中。然后再次编辑发布之后,此时对于之前的草稿是一个“编辑”的操作,同时由“草稿状态”变为“发布状态”,此时博客会直接进入编辑的接口,不再去做添加操作,这样一来,该篇博客的(关联表,标签,分类数据)从始至终都未被存入至数据库中。

如何解决呢?
根据“是否发布”的状态判断
封装方法aboutPublished()


七.foreach标签和pageInfo冲突的解决思路
1.需求
在客户端“标签”一栏中,当点击某个标签时,查询出所有关于这个标签的博客,以列表形式呈现,以后台逻辑为主
2.我的解决思路


3.出现的问题
pageinfo不能正常显示查询到的总记录数
经过一番跟踪检查,和sql语句中foreach相关,具体原因,看的不是很理解1.使用foreach标签hi
参考资料:
https://blog.csdn.net/douzhenwen/article/details/112025079
https://www.jianshu.com/p/af138ede8580

4.转换思路
使用子查询
(1).不在需要先到blog_relation_tag关联表中查出相关list,在传入到blog表中
(2).而是直接在查询博客集合的sql中添加子查询,把步骤(1)交给子查询完成即可

八、项目中使用到的sql语句查询总结
九、thymeleaf中的Ajax和Ajax的用法区别总结
十、获取自增id
我的做法(不知道还能自动获取自增id,好神奇)
使用单例模式生成id
private static int getSYN_BLOGID(){
        if (SYN_BLOGID == null){
            SYN_BLOGID=;
            return SYN_BLOGID;
        }
        return SYN_BLOGID;
    }
- 1
- 2
- 3
- 4
- 5
- 6
- 7
在新增博客时,由于博客和标签是多对多的关系,所以需要id关联表来维护两个表的关系,但是在新增博客时一般情况下,id为null,那么如何获取到blog_id和tag_id关联呢?
mybatis在mapper映射文件中提供了一个
<insert id="insertSelective"
  useGeneratedKeys="true" //允许JDBC支持自动生成主键
   keyProperty="id"   //自动映射到对象中的id属性
   parameterType="com.lrm.po.Blog">
- 1
- 2
- 3
- 4


