
热门标签
热门文章
- 1返回购买prod_id为BR01 的产品的所有顾客的电子邮件
- 2张孝祥正在整理Java就业面试题大全20100602版本(八)
- 3content-type的几种取值_text/plain
- 4蓝桥青少2023年python测评_python 蓝桥杯 给定一个正整数n,计算n除以7的商
- 5冰冻三尺非一日之寒-自学篇 浅谈个人学习方法_hongyang csdn
- 6springboot系类代码:springboot-data-jpa_spring data jpa怎么注入entityinformation
- 7dockerfile的优化_dockerfile 多个env 合并成一行
- 8springboot 最新稳定版_spring boot 最新版本
- 9PHP调用DLL_php 使用 aspose.dll
- 10MyBatis 源码系列:MyBatis 解析配置文件、二级缓存、SQL
当前位置: article > 正文
利用keras框架搭建一个简单CGAN模型,制作一个数据集用作训练_使用cgan训练自己的数据集
作者:代码独立开发者 | 2024-01-28 23:42:26
赞
踩
使用cgan训练自己的数据集
目录
利用keras框架搭建一个CGAN模型是比较方便的,这里我就不多说什么了,直接上代码吧
目前网络上搭建这种模型的文章已经很多了,在这里我会说一些在阅读其他作者的相关文章的同时进行搭建遇到的一系列问题以及数据集兼容的一点见解。
利用keras框架搭建一个CGAN模型是比较方便的,这里我就不多说什么了,直接上代码吧
- import matplotlib.pyplot as plt
- import numpy as np
- from keras.optimizers import Adam
- from keras.layers import Input, Dense, Reshape, Flatten, Dropout, multiply, LeakyReLU, Layer, BatchNormalization, \
- Embedding
- from keras.models import Model, Sequential
- import tensorflow as tf
- from tensorflow.python.keras.models import save_model
- from keras.utils import plot_model
- import myDataToMnist
-
-
- class Mycgan():
- def __init__(self):
-
- self.img_rows = 64 # 输入图像像素行
- self.img_cols = 64 # 输入图像像素列
- self.img_tag = 1 # 标签
- self.channels = 3 # 管道数量,彩色图像rgb三个管道
- self.img_shapes = (self.img_rows, self.img_cols, self.img_tag, self.channels) # 将三个图像形象组合成一个shape
- self.num_classes = 21 # 样本的数量
- self.latent_dim = 100 # 特征向量的维度
-
- optimizer = Adam(0.0002, 0.5) # 优化算法,自适应的梯度下降算法,参数为:学习速率,
-
- # 构建判别器
- self.discriminator = self.build_Discriminator()
- self.discriminator.compile(loss=['binary_crossentropy'], optimizer=optimizer, metrics=['accuracy'])
-
- # 构建生成器
- self.generator = self.build_Generator()
-
- # 生成器的输入定义(噪声+标签)
- noise = Input(shape=(self.latent_dim,), name='noise')
- label = Input(shape=(1,), name='label')
- img = self.generator([noise, label]) # 生成器生成图像的输入定义
-
- # 暂时仅训练生成器
- self.discriminator.trainable = True
-
- # 鉴别器将生成图像与标签作为输入判别图像真实性
-
- valid = self.discriminator([img, label])
-
- # 组合模型
- self.combined = Model([noise, label], valid, name='CGAN_Model')
- self.combined.compile(loss=['binary_crossentropy'], optimizer=optimizer)
-
- def build_Generator(self):
- # 堆叠模型,允许添加多个层构建深度神经网络
-
- model = Sequential()
-
- model.add(Dense(256, input_dim=self.latent_dim)) # 全连接层
- model.add(LeakyReLU(alpha=0.2)) # 带泄露的RLU层,赋予模型一个起始较小的梯度
- model.add(BatchNormalization(momentum=0.8)) # 批量标准化层,将输入张量的数据转换到0~1之间
- model.add(Dense(512))
- model.add(LeakyReLU(alpha=0.2))
- model.add(BatchNormalization(momentum=0.8))
- model.add(Dense(1024))
- model.add(LeakyReLU(alpha=0.2))
- model.add(BatchNormalization(momentum=0.8))
- model.add(Dense(np.prod(self.img_shapes), activation='tanh')) # 双曲正切激活函数
- model.add(Reshape(self.img_shapes)) # 将转换并计算后张量转换到指定尺寸(此处为原图像尺寸)
-
- model.summary() # 打印网络结构及各项参数
-
- noise = Input(shape=(self.latent_dim,))
- label = Input(shape=(1,), dtype='float32')
- label_embedding = Flatten()(Embedding(input_dim=self.num_classes, output_dim=self.latent_dim)(label))
-
- # label = Input(shape=(1,),dtype='string')
- # label_embedding = Flatten()(Embedding(self.num_classes,self.latent_dim)) #将参数联合转换为稠密张量,再展平为一维张量
-
- model_input = multiply([noise, label_embedding]) # 通过将噪声与标签逐一乘积合成一个张量作为整个生成器的输入
- img = model(model_input) # 生成图像
- save_model(Model([noise, label], img), 'generator.h5')
- return Model([noise, label], img, name='generator') # 将生成图像与合成的条件向量作为输出传入到判别器
-
- def build_Discriminator(self):
-
- model = Sequential()
-
- model.add(Dense(512, input_dim=np.prod(self.img_shapes)))
- model.add(LeakyReLU(alpha=0.2))
- model.add(Dense(512))
- model.add(LeakyReLU(alpha=0.2))
- model.add(Dropout(0.4)) # 防止过拟合
- model.add(Dense(512))
- model.add(LeakyReLU(alpha=0.2))
- model.add(Dropout(0.4))
- model.add(Dense(1, activation='sigmoid'))
- model.summary()
-
- img = Input(shape=self.img_shapes)
- label = Input(shape=(1,), dtype='int32')
-
- label_embedding = Flatten()(Embedding(self.num_classes, np.prod(self.img_shapes))(label))
- flat_img = Flatten()(img)
-
- model_input = multiply([flat_img, label_embedding])
-
- validity = model(model_input)
-
- save_model(Model([img, label], validity), 'discriminator.h5')
- return Model([img, label], validity, name='discriminator')
-
- def train(self, epochs, batch_size=32, sample_interval=50):
-
- # 加载数据集
- (X_train, Y_train) = (myDataToMnist.x_train, myDataToMnist.y_train)
-
- X_train = (X_train.astype(np.float32) - 127.5) / 127.5
- X_train = np.expand_dims(X_train, axis=3)
- Y_train = Y_train.reshape(-1, 1)
-
- valid = np.ones([batch_size, 1])
- fake = np.zeros([batch_size, 1])
-
- for epochs in range(epochs):
-
- index = np.random.randint(0, X_train.shape[0], batch_size)
- imgs, labels = X_train[index], Y_train[index]
-
- noise = np.random.normal(0, 1, (batch_size, 100))
-
- gen_img = self.generator.predict([noise, labels])
-
- d_loss_real = self.discriminator.train_on_batch([imgs, labels], valid)
- d_loss_fake = self.discriminator.train_on_batch([gen_img, labels], fake)
- d_loss = 0.5 * np.add(d_loss_real, d_loss_fake)
-
- sample_labels = np.random.randint(0, 20, batch_size).reshape(-1, 1)
-
- g_loss = self.combined.train_on_batch([noise, sample_labels], valid)
-
- print("%d [D 损失:%f, ACC.: %.2f%%] [G 损失: %f]" % (epochs, d_loss[0], 100 * d_loss[1], g_loss))
-
- if epochs % sample_interval == 0:
- self.sample_images(epochs)
- tf.keras.models.save_model(self.combined, 'my_cgan_model.h5')
-
- plot_model(self.combined, show_shapes=True, to_file='./model.png')
-
- def sample_images(self, epoch):
- r, c = 4, 5
- noise = np.random.normal(0, 1, (r * c, 100))
- sample_labels = np.arange(0, 20).reshape(-1, 1)
-
- gen_image = self.generator.predict([noise, sample_labels])
-
- gen_image = 0.5 * gen_image + 0.5
-
- fig, axs = plt.subplots(r, c)
- cnt = 0
- for i in range(r):
- for j in range(c):
- axs[i, j].imshow(gen_image[cnt, :, :, 0])
- axs[i, j].set_title("Digit: %d" % sample_labels[cnt])
- axs[i, j].axis('off')
- cnt += 1
- fig.savefig("images/%d.png" % epoch)
- plt.close()
-
-
- if __name__ == '__main__':
- cgan = Mycgan()
- cgan.train(epochs=1500, batch_size=128, sample_interval=200)

需要注意的是,此处数据集不再是mnist灰度图像数据集,而是我自己创建的一个类似格式的彩色图像数据集。
数据集的构建大致如下:
- import os
- import numpy as np
- import pandas as pd
- from PIL import Image
-
- # 定义数据集目录路径及相关信息
- data_dir = f"包含图像文件夹的文件夹"
- label_data_dir = f"标签文件夹名称"
- label_file = '标签,下面有解释'
- image_dir = f"图像文件夹名"
- label_dict = {}
- filename = '映射关联文本'
-
- # 取图像文件夹,从0开始将图像名称作为对应值键入
- with open(filename, 'r') as f:
- lines = f.readlines()
- for line in lines:
- key, value = line.strip().split(':')
- label_dict[key] = value
-
- print(label_dict.__len__())
-
- # 读取标签文件,构建 y_train 数组
- with open(os.path.join(label_data_dir, label_file), "r") as f:
- labels = f.readlines()
- y_train = np.array([int(label.strip()) for label in labels]) # 删除每个标签后面的换行符
-
- # 读取图像文件,构建 x_train 数组
- image_paths = [os.path.join(data_dir, image_dir, fname) for fname in os.listdir(os.path.join(data_dir, image_dir)) if
- fname.endswith(".jpg")]
-
- x_train = []
-
- for image_path in image_paths:
- with Image.open(image_path) as img:
- img = img.resize((64, 64))
- img_arr = np.array(img) # 将 PIL.Image 对象转换为 ndarray 数组
- x_train.append(img_arr)
-
- x_train = np.array(x_train)
-
- y_train_desc = []
- for y in y_train:
- y_train_desc.append(label_dict[str(y)])
-
- train_df = pd.DataFrame({"data": list(x_train), "label": y_train_desc})
- train_df.to_csv("train.csv", index=False)
-
- print(x_train.shape[1])
关于tag.txt:
序号,长度为你要构建的图像集的图像数
关于tags.txt:
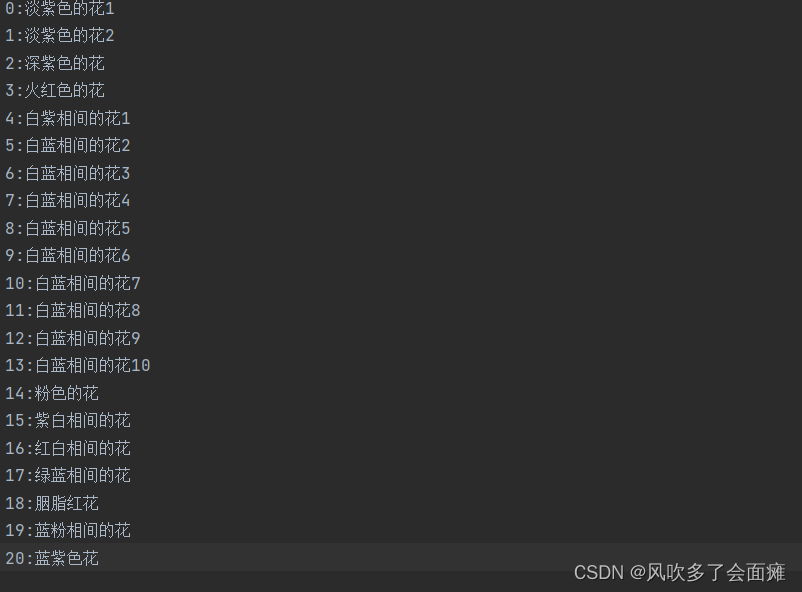
映射关系,具体为于当前序号相关联的图像的名称
大致就是这样,如果想通过控制台输入控制图像生成的话,可以将生成器中label封装一层文本相似度比较的程序,通过比较输入文本与数据集中映射文本的相似度选取最高相似度的文本对应的序号作为随机条件噪声输入,只需要把sample_labels = np.arrange(0,20).reshape(-1,1)改为np.array(输入的随机条件噪声值).reshape(-1,1)就行,当然本代码中的图像展示只是训练结果,如果需要测试结果必须通过读取保存好的模型.h5文件进行predict().
文本相似度的对比可以通过余弦相似度比较,例如以下代码:
- # 输入文本进行清洗
- import jieba
- import myDataToMnist
- from sklearn.feature_extraction.text import TfidfVectorizer
- from sklearn.metrics.pairwise import cosine_similarity
-
- def text_compare():
- # 1.对文本进行分词
- print("请输入一些描述词,类似“紫色的花”:")
- text1 = input()
- len1 = len(text1)
- text2 = ""
- sim = 0.0
- label = ""
- for tex2 in myDataToMnist.y_train_desc:
- len2 = len(tex2)
- if len1 > len2:
- text2 += ' ' * (len1 - len2)
- else:
- text1 += ' ' * (len1 - len2)
-
- sen1 = jieba.lcut(text1)
- sen2 = jieba.lcut(tex2)
-
- seg_str1 = ",".join(sen1)
- seg_str2 = ",".join(sen2)
-
- vectorizer = TfidfVectorizer()
- vectorizer.fit([seg_str1,seg_str2])
- vector1,vector2 = vectorizer.transform([seg_str1,seg_str2])
-
- similarity = cosine_similarity(vector1,vector2)[0][0]
- if similarity > sim:
- sim = similarity
- label = tex2
- print("文本相似度:",sim)
- print("相似文本:",label)
- print("噪声编号:", myDataToMnist.y_train_desc.index(label))
-
-
- # 通过值找到键
- def get_key(key, value):
- return list(key.keys())[list(key.values()).index(value)]
-
-
- text_compare()
声明:本文内容由网友自发贡献,不代表【wpsshop博客】立场,版权归原作者所有,本站不承担相应法律责任。如您发现有侵权的内容,请联系我们。转载请注明出处:https://www.wpsshop.cn/article/detail/42280
推荐阅读


相关标签

