
热门标签
热门文章
- 1springboot3.0的新特性_springboot3.0新特性
- 2解决 three.js 模型颜色偏差问题_three 模型加载墙面颜色变了
- 3L1-036 A乘以B-java
- 4http://与www.开头的网站有什么区别
- 5C++ 指针与作用域_c++ 指针定义的作用域
- 6获取机器内存的三种方法_asmwbinvd
- 7win服务器系统2019和2016区别,Windows Server 2019和Windows Server, Version 1909的区别是什么?...
- 8Python中time模块详解[转]
- 9props与state的区别_state和props的区别
- 10JAVA获取当前进程的内存占用数和CPU利用率以及读写字节数并计算统计信息_java获取cpu使用率
当前位置: article > 正文
android开发基础4-基本程序单元activity(明日科技教程)_安卓基本程序单元
作者:代码优化者 | 2024-01-17 18:19:51
赞
踩
安卓基本程序单元
Activity概述
代表手机或平板上的一屏
Activity的4钟状态
- 运行状态
- 暂停状态:可见,但是不能操作,比如弹出了一个对话框
- 停止状态:不可见了
- 销毁状态:应用强制停止后,不可见
Activity的生命周期
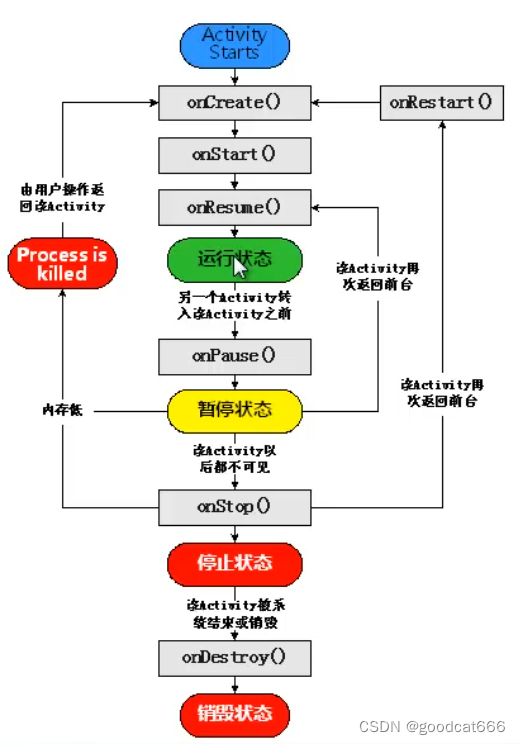
在onResume执行后,Activity就是可见的了
可以通过下面代码查看生命周期
public class MainActivity extends AppCompatActivity {

    private static final String TAG = "MainActivityTAG";

    @Override
    protected void onPause() {
        super.onPause();
        Log.i(TAG,"onPause");
    }

    @Override
    protected void onResume() {
        super.onResume();
        Log.i(TAG,"onResume");
    }

    @Override
    protected void onStart() {
        super.onStart();
        Log.i(TAG,"onStart");
    }

    @Override
    protected void onStop() {
        super.onStop();
        Log.i(TAG,"onStop");
    }

    @Override
    protected void onRestart() {
        super.onRestart();
        Log.i(TAG,"onRestart");
    }

    @Override
    protected void onDestroy() {
        super.onDestroy();
        Log.i(TAG,"onDestroy");
    }

    @Override
    protected void onCreate(Bundle savedInstanceState) {
        super.onCreate(savedInstanceState);
        setContentView(R.layout.activity_main);
        Log.i(TAG,"onCreate");

    }
}

- 1
- 2
- 3
- 4
- 5
- 6
- 7
- 8
- 9
- 10
- 11
- 12
- 13
- 14
- 15
- 16
- 17
- 18
- 19
- 20
- 21
- 22
- 23
- 24
- 25
- 26
- 27
- 28
- 29
- 30
- 31
- 32
- 33
- 34
- 35
- 36
- 37
- 38
- 39
- 40
- 41
- 42
- 43
- 44
- 45
- 46
- 47
- 48
创建、启动和关闭Activity
创建Activity
1、创建class,继承自Activity的Activity
2、重写需要的回调方法
3、设置要显示的视图
4、在AndroidManifest.xml配置activity
或者
使用android studio的创建Activity的向导
启动Activity
入口Activity
需要在AndroidManifest.xml中进行配置
        <activity
            android:name=".MainActivity"
            android:exported="true">
            <intent-filter>
                <action android:name="android.intent.action.MAIN" />
                <category android:name="android.intent.category.LAUNCHER" />
            </intent-filter>
        </activity>
- 1
- 2
- 3
- 4
- 5
- 6
- 7
- 8
其他Activity
通过startActivity进行启动
Intent intent = new Intent(MainActivity.this,DetailActivity.class);
startActivity(intent);
- 1
- 2
关闭Activity
在需要的地方调用finish()方法就行
刷新当前Activity
onCreate(null);
多个Activity的使用
使用Bundle在Activity中间交换数据
什么时Bundle:键值对的组合
使用
1、通过putXXX方法,将数据保存到Bundle中
2、通过putExtras方法,将Bundle保存到Intent中
3、通过startActivity方法,调用intent传递数据
发送Bundle
Intent intent = new Intent(MainActivity.this,DetailActivity.class);
Bundle bundle = new Bundle();
bundle.putCharSequence("name", "1231232");
intent.putExtras(bundle);
startActivity(intent);
- 1
- 2
- 3
- 4
- 5
接受Bundle
Intent intent1 = getIntent();
Bundle bundle1 = intent1.getExtras();
String name = bundle.getString("name");
- 1
- 2
- 3
调用另一个Activity并返回结果
需要使用 startActivityForResult方法
startActivityForResult(Intent intent, int requestCode);
// requestCode 请求码,标识请求的来源
- 1
- 2
在另一个Activity中返回结果
Intent intent1 = getIntent();
Bundle bundle1 = new Bundle();
bundle1.putInt("imageId",213);
setResult(0x11, intent);
finish();
- 1
- 2
- 3
- 4
- 5
接收返回的数据
    @Override
    protected void onActivityResult(int requestCode, int resultCode, @Nullable Intent data) {
        super.onActivityResult(requestCode, resultCode, data);
        if(requestCode == 0x07 && resultCode == 0x11){
            Bundle bundle = data.getExtras();
            int imageId = bundle.getInt("imageId");
        }
    }
- 1
- 2
- 3
- 4
- 5
- 6
- 7
- 8
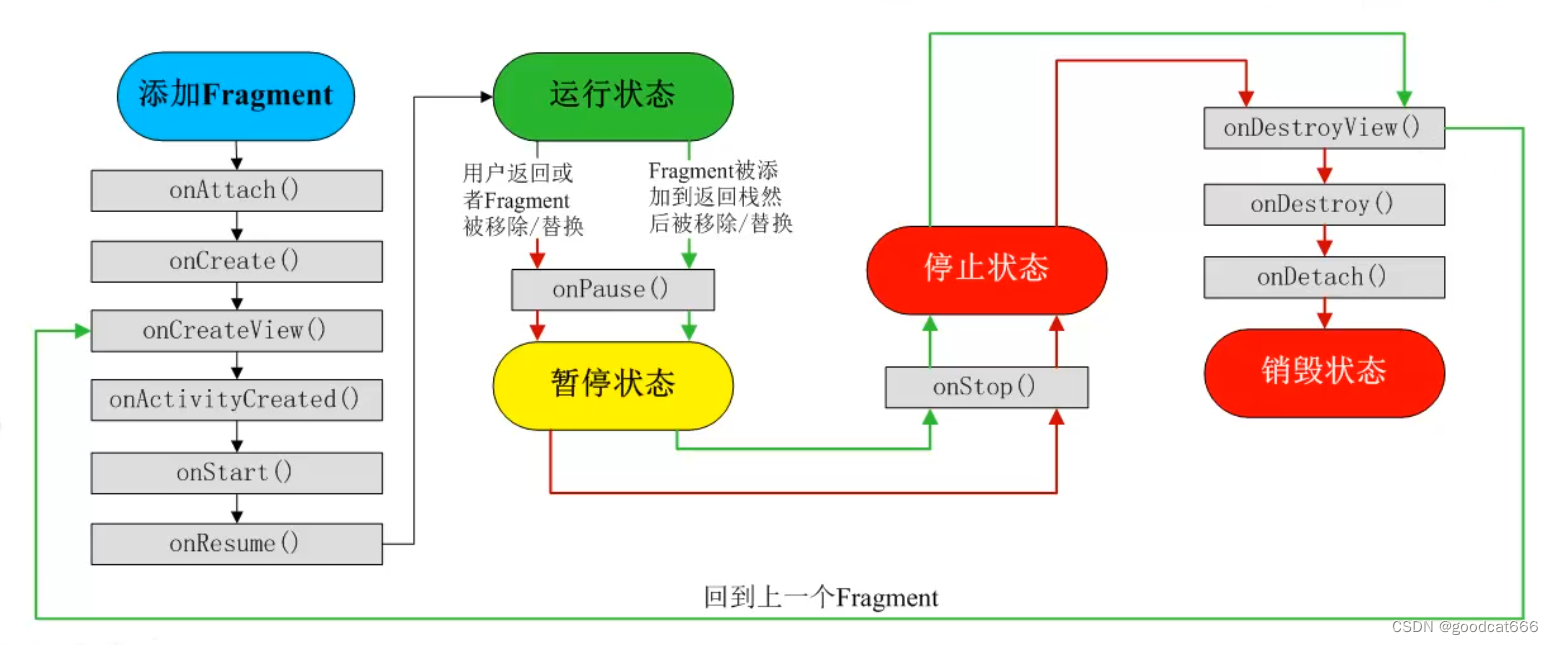
使用Fragment
可以在多个Activity中重用多个Fragment
也可以在一个Activity中使用多个Fragment
Fragment的生命周期
1、创建多个Fragment布局文件
2、在需要用到这些fragment布局文件的地方,用fragment标签占位
3、在java中,为每一个布局文件绑定显示和监听
4、在java中,为用到fragment的地方,进行fragment切换监听
1、
<?xml version="1.0" encoding="utf-8"?>
<RelativeLayout
    xmlns:android="http://schemas.android.com/apk/res/android"
    android:layout_width="match_parent"
    android:layout_height="match_parent"
>
    <ImageView
        android:layout_width="match_parent"
        android:layout_height="match_parent"
        android:src="@drawable/tongxun"
        android:scaleType="fitXY"/>
</RelativeLayout>
- 1
- 2
- 3
- 4
- 5
- 6
- 7
- 8
- 9
- 10
- 11
- 12
- 13
2、
<?xml version="1.0" encoding="utf-8"?>
<RelativeLayout
    xmlns:android="http://schemas.android.com/apk/res/android"
    xmlns:tools="http://schemas.android.com/tools"
    android:layout_width="match_parent"
    android:layout_height="match_parent"
    tools:context="com.mingrisoft.MainActivity">

    <fragment
        android:id="@+id/fragment"
        android:name="com.mingrisoft.WeChat_Fragment"
        android:layout_width="match_parent"
        android:layout_height="match_parent"/>

    <LinearLayout
        android:layout_width="match_parent"
        android:layout_height="50dp"
        android:layout_alignParentBottom="true"
        android:orientation="horizontal">

        <ImageView
            android:id="@+id/image1"
            android:layout_width="0dp"
            android:layout_height="50dp"
            android:layout_weight="1"
            android:src="@drawable/bottom_1"
            />
        <ImageView
            android:id="@+id/image2"
            android:layout_width="0dp"
            android:layout_height="50dp"
            android:layout_weight="1"
            android:src="@drawable/bottom_2"
            />
        <ImageView
            android:id="@+id/image3"
            android:layout_width="0dp"
            android:layout_height="50dp"
            android:layout_weight="1"
            android:src="@drawable/bottom_3"
            />
        <ImageView
            android:id="@+id/image4"
            android:layout_width="0dp"
            android:layout_height="50dp"
            android:layout_weight="1"
            android:src="@drawable/bottom_4"
            />

    </LinearLayout>

</RelativeLayout>
- 1
- 2
- 3
- 4
- 5
- 6
- 7
- 8
- 9
- 10
- 11
- 12
- 13
- 14
- 15
- 16
- 17
- 18
- 19
- 20
- 21
- 22
- 23
- 24
- 25
- 26
- 27
- 28
- 29
- 30
- 31
- 32
- 33
- 34
- 35
- 36
- 37
- 38
- 39
- 40
- 41
- 42
- 43
- 44
- 45
- 46
- 47
- 48
- 49
- 50
- 51
- 52
- 53
3、
package com.mingrisoft;

import android.app.Fragment;
import android.os.Bundle;
import android.support.annotation.Nullable;
import android.view.LayoutInflater;
import android.view.View;
import android.view.ViewGroup;

/**
 * Created by Administrator on 2016/2/18.
 */
public class WeChat_Fragment extends Fragment {
    @Nullable
    @Override
    public View onCreateView(LayoutInflater inflater, ViewGroup container, Bundle savedInstanceState) {
        View view=inflater.inflate(R.layout.wechat_fragment,null);
        return view;
    }
}
- 1
- 2
- 3
- 4
- 5
- 6
- 7
- 8
- 9
- 10
- 11
- 12
- 13
- 14
- 15
- 16
- 17
- 18
- 19
- 20
- 21
4、
package com.mingrisoft;

import android.app.Activity;
import android.app.Fragment;
import android.app.FragmentManager;
import android.app.FragmentTransaction;
import android.os.Bundle;
import android.view.View;
import android.widget.ImageView;

public class MainActivity extends Activity {

    @Override
    protected void onCreate(Bundle savedInstanceState) {
        super.onCreate(savedInstanceState);
        setContentView(R.layout.activity_main);
        ImageView imageView1 = (ImageView) findViewById(R.id.image1);//获取布局文件的第一个导航图片
        ImageView imageView2 = (ImageView) findViewById(R.id.image2);//获取布局文件的第二个导航图片
        ImageView imageView3 = (ImageView) findViewById(R.id.image3);//获取布局文件的第三个导航图片
        ImageView imageView4 = (ImageView) findViewById(R.id.image4);//获取布局文件的第四个导航图片
        imageView1.setOnClickListener(l);//为第一个导航图片添加单机事件
        imageView2.setOnClickListener(l);//为第二个导航图片添加单机事件
        imageView3.setOnClickListener(l);//为第三个导航图片添加单机事件
        imageView4.setOnClickListener(l);//为第四个导航图片添加单机事件
    }
    //创建单机事件监听器
    View.OnClickListener l = new View.OnClickListener() {
        @Override
        public void onClick(View v) {
            FragmentManager fm = getFragmentManager();   // 获取Fragment
            FragmentTransaction ft = fm.beginTransaction(); // 开启一个事务
            Fragment f = null; //为Fragment初始化
            switch (v.getId()) {    //通过获取点击的id判断点击了哪个张图片
                case R.id.image1:
                    f = new WeChat_Fragment(); //创建第一个Fragment
                    break;
                case R.id.image2:
                    f = new Message_Fragment();//创建第二个Fragment
                    break;
                case R.id.image3:
                    f = new Find_Fragment();//创建第三个Fragment
                    break;
                case R.id.image4:
                    f = new Me_Fragment();//创建第四个Fragment
                    break;
                default:
                    break;
            }
            ft.replace(R.id.fragment, f); //替换Fragment
            ft.commit(); //提交事务
        }
    };
}
- 1
- 2
- 3
- 4
- 5
- 6
- 7
- 8
- 9
- 10
- 11
- 12
- 13
- 14
- 15
- 16
- 17
- 18
- 19
- 20
- 21
- 22
- 23
- 24
- 25
- 26
- 27
- 28
- 29
- 30
- 31
- 32
- 33
- 34
- 35
- 36
- 37
- 38
- 39
- 40
- 41
- 42
- 43
- 44
- 45
- 46
- 47
- 48
- 49
- 50
- 51
- 52
- 53
- 54
声明:本文内容由网友自发贡献,不代表【wpsshop博客】立场,版权归原作者所有,本站不承担相应法律责任。如您发现有侵权的内容,请联系我们。转载请注明出处:https://www.wpsshop.cn/article/detail/41243
推荐阅读
![Android Termux安装MySQL,并使用cpolar实现公网安全远程连接[内网穿透]](https://img-blog.csdnimg.cn/fabd1c92d58f4f5b8946e9b8f6b49f50.jpeg?x-oss-process=image/resize,m_fixed,h_300,image/format,png)


相关标签

