
- 1数据标签体系与用户画像_对象标签模型其实就是根据不同应用场景和分析维度,对数据标签进行组合,赋值计算,
- 2Android Okhttp断点续传
- 3选错平台误终身!七大JavaScript硬件开发平台横评
- 4Python tkinter 初探Toplevel控件搭建父子窗口_toplevel python
- 5Kubernetes Service、Ingress、Ingress Controller_ingress controller必须和ingress在同一个命名空间吗
- 6数字技术如何改变乡村生活:从传统到现代的跨越
- 7DRUID连接池的使用
- 8YOLO系列目标检测算法-YOLOv6_yolov6如何添加注意力机制
- 9egret.H5游戏UI基础_eui.uilayer
- 10Flink 输出至 Elasticsearch
Android 系统启动过程纪要(基于Android 10)
赞
踩
前言
看过源码的都知道,Launcher系统启动都会经过这三个进程 init ->zygote -> system_server。今天我们就来讲解一下这三个进程以及Launcher系统启动。
init进程
- 准备Android虚拟机环境:创建和挂载系统文件目录;
- 初始化属性服务;
- 设置子进程信号处理函数(防止init的子进程出现僵尸进程,在子进程暂停和结束是接受信号并进行处理);
僵尸进程:父进程使用fork创建子进程,如果子进程终止,但父进程并不知道已经终止。虽然此时子进程已经退出,但是还是保留了他的信息(进程号。退出状态。运行时间等)。这样,系统进程表就会被无端耗用如果耗尽之后,系统可能就无法再创建新的进程。
- 启动属性服务,并为其分配内存用来存储属性:使用一个键值对(注册表)记录用户\软件的一些使用信息(确保系统或者软件重启之后能根据注册表中的信息进行初始化的工作)
- 解析init.rc配置文件。 解析init.zygote脚本文件,启动zygote进程
总的来说做了三件事:
- 创建和挂在系统启动所需要的文件目录;
- 初始化和启动属性服务;
- 解析init.rc配置文件并启动zygote进程。
zygote进程
init通过调用app_main.cpp的main函数中的start方法来启动zygote进程。
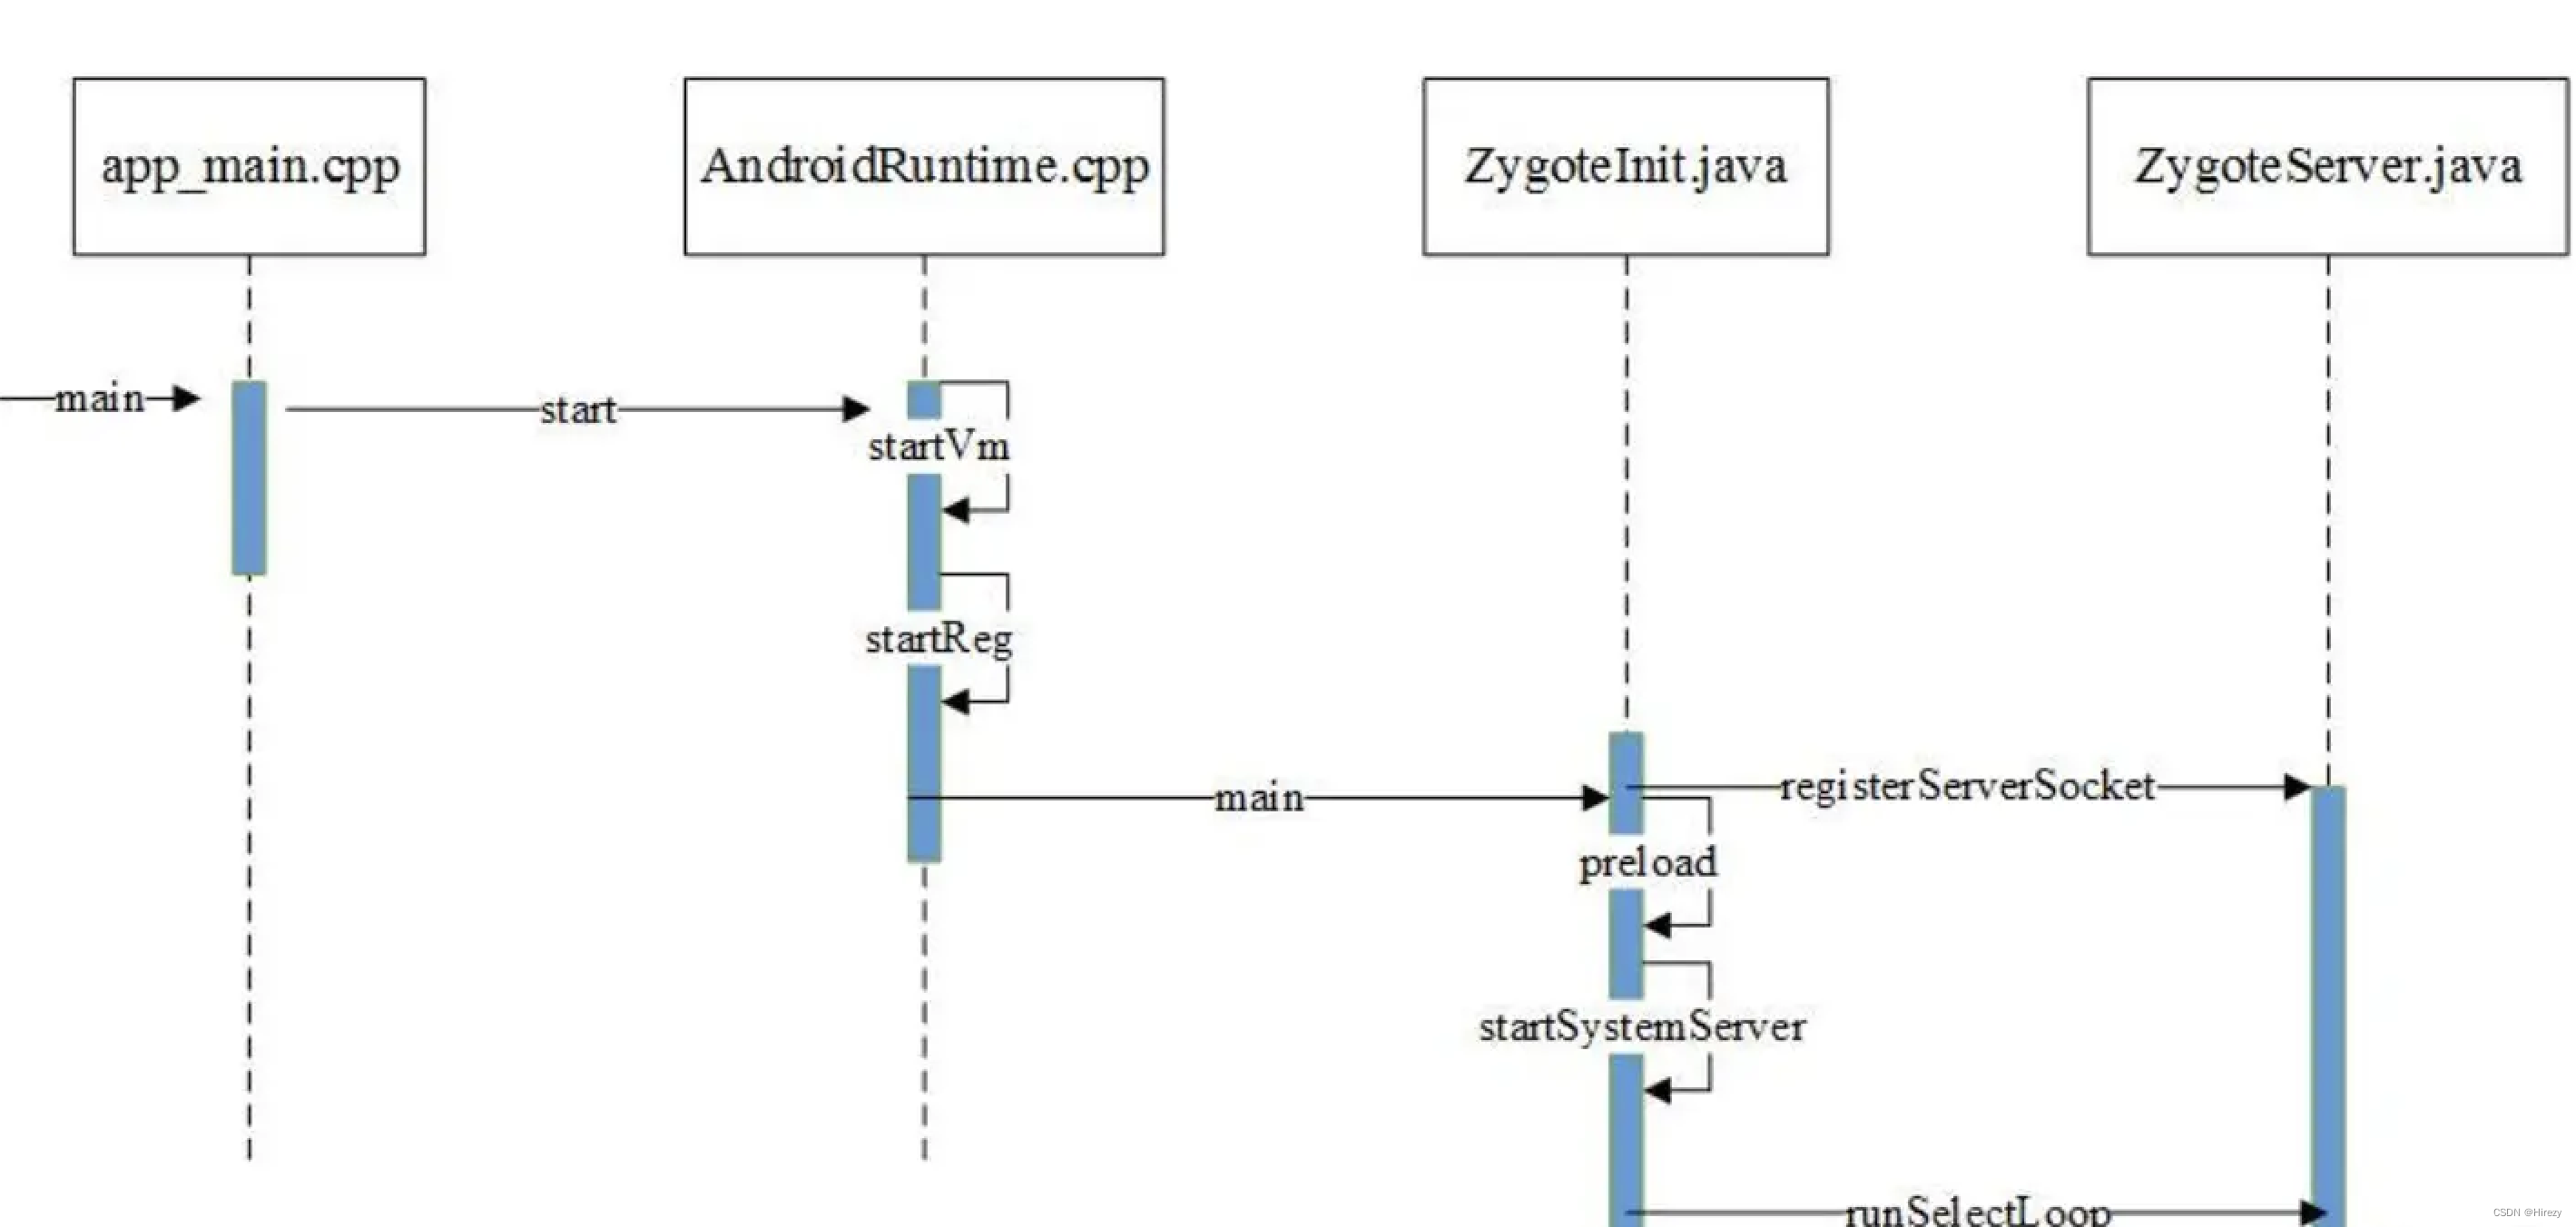
DVM,ART,应用程序进程以及SystemServer进程都是有zygote创建。通过fork自身(从zygote进程)来创建新的应用进程。因此,zygote进程和它的子进程都会运行main函数。main函数里会通过标记查看main函数是运行在zygote进程还是子进程。如果实在zygote进程里,那么就会调用AppRuntime的start函数。在start函数里,会创建Java虚拟机以及做一些其他的准备工作。最后通过JNI调用ZygoteInit.java里的mian方法,进入Java框架层。
main方法主要做下面几件事情:
- 创建一个Server端的Socket,用来等待AMS请求创建新的应用进程;
- 预加载类和资源;
- 启动SystemServer进程;
- 等待AMS请求创建新的应用程序进程(通过无限循环while(true)等待AMS的请求)。
SystemServer(zygote第一个启动的进程)
SystemServer主要用来创建系统服务,例如AMS,WMS都是有他创建的。Zygote进程通过forkSystemServetr方法复制Zygote进程的地址空间,并关闭SystemServer不需要的Socket进程。然后通过handleSystemServerProcess方法启动进程。
//ZygoteInit.java
private static Runnable forkSystemServer(String abiList, String socketName,
            ZygoteServer zygoteServer) {

 		String[] args = {
                "--setuid=1000",
                "--setgid=1000",
                "--setgroups=1001,1002,1003,1004,1005,1006,1007,1008,1009,1010,1018,1021,1023,"
                        + "1024,1032,1065,3001,3002,3003,3006,3007,3009,3010,3011,3012",
                "--capabilities=" + capabilities + "," + capabilities,
                "--nice-name=system_server",
                "--runtime-args",
                "--target-sdk-version=" + VMRuntime.SDK_VERSION_CUR_DEVELOPMENT,
                "com.android.server.SystemServer",
        };

        ZygoteArguments parsedArgs;
 		try {
            ZygoteCommandBuffer commandBuffer = new ZygoteCommandBuffer(args);
            try {
                parsedArgs = ZygoteArguments.getInstance(commandBuffer);
            } catch (EOFException e) {
                throw new AssertionError("Unexpected argument error for forking system server", e);
            }
     		catch (IllegalArgumentException  e) {

            }

        int pid;

        try {
            //...
            /* Request to fork the system server process */
            pid = Zygote.forkSystemServer(
                    parsedArgs.mUid, parsedArgs.mGid,
                    parsedArgs.mGids,
                    parsedArgs.mRuntimeFlags,
                    null,
                    parsedArgs.mPermittedCapabilities,
                    parsedArgs.mEffectiveCapabilities);
        } catch (IllegalArgumentException ex) {
            throw new RuntimeException(ex);
        }


        if (pid == 0) {
            if (hasSecondZygote(abiList)) {
                waitForSecondaryZygote(socketName);
            }
            //关闭Zygote进程创建的Socket
            zygoteServer.closeServerSocket();
            return handleSystemServerProcess(parsedArgs);
        }

        return null;
    }

- 1
- 2
- 3
- 4
- 5
- 6
- 7
- 8
- 9
- 10
- 11
- 12
- 13
- 14
- 15
- 16
- 17
- 18
- 19
- 20
- 21
- 22
- 23
- 24
- 25
- 26
- 27
- 28
- 29
- 30
- 31
- 32
- 33
- 34
- 35
- 36
- 37
- 38
- 39
- 40
- 41
- 42
- 43
- 44
- 45
- 46
- 47
- 48
- 49
- 50
- 51
- 52
- 53
- 54
- 55
- 56
- 57
在handleSystemServerProcess方法中,会启动Binder线程池,这样SystemServer就可以使用Binder和其他应用进程进程通讯。
//ZygoteInit.java
    private static Runnable handleSystemServerProcess(ZygoteArguments parsedArgs) {
     ///
        if (parsedArgs.mInvokeWith != null) {
            //
        } else {
            return ZygoteInit.zygoteInit(parsedArgs.mTargetSdkVersion,
                    parsedArgs.mDisabledCompatChanges,
                    parsedArgs.mRemainingArgs, cl);
        }
    }
- 1
- 2
- 3
- 4
- 5
- 6
- 7
- 8
- 9
- 10
- 11
- 12
启动Binder线程池之后,会调用RuntimeInit.applicationInit:
//RuntimeInit.java
  protected static Runnable applicationInit(int targetSdkVersion, long[] disabledCompatChanges,
            String[] argv, ClassLoader classLoader) {

        //
        final Arguments args = new Arguments(argv);
        return findStaticMain(args.startClass, args.startArgs, classLoader);
    }
- 1
- 2
- 3
- 4
- 5
- 6
- 7
- 8
- 9
然后调用findStaticMain 方法:
	RuntimeInit.java
      protected static Runnable findStaticMain(String className, String[] argv,
            ClassLoader classLoader) {
        Class<?> cl;

        try {
        //使用反射创建SystemServer。
            cl = Class.forName(className, true, classLoader);
        } catch (ClassNotFoundException ex) {
            throw new RuntimeException(
                    "Missing class when invoking static main " + className,
                    ex);
        }

        Method m;
        try {
        //找到ServerServer的main方法
            m = cl.getMethod("main", new Class[] { String[].class });
        } catch (NoSuchMethodException ex) {
            throw new RuntimeException(
                    "Missing static main on " + className, ex);
        } catch (SecurityException ex) {
            throw new RuntimeException(
                    "Problem getting static main on " + className, ex);
        }

        int modifiers = m.getModifiers();
        if (! (Modifier.isStatic(modifiers) && Modifier.isPublic(modifiers))) {
            throw new RuntimeException(
                    "Main method is not public and static on " + className);
        }

  	 //通过MethodAndArgsCaller调用SystemServer的main方法
        return new MethodAndArgsCaller(m, argv);
    }
- 1
- 2
- 3
- 4
- 5
- 6
- 7
- 8
- 9
- 10
- 11
- 12
- 13
- 14
- 15
- 16
- 17
- 18
- 19
- 20
- 21
- 22
- 23
- 24
- 25
- 26
- 27
- 28
- 29
- 30
- 31
- 32
- 33
- 34
- 35
可以看到,这里使用反射的方式创建了Systemserver,其中的className实在ZygoteInit.java类中forkSystemServer 方法的变量arg中初始化的。然后通过MethodAndArgsCaller来调用Systemserver的main方法,主要是为了能让ZygoteInit.mian能捕获异常(因为SystemServer的main方法在调用之前SystemServer进程已经做了很多准备工作,而如果慧姐抛出异常,则会清理掉所有的堆栈信帧,使得SystemServer的main看起来就不是SystemServer的入口方法了),MethodAndArgsCaller代码也很简单:
static class MethodAndArgsCaller implements Runnable {
        /** method to call */
        private final Method mMethod;

        /** argument array */
        private final String[] mArgs;

        public MethodAndArgsCaller(Method method, String[] args) {
            mMethod = method;
            mArgs = args;
        }

        public void run() {
            try {
                mMethod.invoke(null, new Object[] { mArgs });
            } catch (IllegalAccessException ex) {
                throw new RuntimeException(ex);
            } catch (InvocationTargetException ex) {
                Throwable cause = ex.getCause();
                if (cause instanceof RuntimeException) {
                    throw (RuntimeException) cause;
                } else if (cause instanceof Error) {
                    throw (Error) cause;
                }
                throw new RuntimeException(ex);
            }
        }
    }
- 1
- 2
- 3
- 4
- 5
- 6
- 7
- 8
- 9
- 10
- 11
- 12
- 13
- 14
- 15
- 16
- 17
- 18
- 19
- 20
- 21
- 22
- 23
- 24
- 25
- 26
- 27
- 28
- 29
而在ZygoteInit的main方法中,有该异常的捕获的try语句。
在SystemServer中,main方法的关键操作如下:
public static void main(String[] args) {
        new SystemServer().run();
}

private void run() {
        //
        try {
            Looper.prepareMainLooper();
            Looper.getMainLooper().setSlowLogThresholdMs(
                    SLOW_DISPATCH_THRESHOLD_MS, SLOW_DELIVERY_THRESHOLD_MS);
             System.loadLibrary("android_servers");
            createSystemContext();
        }
        //
        // Start services.
        try {
            t.traceBegin("StartServices");
            startBootstrapServices(t);//启动引导服务
            startCoreServices(t);//启动核心服务
            startOtherServices(t);//启动其他服务
        } catch (Throwable ex) {
            throw ex;
        } finally {
            t.traceEnd(); // StartServices
        }
        Looper.loop();
}
- 1
- 2
- 3
- 4
- 5
- 6
- 7
- 8
- 9
- 10
- 11
- 12
- 13
- 14
- 15
- 16
- 17
- 18
- 19
- 20
- 21
- 22
- 23
- 24
- 25
- 26
- 27
- 28
- 29
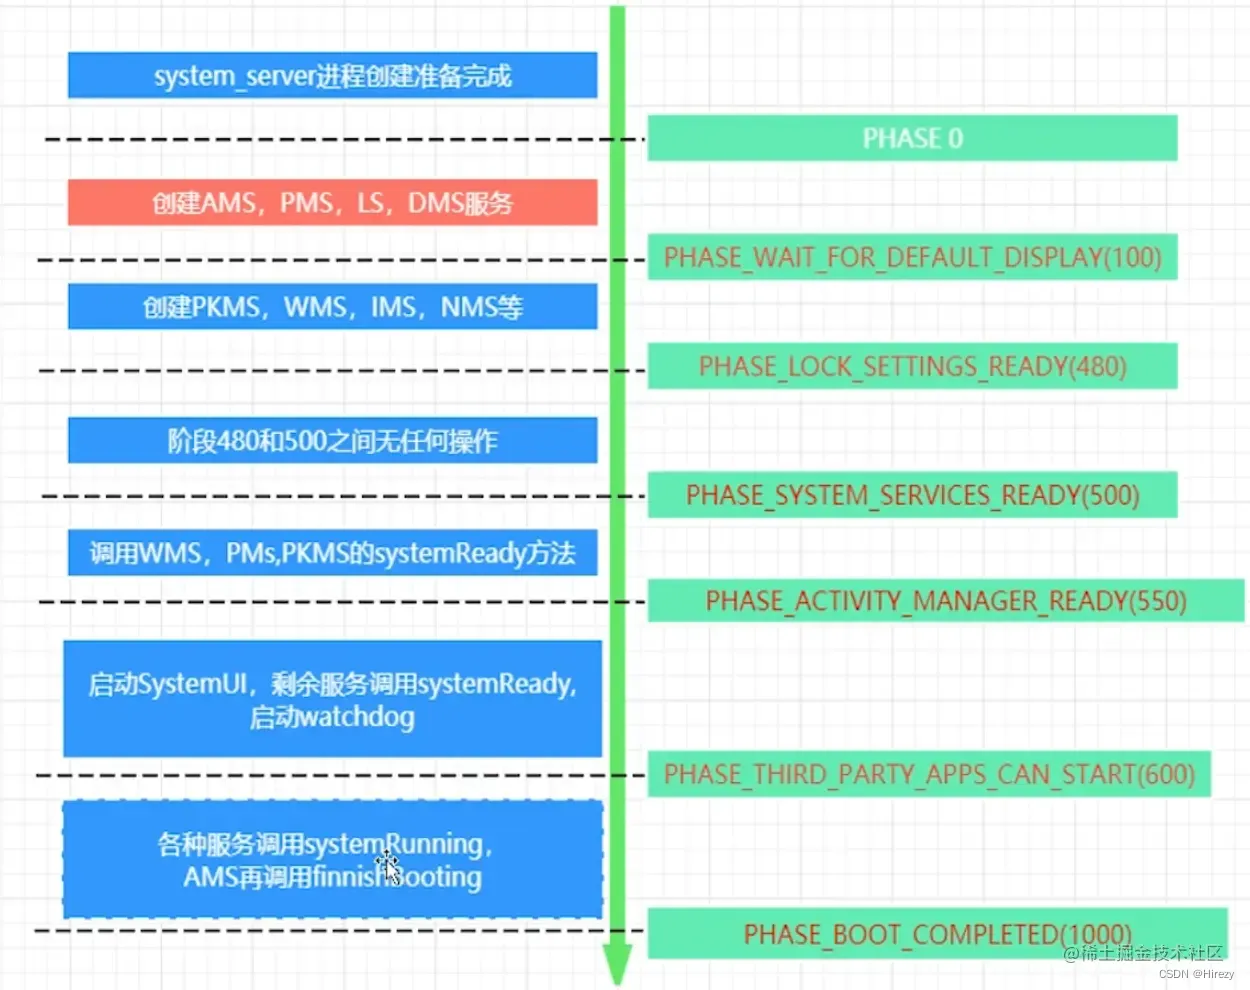
SystemServer会创建消息Looper,加载库文件,并创建系统的Context。然后创建和启动各种系统服务:
- 引导服务:Installer、AMS、PMS等
- 核心服务:DropBoxManagerService、BatteryService等
- 其他服务:CameraService、WMS等
以PowerStatsService为例,通过SystemServiceManager的startService方法启动:mSystemServiceManager.startService(PowerStatsService.class);
SystemServiceManager:Manages creating, starting, and other lifecycle events of SystemService system services
   //SystemServiceManager.java
   private final ArrayList<SystemService> mServices = new ArrayList<SystemService>();

   public <T extends SystemService> T startService(Class<T> serviceClass) {
        try {
            final String name = serviceClass.getName();
            final T service;
            try {
                Constructor<T> constructor = serviceClass.getConstructor(Context.class);
                service = constructor.newInstance(mContext);
            } catch (InvocationTargetException ex) {
                throw new RuntimeException("Failed to create service " + name
                        + ": service constructor threw an exception", ex);
            }

            startService(service);
            return service;
        } finally {
            Trace.traceEnd(Trace.TRACE_TAG_SYSTEM_SERVER);
        }
    }

    public void startService(@NonNull final SystemService service) {
        // Register it.
        mServices.add(service);
        // Start it.
        long time = SystemClock.elapsedRealtime();
        try {
            service.onStart();
        } catch (RuntimeException ex) {
            throw new RuntimeException("Failed to start service " + service.getClass().getName()
                    + ": onStart threw an exception", ex);
        }
        warnIfTooLong(SystemClock.elapsedRealtime() - time, service, "onStart");
    }
- 1
- 2
- 3
- 4
- 5
- 6
- 7
- 8
- 9
- 10
- 11
- 12
- 13
- 14
- 15
- 16
- 17
- 18
- 19
- 20
- 21
- 22
- 23
- 24
- 25
- 26
- 27
- 28
- 29
- 30
- 31
- 32
- 33
- 34
- 35
- 36
通过创建service,然后将service添加到一个ArrayList中,这样就完成了注册工作。最后调用service的start方法启动。
SystemServer进程被创建后做了一下工作:
- 启动Binder线程池,用于和其他进程通讯;
- 创建SystemServerManager,用于系统服务的创建、启动和管理;
- 使用SystemServerManager启动各种服务。
负责拉起AMS等80多个服务
     try {
            traceBeginAndSlog("StartServices");
            startBootstrapServices();
            startCoreServices();
            startOtherServices();
            SystemServerInitThreadPool.shutdown();
        } catch (Throwable ex) {
            Slog.e("System", "******************************************");
            Slog.e("System", "************ Failure starting system services", ex);
            throw ex;
        } finally {
            traceEnd();
        }
- 1
- 2
- 3
- 4
- 5
- 6
- 7
- 8
- 9
- 10
- 11
- 12
- 13
- 14
finishBooting负责发送系统启动完成广播
为什么应用启动时要从zygote进程中fork: 若从init fork需要准备虚拟机,预加载类文件;若从system_server App进程不需要大量的服务(AMS WMS PMS等80多种服务)
Launcher启动
系统启动的最后一步是启动一个用来显示系统中已安装应用的应用程序——Launcher。通俗的讲,它就是Android的系统桌面,主要有以下两个特点:
- 作为Android系统的启动器,用于启动应用程序;
- 作为Android系统的桌面,用于显示和管理应用程序的快捷图标或者其他桌面组件。
在SystemServer启动过程中,由它启动的Ams(ActivityManagerService.)会将Launcher启动。Launcher的启动入口在SystemServer的startOtherServices方法中:
//SystemServer.java
// We now tell the activity manager it is okay to run third party
// code.  It will call back into us once it has gotten to the state
// where third party code can really run (but before it has actually
// started launching the initial applications), for us to complete our
// initialization.
 mActivityManagerService.systemReady(() -> {
      mSystemServiceManager.startBootPhase(t, SystemService.PHASE_ACTIVITY_MANAGER_READY);
    }

);
- 1
- 2
- 3
- 4
- 5
- 6
- 7
- 8
- 9
- 10
- 11
根据官方注释,我们可以看出,在这里系统服务已经就绪,到这里系统就算启动完成,可以跑第三方的代码了。此时,会调用AMS的systemReady方法,让AMS去启动Launcher。下面是ActivityManagerService.java中systemReady方法启动Launcher的关键代码:
public ActivityTaskManagerInternal mAtmInternal;

public void systemReady(final Runnable goingCallback, TimingsTraceLog traceLog) {
	 synchronized (this) {
	 	mAtmInternal.startHomeOnAllDisplays(currentUserId, "systemReady");
	 }
}
- 1
- 2
- 3
- 4
- 5
- 6
- 7
其中,mAtmInternal 的具体实现是:ActivityTaskManagerService.LocalService。是在ActivityTaskManagerService里的一个内部类。ActivityTaskManagerService.LocalService.startHomeOnAllDisplays代码如下:
@Override
public boolean startHomeOnAllDisplays(int userId, String reason) {
    synchronized (mGlobalLock) {
        return mRootActivityContainer.startHomeOnAllDisplays(userId, reason);
    }
}
- 1
- 2
- 3
- 4
- 5
- 6
RootActivityContainer.startHomeOnAllDisplays的代码如下:
boolean startHomeOnAllDisplays(int userId, String reason) {
	 boolean homeStarted = false;
	 // 由于Android系统支持多用户和多显示,调用startHomeOnAllDisplays启动每个display上的Home Activity
        for (int i = mActivityDisplays.size() - 1; i >= 0; i--) {
            final int displayId = mActivityDisplays.get(i).mDisplayId;
            homeStarted |= startHomeOnDisplay(userId, reason, displayId);
        }
        return homeStarted;
}
- 1
- 2
- 3
- 4
- 5
- 6
- 7
- 8
- 9
继续追踪startHomeOnDisplay方法:
boolean startHomeOnDisplay(int userId, String reason, int displayId) {
    return startHomeOnDisplay(userId, reason, displayId, false /* allowInstrumenting */,
        false /* fromHomeKey */);
}


boolean startHomeOnDisplay(int userId, String reason, int displayId, boolean allowInstrumenting,
            boolean fromHomeKey) {

        if (displayId == INVALID_DISPLAY) {
            displayId = getTopDisplayFocusedStack().mDisplayId;
        }

        Intent homeIntent = null;
        ActivityInfo aInfo = null;
        if (displayId == DEFAULT_DISPLAY) {
        	//第一步:获取Intent
        	//这里的mService就是ActivityTaskManagerService
            homeIntent = mService.getHomeIntent();
            aInfo = resolveHomeActivity(userId, homeIntent);
        } else if (shouldPlaceSecondaryHomeOnDisplay(displayId)) {
            Pair<ActivityInfo, Intent> info = resolveSecondaryHomeActivity(userId, displayId);
            aInfo = info.first;
            homeIntent = info.second;
        }
        if (aInfo == null || homeIntent == null) {
            return false;
        }

        if (!canStartHomeOnDisplay(aInfo, displayId, allowInstrumenting)) {
            return false;
        }
        homeIntent.setComponent(new ComponentName(aInfo.applicationInfo.packageName, aInfo.name));
        homeIntent.setFlags(homeIntent.getFlags() | FLAG_ACTIVITY_NEW_TASK);
        if (fromHomeKey) {
            homeIntent.putExtra(WindowManagerPolicy.EXTRA_FROM_HOME_KEY, true);
        }

        final String myReason = reason + ":" + userId + ":" + UserHandle.getUserId(
                aInfo.applicationInfo.uid) + ":" + displayId;
         //  第二步:启动
        mService.getActivityStartController().startHomeActivity(homeIntent, aInfo, myReason,
                displayId);
        return true;
}
- 1
- 2
- 3
- 4
- 5
- 6
- 7
- 8
- 9
- 10
- 11
- 12
- 13
- 14
- 15
- 16
- 17
- 18
- 19
- 20
- 21
- 22
- 23
- 24
- 25
- 26
- 27
- 28
- 29
- 30
- 31
- 32
- 33
- 34
- 35
- 36
- 37
- 38
- 39
- 40
- 41
- 42
- 43
- 44
- 45
- 46
- 47
其中,第一步获取Intent的getHomeIntent方法在ActivityTaskManagerService中,代码如下:就是给Intent添加了Intent.CATEGORY_HOME属性
String mTopAction = Intent.ACTION_MAIN;

Intent getHomeIntent() {
    Intent intent = new Intent(mTopAction, mTopData != null ? Uri.parse(mTopData) : null);
        intent.setComponent(mTopComponent);
        intent.addFlags(Intent.FLAG_DEBUG_TRIAGED_MISSING);
        if (mFactoryTest != FactoryTest.FACTORY_TEST_LOW_LEVEL) {
        	//返回一个Category为Intent.CATEGORY_HOME的Intent
            intent.addCategory(Intent.CATEGORY_HOME);
        }
        return intent;
 }
- 1
- 2
- 3
- 4
- 5
- 6
- 7
- 8
- 9
- 10
- 11
- 12
接下来第二步,startHomeActivity方法在ActivityStartController中,关键代码入下:
void startHomeActivity(Intent intent, ActivityInfo aInfo, String reason, int displayId) {
        final ActivityOptions options = ActivityOptions.makeBasic();
        options.setLaunchWindowingMode(WINDOWING_MODE_FULLSCREEN);
        if (!ActivityRecord.isResolverActivity(aInfo.name)) {
            options.setLaunchActivityType(ACTIVITY_TYPE_HOME);
        }
        options.setLaunchDisplayId(displayId);
        mLastHomeActivityStartResult = obtainStarter(intent, "startHomeActivity: " + reason)
                .setOutActivity(tmpOutRecord)
                .setCallingUid(0)
                .setActivityInfo(aInfo)
                .setActivityOptions(options.toBundle())
                .execute();//启动
}
- 1
- 2
- 3
- 4
- 5
- 6
- 7
- 8
- 9
- 10
- 11
- 12
- 13
- 14
- 15
其中,最后的execute最终是执行的ActivityStarter的execute代码:
 /**
     * Starts an activity based on the request parameters provided earlier.
     * @return The starter result.
     */
    int execute() {
        try {
            // TODO(b/64750076): Look into passing request directly to these methods to allow
            // for transactional diffs and preprocessing.
            if (mRequest.mayWait) {
                return startActivityMayWait(mRequest.caller, mRequest.callingUid,
                        mRequest.callingPackage, mRequest.realCallingPid, mRequest.realCallingUid,
                        mRequest.intent, mRequest.resolvedType,
                        mRequest.voiceSession, mRequest.voiceInteractor, mRequest.resultTo,
                        mRequest.resultWho, mRequest.requestCode, mRequest.startFlags,
                        mRequest.profilerInfo, mRequest.waitResult, mRequest.globalConfig,
                        mRequest.activityOptions, mRequest.ignoreTargetSecurity, mRequest.userId,
                        mRequest.inTask, mRequest.reason,
                        mRequest.allowPendingRemoteAnimationRegistryLookup,
                        mRequest.originatingPendingIntent, mRequest.allowBackgroundActivityStart);
            } else {
                return startActivity(mRequest.caller, mRequest.intent, mRequest.ephemeralIntent,
                        mRequest.resolvedType, mRequest.activityInfo, mRequest.resolveInfo,
                        mRequest.voiceSession, mRequest.voiceInteractor, mRequest.resultTo,
                        mRequest.resultWho, mRequest.requestCode, mRequest.callingPid,
                        mRequest.callingUid, mRequest.callingPackage, mRequest.realCallingPid,
                        mRequest.realCallingUid, mRequest.startFlags, mRequest.activityOptions,
                        mRequest.ignoreTargetSecurity, mRequest.componentSpecified,
                        mRequest.outActivity, mRequest.inTask, mRequest.reason,
                        mRequest.allowPendingRemoteAnimationRegistryLookup,
                        mRequest.originatingPendingIntent, mRequest.allowBackgroundActivityStart);
            }
        } finally {
            onExecutionComplete();
        }
    }
- 1
- 2
- 3
- 4
- 5
- 6
- 7
- 8
- 9
- 10
- 11
- 12
- 13
- 14
- 15
- 16
- 17
- 18
- 19
- 20
- 21
- 22
- 23
- 24
- 25
- 26
- 27
- 28
- 29
- 30
- 31
- 32
- 33
- 34
- 35
其中,startActivity有三个的重载方法,经过不断的调用,最后会调用:startActivity(final ActivityRecord r, ActivityRecord sourceRecord, IVoiceInteractionSession voiceSession, IVoiceInteractor voiceInteractor, int startFlags, boolean doResume, ActivityOptions options, TaskRecord inTask, ActivityRecord[] outActivity, boolean restrictedBgActivity) 方法:
 private int startActivity(final ActivityRecord r, ActivityRecord sourceRecord,
                IVoiceInteractionSession voiceSession, IVoiceInteractor voiceInteractor,
                int startFlags, boolean doResume, ActivityOptions options, TaskRecord inTask,
                ActivityRecord[] outActivity, boolean restrictedBgActivity) {
     try {
         mService.mWindowManager.deferSurfaceLayout();
            result = startActivityUnchecked(r, sourceRecord, voiceSession, voiceInteractor,
                    startFlags, doResume, options, inTask, outActivity, restrictedBgActivity);
     }
 }
- 1
- 2
- 3
- 4
- 5
- 6
- 7
- 8
- 9
- 10
大致的流程图如下:

接下来就是Launcher进程和Activity的创建了,这个过程和普通的应用启动就没什么区别了,详情查看Android Activity的创建流程。
![Android Termux安装MySQL,并使用cpolar实现公网安全远程连接[内网穿透]](https://img-blog.csdnimg.cn/fabd1c92d58f4f5b8946e9b8f6b49f50.jpeg?x-oss-process=image/resize,m_fixed,h_300,image/format,png)


