
- 1c++ 全局数组_c++ 怎么使数组全局化
- 2比较稳妥的荣品 rk3399刷机,顺便解决无法进入刷入系统问题以及短接针脚刷机麻烦的问题
- 3python转换八进制用取余数方法_python 二、八、十六进制之间的快速转换
- 4多少并发量算高并发_高并发解决方案之秒杀
- 5Django实现接口自动化平台(十四)测试用例模块Testcases序列化器及视图【持续更新中】_python django自动化测试平台源码
- 6斯坦福 Stats60:21 世纪的统计学:第十五章到第十八章
- 7VMware虚拟机和主机之间无法复制粘贴,移动文件,重新安装vmware-tools变灰,VMware Tools继续运行脚本未能在虚拟机中成功运行。_vmware无法复制到主机
- 8基于GPT-4的 IDEA 神仙插件,亲测可用!
- 9【debug】error: subprocess-exited-with-error
- 10MyBatis-Plus QueryWapper 满足多个条件Or另一个条件_querywrapper 多个条件or匹配
KubeSphere 接入外部 Elasticsearch 最佳实践_kubesphere 外置es
赞
踩
作者:张坚,科大讯飞开发工程师,云原生爱好者。
大家好,我是张坚。今天来聊聊如何在 KubeSphere 中集成外置的 ES 组件。
KubeSphere 在安装完成时候可以启用日志组件,这样会安装 ES 组件并可以收集所有部署组件的日志,也可以收集审计日志,然后可以很方便的在 KubeSphere 平台上进行日志查询。
但是在实际使用过程中发现使用 KubeSphere 自身的 ES 会很重,而且官方也建议我们将日志接入到外部的 ES 中减轻 Kubernetes 的压力。
以下为操作实战。
前置步骤
ES 集群需支持 http 协议
1️⃣ 搭建好外部 ES 集群,使用 http 协议(非本文重点)。
测试环境 IP: 172.30.10.226,172.30.10.191,172.30.10.184
port: 9200
username: elastic
password: changeme
2️⃣ 对 ES 做负载均衡。
有三种常见的做法:
- 使用 nginx 做负载均衡;
- 单协调节点;
- 通过自定义 service 和 endpoints 负载均衡。
本文档基于第三种负载均衡方案(通过 endpoints 负载)做对接。
备份 ks-installer
管理员账号登录 KubeSphere,在平台管理 - 集群管理 - CRD 中搜索 clusterconfiguration,在自定义资源中,点击 ks-installer 选择编辑 YAML ,复制备份。
关闭内部 ES 对接外部 ES(如果未开启日志则省略)
集群开启了内部 Elasticsearch,会存在如下系统组件和日志接收器
1️⃣ 系统组件:

2️⃣ 日志接收器:
容器日志、资源事件、审计日志(不开启不会有日志接收器)
接收器地址为内部 Elasticsearch 地址:elasticsearch-logging-data.kubesphere-logging-system.svc:9200
关闭内部 ES 并卸载日志相关可插拔组件
执行命令编辑 ks-installer:
$ kubectl edit cc ks-installer -n kubesphere-system1️⃣ 卸载日志系统,将 ks-installer 参数的 logging.enabled 字段的值从 true 改为 false。
2️⃣ 卸载事件日志系统,将 ks-installer 参数的 events.enabled 字段的值从 true 改为 false。
3️⃣ 卸载审计日志系统,将 ks-installer 参数的 auditing.enabled 字段的值从 true 改为 false。
4️⃣ 配置文件的最后,删除如下内容:
 es:
    enabledTime: 2022-08-16T10:33:18CST
    status: enabled
  events:
    enabledTime: 2022-04-15T16:22:59CST
    status: enabled
  fluentbit:
    enabledTime: 2022-04-15T16:19:46CST
    status: enabled
  logging:
    enabledTime: 2022-04-15T16:22:59CST
status: enabled- 1
- 2
- 3
- 4
- 5
- 6
- 7
- 8
- 9
- 10
- 11
执行命令检查安装过程:
$ kubectl logs -n kubesphere-system $(kubectl get pod -n kubesphere-system -l app=ks-install -o jsonpath='{.items[0].metadata.name}') -f#日志出现以下内容说明重启成功 Collecting installation results ... ##################################################### ### Welcome to KubeSphere! ### ##################################################### Console: http://172.30.9.xxx:30880 Account: admin Password: P@88w0rd NOTES: 1. After you log into the console, please check the monitoring status of service components in "Cluster Management". If any service is not ready, please wait patiently until all components are up and running. 2. Please change the default password after login. ##################################################### https://kubesphere.io 2022-08-04 15:53:14 #####################################################

- 1
- 2
- 3
- 4
- 5
- 6
- 7
- 8
- 9
- 10
- 11
- 12
- 13
- 14
- 15
- 16
- 17
- 18
- 19
- 20
- 21
执行命令卸载相关可插拔组件:
 ###### 卸载 KubeSphere 日志系统
 $ kubectl delete inputs.logging.kubesphere.io -n kubesphere-logging-system tail

 ###### 卸载 KubeSphere 事件系统
 $ helm delete ks-events -n kubesphere-logging-system

 ###### 卸载 KubeSphere 审计
 $ helm uninstall kube-auditing -n kubesphere-logging-system

 $ kubectl delete crd rules.auditing.kubesphere.io

 $ kubectl delete crd webhooks.auditing.kubesphere.io

 ###### 卸载包括 Elasticsearch 的日志系统
 $ kubectl delete crd fluentbitconfigs.logging.kubesphere.io

 $ kubectl delete crd fluentbits.logging.kubesphere.io

 $ kubectl delete crd inputs.logging.kubesphere.io

 $ kubectl delete crd outputs.logging.kubesphere.io

 $ kubectl delete crd parsers.logging.kubesphere.io

 $ kubectl delete deployments.apps -n kubesphere-logging-system fluentbit-operator

 $ helm uninstall elasticsearch-logging --namespace kubesphere-logging-system

 $ kubectl delete deployment logsidecar-injector-deploy -n kubesphere-logging-system

 $ kubectl delete ns kubesphere-logging-system
- 1
- 2
- 3
- 4
- 5
- 6
- 7
- 8
- 9
- 10
- 11
- 12
- 13
- 14
- 15
- 16
- 17
- 18
- 19
- 20
- 21
- 22
- 23
- 24
- 25
- 26
- 27
- 28
- 29
- 30
卸载过程中可能出现如下异常:
crd 资源删除时出现问题,尝试使用如下命令
$ kubectl patch crd/crd名称 -p '{"metadata":{"finalizers":[]}}' --type=merge创建 namespace
$ kubectl create ns kubesphere-logging-system自定义 service 负载均衡 ES 节点
es-service.yaml
apiVersion: v1
kind: Service
metadata:
  labels:
    app: es-service
  name: es-service
  namespace: kubesphere-logging-system
spec:
  ports:
  - port: 9200
    name: es
    protocol: TCP
targetPort: 9200- 1
- 2
- 3
- 4
- 5
- 6
- 7
- 8
- 9
- 10
- 11
- 12
es-endpoints.yaml
ip 地址修改为真实要对接的 ES 集群节点的 IP 地址。
apiVersion: v1
kind: Endpoints
metadata:
  labels:
    app: es-service
  name: es-service
  namespace: kubesphere-logging-system
subsets:
- addresses:
  - ip: 172.30.10.***
  - ip: 172.30.10.***
  - ip: 172.30.10.***
  ports:
  - port: 9200
    name: es
    protocol: TCP
- 1
- 2
- 3
- 4
- 5
- 6
- 7
- 8
- 9
- 10
- 11
- 12
- 13
- 14
- 15
执行命令创建自定义 SVC:
$ kubectl apply -f es-service.yaml -n kubesphere-logging-system
$ kubectl apply -f es-endpoints.yaml -n kubesphere-logging-system

#查看svc
$ kubectl get svc -n kubesphere-logging-system
NAME                              TYPE        CLUSTER-IP       EXTERNAL-IP   PORT(S)    AGE
es-service                        ClusterIP   109.233.8.178    <none>        9200/TCP   10d
#查看endpoints
$ kubectl get ep -n kubesphere-logging-system
NAME ENDPOINTS AGE es-service 172.30.10.***:9200,172.30.10.***:9200,172.30.10.***:9200 10d- 1
- 2
- 3
- 4
- 5
- 6
- 7
- 8
- 9
“平台管理-集群管理-应用负载-服务”搜索 es-service。

es-service 服务地址:es-service.kubesphere-logging-system.svc。
开启日志并对接外部 ES
在平台管理 - 集群管理 - CRD 中搜索 clusterconfiguration,在自定义资源中,点击 ks-installer,修改配置:
开启容器日志、审计日志分别修改
logging.enabled: true
auditing.enabled: true
修改外部 ES 配置
es.basicAuth.enabled: true
es.basicAuth.password
es.basicAuth.username
es.externalElasticsearchUrl
es.externalElasticsearchPort
修改日志保存日期(默认 7 天)
logMaxAge
修改日志索引前缀(默认 logstash)
elkPrefix(开发:dev,测试:sit,生产:prod)
apiVersion: installer.kubesphere.io/v1alpha1
kind: ClusterConfiguration
metadata:
  labels:
    version: v3.2.1
  name: ks-installer
  namespace: kubesphere-system
spec:
  alerting:
    enabled: false
  auditing:
    enabled: true            # false改为true
  ...
    es:
      basicAuth:
        enabled: true          # false改为true
        password: '****'       # 密码
        username: '****'       # 用户名
      data:
        volumeSize: 20Gi
      elkPrefix: sit           #开发:dev 测试:sit 生产:prod
      externalElasticsearchPort: '9200' # 端口
      externalElasticsearchUrl: es-service.kubesphere-logging-system.svc # 修改es-service
      logMaxAge: 7             #默认7天即可
      master:
        volumeSize: 4Gi
    ...
- 1
- 2
- 3
- 4
- 5
- 6
- 7
- 8
- 9
- 10
- 11
- 12
- 13
- 14
- 15
- 16
- 17
- 18
- 19
- 20
- 21
- 22
- 23
- 24
- 25
- 26
执行命令检查安装过程
$ kubectl logs -n kubesphere-system $(kubectl get pod -n kubesphere-system -l app=ks-install -o jsonpath='{.items[0].metadata.name}') -f

#日志出现以下内容说明重启成功

Collecting installation results ...
#####################################################
###              Welcome to KubeSphere!           ###
#####################################################

Console: http://172.30.9.xxx:30880
Account: admin
Password: P@88w0rd

NOTES:
  1. After you log into the console, please check the
     monitoring status of service components in
     "Cluster Management". If any service is not
     ready, please wait patiently until all components
     are up and running.
  2. Please change the default password after login.

#####################################################
https://kubesphere.io             2022-08-04 15:53:14
#####################################################
- 1
- 2
- 3
- 4
- 5
- 6
- 7
- 8
- 9
- 10
- 11
- 12
- 13
- 14
- 15
- 16
- 17
- 18
- 19
- 20
- 21
- 22
- 23
执行命令,查看对应的 ConfigMap 配置:
$ kubectl get configmap kubesphere-config -n kubesphere-system -o yaml #重点如下,看es的配置是否已经生效,host是否为自定义SVC,以及用户名密码索引是否正确
logging:
host: http://es-service.kubesphere-logging-system.svc:9200
basicAuth: True
username: "****" #此处为你填写的正确用户名
password: "****" #此处为你填写的正确密码
indexPrefix: ks-sit-log #不同环境对应dev\sit\prod
auditing:
enable: true
webhookURL: https://kube-auditing-webhook-svc.kubesphere-logging-system.svc:6443/audit/webhook/event
host: http://es-service.kubesphere-logging-system.svc:9200
basicAuth: True
username: "****" #此处为你填写的正确用户名
password: "****" #此处为你填写的正确密码
indexPrefix: ks-sit-auditing #不同环境对应dev\sit\prod- 1
- 2
- 3
- 4
- 5
- 6
- 7
- 8
- 9
- 10
- 11
- 12
- 13
- 14
执行命令编辑对应 output(如果已自动修改则不需要手动修改):
修改 host
修改索引 (开发、测试、生产前缀分别对应 ks-dev-、ks-sit-、ks-prod-)
#修改es的output
$ kubectl edit output es -n kubesphere-logging-system
#修改host 和 logstashPrefix
# host: es-service.kubesphere-logging-system.svc
# logstashPrefix: ks-对应环境-log
#如下:
spec:
  es:
    generateID: true
    host: es-service.kubesphere-logging-system.svc  # host地址
    httpPassword:
      valueFrom:
        secretKeyRef:
          key: password
          name: elasticsearch-credentials
    httpUser:
      valueFrom:
        secretKeyRef:
          key: username
          name: elasticsearch-credentials
    logstashFormat: true
    logstashPrefix: ks-sit-log  # 修改此处为对应环境的日志索引
    port: 9200
    timeKey: '@timestamp'
  matchRegex: '(?:kube|service)\.(.*)'


#修改es-auditing的output
$ kubectl edit output es-auditing -n kubesphere-logging-system
#修改host 和 logstashPrefix
# host: es-service.kubesphere-logging-system.svc
# logstashPrefix: ks-对应环境-auditing

#如下
spec:
  es:
    generateID: true
    host: es-service.kubesphere-logging-system.svc  # host地址
    httpPassword:
      valueFrom:
        secretKeyRef:
          key: password
          name: elasticsearch-credentials
    httpUser:
      valueFrom:
        secretKeyRef:
          key: username
          name: elasticsearch-credentials
    logstashFormat: true
    logstashPrefix: ks-sit-auditing   # 修改此处为对应环境的日志索引
    port: 9200
  match: kube_auditing
- 1
- 2
- 3
- 4
- 5
- 6
- 7
- 8
- 9
- 10
- 11
- 12
- 13
- 14
- 15
- 16
- 17
- 18
- 19
- 20
- 21
- 22
- 23
- 24
- 25
- 26
- 27
- 28
- 29
- 30
- 31
- 32
- 33
- 34
- 35
- 36
- 37
- 38
- 39
- 40
- 41
- 42
- 43
- 44
- 45
- 46
- 47
- 48
- 49
- 50
- 51
重启 ks-apiserver
$ kubectl rollout restart deployment ks-apiserver -n kubesphere-system验证
$ kubectl get po -n kubesphere-logging-system
NAME                                                              READY   STATUS      RESTARTS   AGE
elasticsearch-logging-curator-elasticsearch-curator-276864h2xt2   0/1     Error       0          38h
elasticsearch-logging-curator-elasticsearch-curator-276864wc6bs   0/1     Completed   0          38h
elasticsearch-logging-curator-elasticsearch-curator-276879865wl   0/1     Completed   0          14h
elasticsearch-logging-curator-elasticsearch-curator-276879l7xpf   0/1     Error       0          14h
fluent-bit-4vzq5                                                  1/1     Running     0          47h
fluent-bit-6ckvm                                                  1/1     Running     0          25h
fluent-bit-6jt8d                                                  1/1     Running     0          47h
fluent-bit-88crg                                                  1/1     Running     0          47h
fluent-bit-9ps6z                                                  1/1     Running     0          47h
fluent-bit-djhtx                                                  1/1     Running     0          47h
fluent-bit-dmpfv                                                  1/1     Running     0          47h
fluent-bit-dtr7z                                                  1/1     Running     0          47h
fluent-bit-flxbt                                                  1/1     Running     0          47h
fluent-bit-fnxdk                                                  1/1     Running     0          47h
fluent-bit-gqbrl                                                  1/1     Running     0          47h
fluent-bit-kbzsj                                                  1/1     Running     0          47h
fluent-bit-lbnnh                                                  1/1     Running     0          47h
fluent-bit-nq4g8                                                  1/1     Running     0          47h
fluent-bit-q5shz                                                  1/1     Running     0          47h
fluent-bit-qrb7v                                                  1/1     Running     0          47h
fluent-bit-r26fk                                                  1/1     Running     0          47h
fluent-bit-rfrpd                                                  1/1     Running     0          47h
fluent-bit-s8869                                                  1/1     Running     0          47h
fluent-bit-sp5k4                                                  1/1     Running     0          47h
fluent-bit-vjvhl                                                  1/1     Running     0          47h
fluent-bit-xkksv                                                  1/1     Running     0          47h
fluent-bit-xrlz4                                                  1/1     Running     0          47h
fluentbit-operator-745bf5559f-vnz8w                               1/1     Running     0          47h
kube-auditing-operator-84857bf967-ftbjr                           1/1     Running     0          47h
kube-auditing-webhook-deploy-64cfb8c9f8-hf8g8                     1/1     Running     0          47h
kube-auditing-webhook-deploy-64cfb8c9f8-zf4rd                     1/1     Running     0          47h
logsidecar-injector-deploy-5fb6fdc6dd-fj5vm                       2/2     Running     0          47h
logsidecar-injector-deploy-5fb6fdc6dd-qbhdg                       2/2     Running     0          47h
- 1
- 2
- 3
- 4
- 5
- 6
- 7
- 8
- 9
- 10
- 11
- 12
- 13
- 14
- 15
- 16
- 17
- 18
- 19
- 20
- 21
- 22
- 23
- 24
- 25
- 26
- 27
- 28
- 29
- 30
- 31
- 32
- 33
- 34
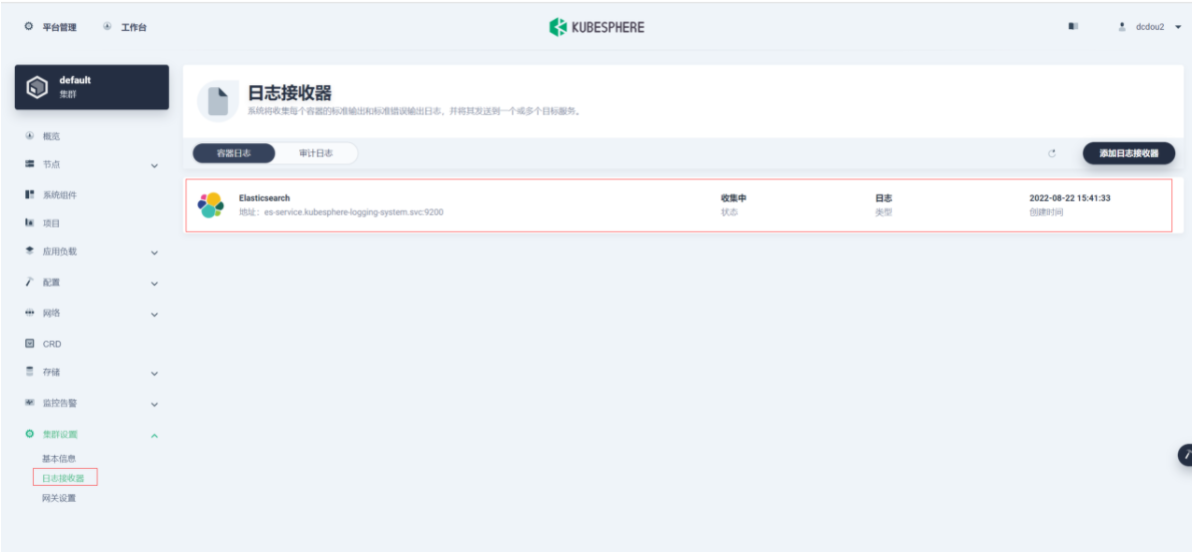
日志接收器:
查询审计日志:

本文由博客一文多发平台 OpenWrite 发布!


