
- 1rasterio介绍以及代码
- 2篇三:让OAuth2 server支持密码模式_oauth2authorizationgrantauthenticationtoken
- 3Django 自定义权限管理系统(通过中间件认证)_中间件对指定的文件配置权限认证
- 4Confluent kafka rest实战
- 5关于Gitee的安装与概述_gitee安装
- 6SF相关1111
- 7补: Codeforces Round #698 (Div. 2)_codeforces round #698 (div. 2) c
- 8基于微信小程序+SpringBoot的私家车位共享系统小程序(源码+文档+部署+讲解)
- 9Codeforces Round #828 (Div. 3) 题解(A-E2)_828 codeforces
- 10Mac 系统安装 PyCharm 并使用_mac安装pycharm
基于C51单片机设计的密码锁(附源代码)_单片机密码锁代码
赞
踩
这位正在读文章的朋友你好,这篇文章是本人的第二篇,希望较第一篇相比,能更严谨一点,切实地给你带来帮助。(如有不对的地方,欢迎您的指正)
本次项目用到的外设有C51芯片,SG90舵机,lcd1602液晶显示屏。
实验共用到了lcd1602(lcd1602.c)、舵机(Motor.c)、矩阵键盘(Maxtrixkey.c)文件的编写。如下图所示
![]()
先分别详细地介绍一下各模块的编程:
第一部分:矩阵键盘编程
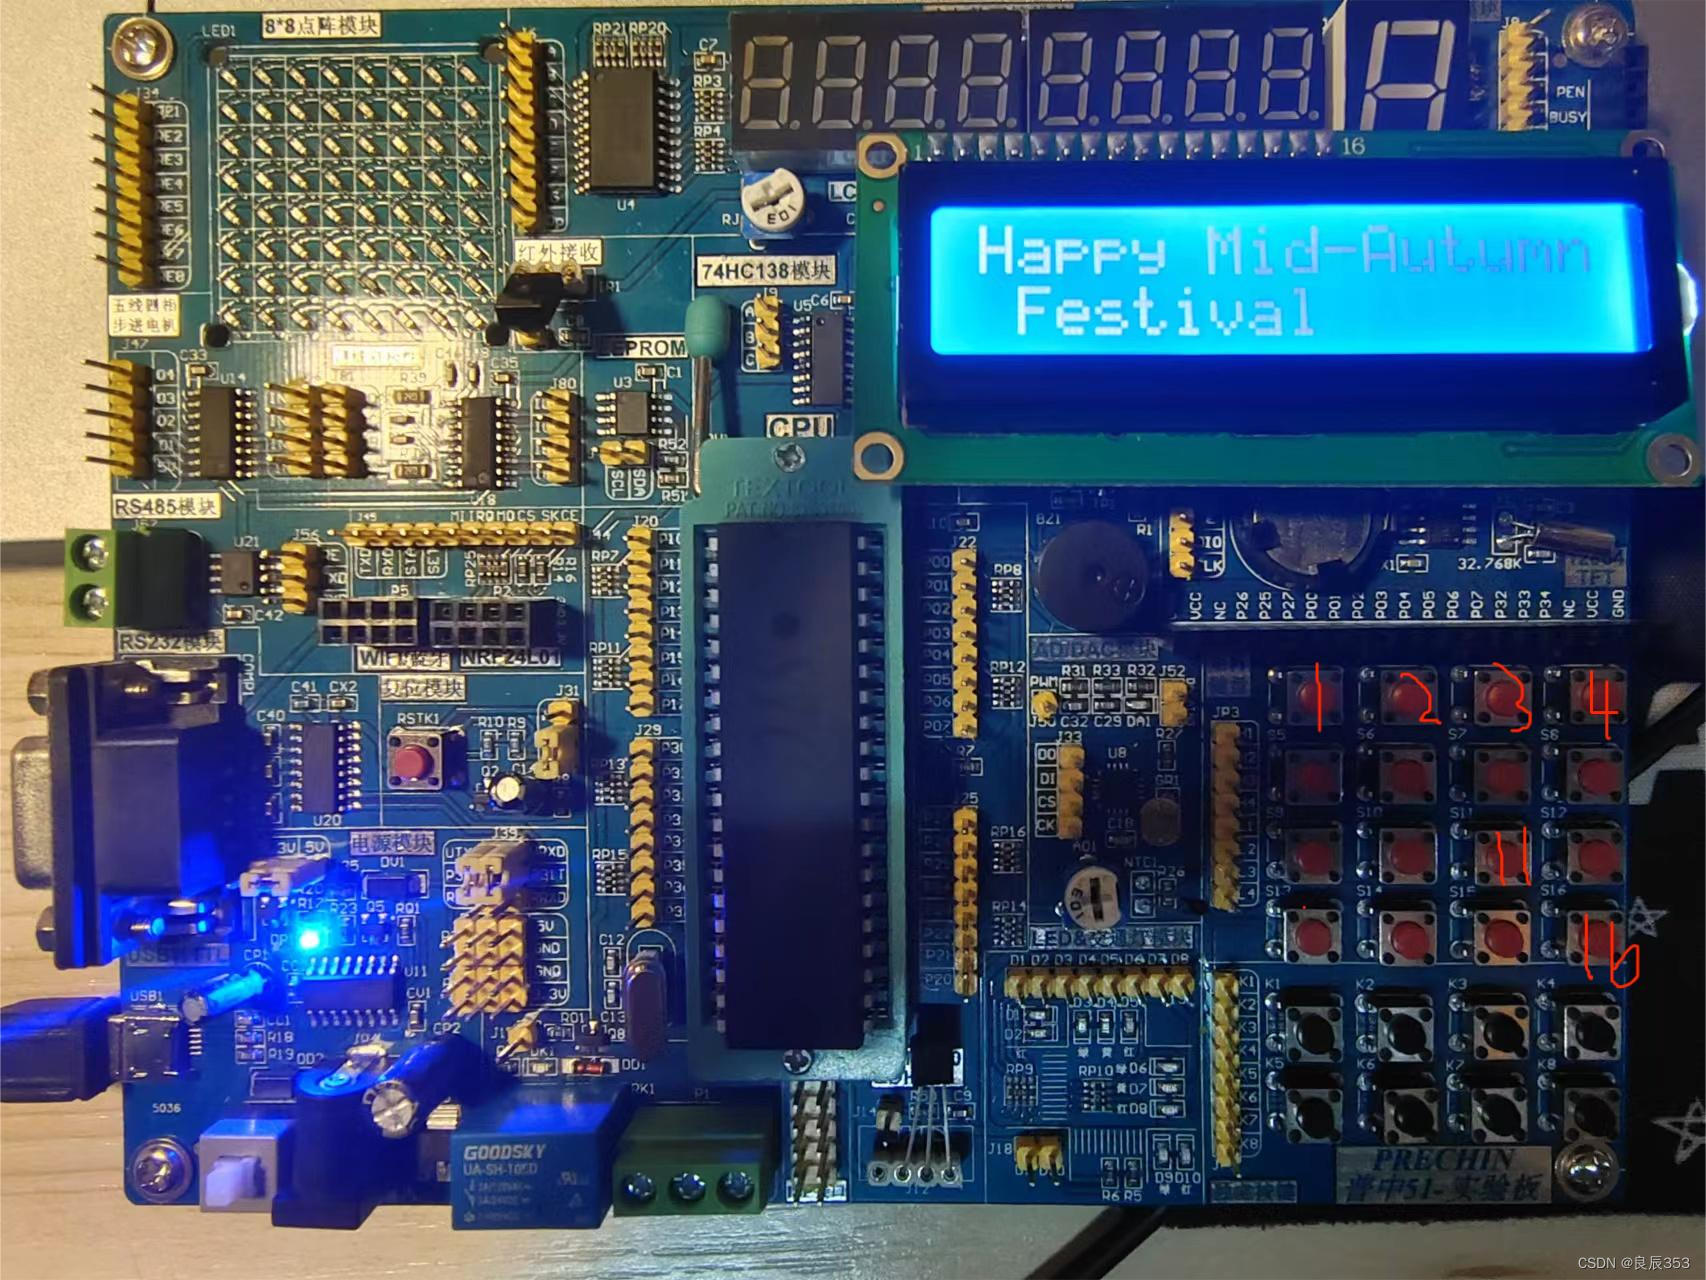
期望结果:按键从左上方到右下方分别代表着从数字1到数字16.(如图所示),其中数字11我们根据它比较接近9,将其在main函数中设计成确认键。
代码如下:
MaxtrixKey.c
- #include <REGX51.H>
- #include "Delay.h"
- unsigned char MaxtriKey()
- {
- unsigned char KeyNumber=0;
-
- P3=0xFF;//先把P1全部高电平
- P3_4=0;//把第一列置低
- if(P3_0==0){Delay(20);while(P3_0==0);Delay(20);KeyNumber=1;}
- if(P3_1==0){Delay(20);while(P3_1==0);Delay(20);KeyNumber=5;}
- if(P3_2==0){Delay(20);while(P3_2==0);Delay(20);KeyNumber=9;}
- if(P3_3==0){Delay(20);while(P3_3==0);Delay(20);KeyNumber=13;}
-
- P3=0xFF;//先把P1全部高电平
- P3_5=0;//把第二列置低
- if(P3_0==0){Delay(20);while(P3_0==0);Delay(20);KeyNumber=2;}
- if(P3_1==0){Delay(20);while(P3_1==0);Delay(20);KeyNumber=6;}
- if(P3_2==0){Delay(20);while(P3_2==0);Delay(20);KeyNumber=10;}
- if(P3_3==0){Delay(20);while(P3_3==0);Delay(20);KeyNumber=14;}
-
- P3=0xFF;//先把P1全部高电平
- P3_6=0;//把第三列置低
- if(P3_0==0){Delay(20);while(P3_0==0);Delay(20);KeyNumber=3;}
- if(P3_1==0){Delay(20);while(P3_1==0);Delay(20);KeyNumber=7;}
- if(P3_2==0){Delay(20);while(P3_2==0);Delay(20);KeyNumber=11;}
- if(P3_3==0){Delay(20);while(P3_3==0);Delay(20);KeyNumber=15;}
-
- P3=0xFF;//先把P1全部高电平
- P3_7=0;//把第四列置低
- if(P3_0==0){Delay(20);while(P3_0==0);Delay(20);KeyNumber=4;}
- if(P3_1==0){Delay(20);while(P3_1==0);Delay(20);KeyNumber=8;}
- if(P3_2==0){Delay(20);while(P3_2==0);Delay(20);KeyNumber=12;}
- if(P3_3==0){Delay(20);while(P3_3==0);Delay(20);KeyNumber=16;}
-
-
- return KeyNumber;
- }

MaxtrixKey.h
- #ifndef __MAXTRIXKEY_H__
- #define __MAXTRIXKEY_H__
- unsigned char MaxtriKey();
- #endif
.h文件就是简单定义一下.c中的函数,矩阵键盘C文件里只有这一个。
.c文件中矩阵键盘设计原理不加以赘述,我设计的接的是P3口,各位读者可以自由选择。
接下来是lcd1602的C文件,这个C文件的代码我是从网上找的,知道各函数的用途其实就足够了(对于我这样的业余选手 emm...),我在网上找的这个C文件里的函数挺多的,但最主要的用的是符号显示和数字显示函数。
lcd1602.c(直接用,也无伤大雅)
- #include <REGX51.H>
- //引脚配置:
- sbit LCD_RS=P2^6;
- sbit LCD_RW=P2^5;
- sbit LCD_EN=P2^7;
- #define LCD_DataPort P0
- //函数定义:
- /**
- * @brief LCD1602延时函数,12MHz调用可延时1ms
- * @param 无
- * @retval 无
- */
- void LCD_Delay()
- {
- unsigned char i, j;
-
- i = 2;
- j = 239;
- do
- {
- while (--j);
- } while (--i);
- }
-
- /**
- * @brief LCD1602写命令
- * @param Command 要写入的命令
- * @retval 无
- */
- void LCD_WriteCommand(unsigned char Command)
- {
- LCD_RS=0;
- LCD_RW=0;
- LCD_DataPort=Command;
- LCD_EN=1;
- LCD_Delay();
- LCD_EN=0;
- LCD_Delay();
- }
-
- /**
- * @brief LCD1602写数据
- * @param Data 要写入的数据
- * @retval 无
- */
- void LCD_WriteData(unsigned char Data)
- {
- LCD_RS=1;
- LCD_RW=0;
- LCD_DataPort=Data;
- LCD_EN=1;
- LCD_Delay();
- LCD_EN=0;
- LCD_Delay();
- }
-
- /**
- * @brief LCD1602设置光标位置
- * @param Line 行位置,范围:1~2
- * @param Column 列位置,范围:1~16
- * @retval 无
- */
- void LCD_SetCursor(unsigned char Line,unsigned char Column)
- {
- if(Line==1)
- {
- LCD_WriteCommand(0x80|(Column-1));
- }
- else if(Line==2)
- {
- LCD_WriteCommand(0x80|(Column-1+0x40));
- }
- }
-
- /**
- * @brief LCD1602初始化函数
- * @param 无
- * @retval 无
- */
- void LCD_Init()
- {
- LCD_WriteCommand(0x38);//八位数据接口,两行显示,5*7点阵
- LCD_WriteCommand(0x0c);//显示开,光标关,闪烁关
- LCD_WriteCommand(0x06);//数据读写操作后,光标自动加一,画面不动
- LCD_WriteCommand(0x01);//光标复位,清屏
- }
-
- /**
- * @brief 在LCD1602指定位置上显示一个字符
- * @param Line 行位置,范围:1~2
- * @param Column 列位置,范围:1~16
- * @param Char 要显示的字符
- * @retval 无
- */
- void LCD_ShowChar(unsigned char Line,unsigned char Column,char Char)
- {
- LCD_SetCursor(Line,Column);
- LCD_WriteData(Char);
- }
-
- /**
- * @brief 在LCD1602指定位置开始显示所给字符串
- * @param Line 起始行位置,范围:1~2
- * @param Column 起始列位置,范围:1~16
- * @param String 要显示的字符串
- * @retval 无
- */
- void LCD_ShowString(unsigned char Line,unsigned char Column,char *String)
- {
- unsigned char i;
- LCD_SetCursor(Line,Column);
- for(i=0;String[i]!='\0';i++)
- {
- LCD_WriteData(String[i]);
- }
- }
-
- /**
- * @brief 返回值=X的Y次方
- */
- int LCD_Pow(int X,int Y)
- {
- unsigned char i;
- int Result=1;
- for(i=0;i<Y;i++)
- {
- Result*=X;
- }
- return Result;
- }
-
- /**
- * @brief 在LCD1602指定位置开始显示所给数字
- * @param Line 起始行位置,范围:1~2
- * @param Column 起始列位置,范围:1~16
- * @param Number 要显示的数字,范围:0~65535
- * @param Length 要显示数字的长度,范围:1~5
- * @retval 无
- */
- void LCD_ShowNum(unsigned char Line,unsigned char Column,unsigned int Number,unsigned char Length)
- {
- unsigned char i;
- LCD_SetCursor(Line,Column);
- for(i=Length;i>0;i--)
- {
- LCD_WriteData(Number/LCD_Pow(10,i-1)%10+'0');
- }
- }
-
- /**
- * @brief 在LCD1602指定位置开始以有符号十进制显示所给数字
- * @param Line 起始行位置,范围:1~2
- * @param Column 起始列位置,范围:1~16
- * @param Number 要显示的数字,范围:-32768~32767
- * @param Length 要显示数字的长度,范围:1~5
- * @retval 无
- */
- void LCD_ShowSignedNum(unsigned char Line,unsigned char Column,int Number,unsigned char Length)
- {
- unsigned char i;
- unsigned int Number1;
- LCD_SetCursor(Line,Column);
- if(Number>=0)
- {
- LCD_WriteData('+');
- Number1=Number;
- }
- else
- {
- LCD_WriteData('-');
- Number1=-Number;
- }
- for(i=Length;i>0;i--)
- {
- LCD_WriteData(Number1/LCD_Pow(10,i-1)%10+'0');
- }
- }
-
- /**
- * @brief 在LCD1602指定位置开始以十六进制显示所给数字
- * @param Line 起始行位置,范围:1~2
- * @param Column 起始列位置,范围:1~16
- * @param Number 要显示的数字,范围:0~0xFFFF
- * @param Length 要显示数字的长度,范围:1~4
- * @retval 无
- */
- void LCD_ShowHexNum(unsigned char Line,unsigned char Column,unsigned int Number,unsigned char Length)
- {
- unsigned char i,SingleNumber;
- LCD_SetCursor(Line,Column);
- for(i=Length;i>0;i--)
- {
- SingleNumber=Number/LCD_Pow(16,i-1)%16;
- if(SingleNumber<10)
- {
- LCD_WriteData(SingleNumber+'0');
- }
- else
- {
- LCD_WriteData(SingleNumber-10+'A');
- }
- }
- }
-
- /**
- * @brief 在LCD1602指定位置开始以二进制显示所给数字
- * @param Line 起始行位置,范围:1~2
- * @param Column 起始列位置,范围:1~16
- * @param Number 要显示的数字,范围:0~1111 1111 1111 1111
- * @param Length 要显示数字的长度,范围:1~16
- * @retval 无
- */
- void LCD_ShowBinNum(unsigned char Line,unsigned char Column,unsigned int Number,unsigned char Length)
- {
- unsigned char i;
- LCD_SetCursor(Line,Column);
- for(i=Length;i>0;i--)
- {
- LCD_WriteData(Number/LCD_Pow(2,i-1)%2+'0');
- }
- }
lcd1602.h
- #ifndef __LCD1602_H__
- #define __LCD1602_H__
-
- //用户调用函数:
- void LCD_Init();
- void LCD_ShowChar(unsigned char Line,unsigned char Column,char Char);
- void LCD_ShowString(unsigned char Line,unsigned char Column,char *String);
- void LCD_ShowNum(unsigned char Line,unsigned char Column,unsigned int Number,unsigned char Length);
- void LCD_ShowSignedNum(unsigned char Line,unsigned char Column,int Number,unsigned char Length);
- void LCD_ShowHexNum(unsigned char Line,unsigned char Column,unsigned int Number,unsigned char Length);
- void LCD_ShowBinNum(unsigned char Line,unsigned char Column,unsigned int Number,unsigned char Length);
-
- #endif
-
接下来是SG90舵机部分,舵机工作原理如果不了解,建议找书看看,我这里解释的话,可能没这么严谨,所以我这里直接给出代码了。
Motor.c
- #include <REGX51.H>
- #include "Delay.h"
- #define MotorData P1
- unsigned char phasecw[4] ={0x08,0x04,0x02,0x01};
- unsigned char phaseccw[4]={0x01,0x02,0x04,0x08};
- void MotorCW(void)
- {
- unsigned int i;
- for(i=0;i<4;i++)
- {
- MotorData=phasecw[i];
- Delay(15);
- }
- }
- void MotorCCW(void)
- {
- unsigned int i;
- for(i=0;i<4;i++)
- {
- MotorData=phaseccw[i];
- Delay(15);
- }
- }
- void MotorStop(void)
- {
- MotorData=0x00;
- }
MotorCW是逆时针转动90度,MotorCCW是顺时针转动90度,分别代表着开门与关门。
Motor.h
- #ifndef __MOTOR_H__
- #define __MOTOR_H__
- void MotorCW(void);
- void MotorCCW(void);
- void MotorStop(void);
- #endif
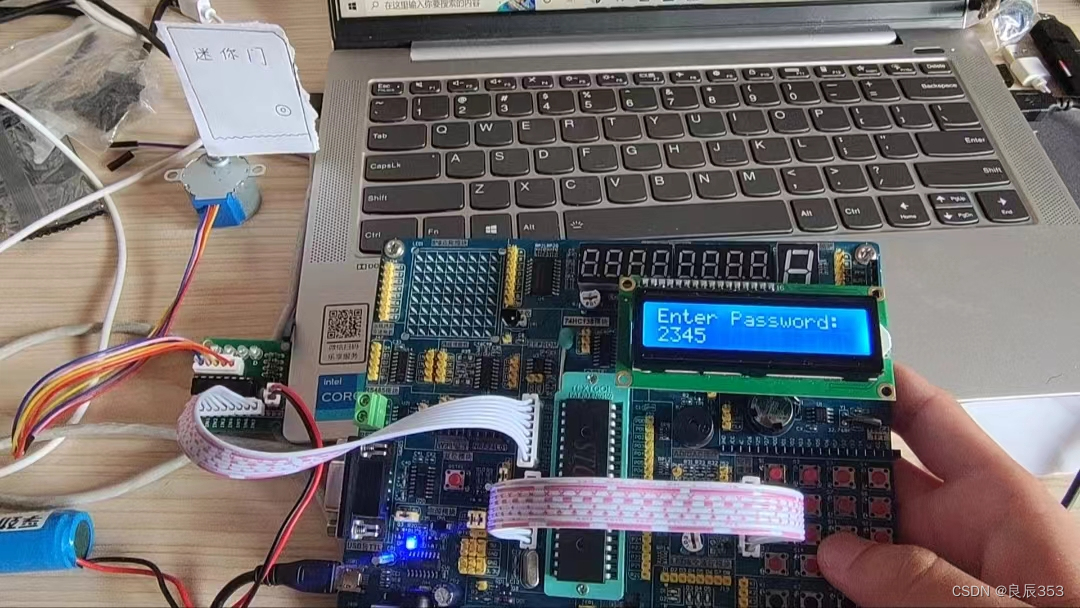
main.c(这里我设计的密码是2345,你随意* *)
- #include <REGX51.H>
- #include "lcd1602.h"
- #include "MaxtrixKey.h"
- #include "Delay.h"
- #include "Motor.h"
- unsigned char KeyNum;
- unsigned int Password;
- unsigned int Count=0;
- unsigned int k,m;
- void main()
- {
- LCD_Init();
- LCD_ShowString(1,1,"Password:");
- while(1)
- {
- KeyNum=MaxtriKey();
- if(KeyNum)
- {
- if(KeyNum<=10)//如果s1-s10按键按下 输入密码
- {
- if(Count<4)
- {
- Password*=10;
- Password+=KeyNum%10;//获取一位密码
- Count++;
- }
- LCD_ShowNum(2,1,Password,4);
- }
- if(KeyNum==11)//当确认键被按下
- {
- if(Password==2345)
- {
- LCD_Init();
- LCD_ShowString(1,1,"Welcome home!");
- Password=0;
- Count=0;
- Delay(1000);
- for(k=0;k<125;k++)
- {
- MotorCW();
- }
- LCD_Init();
- LCD_ShowString(1,1,"Will Be closed");
- LCD_ShowString(2,1,"5S later....");
- Delay(5000);
- for(m=0;m<125;m++)
- {
- MotorCCW();
- }
- LCD_Init();
- LCD_ShowString(1,1,"Password:");
- LCD_ShowNum(2,1,Password,4);
- }
- else
- {
- LCD_ShowString(1,14,"ERR");
- Delay(3000);
- LCD_Init();
- LCD_ShowString(1,1,"Try again?");
- Delay(3000);
- Password=0;
- Count=0;
- Delay(1000);
- LCD_Init();
- LCD_ShowString(1,1,"Enter Password:");
- LCD_ShowNum(2,1,Password,4);
- }
- }
- }
- }
- }
实验现象:
已上传到我 主页--->视频


![]()

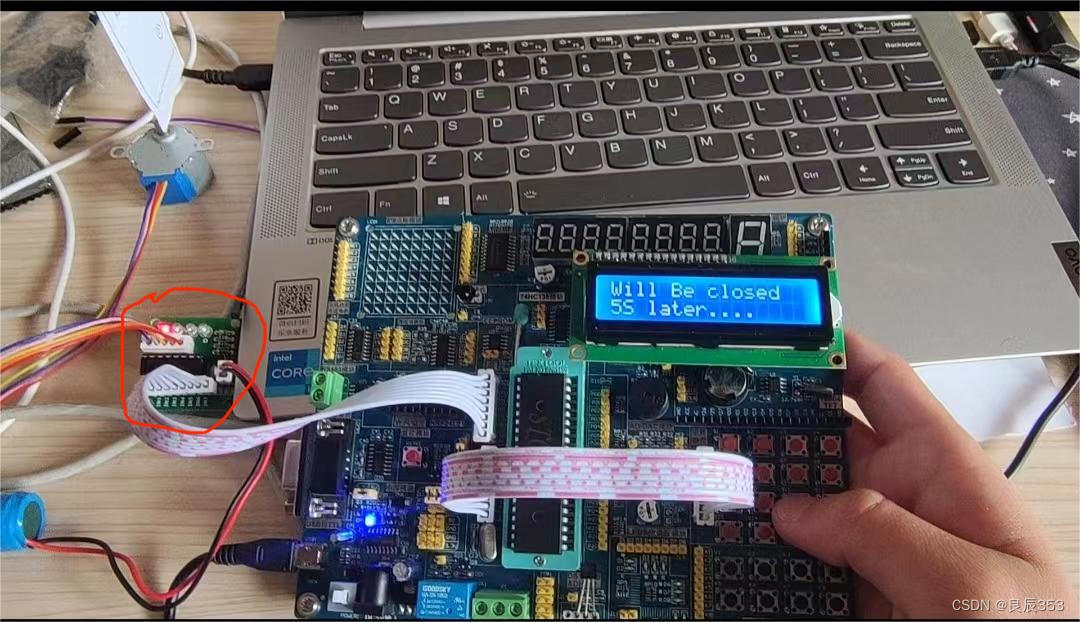
我红色圈住的这个东西,是SG90的驱动的芯片,一般情况下,这么大的学习板都是带的,我这个也带的,就在红圈的右边一点,当时买这个驱动芯片是想着把它固定在寝室门上做一个蓝牙控制寝室开关灯的。


