
热门标签
当前位置: article > 正文
Centos 局域网访问服务器 jupyter notebook 的设置方法_overwrite /home/admin/.jupyter/jupyter_notebook_co
作者:菜鸟追梦旅行 | 2024-03-15 23:00:49
赞
踩
overwrite /home/admin/.jupyter/jupyter_notebook_config.py with default confi
本篇教程,介绍如何设置服务器的Jupyter,并远程登陆, 就像rstudio-server一样的。
1, 安装jupyter notebook
这里推荐安装Anaconda
wget https://repo.anaconda.com/archive/Anaconda3-2018.12-Linux-x86_64.sh
bash Anaconda3-2018.12-Linux-x86_64.sh
- 1
- 2
安装好之后运行jupyter notebook, 不报错, 说明安装成功
jupyter notebook
[W 14:39:00.106 NotebookApp] .....
- 1
- 2
- 3
2, 配置文件
局域网登陆Jupyter notebook, 要有密码, 类似RStudio-server
2.1, 生成配置文件
jupyter notebook --generate-config
- 1
- 2
如果之前有配置文件, 你可以选择覆盖, 从新进行设置: 选择y
Overwrite /home/dengfei/.jupyter/jupyter_notebook_config.py with default config? [y/N]y
Writing default config to: /home/dengfei/.jupyter/jupyter_notebook_config.py
- 1
- 2
- 3
2.2, 编辑~/.jupyter/jupyter_notebook_config.py文件
vim ~/.jupyter/jupyter_notebook_config.py
- 1
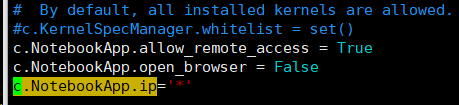
设置如下:
- 允许远程访问
- 不使用本地浏览器打开
- 允许所有IP访问
c.NotebookApp.allow_remote_access = True
c.NotebookApp.open_browser = False
c.NotebookApp.ip='*'
- 1
- 2
- 3
把上面三行追加到配置文件的末尾:
3, 生成密码
打开ipython
 from notebook.auth import passwd
 passwd()
- 1
- 2
输入notebook的密码即可.
4, 运行notebook命令, 查看是否可以登录
(base) [dengfei@localhost ~]$ jupyter notebook
[W 14:54:28.145 NotebookApp] WARNING: The notebook server is listening on all IP addresses and not using encryption. This is not recommended.
[I 14:54:28.147 NotebookApp] The port 8888 is already in use, trying another port.
[I 14:54:28.189 NotebookApp] JupyterLab extension loaded from /home/dengfei/anaconda3/lib/python3.6/site-packages/jupyterlab
[I 14:54:28.190 NotebookApp] JupyterLab application directory is /home/dengfei/anaconda3/share/jupyter/lab
[I 14:54:28.191 NotebookApp] Serving notebooks from local directory: /home/dengfei
[I 14:54:28.192 NotebookApp] The Jupyter Notebook is running at:
[I 14:54:28.192 NotebookApp] http://(localhost.localdomain or 127.0.0.1):8889/
[I 14:54:28.192 NotebookApp] Use Control-C to stop this server and shut down all kernels (twice to skip confirmation).
- 1
- 2
- 3
- 4
- 5
- 6
- 7
- 8
- 9
- 10
上面显示, 8888这个端口已经占用, 这里使用8889端口.
因为本地服务器的IP为: 192.168.3.44, 所以我使用
192.168.3.44:8889
- 1
进行访问
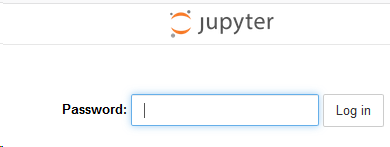
5, 输入上步设置的密码, 进行登录.
在哪一个路径打开的jupyter notebook, notebook中就显示当前路径

如果您对于数据分析,对于软件操作,对于数据整理,对于结果理解,有任何问题,欢迎联系我。

声明:本文内容由网友自发贡献,不代表【wpsshop博客】立场,版权归原作者所有,本站不承担相应法律责任。如您发现有侵权的内容,请联系我们。转载请注明出处:https://www.wpsshop.cn/w/菜鸟追梦旅行/article/detail/245220?site
推荐阅读
相关标签

