
- 1JavaScript 基础 二_document elementbyid 设置width
- 2学习 VS2010编程经典示例_vs教程编程实例详解
- 3多益网络2019秋招笔试题_多益笔试
- 4LVS Linux虚拟服务_lvs 回环
- 5spring boot项目打包加密_jar-protect
- 6Android获取NTP网络时间_android 获取ntp
- 7深度学习之基于YoloV5人体姿态摔倒识别分析报警系统_基于yolov5摔倒检测
- 8阿里P5-P7学习路线及薪资待遇
- 9【C++】AVL树/红黑树实现及map与set的封装
- 102024-06-01:用go语言,给定一个从0开始索引的整数数组 nums 、两个正整数 k 和 dist 。 数组的代价是该数组中的第一个元素。 问题要求将数组 nums 分割成 k 个连续且不重叠_数组中特殊等间距元素的和 题目描述:给定一个索引从 0 开始的整数类型数组 nums ,
SpringBoot+Vue项目实例开发及部署
赞
踩
目录
一、SpringBoot快速上手
1、SpringBoot介绍
- SpringBoot是由Pivotal团队提供的基于Spring的全新框架,旨在简化Spring应用的初始搭建和开发过程。
- SpringBoot是所有基于Spring开发项目的起点。
- SpringBoot就是尽可能地简化应用开发的门槛,让应用开发、测试、部署变得更加简单。
2、SpringBoot特点
- 遵循“约定优于配置”的原则,只需要很少的配置或使用默认的配置。
- 能够使用内嵌的Tomcat、Jetty服务器,不需要部署war文件。
- 提供定制化的启动器starter,简化Maven配置,开箱即用。
- 纯Java配置,没有代码生成,也不需要XML配置。
- 提供了生产级的服务监控方案,如安全监控、应用监控、健康检测等。
3、快速创建SpringBoot应用
- 利用IDEA的Spring Initializr创建SpringBoot项目
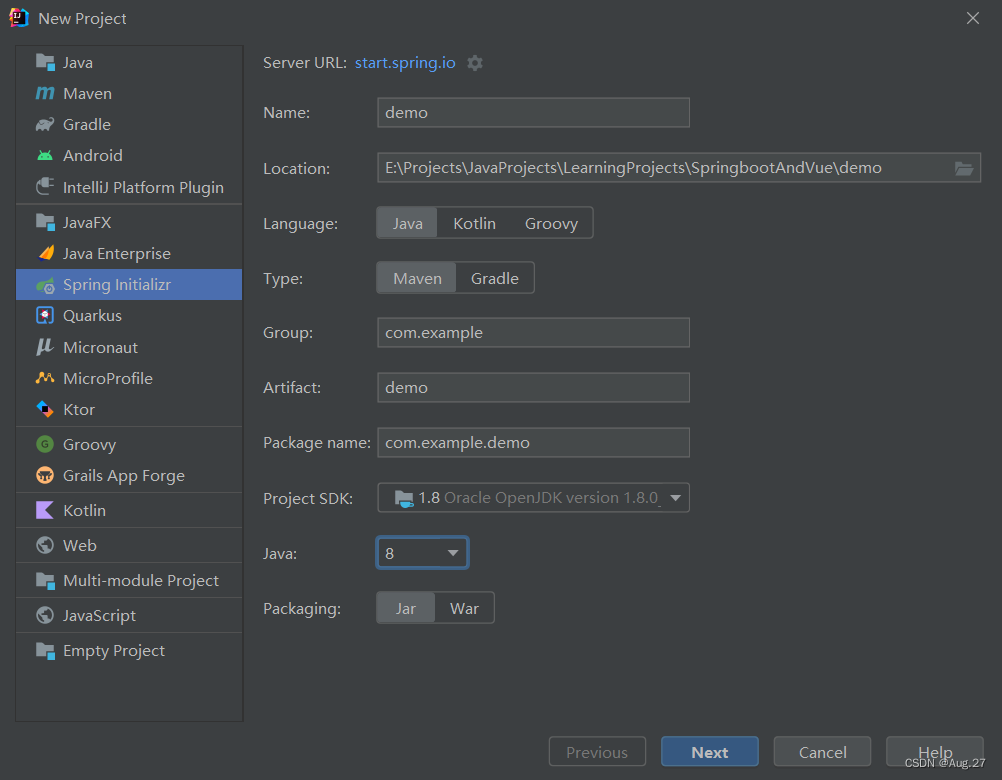
- 我们开发web项目,所以添加web依赖
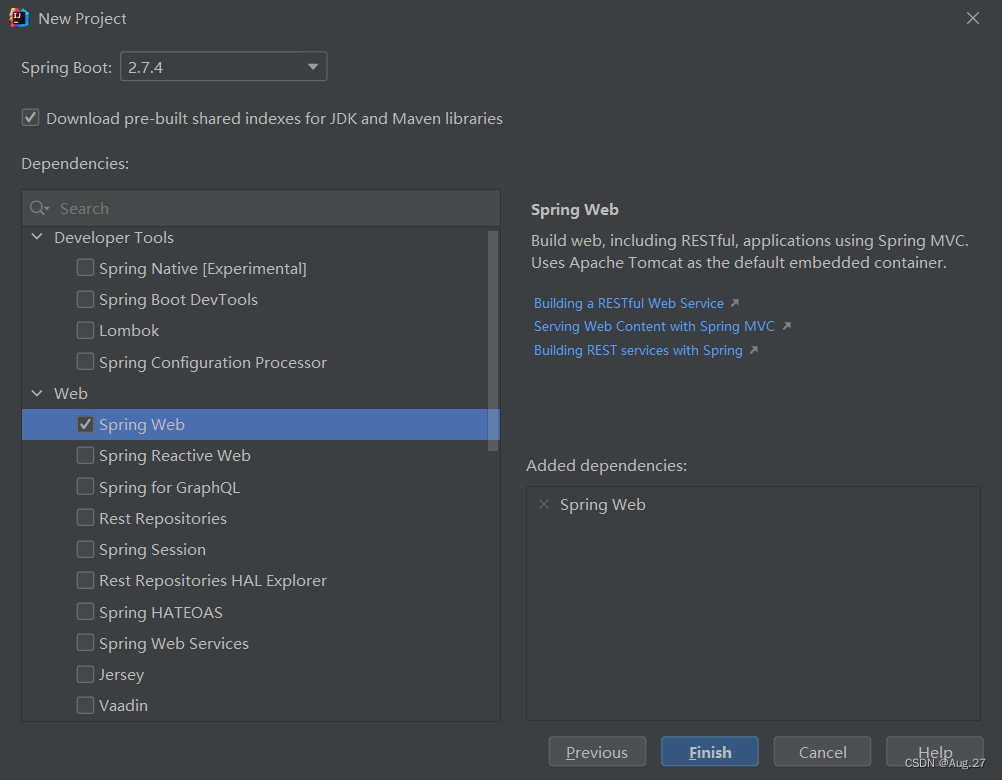
- 这样就会自动将web项目所需要的依赖下载并引入
- 点击完成项目就新建成功
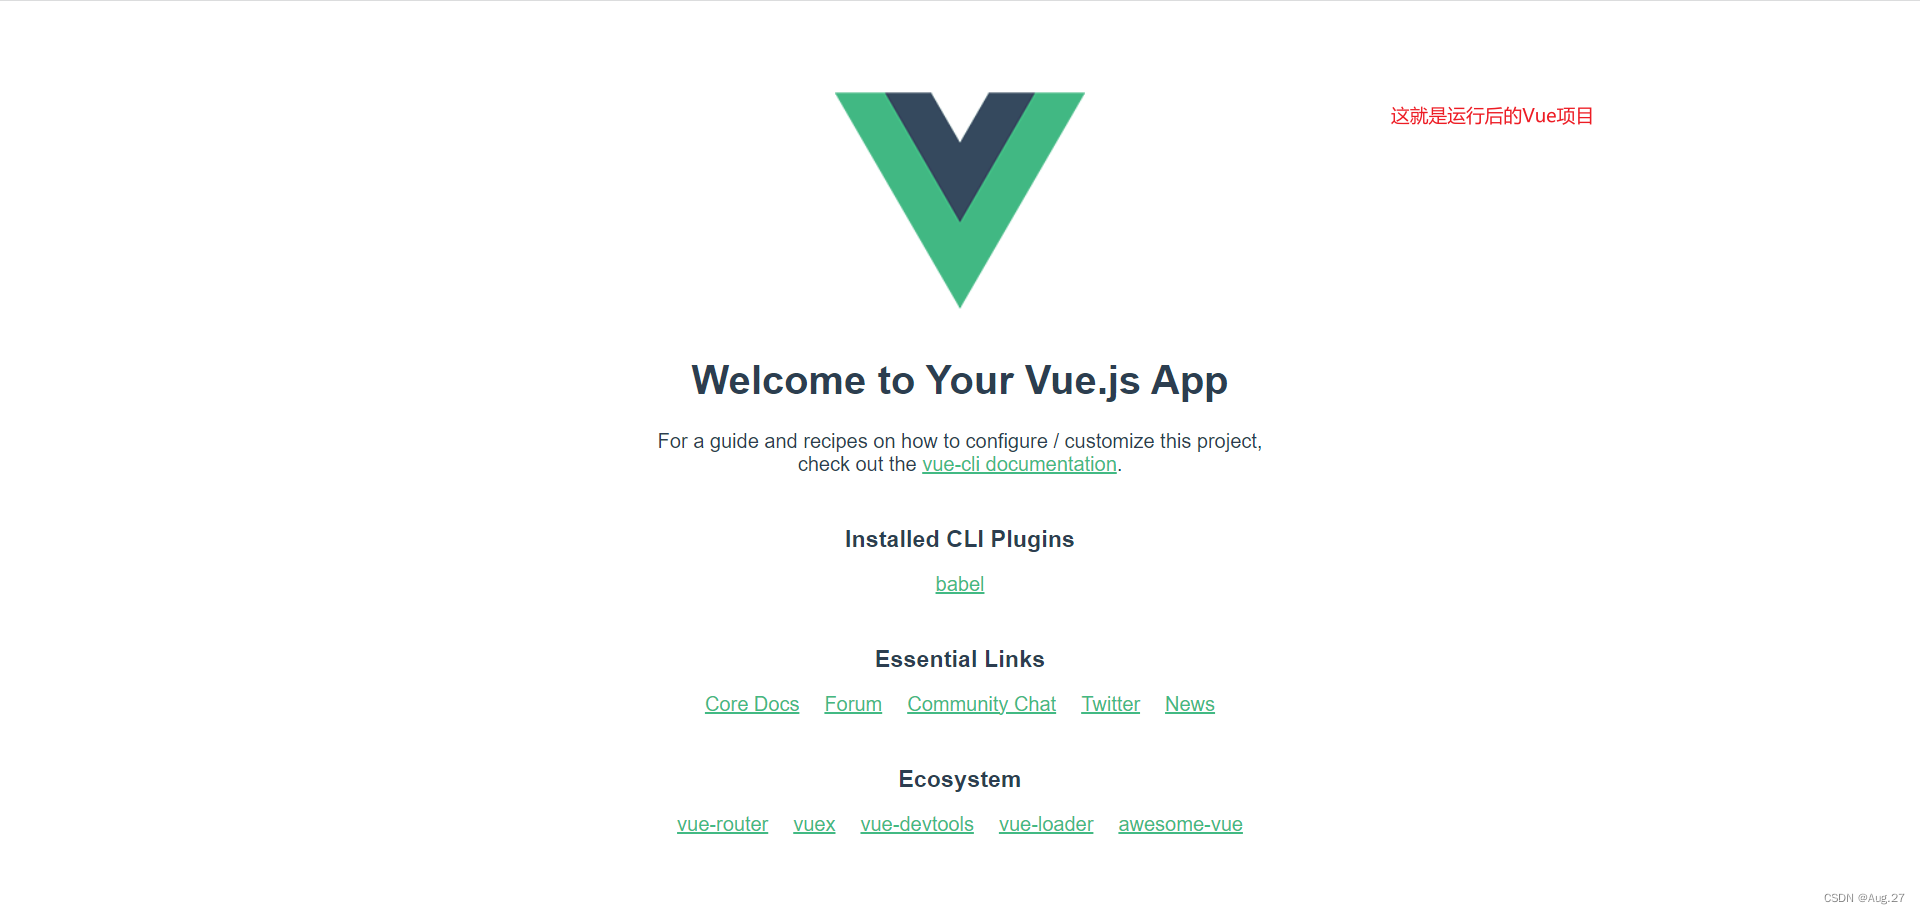
- 接下来测试一下项目运行
- 在项目新建一个controller包,里面专门用来存放controller控制器

-
- @RestController
- public class IndexController {
- @GetMapping("/index")
- public String index(){
- return "欢迎访问首页";
- }
- }
- 接着运行主程序
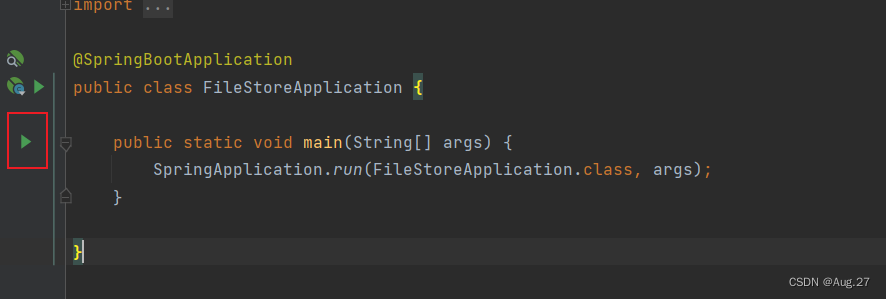
- 接下来查看控制台
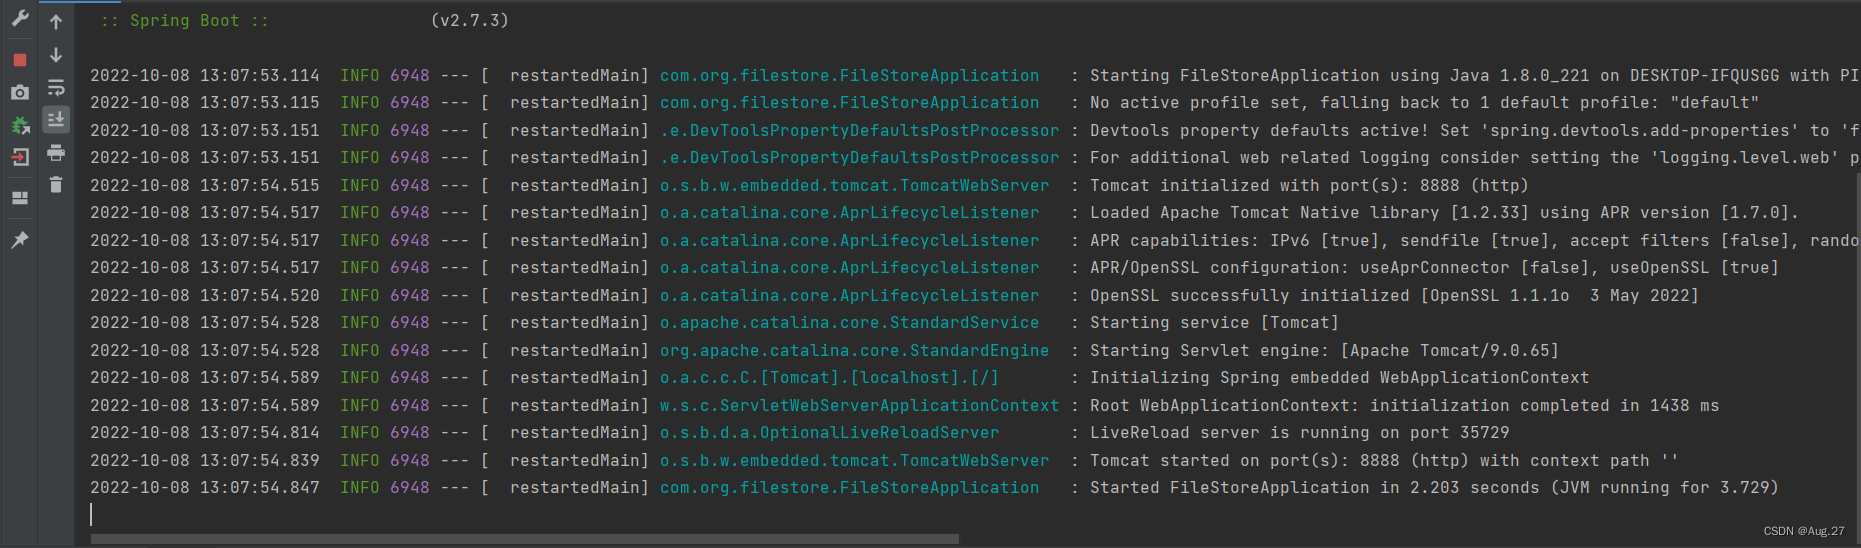
- 这样就运行成功
- 我们在浏览器访问一下http://localhost:8888/index
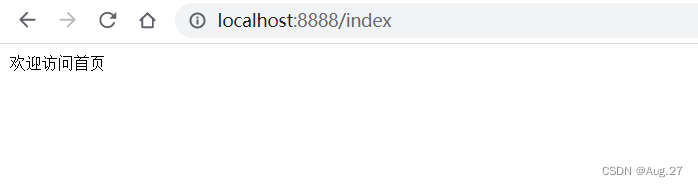
- 这样就说明项目可以正常访问了
4、SpringBoot开发热部署
- 在实际的项目开发调试过程中会频繁地修改后台类文件,导致需要重新编译、重新启动,整个过程非常麻烦,影响开发效率。
- SpringBoot提供了spring-boot-devtools组件,使得无须手动重启SpringBoot应用即可重新编译、启动项目,大大缩短编译启动的时间。
- devtools会监听classpath下文件的变动,触发Restart类加载器重新加载该类,从而实现类文件和属性文件的热部署。
- 并不是所有的更改都需要重启应用(如静态资源、视图模板),可以通过设置spring.devtools.restart.exclude属性来指定一些文件或目录的修改不用重启应用。
- 实现步骤:
- 在pom.xml配置文件中添加dev-tools依赖。
- 使用optional=true表示依赖不会传递,即该项目依赖devtools;其他项目如果引入此项目生成的jar包,则不会包含devtools。
-
- <dependency>
- <groupId>org.springframework.boot</groupId>
- <artifactId>spring-boot-devtools</artifactId>
- <optional>true</optional>
- </dependency>
- 依赖引入后在application.yml中配置devtools
-
- spring:
- devtools:
- restart:
- enabled: true #热部署生效
- additional-paths: src/main/java #设置重启目录
- exclude: static/** #设置classpath目录下的WEB-INF文件夹内容修改不重启
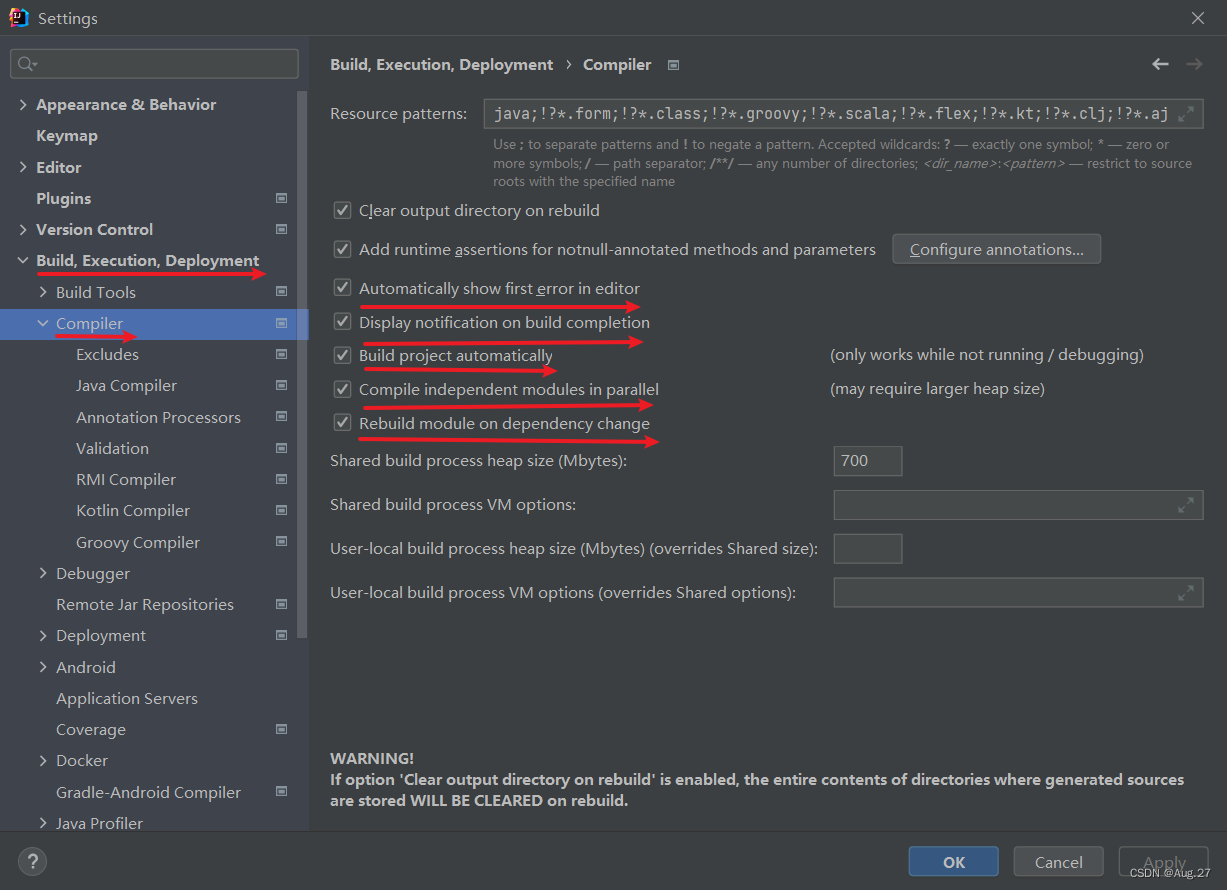
- 配置后还不行,因为IDEA还需要在设置中配置项目自动运行
- 打开Settings页面,在左边的菜单栏依次找到
- Build、Execution、Deployment、Compile,勾选Build project automatically
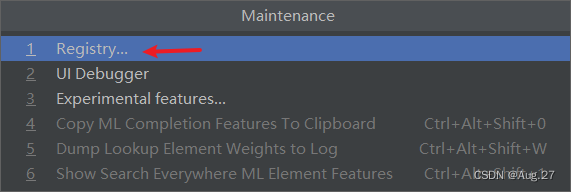
- 按Ctrl+Shift+Alt+/ 快捷键调出Maintenance页面,单击Registry,勾选
- compiler.automake.allow.when.app.running复选框
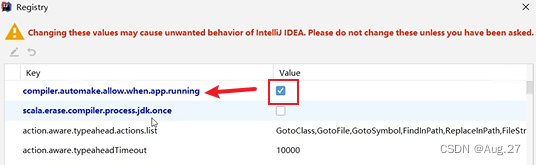
- 如果IDEA版本比较搞,可能没有出现这个复选框,那么尝试以下方法
- 在Settings中拉到最下面找到Advanced Settings
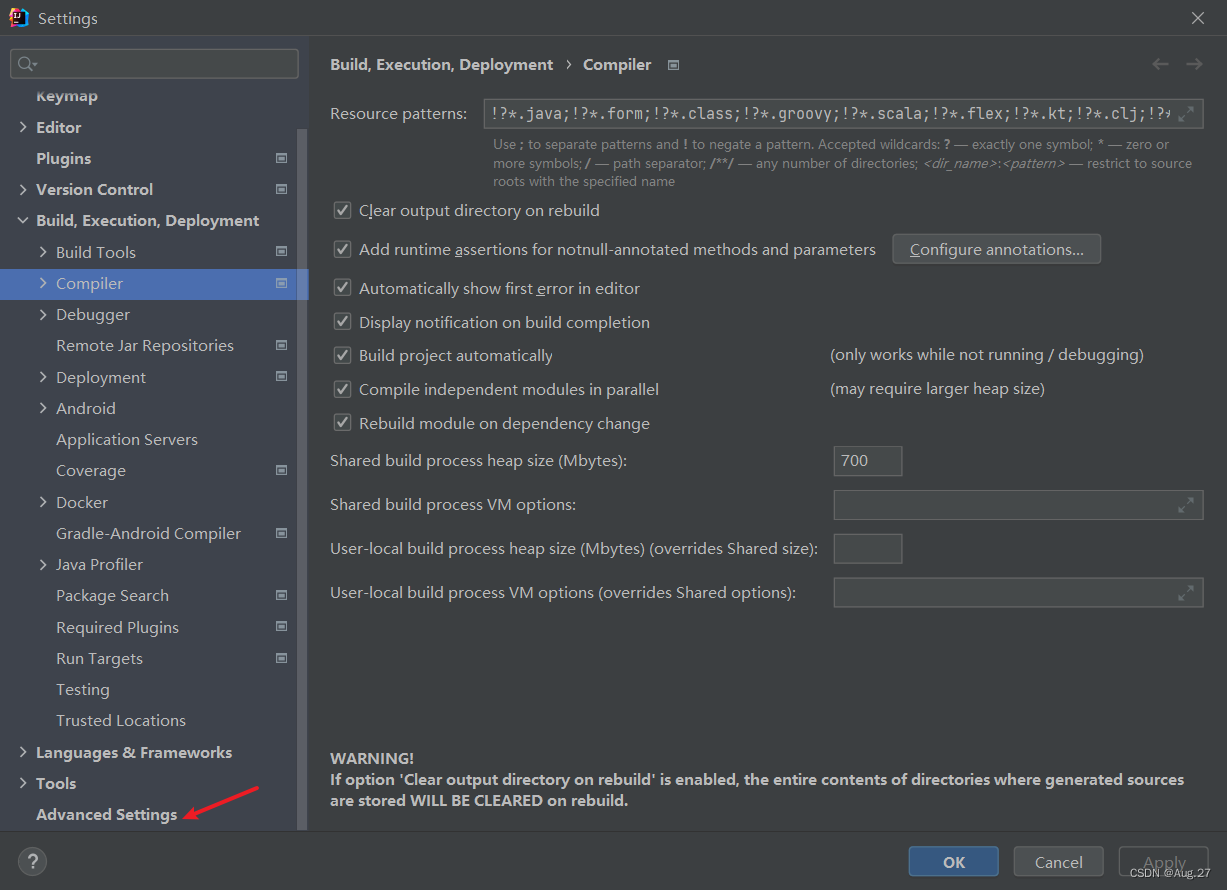
- 然后找到Allow auto-make to start even if developed application is currently running
- 然后勾选
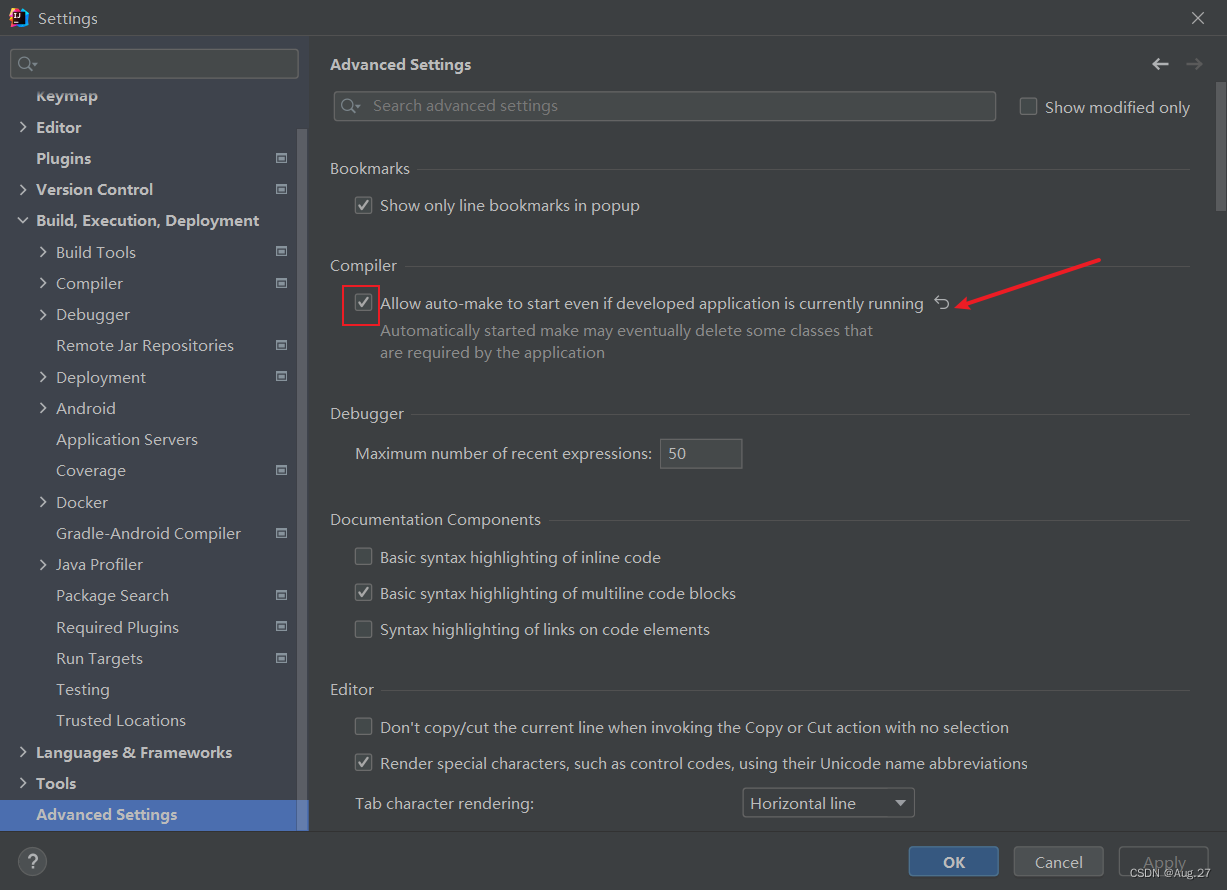
- 这样开发热部署就配置完成。
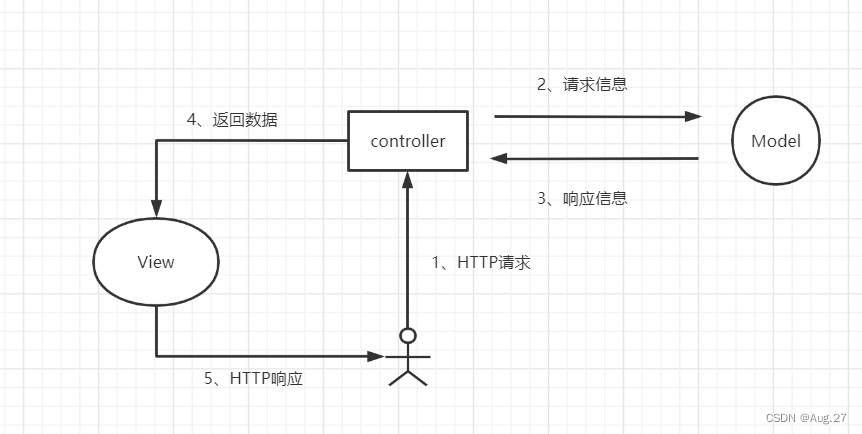
二、Web开发基础
1、Web入门
- SpringBoot将传统Web开发的MVC、JSON、Tomcat等框架整合,提供了spring-boot-starter-web组件,简化了Web应用配置。
- 创建SpringBoot项目勾选SpringWeb选项后,会自动将spring-boot-starter-web组件加入到项目中。
- spring-boot-starter-web启动器主要包括WEB、WebMVC、JSON、Tomcat等基础依赖组件,作用是提供Web开发场景所需要的所有底层依赖。
- WebMVC为Web开发的基础框架,JSON为JSON数据解析组件,Tomcat为自带的容器依赖。
-
- <dependency>
- <groupId>org.springframework.boot</groupId>
- <artifactId>spring-boot-starter-web</artifactId>
- </dependency>
2、控制器
- SpringBoot提供了@Controller和@RestController两种注解来标识此类负责接收和处理HTTP请求
- 如果请求的是页面和数据,使用@Controller注解即可;如果只是请求数据,则可以使用@RestController注解
- @Controller的用法
- 下面示例中返回了index页面和name的数据,在前端页面中可以通过${name}参数获取后台返回的数据并显示。
- @Controller通常与Thymeleaf模板引擎结合使用
-
- @Controller
- public class IndexController {
- @GetMapping("/index")
- public String index(ModelMap map){
- map.addAttribute("name","张三");
- return "index";
- }
- }
- @RestController的用法
- 默认情况下,@RestController注解会将返回的对象数据转换为JSON格式
-
- @RestController
- public class IndexController {
- @GetMapping("/user")
- public User getUser(){
- User user = new User();
- user.setUsername("张三");
- user.setPassword("123");
- return user;
- }
- }
3、路由映射
- @RequestMapping注解主要负责URL的路由映射。它可以添加在Controller类或者具体的方法上。
- 如果添加在Controller类上,则这个Controller中的所有路由映射都将会加上此映射规则,如果添加在方法上,则只对当前方法生效。
- @RequestMapping注解包含很多属性参数来定义HTTP的请求映射规则。常用的属性参数如下:
- value:请求URL的路径,支持URL模板、正则表达式
- method:HTTP请求方法(POST/GET)
- consumes:请求的媒体类型(Content-Type),如application/json
- produces:响应的媒体类型
- params,headers:请求的参数及请求头的值
- value和method比较常用,其他三个比较少用
- @RequestMapping的value属性用于匹配URL映射,value支持简单表达式
- @RequestMapping("/user")
- @RequestMapping支持使用通配符匹配URL,用于统一映射某些URL规则类似的请求:
- @RequestMapping("/getJson/*.json"),当在浏览器中请求/getJson/a.json或者/getJson/b.json时,都会匹配到后台的json方法。
- @RequestMapping的通配符匹配非常简单实用,支持"*"、"?"、"**"等通配符:
- "*":匹配任意字符;
- "**":匹配任意路径;
- "?":匹配单个字符。
- 有通配符的优先低于没有通配符的,比如/user/add.json比/user/*.json优先匹配。
- 有"**"通配符的优先级低于"*"通配符的。
4、参数传递
- @RequestParam将请求参数绑定到控制器的方法参数上,接收的参数来自HTTP请求体或请求URL的QueryString,当请求的参数名称与Controller的业务方法参数名称一致时,@RequestParam可以省略。
- @RequestParam注解一添加,这个方法就必须加参数,如果URL没有参数则会报错。如果想解除可不添加参数,可以在注解后面加上required=false,如:
- @RequestParam( value = "xxx",required = false)
-
- @RestController
- public class IndexController {
- // http://localhost:8888/index?nickname=zhangsan
- @GetMapping("/index")
- public String index(@RequestParam("nickname") String name){
- return "你好"+name;
- }
- }
- 上面的代码请求参数和方法参数名称不一致,所以需要使用@RequestParam继续绑定
-

-
- @RestController
- public class IndexController {
- // http://localhost:8888/index?nickname=zhangsan
- @GetMapping("/index")
- public String index(String nickname){
- return "你好"+nickname;
- }
- }
- 上面的代码请求参数和方法参数名称一致,所以不需要使用@RequestParam进行绑定
-
- @RestController
- public class IndexController {
- // http://localhost:8888/index?nickname=zhangsan&phone=123
- @GetMapping("/index")
- public String index(String name,String phone){
- return "你好"+name+phone;
- }
- }
- 上面代码是请求多个参数,URL使用“&”进行拼接,方法上再增加一个参数

- @PathVaraible:用于处理动态的URL,URL的值可以作为控制器中处理方法的参数。
- 如果是Rest风格的URI,比如动态URI,/xxxx/yyyyy,其中yyyy代表一个ID,而这个ID可能是一个数据用用户表的ID,那么就需要用@PathVaraible将该URI的值传给controller方法参数
-
- @GetMapping("/getUser/{id}")
- public String getUser(@PathVariable String id){
- System.out.println("id->"+id);
- return "getUser";
- }
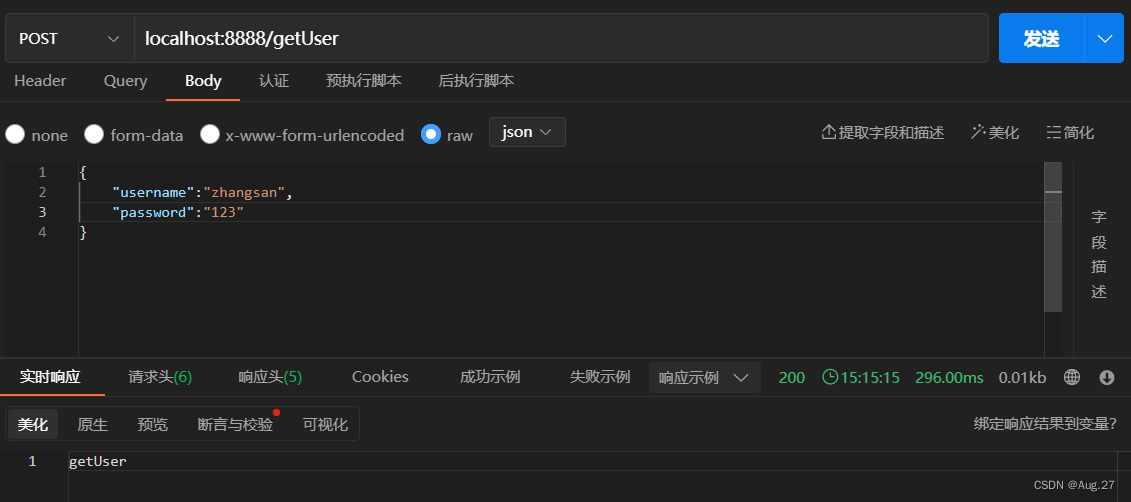
- @RequestBody接收的参数是来自requestBody中,即请求体。一般用于处理非Content-Type:application/x-www-form-urlencoded编码格式的数据:
- 比如:application/json、application/xml等类型的数据。
-
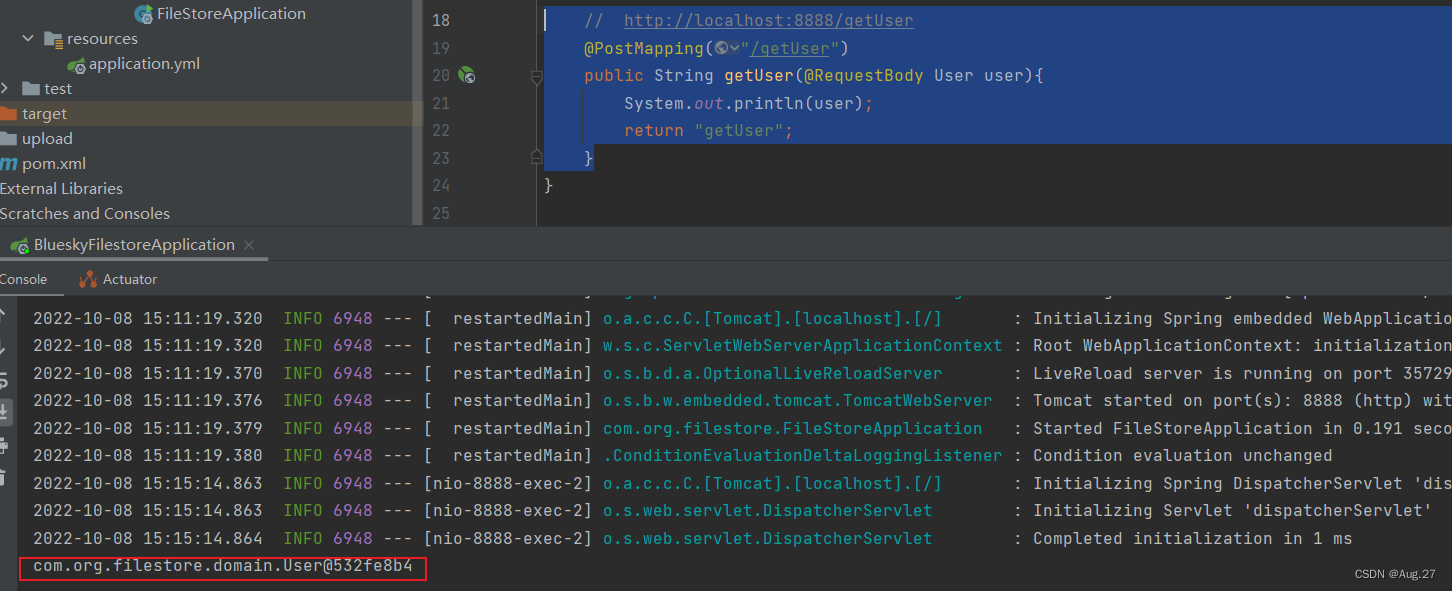
- // http://localhost:8888/getUser
- @PostMapping("/getUser")
- public String getUser(@RequestBody User user){
- System.out.println(user);
- return "getUser";
- }
三、Web开发进阶
1、静态资源访问
- 使用IDEA创建SpringBoot项目,会默认创建classpath:/static/目录,静态资源一般放在这个目录下面即可。
- 如果默认的静态资源过滤策略不能满足开发需求,也可以自定义静态资源过滤策略。
- 过滤规则为/static/**,静态资源位置为classpath:/static/
- 在appliction.yml文件中直接定义过滤规则和静态资源位置:
-
- spring:
- mvc:
- static-path-pattern: /static/**
- web:
- resources:
- static-locations: classpath:/static/ #静态资源
-
2、文件上传原理
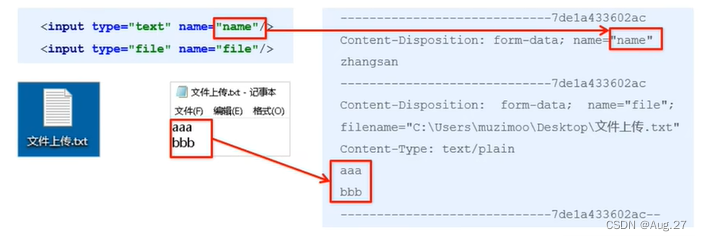
- 表单的enctype属性规定在发送到服务器之前应该如何对表单数据进行编码。
- 当表单的enctype="application/x-www-form-urlencoded"(默认)时,form表单中的数据格式为:key=value&key=value
- 当表单的enctype="multipart/form-data"时,其传输数据形式如下:
-
SpringBoot实现文件上传功能
-
Springboot工程嵌入的tomcat限制了请求的文件大小,每个文件的配置最大为1MB,单次请求的文件的总数不能大于10MB。
-
要更改这个默认值需要在配置文件application.yml中加入两个配置:
-
- spring:
- servlet:
- multipart:
- max-file-size: 10GB #文化最大10G
- max-request-size: 10GB #单次请求文件总数不能超过10G
-
-
当表单的enctype="multipart/form-data"时,可以使用MultipartFile获取上传的文件数据,再通过transferTo方法将其写入磁盘中:
-
- @RestController
- public class FileController {
- /**
- * 默认定位到的当前用户目录("user.dir")(即工程根目录)
- * JVM就可以据"user.dir" + "你自己设置的目录" 得到完整的路径(即绝对路径)
- */
- // private static final String UPLOADED_FOLDER = System.getProperty("user.dir")+"/upload/";
- @PostMapping("/upload")
- public String upload(MultipartFile file, HttpServletRequest request)throws Exception{
- System.out.println("文件大小:"+file.getSize());
- System.out.println("文件的ContentType:"+file.getContentType());
- System.out.println("文件的初始名字:"+file.getOriginalFilename());
- String path = request.getServletContext().getRealPath("/upload/");
- System.out.println("获取web服务器的运行目录:"+path);
- saveFile(file,path);
- return "upload success";
- }
- public void saveFile(MultipartFile f,String path)throws IOException{
- File upDir = new File(path);
- if (!upDir.exists()){
- upDir.mkdir();
- }
- File file = new File(path+f.getOriginalFilename());
- f.transferTo(file);
- }
- }

-
3、拦截器
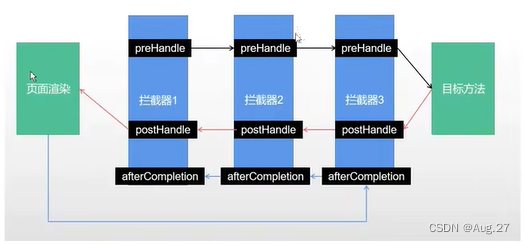
- 拦截器在Web系统中非常常见,对于某些全局统一的操作,我们可以把它提取到拦截器中实现。总结起来,拦截器大致有以下几种使用场景:
- 权限检查:如登录检测,进入处理程序检测是否登录,如果没有,则直接返回登录页面。
- 性能监控:有时系统在某段时间莫名其妙很慢,可以通过拦截器在进入处理程序之前记录开始时间,在处理完后记录结束时间,从而得到该请求的处理时间。
- 通用行为:读取cookies得到用户信息并将用户对象放入请求,从而方便后续流程使用,还有提取Locale、Theme信息等,只要是多个处理程序都需要的,即可使用拦截器实现。
- Springboot定义了HandlerInterceptor接口来实现自定义拦截器的功能
- HandlerInterceptor接口定义了preHandle、postHandle、afterCompletion三种方法,通过重写这三种方法实现请求前、请求后等操作。
- 拦截器定义:
-
- public class LoginInterceptor implements HandlerInterceptor {
- @Override
- public boolean preHandle(HttpServletRequest request, HttpServletResponse response, Object handler) throws Exception {
- System.out.println("LoginInterceptor");
- return true;
- }
- }
-
- 拦截器注册:
- addPathPatterns方法定义拦截的地址
- excludePathPatterns定义排除某些地址不被拦截
- 添加的一个拦截器没有addPathPattern任何一个url则默认拦截所有请求
- 如果没有excludePathPatterns任何一个请求,则默认不放过如何一个请求。
-
- @Configuration // Configuration必须要添加
- public class WebConfig implements WebMvcConfigurer {
- @Override
- public void addInterceptors(InterceptorRegistry registry) {
- registry.addInterceptor(new LoginInterceptor());
- // registry.addInterceptor(new LoginInterceptor()).addPathPatterns("/user/**"); // 拦截所有user下面的接口
- }
- }
四、构建RESTful服务
1、RESTful介绍
-
RESTful是目前流行的互联网软件服务架构设计风格。
-
REST(Representational State Transfer,表述性状态转移) 一词是由Roy Thomas Fielding在2000年的博士论文中提出的,它定义了互联网软件服务的架构原则,如果一个架构符合REST原则,则称之为RESTful架构。
-
REST并不是一个标准,它更像一组客户端和服务端交互时的架构理念和设计原则,基于这种架构理念和设计原则的Web API更加简洁、更有层次。
2、RESTful特点
- 每一个URL代表一个资源。
- 客户端使用GET、POST、PUT、DELETE四种表示操作方式的动词对服务端资源进行操作:
- GET用于获取资源
- POST用于新建资源(也可以用于更新资源)
- PUT用于更新资源
- DELETE用于新建资源
- 通过操作资源的表现形式来实现服务端请求操作。
- 资源的表现形式是JSON或HTML。
- 客户端与服务端之间的交互在请求之间是无状态的,从客户端到服务端的每个请求都包含必需的信息。
3、RESTful API
- 符合RESTful规范的Web API需要具备如下两个关键特性:
- 安全性:安全的方法被期望不会产生如何副作用,当我们使用GET操作获取资源时,不会引起资源本身的改变,也不会引起服务器状态的改变。
- 幂等性:幂等的方法保证了重复进行一个请求和一次请求的效果相同(并不是指响应总是相同的,而是指服务器上资源的状态从第一次请求后就不再改变了),在数学上幂等性是指N次变换和一次变换相同。
4、HTTP状态码
- HTTP状态码就是服务器向用户返回的状态码和提示信息,客户端的每一次请求,服务器都必须回应,回应包括HTTP状态码和数据两部分
- HTTP定义了40个标准状态码。可用于传达客户端请求的结果。状态码分为以下五个类别:
- 1xx:信息,通信传输协议级信息
- 2xx:成功,表示客户端的请求已成功接受
- 3xx:重定向,表示客户端必须执行一些其他操作才能完成其请求
- 4xx:客户端错误,此类错误状态码指向客户端
- 5xx:服务器错误,服务器负责这些错误状态码
5、SpringBoot实现RESTful API
- 在RESTful架构中,每个网址代表一种资源,所以URL中建议不要包含动词,只包含名词即可,而且所用的名词往往与数据库的表格名对应
- 用户管理模块API示例:
-
HTTP Method 接口地址 接口描述 POST /user 创建用户 GET /user/id 根据id获取用户信息 PUT /user 更新用户 DELETE /user/id 根据id删除对应用户
-
-
- @RestController
- public class UserController {
- // @PathVariable:注:路由内属性与形参相同可简写,
- // 若不相同,则需要加上对应的名称绑定,如:@PathVariable("id")
- @GetMapping("/user/{id}")
- public String getUserById(@PathVariable int id){
- System.out.println(id);
- return "根据ID获取用户信息";
- }
- @PostMapping("/user")
- public String save(User user){
- return "添加用户";
- }
- @PutMapping("/user")
- public String update(User user){
- return "更新用户";
- }
- @DeleteMapping("/user/{id}")
- public String deleteById(@PathVariable int id){
- System.out.println(id);
- return "根据id删除用户";
- }
- }
6、Swagger
- Swagger是一个规范和完整的框架,用于生成、描述、调用和可视化RESTful风格的Web服务,是非常流行的API表达工具。
- Swagger能够自动生成完善的RESTful API文档,同时并根据后台代码的修改同步更新,同时提供完整的测试页面来调试API。
-
使用Swagger生成Web API文档
- 在Springboot项目中集成Swagger很简单,只需要在项目中引入springfox-swagger2和springfox-swagger-ui依赖即可。
-
- <!-- swagger -->
- <dependency>
- <groupId>io.springfox</groupId>
- <artifactId>springfox-swagger2</artifactId>
- <version>2.9.2</version>
- </dependency>
- <dependency>
- <groupId>io.springfox</groupId>
- <artifactId>springfox-swagger-ui</artifactId>
- <version>2.9.2</version>
- </dependency>
-
配置Swagger
- 注意:swagger版本不一样,配置也不一样(本人使用的是2.9.2版本)
-
- @Configuration // 告诉spring容器,这个类是一个配置类
- @EnableSwagger2 // 启用Swagger2功能
- public class Swagger2Config {
- @Bean
- public Docket createRestApi(){
- return new Docket(DocumentationType.SWAGGER_2)
- .apiInfo(apiInfo())
- .select()
- // com包下的所有API都交给Swagger2管理
- .apis(RequestHandlerSelectors.basePackage("com"))
- .paths(PathSelectors.any())
- .build();
- }
- // API文档页面显示信息
- private ApiInfo apiInfo(){
- return new ApiInfoBuilder()
- .title("文件系统项目API") // 标题
- .description("学习Springboot+Vue项目") // 描述
- .build();
- }
- }
- 如果项目报以下的错误
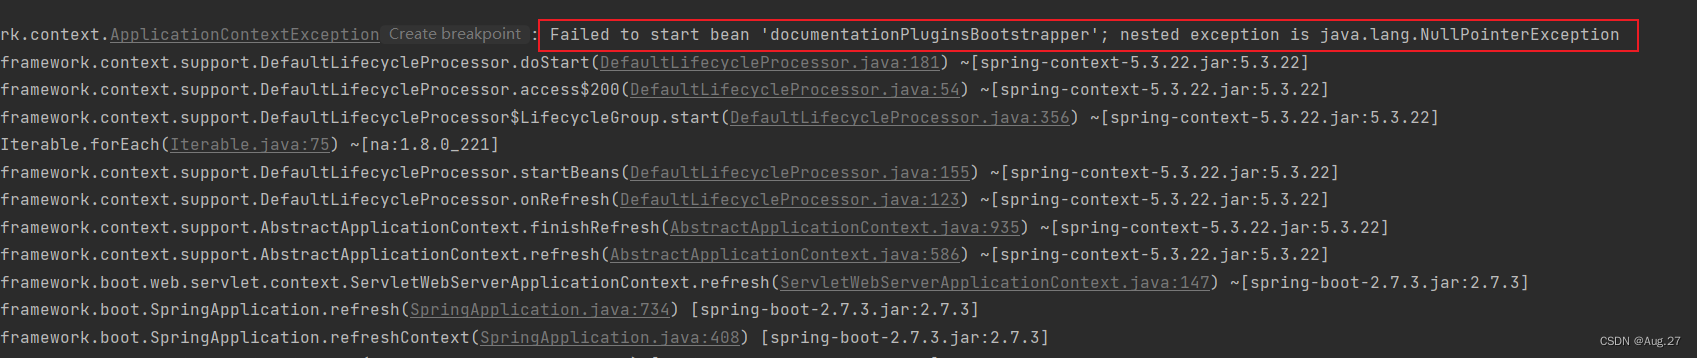
- 这是因为Springboot2.6.x以后与Swagger有版本冲突问题,所以需要在yml文件或properties文件中添加以下配置
-
- # yml文件:
- mvc:
- pathmatch:
- matching-strategy: ant_path_matcher
- # properties文件:
- spring.mvc.pathmatch.matching-strategy=ant_path_matcher
-
-
使用Swagger2进行接口测试
- 启动项目访问http://localhost:8888/swagger-ui.html,即可打开自动生成的可视化测试页面。
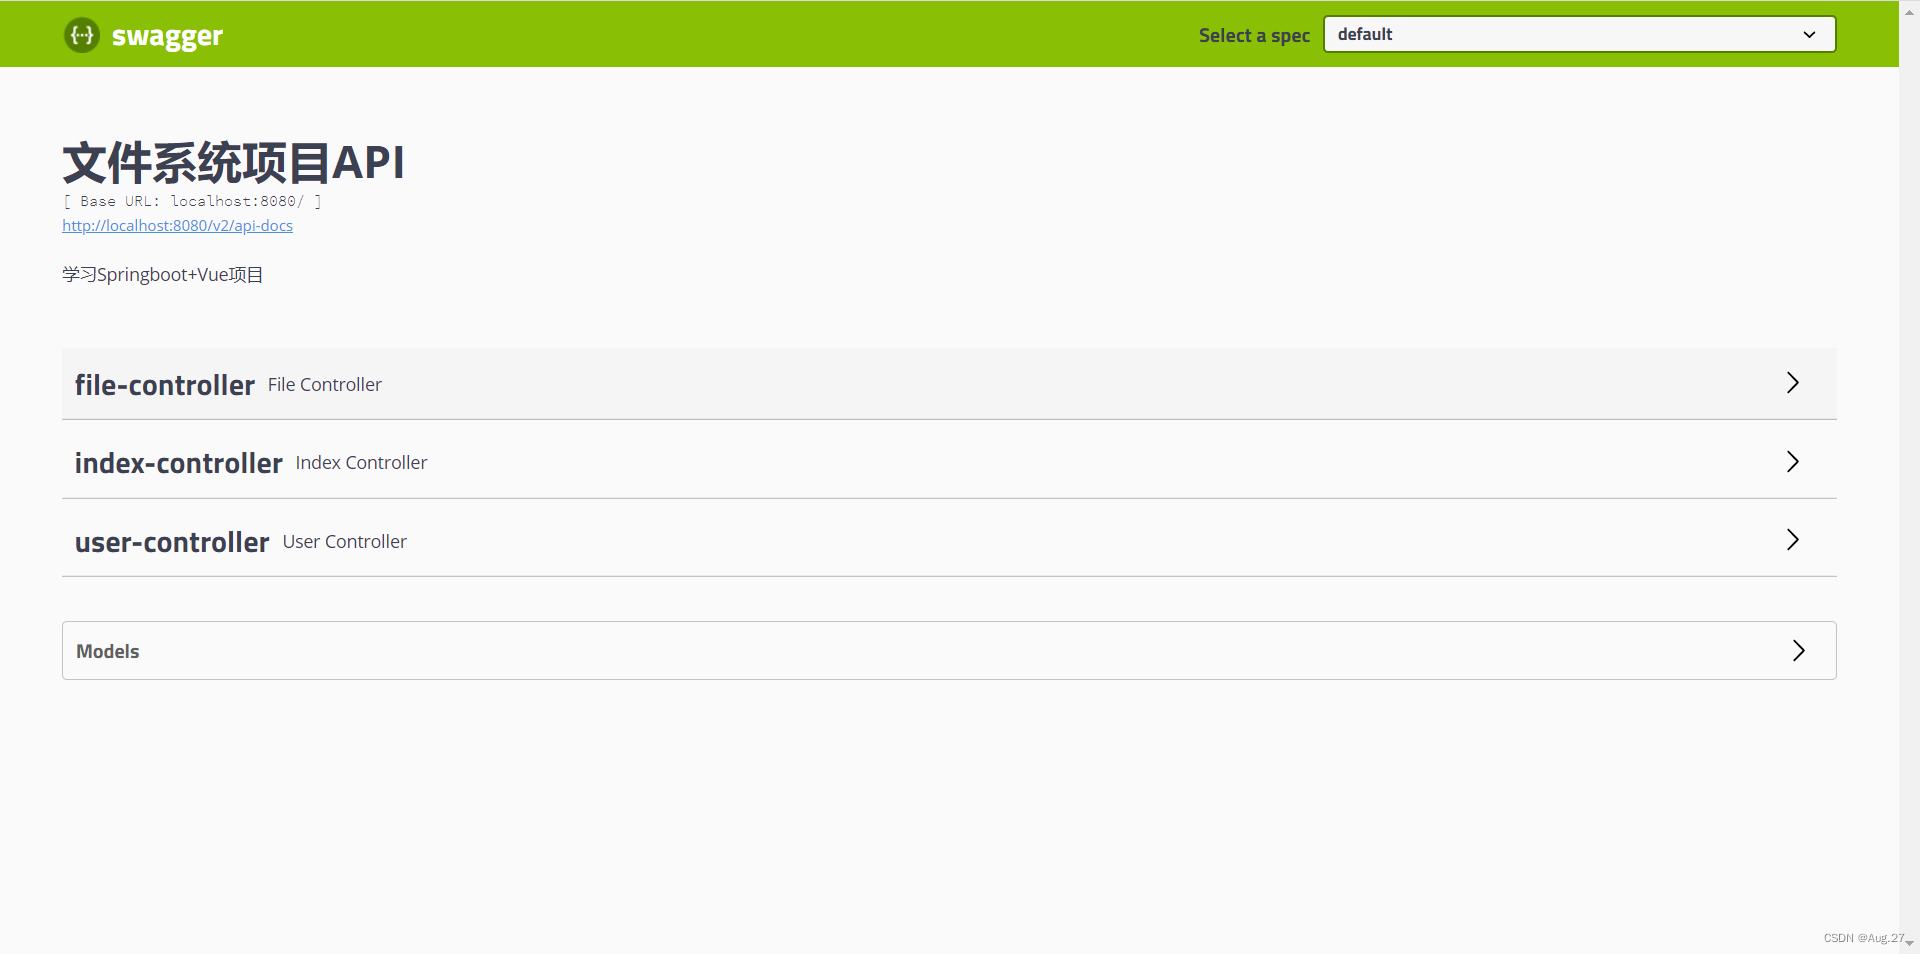
- 这个页面就是成功打开了。
-
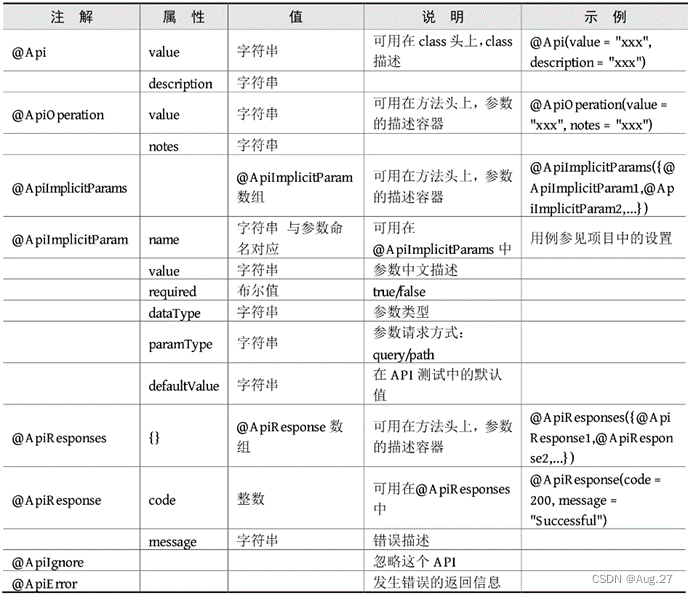
Swagger常用注解
- Swagger提供了一系列注解来描述接口信息,包括接口说明、请求方法、请求参数、返回信息等。
五、MybatisPlus快速上手
1、ORM介绍
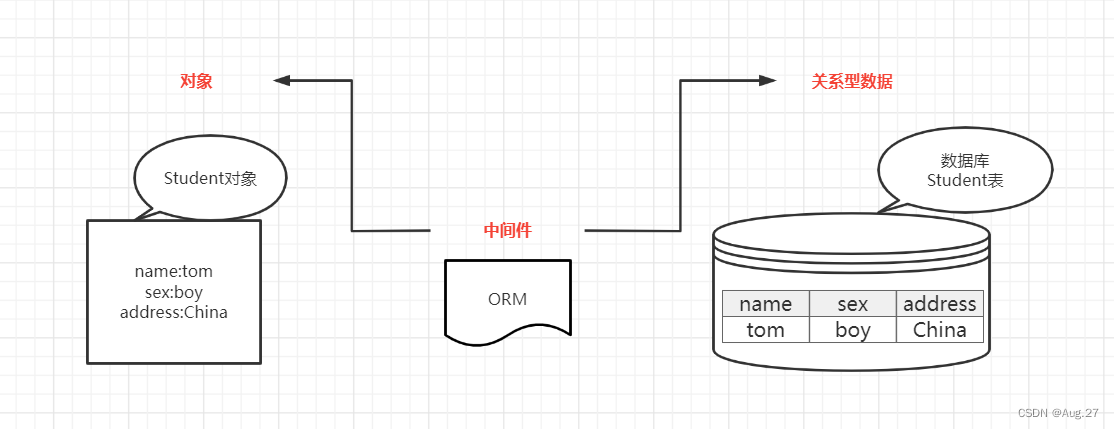
- ORM(Object Relational Mapping,对象关系映射)是为了解决面向对象与关系数据库存在的互不匹配现象的一种技术。
- ORM通过使用描述对象和数据库之间映射的元数据将程序中的对象自动持久化到关系数据库中。
- ORM框架的本质是简化编程中操作数据库的编码。
2、MyBatis-Plus介绍
- MyBatis是一款优秀的数据持久层ORM框架,被广泛地应用于应用系统。
- MyBatis能够非常灵活地实现动态SQL,可以使用XML或注解来配置和映射原生信息,能够轻松地将Java的POJO(Plain Ordinary Java Object,普通Java对象)与数据库中的表和字段进行映射关联。
- MyBatis-Plus是一个MyBatis的增强工具,在MyBatis的基础上做了增强,简化了开发。
-
添加依赖
-
- <!-- mybatisPlus 依赖 -->
- <dependency>
- <groupId>com.baomidou</groupId>
- <artifactId>mybatis-plus-boot-starter</artifactId>
- <version>3.5.2</version>
- </dependency>
- <!-- mysql驱动依赖 -->
- <dependency>
- <groupId>mysql</groupId>
- <artifactId>mysql-connector-java</artifactId>
- </dependency>
- <!-- 数据库连接池Druid -->
- <dependency>
- <groupId>com.alibaba</groupId>
- <artifactId>druid-spring-boot-starter</artifactId>
- <version>1.2.13-SNSAPSHOT</version>
- </dependency>
-
-
全局配置
- 配置数据库相关信息。
-
- spring:
- datasource:
- type: com.alibaba.druid.pool.DruidDataSource
- driver-class-name: com.mysql.jdbc.Driver
- url: jdbc:mysql://localhost:3306/mydb?useSSL=false
- username: root
- password: 646681
- mybatis-plus:
- configuration:
- log-impl: org.apache.ibatis.logging.stdout.StdOutImpl
-
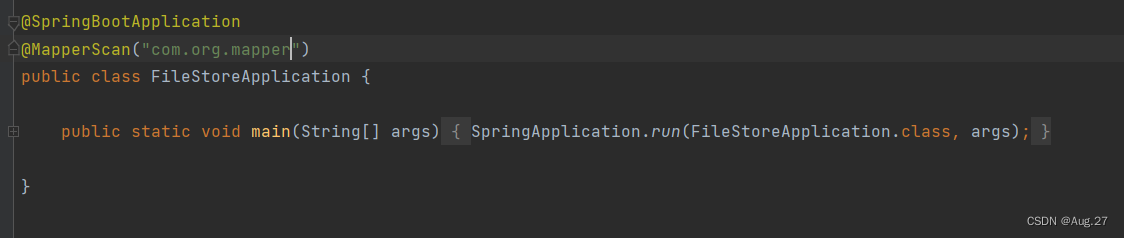
- 添加@MapperScan注解
- 配置数据库相关信息。
-
Mybatis CRUD 注解
-
Mybatis CRUD 操作
-
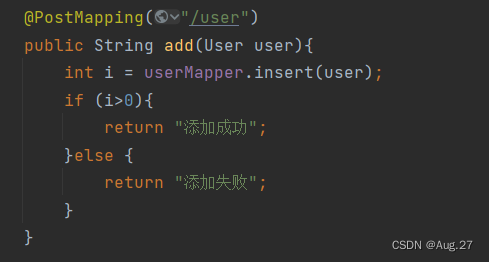
- @Mapper
- public interface UserMapper {
- // 增加用户
- @Insert("insert into user(username,password,birthday) values (#{username},#{password},#{birthday})")
- int add(User user);
- // 根据id删除用户
- @Delete("delete from user where id=#{id}")
- int delete(int id);
- // 更新用户信息
- @Update("update user set username=#{username},password=#{password},birthday=#{birthday} where id=#{id}")
- int update(User user);
- // 根据id查询用户
- @Select("select * from user where id=#{id}")
- User findById(int id);
- // 查询所有用户
- @Select("select * from user")
- List<User> findAll();
- }
- 以上是Mybatis的CRUD操作
-
-
Mybatis-Plus 注解
- @TableName,当表名与实体类名称不一致时,可以使用@TableName注解进行关联。
- @TableField,当表中字段名称与实体类属性不一致时,使用@TableField进行关联。
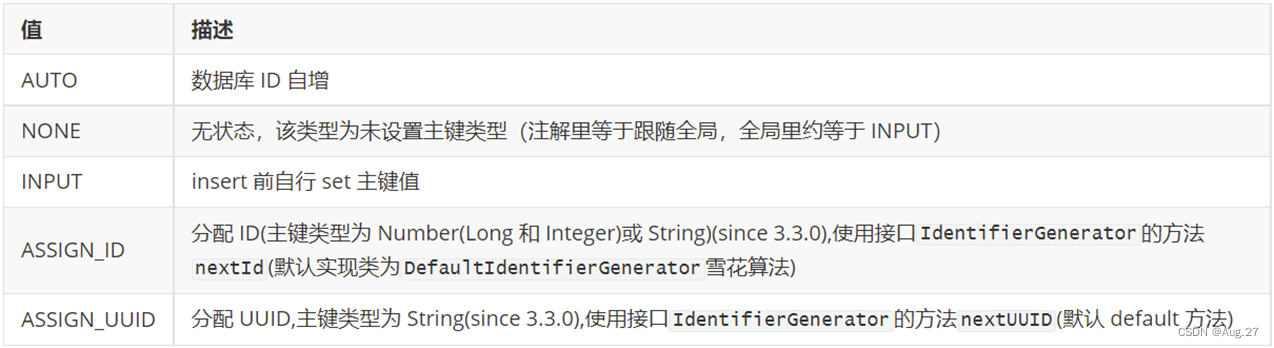
- @TableId,用于标记表中的主键字段,MybatisPlus也提供了主键生成策略。
- 以上就是MybatisPlus注解的使用
-
Mybatis-Plus CRUD操作
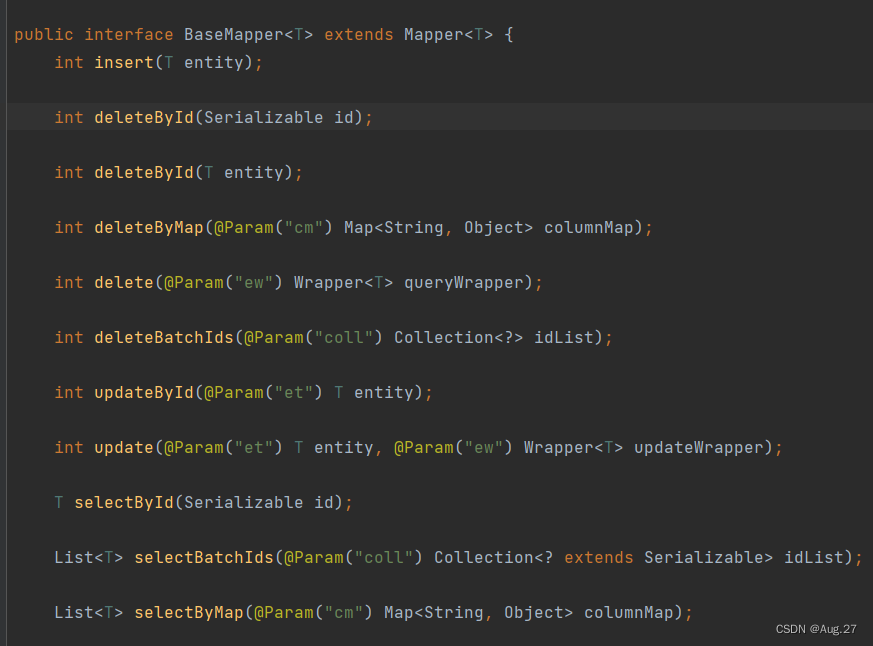
- 在mapper类中继承BaseMapper<T>,T 表示要操作的entity对象
-
- @Mapper
- public interface UserMapper extends BaseMapper<User> {
- }
-
要操作User对象,就将User传给BaseMapper
-
BaseMapper中提供了很多操作,如增删改查等等。
-
-
-
-
直接调用查询方法即可,如需知道更多方法的操作使用,请到Mybatis-Plus官网查看
-
六、多表查询及分页查询
多表查询
- 实现复杂关系映射,可以使用@Results注解、@Result注解、@One注解、@Many注解组合完成复杂关系的配置。
-
多表查询操作
- User类(对应数据库t_user表)
-
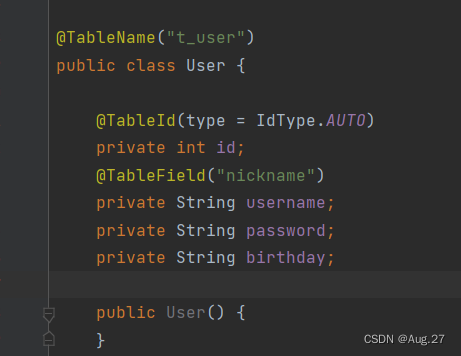
- @TableName("t_user")
- public class User {
- @TableId(type = IdType.AUTO)
- private int id;
- private String username;
- private String password;
- private String birthday;
- // 描述用户的所有订单
- @TableField(exist = false) // 表示在数据库表中不存在,不需要做映射
- private List<Order> orders;
- public User() {
- }
- public User(String username, String password, String birthday) {
- this.username = username;
- this.password = password;
- this.birthday = birthday;
- }
- ....省略了getter和setter方法
- @Override
- public String toString() {
- return "User{" +
- "id=" + id +
- ", username='" + username + '\'' +
- ", password='" + password + '\'' +
- ", birthday='" + birthday + '\'' +
- '}';
- }
- }
- Order类(对应数据库t_order表)
-
- @TableName("t_order")
- public class Order {
- private int id;
- @TableField("order_time")
- private String orderTime;
- private double total;
- @TableField(exist = false)
- private User user;
- public Order() {
- }
- public Order(String orderTime, double total, User user) {
- this.orderTime = orderTime;
- this.total = total;
- this.user = user;
- }
- ....省略了getter和setter方法
- @Override
- public String toString() {
- return "Order{" +
- "id=" + id +
- ", orderTime='" + orderTime + '\'' +
- ", total=" + total +
- ", user=" + user +
- '}';
- }
- }
- UserMapper接口
-
- @Mapper
- public interface UserMapper extends BaseMapper<User> {
- // 根据id查用户
- @Select("select * from t_user where id=#{id}")
- User selectById(int id);
- // 查询用户及其所有的订单
- @Select("select * from t_user")
- @Results(
- {
- @Result(column = "id",property = "id"), // column:字段,property:映射到实体类的属性
- @Result(column = "username",property = "username"),
- @Result(column = "password",property = "password"),
- @Result(column = "birthday",property = "birthday"),
- @Result(column = "id",property = "orders",javaType = List.class,
- many = @Many(select = "com.org.mapper.OrderMapper.selectByUid")
- // 通过user的id去orderMapper的selectByUid查询所以该用户的订单
- )
- }
- )
- List<User> selectAllUserAndOrders();
- }
- OrderMapper接口
-
- @Mapper
- public interface OrderMapper extends BaseMapper<Order> {
- @Select("select * from t_order where uid=#{uid}")
- List<Order> selectByUid(int uid);
- // 查询所有的订单,同时查询订单用户
- @Select("select * from t_order")
- @Results({
- @Result(column = "id",property = "id"),
- @Result(column = "order_time",property = "orderTime"),
- @Result(column = "total",property = "total"),
- @Result(column = "uid",property = "user",javaType = User.class,
- one=@One(select = "com.org.mapper.UserMapper.selectById")
- // 根据order的uid到UserMapper的selectById方法中查询该订单所属的用户
- ),
- })
- List<Order> selectAllOrderAndUser();
- }
- UserController
-
- @RestController
- public class UserController {
- @Autowired
- private UserMapper userMapper;
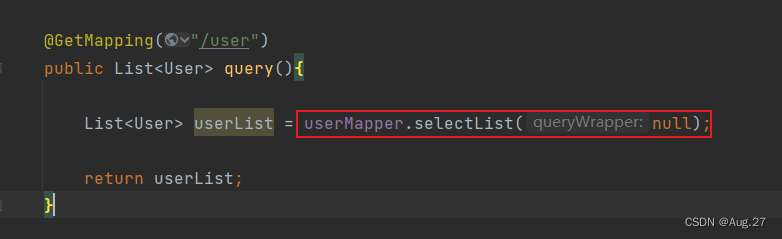
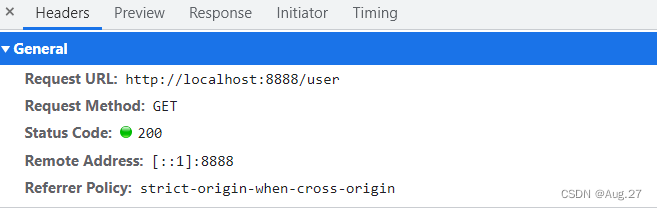
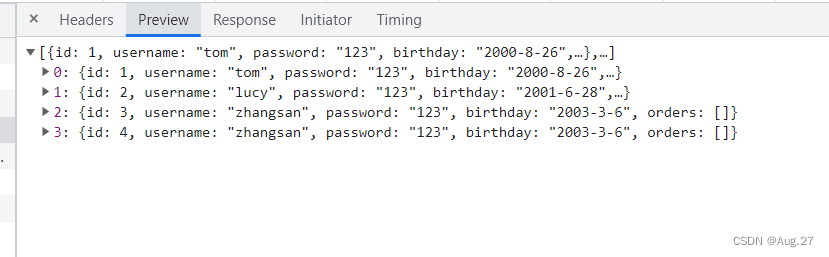
- @GetMapping("/user")
- public List<User> query() {
- // 查询用户及其所有订单
- List<User> userList = userMapper.selectAllUserAndOrders();
- return userList;
- }
- }
- OrderController
-
- @RestController
- public class OrderController {
- @Autowired
- private OrderMapper orderMapper;
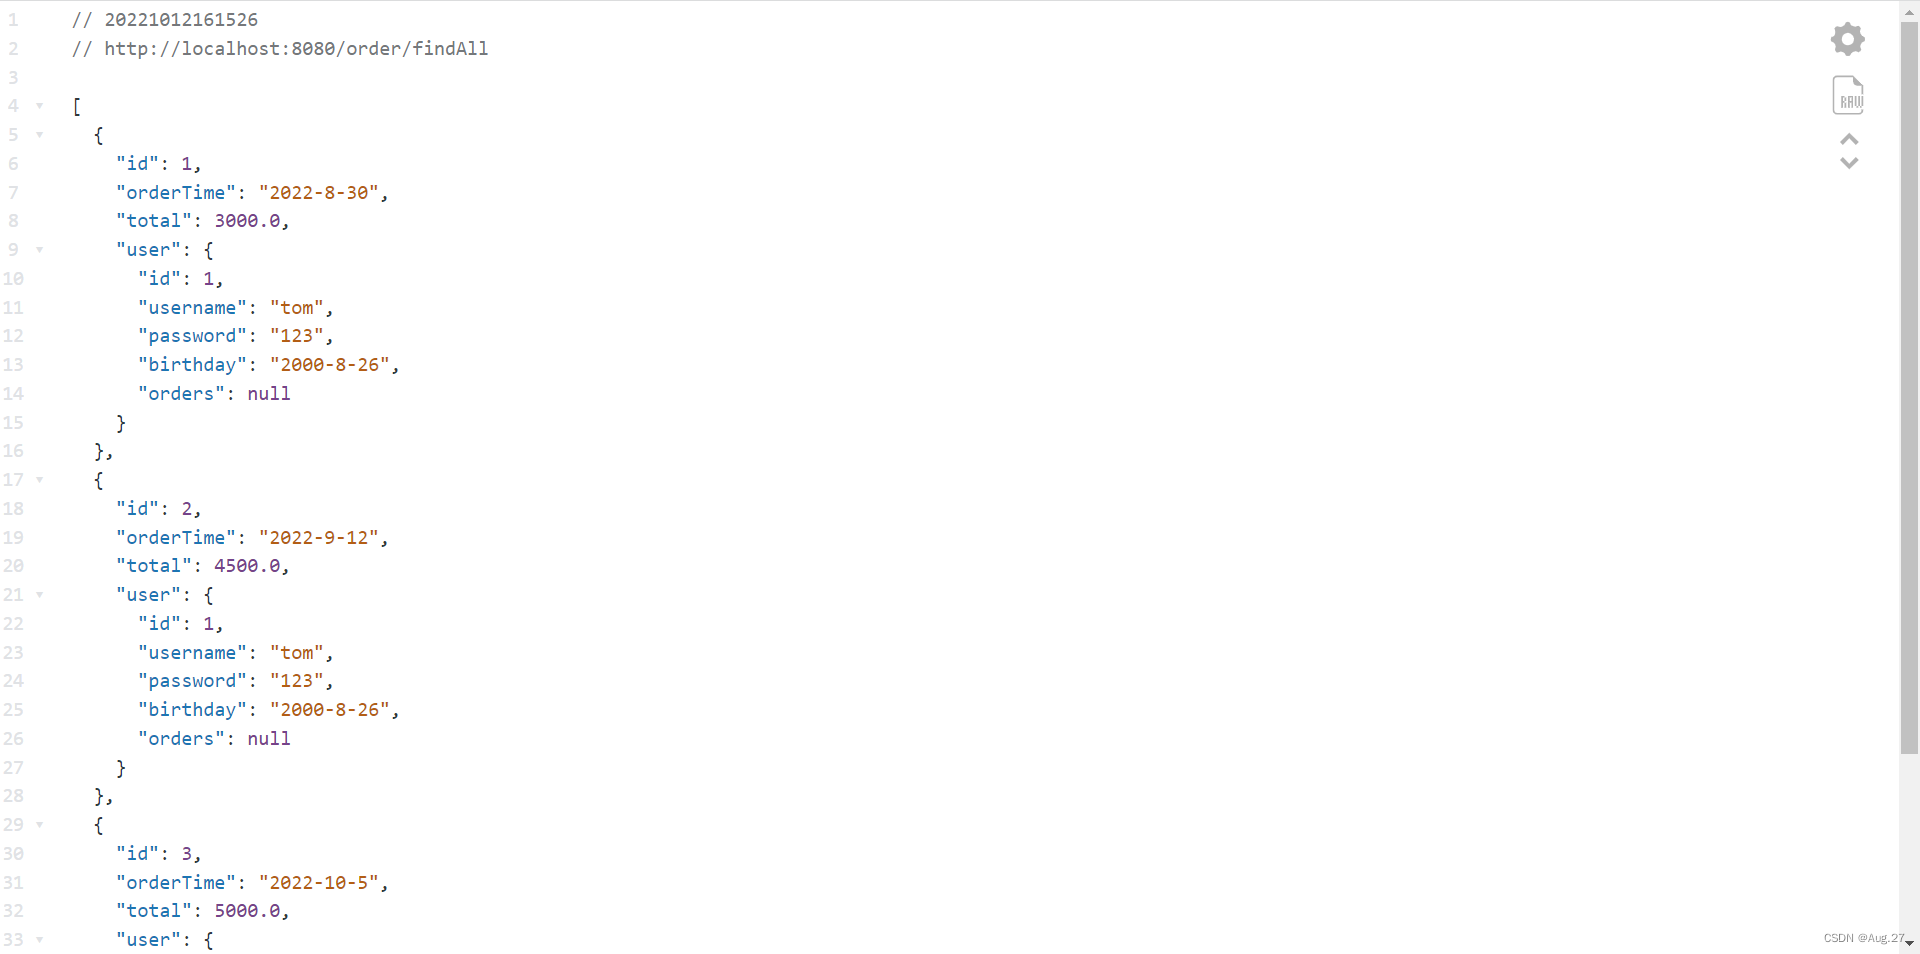
- // 查询订单及其所属的用户
- @GetMapping("/order/findAll")
- public List findAll(){
- List<Order> orderList = orderMapper.selectAllOrderAndUser();
- return orderList;
- }
- }
- 效果展示如下:
- 查询所有用户及其所有订单
- 查询订单及该订单所属用户
条件查询
- 使用QueryWrapper来创建条件
- 用法如下代码所示:
-
- @GetMapping("/user")
- public List<User> query() {
- // 条件查询
- QueryWrapper<User> queryWrapper = new QueryWrapper<>(); // 创建实例
- queryWrapper.eq("username","tom"); // 查询username为tom的用户
- List<User> userList = userMapper.selectList(queryWrapper); // 将条件作为参数传入查询方法,若无条件,则在方法传入null
- return userList;
- }
-
- 更多条件如下图所示:
-
条件 条件实现功能 例子 eq 等于 = 例: eq("name", "老王")--->name = '老王' ne 不等于 <> 例: ne("name", "老王")--->name <> '老王' gt 大于 > 例: gt("age", 18)--->age > 18 ge 大于等于 >= 例: ge("age", 18)--->age >= 18 lt 小于 < 例: lt("age", 18)--->age < 18 le 小于等于 <= 例: le("age", 18)--->age <= 18 between BETWEEN 值1 AND 值2 例: between("age", 18, 30)--->age between 18 and 30 notBetween NOT BETWEEN 值1 AND 值2 例: notBetween("age", 18, 30)--->age not between 18 and 30 like LIKE '%值%' 例: like("name", "王")--->name like '%王%' notLike NOT LIKE '%值%' 例: notLike("name", "王")--->name not like '%王%' likeLeft LIKE '%值' 例: likeLeft("name", "王")--->name like '%王' likeRight LIKE '值%' 例: likeRight("name", "王")--->name like '王%' isNull 字段 IS NULL 例: isNull("name")--->name is null isNotNull 字段 IS NOT NULL 例: isNotNull("name")--->name is not null in 字段 IN (v0, v1, ...) 例: in("age", 1, 2, 3)--->age in (1,2,3) notIn 字段 NOT IN (value.get(0), value.get(1), ...) 例: notIn("age",{1,2,3})--->age not in (1,2,3) - 更多操作可自行到Mybatis-Plus官网查看
-
分页查询
- 编写配置类
-
- @Configuration
- public class MybatisPlusConfig {
- @Bean
- public MybatisPlusInterceptor paginationInterceptor(){
- MybatisPlusInterceptor interceptor = new MybatisPlusInterceptor();
- PaginationInnerInterceptor paginationInnerInterceptor = new PaginationInnerInterceptor(DbType.MYSQL); // 数据库类型
- interceptor.addInnerInterceptor(paginationInnerInterceptor);
- return interceptor;
- }
- }
- 编写分页代码
-
- // 分页查询
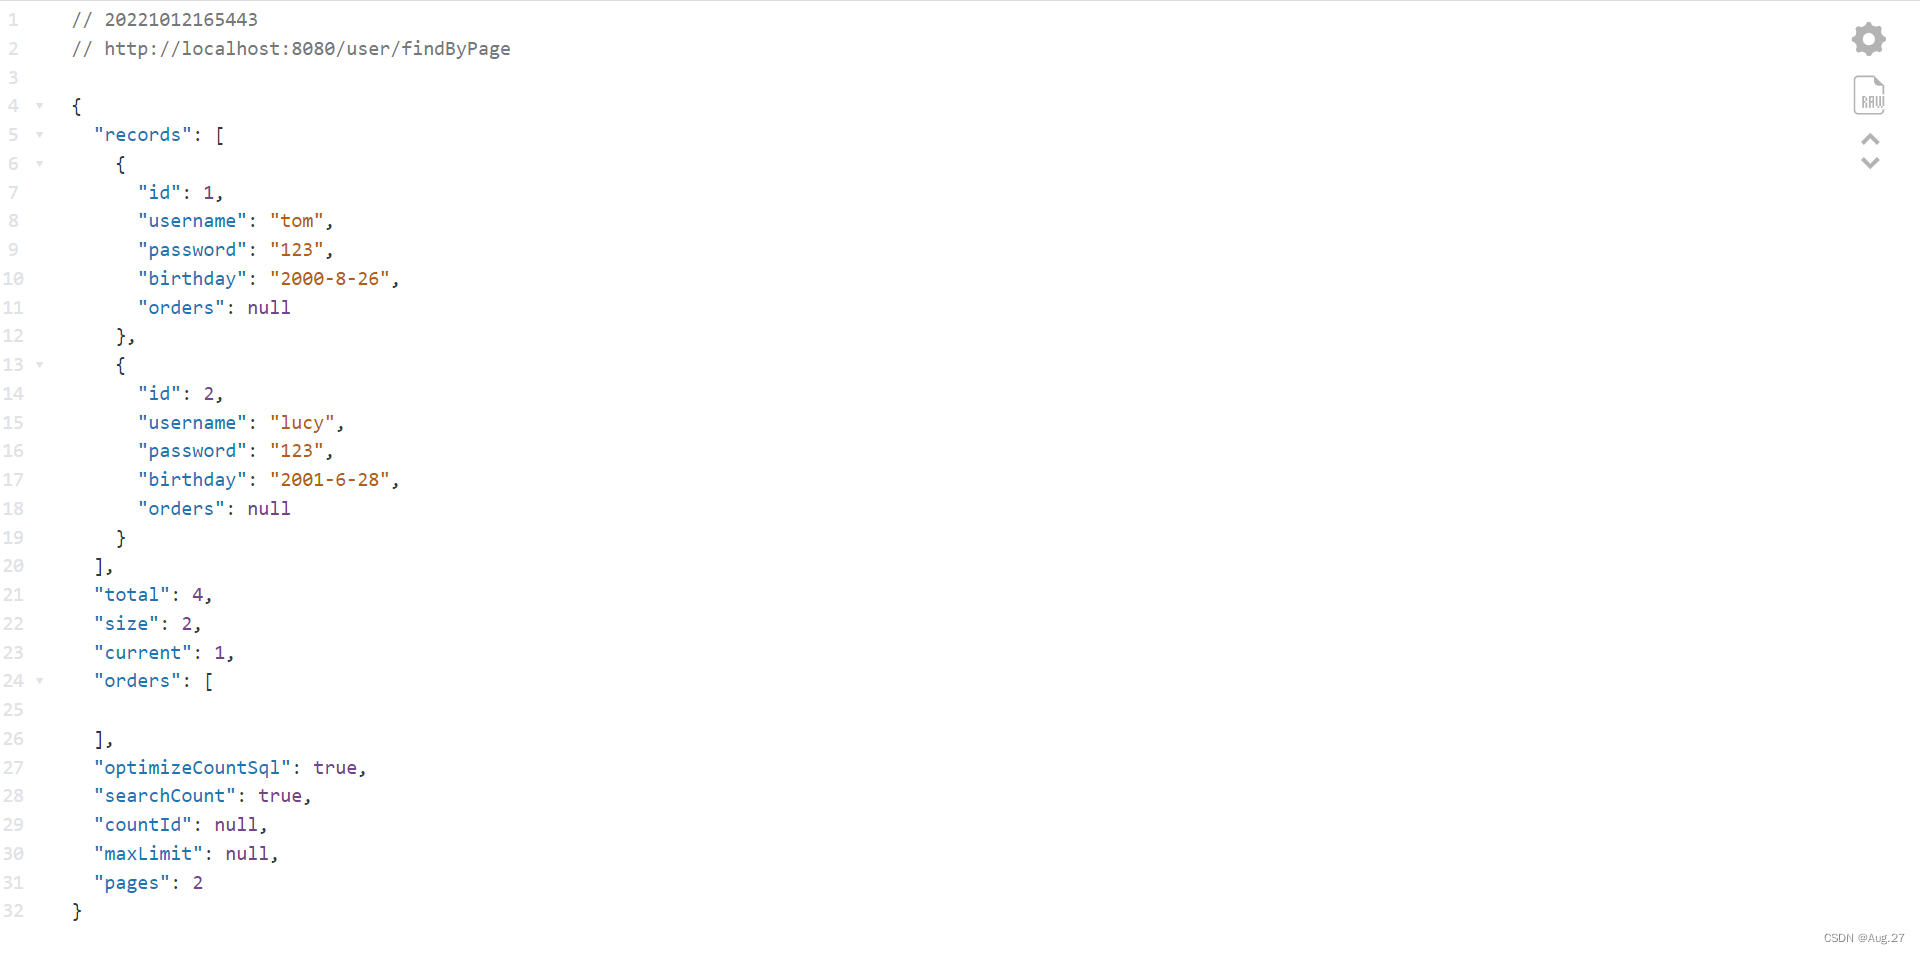
- @GetMapping("/user/findByPage")
- public IPage findByPage(){
- // 设置起始值及每页条数
- Page<User> page = new Page<>(0,2);
- IPage iPage = userMapper.selectPage(page,null); // 第一个参数是page,第二个参数是查询条件
- return iPage;
- }
- 效果展示
七、Vue框架快速上手
1、前端环境准备
- 编码工具:VSCode
- 依赖管理:NPM
- 项目构建:VueCli
2、Vue框架介绍
- Vue.js是一套用于构建用户界面的渐进式框架。
- Vue.js提供了MVVM数据绑定和一个可组合的组件系统,具有简单、灵活的API。
- 其目标是通过尽可能简单的API实现响应式的数据绑定和可组合的视图组件。
-
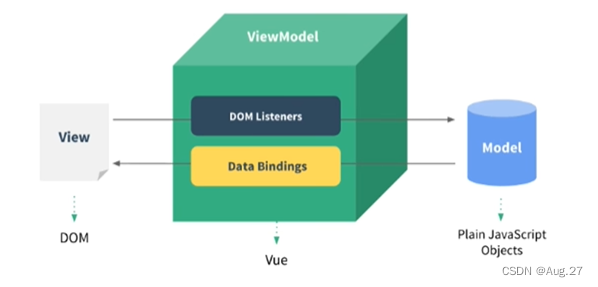
MVVM模式:
- MVVM是Model-View-ViewModel的缩写,它是一种基于前端开发的架构模式,其核心是提供对View和ViewModel的双向数据绑定。
- Vue提供了MVVM风格的双向数据绑定,核心是MVVM中的VM,也就是ViewModel,ViewModel负责连接View和Model,保证视图和数据的一致性。
-
Vue快速入门:
- 导入vue.js的script脚本文件
-
<script src="https://unpkg.com/vue@3/dist/vue.global.js"></script>
-
- 在页面中声明一个将要被vue所控制的DOM区域,既MVVM中的View
-
- <div id="app">
- {{ message }}
- </div>
-
- 创建vm实例对象(vue实例对象)
-
- const vm = {
- // 指定数据源:即MVVM中的Model
- data: function(){
- return{
- message: 'Hello Vue!'
- }
- }
- }
- const app = Vue.createApp(hello)
- app.mount('#app) // 指定当前vue实例要控制页面的哪个区域
-
- 本人使用的是Vue3语法,想了解Vue更多知识及操作可到Vue官网学习!!
- 导入vue.js的script脚本文件
八、Vue组件化开发
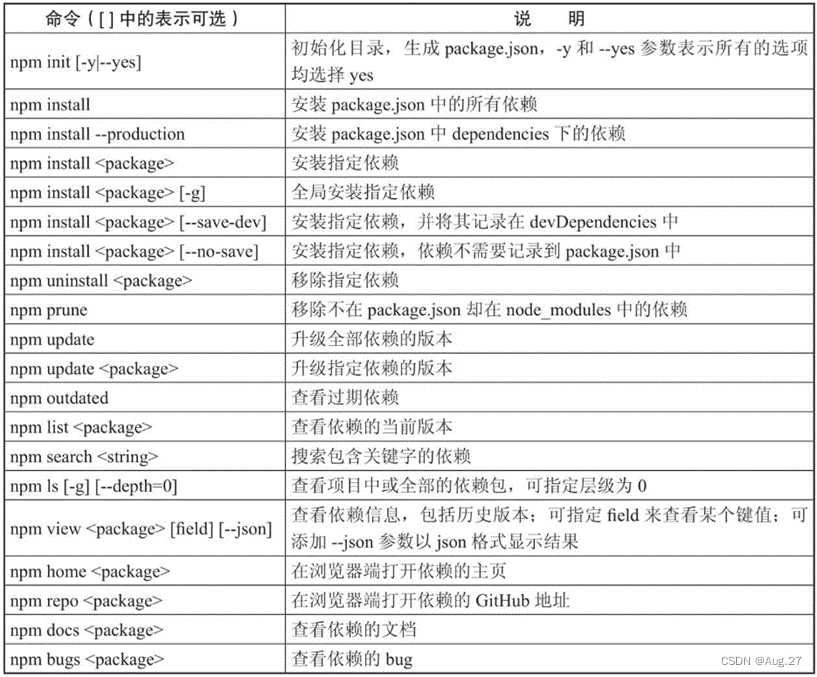
1、NPM简介
- NPM(Node Package Manager)是一个NodeJS包管理和分发工具。
- NPM以其优秀的依赖管理机制和庞大的用户群体,目前已经发展成为整个JS领域的依赖管理工具。
- NPM最常见的用法就是用于安装和更新依赖。要使用NPM,首先需要安装Node工具。
2、NodeJS安装
- NodeJS是一个基于Chrome V8引擎的JavaScript运行时环境。
- Node中包含了NPM包管理工具。
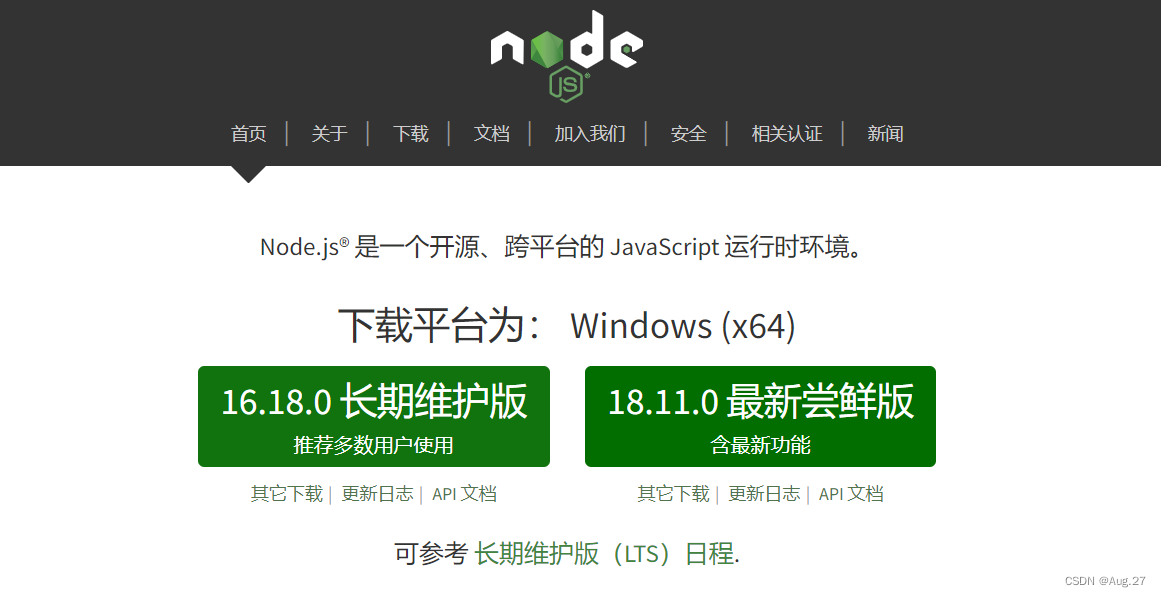
- 下载地址:https://nodejs.org/zh-cn/
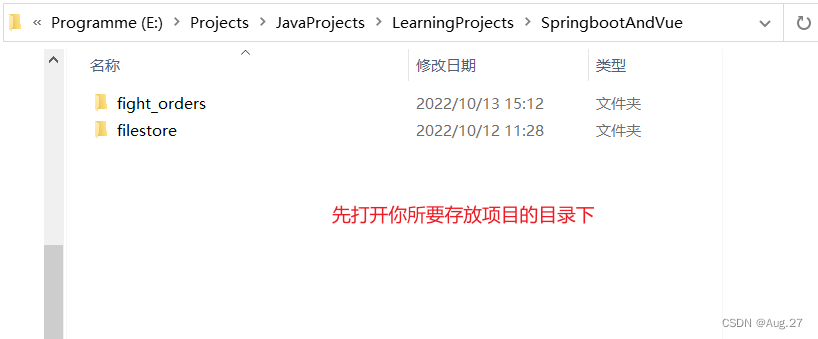
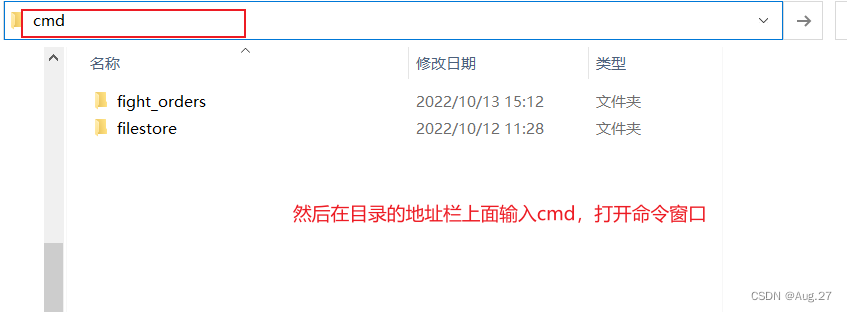
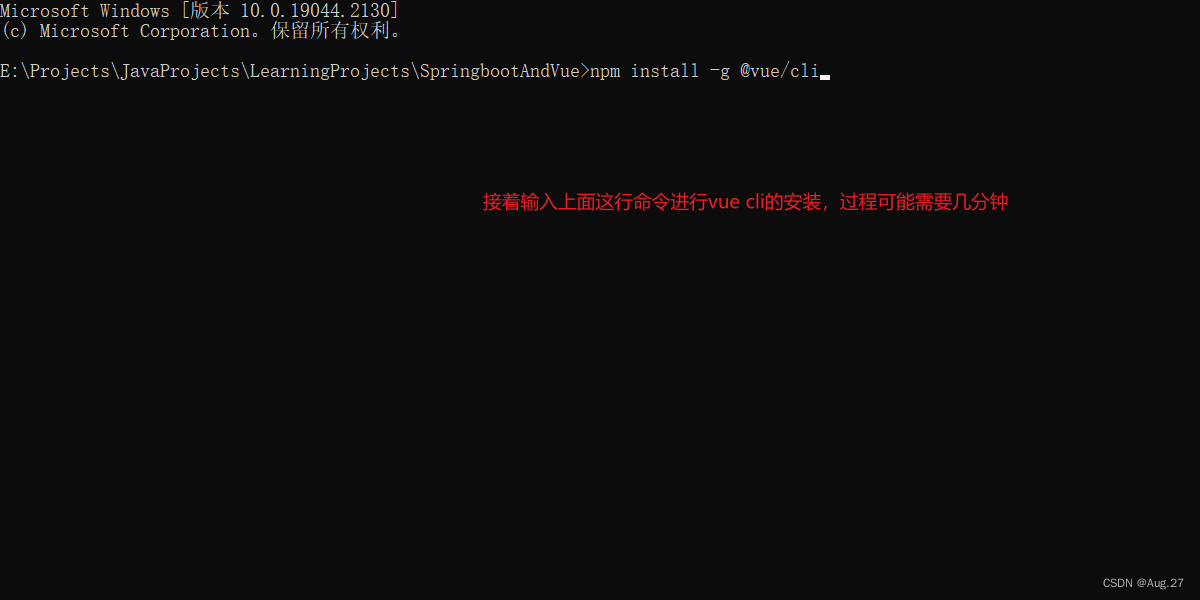
3、NPM使用
4、Vue Cli使用
- Vue Cli是Vue官方提供的构建工具,通常称为脚手架。
- 用于快速搭建一个带有热重载(代码修改后不必刷新页面即可呈现修改后的效果)及构建生产版本等功能的单页面应用。
- Vue Cli基于webpack构建,也可以通过项目内的配置文件进行配置。
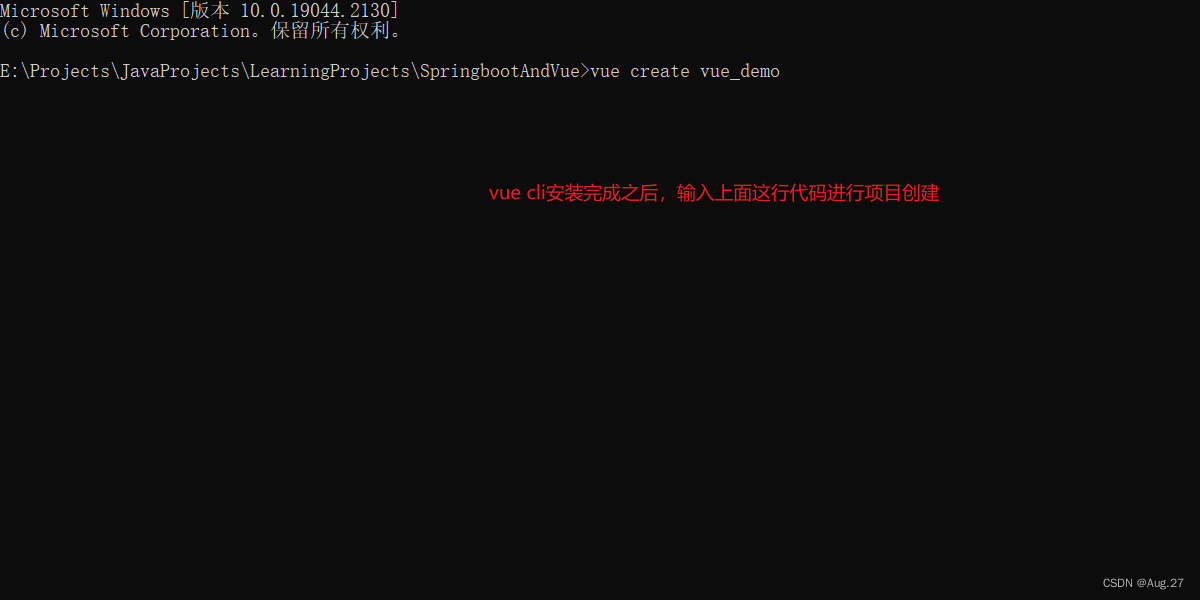
- 安装:
-
npm install -g @vue/cli
-
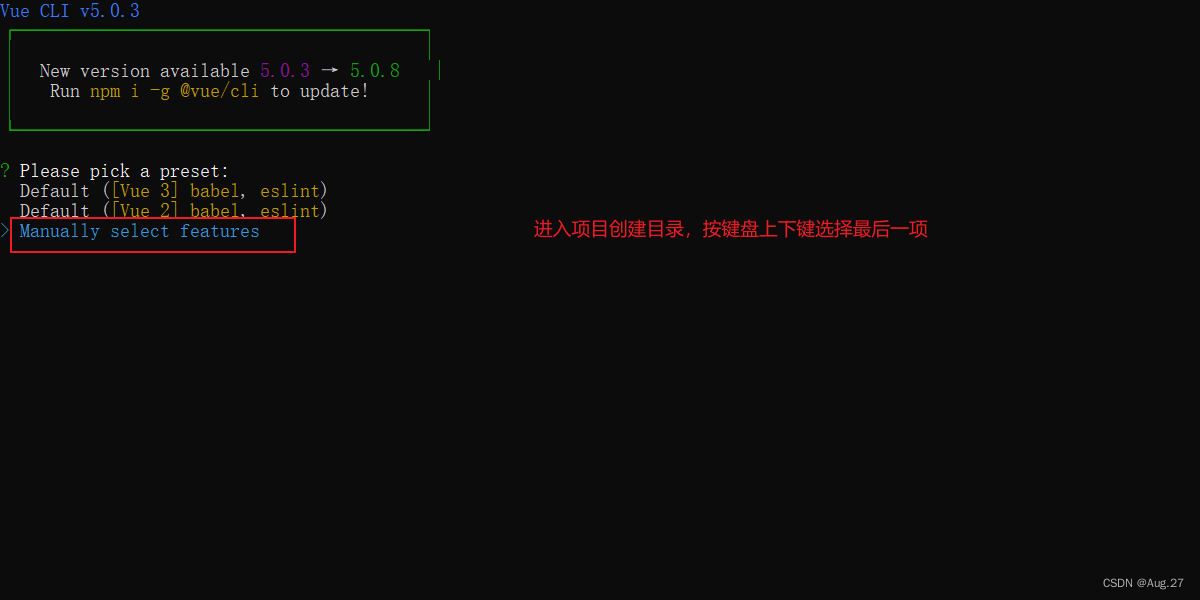
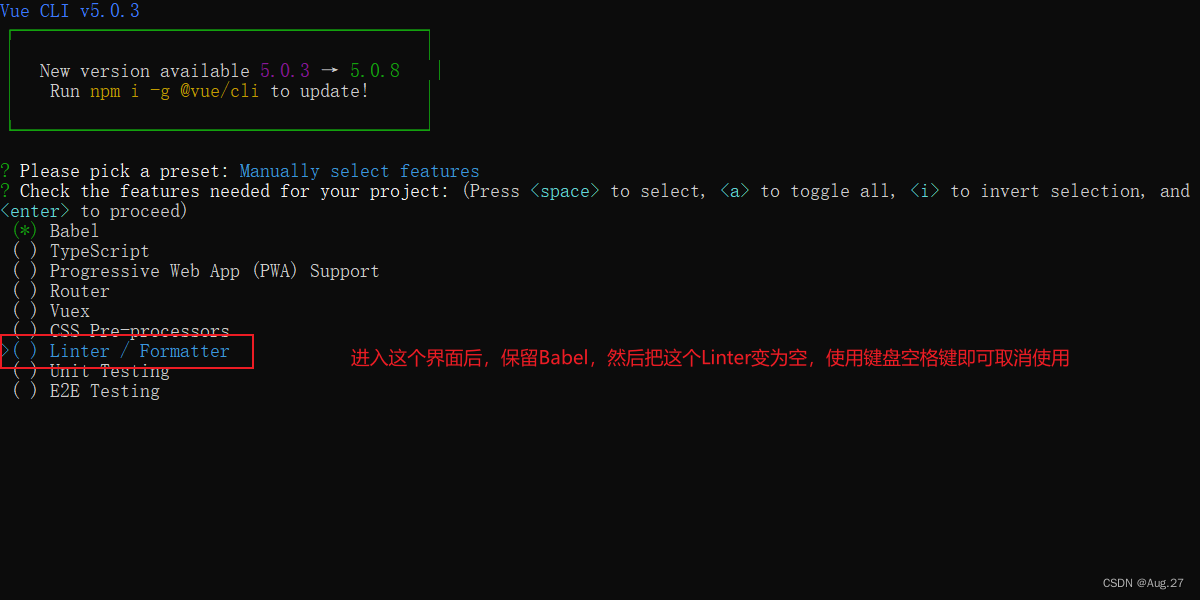
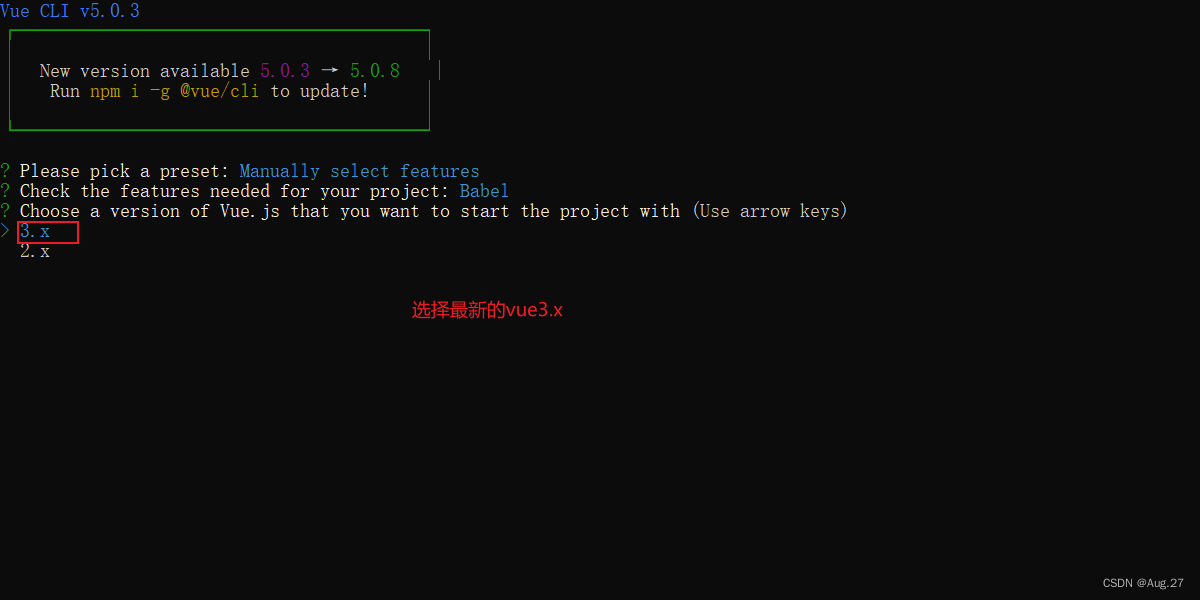
- 具体步骤:
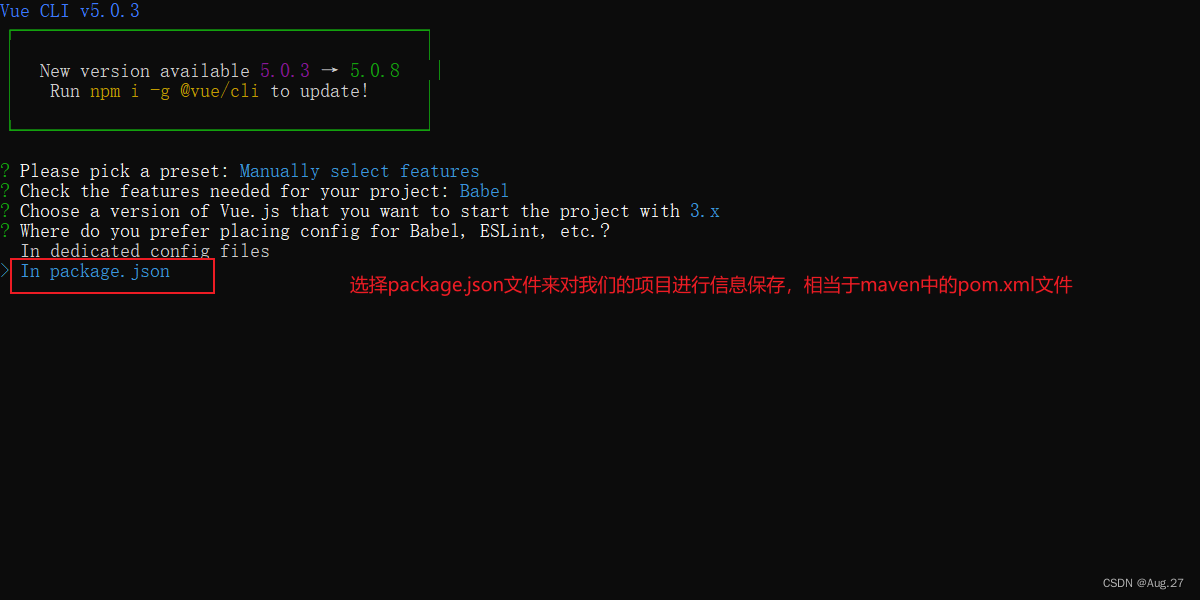
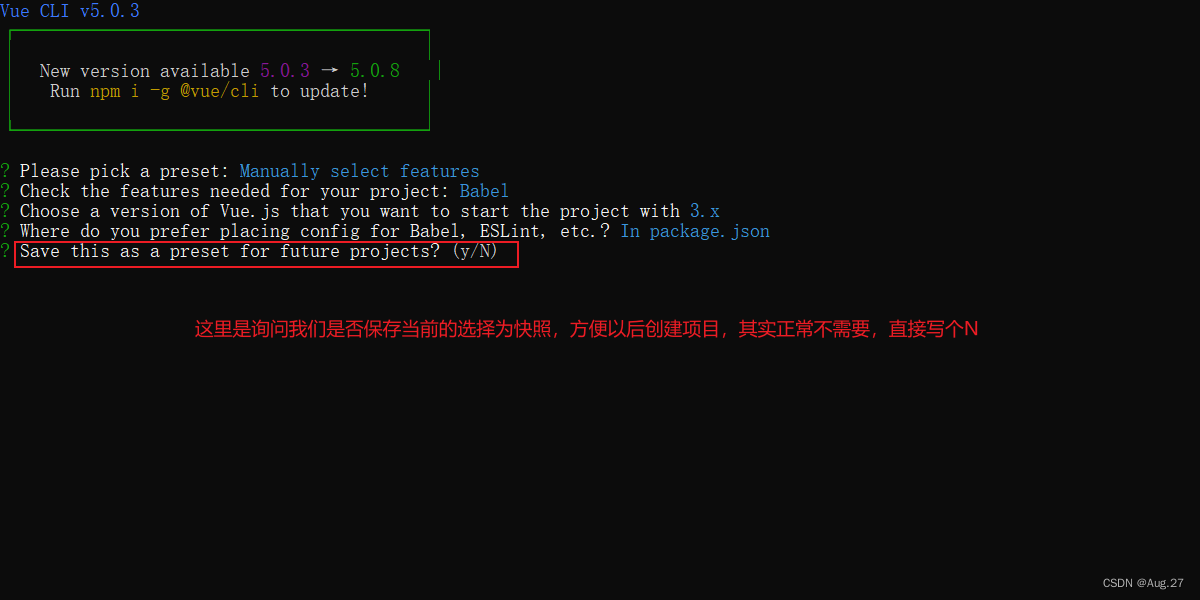
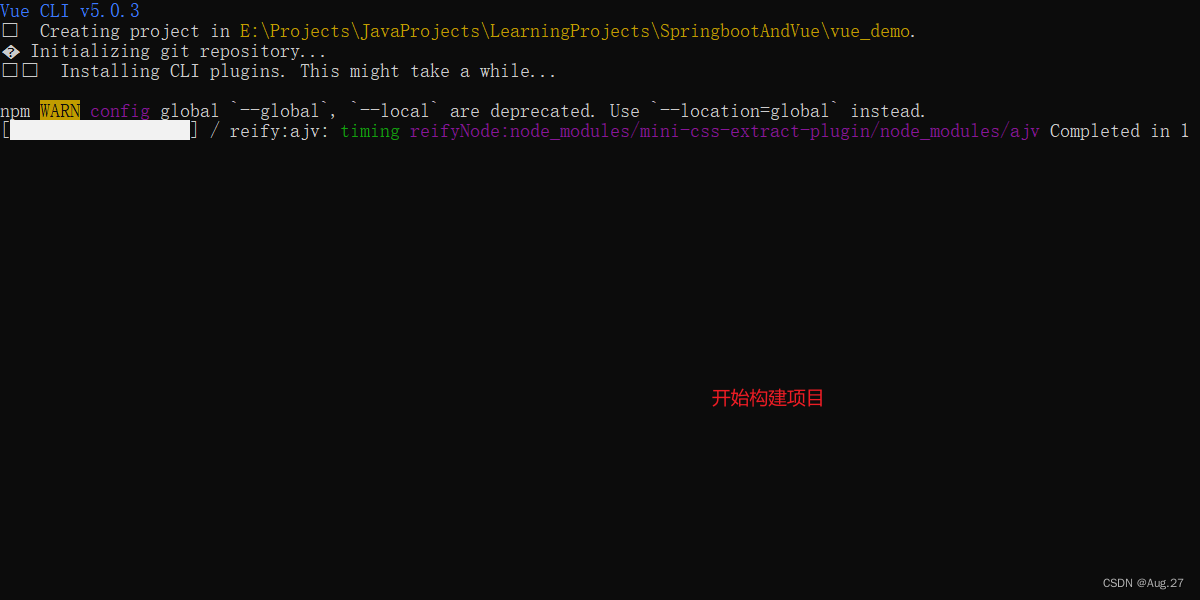
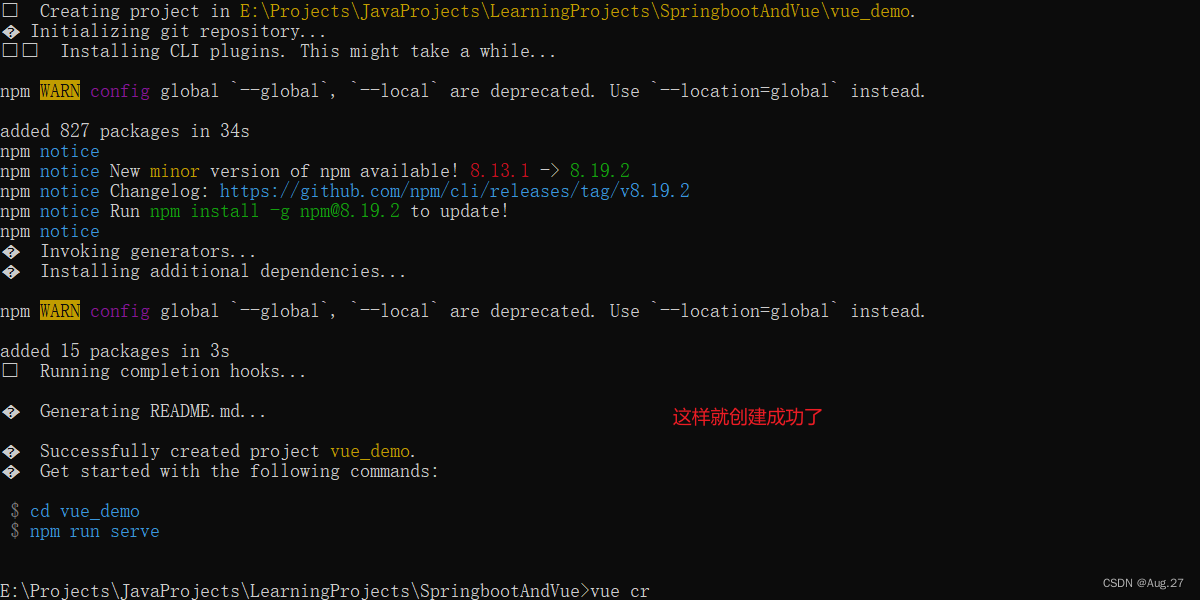
- 以Vue3为例子演示

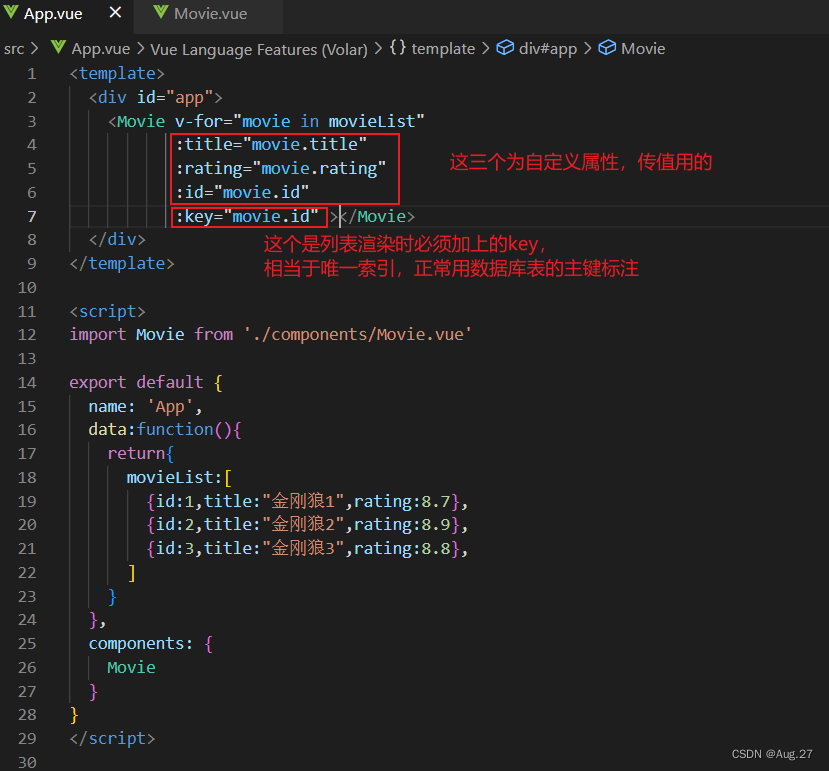
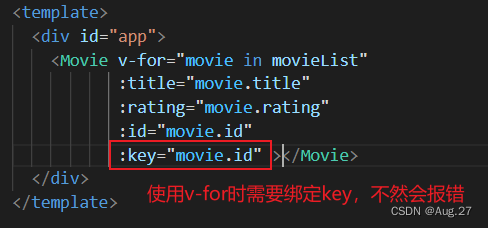
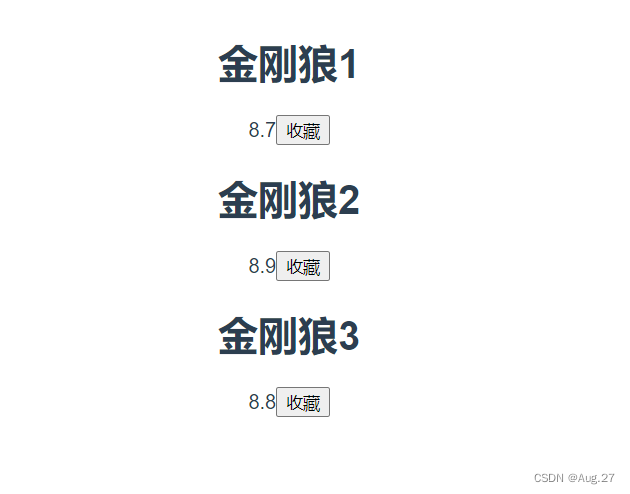
5、组件化开发
- 组件(Component)是Vue.js最强大的功能之一。组件可以扩展HTML元素,封装可重用的代码。
- Vue的组件系统允许我们使用小型、独立和通常可复用的组件构建大型应用。

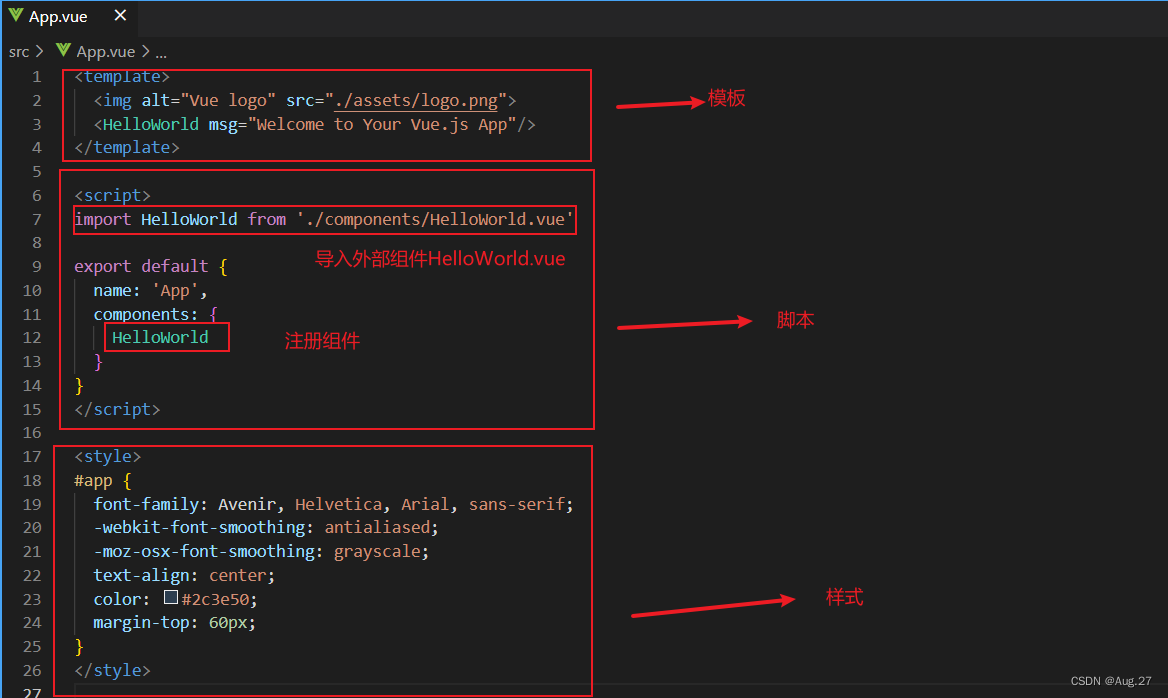
6、组件的构成
- Vue中规定组件的后缀名是.vue
- 每个.vue组件都由三部分组成:
- template:组件的模板结构,可以包含HTML标签及其他的组件
- script:组件的JavaScript代码
- style:组件的样式
-
想了解Vue Cli项目的更多知识及操作可到Vue官网学习!!
九、第三方组件 Element-UI
1、组件间的传值
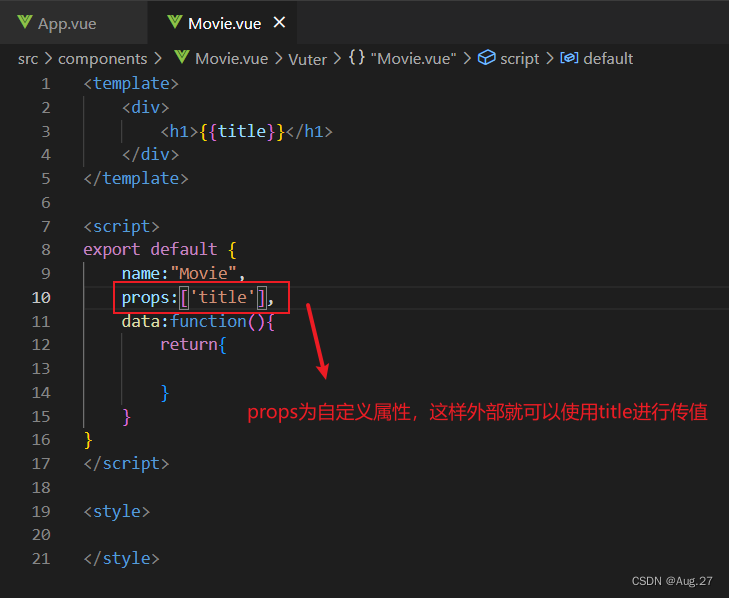
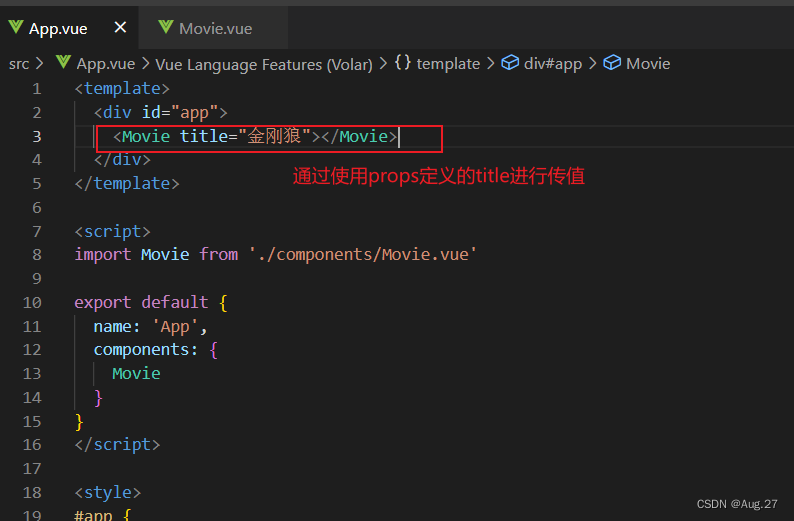
- 组件可以由内部的Data提供数据,也可以由父组件通过prop的方式传值。
- 兄弟组件之间可以通过Vuex等统一数据源提供数据共享。
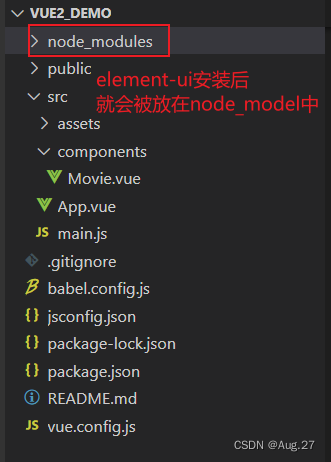
- 目前Element-UI成熟的版本是基于Vue2.x,所以使用Element-UI要创建Vue2.x项目
- 基本数据渲染

- 列表数据渲染
-
更多语法可在Vue官网学习!!
2、Element-UI介绍
- Element-UI是国内饿了么公司提供的一套开源前端框架,简洁优雅,提供了Vue、React、Angular等多个版本
- 文档地址:https://element.eleme.cn/#/zh-CN
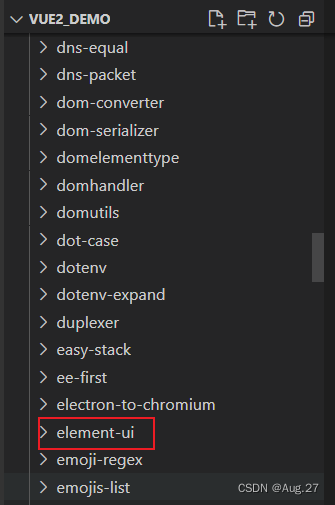
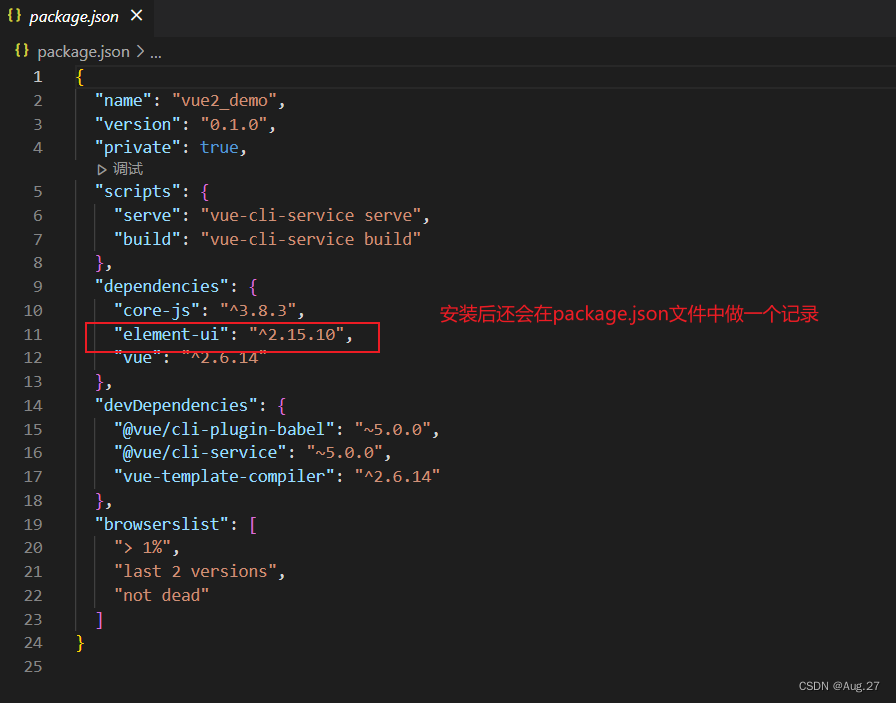
- 安装:
-
npm i element-ui 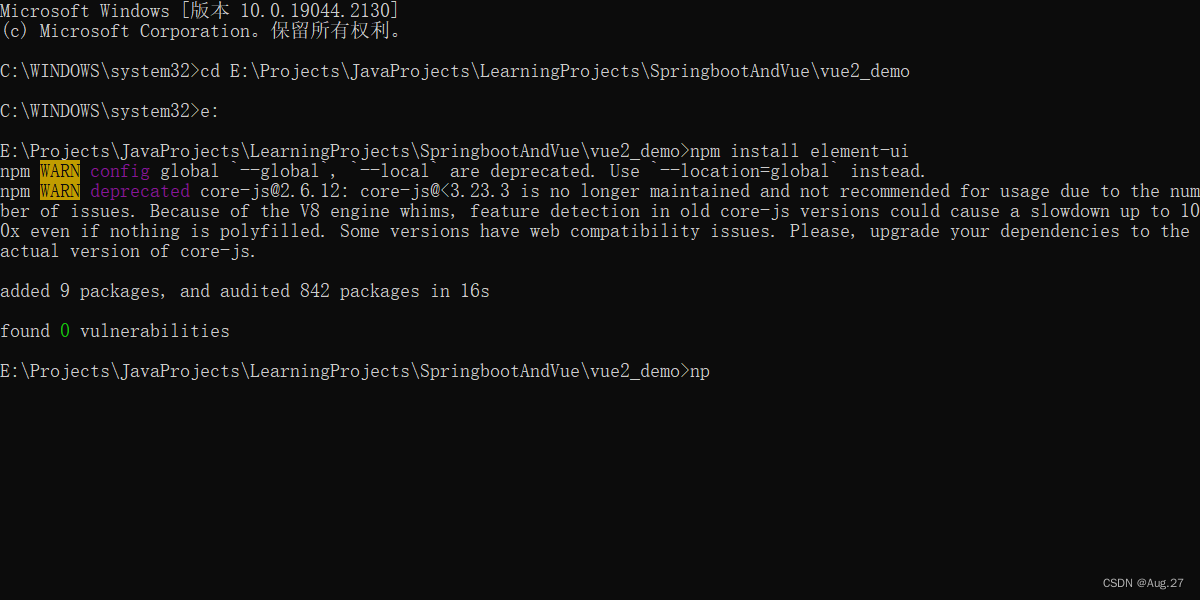
- 以上即为安装成功
-
- 引入Element-UI:
-
- import Vue from 'vue'
- import App from './App.vue'
- import ElementUI from 'element-ui';
- import 'element-ui/lib/theme-chalk/index.css';
- Vue.use(ElementUI); // 全局注册
- Vue.config.productionTip = false
- new Vue({
- render: h => h(App),
- }).$mount('#app')
-
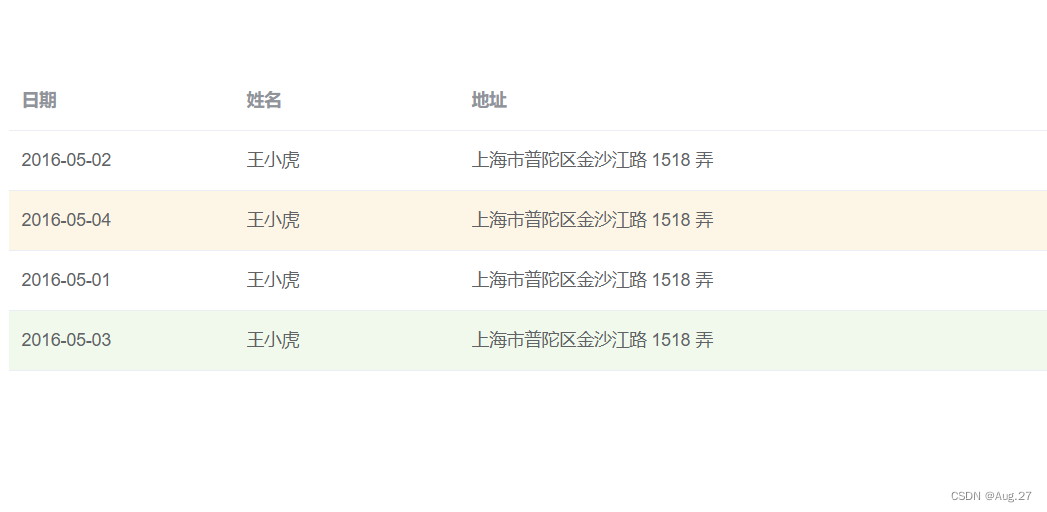
- 简单使用Element-UI
-
- <template>
- <el-table
- :data="tableData"
- style="width: 100%"
- :row-class-name="tableRowClassName">
- <el-table-column
- prop="date"
- label="日期"
- width="180">
- </el-table-column>
- <el-table-column
- prop="name"
- label="姓名"
- width="180">
- </el-table-column>
- <el-table-column
- prop="address"
- label="地址">
- </el-table-column>
- </el-table>
- </template>
- <script>
- export default {
- name:"Hello",
- props:[],
- data() {
- return {
- tableData: [{
- date: '2016-05-02',
- name: '王小虎',
- address: '上海市普陀区金沙江路 1518 弄',
- }, {
- date: '2016-05-04',
- name: '王小虎',
- address: '上海市普陀区金沙江路 1518 弄'
- }, {
- date: '2016-05-01',
- name: '王小虎',
- address: '上海市普陀区金沙江路 1518 弄',
- }, {
- date: '2016-05-03',
- name: '王小虎',
- address: '上海市普陀区金沙江路 1518 弄'
- }]
- }
- },
- methods: {
- tableRowClassName({row, rowIndex}) {
- if (rowIndex === 1) {
- return 'warning-row';
- } else if (rowIndex === 3) {
- return 'success-row';
- }
- return '';
- }
- }
- }
- </script>
- <style>
- .el-table .warning-row {
- background: oldlace;
- }
- .el-table .success-row {
- background: #f0f9eb;
- }
- </style>
- 更多组件和样式可参考官方文档:https://element.eleme.cn/#/zh-CN
-
3、第三方图标库
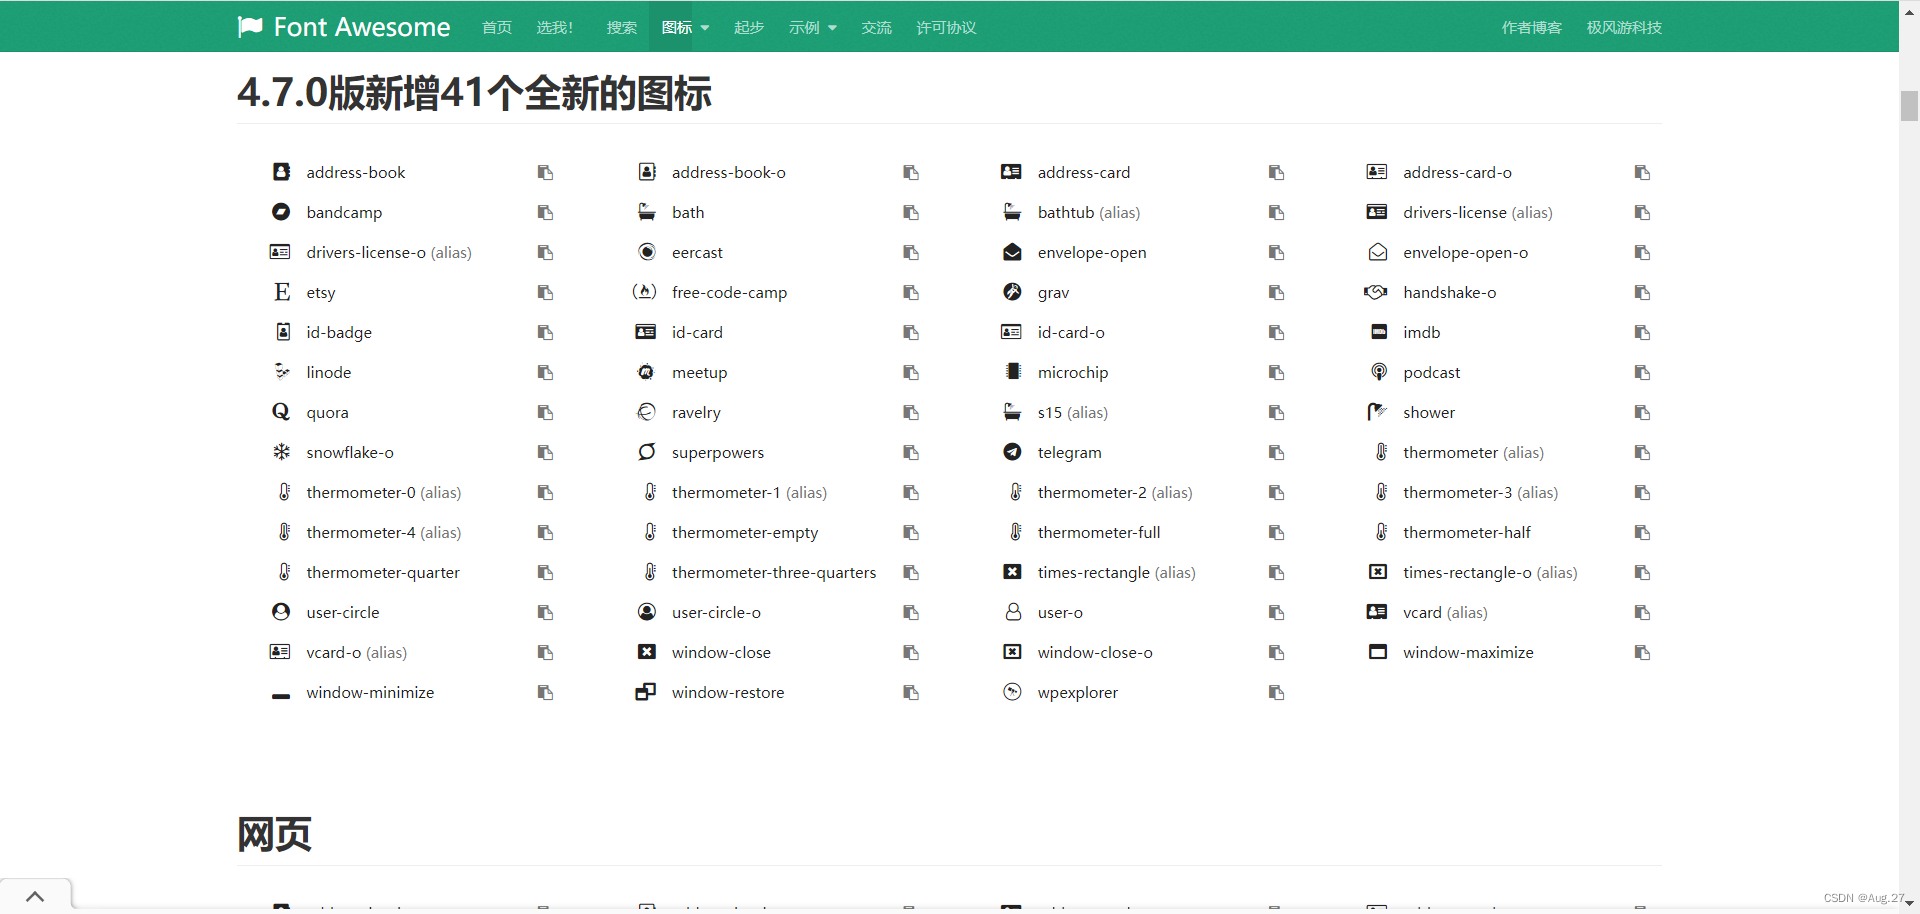
- 由于Element-UI提供的字体图符较少,一般会采用其他图标库,如著名的FontAwesome。
- FontAwesome提供了675个可缩放的矢量图标,可以使用CSS所提供的所有特性对它们进行更改,包括大小、颜色、阴影或者其他任何支持的效果。
- 文档地址:https://fontawesome.dashgame.com/
- 安装:
-
npm install font-awesome
-
- 使用:
-
import 'font-awesome/css/font-awesome.min.css'; -
<i class="fa fa-camera-retro"></i> fa-camera-retro 
- 更多图标可参考官网:https://fontawesome.dashgame.com/
-
十、Axios网络请求
1、Axios简介
- 在实际项目开发中,前端页面所需要的数据往往需要从服务器获取,这必然涉及与服务器的通信。
- Axios是一个基于promise网络请求库,作用于node.js和浏览器中。
- Axios在浏览器端使用XMLHttpRequests发送网络请求,并能自动完成JSON数据的转换。
- 安装:
-
npm install axios
-
- 地址:https://www.axios-http.cn/
- 引入:
-
import axios from 'axios';
-
2、发送网络请求
-
发送GET请求
- 方式一
-
- // 向给定id的用户发起请求
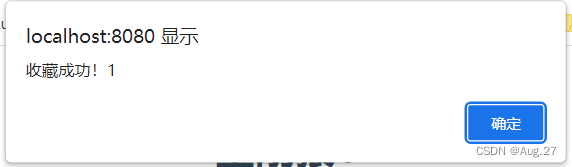
- axios.get('http://localhost:8080/user?id=123')
- .then(function(response){
- // 处理成功情况
- console.log(response);
- })
- .catch(function(error){
- // 处理失败情况
- console.log(error);
- })
- .then(function(){
- // 总是会执行
- });
-
- 方式二
-
- // 上述请求也可以按以下方式完成
- axios.get('http://localhost:8080/user',{
- params:{
- id:123
- }
- })
- .then(function(response){
- // 处理成功情况
- console.log(response);
- })
- .catch(function(error){
- // 处理失败情况
- console.log(error);
- })
- .then(function(){
- // 总是会执行
- });
-
- 方式一
-
发生POST请求
-
- axios.post('http://localhost:8080/user',{
- firstName: 'Fred',
- lastName: 'Flintstone'
- })
- .then(function(response){
- console.log(response);
- })
- .catch(function(error){
- console.log(error);
- });
-
-
异步回调问题(async/await)
- 可以取代上面的异步编程
-
- // 支持async/await 用法
- async function getUser(){
- try{
- // 不需要.then就可以之间拿到response响应数据
- const response = await.axios.get('http://localhost:8080/user?id=1');
- console.log(response);
- }catch(error){
- console.error(error);
- }
- }
-
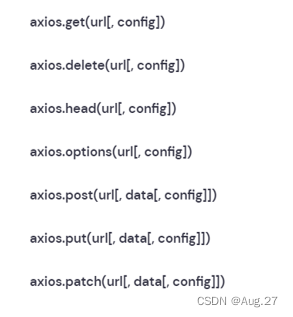
其他请求方式
-
与Vue整合
-
在实际项目开发中,几乎每个组件中都会用到axios发起的数据请求。此时会遇到如下两个问题:
-
每个组件中都需要导入axios
-
每次发送请求都需要填写完整的请求路径
-
-
可以通过全局配置的方法解决上述问题:
-
- // 在main.js中导入axios,然后再继续配置
- import axios from 'axios'
- // 配置请求根路径
- axios.defaults.baseURL = 'http://xxx'
- // 将axios作为全局的自定义属性,每个组件可以在内部直接访问(Vue3)
- app.config.globalProerties.$http = axios
- // 将axios作为全局的自定义属性(不一定$http,可以自定义),每个组件可以在内部直接访问(Vue2)
- Vue.prototype.$http = axios
- //例如:直接在其他组件中写:this.$http.get()就可以实现axios的功能
-
-
3、Axios使用
-
Vue项目的网络请求一般在created里面做,这样页面一创建就会发送网络请求。
-
- created:function(){
- axios.get("http://localhost:8888/user")
- .then((response)=>{ // 箭头函数:ES6语法,它的作用:它的作用域继承于父级(也就是Vue实例),如果用function(response),作用域就不是Vue实例
- console.log(response.data);
- this.tableData = response.data;
- console.log(this.tableData);
- })
- .catch(function(error){
- console.log(error);
- })
- },
-
-
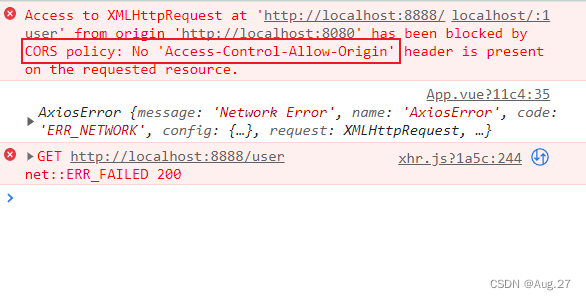
当我们运行项目后,控制台显示报错了,这个的意思是没有明确授权同源策略,导致被CORS策略阻止。
-
为什么会出现跨域问题
-
为了保证浏览器的安全,不同源的客户端本在没有明确授权的情况下,不能读写对方资源,称为同源策略,同源策略是浏览器安全的基石。
-
同源策略是一种约定,它是浏览器最核心也最基本的安全功能。
-
所谓同源(即指在同一个域)就是两个页面具有相同的协议(protocol),主机(host)和端口号(port)。
-
当一个请求url的协议、域名、端口三者之间任意一个与当前页面url不同即为跨域,此时无法读取非同源网页的Cookie,无法向非同源地址发送Ajax请求或者Axios请求。
-
-
跨域问题解决方法
- CORS(Cross-Origin Resource Sharing)是由W3C制定的一种跨域资源共享技术标准,其目的就是为了解决前端的跨域请求。
- CORS可以在不破坏既有规则的情况下,通过后端服务器实现CORS接口,从而实现跨域通信。
- CORS将请求分为两类:简单请求和非简单请求,分别对跨域通信提供支持。
- 简单请求:(满足以下条件的请求即为简单请求,不满足即为复杂请求)
- 请求方法:GET、POST、HEAD
- 除了以下的请求头字段之外,没有自定义的请求头:
- Accept
- Accept-Language
- Content-Language
- Last-Event-ID
- Content-Type
- Content-Type的值只有以下三种:
- text/plain
- multipart/form-data
- application/x-www-form-urlencoded
-
简单请求的服务器处理
-
对于简单请求,CORS的策略是请求时在请求头中增加一个Origin字段。
-
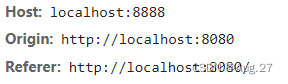
-
服务器收到请求后,根据该字段判断是否允许该请求访问,如果允许,则在HTTP头信息中添加Access-Control-Allow-Origin字段。
-
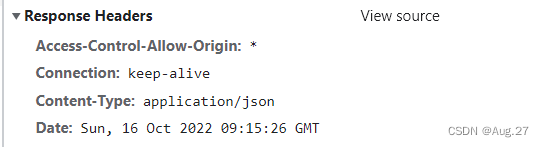
-
如果没有配置跨域,是不会有Access-Control-Allow-Origin字段的。
-
-
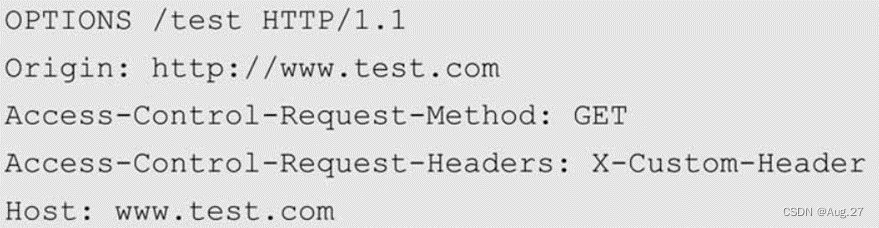
非简单请求
-
对于非简单请求的跨源请求,浏览器会在真实请求发出前增加一次OPTION请求,称为预检请求(preflight request)。
-
预检请求将真实请求的信息,包括请求方法、自定义头字段、源信息添加到HTTP头信息字段中,询问服务器是否允许这样的操作。
-
例如一个GET请求:
-
-
Access-Control-Request-Method表示请求使用的HTTP方法,Access-Control-Request-Headers包含请求的自定义头字段。
-
服务器收到请求时,需要分别对Origin、Access-Control-Request-Method、Access-Control-Request-Headers进行验证,验证通过后,会在返回HTTP头信息中添加:
-
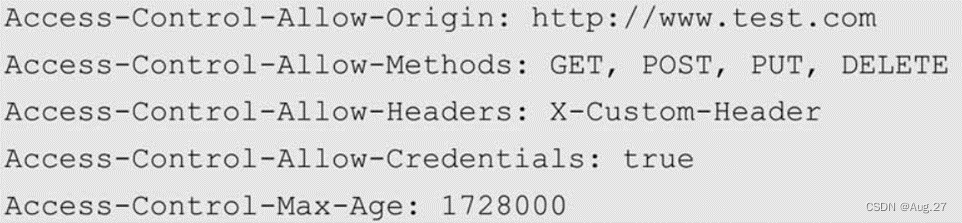
- Access-Control-Allow-Methods、Access-Control-Allow-Headers:真实请求允许的方法、允许使用的字段。
- Access-Control-Allow-Credentials:是否允许用户发送、处理Cookie。
- Access-Control-Max-Age:预检请求的有效期,单位为秒,有效期内不会重复发送预检请求。
-
- 当预检请求通过后,浏览器才会发送真实请求到服务器。这样就实现了跨域资源的请求访问。
-
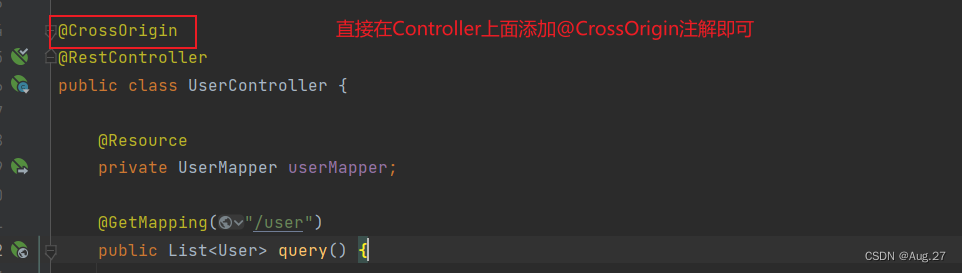
- Springboot中配置CORS
- 方式一:
-
- @Configuration
- public class CorsConfig implements WebMvcConfigurer {
- @Override
- public void addCorsMappings(CorsRegistry registry) {
- registry.addMapping("/**") // 允许跨域访问的路径
- .allowedOrigins("*") // 允许跨域访问的源
- .allowedMethods("POST","GET","PUT","OPTIONS","DELETE") // 允许请求的方法
- .maxAge(16800) // 预检间隔时间
- .allowedHeaders("*") // 允许头部设置
- .allowCredentials(true); // 是否发送Cookie
- }
- }
-
- 方式二:
- 方式一:
- 配置好后重新访问就可以请求成功了
十一、前端路由VueRouter
1、VueRouter安装与使用
- Vue路由vue-router是官方的路由插件,能够轻松的管理SPA项目中组件的切换。
- Vue的单页面应用是基于路由和组件的,路由用于设定访问路径,并将路径和组件映射起来。
- vue-router目前有3.x版本和4.x版本:
- vue-router3.x只能结合vue2进行使用;
- vue-router4.x只能结合vue3进行使用。
-
VueRouter安装:
-
- vue-router@3在vue2中使用
- npm install vue-router@3
- vue-router@4在vue3中使用
- npm install vue-router@4
-
-
创建路由组件
-
声明路由连接和占位标签
- 可以使用<router-link>标签来声明路由链接,并使用<router-view>标签来声明路由占位符,示例如下:
-
- <template>
- <div id="app">
- <!-- 声明路由链接 -->
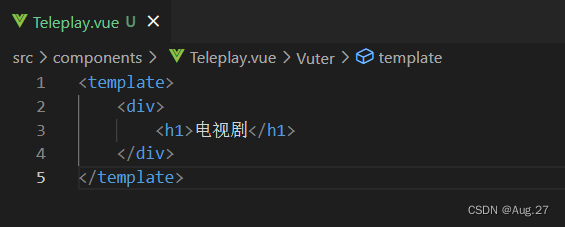
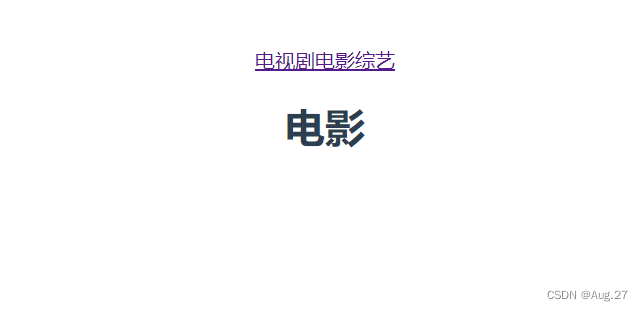
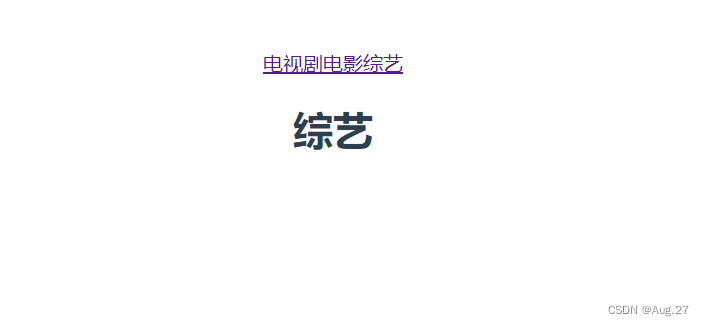
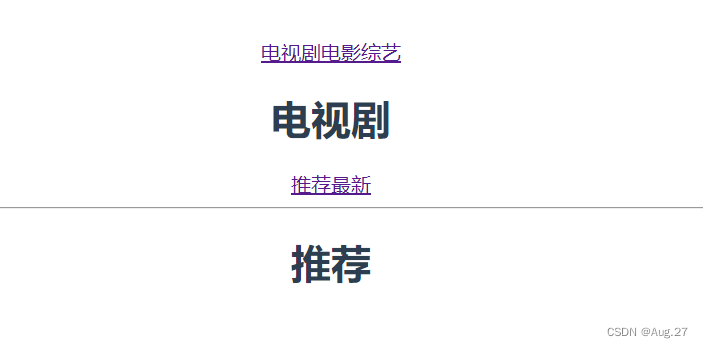
- <router-link to="/teleplay">电视剧</router-link>
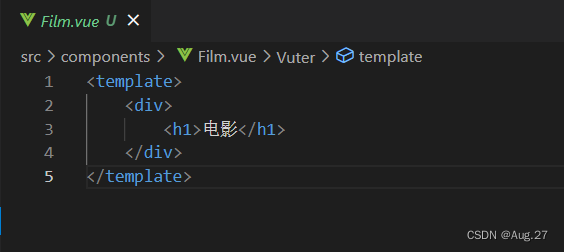
- <router-link to="/film">电影</router-link>
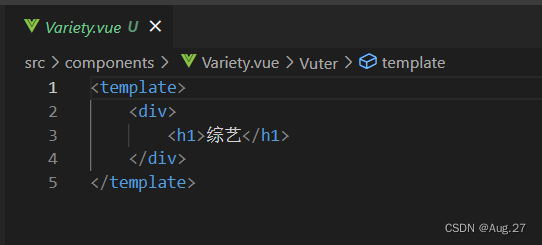
- <router-link to="/variety">综艺</router-link>
- <!-- 声明路由占位标签 -->
- <router-view></router-view>
- </div>
- </template>
-
创建路由模块
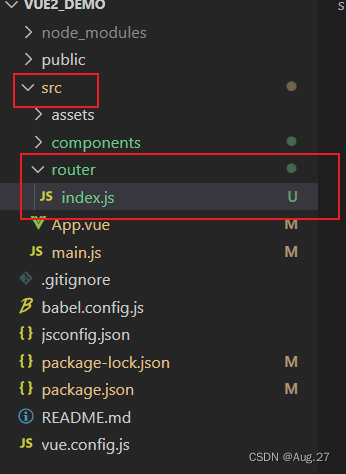
- 在项目src目录下创建一个router目录,在里面新建一个index.js路由模块
- 然后编写以下代码
-
- import VueRouter from "vue-router";
- import Vue from "vue";
- import Teleplay from '../components/Teleplay.vue'
- import Film from '../components/Film.vue'
- import Variety from '../components/Variety.vue'
- // 将VueRouter设置为Vue组件
- Vue.use(VueRouter)
- const router = new VueRouter({
- // 指定hash属性与组件的对应关系
- routes:[
- {path:'/teleplay',component:Teleplay},
- {path:'/film',component:Film},
- {path:'/variety',component:Variety}
- ]
- })
- export default router
-
- 在项目src目录下创建一个router目录,在里面新建一个index.js路由模块
-
挂载路由模块
- 在main.js中导入并挂载router
-
- import Vue from 'vue'
- import App from './App.vue'
- import router from './router/index'
- Vue.config.productionTip = false
- new Vue({
- render: h => h(App),
- // router: router // 如果名称和属性一致可以直接写router即可
- router
- }).$mount('#app')
-
实现效果


2、VueRouter进阶
-
路由重定向
- 路由重定向指的是:用户在访问地址A的时候,强制用户跳转到地址C,从而展示特定的组件页面。
- 通过路由规则的redirect属性,指定一个新的路由地址,可以很方便地设置路由的重定向。
-
- // 将VueRouter设置为Vue组件
- Vue.use(VueRouter)
- const router = new VueRouter({
- // 指定hash属性与组件的对应关系
- routes:[
- // 当用户访问时,直接跳转访问teleplay
- {path:'/',redirect:'/teleplay'},
- {path:'/teleplay',component:Teleplay},
- {path:'/film',component:Film},
- {path:'/variety',component:Variety}
- ]
- })
- export default router
-
嵌套路由
- 在Teleplay.vue组件中,声明toplist和newlist的子路由链接以及子路由占位符,示例代码如下:
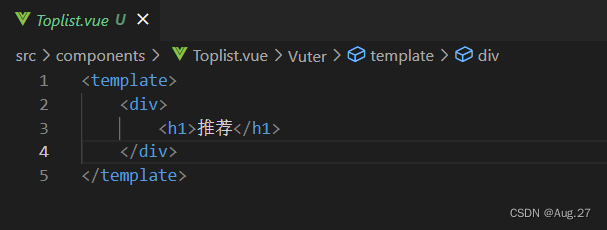
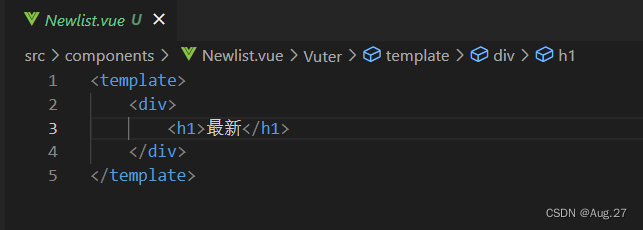
- 在Teleplay中嵌套子路由:
-
- <template>
- <div>
- <h1>电视剧</h1>
- <!-- 子路由链接 -->
- <router-link to="/teleplay/toplist">推荐</router-link>
- <router-link to="/teleplay/newlist">最新</router-link>
- <hr>
- <router-view></router-view>
- </div>
- </template>
-
- 在index.js路由模块中,导入需要的组件,并使用children属性声明子路由规则:
-
- const router = new VueRouter({
- // 指定hash属性与组件的对应关系
- routes:[
- // 当用户访问时,直接跳转访问teleplay
- {path:'/',redirect:'/teleplay'},
- {
- path:'/teleplay',
- component:Teleplay,
- // 通过children属性,嵌套声明子路由
- children:[
- {path:'toplist',component: Toplist},
- {path:'newlist',component: Newlist}
- ]
- },
- {path:'/film',component:Film},
- {path:'/variety',component:Variety},
- ]
- })
- export default router
-
- 在Teleplay.vue组件中,声明toplist和newlist的子路由链接以及子路由占位符,示例代码如下:
-
动态路由
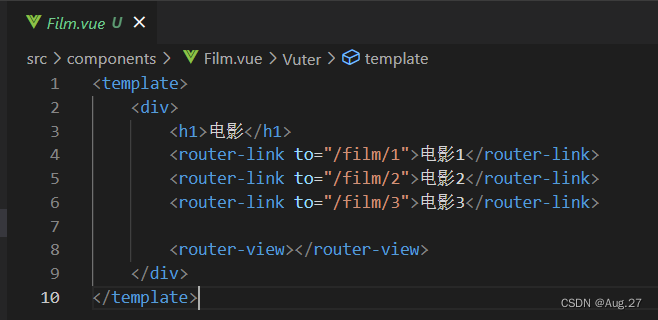
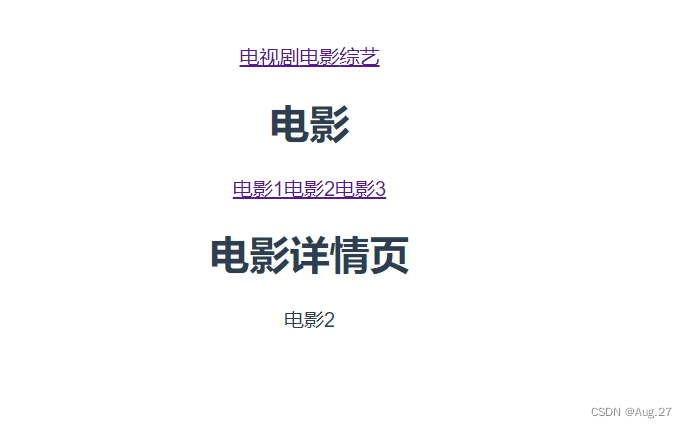
- 以下有三个路由链接,分别跳转不同的电影界面
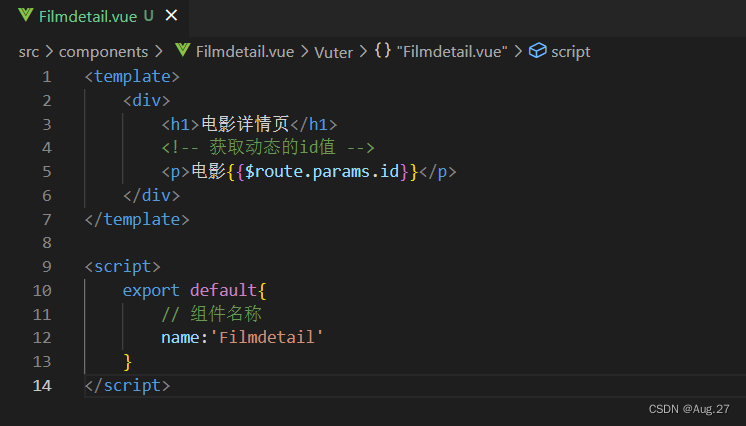
- 新建一个电影详情页Filmdetail.vue
- 然后在router中添加路由链接
-
- {
- path:'/film',
- component:Film,
- children:[
- {path:':id',component:Filmdetail},
- ]
- },
- 这样就能实现传参
-
- 为了简化路由参数的获取形式,vue-router允许在路由规则中开启props传参。
-
- {
- path:'/film',
- component:Film,
- children:[
- {path:':id',component:Filmdetail,props:true},
- ]
- },
-
- <template>
- <div>
- <h1>电影详情页</h1>
- <!-- 获取动态的id值 -->
- <p>电影{{id}}</p>
- </div>
- </template>
- <script>
- export default{
- // 组件名称
- name:'Filmdetail',
- props:["id"] // 定义属性名称
- }
- </script>
-
这样就可以根据自己自定义的属性来获取传过来的参数。
-
- 以下有三个路由链接,分别跳转不同的电影界面
-
编程式导航
-
声明式 编程式 <router-link to="..."> router.push(...) - 除了使用<router-link> 创建a标签来定义导航链接,我们还可以借助router的实例方法,通过编写代码来实现。
- 想要导航到不同的URL,则使用router.push方法。这个方法会向history栈添加一个新的记录,所以,当用户点击浏览器后退按钮时,则回到之前的URL。
- 当你点击<router-link>时,这个方法会在内部调用,所以说,点击<router-link to="...">等同于调用router.push(....)。
-
- <template>
- <div>
- <h1>电影</h1>
- <router-link to="/film/1">电影1</router-link>
- <router-link to="/film/2">电影2</router-link>
- <router-link to="/film/3">电影3</router-link>
- <!-- 路由占位标签 -->
- <router-view></router-view>
- <button v-on:click="gotoFilmdetail(3)">跳转到电影3</button>
- </div>
- </template>
- <script>
- export default{
- methods:{
- gotoFilmdetail:function(id){
- this.$router.push('/filmdetail/'+id); // 跳转到特定的url(必须有声明的url)
- }
- }
- }
- </script>
-
-
-
导航守卫
- vue-router提供的导航守卫主要用来拦截导航,让它完成跳转或取消。
- to:Route:即将要进入的目标路由。
- from:Route:当前导航正要离开的路由。
- next:在守卫方法中如果声明了next形参,则必须调用next()函数,否则不允许用户访问任何一个路由。
- 直接放行:next()
- 强制其跳转到登录页面:next('/login')
- 强制其停留在当前页:next(false)
- 使用router.beforeEach注册一个全局前置守卫:
-
- router.beforeEach((to,from,next)=>{
- if(to.path === '/main' && !isAuthenticated){
- next('/login');
- }else{
- next();
- }
- });
-
十二、状态管理VueX
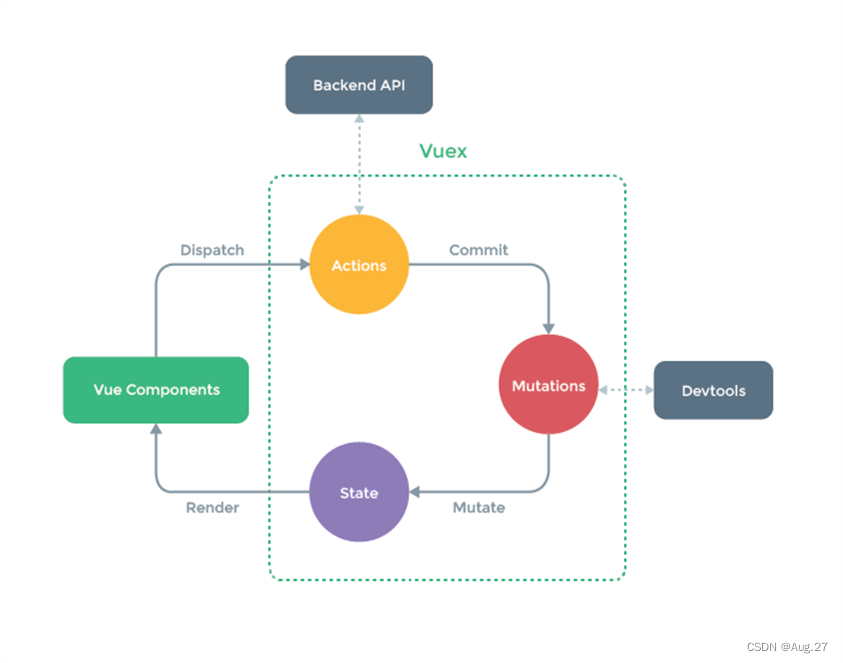
1、VueX介绍
- 对于组件化开发来说,大型应用的状态往往跨越多个组件。在多层嵌套的父子组件之间传递状态已经十分麻烦,而Vue更是没有为兄弟组件提供直接共享数据的办法。
- 基于这个问题,许多框架提供了解决方案——使用全局的状态管理器,将所有分散的共享数据交由状态管理器保管,Vue也不例外。
- VueX是一个专门Vue.js应用程序开发的状态管理库,采用集中式存储管理应用的所有组件的状态。
- 简单的说,VueX用于管理分散在Vue各个组件中的数据。
- 安装:
-
- 这是vue2版本
- npm install vuex@3
- 这是vue3版本
- npm install vuex@4
-
2、状态管理
- 每一个Vuex应用的核心都是一个store,与普通的全局对象不同的是,基于Vue数据与视图绑定的特点,当store中的状态发生变化时,与之绑定的视图也会被重新渲染。
- store中的状态不允许被直接修改,改变store中的状态的唯一途径就是显式地提交(commit)mutation,这可以让我们方便地跟踪每一个状态的变化。
- 在大型复杂应用中,如果无法有效地跟踪到状态的变化,将会对理解和维护代码带来极大的困扰。
- Vuex中有5个重要的概念:State、Getter、Mutation、Action、Module。
-
最简单的store
- 安装Vuex之后,让我们来创建一个store。创建过程直接了当——仅需要提供一个初始state对象和一些mutation:
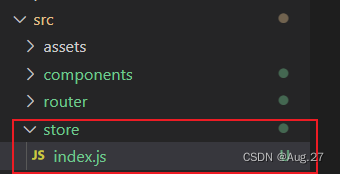
- 在src目录下新建一个store目录,在store目录下新建一个index.js来创建store
- 在index.js中写如下代码:
-
- import Vue from "vue";
- import Vuex from "vuex";
- Vue.use(Vuex);
- const store = new Vuex.Store({
- state:{
- count:0,
- },
- mutations:{
- increment(state){
- state.count++;
- }
- }
- })
- export default store;
-
- 在main.js中导入store这样组件就都可以使用store
-
- // 导入store
- import store from './store/index'
- new Vue({
- render: h => h(App),
- store:store
- }).$mount('#app')
-
- 现在就可以通过store.state来获取状态对象,并通过store.commit方法触发状态变更:
-
- <template>
- <div>
- <h1>TestStore</h1>
- <h2>{{this.$store.state.count}}</h2>
- <button @click="add">+1</button>
- </div>
- </template>
- <script>
- export default{
- name:'TestStore',
- methods:{
- add(){
- this.$store.commit("increment");
- }
- }
- }
- </script>

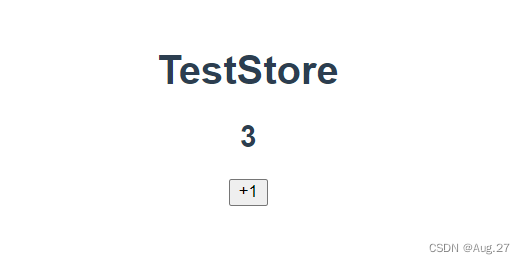
-
- 通过提交mutation的方式,而非直接改变store.state.count,是因为外面想要更明确地追踪到状态的变化。这个简单的约定能够让你的意图更加明显,这样你在阅读代码的时候更容易地解读应用内部的状态改变。此外,这样让我们有机会去实现一些能记录每次状态改变,保存状态快照的调试工具。有了它,甚至可以实现如时间穿梭般的调试体验。
- 由于store中的状态是响应式的,在组件中调用store中的状态简单到仅需要在计算属性中返回即可。触发变化也仅仅是在组件的methods中提交mutation。
- 在src目录下新建一个store目录,在store目录下新建一个index.js来创建store
- 安装Vuex之后,让我们来创建一个store。创建过程直接了当——仅需要提供一个初始state对象和一些mutation:
-
State
- State用于维护所有应用层的状态,并确保应用只有唯一的数据源
-
- const store = new Vuex.Store({
- state:{
- count:0
- },
- mutations:{
- increment(state){
- state.count++;
- }
- }
- })
-
- 在组件中,可以直接使用this.$store.count访问数据,也可以先用mapState辅助函数将其映射下来。
- 直接使用this.$store.count访问数据
-
- <template>
- <div>
- <h1>TestStore</h1>
- <h2>{{this.$store.state.count}}</h2>
- </div>
- </template>
-
- 先用mapState辅助函数将其映射下来
-
- import {mapState} from 'vuex'
- export default{
- name: 'TestStore',
- computed: mapState({
- // 箭头函数可使代码更加简练
- count: state => state.count,
- // 传字符串参数 'count' 等同于 'state => state.count'
- countAlias: 'count',
- // 为了能够使用'this'获取局部状态,必须使用常规函数
- countPlusLocalState(state){
- return state.count + this.localCount
- }
- })
- }
-
- 注意:当映射的计算属性的名称与state的子节点名称相同时,我们也可以给mapState传一个字符串数组。
-
- computed: mapState([
- // 映射 this.count 为 store.state.count
- 'count'
- ])
-
- 直接使用this.$store.count访问数据
- State用于维护所有应用层的状态,并确保应用只有唯一的数据源
-
对象展开运算符
- mapState函数返回的是一个对象。我们如何将它与局部计算属性混合使用呢?通常,我们需要使用一个工具函数将多个对象合并为一个,以使我们可以将最终对象传给computed属性。但是自从有了对象展开运算符,我们可以极大地简化写法:
-
- computed:{
- // 这是自定义的一个计算属性
- localComputed(){....},
- // 使用对象展开运算符("...")将此对象混入到外部对象中
- ...mapState({
- // ...
- })
- }
-
- mapState函数返回的是一个对象。我们如何将它与局部计算属性混合使用呢?通常,我们需要使用一个工具函数将多个对象合并为一个,以使我们可以将最终对象传给computed属性。但是自从有了对象展开运算符,我们可以极大地简化写法:
-
Getter
- Getter维护由State派生的一些状态,这些状态随着State状态的变化而变化
-
- const store = new Vuex.Store({
- state:{
- todos:[
- {id:1,text:"吃饭",done:true},
- {id:2,text:"睡觉",done:false}
- ]
- },
- getters:{
- doneTodos: (state) => {
- return state.todos.filter(todo => todo.done===false);
- }
- }
- })
-
- 在组件中,可以直接使用this.$store.getters.doneTodos,也可以先用mapGetters辅助函数将其映射下来,代码如下:
-
- <script>
- import { mapGetters } from 'vuex';
- export default{
- name:'TestStore',
- computed: {
- // 使用对象展开运算符将getter混入computed对象中
- ...mapGetters([
- 'doneTodos'
- ])
- }
- }
- </script>
-
- <template>
- <div>
- <ul>
- <li v-for="todo in doneTodos" :key="todo.id">{{todo.text}}</li>
- </ul>
- </div>
- </template>
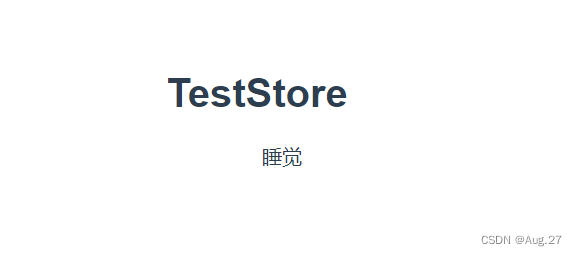
-
- Getter维护由State派生的一些状态,这些状态随着State状态的变化而变化
-
Mutation
- Mutation提供修改State状态的方法
-
- const store = new Vuex.Store({
- state:{
- count:0
- },
- mutations:{
- increment(state){
- state.count++;
- }
- }
- })
-
- 在组件中,可以直接使用store.commit来提交mutation
-
- methods: {
- increment(){
- this.$store.commit('increment')
- console.log(this.$store.state.count)
- }
- }
-
- 也可以先用mapMutation辅助函数
-
- methods:{
- ...mapMutations([
- 'increment', // 将'this.increment()'映射为'this.$store.commit('increment')'
- // 'mapMutations'也支持载荷:(可以传入额外的参数,即为载荷)
- 'incrementBy' // 将'this.incrementBy(amount)'映射为'this.$store.commit('incrementBy',amount)'
- ]),
- }
-
- Mutation提供修改State状态的方法
-
Action
- Action类似Mutation,不同在于:
- Action不能直接修改状态,只能通过提交mutation来修改,Action可以包含异步操作
-
- const store = createStore({
- state: {
- count: 0;
- },
- mutations: {
- increment(state){
- state.count ++;
- }
- },
- actions: {
- increment(context){
- context.commit('increment');
- }
- }
- })
- 在组件中,可以直接使用this.$store.dispatch('xxx')分发action,或者使用mapActions辅助函数先将其映射下来
-
- methods:{
- ...mapActions([
- 'increment', // 将'this.increment()' 映射为 'this.$store.dispatch('increment')'
- // 'mapActions' 也支持载荷:
- 'incrementBy' // 将 'this.incrementBy(amount)' 映射为 'this.$store.dispatch('incrementBy',amount)'
- ]),
- ...mapActions({
- add: 'increment' // 将'this.add()' 映射为 'this.$store.dispatch('increment')'
- })
- }
-
- Action类似Mutation,不同在于:
-
Module
- 由于使用单一状态树,当项目的状态非常多时,store对象就会变得十分臃肿。因此,Vuex允许我们将store分割成模块(Module)。
- 每个模块拥有独立的State、Getter、Mutation和Action,模块之中还可以嵌套模块,每一级都有着相同的结构。
-
- const moduleA = {
- state: ()=>({...}),
- mutations: {...},
- actions:{...},
- getters: {...}
- }
- const moduleB = {
- state: ()=>({...}),
- mutations: {...},
- actions:{...}
- }
- const store = createStore({
- modules: {
- a: moduleA,
- b: moduleB
- }
- })
- store.state.a // ——>moduleA的状态
- store.state.b // ——>moduleB的状态
-
总结
- 作为一个状态管理器,首先要有保管状态的容器——State
- 为了满足衍生数据和数据链的需求,从而有了Getter
- 为了可以“显式地”修改状态,所以需要Mutation
- 为了可以“异步地”修改状态(满足AJAX等异步数据交互),所以需要Action
- 最后,如果应用有成百上千个状态,放在一起会显得十分庞杂,所以分模块管理(Module)也是必不可少的
- Vuex并不是Vue应用开发的必选项,在使用时,应先考虑项目的规模和特点。有所选择地进行取舍,对于小型应用来说,完全没有必要引入状态管理,因为会带来更多的开发成本。
十三、前端数据模拟Mock.js
1、Mock.js介绍
- Mock.js是一款前端开发中拦截Ajax请求再生成随机数据响应的工具,可以用来模拟服务器响应。
- 优点:非常简单方便、无侵入性,基本覆盖常用的接口数据类型。
- 支持生成随机的文本、数字、布尔值、日期、邮箱、链接、图片、颜色等。
- 安装:
-
npm install mockjs
-
2、基本使用
- 在项目src目录下创建mock目录,新建index.js文件
-
- // 引入mock.js
- import Mock from 'mockjs'
- // 设置延迟时间
- // Mock.setup({
- // timeout: 400
- // })
- // 使用mock.js模拟数据
- Mock.mock('/product/search',{
- "ret": 0,
- "data":
- {
- "mtime": "@datatime", // 随机生成日期时间
- "score|1-800": 800, // 随机生成1-800的数字
- "rank|1-100": 100, // 随机生成1-100的数字
- "stars|1-5": 5, // 随机生成1-5的数字
- "nickname": "@cname", // 随机生成中文名字
- "img": "@image('200x100','#ffcc33','#FFF','png','Fast Mock')"
- // 尺寸 背景颜色 文字颜色 图片格式 图片文字
- }
- })
- 然后在main.js中导入,否则无法使用
-
import './mock/index'
-
-
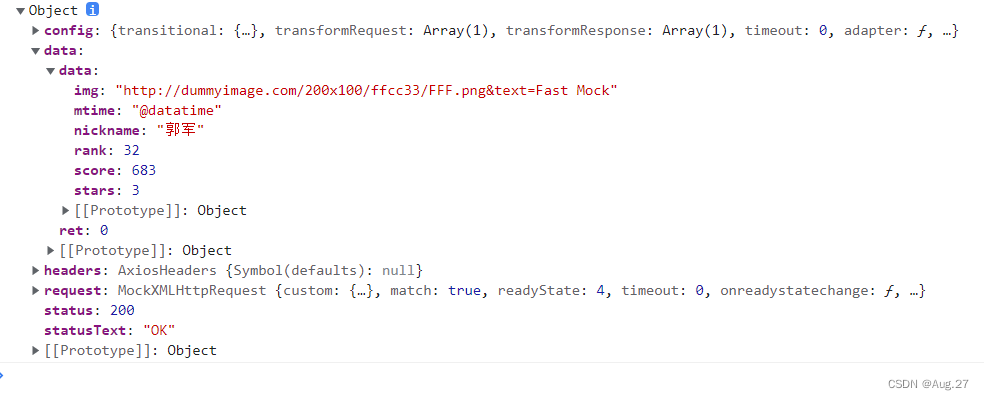
- 组件中调用mock.js中模拟的数据接口,这时返回的response就是mock.js中用Mock.mock('url',data)中设置的data
-
- import axios from 'axios'
- export default{
- mounted:function(){
- axios.get("/product/search")
- .then(res=>{
- console.log(res)
- })
- }
- }
-
- 效果如下:
3、核心方法
- Mock.mock(rurl?, rtype?, template|function(options))
- rurl:表示需要拦截的URL,可以是URL字符串或URL正则
- rtype:表示需要拦截的Ajax请求类型。例如GET、POST、PUT、DELETE等。
- template:表示数据模板,可以是对象或字符串
- function:表示用于生成响应数据的函数。
- 设置延时请求到数据
-
- // 延时400ms请求到数据
- Mock.setup({
- timeout: 400
- })
- // 延时200-600ms请求到数据
- Mock.setup({
- timeout: '200-600'
- })
-
4、数据生成规则
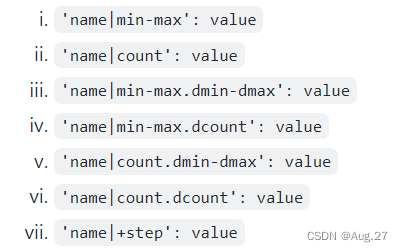
- mock的语法规范包含两层规范:数据模板(DTD)、数据占位符(DPD)
- 数据模板中的每个属性由3部分构成:属性名name、生成规则rule、属性值value:
-
- // 属性名 name
- // 生成规则 rule
- // 属性值 value
- 'name|rule': value
-
- 属性名和生成规则之间用竖线|分隔,生成规则是可选的,有7中格式:
- 更多详细知识可在mockJS官网了解
十四、企业级后台集成方案
1、vue-element-admin介绍
- vue-element-admin是一个后台前端解决方案,它基于vue和element-ui实现。
- 内置了i18国际化解决方案,动态路由,权限验证,提炼了典型的业务模型,提供了丰富的功能组件。
- 可以快速搭建企业级中后台产品原型。
- 地址:https://panjiachen.github.io/vue-element-admin-site/zh/guide/
- 在github上把项目下载下来https://github.com/PanJiaChen/vue-admin-template
- 具体使用可在官网查看文档。
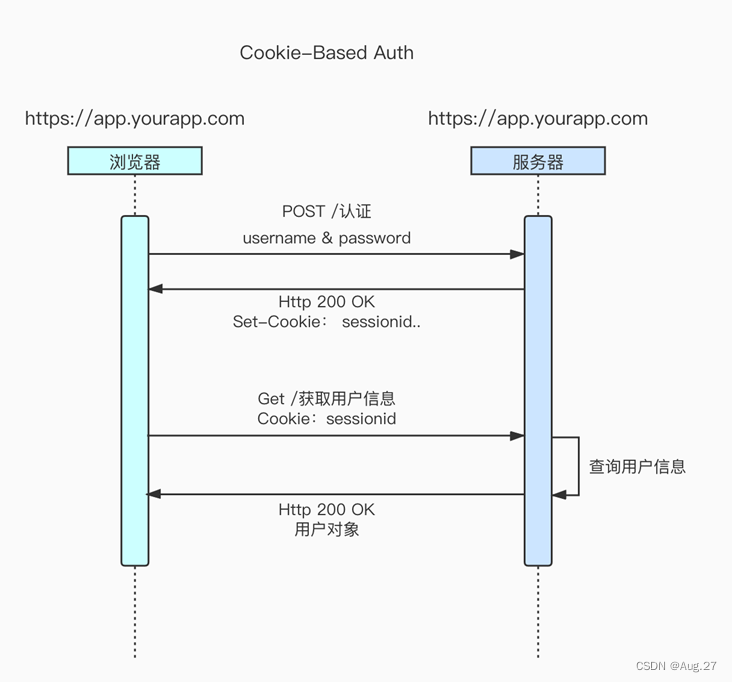
十五、跨域认证
1、Session认证
互联网服务离不开用户认证。一般是一下流程:
- 用户向服务器发送用户名和密码。
- 服务器验证通过后,在当前对话(session)里面保存相关数据,比如用户角色、登录时间等。
- 服务器向用户返回一个session_id,写入用户的Cookie。
- 用户随后的每一次请求,都会通过Cookie,将session_id传回服务器。
- 服务器收到session_id,找到前期保存的数据,由此得知用户的身份。
- session认证过程:
- session认证的方式应用非常普遍,但也存在一些问题,扩展性不好,如果是服务器集群,或者是跨域的服务导向结构,就要求session数据共享,每台服务器都能够读取session,针对此种问题有两种方案:
- 一种是session数据持久化,写入数据库或者别的持久层。各种服务收到请求后,都向持久层请求数据。这种方案的优点是架构清晰,缺点是工程量比较大。
- 另一种是服务器不再保存session数据,所有数据都保存在客户端,每次请求都发回服务器。Token认证就是这种方案的一个代表。
2、Token认证
Token是在服务端产生的一串字符串,是客户端访问资源接口(API)时所需要的资源凭证,流程如下:
- 客户端使用用户名跟密码请求登录,服务端收到请求,去验证用户名与密码
- 验证成功后,服务端会签发一个token并把这个token发送给客户端
- 客户端收到token以后,会把它存储起来,比如放在cookie里或者localStorage里
- 客户端每次向服务端请求资源的时候需要带着服务端签发的token
- 服务端收到请求,然后去验证客户端请求里面带着的token,如果验证成功,就向客户端返回请求的数据
- token认证流程:
- Token认证的特点:
- 基于token的用户认证是一种服务端无状态的认证方式,服务端不用存放token数据
- 用解析token的计算时间换取session的存储空间,从而减轻服务器的压力,减少频繁的查询数据库
- token完全由应用管理,所以它可以避开同源策略CORS

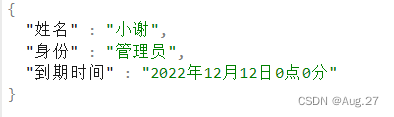
3、JWT
- JSON Web Token(简称JWT)是一个token的具体实现方式,是目前最流行的跨域认证解决方案。
- JWT的原理是,服务器认证以后,生成一个JSON对象,发回给用户,具体如下:
- 用户与服务端通信的时候,都要发回这个JSON对象。服务器完全只靠这个对象认定用户身份。
- 为了防止用户篡改数据,服务器在生成这个对象的时候,会加上签名。
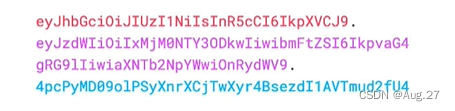
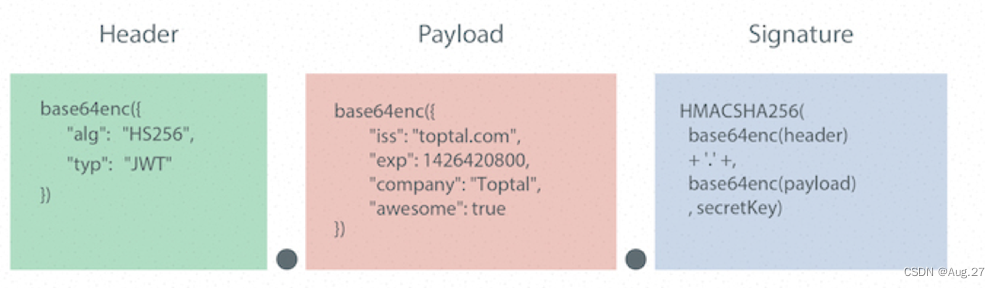
4、JWT组成
- JWT由三部分组成,依次如下:
- Header(头部)
- Payload(负载)
- Signature(签名)
- 三部分最终组合完成一个完整的字符串,中间用“.”分隔,如下:
- Header.Payload.Signature
-
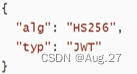
Header
- Header部分是一个JSON对象,描述JWT的元数据
- alg属性表示签名的算法(algorithm),默认是HMAC SHA256(写成HS256)
- typ属性表示这个令牌(token)的类型(type),JWT令牌统一写为JWT
- 最后,将上面的JSON对象使用Base64URL算法转成字符串
- Header部分是一个JSON对象,描述JWT的元数据
-
Payload
- Payload部分也是一个JSON对象,用来存放实际需要传递的数据。JWT规定了7个官方字段,供选用。
- iss(issuer):签发人
- exp(expiration time):过期时间
- sub(subject):主题
- aud(audience):受众
- nbf(Not Before):生效时间
- iat(Issued At):签发时间
- jti(JWT ID):编号
- 注意,JWT默认不加密的,任何人都可以读到,所以不要把秘密信息放在这个部分。
- 这个JSON对象也要使用Base64URL算法转成字符串。
- Payload部分也是一个JSON对象,用来存放实际需要传递的数据。JWT规定了7个官方字段,供选用。
-
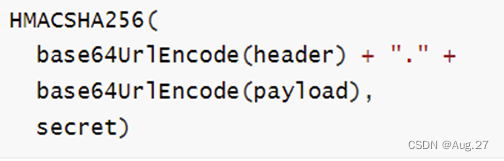
Signature
- Signature部分是对前两部分的签名,防止数据篡改。
- 首先,需要指定一个密钥(secret)。这个密钥只有服务器才知道,不能泄露给用户。
- 然后,使用Header里面指定的签名算法(默认是HMAC SHA256),按照下面的公式产生签名。
5、JWT的特点
- 客户端收到服务器返回的JWT,可以储存在Cookie里面,也可以储存在localStorage。
- 客户端每次与服务器通信,都要带上这个JWT,可以把它放在Cookie里面自动发送,但是这样不能跨域。
- 更好的做法是放在HTTP请求的头信息"Authorization"字段里面,单独发送。
6、JWT的实现
- 加入依赖
-
- <!--JWT-->
- <dependency>
- <groupId>io.jsonwebtoken</groupId>
- <artifactId>jjwt</artifactId>
- <version>0.9.1</version>
- </dependency>
-
- 生成和解析token的工具类
-
- public class JwtUtil {
- // 7天过期
- private static long expire = 604800;
- // 32位秘钥
- private static String secret = "abcdfghiabcdfghiabcdfghiabcdfghi";
- // 生成token
- public static String generateToken(String username){
- Date now = new Date();
- Date expiration = new Date(now.getTime() + 1000 * expire);
- return Jwts.builder()
- .setHeaderParam("type","JWT") // 设置Header
- .setSubject(username) // 设置负载
- .setIssuedAt(now) // 设置生效时间
- .setExpiration(expiration) // 设置过期时间
- .signWith(SignatureAlgorithm.HS512,secret) // 指定签名算法
- .compact();
- }
- // 解析token
- public static Claims getClaimsByToken(String token){
- return Jwts.parser()
- .setSigningKey(secret) // 传密钥,查看是否有篡改
- .parseClaimsJws(token) // token是否正确
- .getBody();
- }
- }
-
- 生成token
-
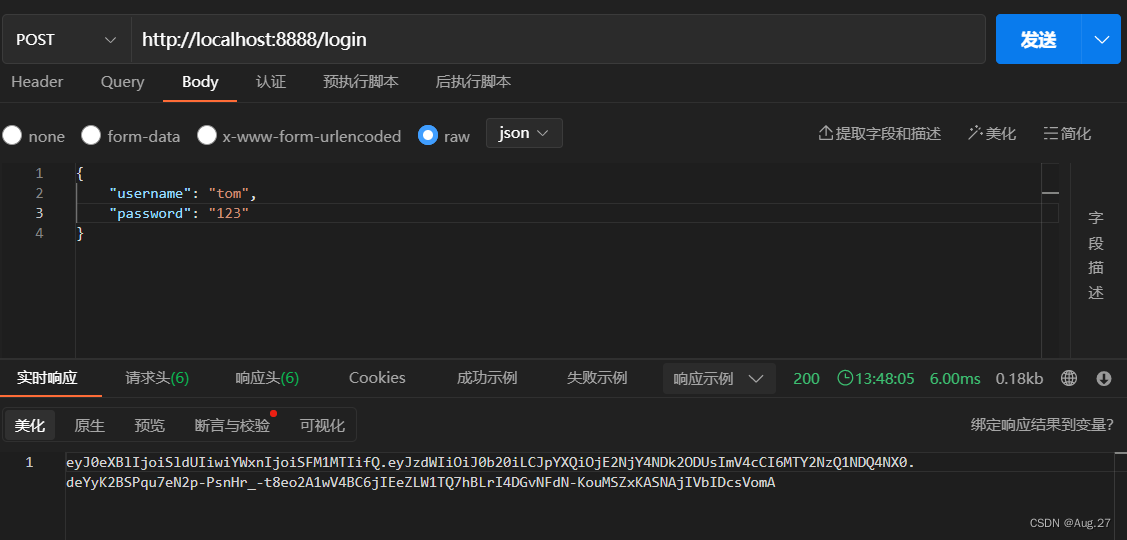
- @PostMapping("/login")
- public String login(@RequestBody User user){ // 用@RequestBody接收,前台就需要发送的是json格式
- String token = JwtUtil.generateToken(user.getUsername());
- return token;
- }
-
- 解析token
-
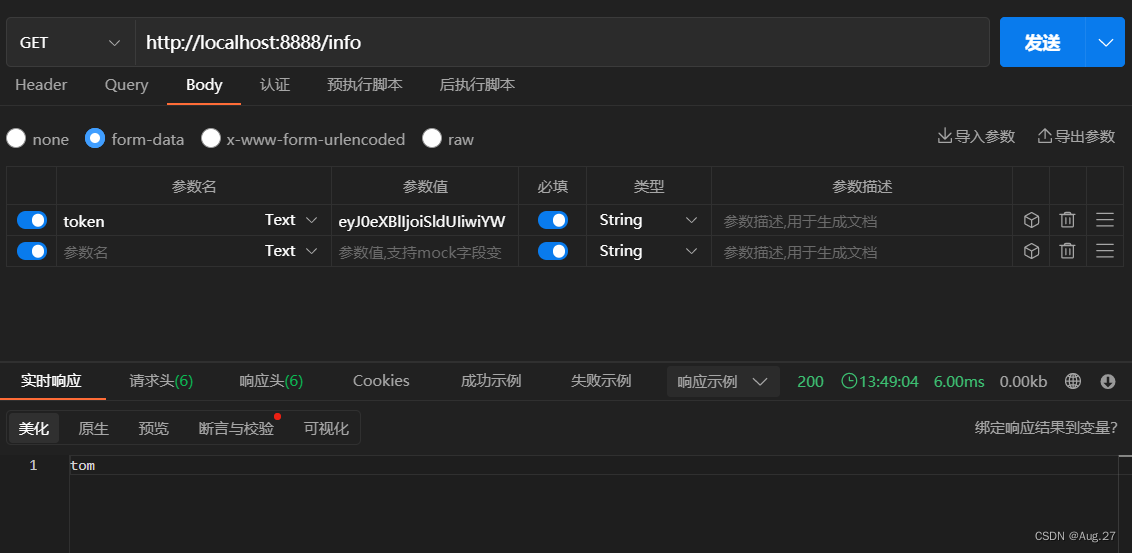
- @GetMapping("/info")
- public String info(String token){
- String username = JwtUtil.getClaimsByToken(token).getSubject(); // 解析token获取用户名
- return username;
- }
-
- 这样就简单实现了生成token和解析token
十七、Springboot+Vue云端环境配置
- 以下部署基于Centos7 系统环境(使用XShell链接和Xftp进行文件传输)
1、安装MySQL
- 卸载Centos7自带的mariadb
-
- # 查找 是否安装了mariadb
- rpm -qa|grep mariadb
- # mariadb-libs-5.5.52-1.el7.x86_64
- # 卸载(版本根据自己系统自带的自行更改)
- rpm -e mariadb-libs-5.5.52-1.el7.x86_64 --nodeps
-
-
解压MySQL
-
- # 创建mysql安装包存放点
- mkdir /usr/server/mysql
- # 解压
- tar xvf mysql-5.7.34-1.el7.x86_64.rpm-bundle.tar
-
-
执行安装
-
- # 切换到安装目录
- cd /usr/server/mysql/
- yum -y install libaio
- yum -y install libncurses*
- yum -y install perl perl-devel
- # 安装
- rpm -ivh mysql-community-common-5.7.34-1.el7.x86_64.rpm
- rpm -ivh mysql-community-libs-5.7.34-1.el7.x86_64.rpm
- rpm -ivh mysql-community-client-5.7.34-1.el7.x86_64.rpm
- rpm -ivh mysql-community-server-5.7.34-1.el7.x86_64.rpm
-
-
启动MySQL
-
- #启动mysql
- systemctl start mysqld.service
- #查看生成的临时root密码
- cat /var/log/mysqld.log | grep password
-

-
-
修改初始的随机密码
-
- # 登录mysql
- mysql -u root -p
- Enter password: #输入在日志中生成的临时密码
- # 更新root密码 设置为root(密码自行定义,后面远程连接需要用到)
- set global validate_password_policy=0;
- set global validate_password_length=1;
- set password=password('root');
-
-
授予远程连接权限
-
- # 让数据库支持远程连接
- grant all privileges on *.* to 'root' @'%' identified by 'root';
- # 刷新
- flush privileges;
-
-
控制命令
-
- #mysql的启动和关闭 状态查看
- systemctl stop mysqld
- systemctl status mysqld
- systemctl start mysqld
- #建议设置为开机自启动服务
- systemctl enable mysqld
- #查看是否已经设置自启动成功
- systemctl list-unit-files | grep mysqld
-
-
关闭防火墙
-
- firewall-cmd --state #查看防火墙状态
- systemctl stop firewalld.service #停止firewall
- systemctl disable firewalld.service #禁止firewall开机启动
-
2、安装Nginx
- 安装Nginx
-
- yum install epel-release
- yum update
- yum -y install nginx
-
- nginx命令
-
- systemctl start nginx #开启nginx服务
- systemctl stop nginx #停止nginx服务
- systemctl restart nginx #重启nginx服务
-
3、配置JDK
- 到官网https://www.oracle.com/java/technologies/downloads/#java8下载jdk版本
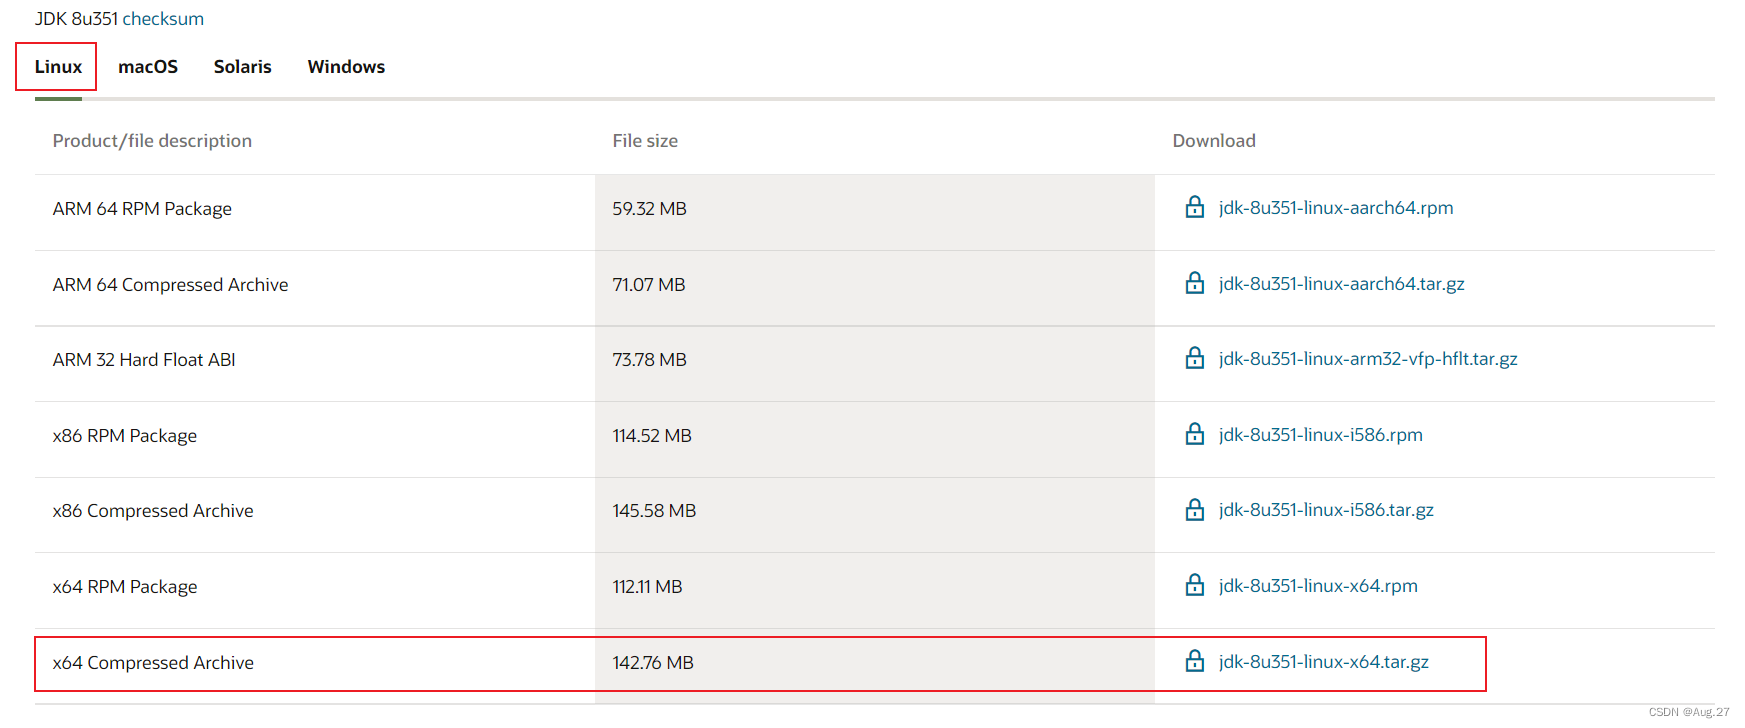
- 解压
-
tar -zvxf jdk-8u131-linux-x64.tar.gz
-
- 编辑 /etc/profile 文件
-
- vi /etc/profile
- # 文件末尾增加
- export JAVA_HOME=/usr/server/jdk1.8.0_351
- export PATH=${JAVA_HOME}/bin:$PATH
-
- 执行source命令,使配置立即生效
-
source /etc/profile
-
- 检查是否安装成功
-
java -version
-
十八、Springboot+Vue项目部署
1、部署Vue项目
- 打包Vue项目
- 在vue项目的目录,执行以下代码
-
npm run build - 将生成的dist目录上传至服务器 /usr/vue/dist(路径自定义)
- 配置Nginx
- 进入到/etc/nginx/conf.d目录,创建vue.conf文件,内容如下
-
- server {
- listen 80;
- server_name locahost;
- location / {
- root /usr/app/dist;
- index index.html;
- }
- }
- 使配置生效
-
nginx -s reload
2、打包运行Java程序
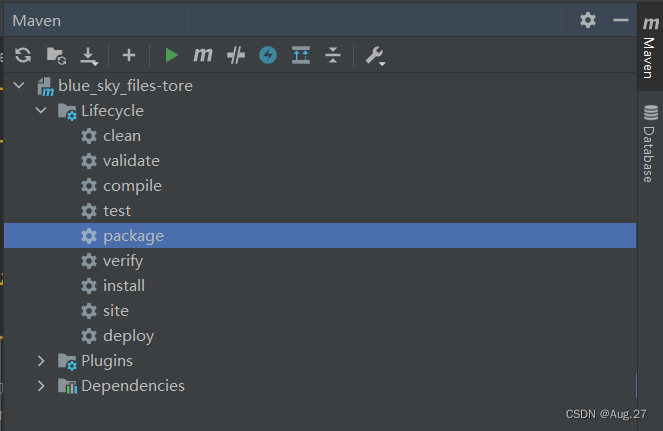
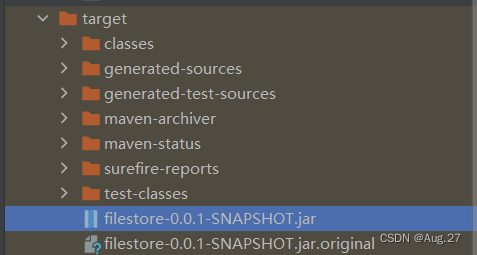
- 在右边的maven中双击package,会自动打包在项目路径文件夹的/target文件夹下
- 因为springboot有内置tomcat容器,这点比较方便,省去了tomcat的部署。我们到时候直接可以直接
把jar包扔到linux上 -
- # 表示让java程序在后台运行,然后生成运行日志,方便查看项目是否报错。
- nohup java -jar shop-0.0.1-SNAPSHOT.jar > logName.log 2>&1 &
项目正常运行了,说明部署成功了,这样项目所有人就可以访问了。

