
- 1linux下实现简单的进度条_linux系统界面用图片实现进度条
- 2FPGA仿真类型详解_寄存器传输级
- 3如何更改conda环境位置_更改conda环境安装目录
- 4PyTorch中torch、torchvision、torchaudio版本对应关系_windows torchaudio torch对应关系
- 5vue项目中实现elementui多语言切换_element ui 多语言
- 6Centos7安装elasticsearch-常见问题-yoguo_启动elastic 不能返回json
- 7GPT如何快速写论文_gpt3.5如何写论文
- 8macOS Big Sur 11.6.5 (20G527) Boot ISO 原版可引导镜像
- 9JSON parse error: Illegal unquoted character ((CTRL-CHAR, code 10)): has to be escaped using backsla
- 10LeetCode1047:删除字符串中的所有相邻重复项
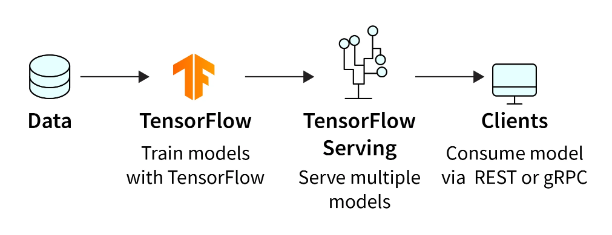
TensorFlow部署:使用TF Serving为TensorFlow模型提供服务_found untraced functions such as _jit_compiled_con
赞
踩

概述
TensorFlow Serving 是 Google 开发的开源库,有助于为生产用例部署机器学习模型。它充当训练模型和生产环境之间的桥梁,实现 TensorFlow 模型的无缝部署和服务。
TensorFlow Serving 提供了一个可扩展且高效的架构,用于管理、更新和监控生产中的机器学习模型。它解决了处理并发请求、扩展以服务高流量以及允许无缝更新而不导致停机的挑战。
在本文中,我们将详细探讨 TensorFlow Serving。我们将介绍其架构、设置步骤,以及如何在实际机器学习应用程序中使用 TensorFlow Serving.nent 部署和管理 TensorFlow 模型。
TensorFlow 服务架构
TensorFlow Serving 的架构被设计为可扩展、模块化和可扩展。它遵循客户端-服务器范例,其中客户端发送包含输入数据的请求,服务器以模型的预测进行响应。让我们仔细看看 TensorFlow Serving 架构的关键组件:
-
客户:
客户端负责向 TensorFlow Serving 服务器发送预测请求。它可以是需要根据已部署模型进行预测的任何应用程序,例如 Web 服务或移动应用程序。
-
模型服务器:
模型服务器是TensorFlow Serving的核心组件。它管理模型的加载和卸载、提供预测服务并处理各种模型版本。它公开了一个定义良好的 API,客户端可以使用该 API 来请求预测。
-
服务内容:
servable 是 TensorFlow 模型的可加载单元。它可以代表同一模型的不同版本或多个模型。模型服务器可以同时处理多个服务,从而实现模型版本控制和 A/B 测试。
-
装载机:
加载器负责将服务加载到内存中。TensorFlow Serving 使用延迟加载方法,这意味着仅当预测请求到达时模型才会加载到内存中。
设置 TensorFlow 服务
在使用 TensorFlow Serving 部署模型之前,您需要在系统上进行设置。TensorFlow Serving 可以使用 Docker 或作为系统包安装。我们将概述使用 Docker 设置 TensorFlow Serving 的步骤:
-
安装 Docker:
如果您尚未安装 Docker,请按照 Docker 官方网站上针对您的操作系统的说明进行操作。
-
拉取 TensorFlow 服务图像:
使用以下命令拉取 TensorFlow Serving Docker 镜像:
docker pull tensorflow/serving输出:

-
运行 TensorFlow 服务:
拉取映像后,通过指定模型的位置来启动具有所需模型的 TensorFlow Serving 容器。例如:
- TESTDATA="$(pwd)/serving/tensorflow_serving/servables/tensorflow/testdata"
- docker run -t --rm -p 8501:8501 \
- -v "$TESTDATA/saved_model_half_plus_two_cpu:/models/half_plus_two" \
- -e MODEL_NAME=half_plus_two \
- tensorflow/serving &
输出:

在这里,将/path/to/model/directory替换为包含已保存的 TensorFlow 模型的目录的路径,并将model_name 替换为模型的名称。
-
测试部署:
TensorFlow Serving 启动并运行后,您可以发送测试请求以确保一切正常工作。使用以下命令发送测试请求:
- curl -d '{"instances": [1.0, 2.0, 5.0]}' \
- -X POST http://localhost:8501/v1/models/half_plus_two:predict
输出:
{ "predictions": [2.5, 3.0, 4.5] }
将input_data替换为您想要获取预测的测试数据。
设置完 TensorFlow Serving 后,让我们继续讨论使用 TensorFlow Serving 提供 TensorFlow 模型的步骤。
使用 TensorFlow Serving 为 TensorFlow 模型提供服务
为了使用 Tensorflow 服务部署模型,我们需要执行以下步骤:
- 步骤 1.安装依赖项。
- 步骤 2.构建模型。
- 步骤 3.预处理输入。
- 步骤 4.对预测进行后处理。
- 步骤 5.保存模型。
- 步骤 6.检查训练后的模型。
- 步骤 7.导出模型。
- 步骤 8.使用 Tensorflow 服务部署模型。
现在我们将了解如何使用 MobileNet 预训练模型来使用 Tensorflow 服务来部署模型。
第 1 步:依赖关系
首先,您需要安装必要的依赖项,包括 TensorFlow 和 TensorFlow Serving。确保安装了适当的版本以避免兼容性问题。
- import os
- import json
- import shutil
- import requests
- import numpy as np
- import tensorflow as tf
- import matplotlib.pyplot as plt
第二步:模型
出于本文的目的,我们将使用带有简单 Softmax 回归模型的手写数字分类器。
我们将使用MobileNet预训练模型来说明将模型保存到磁盘的过程。
- # Using MobileNet from Keras Applications
- model = tf.keras.applications.MobileNet()
上面的代码可用于训练和导出模型以使用 Tensorflow Serving 进行服务。
第三步:预处理
在提供模型之前,预处理输入数据以匹配模型的输入格式至关重要。在此示例中,输入图像预计为形状为(28, 28, 1)的灰度图像。如果传入的数据采用不同的格式,则应进行相应的预处理。
- def preprocess(image, mean=0.5, std=0.5, shape=(224, 224)):
- """Scale, normalize and resizes images."""
- image = image / 255.0 # Scale
- image = (image - mean) / std # Normalize
- image = tf.image.resize(image, shape) # Resize
- return image
第四步:后处理
同样,在收到模型的预测后,可能需要进行后处理,将输出转换为人类可读的格式或执行任何所需的附加操作。
- # Download human-readable labels for ImageNet.
- imagenet_labels_url = (
- "https://storage.googleapis.com/download.tensorflow.org/data/ImageNetLabels.txt"
- )
- response = requests.get(imagenet_labels_url)
- # Skiping backgroung class
- labels = [x for x in response.text.split("\n") if x != ""][1:]
- # Convert the labels to the TensorFlow data format
- tf_labels = tf.constant(labels, dtype=tf.string)
-
-
- def postprocess(prediction, labels=tf_labels):
- """Convert from probs to labels."""
- indices = tf.argmax(prediction, axis=-1) # Index with highest prediction
- label = tf.gather(params=labels, indices=indices) # Class name
- return label

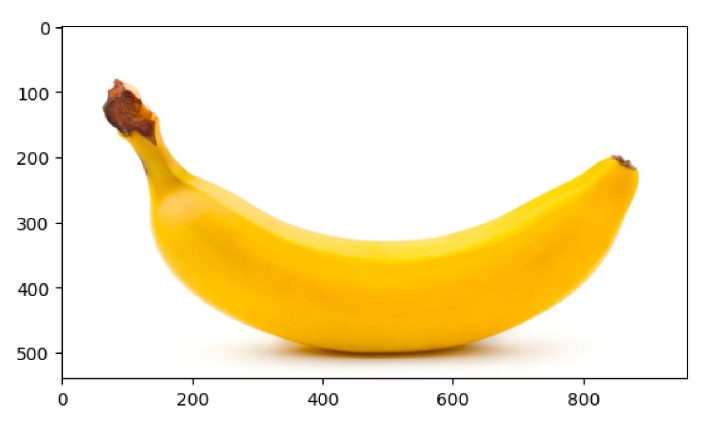
为了检查这个过程,让我们下载一张香蕉图片,
- # Download the image from the URL
- response = requests.get("https://i.imgur.com/j9xCCzn.jpeg", stream=True)
-
- # Save the downloaded image to a local file
- with open("banana.jpeg", "wb") as f:
- shutil.copyfileobj(response.raw, f)
-
- # Read the saved image using matplotlib
- sample_img = plt.imread("./banana.jpeg")
-
- # Display information about the original image
- print(f"Original image shape: {sample_img.shape}")
- print(f"Original image pixel range: ({sample_img.min()}, {sample_img.max()})")
-
- # Display the original image using matplotlib
- plt.imshow(sample_img)
- plt.show()
-
- # Preprocess the image (assumed to be a function named preprocess)
- preprocess_img = preprocess(sample_img)
-
- # Display information about the preprocessed image
- print(f"Preprocessed image shape: {preprocess_img.shape}")
- print(
- f"Preprocessed image pixel range: ({preprocess_img.numpy().min()},",
- f"{preprocess_img.numpy().max()})",
- )
-
- # Expand dimensions and cast the image for batching
- batched_img = tf.expand_dims(preprocess_img, axis=0)
- batched_img = tf.cast(batched_img, tf.float32)
- print(f"Batched image shape: {batched_img.shape}")
-
- # Assuming 'model' is a pre-trained TensorFlow model
- # Run the model inference on the batched image
- model_outputs = model(batched_img)
-
- # Display information about the model's output
- print(f"Model output shape: {model_outputs.shape}")
- print(f"Predicted class: {postprocess(model_outputs)}")
输出:
- Preprocessed image shape: (224, 224, 3)
- Preprocessed image pixel range: (-1.0, 1.0)
- Batched image shape: (1, 224, 224, 3)
- Model output shape: (1, 1000)
- Predicted class: [b'banana']
第5步:保存模型
要使用 TensorFlow Serving 部署模型,我们需要将其保存为 SavedModel 格式,这是模型的序列化版本,包含模型架构及其训练权重。
- model_dir = "./model"
- model_version = 1
- model_export_path = f"{model_dir}/{model_version}"
-
- tf.saved_model.save(
- model,
- export_dir=model_export_path,
- )
-
- print(f"SavedModel files: {os.listdir(model_export_path)}")
输出:
- WARNING:absl:Found untraced functions such as _jit_compiled_convolution_op, _jit_compiled_convolution_op, _jit_compiled_convolution_op, _jit_compiled_convolution_op, _jit_compiled_convolution_op while saving (showing 5 of 28). These functions will not be directly callable after loading.
- > INFO:tensorflow:Assets written to: ./model/1/assets
- > INFO:tensorflow:Assets written to: ./model/1/assets
- > SavedModel files: ['fingerprint.pb', 'variables', 'saved_model.pb', 'assets']
第 6 步:检查您保存的模型
您可以使用TensorFlow提供的saved_model_cli工具检查SavedModel的内容:
!saved_model_cli show --dir {model_export_path} --tag_set serve --signature_def serving_default
输出:
- The given SavedModel SignatureDef contains the following input(s):
- inputs['input_1'] tensor_info:
- dtype: DT_FLOAT
- shape: (-1, 224, 224, 3)
- name: serving_default_input_1:0
- The given SavedModel SignatureDef contains the following output(s):
- outputs['predictions'] tensor_info:
- dtype: DT_FLOAT
- shape: (-1, 1000)
- name: StatefulPartitionedCall:0
- Method name is: tensorflow/serving/predict
这将显示有关模型的输入、输出和签名的信息。
第 7 步:导出并保存 TensorFlow 模型以供服务
TensorFlow Serving 要求将模型保存在称为“servable”格式的特定目录结构中。使用 SavedModel 格式时,模型目录应具有以下结构:
要安装tensorflow服务,请使用以下命令
- wget 'http://storage.googleapis.com/tensorflow-serving-apt/pool/tensorflow-model-server-universal-2.8.0/t/tensorflow-model-server-universal/tensorflow-model-server-universal_2.8.0_all.deb'
- dpkg -i tensorflow-model-server-universal_2.8.0_all.deb
上面的命令将 Tensorflow 安装到我们的系统中。现在,我们将开始运行 Tensorflow 服务并加载我们的模型。加载后,我们可以通过使用REST发出请求来进行推断。要考虑的重要参数是:
- port:您将用于 gRPC 请求的端口。
- rest_api_port:您将用于 REST 请求的端口。
- model_name:您将在 REST 请求的 URL 中使用它。它可以是任何东西。
- model_base_path:这是保存模型的目录的路径。
第 8 步:使用 TensorFlow Serving 部署模型
以可服务格式准备好模型后,您可以使用 TensorFlow Serving 进行部署。我们已经介绍了使用 Docker 设置 TensorFlow Serving 的步骤。部署新模型或更新现有模型时,请确保模型服务器配置为提供正确版本的模型。
docker run -p 8501:8501 --name=tf_serving_container --mount type=bind,source=/path/to/model/directory,target=/models/model_name -e MODEL_NAME=model_name -t tensorflow/serving
安装更新的模型目录后,模型服务器将提供最新版本的模型。
客户端现在可以向服务器发送预测请求以获得模型预测。
管理模型版本并为多个模型提供服务
TensorFlow Serving 允许您管理模型的多个版本并同时为它们提供服务。当您部署模型的新版本时,它不会影响正在提供的现有版本。客户端可以明确请求特定版本进行预测。
要服务单个模型,请使用以下命令:
- docker run --runtime=nvidia -p 8501:8501 \
- --mount type=bind,source=/tmp/tfserving/serving/tensorflow_serving/servables/tensorflow/testdata/saved_model_half_plus_two_gpu,target=/models/half_plus_two \
- -e MODEL_NAME=half_plus_two -t tensorflow/serving:latest-gpu &
输出:
- Exporting HTTP/REST API at:localhost:8501...
- TARGET_LOG: Entering the event loop
要服务多个模型,请为每个模型遵循类似的目录结构:
- model_configs_list:{
- config:{
- name: "amd",
- base: "/models/amd",
- platform: "tensorflow"
- },
- config: {
- name: "resnet",
- base: "models/resnet",
- platform: "tensorflow"
- }
- }
以下代码可用于使用张量流服务为多个模型提供服务

输出:

使用 TensorFlow Serving 为您的模型提供服务
要测试模型的部署,您可以使用curl等工具或通过自定义应用程序向模型服务器发送预测请求。确保输入数据格式正确并符合模型的输入要求。
curl -d '{"instances": [input_data]}' -H "Content-Type: application/json" -X POST http://localhost:8501/v1/models/model_1:predict
在 TensorFlow Serving 中向您的模型发出请求
我们现在可以使用 REST API 使用 Tensorflow 服务模型进行预测。它首先将一批图像转换为与模型输入兼容的 JSON 格式。然后,它使用给定的 URL 向模型的预测端点发送 POST 请求。解析模型的响应,提取预测输出,并打印输出的形状。最后,假设使用postprocess()函数根据模型的输出确定并打印预测的类别。
- import json
- import requests
- import numpy as np
-
- # Convert the batched image data to a JSON format
- data = json.dumps(
- {"signature_name": "serving_default", "instances": batched_img.numpy().tolist()}
- )
-
- # URL for making a POST request to a TensorFlow Serving model
- url = "http://localhost:8501/v1/models/model:predict"
-
- # Define a function to send a REST request for prediction
- def predict_rest(json_data, url):
- # Send a POST request to the specified URL with JSON data
- json_response = requests.post(url, data=json_data)
-
- # Parse the JSON response
- response = json.loads(json_response.text)
-
- # Extract the prediction outputs from the response and convert to a NumPy array
- rest_outputs = np.array(response["predictions"])
-
- return rest_outputs
-
- # Call the function to get prediction outputs using REST API
- rest_outputs = predict_rest(data, url)
-
- # Assuming postprocess() is a function that processes prediction outputs
- # and returns the predicted class
- predicted_class = postprocess(rest_outputs)
-
- # Print the shape of the REST output and the predicted class
- print(f"REST output shape: {rest_outputs.shape}")
- print(f"Predicted class: {predicted_class}")
-
输出:
- REST output shape: (1, 1000)
- Predicted class: [b'banana']
使用 TensorFlow Serving 的最佳实践
使用 TensorFlow Serving 部署机器学习模型时,有几种最佳实践可以确保最佳性能和可维护性:
-
监控模型性能:
跟踪生产环境中模型的性能指标。监控请求延迟、错误率和资源利用率等因素以识别任何问题。
-
版本控制:
实施模型版本控制以允许不同模型版本的无缝更新和 A/B 测试。这允许您在需要时回滚到以前的版本。
-
健康检查:
为模型服务器设置运行状况检查,以确保其响应良好且正常运行。这有助于快速识别任何服务中断。
-
缩放比例:
配置 TensorFlow Serving 以根据流量需求动态扩展。如果需要,使用负载平衡机制在多个实例之间分配请求。
-
优雅关机:
实施正常关闭程序,以避免模型更新或服务器维护期间服务中断。
-
安全:
使用适当的安全措施(例如访问控制和加密)保护您的模型服务器,尤其是在提供敏感数据时。
-
模型优化:
优化您的服务模型。考虑减小模型的大小,将 TensorFlow Lite 用于移动应用程序,或将 TensorFlow.js 用于基于浏览器的应用程序。
-
日志记录和错误处理:
实施强大的日志记录和错误处理以促进调试和问题解决。
结论
- TensorFlow Serving 是在生产环境中部署机器学习模型的宝贵工具。
- 其可扩展且高效的架构可以轻松管理、更新和监控模型,使其成为现实应用程序的关键组件。
- 通过遵循最佳实践并遵守本文提供的指南,您可以使用 TensorFlow Serving 有效部署和服务 TensorFlow 模型,从而为您的应用程序提供强大的机器学习功能。

