
热门标签
热门文章
- 1NFS共享_nfs文件挂载新文件所有用户改变
- 2生成人工智能体:人类行为的交互式模拟论文与源码架构解析(4)——架构分析 - 核心操作提示词构造_poignancy参数
- 3合合TextIn - 大模型加速器
- 4【电磁】基于Matlab模拟二维空间电磁波的FDTD_二维fdtd算法中有几个电磁场分量
- 5面试官问我:如何在命令行跑Postman?我懵了!
- 6win10搭建hadoop和spark_winutils-master.zip在哪下载
- 7python openpyxl库的详细使用_python的openpyxl库的使用
- 8oracle erp 库存相关,oracle erp库存模块表(INV)
- 9经典面试题之ES6篇_es面试题总结
- 10DbHelper通用数据库类及增删改 使用示例
当前位置: article > 正文
uniapp 3D地图 效果模拟 mapbox 或者 其他设备_uniapp小程序使用mapbox
作者:正经夜光杯 | 2024-07-16 08:33:41
赞
踩
uniapp小程序使用mapbox
一 , mapbox 地图 的引入和安装
(1)先进行mapbox 的引入安装 npm install --save mapbox-gl
(2)mapbox gl js 官方文档
Markers and controls | Mapbox GL JS | Mapbox![]() https://docs.mapbox.com/mapbox-gl-js/api/markers/
https://docs.mapbox.com/mapbox-gl-js/api/markers/
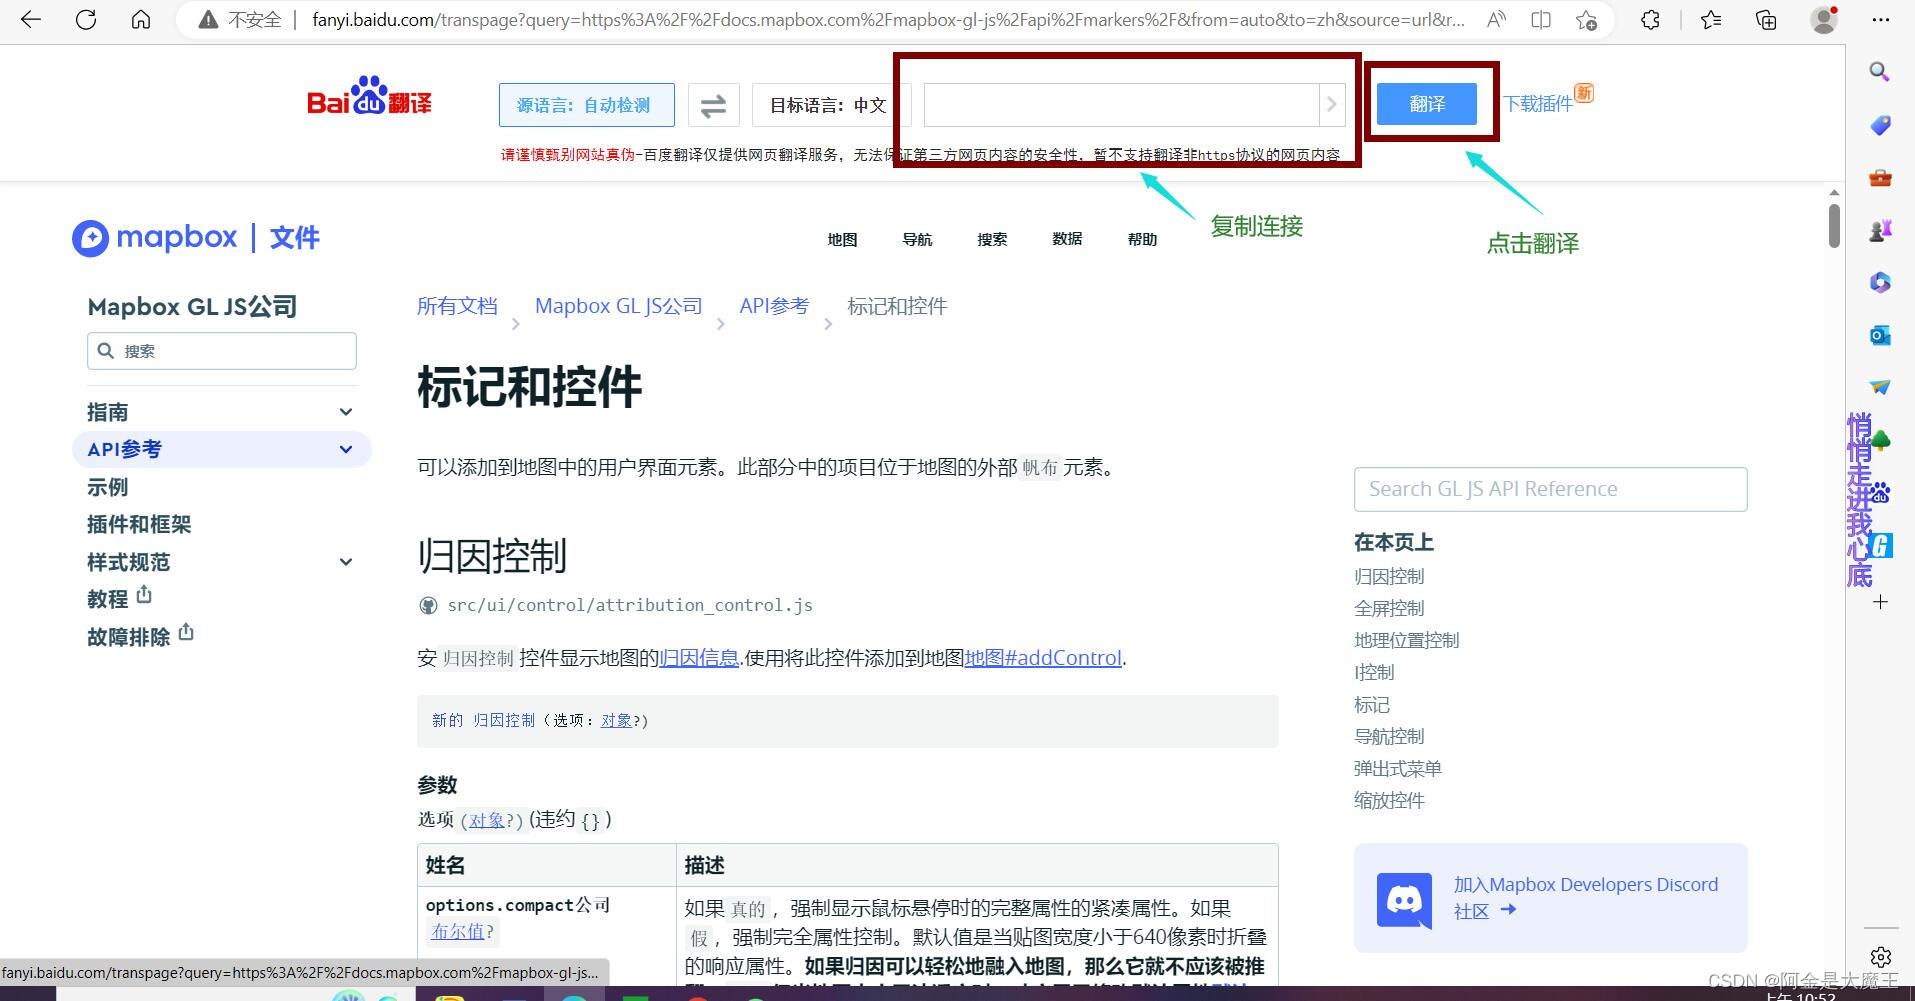
(3)中文翻译 使用方式 下边是百度翻译的连接:
二 , 3d 地图的 script 的 定义方式
module="mapContainer" lang="renderjs"
代码展示
- <template>
- <view>
- <div class="mapDiv" ref="mapContainer" id="mapContainer"> </div>
- </view>
- </template>
-
- mapContainer 这个也可以定义成任何名字 但是要统一
-
-
- <script setup module="mapContainer" lang="renderjs">
- import mapboxgl from 'mapbox-gl';
- export default {
- mounted(){
- const map = new mapboxgl.Map({
- accessToken: 'pk.eyJ1IAQ', //换成自己数据
- container: 'mapContainer', //换成自己数据
- style: 'mapbox://styl1', //换成自己数据
- //style: strStyle, //换成自己数据
- center: [125.05, 44.0], //换成自己数据
- maxBounds: [
- [121.6383441, 40.864816],
- [131.34852, 46.186],
- ],
- maxZoom: 187,
- minZoom: 97,
- zoom: 172,
- pitch: 475, //俯视角度
- //bearing: -670,
- antialias: false,
- attributionControl: false,
- });
- map.on('load',()=>{
- console.log("load",3333333)
- })
- },
-
- }
- </script>
- <style>
- ._abbr{
- font-size: 24px;
- margin-top: 200px;
- }
- .mapDiv {
- height: 1280px;
- width: 100%;
- }
-
- .login-btn {
- margin: 0 43%;
- width: 150px;
- height: 150px;
- background: #004d00;
- border-radius: 100px;
- color: #fff;
- font-size: 25px;
- text-align: center;
- line-height: 150px;
- position: fixed;
- bottom: 50px;
- }
- .abb{
- display: flex;
- padding:5px 47%;
- }
-
-
- </style>
-
-
-
三 , 获取定位置 添加标记点
代码展示
- <template>
- <view>
- <div class="mapDiv" ref="mapContainer" id="mapContainer"> </div>
- </view>
- </template>
- <script setup module="mapContainer" lang="renderjs">
- import mapboxgl from 'mapbox-gl';
- export default {
- mounted(){
- const map = new mapboxgl.Map({
- accessToken: 'pk.eyJ1IAQ', //换成自己数据
- container: 'mapContainer', //换成自己数据
- style: 'mapbox://styl1', //换成自己数据
- //style: strStyle, //换成自己数据
- center: [125.05, 44.0], //换成自己数据
- maxBounds: [
- [121.6383441, 40.864816],
- [131.34852, 46.186],
- ],
- maxZoom: 187,
- minZoom: 97,
- zoom: 172,
- pitch: 475, //俯视角度
- //bearing: -670,
- antialias: false,
- attributionControl: false,
- });
- const geolocate = new mapboxgl.GeolocateControl({ //获取当前位置信息
- positionOptions: {
- enableHighAccuracy: true
- },
- trackUserLocation: true
- });
- // Add the control to the map.
- map.addControl(geolocate);
- map.on('load', () => {
- geolocate.trigger();
- });
-
-
- //========================================
-
- 获取点击位置的信息
-
-
- map.on('click', function(e) { //获取位置信息
- var coordinates = e.lngLat;
- const longitude = coordinates.lat
- console.log(coordinates.lat,'111') //经纬度
- console.log(coordinates.lng,'111')
-
-
- // Set marker options.
- const marker = new mapboxgl.Marker({ //标记点
- draggable: true //是否移动
- })
- .setLngLat( e.lngLat) //定位信息
- .setPopup(new mapboxgl.Popup().setHTML("<h1>我是小周啊</h1>")) // 基本信息
- .addTo(map); //运行在地图
-
-
- },
-
- }
- </script>
- <style>
- ._abbr{
- font-size: 24px;
- margin-top: 200px;
- }
- .mapDiv {
- height: 1280px;
- width: 100%;
- }
-
- .login-btn {
- margin: 0 43%;
- width: 150px;
- height: 150px;
- background: #004d00;
- border-radius: 100px;
- color: #fff;
- font-size: 25px;
- text-align: center;
- line-height: 150px;
- position: fixed;
- bottom: 50px;
- }
- .abb{
- display: flex;
- padding:5px 47%;
- }
-
-
- </style>
-
-
四 , 要是想要uniapp 自带的获取位置 获取设备地址 不需要配置key信息,要是后续有别的 工作 参考下边配置一下key
代码展示
- function openUserPopup() { 获取设备当前位置
- console.log('ada')
- uni.getLocation ({
- type: 'wgs84',
- altitude:true ,
- geocode:true,
- success: function (res) {
- kkk.value = res.longitude
- lll.value = res.latitude
- console.log('当前位置的经度:' + res.longitude);
- console.log('当前位置的纬度:' + res.latitude);
-
- },
- });
-
-
- }
-
-
- -----------------------------------------------------------------------------
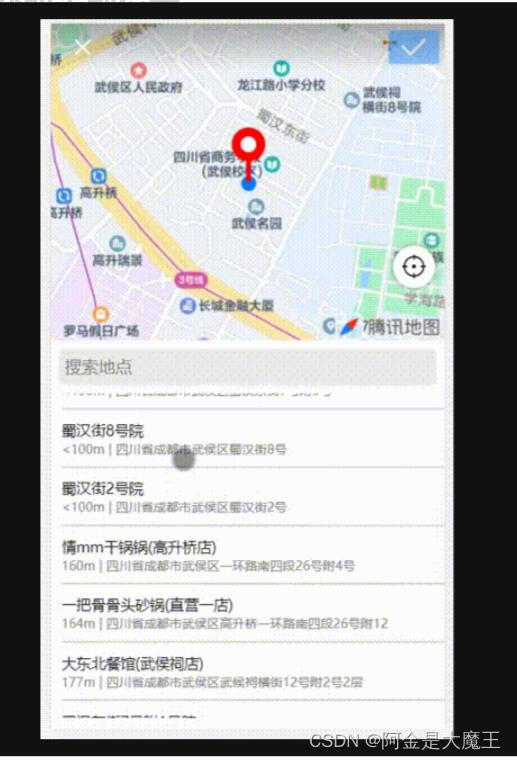
- uni.chooseLocation({ //获取当前位置 打开地图选择位置。
- success: function (res) {
- console.log('位置名称:' + res.name);
- console.log('详细地址:' + res.address);
- console.log('纬度:' + res.latitude);
- console.log('经度:' + res.longitude);
- }
- });
-
-
- -----------------------------------------------------------------------------------
- uni.getLocation({ //打开设备默认地图 获取当前位置
- type: 'gcj02', //返回可以用于uni.openLocation的经纬度
- success: function (res) {
- const latitude = res.latitude;
- const longitude = res.longitude;
- uni.openLocation({
- latitude: latitude,
- longitude: longitude,
- success: function () {
- console.log('success');
- }
- });
- }
- });
-
- ----------------------------------------------------------------------------------
--------------------------------------------------------------------------------------
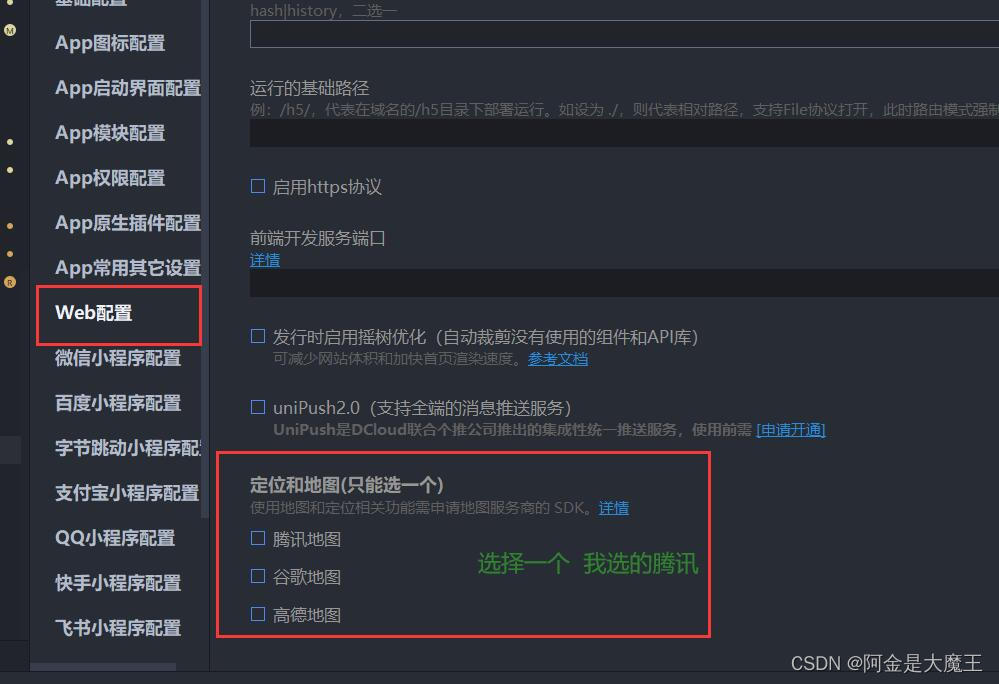
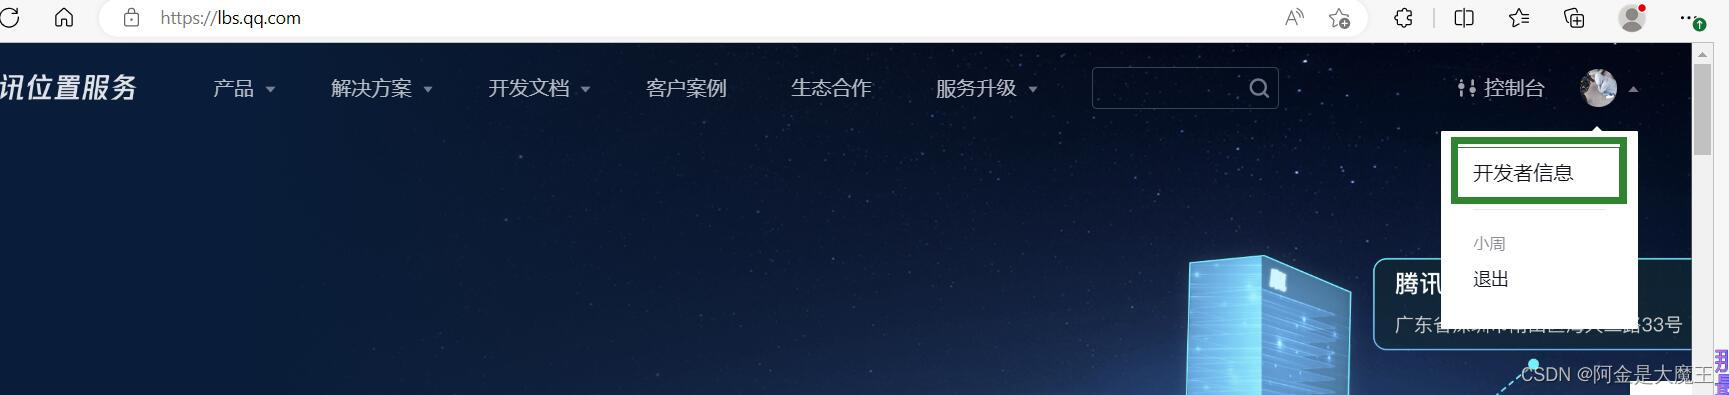
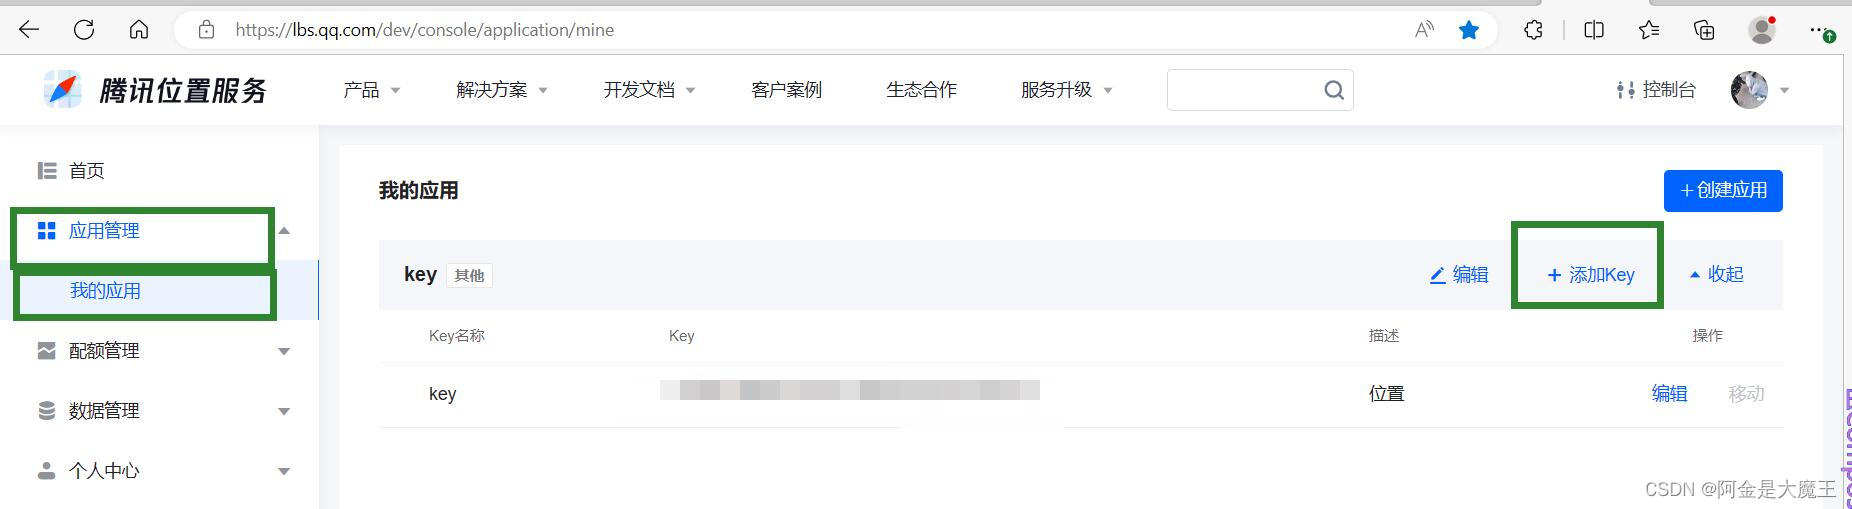
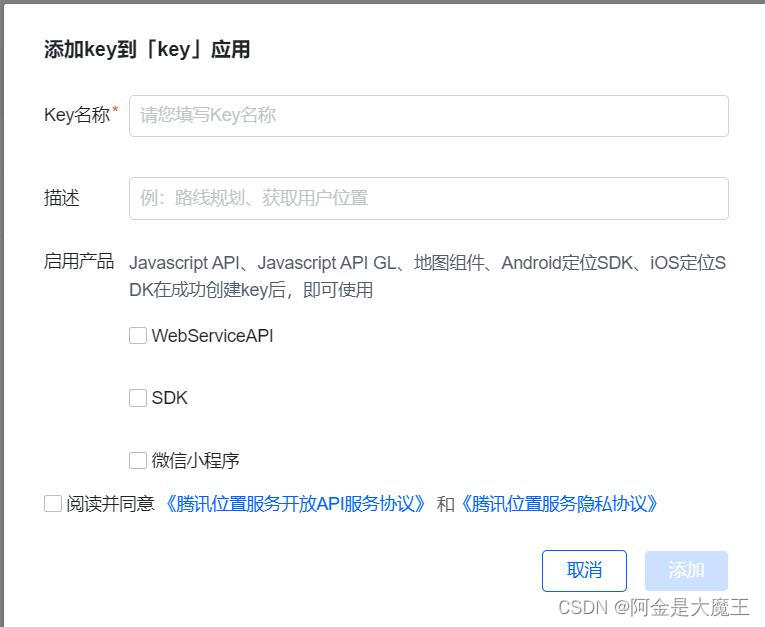
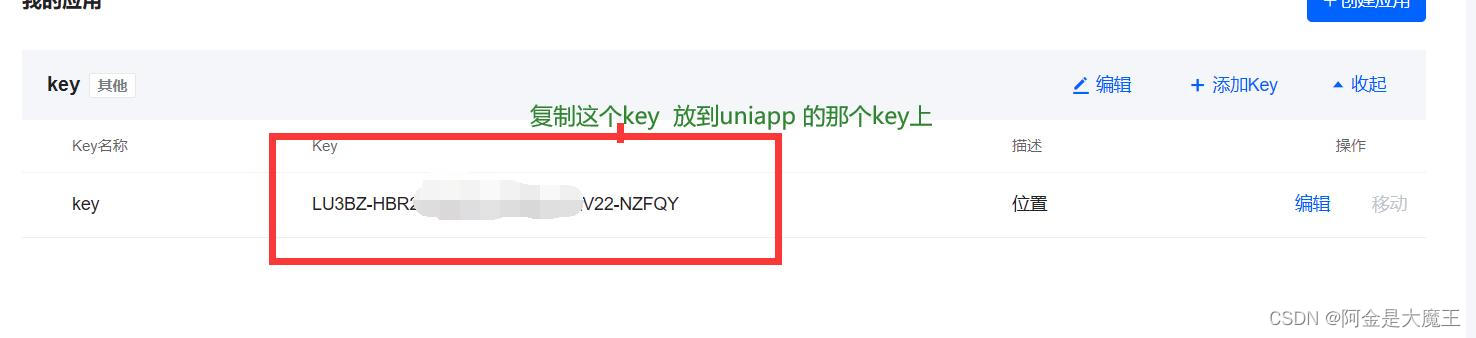
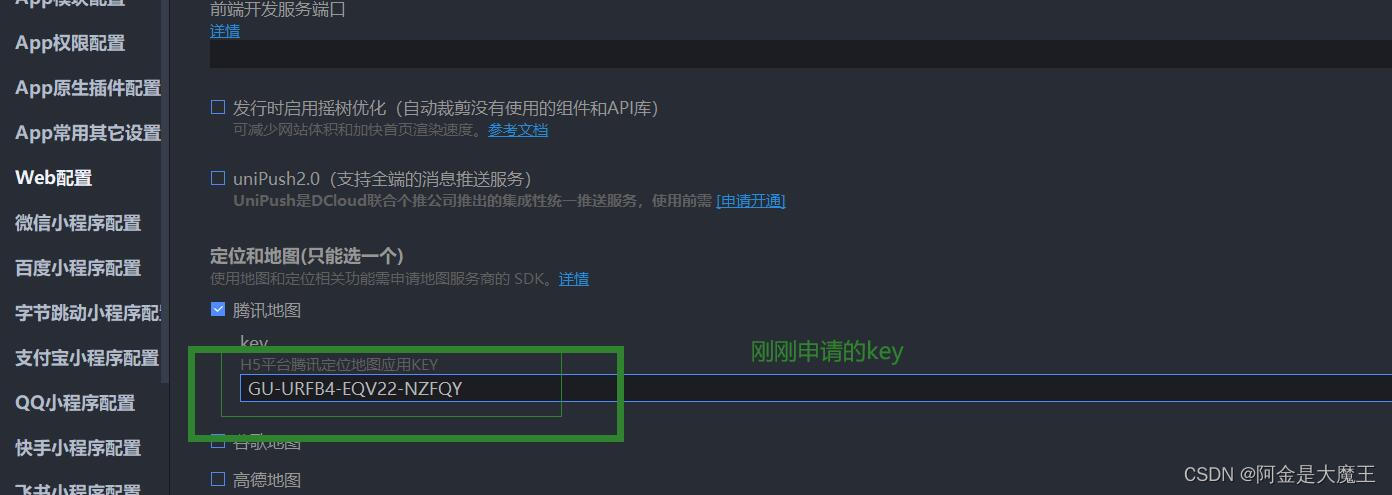
一 , uniapp 腾讯地图的 使用方式 首先打开uniapp 找到 地图选项
配置过程
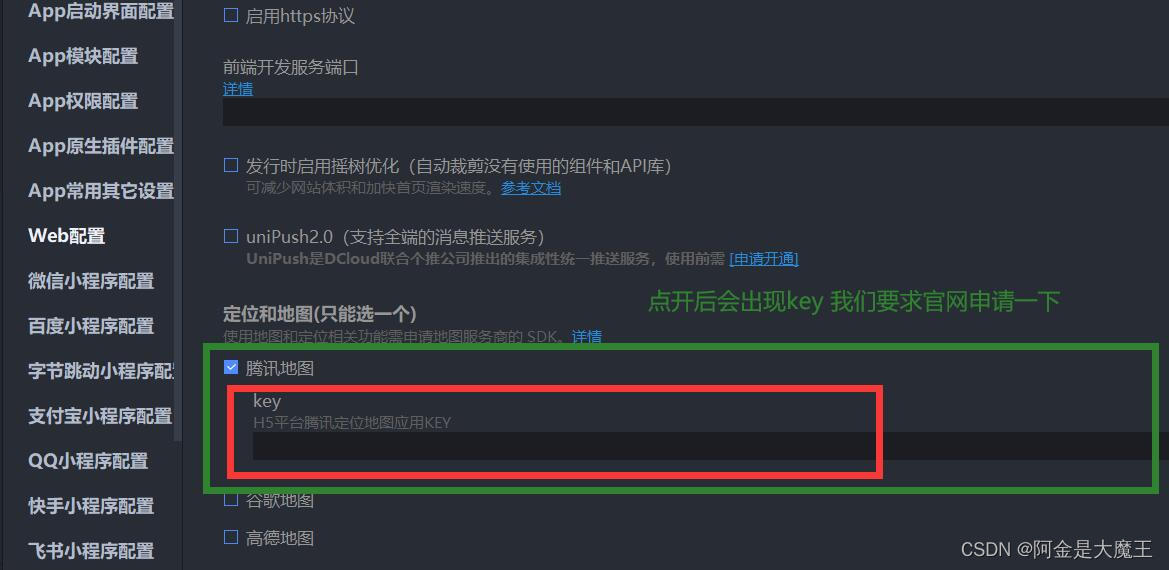
腾讯位置获取链接
腾讯位置服务 - 立足生态,连接未来 (qq.com)![]() https://lbs.qq.com/
https://lbs.qq.com/
代码展示
- <template>
- <view>
- <button type="default" @click="getCurrentLocation()">获取当前位置</button>
- <button type="primary" @click="getaddress()">获取选择的位置</button>
- <view style="color: red;">
- {{positionInfo.address}}
- </view>
- </view>
- </template>
-
- <script>
- export default {
- data() {
- return {
- positionInfo: {
- address: '',
- longitude: '', //经度
- latitude: '', //纬度
- },
-
- }
- },
- methods: {
- // 通过自带的方法获取到当前的经纬度,调用方法获取到地址获取到地址的中文信息
- getCurrentLocation() {
- let that = this //在uniapp中药定义一下this才能使用
- uni.getLocation({
- type: 'wgs84',
- success: function(res) {
- console.log(res)
- that.positionInfo.longitude = res.longitude;
- that.positionInfo.latitude = res.latitude;
- that.loAcquire(that.positionInfo.longitude, that.positionInfo.latitude)
- }
- });
- },
- // 获取当前地址
- loAcquire(longitude, latitude) {
- let that = this;
- uni.showLoading({
- title: '加载中',
- mask: true
- });
- let str = `output=jsonp&key='此处输入你申请的密钥'=${latitude},${longitude}` //记得在这里要输入密钥哦!
- this.$jsonp('https://apis.map.qq.com/ws/geocoder/v1/?' + str, {}).then(res => {
- console.log(res);
- uni.hideLoading();
- if (res.status == 0) {
- that.positionInfo.address = '当前位置是:' + res.result.address_component.street_number; //当前定位
- }
- })
- },
- // 获取选择地址
- getaddress() {
- let that = this
- uni.chooseLocation({
- success: function(res) {
- that.positionInfo.address = '选择的位置是:' + res.name
- }
- });
- },
- }
- }
- </script>
-
- <style scoped>
- button,
- view {
- margin: 20px;
- }
- </style>
推荐阅读
相关标签

