
热门标签
热门文章
- 1activiti 多实例任务_activiti多实例
- 2教你如何使用自定义测试(Minium)进行微信小程序自动化测试_mock_native_modal
- 3从官方文档弄懂Lightgbm(Python版本快速入门)_lightgbm官方文档
- 4rest_framework中的五大接口_restframework写post接口
- 5iOS应用崩溃(一)——Crash文件解析
- 6c++遍历文件夹下所有图片_c++遍历文件夹下的图片
- 7【bearpi物联网应用笔记】hi3861通过mqtt连接onenet_hi3861使用mqtt协议连接中移动onenet云
- 8MIPS单周期CPU的设计——I型指令的设计
- 9微信公众号开发--实现扫码关注公众号自动登录网站_微信公众号扫码登录网站
- 10在HarmonyOS手机应用初步实现注册登录功能_harmony os注册登录
当前位置: article > 正文
移动应用程序设计基础——Android环境构建与Activity生命周期_实验1:android studio开发环境搭建及activity生命周期
作者:你好赵伟 | 2024-03-16 21:06:46
赞
踩
实验1:android studio开发环境搭建及activity生命周期
《移动应用程序设计基础》实 验 报 告(一)
实验名称:
Android环境构建与Activity生命周期
所使用的工具软件及环境:
JDK1.8,Android Studio
(一)
一、实验目的:
安装智能手机开发相关软件平台,并在此基础上测试Activity的生命周期过程。
- 完成智能手机开发平台安装、以及相关配置;
- 并实现Hello World;
- 添加Log日志,通过Log日志验证Activity生命周期中的7个方法执行过程;
- 了解项目的基本文件目录结构,了解Activity周期中的4种状态。
二、实验内容:
- 安装JAVA JDK
- 安装Android Studio,熟悉AS的基本操作,改变AS的字体,显示方式;截图和文字说明。
- 建立新项目,实现Hello World。说明各个文件的作用,以及各个关键语句的作用或含义,给出程序的运行结果。
- 设置生命周期的Log日志,分别执行相关操作
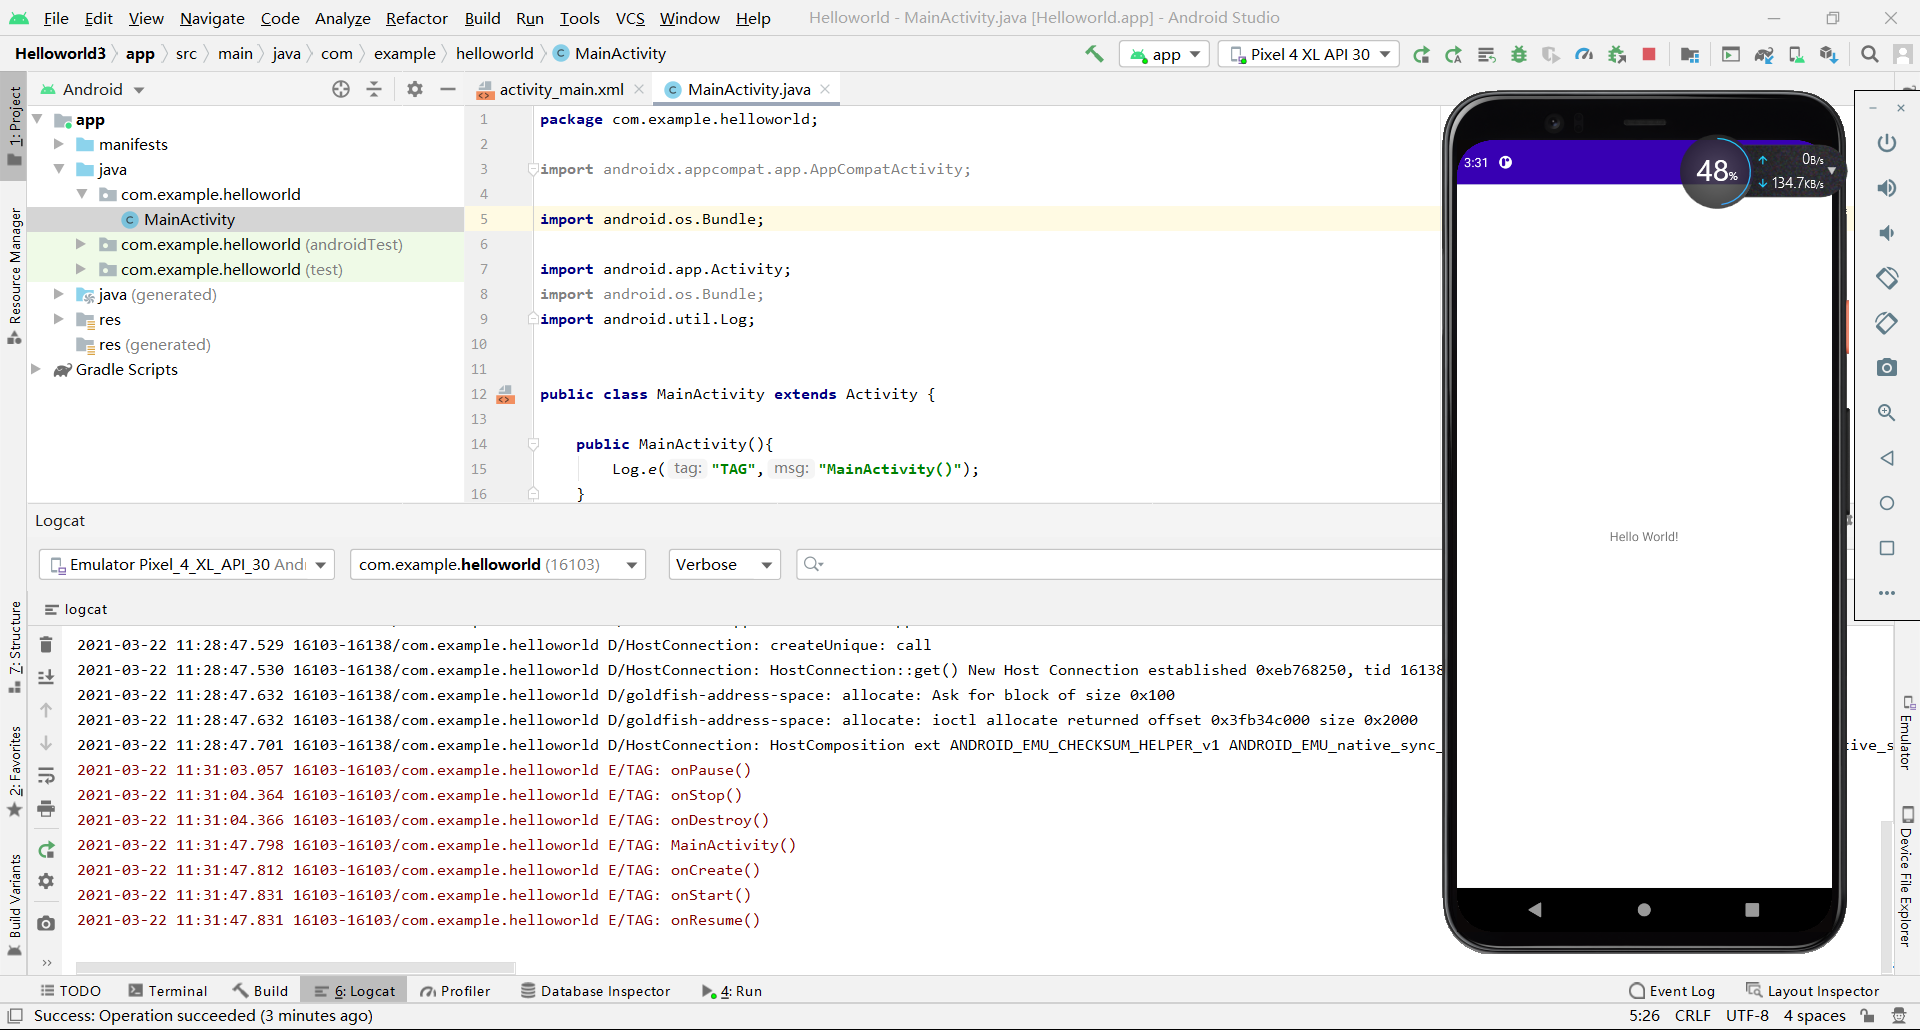
- 在MainActivity中复写onCreate 、onStart、onResume 、onPause 、onStop 、onDestroy 和onRestart;
- 分别在各个方法中添加日志监视语句,例如:Log.e(“ActivityLife”, "onCreate");
- 分别执行
- 打开程序,在LogCat的输出日志中检查输出情况,执行顺序是否为onCreate()、onStart()、onResume();
- 按下back键,在LogCat的输出日志中检查输出情况,执行顺序是否为onPause()、onStop()、onDestory();
- 按下home键,在LogCat的输出日志中检查输出情况,执行顺序是否为onPause()、onStop();
- 再启动HelloWorld,在LogCat的输出日志中检查输出情况,执行顺序是否为onRestart()、onStart()、onResume();
三、源代码
- //activity_main.xml
-
- <?xml version="1.0" encoding="utf-8"?>
-
- <androidx.constraintlayout.widget.ConstraintLayout xmlns:android="http://schemas.android.com/apk/res/android"
-
- xmlns:app="http://schemas.android.com/apk/res-auto"
-
- xmlns:tools="http://schemas.android.com/tools"
-
- android:layout_width="match_parent"
-
- android:layout_height="match_parent"
-
- tools:context=".MainActivity">
-
-
-
- <TextView
-
- android:layout_width="wrap_content"
-
- android:layout_height="wrap_content"
-
- android:text="Hello World!"
-
- app:layout_constraintBottom_toBottomOf="parent"
-
- app:layout_constraintLeft_toLeftOf="parent"
-
- app:layout_constraintRight_toRightOf="parent"
-
- app:layout_constraintTop_toTopOf="parent" />
-
-
-
- </androidx.constraintlayout.widget.ConstraintLayout>

- //MainActivity.java
-
- package com.example.helloworld;
-
- import androidx.appcompat.app.AppCompatActivity;
-
- import android.os.Bundle;
-
- import android.app.Activity;
- import android.os.Bundle;
- import android.util.Log;
-
-
- public class MainActivity extends Activity {
-
- public MainActivity(){
- Log.e("TAG","MainActivity()");
- }
-
- @Override
- protected void onCreate(Bundle savedInstanceState) {
- Log.e("TAG","onCreate()");
- super.onCreate(savedInstanceState);
- setContentView(R.layout.activity_main);
- }
-
- @Override
- protected void onStart() {
- Log.e("TAG","onStart()");
- super.onStart();
-
- }
- @Override
- protected void onResume() {
- Log.e("TAG","onResume()");
- super.onResume();
-
- }
-
-
- @Override
- protected void onPause() {
- Log.e("TAG","onPause()");
- super.onPause();
- }
-
- @Override
- protected void onStop() {
- Log.e("TAG","onStop()");
- super.onStop();
- }
-
- @Override
- protected void onDestroy() {
- Log.e("TAG","onDestroy()");
- super.onDestroy();
- }
-
- @Override
- protected void onRestart() {
- Log.e("TAG","onRestart()");
- super.onRestart();
- }
- }
-
-
四、实验结果测试
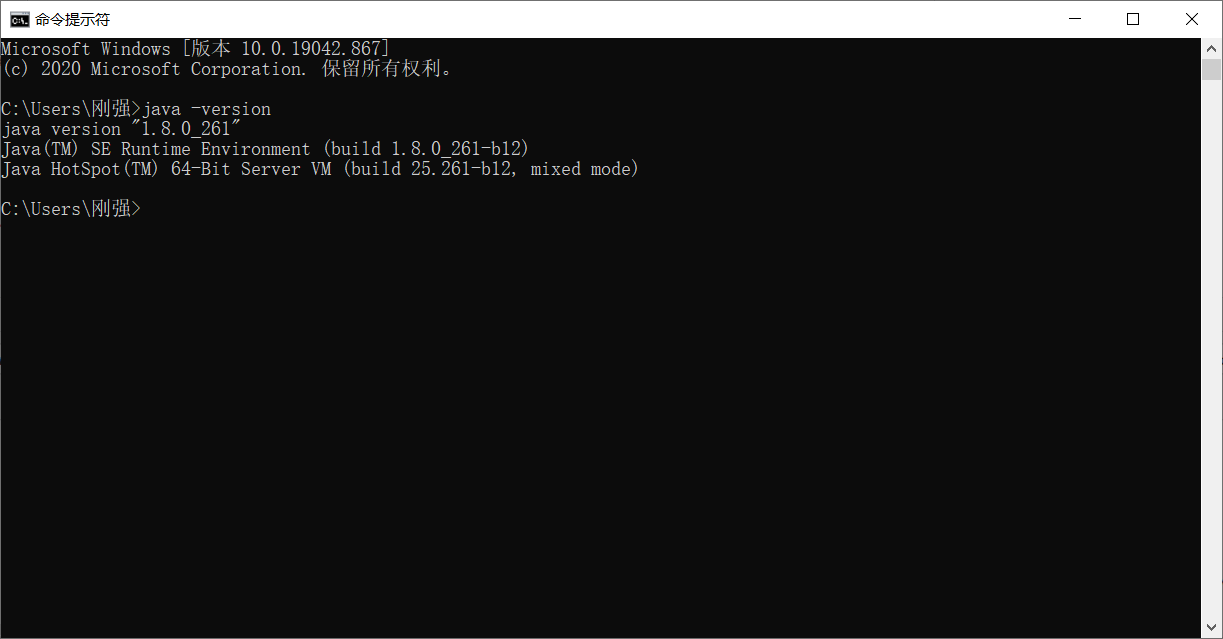
1.此时安装好的JDK版本
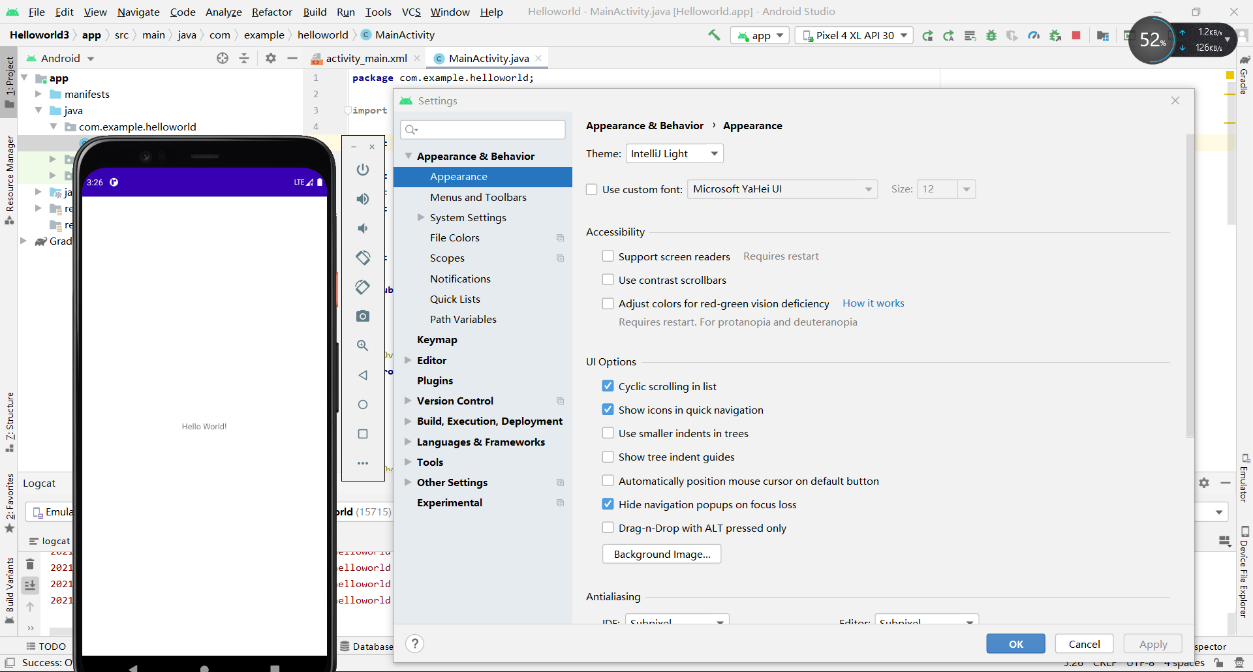
2、3.能够创建一个新工程项目helloworld且能运行,在Android studio中能够改变主题和字体样式和大小,此时我选择默认不做改变

4.(1)首次打开helloworld查看运行周期日志

(2)点击back,查看周期日志
(3)重新启动,查看周期日志

(4)点击home,查看周期日志
五、收获与体会
能够安装好JDK,收悉了android studio各个工程项目中的文件,能够初次运行helloworld,且学习到了app的生存周期并且能够查看日志。
(二)
一、实验目的:
安装智能手机开发相关软件平台,并在此基础上测试Activity的生命周期过程。
- 完成智能手机开发平台安装、以及相关配置;
- 并实现Hello World;
- 添加Log日志,通过Log日志验证Activity生命周期中的7个方法执行过程;
- 了解项目的基本文件目录结构,了解Activity周期中的4种状态。
二、实验内容:
5、bug调试、测试实验
以下代码是实现一个进度条测试程序,在界面(activity_main.xml)上放置一个水平长条形的进度条(style:progressBarStyleHorizontal,id:horizontal_pbar),以及一个启动进度条的按钮。点击按钮,进度条从0增加到满格100,进度条停止。由于代码中存在各种问题,现请你将代码修正和调试正确。
三、源代码
- //activity_main.xml
-
- <?xml version="1.0" encoding="utf-8"?>
-
- <LinearLayout xmlns:android="http://schemas.android.com/apk/res/android"
-
- xmlns:tools="http://schemas.android.com/tools"
-
- android:layout_width="match_parent"
-
- android:layout_height="match_parent"
-
- android:orientation="vertical"
-
- tools:context="com.example.helloworld.MainActivity">
-
- <ProgressBar
-
- android:id="@+id/horizontal_pbar"
-
- style="?android:attr/progressBarStyleHorizontal"
-
- android:layout_width="match_parent"
-
- android:layout_height="50dp"
-
- android:max="100" />
-
- <Button
-
- android:id="@+id/start_pbar_btn"
-
- android:layout_width="match_parent"
-
- android:layout_height="wrap_content"
-
- android:text="启动进度条" />
-
- </LinearLayout>
- //MainActivity.java
-
- package com.example.helloworld;
-
- import androidx.appcompat.app.AppCompatActivity;
-
- import android.os.Bundle;
- import android.os.Handler;
- import android.view.View;
- import android.widget.Button;
- import android.widget.ProgressBar;
-
- public class MainActivity extends AppCompatActivity {
- private ProgressBar mProgress;
- private Handler mHandler = new Handler();
- private Boolean FLAG=true;
-
- private Button startpbarbtn;
-
- int mProgressStatus=0;
- protected void onCreate(Bundle icicle) {
- super.onCreate(icicle);
- setContentView(R.layout.activity_main);
- mProgress = (ProgressBar) findViewById(R.id.horizontal_pbar);
- //设置监听按钮
- startpbarbtn = (Button)findViewById(R.id.start_pbar_btn);
- //设置监视内容
- startpbarbtn.setOnClickListener(new View.OnClickListener() {
- @Override
- public void onClick(View view) {
-
- //监听
- new Thread(new Runnable() {
- public void run() {
- //推荐使用标志位使其不执行代码,不推荐使用true
- while (FLAG) {
- mProgressStatus = addNum();
- // 更新进度条
- // post方法推送一个Runnable到Handler,可以在此更新UI
- mHandler.post(new Runnable() {
- public void run() {
- if(mProgressStatus<100) {
- mProgress.setProgress(mProgressStatus);
- mProgressStatus++;
- }
- //执行完成后隐藏进度条并将标志设置为false
- else {
- mProgress.setVisibility(View.INVISIBLE);
- FLAG = false;
- }
- }
- });
- }
- }
- private int addNum() {
-
- try {
- Thread.sleep(100);
- } catch (InterruptedException e) {
- e.printStackTrace();
- }
- return mProgressStatus;
- }
-
- }).start();
- }
- });
- }
- }
四、实验结果测试

1.将bug程序修改完成,启动
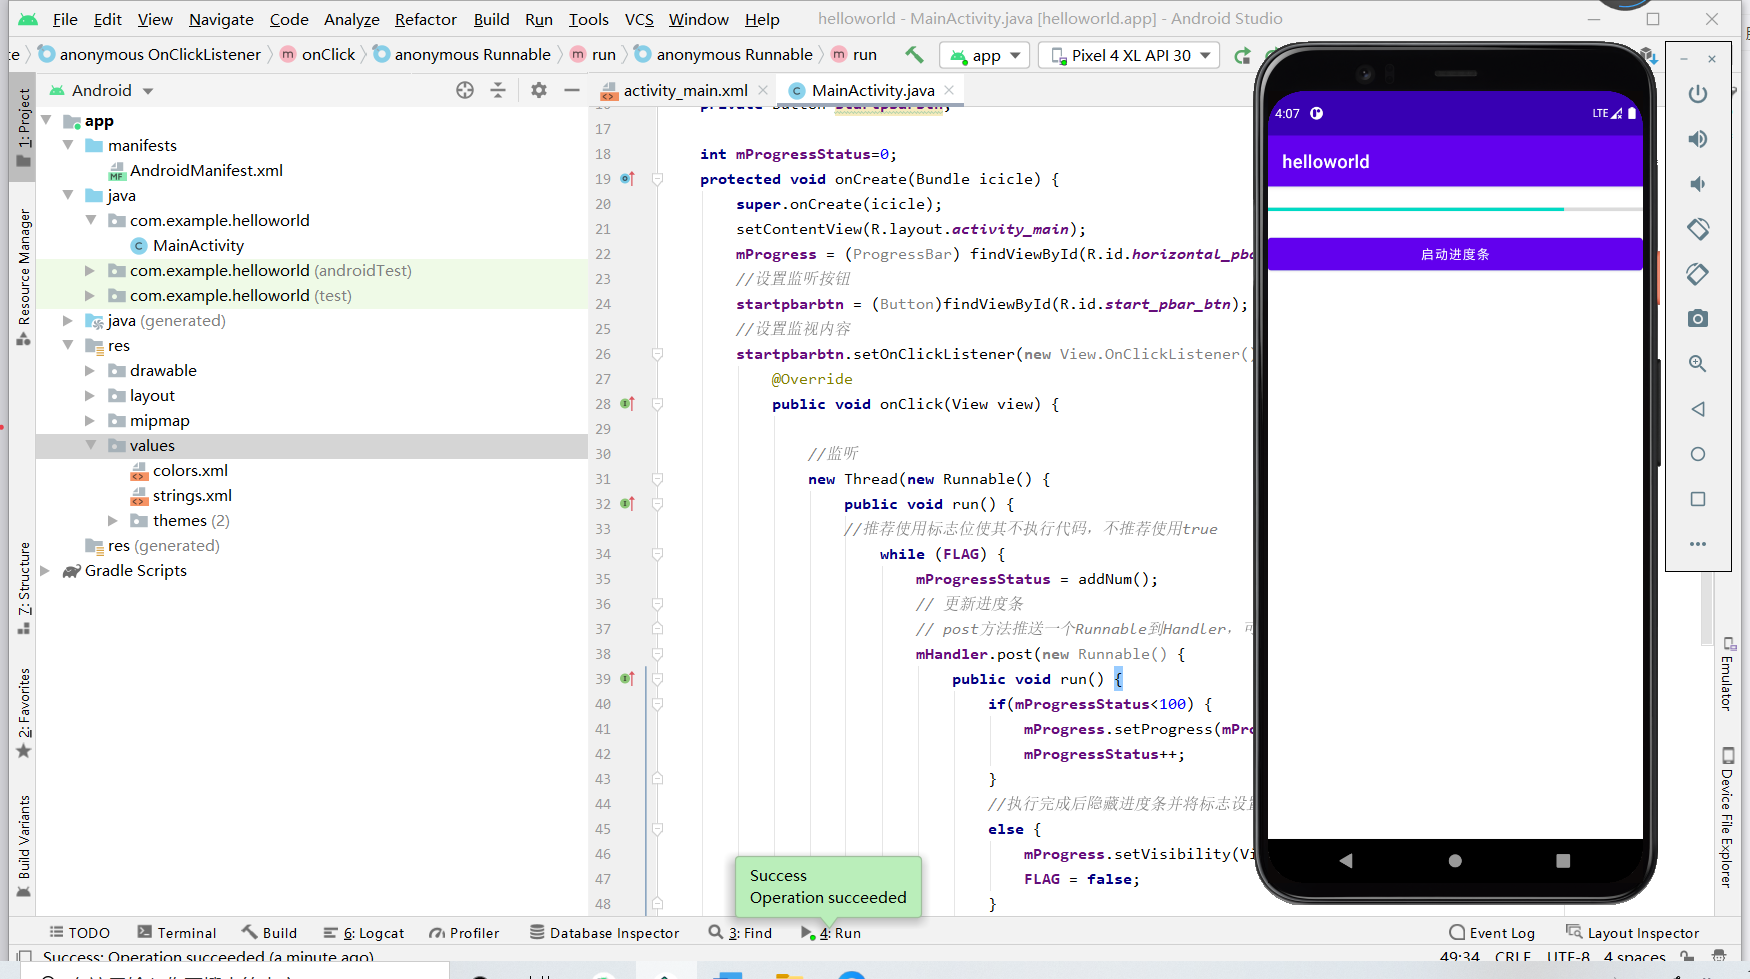
2.点击启动进度条,开始启动

3.进度完成,隐藏进度条
五、收获与体会
对部分代码进行修改,增加了按钮监听,使得程序可以正常运行,对监听器的运用和Android studio代码的编写有了进一步的了解和运用。
声明:本文内容由网友自发贡献,不代表【wpsshop博客】立场,版权归原作者所有,本站不承担相应法律责任。如您发现有侵权的内容,请联系我们。转载请注明出处:https://www.wpsshop.cn/w/你好赵伟/article/detail/252009?site
推荐阅读
相关标签

