
- 1人工智能Ai画画——stable diffusion 原理和使用方法详解!_stable diffusion组件
- 2es中,should的用法(以组合搜索做示例)_es should
- 3android自动获取系统时间,Android--获取系统时间的几种方式
- 4Git,GitHub与GitLab的区别,这原因我服了_githu没有webide但gitlab有
- 52024最新版JavaScript逆向爬虫教程-------基础篇之JavaScript混淆原理_js逆向
- 6Dockerfile最佳实践
- 7C++ 11智能指针详解和使用_c++ 指针11
- 8图机器学习基础知识——CS224W(17-scalable)
- 9程序员的日日夜夜_日日干b
- 10java gettime gmt,在java中将本地时区转换为GMT
JS中的File(四):文件流Streams API使用详解_js file.stream()
赞
踩
目录
PS:涉及到一些基本的文件操作和格式内容知识,可以进入我的主页参考我之前的此系列文章。这个系列我还会继续更新下去的~
参考:
从 Fetch 到 Streams —— 以流的角度处理网络请求 - 掘金 (juejin.cn)
Stream API - Web API 接口参考 | MDN (mozilla.org)
一、流的原理
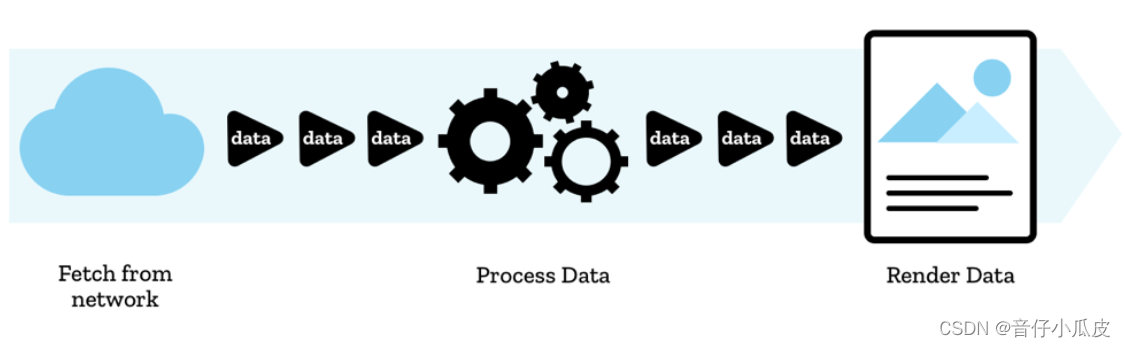
在流之前,如果想要对文件资源进行操作,需要先下载完整的文件,等待它反序列化成合适的格式,在完整地对接收到的内容进行统一处理。流出现之后,网络发送文件可以将文件以一块块的数据形式传输,这使得——视频缓冲区 和 逐渐加载播放其他类型的资源成为可能。
*在阅读的时候,总会遇到一个词组叫做"Underlying Sink",我们翻译为"底层接收器"或者"底层汇聚器",指的是用于接收流写入数据的底层组件或实体,表达的是底层数据传输的目标或者终点。
流的优点:
- 在javascript中对流可以进行按块、按位处理,不再需要缓冲区、字符串或者blob;
- 你可以检测流何时开始或结束,将流链接在一起,根据需要处理错误和取消流,并对流的读取速度做出反应。
- 流的处理实现了异步,很多方法基于Promise,所以注意时序顺序
由于网络请求方法Fetch API,它区别于原始的XHR不仅仅在是基于Promise处理网络请求任务(XHR是基于事件驱动的callback),更是在于它是基于数据流来实现的。所以下文在描述流的操作时,不可避免要和fetch结合。另外,fetch API基于Request对象实现的,因此下文中提及的Request对象的基于流的使用和fetch API同理
二、流的分类
1、可读流(ReadableStream)
表示数据的可读流。在使用Fetch进行网络请求处理时,请求对象中的body属性Request.body 和 响应对象Response.body 属性中可以获取到可读流的主体,这是将主体内容暴露作为一个可读流的 getter。
或者开发者可以自定义流(使用ReadableStream()进行构造,定义一些钩子比如start、cancel、pull等,参数的传入是controller控制器实例,同下文中提及的构造器参数)
举个应用栗子
- // Fetch the original image
- fetch("./tortoise.png")
- // Retrieve its body as ReadableStream
- .then((response) => response.body)
- .then((body) => {
- const reader = body.getReader();
- // 使用 read读取,并获取状态和value
- const { done, value } = await reader.read();
-
- if (done) {
- console.log('End of file reached');
- // 释放读取器
- reader.releaseLock();
- } else {
- // 处理读取到的数据块
- console.log('Read:', value);
- // 继续递归读取下一个数据块
- // 可以递归读取
- }
- });

ReadableStream中除了getReader()获取对可读流的读取器,还有一些常用方法:
- ReadableStream.tee():拷贝流,实现的是返回一个数组,包含对原始可读流的两个相同的副本可读流,然后可以独立的使用不同的 reader 读取
- 链式管道传输ReadableStream.pipeThrough()和ReadableStream.pipeTo():实现的是从一个流输出到另一个。前者pipeThrough是将可读流管道输出至拥有一对writer/reader 的流中比如下文介绍的TransformStream,并将一种数据转换成另一种类型的流(比如输入WritableStream->TransformStream->返回输出ReadableStream);后者pipeTo是可读流管道传输至作为链式管道传输终点的 writer(转换为readableStream->writableStream)
2、可写流(WritableStream)
为将流写入目的地(称为接收器)的过程,提供了一个标准抽象。内置了背压和队列机制。
*解释下背压和队列机制:
-
背压(Backpressure):
- 背压是指在数据写入速度大于消费者(读取端)的处理速度时,为了防止数据溢出,写入端必须采取一些措施以减缓写入速度的现象。
- 在可写流(
WritableStream)中,当写入速度过快而消费者无法跟上时,可写流会发出背压信号,告诉写入端要减缓写入。这可以通过writer.write()返回的 Promise 来实现,当 Promise 处于挂起状态时,表示发生了背压。
-
队列机制:
- 队列机制是一种用于缓存待写入数据的机制,以确保写入端和消费者之间的速度匹配。
- 在
WritableStream中,有一个内部的队列用于存储待写入的数据块。写入端通过writer.write(chunk)将数据块推送到队列中。如果队列已满或发生背压,writer.write(chunk)返回一个处于挂起状态的 Promise。 - 当队列中的数据被消费者处理时,队列中的下一个数据块会被写入。
定义构造WritableStream有两个对象参数:第一个必选,用于配置一些写入流时的钩子;第二个可选,用于配置一些chunk入队和队列控制的策略(利用ByteLengthQueuingStrategy【按字节计量】和CountQueuingStrategy【按元素数量计量】接口去定义策略)。
在必选中,所有的对象字段都是可选的,如下:
- start(controller):在WritableStream对象完成构造后立即调用controller method执行一次
- write(chunk,controller):每当一个新的chunk准备写入接收器的时候,将调用方法
- close(controller):当结束写入流时候调用该方法
- abort(reason):当写入流被中断或者写入流进入错误状态的时候,调用该方法
构造完的WritableStream可以用getWriter()方法获取其写入器
举个应用栗子
- const decoder = new TextDecoder("utf-8");
- const queuingStrategy = new CountQueuingStrategy({ highWaterMark: 1 });
- let result = "";
- const writableStream = new WritableStream(
- {
- // Implement the sink
- write(chunk) {
- return new Promise((resolve, reject) => {
- const buffer = new ArrayBuffer(1);
- const view = new Uint8Array(buffer);
- view[0] = chunk;
- const decoded = decoder.decode(view, { stream: true });
- const listItem = document.createElement("li");
- listItem.textContent = `Chunk decoded: ${decoded}`;
- list.appendChild(listItem);
- result += decoded;
- resolve();
- });
- },
- close() {
- const listItem = document.createElement("li");
- listItem.textContent = `[MESSAGE RECEIVED] ${result}`;
- list.appendChild(listItem);
- },
- abort(err) {
- console.error("Sink error:", err);
- },
- },
- queuingStrategy,
- );
3、转换流(TransformStream)
代表一个即可写入又可读取的流,在读写之间起着中间流转换的作用。因此转换流比较简单,无实例方法,可自定义构造,只有两个只读的属性ReadableStream与 WritableStream,这两个都暴露的都是自身的可读流和可写流。通常,借助这两个属性来做中间转换!
举个应用栗子
实现输入的所有字符串都转为大写字母
- class UpperCaseTransformer {
- constructor() {
- this.transformStream = new TransformStream({
- start(controller) {//开始钩子
- //----下面是给个示例!
- // 将会在对象创建时立刻执行,并传入一个流控制器
- controller.desiredSize
- // 填满队列所需字节数
- controller.enqueue(chunk)
- // 向可读取的一端传入数据片段
- controller.error(reason)
- // 同时向可读取与可写入的两侧触发一个错误
- controller.terminate()
- // 关闭可读取的一侧,同时向可写入的一侧触发错误
- },
-
- async transform(chunk, controller) {//中间chunck转换
- // 将 chunk 转换为大写
- const upperCaseChunk = chunk.toString().toUpperCase();
-
- // 块入队,将转换后的数据传递给下游
- controller.enqueue(upperCaseChunk);
- },
-
- flush(controller) {
- // 当可写入的一端得到的所有的片段完全传入 transform() 方法处理后,在可写入的一端即将关
- 闭时调用
- }
- },queuingStrategy); //queuingStrategy策略内容假设为 { highWaterMark: 1 }
-
- //获取自身的读写流主提
- this.readableStream = this.transformStream.readable;
- this.writableStream = this.transformStream.writable;
- }
-
- // 关闭流
- async close() {
- await this.writableStream.getWriter().close();
- }
-
- // 获取读取器
- getReader() {
- return this.readableStream.getReader();
- }
-
- // 获取写入器
- getWriter() {
- return this.writableStream.getWriter();
- }
- }
三、流中的Request和Response对象
这两个对象的很多属性依然和普通网络请求一样,可以直接通过对象获取,比如headers、request中的url和credentials等、response中的status等。
但是,在fetch和Request对象下,这两个对象的body属性返回的ReadableStream!
那么要如何转换成文件的其他资源格式和对象呢?request和response都有着相同的实例方法如下,只不过request是调用这些方法作为请求体body的内容格式,response是将响应体的body解析为对应格式:
- arrayBuffer() // 返回一个Promise,兑现为ArrayBuffer
- blob() // 返回一个Promise,兑现为blob
- formData() //如上
- text() //如上,返回字符串
-
- clone()//将request或者response拷贝
直接单独说的是json()方法,request和response都有着相同的实例方法,可以将body内容兑现为json
但是response中还有一个静态方法json,可以在后端处理的时候,将输入的data直接以json格式塞入body而不是默认的readableStream;options配置status状态码、statusText状态信息、headers等,返回的是一个 以json内容为body 的response对象
Response.json(data, options)举个应用栗子
fetch读取图像【涉及到如何从stream转为blob】
- const image = document.getElementById("target");
-
- // 请求原始图片
- fetch("./tortoise.png")
- // 取出 body
- .then((response) => response.body)
- .then((body) => {
- const reader = body.getReader();
-
- return new ReadableStream({
- start(controller) {
- return pump();
-
- function pump() {
- return reader.read().then(({ done, value }) => {
- // 读不到更多数据就关闭流
- if (done) {
- controller.close();
- return;
- }
-
- // 将下一个数据块置入流中
- controller.enqueue(value);
- return pump();
- });
- }
- },
- });
- })
- .then((stream) => new Response(stream))
- .then((response) => response.blob())
- .then((blob) => URL.createObjectURL(blob))
- .then((url) => console.log((image.src = url)))
- .catch((err) => console.error(err));
四、综合应用
将彩色图片转成由灰度级别信息(grayscale)表示的黑白图,达成以下效果
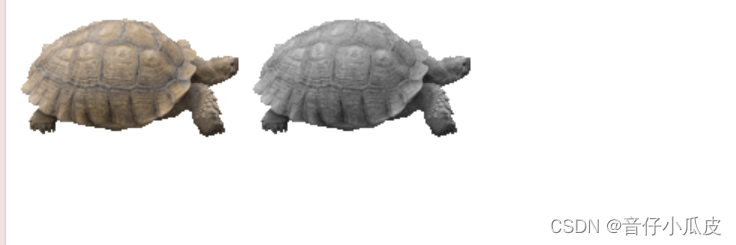
github链接:dom-examples/streams/grayscale-png at main · mdn/dom-examples (github.com)
这里仅粘贴与流操作有关的核心代码,其中转换代码在png-lib.js里面,流读取在index.html中,有兴趣的去github看,里面还有不少其他例子~
transform:
- class GrayscalePNGTransformer {
- constructor() {
- this._mode = 'magic';
- }
-
- /**
- * Called for every downloaded PNG data chunk to be grayscaled.
- *
- * @param {Uint8Array} chunk The downloaded chunk.
- * @param {TransformStreamDefaultController} controller The controller to euqueue grayscaled data.
- */
- transform(chunk, controller) {
- let position = chunk.byteOffset;
- let length = chunk.byteLength;
- const source = new DataView(chunk.buffer, position, length);
- const buffer = new Uint8Array(length);
- const target = new DataView(buffer.buffer, position, length);
-
- while (position < length) {
- switch (this._mode) {
- case 'magic': {
- const magic1 = source.getUint32(position);
- target.setUint32(position, magic1);
- position += 4;
-
- const magic2 = source.getUint32(position);
- target.setUint32(position, magic2);
- position += 4;
-
- const magic = magic1.toString(16) + '0' + magic2.toString(16);
- console.log('%cPNG magic: %c %o', 'font-weight: bold', '', magic);
- if (magic !== '89504e470d0a1a0a') {
- throw new TypeError('This is not a PNG');
- }
-
- this._mode = 'header';
- break;
- }
- case 'header': {
- // Read chunk info
- const chunkLength = source.getUint32(position);
- target.setUint32(position, chunkLength);
- position += 4;
- const chunkName = this.readString(source, position, 4);
- this.writeString(target, position, chunkName);
- position += 4;
- if (chunkName !== 'IHDR') {
- throw new TypeError('PNG is missing IHDR chunk');
- }
-
- // Read image dimensions
- this._width = source.getUint32(position);
- target.setUint32(position, this._width);
- position += 4;
- this._height = source.getUint32(position);
- target.setUint32(position, this._height);
- position += 4;
- console.log('%cPNG dimensions:%c %d x %d', 'font-weight: bold', '', this._width, this._height);
-
- this._bitDepth = source.getUint8(position);
- target.setUint8(position, this._bitDepth);
- position += 1;
- console.log('%cPNG bit depth: %c %d', 'font-weight: bold', '', this._bitDepth);
-
- this._colorType = source.getUint8(position);
- target.setUint8(position, this._colorType);
- position += 1;
- console.log('%cPNG color type:%c %s', 'font-weight: bold', '', this.colorType(this._colorType));
-
- const compression = source.getUint8(position);
- target.setUint8(position, compression);
- position += 1;
- console.log('%cPNG compressio:%c %d', 'font-weight: bold', '', compression);
- const filter = source.getUint8(position);
- target.setUint8(position, filter);
- position += 1;
- console.log('%cPNG filter: %c %d', 'font-weight: bold', '', filter);
- const interlace = source.getUint8(position);
- target.setUint8(position, interlace);
- position += 1;
- console.log('%cPNG interlace: %c %d', 'font-weight: bold', '', interlace);
-
- const chunkCrc = source.getUint32(position);
- target.setUint32(position, chunkCrc);
- position += 4;
-
- this._mode = 'data';
- break;
- }
- case 'data': {
- // Read chunk info
- const dataSize = source.getUint32(position);
- console.log('%cPNG data size: %c %d', 'font-weight: bold', '', dataSize);
-
- const chunkName = this.readString(source, position + 4, 4);
- if (chunkName !== 'IDAT') {
- throw new TypeError('PNG is missing IDAT chunk');
- }
-
- const crcStart = position + 4;
-
- // Extract the data from the PNG stream
- const bytesPerCol = this.bytesPerPixel();
- const bytesPerRow = this._width * bytesPerCol + 1;
- let result = chunk.subarray(position + 8, position + 8 + dataSize);
-
- // Decompress the data
- result = pako.inflate(result);
-
- // Remove PNG filters from each scanline
- result = this.removeFilters(result, bytesPerCol, bytesPerRow);
-
- // Actually grayscale the image
- result = this.grayscale(result, bytesPerCol, bytesPerRow);
-
- // Compress with Deflate
- result = pako.deflate(result);
-
- // Write data to target
- target.setUint32(position, result.byteLength);
- this.writeString(target, position + 4, 'IDAT');
- buffer.set(result, position + 8);
-
- position += result.byteLength + 8;
-
- const chunkCrc = crc32(chunkName, result);
- target.setUint32(position, chunkCrc);
- position += 4;
-
- this._mode = 'end';
- break;
- }
- case 'end': {
- // Write IEND chunk
- target.setUint32(position, 0);
- position += 4;
- this.writeString(target, position, 'IEND');
- position += 4;
- target.setUint32(position, 2923585666);
- position += 4;
-
- controller.enqueue(buffer.subarray(0, position));
- return;
- }
- }
- }
- }
-
- /**
- * @param {DataView} dataView
- * @param {number} position
- * @param {number} length
- */
- readString(dataView, position, length) {
- return new Array(length)
- .fill(0)
- .map((e, index) => String.fromCharCode(dataView.getUint8(position + index))).join('');
- }
-
- /**
- * @param {DataView} dataView
- * @param {number} position
- * @param {string} string
- */
- writeString(dataView, position, string) {
- string.split('').forEach((char, index) => dataView.setUint8(position + index, char.charCodeAt(0)));
- }
-
- //..........未完
-
- }
流读取和转换:
- <script type="application/javascript">
- const image = document.getElementById('target');
-
- // Fetch the original image
- fetch('tortoise.png')
- // Retrieve its body as ReadableStream
- .then(response => response.body)
- // Create a gray-scaled PNG stream out of the original
- .then(rs => rs.pipeThrough(new TransformStream(new GrayscalePNGTransformer())))
- // Create a new response out of the stream
- .then(rs => new Response(rs))
- // Create an object URL for the response
- .then(response => response.blob())
- .then(blob => URL.createObjectURL(blob))
- // Update image
- .then(url => image.src = url)
- .catch(console.error);
-
- </script>

