
- 1【Docker】Docker的部署含服务和应用、多租环境、Linux内核的详细介绍_什么应用适合容器部署
- 2什么是ddos攻击,如何低成本防御ddos攻击?
- 3php反序列化之pop链构造(基于重庆橙子科技靶场)
- 4AI与区块链的完美交融创新时代的双重引擎
- 5【Spring Boot 3】【数据源】自定义多数据源
- 6Android 13 - Media框架(19)- ACodec(一)_acodec定义的状态机
- 7支持向量机回归预测SVR——MATLAB超详细代码实现过程_支持向量机回归预测模型
- 8软考 | 2010年上半年 软件设计师 下午试卷_杌明, 某大型企业的数据中心为了集中管理、控制用户对数据的访问并支持大量的连接
- 9windows服务器限制特定ip访问指定端口(服务器ip白名单)_windows限制ip地址访问
- 10python中的装饰器,继承与抽象类_python 子类新装饰器会调用父类的装饰器吗
chatglm2微调—Lora_lora 微调 chatglm2
赞
踩
1.使用ChatGLM-Efficient-Tuning框架
官网下载https://github.com/hiyouga/ChatGLM-Efficient-Tuning
或者国内镜像https://gitee.com/mirrors/chatglm-efficient-tuning
推荐一些写的不错的链接以及官网readme
ChatGLM2-6B微调 - 掘金 (juejin.cn)
基于 PEFT 的高效 ChatGLM2-6B 微调 - 简书 (jianshu.com)
【CHATGLM】ChatGLM2-6B--LoRA微调--(02) - 知乎 (zhihu.com)
【微调】CHATGLM2-6B LoRA 微调 - 知乎 (zhihu.com)
2.配置ChatGLM-Efficient-Tuning
- cd ChatGLM-Effi-Tuning
- pip install -r requirements.txt -i https://pypi.tuna.tsinghua.edu.cn/simple
- #必要可以加清华源
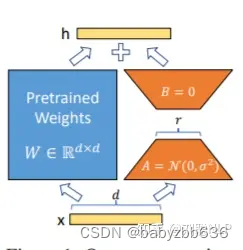
目前主流对大模型进行微调方法有三种:Freeze方法、P-Tuning方法和Lora方法

LoRA: 在大型语言模型上对指定参数(权重矩阵)并行增加额外的低秩矩阵,并在模型训练过程中,仅训练额外增加的并行低秩矩阵的参数,冻结其他参数。 当“秩值”远小于原始参数维度时,新增的低秩矩阵参数量也就很小。在下游任务tuning时,仅须训练很小的参数,但能获取较好的表现结果。
3.Lora微调训练
推荐使用项目下example/train_sft.sh
网络上复制的一直报错export_model.py: error: the following arguments are required: --output_dir.明明指定了输出路径,甚至放在根目录或者绝对路径还报错,直至看到项目下example/train_sft.sh文件发现复制命令的有些换行/是蓝,正常是黄色,这样可能导致换行失效了。不知道为什么?

所以还是用example/train_sft.sh
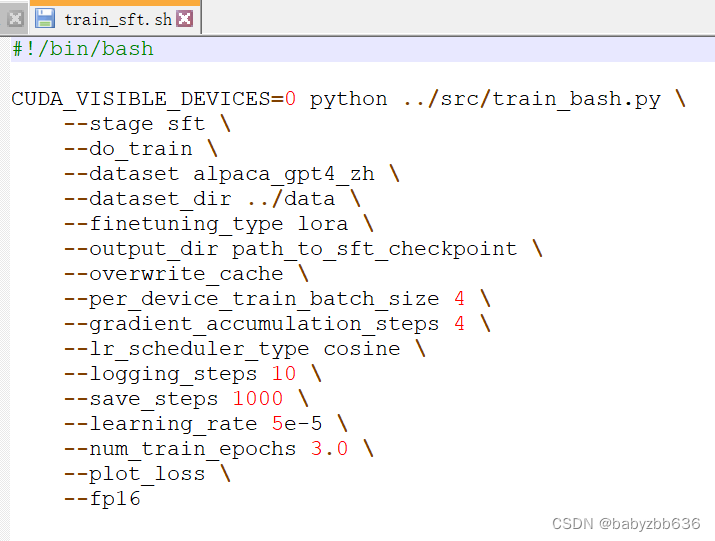
可设置的主要参数包括:
dataset, 分词后的数据集,即在 data/ 地址下的文件夹名称lora_rank, 设置 LoRA 的秩,推荐为4或8,默认8per_device_train_batch_size, 每块 GPU 上的 batch size,显存不大尽量1-2gradient_accumulation_steps, 梯度累加,可以在不提升显存占用的情况下增大 batch sizesave_steps, 多少步保存一次save_total_limit, 保存多少个checkpointlearning_rate, 学习率output_dir, 模型文件保存地址
训练过程

4.Lora模型评估预测
评估:
- CUDA_VISIBLE_DEVICES=0 python ../src/train_bash.py \
- --stage sft \
- --do_eval \
- --model_name_or_path /home/xx/ChatGLM2-6B/model \
- --dataset alpaca_gpt4_zh \
- --dataset_dir ../data \
- --finetuning_type lora \
- --checkpoint_dir /home/xx/ChatGLM-Efficient-Tuning/output/lora_ckp \
- --output_dir /home/xx/ChatGLM-Efficient-Tuning/eval/lora \
- --overwrite_cache \
- --per_device_eval_batch_size 8 \
- --max_samples 50 \
- --predict_with_generate

预测:
- CUDA_VISIBLE_DEVICES=0 python ../src/train_bash.py \
- --stage sft \
- --do_predict \
- --model_name_or_path /home/lenovo/ChatGLM2-6B/model \
- --dataset alpaca_gpt4_zh \
- --dataset_dir ../data \
- --finetuning_type lora \
- --checkpoint_dir /home/lenovo/ChatGLM-Efficient-Tuning/output/lora_ckp \
- --output_dir /home/lenovo/ChatGLM-Efficient-Tuning/eval/lora \
- --overwrite_cache \
- --per_device_eval_batch_size 8 \
- --max_samples 50 \
- --predict_with_generate

5.Lora模型合并及使用
(1)模型合并
- CUDA_VISIBLE_DEVICES=0 python ../src/export_model.py \
- --model_name_or_path /home/xx/ChatGLM2-6B/model \
- --finetuning_type lora \
- --dataset_dir ../data \
- --checkpoint_dir /home/xx/ChatGLM-Efficient-Tuning/output/lora_ckp \
- --output_dir /home/xx/ChatGLM-Efficient-Tuning/output/lora_combine_model \
(2)加载并进行推理(有点问题待解决)
把训练的Lora模型打包带走,假设文件夹为 model/chatglm2_lora, 其中(至少)包含 adapter_model.bin 和 adapter_config.json 两个文件,加载及推理代码如下:
- from peft import PeftModel
- from transformers import AutoTokenizer, AutoModel
- import torch
-
- device = torch.device(1)
- # 加载原始 LLM
- model_path = "THUDM/chatglm-6b"
- model = AutoModel.from_pretrained(model_path, trust_remote_code=True).half().to(device)
- tokenizer = AutoTokenizer.from_pretrained(model_path, trust_remote_code=True)
- model.chat(tokenizer, "你好", history=[])
-
-
- # 给原始 LLM 安装上你的 LoRA tool
- model = PeftModel.from_pretrained(model, "model/chatglm2_lora").half()
- model.chat(tokenizer, "你好", history=[])

