
- 1CMake Error: Could not find CMAKE_ROOT 解决办法_cmake error: could not find cmake_root !!!
- 2软件设计师——题目以及解析记录(单选)_候选码判断例题
- 3pytorch计算余弦相似度_pytorch cosine similarity
- 4云原生 | Docker - [Dockerfile]_syntax=docker/dockerfile:1
- 5数学建模 | 关于随机森林你必须知道的20个知识点_随机森林一般选多少棵树
- 6Linux系统盘出现问题处理思路_linux磁盘修复
- 7微信小程序的springboot高校新生报道管理系统
- 8一篇就够:uniapp-Mqtt系列问题详细攻略(解决掉线、真机调试错误等问题)_uniapp mqtt
- 9golang使用energy开发GUI桌面程序,CEF,LCL_golang energy
- 10【STM32外设系列】JW01三合一空气质量检测模块_jw01co2传感器需要几个外部引脚
springBoot整合myBatis完整前后端项目实例_springboot+sqlserver+mybatis
赞
踩
前期已经介绍:
本文主要介绍springBoot三层架构(controller+service/serviceImpl+Dao)+myBatis+thymeleaf开发模式完整的项目整合。
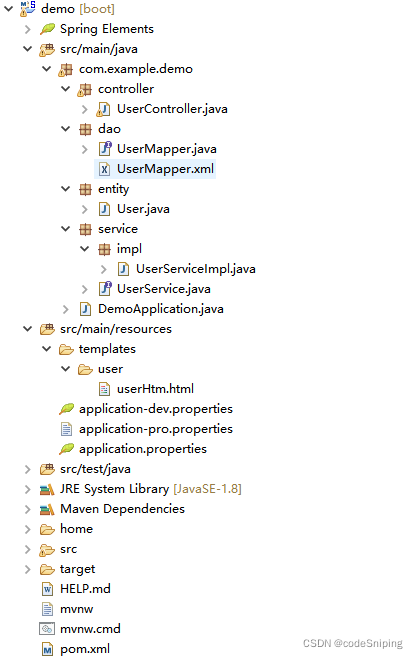
以获取用户信息为例,先看整体结构图:
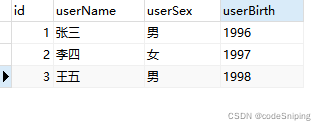
1. 数据表信息:
2. pom文件引入数据库驱动包(示例数据库为SQLServer)
- <dependency>
- <groupId>org.mybatis.spring.boot</groupId>
- <artifactId>mybatis-spring-boot-starter</artifactId>
- <version>2.0.0</version>
- </dependency>
- <dependency>
- <groupId>com.microsoft.sqlserver</groupId>
- <artifactId>mssql-jdbc</artifactId>
- </dependency>
3. properties或yml文件添加对应配置
- ##设置端口
- server.port=6789
- ##设置数据源信息
- spring.datasource.driver-class-name=com.microsoft.sqlserver.jdbc.SQLServerDriver
- spring.datasource.url=jdbc:sqlserver://192.168.0.8:1433;DatabaseName=myDB;useUnicode=true;characterEncoding=utf8;characterSetResults=utf8;allowMultiQueries=true
- spring.datasource.username=sa
- spring.datasource.password=DB!pwd
- #设置thymeleaf
- spring.thymeleaf.prefix=classpath:/templates/
- spring.thymeleaf.encoding=UTF-8
- spring.thymeleaf.cache=false
- spring.thymeleaf.suffix=.html
- spring.thymeleaf.servlet.content-type=text/html
4. User实体类:
- package com.example.demo.entity;
-
- public class User {
- private int id;
- private String userName;
- private String userSex;
- private String userBirth;
-
- public int getId() {
- return id;
- }
-
- public void setId(int id) {
- this.id = id;
- }
-
- public String getUserName() {
- return userName;
- }
-
- public void setUserName(String userName) {
- this.userName = userName;
- }
-
- public String getUserSex() {
- return userSex;
- }
-
- public void setUserSex(String userSex) {
- this.userSex = userSex;
- }
-
- public String getUserBirth() {
- return userBirth;
- }
-
- public void setUserBirth(String userBirth) {
- this.userBirth = userBirth;
- }
- }

5. 数据访问层DAO
- package com.example.demo.dao;
-
- import java.util.List;
-
- import org.apache.ibatis.annotations.Mapper;
-
- import com.example.demo.entity.User;
-
- @Mapper
- public interface UserMapper {
- List<User> getInfoList();
- }
PS:此处需要添加@Mapper注解,如果觉得每一个文件都添加比较麻烦,可以在启动类添加@MapperScan扫描注入,并且可以添加扫描多个包:
- package com.example.demo;
-
- import org.mybatis.spring.annotation.MapperScan;
- import org.springframework.boot.SpringApplication;
- import org.springframework.boot.autoconfigure.SpringBootApplication;
-
- @SpringBootApplication
- //可以添加多个,还可以用通配符进行配置
- @MapperScan(basePackages="com.example.demo.dao")
- public class DemoApplication {
-
- public static void main(String[] args) {
- SpringApplication.run(DemoApplication.class, args);
- }
-
- }
6. service接口:
- package com.example.demo.service;
-
- import java.util.List;
-
- import com.example.demo.entity.User;
-
- public interface UserService {
- List<User> getInfoList();
- }
7. service接口实现类:
- package com.example.demo.service.impl;
-
- import java.util.List;
-
- import org.springframework.beans.factory.annotation.Autowired;
- import org.springframework.stereotype.Service;
-
- import com.example.demo.dao.UserMapper;
- import com.example.demo.entity.User;
- import com.example.demo.service.UserService;
-
- //此处的命名对于类似项目结构一个接口对应多个实现类的情况必不可少
- @Service("userService")
- public class UserServiceImpl implements UserService{
- @Autowired
- private UserMapper demoDao;
-
- @Override
- public List<User> getInfoList() {
- return demoDao.getInfoList();
- }
-
- }
8. SQL Mapper文件:
- <?xml version="1.0" encoding="UTF-8"?>
- <!DOCTYPE mapper PUBLIC "-//mybatis.org//DTD Mapper 3.0//EN"
- "http://mybatis.org/dtd/mybatis-3-mapper.dtd">
- <mapper namespace="com.example.demo.dao.UserMapper">
- <select id="getInfoList" parameterType="String" resultType="com.example.demo.entity.User">
- select
- userName,
- userSex,
- userBirth
- from user_info
- </select>
- </mapper>
PS:此处需要注意,mapper文件要和数据访问层DAO文件在同一目录下,不然会出现“Invalid bound statement”即无效绑定语句的异常。如果想结构清晰并对mybatis文件进行统一管理,可以在demo\src\main\resources目录下创建mybatis目录,把所有mybatis文件放在此目录下,并在properties或yml文件添加mybatis配置:mybatis.mapper-locations=classpath:/myBatis/*.xml
9. 控制器Controller
- package com.example.demo.controller;
-
- import java.util.List;
-
- import org.springframework.beans.factory.annotation.Autowired;
- import org.springframework.stereotype.Controller;
- import org.springframework.ui.Model;
- import org.springframework.web.bind.annotation.RequestMapping;
- import com.example.demo.entity.User;
- import com.example.demo.service.UserService;
-
- @Controller
- public class UserController {
- @Autowired
- UserService userService;
-
- @RequestMapping("/getUser")
- public String getUser(Model model){
- List<User> userList=userService.getInfoList();
- model.addAttribute("userList",userList);
- return "user/userHtm";
- }
- }
PS:如果一个接口对应多个实现类(即:UserService 对应多个实现类),可以通过@Resource(name="userService")或【@Autowired+@Qualifier("userService")】注入需要的实现类,前提是实现类中已命名。
10. thymeleaf html数据展示:
- <!DOCTYPE html>
- <html xmlns : th = "http://www.thymeleaf.org">
- <head>
- <meta charset="UTF-8">
- <title>Demo HTML</title>
- <style type="text/css">
- .user-table{
- border:1px solid grey;
- border-spacing:0;
- }
- .user-table th,.user-table td{
- border:1px solid grey;
- }
- </style>
- </head>
- <body>
- <table class="user-table">
- <tr>
- <th>序号</th>
- <th>姓名</th>
- <th>性别</th>
- <th>出生年份</th>
- </tr>
- <tr th:each="user,userStat:${userList}">
- <td th:text="${userStat.index}+1"></th>
- <td th:text="${user.userName}"></td>
- <td th:text="${user.userSex}"></td>
- <td th:text="${user.userBirth}"></td>
- </tr>
- </table>
- </body>
- </html>
11. 请求测试:
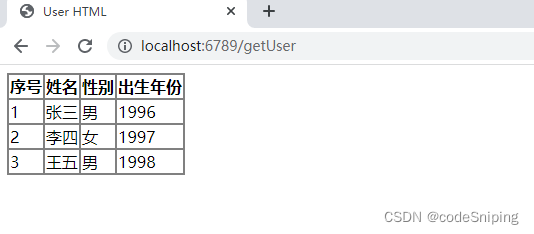
以上,完整的项目案例已结束。
PS:整个项目设计下来,肯定有人会觉得太繁琐,每一个service接口还需要再设计一个serviceImpl实现类,又要对应一个访问层DAO,代码虽不复杂,但就是感觉繁琐,目前其实很多同行们都是直接自动生成这些文件的。本可以只用service,至于为什么要采用service+serviceImpl这样的结构模式,权威些的解释是:spring鼓励应用程序的各个层以接口的形式暴露功能,在service层,可以使用service接口+serviceImpl实现类,也可以只使用service类,但考虑到“接口是实现松耦合的关键”,所以更加推荐使用service接口+serviceImpl实现类。
虽然繁琐些,但对于初学者能够清晰了解后端设计思想和结构,还是很有帮助的~
后续再介绍一种逻辑简单、结构清晰并且很易于上手的项目案例。


