
- 1gpu instancing animation代替骨骼动画的做法_animmap制作
- 2**关于 Element 中el-tooltip动态访问接口加载数据**_el-tooltip 移入时调用接口
- 3大语言模型不适合的范围
- 4看看数据科学家们都在用什么:Github上的十大深度学习项目_数据科学家 开源产品
- 5window.eventBus 在Vue中的使用方法(一)
- 6美赛论文写作!!(敲实用)
- 7手动更新maven的central repository(亲测有效)_repo.maven.apache.org hosts
- 8C#模板生成_c# 模板
- 9Codeforces 296D. Greg and Graph (Floyd)_n distinct integers 1 , 2 , … , x 1 ,x 2 ,
- 10[Linux]-UDP编程_linux udp编程
Mybatis 一、二级缓存源码解析_mybatis二级缓存源码
赞
踩
Mybatis 一、二级缓存源码解析
一. 什么是Mybatis缓存
缓存就是内存中的数据,常常来自对数据库查询结果的保存,使用缓存,我们可以避免频繁的与数据库进行交互,进而提高响应速度。
mybatis也提供了对缓存的支持,分为一级缓存和二级缓存,可以通过下图来理解:
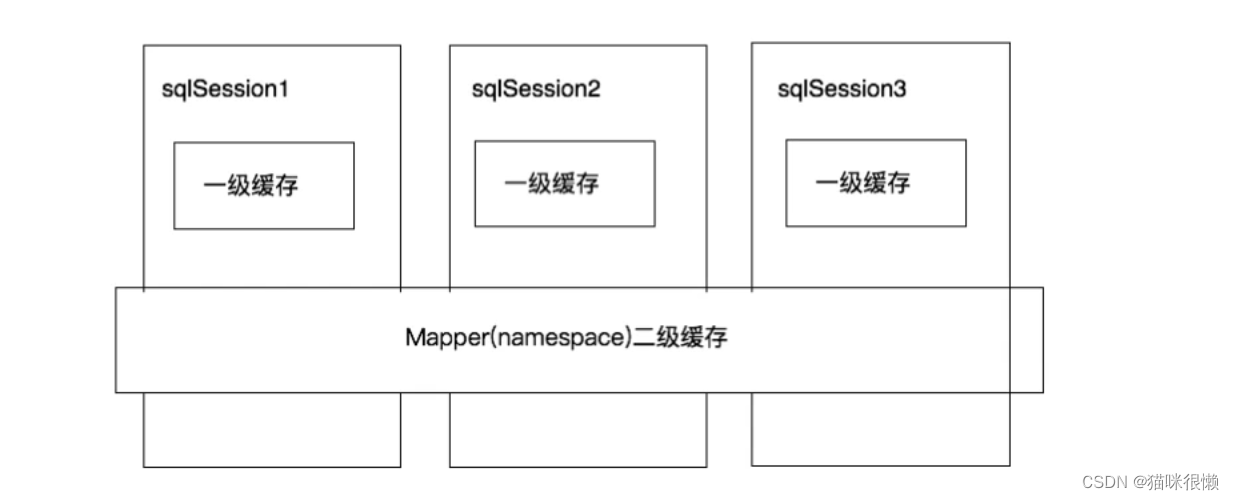
①、一级缓存是SqlSession级别的缓存。在操作数据库时需要构造sqlSession对象,在对象中有一个数据结构(HashMap)用于存储缓存数据。不同的sqlSession之间的缓存数据区域(HashMap)是互相不影响的。
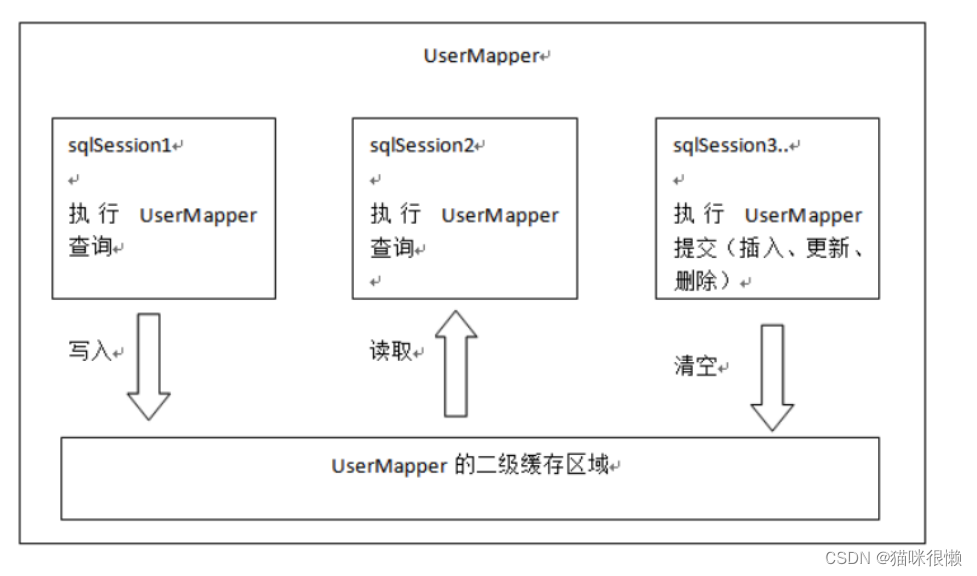
②、二级缓存是mapper级别的缓存,多个SqlSession去操作同一个Mapper的sql语句,多个SqlISession可以共用二级缓存,二级缓存是跨SqlSession的
二. 一级缓存
2.1 一级缓存演示
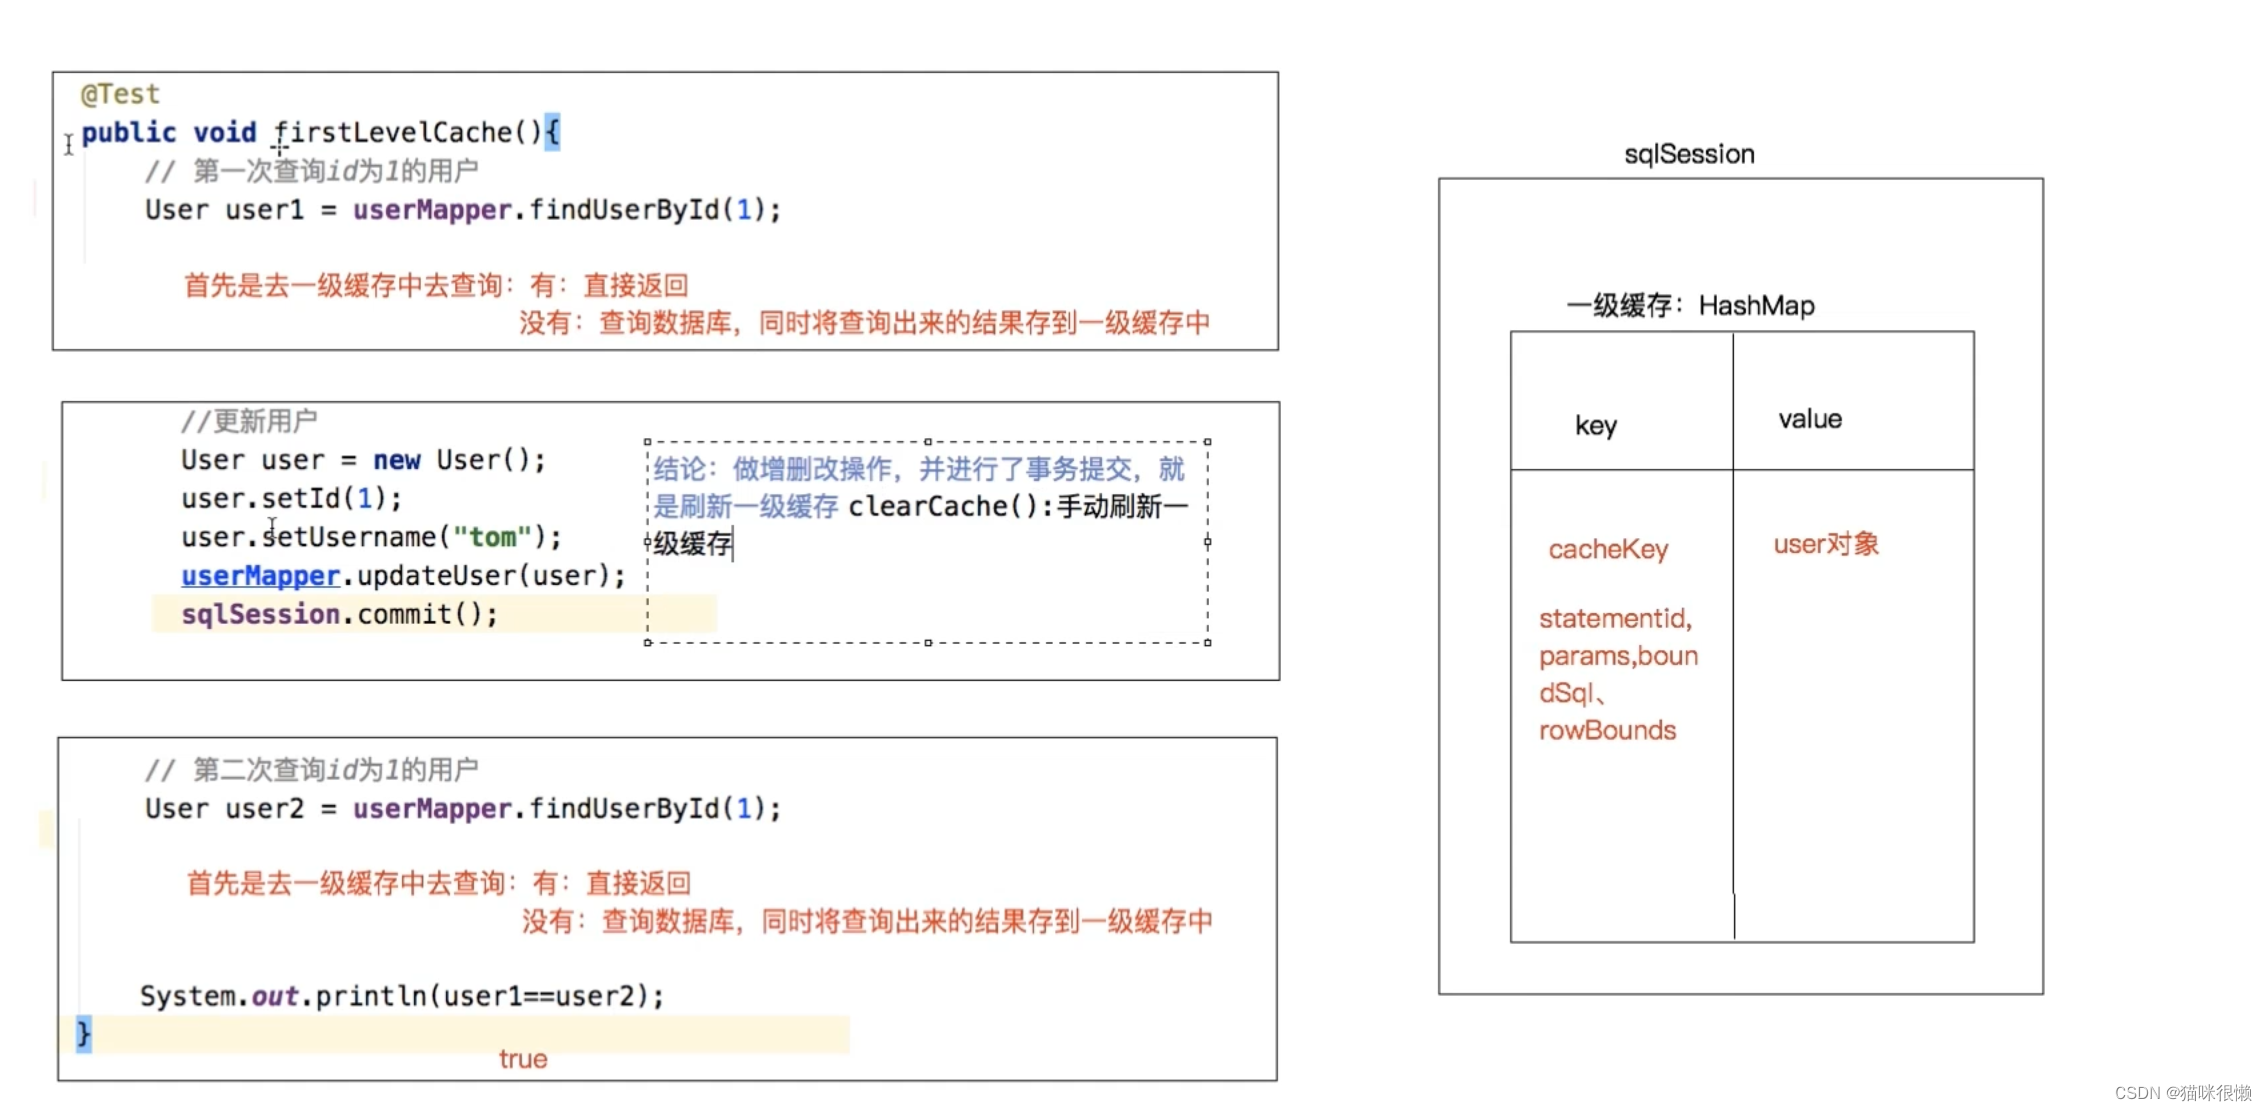
- 第⼀次发起查询⽤户id为1的⽤户信息,先去找缓存中是否有id为1的⽤户信息,如果没有,从数据
库查询⽤户信息。得到⽤户信息,将⽤户信息存储到⼀级缓存中。 - 如果中间sqlSession去执⾏commit操作(执⾏插⼊、更新、删除),则会清空SqlSession中的⼀
级缓存,这样做的⽬的为了让缓存中存储的是最新的信息,避免脏读。 - 第⼆次发起查询⽤户id为1的⽤户信息,先去找缓存中是否有id为1的⽤户信息,缓存中有,直接从
缓存中获取⽤户信息
2.2 一级缓存是什么?
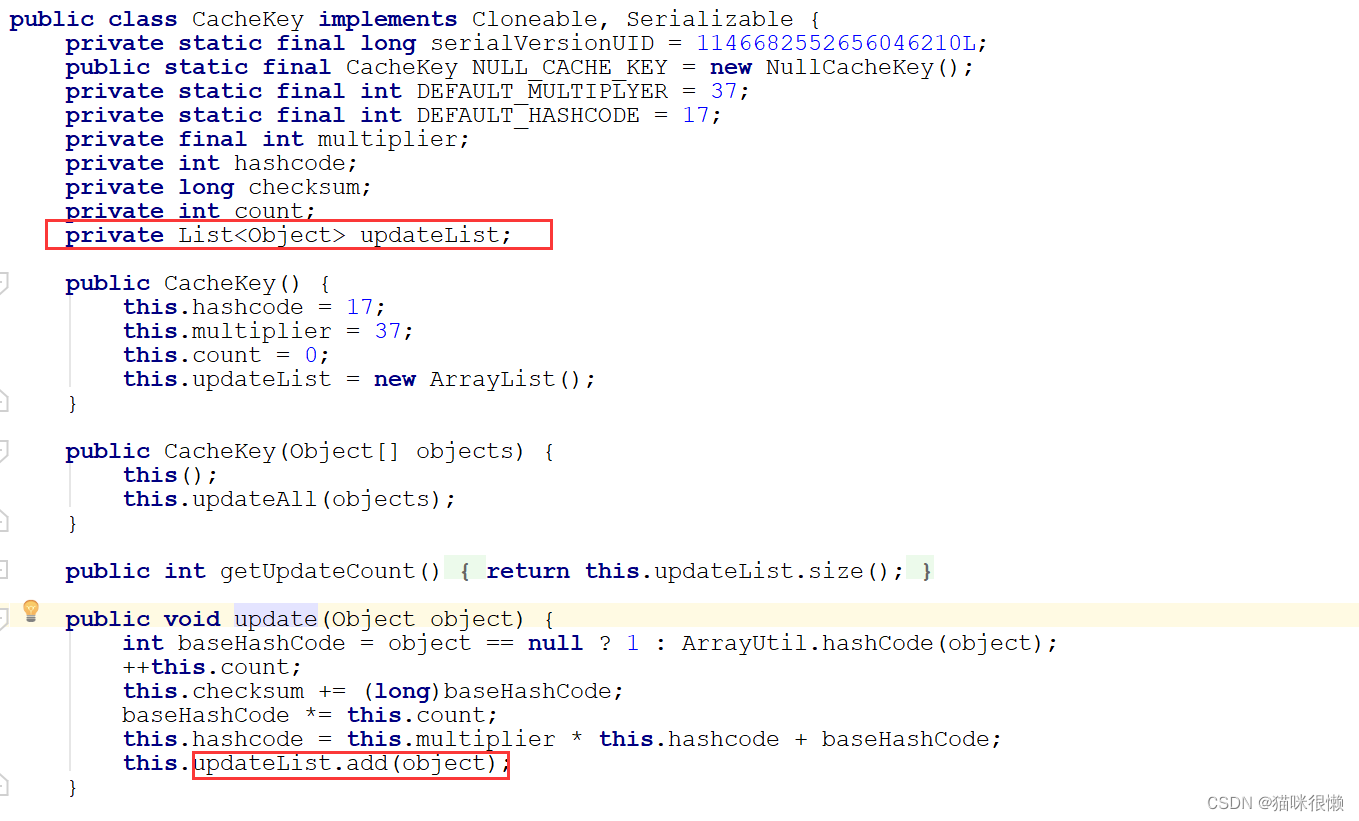
一提到⼀级缓存就绕不开SqlSession,所以索性我们就直接从SqlSession这个接口入手,看看有没有创建缓存或者与缓存有关的属性或者⽅法:
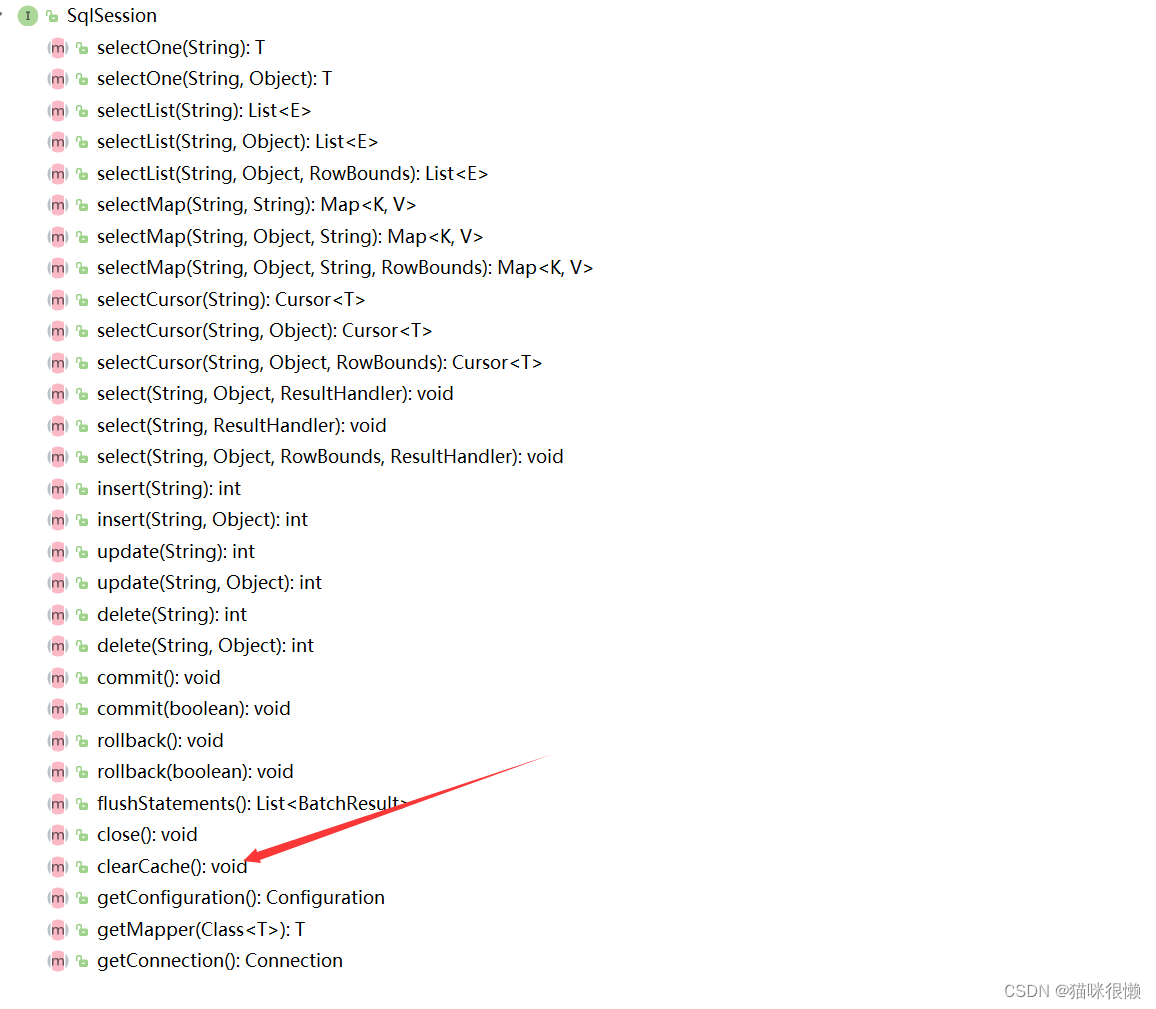
通过查找sqlsession接口的抽象方法,我们发现只有一个clearCache()的方法和缓存有点关系,那么我们可以点击这个方法的实现类查看,
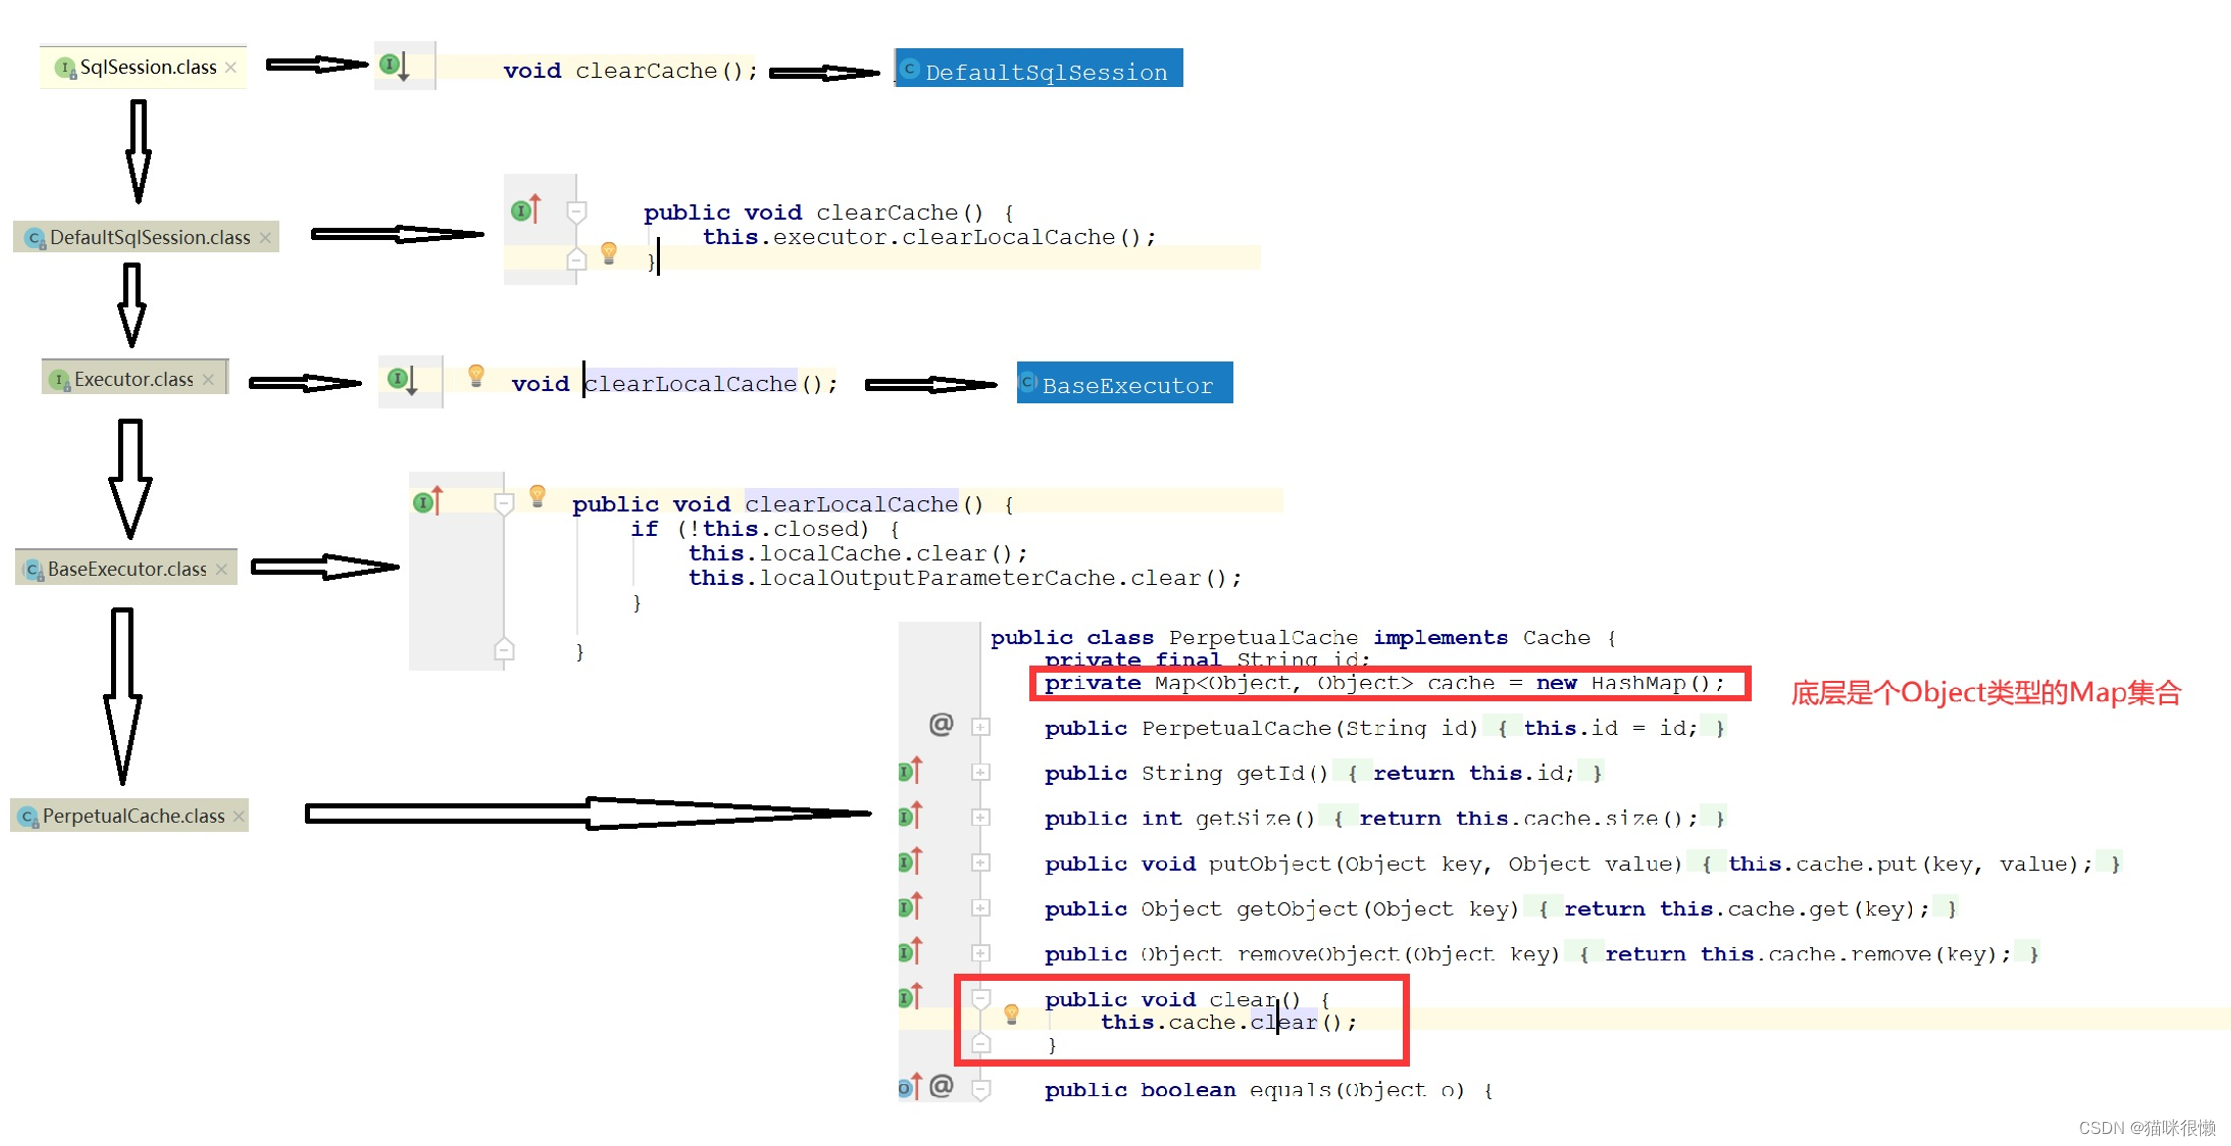
通过上图的流程分析我们可以看出:Mybatis一级缓存的底层实现其实是一个Object类型的HashMap。
每一个sqlsession都会存在一个map对象的引用
分析了一圈我们可以的得到以下的流程图:

2.3 一级缓存什么时候被创建的?
我们推测一级缓存的创建,肯定是在刚刚罗列的几个类中的其中一个执行

通过我们的分析,我们在
Executor.class这个类中发现一个createCacheKey的方法,从字面意思上看 很像是一级缓存创建的方法

我们点击createCacheKey的实现类BaseExecutor,查看该接口的具体实现
	//RowBounds: 分页对象
	//BoundSql :待执行的SQL语句存在这个对象中
    public CacheKey createCacheKey(MappedStatement ms, Object parameterObject, RowBounds rowBounds, BoundSql boundSql) {
        if (this.closed) {
            throw new ExecutorException("Executor was closed.");
        } else {
        	//创建cacheKey对象
            CacheKey cacheKey = new CacheKey();
            //ms.getId(): namespace.id
            cacheKey.update(ms.getId());
            //设置分页参数
            cacheKey.update(rowBounds.getOffset());
            cacheKey.update(rowBounds.getLimit());
            //获取到待执行的sql
            cacheKey.update(boundSql.getSql());

			//综上所述:cacheKey = namespace.id + 分页参数 +待执行的sql语句

            List<ParameterMapping> parameterMappings = boundSql.getParameterMappings();
            TypeHandlerRegistry typeHandlerRegistry = ms.getConfiguration().getTypeHandlerRegistry();
            Iterator var8 = parameterMappings.iterator();
			//设置参数的 忽略
            while(var8.hasNext()) {
                ParameterMapping parameterMapping = (ParameterMapping)var8.next();
                if (parameterMapping.getMode() != ParameterMode.OUT) {
                    String propertyName = parameterMapping.getProperty();
                    Object value;
                    if (boundSql.hasAdditionalParameter(propertyName)) {
                        value = boundSql.getAdditionalParameter(propertyName);
                    } else if (parameterObject == null) {
                        value = null;
                    } else if (typeHandlerRegistry.hasTypeHandler(parameterObject.getClass())) {
                        value = parameterObject;
                    } else {
                        MetaObject metaObject = this.configuration.newMetaObject(parameterObject);
                        value = metaObject.getValue(propertyName);
                    }

                    cacheKey.update(value);
                }
            }
            //判断配置文件中是否存在数据库连接的四大参数
            if (this.configuration.getEnvironment() != null) {
                cacheKey.update(this.configuration.getEnvironment().getId());
            }

            return cacheKey;
        }
    }

- 1
- 2
- 3
- 4
- 5
- 6
- 7
- 8
- 9
- 10
- 11
- 12
- 13
- 14
- 15
- 16
- 17
- 18
- 19
- 20
- 21
- 22
- 23
- 24
- 25
- 26
- 27
- 28
- 29
- 30
- 31
- 32
- 33
- 34
- 35
- 36
- 37
- 38
- 39
- 40
- 41
- 42
- 43
- 44
- 45
- 46
- 47
- 48
- 49
- 50
点进去
cacheKey.update(this.configuration.getEnvironment().getId())的update方法,在这个方法中,完成了cacheKey的封装
那么接下来,又有一个疑问了 Executor.class这个类中的createCacheKey方法是什么时候被调用的?按照正常的逻辑来说,是不是应该先从数据库中查询到数据,然后再将这个数据保存到缓存中呢?所以我们要了解这个createCacheKey方法是什么时候被调用的,应该要去找到底层执行sql的方法
我们知道只要是执行查询的操作,底层执行的都是
Executor.class中的query方法 —> 查看该方法的实现
	//BaseExecutor中query方法的具体实现
    public <E> List<E> query(MappedStatement ms, Object parameter, RowBounds rowBounds, ResultHandler resultHandler) throws SQLException {
    	//获取到待指向的sql语句
        BoundSql boundSql = ms.getBoundSql(parameter);
        //开始调用createCacheKey方法
        CacheKey key = this.createCacheKey(ms, parameter, rowBounds, boundSql);
        //点击this.query(ms, parameter, rowBounds, resultHandler, key, boundSql)方法继续查看
        return this.query(ms, parameter, rowBounds, resultHandler, key, boundSql);
    }
- 1
- 2
- 3
- 4
- 5
- 6
- 7
- 8
- 9
- 10
- 11
this.query(ms, parameter, rowBounds, resultHandler, key, boundSql)方法的源码,如下:
 public <E> List<E> query(MappedStatement ms, Object parameter, RowBounds rowBounds, ResultHandler resultHandler, CacheKey key, BoundSql boundSql) throws SQLException {
        ErrorContext.instance().resource(ms.getResource()).activity("executing a query").object(ms.getId());
        if (this.closed) {
            throw new ExecutorException("Executor was closed.");
        } else {
            if (this.queryStack == 0 && ms.isFlushCacheRequired()) {
                this.clearLocalCache();
            }

            List list;
            try {
                ++this.queryStack;
                //根据获取到的CacheKey ,从一级缓存中获取,查看是否存在此数据
                list = resultHandler == null ? (List)this.localCache.getObject(key) : null;
                if (list != null) {
                	//说明一级缓存中存在CacheKey的缓存数据:
                	//       直接调用handleLocallyCachedOutputParameters方法,返回缓存中的数据
                    this.handleLocallyCachedOutputParameters(ms, key, parameter, boundSql);
                } else {
                    //说明一级缓存中不存在CacheKey的缓存数据:
                	//       调用queryFromDatabase方法,查询数据库中的数据
                    list = this.queryFromDatabase(ms, parameter, rowBounds, resultHandler, key, boundSql);
                }
            } finally {
                --this.queryStack;
            }

            if (this.queryStack == 0) {
                Iterator var8 = this.deferredLoads.iterator();

                while(var8.hasNext()) {
                    BaseExecutor.DeferredLoad deferredLoad = (BaseExecutor.DeferredLoad)var8.next();
                    deferredLoad.load();
                }

                this.deferredLoads.clear();
                if (this.configuration.getLocalCacheScope() == LocalCacheScope.STATEMENT) {
                    this.clearLocalCache();
                }
            }

            return list;
        }
    }
- 1
- 2
- 3
- 4
- 5
- 6
- 7
- 8
- 9
- 10
- 11
- 12
- 13
- 14
- 15
- 16
- 17
- 18
- 19
- 20
- 21
- 22
- 23
- 24
- 25
- 26
- 27
- 28
- 29
- 30
- 31
- 32
- 33
- 34
- 35
- 36
- 37
- 38
- 39
- 40
- 41
- 42
- 43
- 44
- 45
- 46
this.queryFromDatabase(ms, parameter, rowBounds, resultHandler, key, boundSql)方法的源码,如下:
    private <E> List<E> queryFromDatabase(MappedStatement ms, Object parameter, RowBounds rowBounds, ResultHandler resultHandler, CacheKey key, BoundSql boundSql) throws SQLException {
        this.localCache.putObject(key, ExecutionPlaceholder.EXECUTION_PLACEHOLDER);

        List list;
        try {
        	//执行doQuery方法,从数据库中查询出数据存储到list集合中
            list = this.doQuery(ms, parameter, rowBounds, resultHandler, boundSql);
        } finally {
            this.localCache.removeObject(key);
        }
		//key:CacheKey   list:数据库中查询到的数据
		//根据查询结果,将数据库中的数据保存到缓存中
        this.localCache.putObject(key, list);
        if (ms.getStatementType() == StatementType.CALLABLE) {
            this.localOutputParameterCache.putObject(key, parameter);
        }

        return list;
    }
- 1
- 2
- 3
- 4
- 5
- 6
- 7
- 8
- 9
- 10
- 11
- 12
- 13
- 14
- 15
- 16
- 17
- 18
- 19
- 20
- 21
三. 二级缓存
3.1 二级缓存演示
⼆级缓存的原理和⼀级缓存原理⼀样,第⼀次查询,会将数据放⼊缓存中,然后第⼆次查询则会直接去缓存中取。但是⼀级缓存是基于sqlSession的,⽽⼆级缓存是基于mapper⽂件的namespace的,也就是说多个sqlSession可以共享⼀个mapper中的⼆级缓存区域,并且如果两个mapper的namespace 相同,即使是两个mapper,那么这两个mapper中执⾏sql查询到的数据也将存在相同的⼆级缓存区域中
大家知道,Mybatis默认二级缓存是关闭的,如果我们想在SpringBoot中打开二级缓存,只需要2步:
1.在application.properties中加上以下配置
mybatis.configuration.cache-enabled=true
- 1
2.在mapper的xml文件中的namespace中加上
<cache></cache>
- 1
即可。直接这样执行sql会报错,因为开启了二级缓存后entity类必须要序列化,序列化后就可以正常使用了。
这里需要注意的是,同样的sql多次执行中控制台还是会显示sql语句,但是这并不是说发了2次sql,因为如果缓存生效了,控制台里会提示Cache Hit xxx,就表明是从缓存中取得的结果了
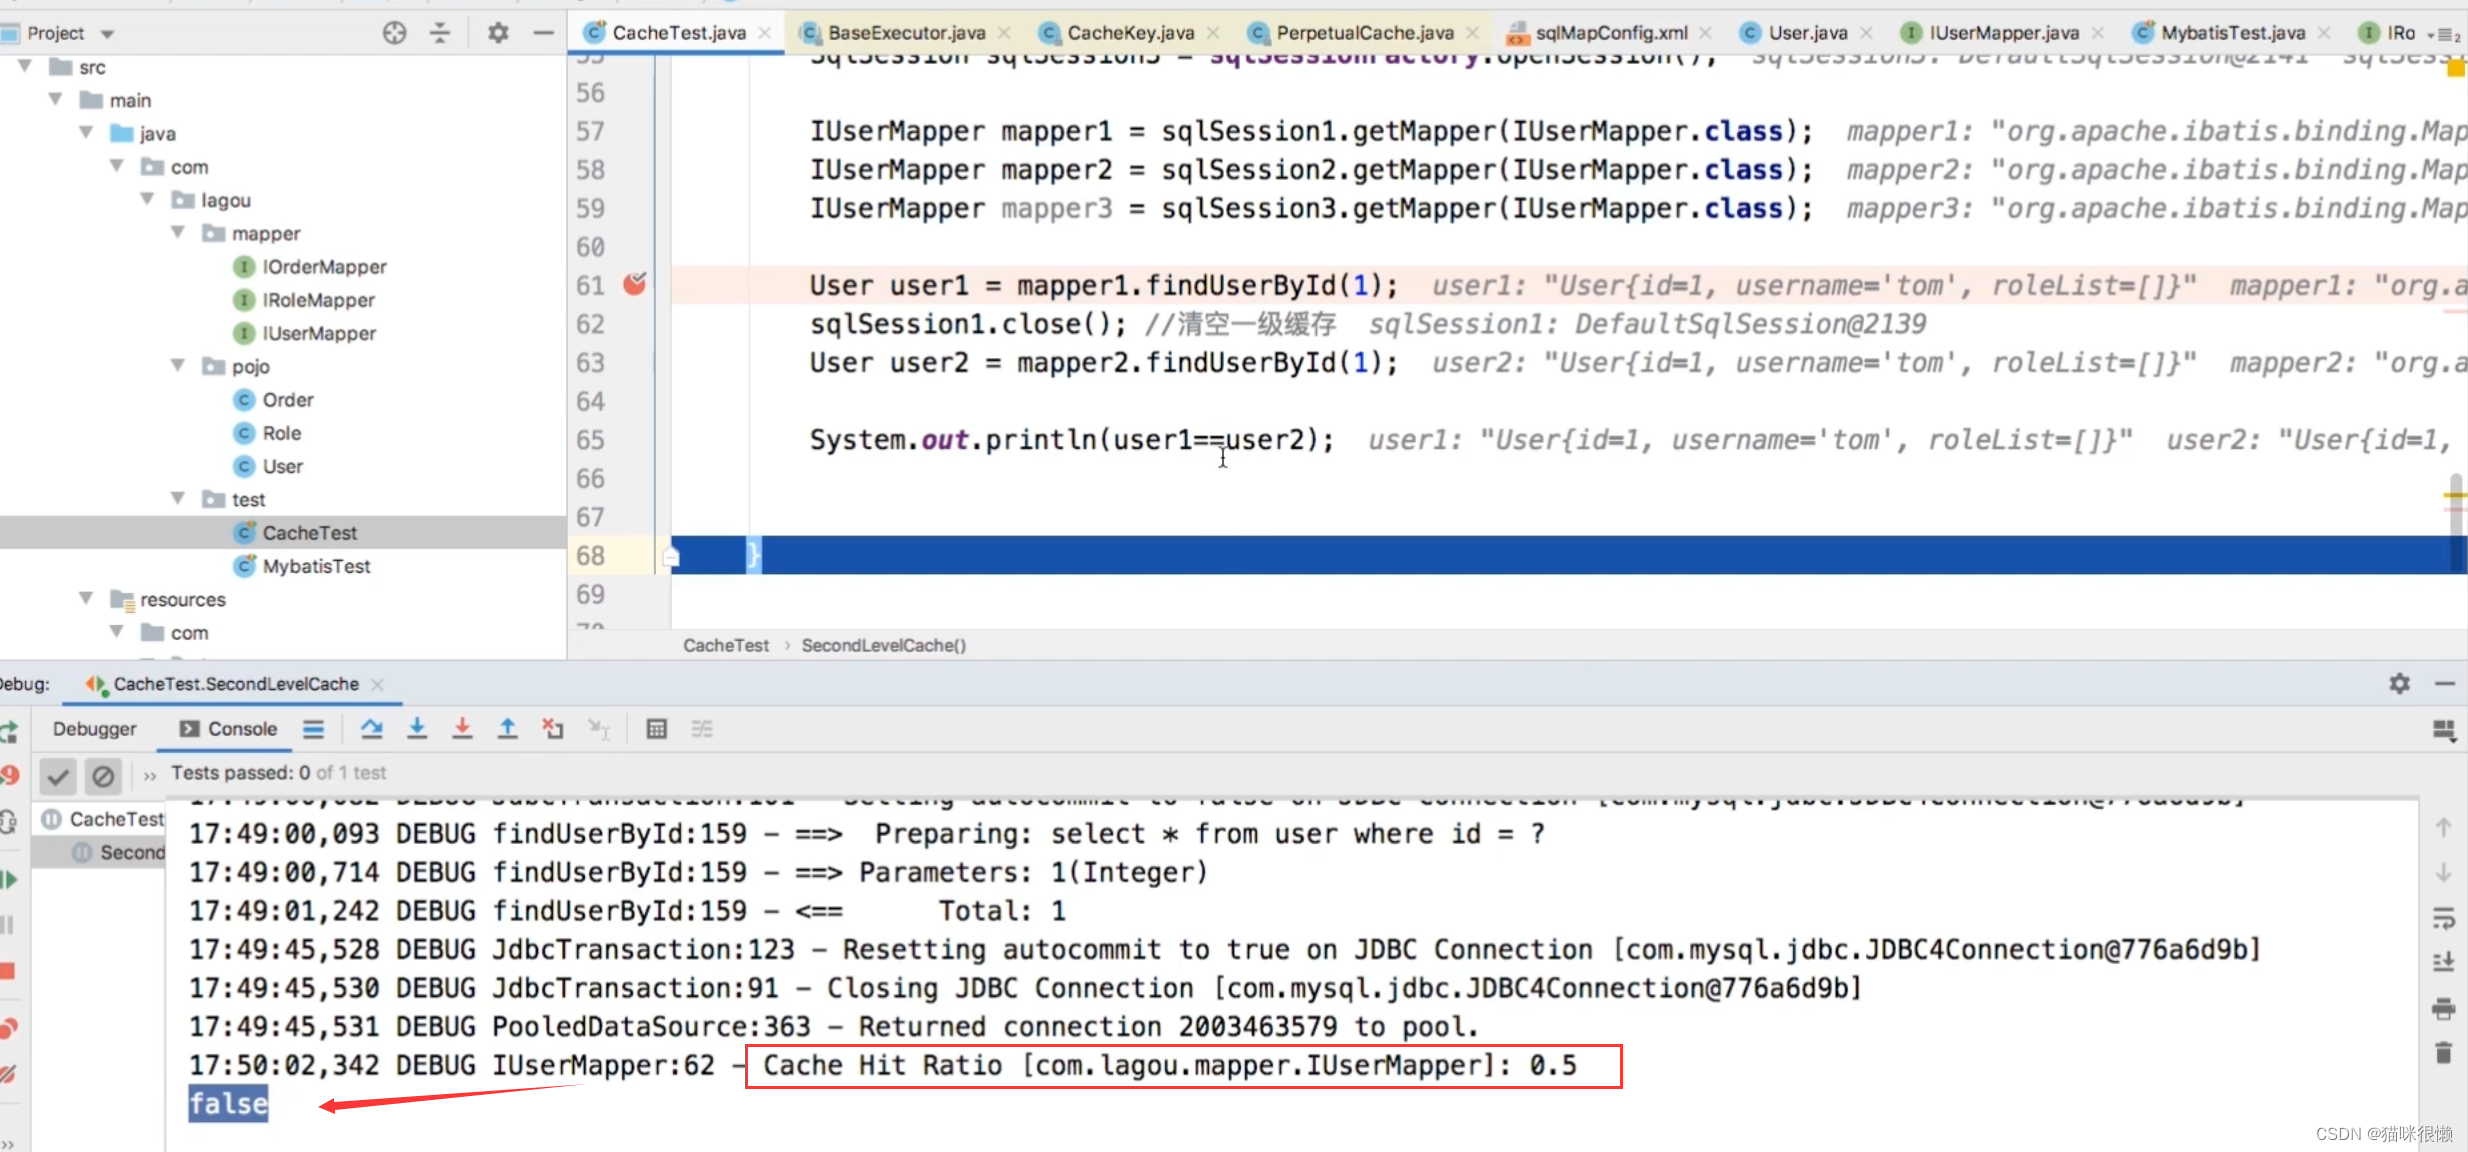
我们可以看到Cache Hit xxx:0.5,这代表在二级缓存中命中了数据,即mapper2查询出来的数据是来自缓存中,
但是此时有一个问题:为什么user1 != user2 呢?结果为 false
这是因为二级缓存与一级缓存不同:一级缓存缓存的是对象,二级缓存缓存的是数据;在命中二级缓存时,会重新封装成一个对象返回,因此二者是false。
3.2 标签 < cache/> 的解析
⼆级缓存构建在⼀级缓存之上,在收到查询请求时,MyBatis ⾸先会查询⼆级缓存,若⼆级缓存未命中,再去查询⼀级缓存,⼀级缓存没有,再查询数据库。
数据查询顺序:⼆级缓存 -----> ⼀级缓存 -----> 数据库
与⼀级缓存不同,⼆级缓存和具体的命名空间绑定,⼀个Mapper中有⼀个Cache,相同Mapper中的MappedStatement共⽤⼀个Cache,⼀级缓存则是和 SqlSession 绑定。
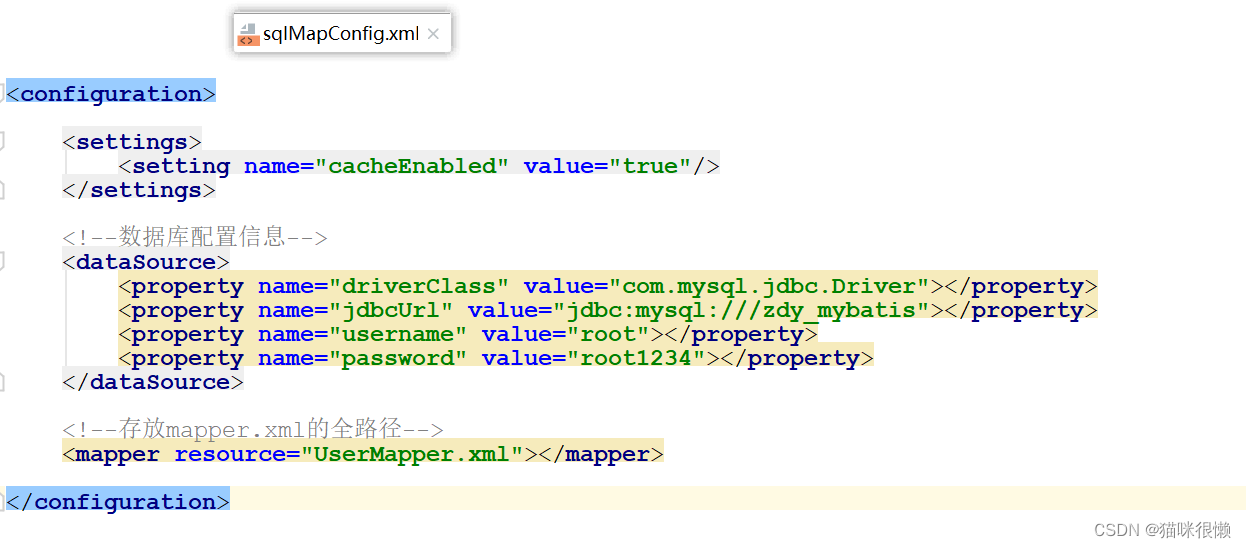
我们都知道 < cache/>标签存在于mapper.xml文件中,SqlMapConfig.xml文件中引入了相应的mapper.xml文件,所以我们需要从SqlMapConfig.xml的文件解析开始探究标签< cache/> 的解析:

由上图可知,SqlSessionFactoryBuilder().build(resourceAsStream)方法会对配置文件的进行解析,因此我们点进去查看相应的源码:

继续点击 this.build()方法:
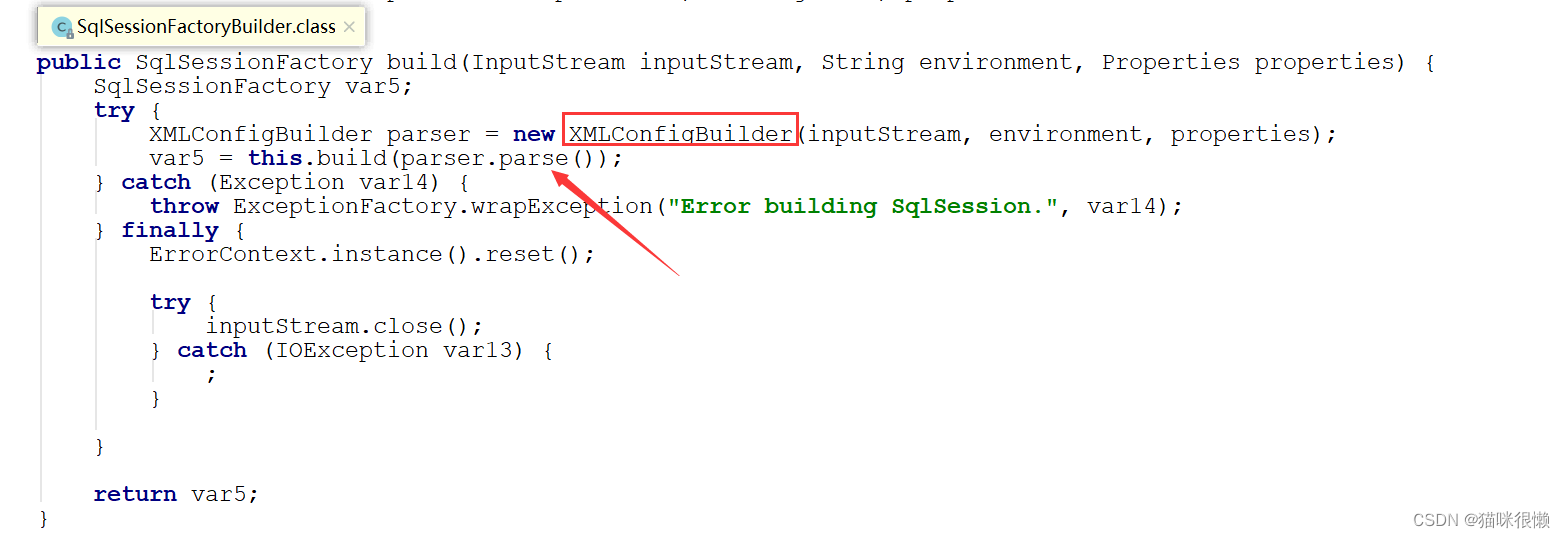
XML的解析⼯作主要交给XMLConfigBuilder.parse()⽅法来实现,XMLConfigBuilder这个类是Mybatis专门用来解析SqlMapConfig.xml配置文件的类,我们点击parser.parse()方法查看具体的解析细节:
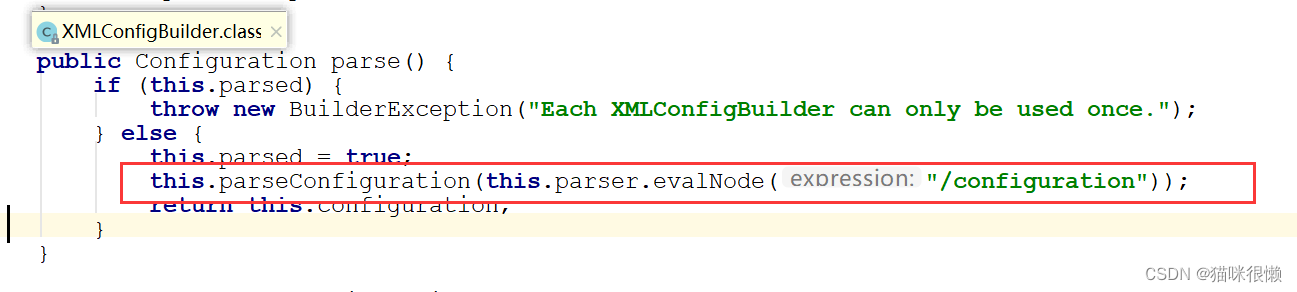
点击XMLConfigBuilder.parse()⽅法后,我们发现是调用了XMLConfigBuilder类中的parse()方法;并且再次调用了本类中的parseConfiguration()方法传递了根标签this.parser.evalNode("/configuration")的内容(也就是下图配置文件里面的内容)
继续点击this.parseConfiguration(this.parser.evalNode("/configuration"))方法
    private void parseConfiguration(XNode root) {
        try {

			//部分源代码省略。。。主要用于解析其他标签

			//解析mapper标签
            this.mapperElement(root.evalNode("mappers"));

        } catch (Exception var3) {
            throw new BuilderException("Error parsing SQL Mapper Configuration. Cause: " + var3, var3);
        }
    }
- 1
- 2
- 3
- 4
- 5
- 6
- 7
- 8
- 9
- 10
- 11
- 12
我们主要关注解析mapper.xml文件的代码,点击this.mapperElement(root.evalNode("mappers"))方法
    private void mapperElement(XNode parent) throws Exception {
        if (parent != null) {
            Iterator var2 = parent.getChildren().iterator();

            while(true) {
                while(var2.hasNext()) {
                    XNode child = (XNode)var2.next();
                    String resource;
                    if ("package".equals(child.getName())) {
                        resource = child.getStringAttribute("name");
                        this.configuration.addMappers(resource);
                    } else {
                        resource = child.getStringAttribute("resource");
                        String url = child.getStringAttribute("url");
                        String mapperClass = child.getStringAttribute("class");
                        XMLMapperBuilder mapperParser;
                        InputStream inputStream;
                        if (resource != null && url == null && mapperClass == null) {
                            ErrorContext.instance().resource(resource);
                            inputStream = Resources.getResourceAsStream(resource);

                            //创建XMLMapperBuilder对象
                            mapperParser = new XMLMapperBuilder(inputStream, this.configuration, resource, this.configuration.getSqlFragments());
                            //⽣成XMLMapperBuilder,并执⾏其parse⽅法
                            mapperParser.parse();

                        } else if (resource == null && url != null && mapperClass == null) {
                            ErrorContext.instance().resource(url);
                            inputStream = Resources.getUrlAsStream(url);
                            mapperParser = new XMLMapperBuilder(inputStream, this.configuration, url, this.configuration.getSqlFragments());
                            mapperParser.parse();
                        } else {
                            if (resource != null || url != null || mapperClass == null) {
                                throw new BuilderException("A mapper element may only specify a url, resource or class, but not more than one.");
                            }

                            Class<?> mapperInterface = Resources.classForName(mapperClass);
                            this.configuration.addMapper(mapperInterface);
                        }
                    }
                }

                return;
            }
        }
    }
- 1
- 2
- 3
- 4
- 5
- 6
- 7
- 8
- 9
- 10
- 11
- 12
- 13
- 14
- 15
- 16
- 17
- 18
- 19
- 20
- 21
- 22
- 23
- 24
- 25
- 26
- 27
- 28
- 29
- 30
- 31
- 32
- 33
- 34
- 35
- 36
- 37
- 38
- 39
- 40
- 41
- 42
- 43
- 44
- 45
- 46
这里我们主要注意XMLMapperBuilder这个类,XMLMapperBuilder是Mybatis专门用来用来解析mapper.xml文件的
继续点击 mapperParser.parse()方法,查看mapper文件的解析流程

继续点击XMLMapperBuilder类中的this.configurationElement(this.parser.evalNode("/mapper"))方法,查看mapper文件的解析流程(这里和XMLConfigBuilder中的方法类似)
private void configurationElement(XNode context) {
        try {
            String namespace = context.getStringAttribute("namespace");
           if (namespace != null && !namespace.isEmpty()) {
                //部分源代码省略。。。

				// 最终在这⾥看到了关于cache属性的处理
                this.cacheElement(context.evalNode("cache"));

                //部分源代码省略。。。

				//解析<select /> <insert /> <update /> <delete >节点们
				//这里会将生成的Cache包装到对应的MappedStatement
				this.buildStatementFromContext(context.evalNodes("select|insert|update|delete"));

            } else {
                throw new BuilderException("Mapper's namespace cannot be empty");
            }
        } catch (Exception var3) {
            throw new BuilderException("Error parsing Mapper XML. The XML location is '" + this.resource + "'. Cause: " + var3, var3);
        }
    }
- 1
- 2
- 3
- 4
- 5
- 6
- 7
- 8
- 9
- 10
- 11
- 12
- 13
- 14
- 15
- 16
- 17
- 18
- 19
- 20
- 21
- 22

我们进去 this.cacheElement(context.evalNode("cache"))方法查看
        if (context != null) {

            //解析<cache/>标签的type属性,这⾥我们可以⾃定义cache的实现类,⽐如redisCache,如果没有⾃定义,这⾥使⽤和⼀级缓存相同的PERPETUAL
            String type = context.getStringAttribute("type", "PERPETUAL");

            Class<? extends Cache> typeClass = this.typeAliasRegistry.resolveAlias(type);
            String eviction = context.getStringAttribute("eviction", "LRU");
            Class<? extends Cache> evictionClass = this.typeAliasRegistry.resolveAlias(eviction);
            Long flushInterval = context.getLongAttribute("flushInterval");
            Integer size = context.getIntAttribute("size");
            boolean readWrite = !context.getBooleanAttribute("readOnly", false);
            boolean blocking = context.getBooleanAttribute("blocking", false);
            Properties props = context.getChildrenAsProperties();

			// 构建Cache对象
            this.builderAssistant.useNewCache(typeClass, evictionClass, flushInterval, size, readWrite, blocking, props);

        }

    }
- 1
- 2
- 3
- 4
- 5
- 6
- 7
- 8
- 9
- 10
- 11
- 12
- 13
- 14
- 15
- 16
- 17
- 18
- 19
- 20
来看看是如何构建Cache对象的:MapperBuilderAssistant类中的useNewCache()方法
    public Cache useNewCache(Class<? extends Cache> typeClass, Class<? extends Cache> evictionClass, Long flushInterval, Integer size, boolean readWrite, boolean blocking, Properties props) {
    	// 1.⽣成Cache对象
        Cache cache = (new CacheBuilder(this.currentNamespace))
        //这⾥如果我们定义了<cache/>中的type,就使⽤⾃定义的Cache,否则使⽤和⼀级缓存相同的PerpetualCache
        .implementation((Class)this.valueOrDefault(typeClass, PerpetualCache.class))
        .addDecorator((Class)this.valueOrDefault(evictionClass, LruCache.class))
        .clearInterval(flushInterval)
        .size(size)
        .readWrite(readWrite)
        .blocking(blocking)
        .properties(props)
        .build();
        // 2.添加到Configuration中
        this.configuration.addCache(cache);
        // 3.并将cache赋值给MapperBuilderAssistant.currentCache
        this.currentCache = cache;
        return cache;
    }
- 1
- 2
- 3
- 4
- 5
- 6
- 7
- 8
- 9
- 10
- 11
- 12
- 13
- 14
- 15
- 16
- 17
- 18
我们看到⼀个Mapper.xml只会解析⼀次标签,也就是只创建⼀次Cache对象,放进configuration中, 并将cache赋值给MapperBuilderAssistant.currentCache
这就对应了我们前面所说的一个Mapper对应一个Cache对象

那么接下来,我们看看另外一句话是什么意思:相同的Mapper中的Mappedstatement公用一个Cache?

我们回到解析完< cache/> 标签的方法,XMLMapperBuilder类中的configurationElement方法
private void configurationElement(XNode context) {
        try {
            String namespace = context.getStringAttribute("namespace");
            if (namespace != null && !namespace.isEmpty()) {
                //部分源代码省略。。。

				// 最终在这⾥看到了关于cache属性的处理
                this.cacheElement(context.evalNode("cache"));

                //部分源代码省略。。。

				//解析<select /> <insert /> <update /> <delete >节点们
				//这里会将生成的Cache包装到对应的MappedStatement
				this.buildStatementFromContext(context.evalNodes("select|insert|update|delete"));

            } else {
                throw new BuilderException("Mapper's namespace cannot be empty");
            }
        } catch (Exception var3) {
            throw new BuilderException("Error parsing Mapper XML. The XML location is '" + this.resource + "'. Cause: " + var3, var3);
        }
    }
- 1
- 2
- 3
- 4
- 5
- 6
- 7
- 8
- 9
- 10
- 11
- 12
- 13
- 14
- 15
- 16
- 17
- 18
- 19
- 20
- 21
- 22
重点关注buildStatementFromContext(context.evalNodes("select|insert|update|delete"));这个方法
这个方法主要是做两件事:
1,解析<select /> <insert /> <update /> <delete >节点们
2,生成的Cache包装到对应的MappedStatement
我们点击buildStatementFromContext(context.evalNodes("select|insert|update|delete"))这个方法看一下具体实现
buildStatementFromContext(context.evalNodes(“select|insert|update|delete”));将Cache包装到MappedStatement

继续点击this.buildStatementFromContext(list, this.configuration.getDatabaseId())方法
XMLMapperBuilder类中的buildStatementFromContext方法
    private void buildStatementFromContext(List<XNode> list, String requiredDatabaseId) {
        Iterator var3 = list.iterator();

        while(var3.hasNext()) {
            XNode context = (XNode)var3.next();
            //创建XMLStatementBuilder 对象,执行解析
            XMLStatementBuilder statementParser = new XMLStatementBuilder(this.configuration, this.builderAssistant, context, requiredDatabaseId);
            try {
                //每一条执行语句转换成一个MappedStatement
                statementParser.parseStatementNode();
            } catch (IncompleteElementException var7) {
            	//解析失败,添加到configuration 中
                this.configuration.addIncompleteStatement(statementParser);
            }
        }

    }
- 1
- 2
- 3
- 4
- 5
- 6
- 7
- 8
- 9
- 10
- 11
- 12
- 13
- 14
- 15
- 16
- 17
继续点击 statementParser.parseStatementNode()方法
    public void parseStatementNode() {
        String id = this.context.getStringAttribute("id");
        String databaseId = this.context.getStringAttribute("databaseId");
        if (this.databaseIdMatchesCurrent(id, databaseId, this.requiredDatabaseId)) {

            //部分源代码省略。。。主要是解析标签内相应的属性

			//创建MappedStatement对象
            this.builderAssistant.addMappedStatement(id, sqlSource, statementType, sqlCommandType, fetchSize, timeout, parameterMap, parameterTypeClass, resultMap, resultTypeClass, resultSetTypeEnum, flushCache, useCache, resultOrdered, (KeyGenerator)keyGenerator, keyProperty, keyColumn, databaseId, langDriver, resultSets);
        }
    }
- 1
- 2
- 3
- 4
- 5
- 6
- 7
- 8
- 9
- 10
- 11
继续点击this.builderAssistant.addMappedStatement(0方法
    public MappedStatement addMappedStatement(String id, SqlSource sqlSource, StatementType statementType, SqlCommandType sqlCommandType, Integer fetchSize, Integer timeout, String parameterMap, Class<?> parameterType, String resultMap, Class<?> resultType, ResultSetType resultSetType, boolean flushCache, boolean useCache, boolean resultOrdered, KeyGenerator keyGenerator, String keyProperty, String keyColumn, String databaseId, LanguageDriver lang, String resultSets) {
        if (this.unresolvedCacheRef) {
            throw new IncompleteElementException("Cache-ref not yet resolved");
        } else {
            id = this.applyCurrentNamespace(id, false);
            boolean isSelect = sqlCommandType == SqlCommandType.SELECT;


            MappedStatement.Builder statementBuilder = (new MappedStatement
            				.Builder(this.configuration, id, sqlSource, sqlCommandType))
            				.resource(this.resource)
            				.fetchSize(fetchSize)
            				.timeout(timeout)
            				.statementType(statementType)
            				.keyGenerator(keyGenerator)
            				.keyProperty(keyProperty)
            				.keyColumn(keyColumn)
            				.databaseId(databaseId)
            				.lang(lang)
            				.resultOrdered(resultOrdered)
            				.resultSets(resultSets)
            				.resultMaps(this.getStatementResultMaps(resultMap, resultType, id))
            				.resultSetType(resultSetType)
            				.flushCacheRequired((Boolean)this.valueOrDefault(flushCache, !isSelect))
            				.useCache((Boolean)this.valueOrDefault(useCache, isSelect))
            				// 在这⾥将之前⽣成的Cache封装到MappedStatement
            				.cache(this.currentCache);

            ParameterMap statementParameterMap = this.getStatementParameterMap(parameterMap, parameterType, id);
            if (statementParameterMap != null) {
                statementBuilder.parameterMap(statementParameterMap);
            }

            MappedStatement statement = statementBuilder.build();
            this.configuration.addMappedStatement(statement);
            return statement;
        }
    }
- 1
- 2
- 3
- 4
- 5
- 6
- 7
- 8
- 9
- 10
- 11
- 12
- 13
- 14
- 15
- 16
- 17
- 18
- 19
- 20
- 21
- 22
- 23
- 24
- 25
- 26
- 27
- 28
- 29
- 30
- 31
- 32
- 33
- 34
- 35
- 36
- 37
- 38
我们知道每一个mapper.xml文件中的<select /> <insert /> <update /> <delete >标签都是一个MappedStatement对象,并且我们在刚刚的源码中发现,在执行 MappedStatement.Builder创建MappedStatement对象时候,会执行.cache(this.currentCache)方法,将之前解析的Mapper.xml时创建的cache封装到对应的MappedStatement对象中
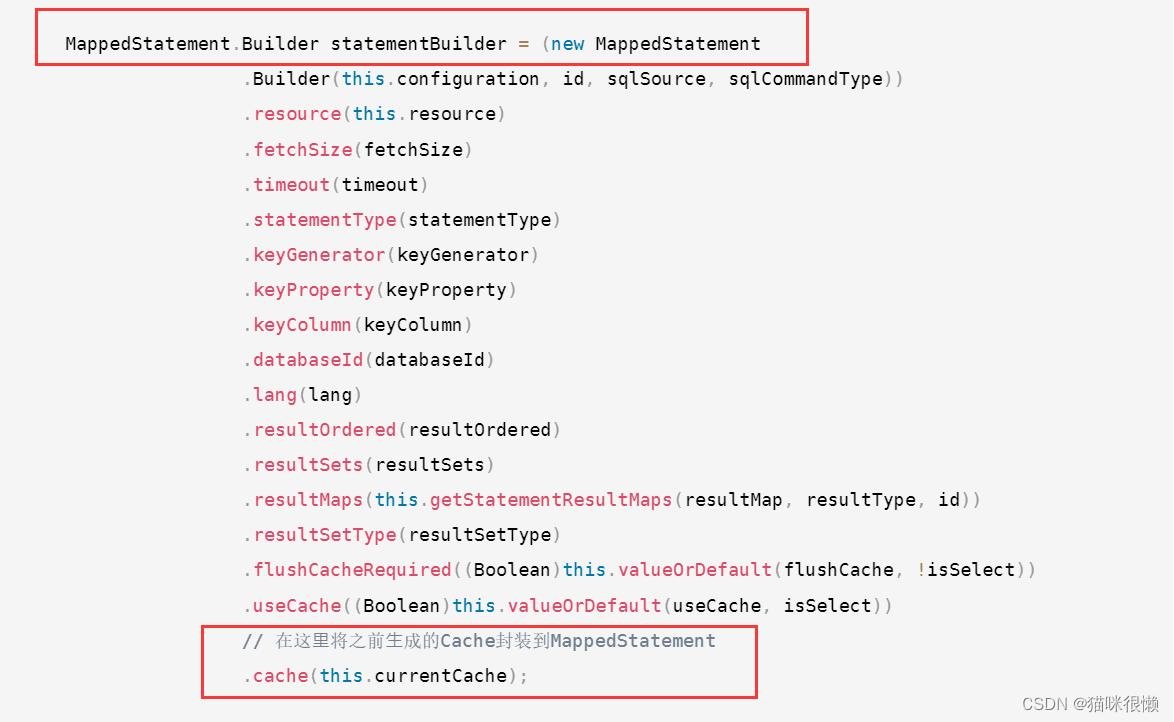
我们看到将Mapper中创建的Cache对象,加⼊到了每个MappedStatement对象中,也就是同⼀个
Mapper中所有的MappedStatement中共用的是一个Cache对象
这就对应了另外一句话:相同的Mapper中的Mappedstatement公用一个Cache

到此为止,< cache/> 的解析流程就全部结束了。
3.3 查询源码分析
具体流程与一级缓存相似,以流程图的形式展示:

主要的区别在于:在我们开启二级缓存以后,Executor接口的抽象方法query()走的实现类为CachingExecutor,而不是一级缓存时候BaseExecutor。

通过查阅资料我们知道:CachingExecutor是一个缓存装饰类,CachingExecutor中包含了对BaseExecutor的引用
我们点击CachingExecutor类中的query()方法查看具体实现
    public <E> List<E> query(MappedStatement ms, Object parameterObject, RowBounds rowBounds, ResultHandler resultHandler) throws SQLException {
    	//获得BoundSql对象
        BoundSql boundSql = ms.getBoundSql(parameterObject);
        //创建 CacheKey  对象
        CacheKey key = this.createCacheKey(ms, parameterObject, rowBounds, boundSql);
        //查询
        return this.query(ms, parameterObject, rowBounds, resultHandler, key, boundSql);
    }
- 1
- 2
- 3
- 4
- 5
- 6
- 7
- 8
点击this.query(ms, parameterObject, rowBounds, resultHandler, key, boundSql)方法查看具体实现
    public <E> List<E> query(MappedStatement ms, Object parameterObject, RowBounds rowBounds, ResultHandler resultHandler, CacheKey key, BoundSql boundSql) throws SQLException {
        //从 MappedStatement 中获取Cache,注意这里的Cache是从MappedStatement中获取的
        //也就是我们上面解析Mapper中<cache/>标签中创建的,它保存在Configration中
        //我们在初始化解析xml时分析过每一个MappedStatement都有一个Cache对象,就是这里
        Cache cache = ms.getCache();
        if (cache != null) {
        	 //如果需要刷新缓存的话就刷新:flushCache="true"
        	 //判断标签中是否配置了刷新缓存的属性
            this.flushCacheIfRequired(ms);
            if (ms.isUseCache() && resultHandler == null) {
                this.ensureNoOutParams(ms, boundSql);
                //从二级缓存中,获取结果
                List<E> list = (List)this.tcm.getObject(cache, key);
                if (list == null) {
                	//如果没有值,则执行查询,这个查询也是先走一级缓存,以及缓存也没有的话,则进行查询数据库
                    list = this.delegate.query(ms, parameterObject, rowBounds, resultHandler, key, boundSql);
                    this.tcm.putObject(cache, key, list);
                }

                return list;
            }
        }
- 1
- 2
- 3
- 4
- 5
- 6
- 7
- 8
- 9
- 10
- 11
- 12
- 13
- 14
- 15
- 16
- 17
- 18
- 19
- 20
- 21
- 22
如上,注意⼆级缓存是从 MappedStatement 中获取的。由于 MappedStatement 存在于全局配置
中,可以多个 CachingExecutor 获取到,这样就会出现线程安全问题。除此之外,若不加以控制,多个
事务共⽤⼀个缓存实例,会导致脏读问题。⾄于脏读问题,需要借助其他类来处理,也就是上⾯代码中
tcm 变量对应的类型。下⾯分析⼀下。
TransactionalCache
public class TransactionalCache implements Cache {
	 //真正的缓存对象,和上⾯的Map<Cache, TransactionalCache>中的Cache是同⼀个
	 private final Cache delegate;
	 private boolean clearOnCommit;
	 // 在事务被提交前,所有从数据库中查询的结果将缓存在此集合中
	 private final Map<Object, Object> entriesToAddOnCommit;
	 // 在事务被提交前,当缓存未命中时,CacheKey 将会被存储在此集合中
	 private final Set<Object> entriesMissedInCache;
	 @Override
	 public Object getObject(Object key) {
	 // 查询的时候是直接从delegate中去查询的,也就是从真正的缓存对象中查询
	 Object object = delegate.getObject(key);

	if (object == null) {
		 // 缓存未命中,则将 key 存⼊到 entriesMissedInCache 中
		 entriesMissedInCache.add(key);
	 }
	 if (clearOnCommit) {
		 return null;
	 } else {
	 	return object;
	 }

	 @Override
	 public void putObject(Object key, Object object) {
	 // 将键值对存⼊到 entriesToAddOnCommit 这个Map中中,⽽⾮真实的缓存对象delegate 中
	 entriesToAddOnCommit.put(key, object);
	 }

	 @Override
	 public Object removeObject(Object key) {
	 	return null;
	 }

	 @Override
	 public void clear() {
		 clearOnCommit = true;
		 // 清空 entriesToAddOnCommit,但不清空 delegate 缓存
		 entriesToAddOnCommit.clear();
	 }

	 public void commit() {
	 	// 根据 clearOnCommit 的值决定是否清空 delegate
	 	if (clearOnCommit) {
		 delegate.clear();
		 }
		 // 刷新未缓存的结果到 delegate 缓存中
		 flushPendingEntries();
		 // 重置 entriesToAddOnCommit 和 entriesMissedInCache
		 reset();
	 }
	 public void rollback() {
		 unlockMissedEntries();
		 reset();
	 }
	 private void reset() {
		 clearOnCommit = false;
		 // 清空集合
		 entriesToAddOnCommit.clear();
		 entriesMissedInCache.clear();
	 }
	 private void flushPendingEntries() {
		 for (Map.Entry<Object, Object> entry :
			entriesToAddOnCommit.entrySet()) {
				 // 将 entriesToAddOnCommit 中的内容转存到 delegate 中
				 delegate.putObject(entry.getKey(), entry.getValue());
			 }
			 for (Object entry : entriesMissedInCache) {
				 if (!entriesToAddOnCommit.containsKey(entry)) {
				 // 存⼊空值
				 delegate.putObject(entry, null);
			 }
		 }
	 }
	 private void unlockMissedEntries() {
		 for (Object entry : entriesMissedInCache) {
			 try {
				 // 调⽤ removeObject 进⾏解锁
				 delegate.removeObject(entry);
			 } catch (Exception e) {
			 	log.warn("...");
			 }
		 }
	 }
}
- 1
- 2
- 3
- 4
- 5
- 6
- 7
- 8
- 9
- 10
- 11
- 12
- 13
- 14
- 15
- 16
- 17
- 18
- 19
- 20
- 21
- 22
- 23
- 24
- 25
- 26
- 27
- 28
- 29
- 30
- 31
- 32
- 33
- 34
- 35
- 36
- 37
- 38
- 39
- 40
- 41
- 42
- 43
- 44
- 45
- 46
- 47
- 48
- 49
- 50
- 51
- 52
- 53
- 54
- 55
- 56
- 57
- 58
- 59
- 60
- 61
- 62
- 63
- 64
- 65
- 66
- 67
- 68
- 69
- 70
- 71
- 72
- 73
- 74
- 75
- 76
- 77
- 78
- 79
- 80
- 81
- 82
- 83
- 84
- 85
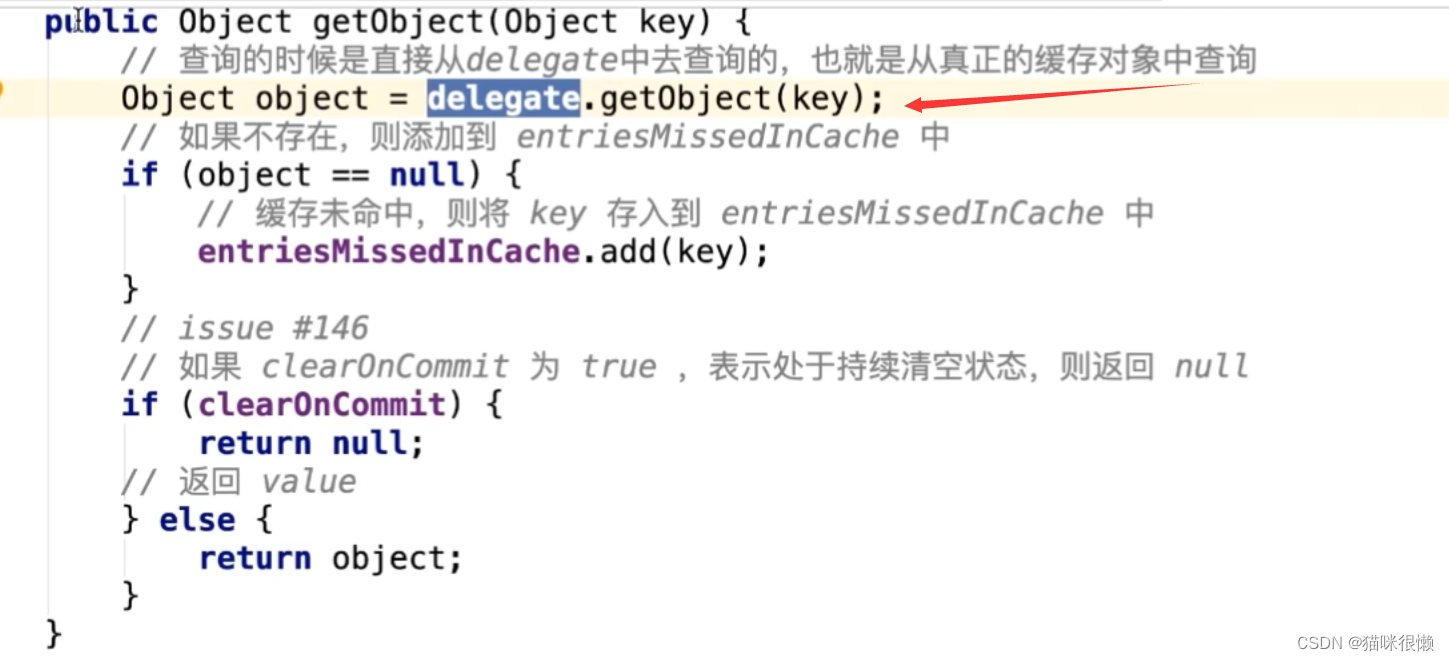
存储⼆级缓存对象的时候是放到了TransactionalCache.entriesToAddOnCommit这个map中,但是每
次查询的时候是直接从TransactionalCache.delegate中去查询的,所以这个⼆级缓存查询数据库后,设
置缓存值是没有⽴刻⽣效的,主要是因为直接存到 delegate 会导致脏数据问题
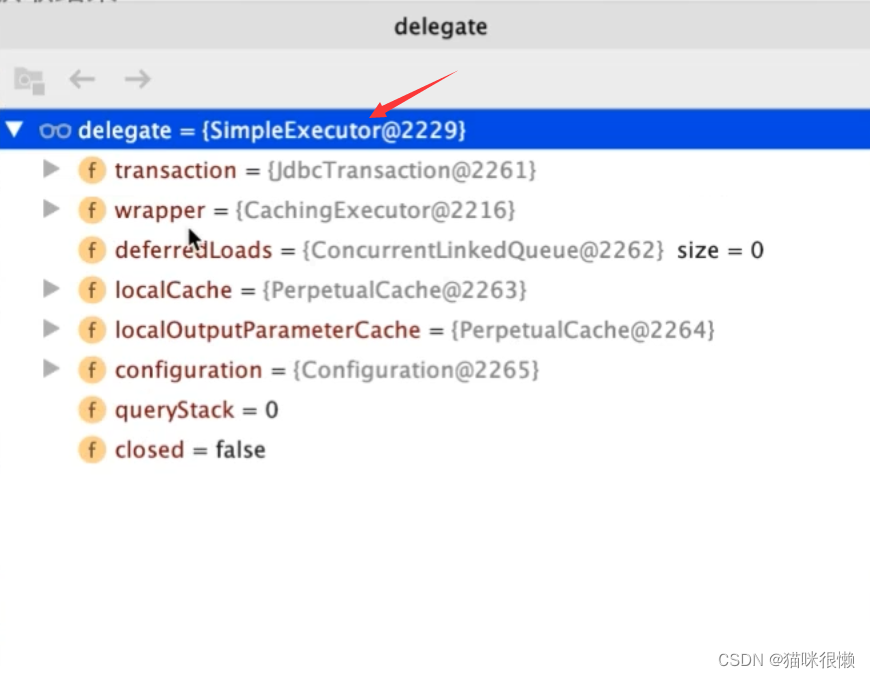
注意:我们在这里还发现有一个delegate类执行了query方法,这个delegate类很陌生

我们将鼠标放置在delegate类上后发现,delegate类是SimpleExecutor类,而SimpleExecutor是BaseExecutor的具体实现类,所以delegate类执行了query方法,就是BaseExecutor执行query方法;也就是说二级缓存没有命中的情况下,会接着一级缓存中找,最后才会查询数据库。
最后,我们分析一下`tcm.putObject(cache, key, list)这个方法
先说结论:tcm.putObject()方法是先将数据库中查询出来的数据放在一个entriesToAddOnCommit的map集合中,只有在sqlsession进行commit操作的时候,才会将entriesToAddOnCommit的数据刷入二级缓存中

tcm.putObject()最终调用的是TransactionalCache类中的putObject()方法,如下图


这个时候,我们发现,我们存的时候是存在entriesToAddOnCommit中,但是我们取是直接从delegate这个缓存对象中取的,这就引出了为啥执行一个commit()操作,具体执行的源代码如下图:
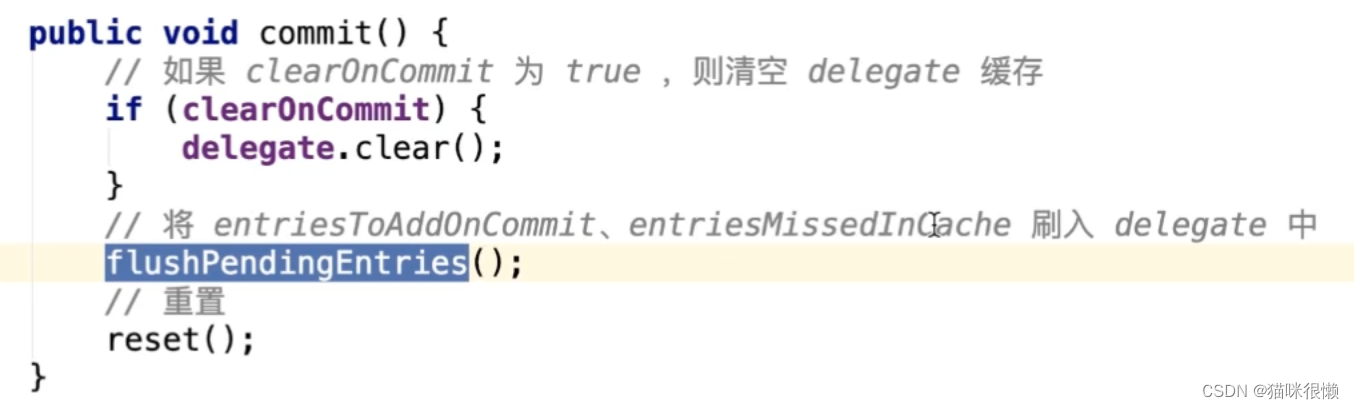
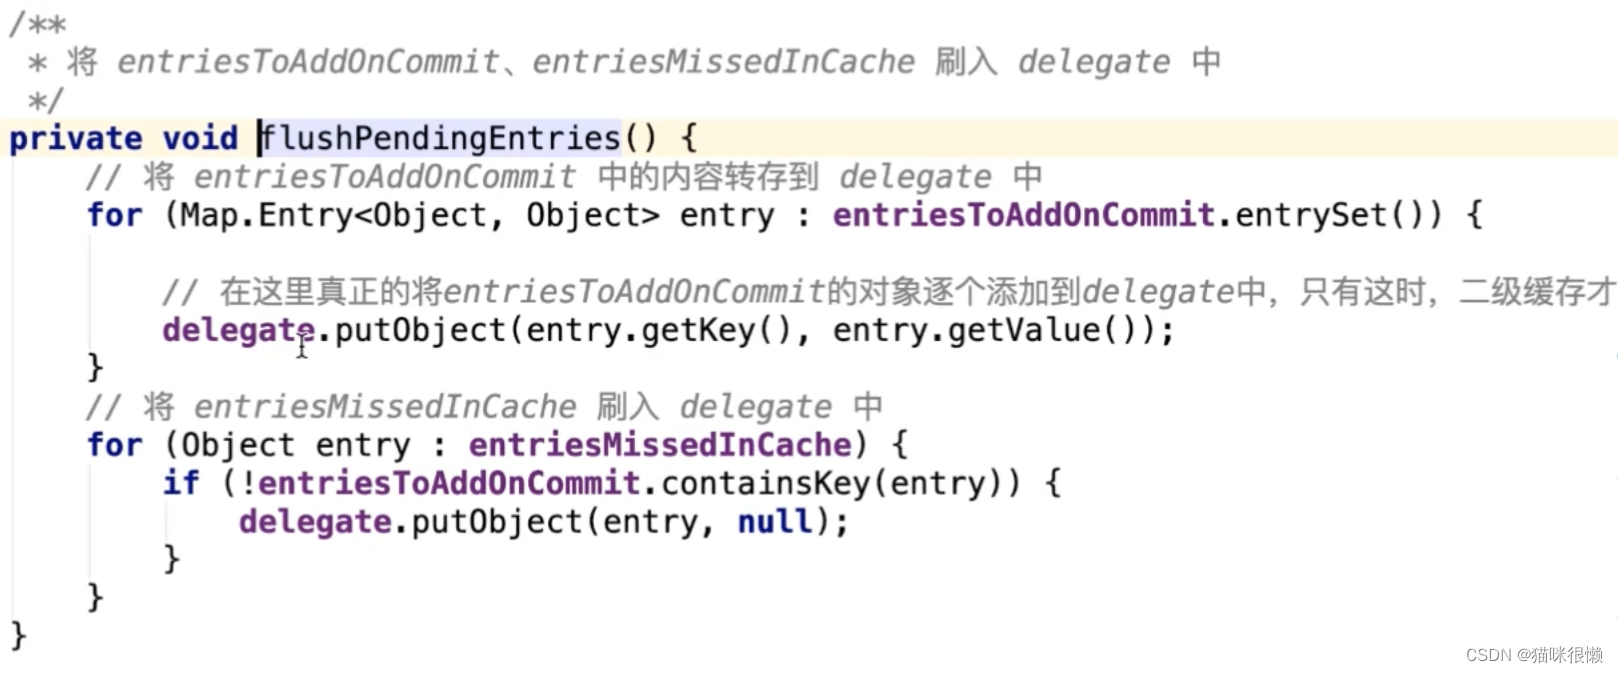
flushPendingEntries()方法的具体实现
3.4 总结
在⼆级缓存的设计上,MyBatis⼤量地运⽤了装饰者模式,如CachingExecutor, 以及各种Cache接⼝的装饰器。
- ⼆级缓存实现了Sqlsession之间的缓存数据共享,属于namespace级别
- ⼆级缓存具有丰富的缓存策略。
- ⼆级缓存可由多个装饰器,与基础缓存组合⽽成
- ⼆级缓存⼯作由 ⼀个缓存装饰执⾏器CachingExecutor和 ⼀个事务型预缓存TransactionalCache完成。

